13 Copying an Environment to Another Environment
Once you have completed the setup and applied fixes and modifications to your Prototype environment, you should copy the data, Central Objects, tested full package, and related records to your Production environment using the process described in this chapter.
Note:
This process cannot be run for a target environment if the target environment and its path code are not already defined in tables F00941 and F00942. It also is dependent on the existence of Data Source Templates for the target environment so that OCM can be generated. You can verify such existence using the Data Source Templates by Environment application P98503 on menu GH9611. The Data Source templates for all standard environments are shipped in your planner database.This chapter discusses:
Section 13.1, "Adding Security Overrides"
Section 13.2, "Setting up the Database Components for the Target Environment"
Section 13.3, "Running the Copy Environment Application (P989400)"
13.1 Adding Security Overrides
If you are running Copy Environment with Security Server turned on, you will need to add an override for JDE for the new Central Objects Data Source for the target Path Code.
-
On an JD Edwards EnterpriseOne administration client (also called a Web Development or "fat" client), create the Central Objects data source for the target path code. For example, Central Objects - XX910.
Tip:
You can also do this task while signed into DEP910 on the Deployment Server, before starting your Copy Environment process in the JDEPLAN environment.The easiest way to do this is to copy the source Central Objects data source and change the name and the owner to match your target path code.
-
In the Security Workbench, add a system user for the owner of the Central Objects data source. For example, XX910 with password equal to the password you set up for that owner in the database, which by default sets the password value to be the same as the owner value.
-
In the Security Workbench, add an override for JDE that defines the target data source (Central Objects - XX910, JDE) as the data source owner. For example, XX910.
13.2 Setting up the Database Components for the Target Environment
Before running the Environment Copy application, you must set up the database components for the Target environment on your Enterprise Server.
-
Sign on to the enterprise server as an administrative user.
-
Navigate to the SQL scripts directory within the EnterpriseOne install location. For example:
z:\JDEdwardsPPack\E910\MSSQL\scripts -
Edit the
ce_JDESET.BATfile as shown below:rem SQL_PATH - directory where you want your database files @set SQL_PATH=z:\JDEdwards\MSSQL rem Version 8 is SQL Server 2000. version 9 is SQL Svr 2005 and above @set SQL_VERSION=9 @set NEWENV=YES @set NEWPATHCODE=YES @set UPATHCODE=pd910 (substitute your path code name) @set UENV=prod (substitute your environment prefix) rem JDE_SRV=MYMACHINE or JDE_SRV=MYMACHINE\MYINSTANCE @set JDE_SRV=MACHINENAME\INSTANCE(substitute your machine name and instance)
-
Start the
cmdwindow and navigate to the SQL scripts directory. -
Run
ce_InstallSQLDatabase.bat, passing in your sa user and password. For example:ce_InstallSQLDatabase.bat sa MySAPwd -
Verify the batch file ran correctly by checking the logs in the scripts directory.
13.3 Running the Copy Environment Application (P989400)
Caution:
If the target path code directory already exists on the Deployment Server or Enterprise Server (for example, from a previous attempt to copy to that path code), you must remove it before you start the copy process. This is necessary because the copy process breaks if another process has a lock on anything within that directory.You can use this command:
rmdir /S /Q d:\JDEdwards\e910\XX910
where you should substitute your target path code directory.
You must run the Copy Environment process on the Deployment Server.
-
From menu GH9611, run the application Environment Copy (P989400).
Note:
For information on Processing Options for this application, refer to Step 3 of this procedure.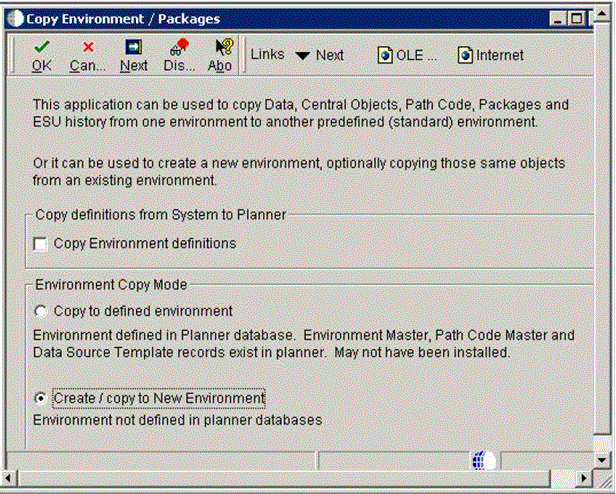
Note:
If you have environment definitions, data source definitions, or path code definitions that exist in your System - 910 data source, but which are not defined on the Deployment Server which you will be using in this process, you can check the radio button for Copy Environment Definitions to copy the missing records from System - 910 to Planner - 910. -
On P989400 - Copy Environment / Packages, click Next.
-
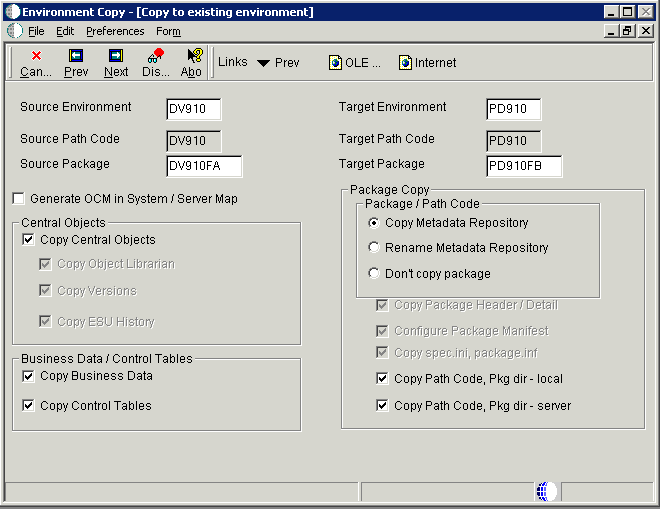
On Environment Copy [Copy to existing environment], complete these fields:
-
Source Environment
-
Target Environment
-
Source Package
-
Target Package
Note:
Any environment copy is dependent on the OCM for the target environment. If the OCM does not currently exist, you can enable the checkbox for Generate OCM in System / Server Map to create data sources and OCM for your target environment before doing the copies.Note:
The Copy Metadata Repository and Rename Metadata Repository options are dependent on certain components having been copied before they are run:-
The package definition records for the target package must exist before the Copy Metadata Repository or Rename Metadata Repository runs. It is recommended that you allow the Copy Environment process to copy the path code and package on the Deployment Server, because that UBE (which runs before the Copy Metadata Repository or Rename Metadata Repository) also copies the package records and the package.inf.
-
The Configure Package Manifest option (which is only selectable by running the following step in this procedure) is dependent on both local and enterprise package repositories having been created, and also depends on the target package definition records.
-
The Rename Metadata Repository option assumes that you have used system or database utilities to copy all the tables in Central Objects to the new database / owner / library.
-
-
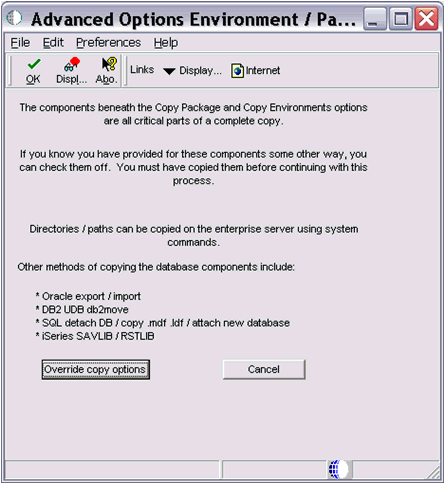
You can override the default copy flags by clicking on the Advanced Copy form exit which displays this screen:
-
On Advanced Options Environment / Path Codes, if you want to override the default flags, click the Override copy options button.
You are returned to the preceding screen where all the default copy options are unprotected, allowing you to pick and choose which components the process will copy. This non-default method is only recommended if you have provided for the copies in a non-standard way. For example, if you used export / import for Oracle in order to make your own copies of Central Objects.
-
After you have set the Environment Copy options as described in Step 3, click Next.
If the data source definitions and OCM for the target environment do not exist, the application generates data source definitions for Business Data, Control Tables, Central Objects and Versions for the target environment. It assumes that the data will be on the same server as the corresponding data sources for the source environment, but you can change this on the Data Source Revisions screens. Below is a sample screen for Business Data:
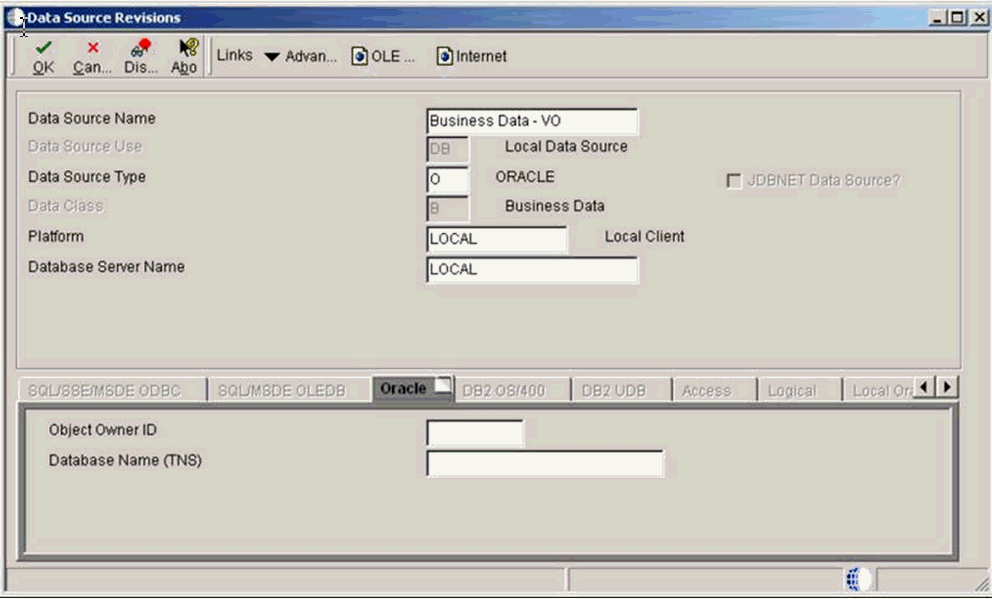
-
Following the series of Data Source Revisions screens, the next screen Copy Environments - [ Machines].
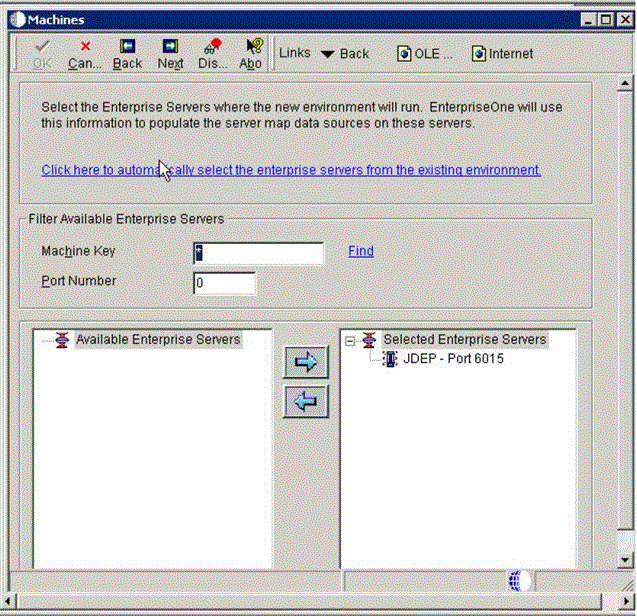
This screen shows a list of enterprise servers that allows you to select to which enterprise servers you want to copy the package / path codes.
Note:
The process submits a UBE to each selected server. The source path code and package must exist on the selected servers. -
On Copy Environments - [ Machines], highlight the desired machine from the node that lists Available Enterprise Servers and click the large right arrow to add the machine to the node that lists Selected Enterprise Servers.
-
Click Next.
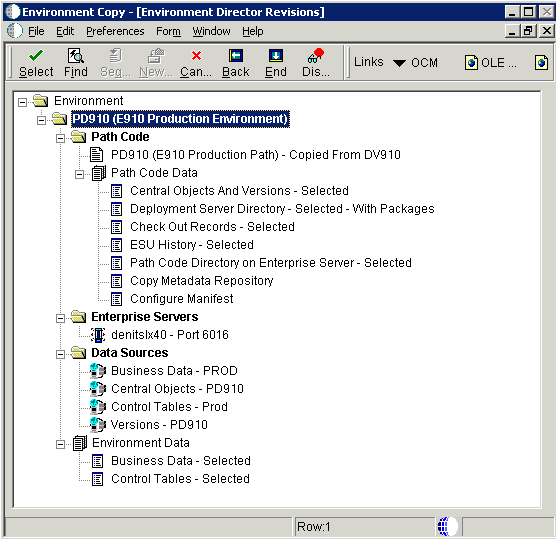
This screen shows lists all the planned function of the processes of running the business functions and UBEs when you click the End button. All UBEs run locally except for the Enterprise Server Path Code copy, which is submitted to the Enterprise Server.
If you selected Generate OCM, a business function runs that generates data sources and OCM in Planner - 910 and copies them up to System - 910. This business function uses the template data source records in F98511, which can be viewed or revised using the Data Source Templates By Environment application on GH9611. The data source template records for the standard environments (DV910, PD910, PS910, PY910) are shipped with the Deployment Server install.
This table lists details of the UBEs that generate the Path Code Data:
Path Code Data UBE Details Business Data Runs R98403 XJDE0021. Control Tables Runs R98403 XJDE0022. Central Objects and Versions Runs R98403 XJDE0019. Deployment Server Directory Runs R9800942. This UBE also copies the Package Header / Detail records.
Checkout Records Runs R989861 XJDE0001. ESU History Runs R9672 XJDE0001. Path Code Directory on Enterprise Server Submits R9894003 XJDE0001 to the server. Copy Metadata Repository Runs R9894005 XJDE0001 to copy the metadata repository within Central Objects. The local repository is renamed by R9894005 XJDE0002, as the local package directory was copied by R9800942.
Configure Manifest Runs in UBE R9894005 XJDE0002 to configure the manifest (F98770PD910FA) in Central Objects and in the target package on the Deployment Server. This UBE also configures the spec.ini in the target package on the Deployment Server.
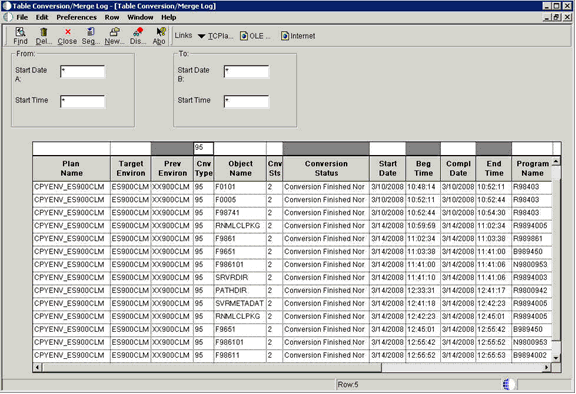
The application writes history records into F984052. To view the history, run the Table Conversion / Merge Log (P984052) on menu GH9611 by filtering on conversion type 95. This screen shows a sample conversion log:
-
After the process completes successfully, you must deploy the target server package to make it available on the Enterprise Server(s).
Caution:
OEE Local Database Consideration. When copying a package using a local Oracle database, there are additional .DBF files in the target package spec directory. For example, if copying PY910FULL to PD910FULL, these two DBF files would exist:PD910\package\PD910FULL\spec\PD910FUL.DBFPD910\package\PD910FULL\spec\PY910FULL.DBFBefore deploying the package, you must manually delete the source package DBF file (in this example, PY910FULL.DBF). This must be done manually because it is not possible for the R9894005 UBE to delete this file as the database keeps a lock on it until the UBE ends.
-
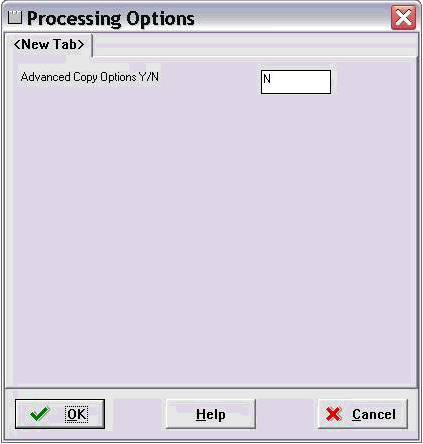
To access the processing options of the Copy Environment Application (P989400), from menu GH9611 right click on the application and select Prompt for Values.
-
In order to activate the Advanced Copy button, enter a value of Y in this field:
Advanced Copy Options Y/N
Click OK to return to the Environment Copy application and note that a new section with advanced options is available:
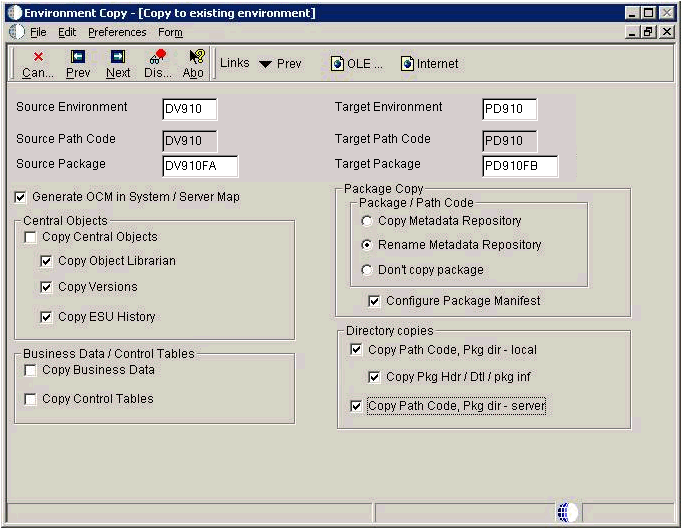
Directory copies
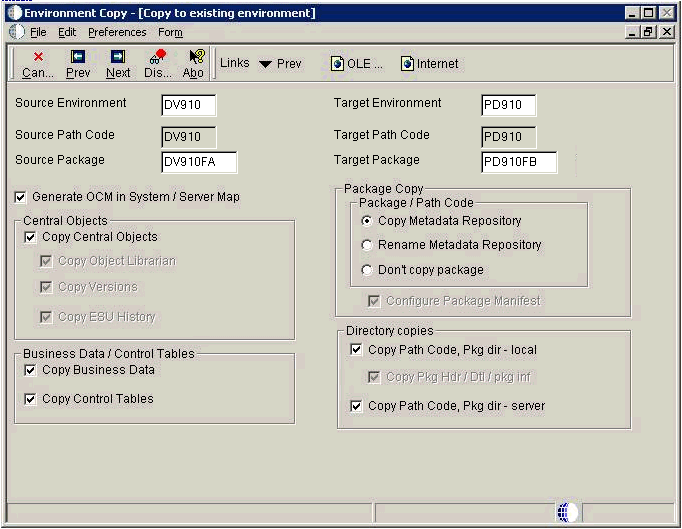
For example, if you choose to do all the database copies using database / system tools, you would set the copy options like this:
