B Manual Cleanup of a Deinstalled Development Client
Caution:
Be sure to follow the guidelines in the preceding sections of this guide entitled:If the deinstallation of the Development Client fails for some reason, you need to perform the manual steps in this procedure to completely remove the old installation before reinstalling the Development Client.
-
Export the OEE tablespaces or detach the SSE databases.
-
Decrypt the database password by running this program:
c:\E910\system\bin32\ReconfigureMSDE.exe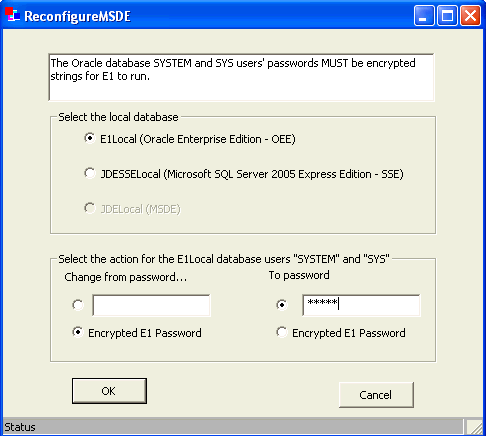
-
Near the top, select the type of local database.
-
Under Change from password, turn on "Encrypted E1 Password."
-
In the To password field, enter a password that you will remember.
-
Click OK.
-
If using OEE, perform the below steps. If using SEE, skip to the next step.
i. Open a command prompt window with "Run as administrator."
ii. Enter this command:
set ORACLE_HOME=c:\Oracle\E1Localiii. Enter this command:
sqlplus sys as sysdbaiv. When prompted, enter the password that you specified in
ReconfigureMSDE.exe.v. Enter this command:
select unique tablespace_name from all_tables;vi. Note the EnterpriseOne tablespace names.
vii. Repeat this command for each EnterpriseOne tablespace:
drop tablespace <tablespace_name> including contents and datafiles;viii. Enter this command:
shutdown;ix. Enter this command:
startup;x. Exit the command prompt window.
-
If using SSE:
i. Download, install, and run the Microsoft SQL Server 2005 Management Studio Express. This program is free from the Microsoft Download Center.
ii. Sign in using the SA user account and the password that you specified in
ReconfigureMSDE.exe.iii. Note the EnterpriseOne databases.
iv. Detach each EnterpriseOne database.
v. Exit the program.
-
-
Delete the following registry keys, where
<JDE_Client_Oracle_Home_Name>is the name of the Oracle Home for the Development Client that you specified during installation.64-bit Versions of Windows
\HKEY_LOCAL_MACHINE\SOFTWARE\Wow6432Node\ORACLE\KEY_<JDE_Client_Oracle_Home_Name>32-bit Versions of Windows
\HKEY_LOCAL_MACHINE\SOFTWARE\ORACLE\KEY_<JDE_Client_Oracle_Home_Name> -
Delete the following registry keys:
64-bit Versions of Windows
\HKEY_LOCAL_MACHINE\SOFTWARE\Wow6432Node\JDEdwards\BPMBroker\HKEY_LOCAL_MACHINE\SOFTWARE\Wow6432Node\JDEdwards\HTMLWebServer\HKEY_LOCAL_MACHINE\SOFTWARE\Wow6432Node\JDEdwards\OneWorld32-bit Versions of Windows
\HKEY_LOCAL_MACHINE\SOFTWARE\JDEdwards\BPMBroker\HKEY_LOCAL_MACHINE\SOFTWARE\JDEdwards\HTMLWebServer\HKEY_LOCAL_MACHINE\SOFTWARE\JDEdwards\OneWorld -
Delete the installation directory for the Development Client (for example,
c:\E910).If you cannot delete the installation directory because a file in that directory is locked, follow these steps:
-
Determine which file is locked and which process has the lock on the file. A freeware program called Process Explorer can be helpful in determining this information. You can obtain a free copy of Process Explorer from this web site:
-
Either kill the locking process with Process Explorer or Microsoft Windows Task Manager or, if the process was started as a Microsoft Windows service, change the Startup Type to Manual and reboot the computer.
-
Try again to delete the E1Local subdirectory.
-
-
Remove the Oracle inventory entries.
-
With a text editor (such as Notepad), edit whichever of the following files applies:
64-bit Versions of Windows
c:\Program Files (x86)\Oracle\inventory\ContentsXML\inventory.xml32-bit Versions of Windows
c:\Program Files\Oracle\inventory\ContentsXML\inventory.xml -
Delete any lines that start with:
<HOME NAME="JDE_Client_Home_Name"where
JDE_Client_Home_Nameis the name that you gave the installation directory when you installed the Development Client. -
Save the file.
-
-
Remove the entry from the Windows PATH.
-
From Windows' Start button, go to Control Panel / System.
-
Click Advanced system settings on the left.
-
Click Environment Variables… near the bottom.
-
In the System variables box near the bottom, highlight Path and click the Edit... button.
-
In the Variable value field, delete
<JDE_Client_Home>\system\bin32where<JDE_Client_Home>is the path that you specified when you installed the Development Client. Be sure to remove the semicolon as well. -
In the Variable value field, delete
<JDE_Client_Home>\<pathcode>\bin32where<pathcode>is the name of an installed pathcode. Be sure to remove the semicolon as well. Repeat this for each pathcode that you installed. -
Click OK.
-
-
Remove the JDE_B9_ICU_DATA Windows environment variable.
-
Navigate to Control Panel > System.
-
Click Advanced system settings on the left.
-
Click Environment Variables… near the bottom.
-
In the System variables box near the bottom, highlight JDE_B9_ICU_DATA and click Delete.
-
Click OK.
-