7 Working With the Enterprise Server
This chapter contains these sections:
-
Section 7.1, "Verifying the Release 9.1 Enterprise Server Installation Using PORTTEST"
-
Section 7.2, "Starting Network Services on the Enterprise Server"
-
Section 7.3, "Stopping Network Services on the Enterprise Server"
-
Section 7.5, "Setting Up a Printer on the Enterprise Server"
-
Section 7.6, "Enabling Multiple Concurrent Table Conversions"
7.1 Verifying the Release 9.1 Enterprise Server Installation Using PORTTEST
Note:
When running PORTTEST after installing the Enterprise Server, the test returns a failure message. This is because it is not able to access the F0902 table at this time, (the format of the F0902 table changes during the Table Conversion Workbench). Ignore any errors relating to accessing the F0902 table, (for example, Select all on table F0902 failed - rcode=0). Once the Workbench tasks are all complete, and the Enterprise Server is configured, rerun PORTTEST.The basic PORTTEST procedure ensures connectivity. Refer to Section 17.1, "Using the PORTTEST Checklist" for additional details including the PORTTEST checklist.
Tip:
Cluster Software Considerations. If using cluster software, skip this step. Before you attempt to start Release 9.1, complete the steps in the Microsoft Windows Cluster chapter of Release 9.1 on a Cluster in JD Edwards EnterpriseOne Tools Server and Workstation Administration Guide.The PORTTEST program initializes a user and an environment (assuming that Release 9.1 is installed and configured correctly). To verify that Release 9.1 is installed correctly, you must run the PORTTEST program for each environment.
To verify the Enterprise Server installation using PORTTEST:
-
Log on to the Enterprise Server as JDE.
-
Open a DOS command window.
-
To verify that Release 9.1 is installed correctly on the Enterprise Server, enter these commands:
d:[or the appropriate drive letter]cd \JDEdwards\E910\System\bin32PORTTEST userid password environmentwhere
useridis a valid Release 9.1 user,passwordis the password for that user, andenvironmentis the environment you are verifying. Enter the PORTTEST command for each environment.Caution:
These parameters are case-sensitive. If your case is incorrect, the command will fail. For example, if youruseridandpasswordare uppercase JDE, and your Pristine environment is uppercase PY910, you should issue the PORTTEST command as such:PORTTEST JDE JDE PY910Tip:
Troubleshooting. The program should display messages indicating the selection of records from an Release 9.1 table. If it does not, review the jde_###.log that was specified in theJDE.INIon the Enterprise Server. If PORTTEST fails to run, see Section 17.1, "Using the PORTTEST Checklist" for diagnostic assistance.
7.2 Starting Network Services on the Enterprise Server
After you install the JD Edwards EnterpriseOne Platform Pack on the Microsoft Windows Enterprise Server, you must start the Network Services.
To start the network services on the Enterprise Server:
-
From Control Panel, access Services.
-
Locate and highlight this service:
JDE E910 -
Click Start.
7.3 Stopping Network Services on the Enterprise Server
To stop the network services on the Enterprise Server:
-
From Control Panel, access Services.
-
Locate and highlight every service that is prefixed with the word JDE (JD Edwards EnterpriseOne releases prior to 8.9 and after 8.11) or PeopleSoft (releases 8.9, 8.10, and 8.11).
-
Click Stop.
Note:
When you stop JD Edwards EnterpriseOne network services on a Microsoft Windows server, some processes might not stop. To stop the services completely, you should either shutdown and restart your Enterprise Server or complete the remaining steps in this procedure. -
On the Enterprise Server, go to Task Manager and right-click any JD Edwards EnterpriseOne process that is still running.
-
Select Debug.
This command takes you to debug mode in Microsoft Visual C++.
-
Stop the debug process and exit Visual C++.
The JD Edwards EnterpriseOne process that you selected shuts down.
Repeat this process for each JD Edwards EnterpriseOne process that is running.
7.4 Working with OCM Generation
This section discusses:
7.4.1 Understanding OCM Mappings
JD Edwards EnterpriseOne does not ship Object Configuration Manager (OCM) records for standard environments in Release 9.1. They are generated when you finalize an installation plan. OCM is created based on the Data Class for data sources and for a table or GT object. The Data Class is stored on the Data Sources By Environment (F98511), Data Source Master (F98611) and Object Librarian Master (F9860) tables.
7.4.2 Understanding Data Source Setup
Before OCM can be created, you must configure your data sources. Data source configuration and prompting is driven by the data in the F98511 table.
The first set of data sources to be configured is the Enterprise Server data sources. This includes the Server Map data source. Also, logic data sources are automatically configured without prompting. OCM records are not created for the server map data source. UBE, BSFN, RTE, and XAPI mappings are created for the logic data sources.
The next set of data sources to be configured is the shared data sources. This includes System, Data Dictionary, and Object Librarian data sources. The first time these data sources are configured, the shared data source template (F98511.SPLL = *SHARED) is copied and tokens are replaced in the data source name and properties to create the shared data source records (F98511.SPLL = DEFAULT). These defaults are then used to create the data source definition in the F98611 table. If record in the F98611 tables already exists, the defaults from the F98511 table are overridden by the current definition. The user is then optionally prompted to customize the data source.
The last set of data sources is the environment data sources. A set of data sources is configured for each environment. This includes Business Data, Control Tables, Central Objects and Versions.
The environment data source template (F98511.SPLL = *ENV) stores defaults for environment data sources. As data sources are configured for an environment, these records are copied and tokens are replaced in the data source name and properties to create records for the environment (F98511.SPLL = Environment Name). These defaults are then used to create the data source definition in the F98611 table. If records in the F98611 table already exists, the defaults from the F98511 table are overridden by the current definition. The user is then optionally prompted to customize the data source.
Given that the standard environments do not always follow the defaults that are specified in the *ENV template, JD Edwards EnterpriseOne provides preconfigured records for the standard environments. Thus, the *ENV template is only used for custom environments.
7.4.3 Understanding OCM Creation
After your data sources have been defined and the plan is complete, the plan is finalized. OCM is created during finalization.
This section describes:
7.4.3.1 Understanding Database Data Sources
The process finds the data class for each table or GT object in Object Librarian (F9860.SICLDF). Based on the environment that is being configured and the data class for the object, the data source name is fetched from F98511. If a record is not found, it looks for a record for the data class where environment name is DEFAULT (to determine whether it should be mapped to a shared data source). If a record is not found, no mapping is created and the table is effectively mapped to the default data source. If a record is found and that record is set as the default mapping data source (F98511.SPDFLTMAP), a mapping with object name DEFAULT is created; otherwise the actual object name is used. Mappings are not created for tables in the Planner and Internal data classes.
7.4.3.2 Understanding Logic Data Sources
The OCM generation algorithm for UBEs and BSFNs are identical to each other, but the output depends on whether the default mapping is LOCAL or an Enterprise Server.
The following table shows the default mappings for UBE and BSFN objects.
| UBE or BSFN | Base EnvironmentDV910, PS910, PD910, PY910 | HTML Web Server EnvironmentJDV910, JPS910, JPD910, JPY910 |
|---|---|---|
| UBE | Enterprise Server | Enterprise Server |
| BSFN | LOCAL | Enterprise Server |
The algorithm is:
-
If the default is LOCAL, a default mapping to LOCAL is created. Server mappings are created for any object whose Location (labeled Business Function Location for BSFNs and Process Location for UBEs) in Object Management Workbench (OMW) is Server Only (F9860.SIBFLOCN = 3).
-
If the default is Enterprise Server, a default mapping to the Enterprise Server is created. LOCAL mappings are created for any object whose Location (labeled Business Function Location for BSFNs and Process Location for UBEs) in OMW is Client Only (F9860.SIBFLOCN = 1).
7.4.4 Understanding OCM Customization
This section discusses:
7.4.4.1 Understanding Data Classes
The data class is at the center of automatic OCM generation. It categorizes the type of data stored in data sources and tables, for example, in the Business Data data source the data class is B while in the System data source the data class is S. If you want to split business data into multiple data sources, you need to create a new data class, add a data source to the data source template for that data class (so Installation Planner prompts for the data source) and assign tables and GT objects to that data class. OCM will be created based on this information. You should do these steps before creating your plan.
7.4.4.2 Creating a New Data Class
You must create a new data class by adding a value to the H96/DU User Defined Code (UDC) for data sources and H96/CL UDC for table and GT objects.
7.4.4.3 Modifying the Data Source Template
A data source template defines the set of data sources that will be used by an environment, and the default values for the properties of the data source. They are stored in the F98511 table.
The information in this table can be edited using Data Source Templates By Environment (GH9611) program. By understanding this application, you can implement custom environment naming standards and ease the creation of environments.
Typically, you will add records to the template for new environments. The template can be found by filtering on *ENV in the environment field. Installation Planner prompts for this set of data sources whenever a new environment is created. The first time data sources are configured for a new environment, these records are copied and tokens replaced to create records specific to the new environment.
If you want to add a new data source to a standard JD Edwards EnterpriseOne environment, enter the environment name into the filter field and add a record specifically for that environment.
Records with an environment *LOGIC are for logic and server map data sources. They are set up when selecting an Enterprise Server.
7.4.4.4 Associating Table Data Classes
A table is associated with a data class using a field on the Object Librarian table (F9860.sicldf). Table data classes can be modified two ways.
-
Object Management Workbench (GH902) - Select the table in the left tree view in OMW and click Design.
Select the Install\Merge Codes tab and modify the data class value. Click OK. Modifying the data class does not affect existing OCM mappings, it is only used when creating mappings for a new environment.
-
Table Data Classes - This application can be used to modify the data class for several tables at once.
This should only be used by a JD Edwards EnterpriseOne administrator. Go to GH9611 and open Table Data Classes. Use the QBE to filter the list of tables in the grid. Select one or more tables whose data class will be changed. Click Select. Type in the new data class value and click OK.
Once these three steps have been taken, planner will prompt for the new data source and create OCM mappings for the new data source whenever an environment is added to a plan and the plan is finalized.
| Environment | Object Name | User/Group | Data Source |
|---|---|---|---|
| ENV1 | DEFAULT | *PUBLIC | Business Data - ENV1 |
| ENV1 | F0094 | *PUBLIC | System - 910 |
| ENV1 | F9860 | *PUBLIC | Object Librarian - 910 |
| ENV1 | F9200 | *PUBLIC | Data Dictionary - 910 |
| ENV1 | F0004 | *PUBLIC | Control Tables - ENV1 |
| ENV1 | F983051 | *PUBLIC | Versions - PY910 |
| ENV1 | GT92002 | *PUBLIC | Data Dictionary - 910 |
| ENV1 | GT9860A | *PUBLIC | Object Librarian - 910 |
| ENV2 | DEFAULT | *PUBLIC | Business Data - ENV2 |
| ENV2 | F0094 | *PUBLIC | System - 910 |
| ENV2 | F9860 | *PUBLIC | Object Librarian - 910 |
| ENV2 | F9200 | *PUBLIC | Data Dictionary - 910 |
| ENV2 | F0004 | *PUBLIC | Control Tables - ENV2 |
| ENV2 | F983051 | *PUBLIC | Versions - DV910 |
| ENV2 | GT92002 | *PUBLIC | Data Dictionary - 910 |
| ENV2 | GT9860A | *PUBLIC | Object Librarian - 910 |
7.5 Setting Up a Printer on the Enterprise Server
This section describes these tasks, which must be performed in the deployment environment:
You also can print Release 9.1 reports, modify existing printers, and delete printers. These tasks are described in detail in the JD Edwards EnterpriseOne Tools System Administration Guide. Refer to that document to learn more about setting up a printer to run from the Release 9.1 Enterprise Server.
If a printer was installed in your previous release of Release 9.1, you do not need to re-install that printer. All printer settings are carried forward during the upgrade to this release.
7.5.1 Adding a New Printer
Release 9.1 provides a Printer Setup director to help you add printers. Instructions appear on each form of the director to guide you through the printer addition process. This procedure is used in conjunction with the steps that appear on the forms of the Printer Setup director.
To install your first printer:
-
On the Printers menu (GH9013), select Printers (P98616).
The Printers form appears.
-
On the Printers form, click Add Printer.
The welcome page for the Printer Setup director appears. This page describes the tasks that the director helps you perform.
-
Review the welcome page and click Next.
The Platform Information form appears. The platform type may appear by default, depending on the operating system on which Release 9.1 is running.
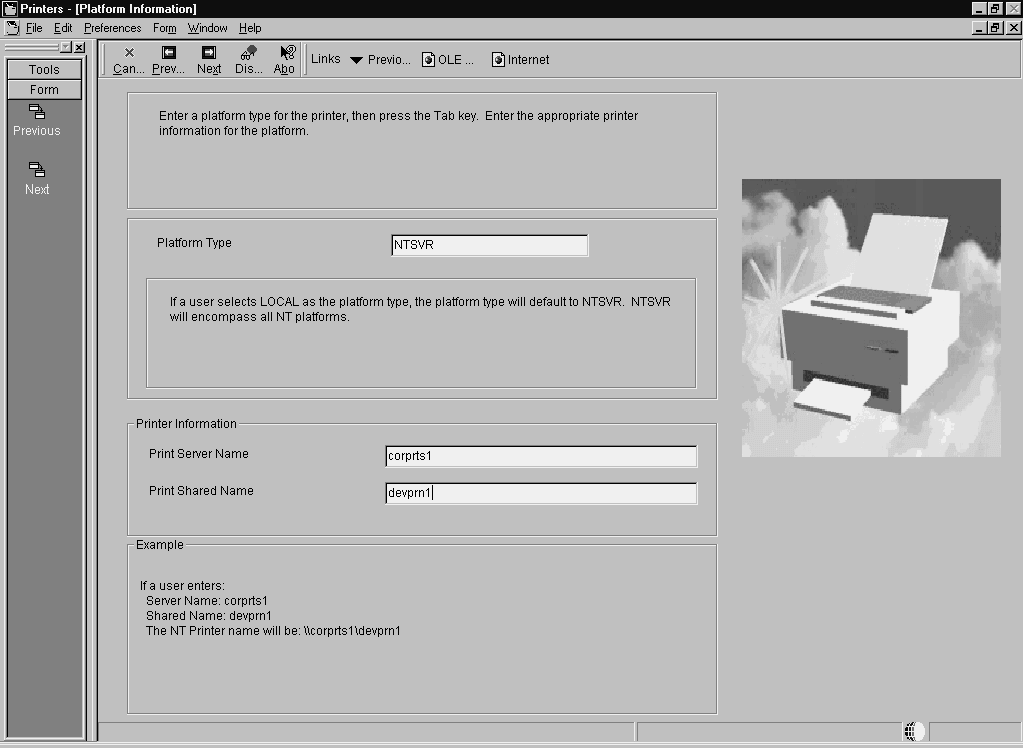
-
On Platform Information, complete these fields:
Field Description Platform Type Enter the platform type on which you are installing or use the visual assist button to select a platform type. Print Server Name Enter the name of the print server for the printer you are setting up. Valid characters are all alpha (A-z), numeric (0-9), period ( . ), and dash ( - ). Release 9.1 uses this name, along with the print shared name, to create the printer name, which is unavailable for modification on the subsequent form. For printing reports to a non-network printer, leave this field blank.
Print Shared Name Enter the share name of the printer you are setting up. All characters are valid except the forward slash ( \ ) and the backslash ( \ ). Release 9.1 uses this name, along with the print server name, to create the printer name, which is unavailable for modification on the subsequent form. -
After you complete the requisite fields, click Next to access the Printer Setup form.
Use this form to set information for the printer such as the printer model, physical location of the printer, printer definition language (PDL), and paper types.
-
On the General tab, complete these fields:
-
Printer Model
-
Printer Location
-
-
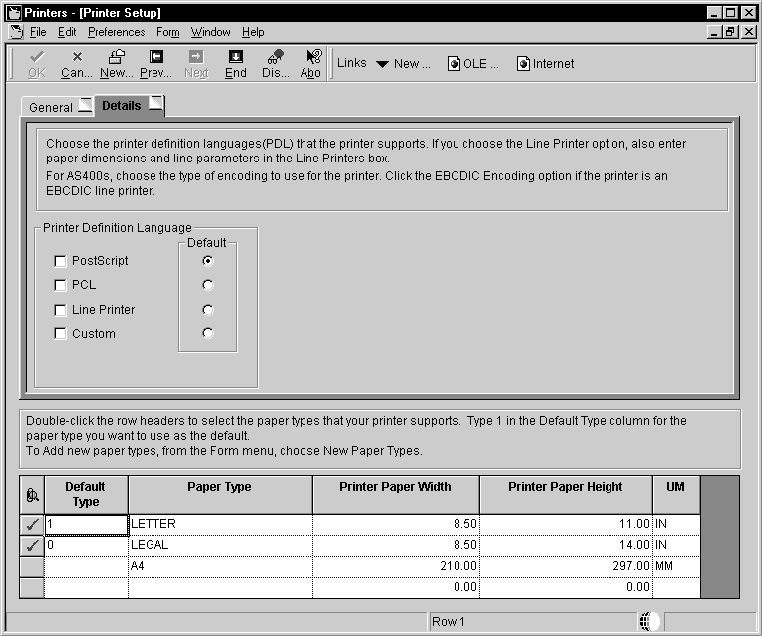
On the Details tab, in the box labeled Printer Definition Language, select one of these options:
-
PostScript
-
PCL
-
Line Printer
-
Custom
-
-
In the Default box, specify one of the Printer Definition Language options as the default value.
You can select multiple PDLs, but only one default PDL. A user can override this default PDL at the time a batch process is submitted.
Choosing PostScript or Printer Command Language (PCL), Release 9.1 disables the Line Printer option. Choosing Line Printer, Release 9.1 disables the PostScript and PCL options.
When choosing the Line Printer option, this logic occurs:
-
Release 9.1 disables the grid at the bottom of the form and any paper types you have chosen are cleared.
JD Edwards EnterpriseOne automatically provides a printer type of *JDE LINE PAPER for the printer.
-
The Fields in the box labeled Line Printers are used to set the paper dimensions and line parameters.
This procedure is explained in later steps in this section.
The custom option uses advanced features of the printers application, which are explained in the later steps in this procedure.
-
-
On the Details tab, when choosing the PostScript option, the Paper Source box appears and you can change these options:
Field Description Max Number of Paper Sources Enter a numeric value in this field to indicate the number of paper trays this printer has available. Default Paper Source Enter a numeric value in this field to indicate which tray number you want Release 9.1 to draw paper from as the default tray. -
On the Details tab, when choosing the Line Printer option, fields appear in a box labeled Line Printers, which you use to set the paper dimensions and line parameters.
Complete these fields:
Field Description Characters Per Inch Enter a value to specify the number of characters in one horizontal inch. Columns Per Page Enter a value to specify the number of characters in one line of text in the specified report. Lines Per Inch Enter a value to specify the number of lines of text in one vertical inch. Lines Per Page Enter a value to specify the number of lines of text on one printed page. Printer Paper Width Displays a value that is calculated automatically based on the values entered in the Line Printers box. Printer Paper Height Displays a value that is calculated automatically based on the values entered in the Line Printers box. -
On the Details tab, the Custom option lets you specify a conversion filter to use.
When choosing the Custom option, a field appears beneath the Custom checkbox. Enter the name of the conversion filter you want to use or use the visual assist to select a filter from the Conversion Program Search and Select form.
-
If you do not want to change or add a conversion filter, skip to Step 16 in this task.
To change or add a conversion filter, from the Form menu, select Advanced, and continue with the steps in this procedure. The Advanced option is enabled only when Custom has been chosen.
The Work With Conversion Programs form appears.
-
Either click Add, or highlight one of the filters and click Copy or Select.
The Advanced Conversion Program form appears.
-
Change one or both of these fields:
Field Description Conversion Program If you clicked Add or Copy on the previous form, the Conversion Program field is enabled. Enter the name of the conversion program that you want to add or copy. When making a copy, the Parameter String field is populated with the string that you highlighted on the previous form. Parameter String The JD Edwards EnterpriseOne system automatically enters the parameter string in native commands based on the host type from which you are printing and the type of printer (PostScript, PCL, or line). -
Click OK.
The Work with Conversion Programs form appears.
Click Close.
The Printer Setup form appears.
-
In the grid at the bottom of the Printer Setup form, double-click the row header for each paper type that your printer supports. A checkmark appears in the row header for each paper type that you select.
Note:
You can add new paper types as necessary. Instructions are included later in this task. -
In the Default Type column, enter the numeral 1 in the row for the paper type you want to use as the default.
select only one paper type as the default. A user can override the default paper type when a batch process is submitted.
-
To add a new paper type, continue with these steps:
-
From the Form menu, select New Paper Type.
The Work With Paper Types form appears.
-
Click Add.
The Paper Type Revisions form appears.
-
Complete these fields:
-
Paper Type
-
Paper Height
-
Paper Width
-
Unit of Measure
The software saves the new paper type.
-
-
Click OK to return to the Work With Paper Types form, and then click Close to return to Printer Setup.
The new paper type is available in the grid on the Printer Setup form. All previous paper type selections are cleared and must be reselected if you want to use them again.
-
When finished entering information for the printer on the Printer Setup form, click End.
Release 9.1 saves the new printer setting and returns you to the first form in the Printers application.
Field Description Platform Type Define the type of physical hardware on which the database resides. Server Name Define the computer that receives documents from clients. Printer Name Enter a name that refers to a shared resource on a server. Each shared directory on a server has a share name, which is used by clients to refer to the directory. Printer Model Define these attributes for your printer: -
Printer Model
-
Printer Location
Designates the physical location of the printer
Paper Type Enter a user defined code (H98\PT) to define the type of printer paper, such as letter or legal. For example, LETTER, LEGAL, and A4. Paper Width Define the width of the paper for this paper type. This value is in the unit of measure specified by Unit of Measure. Paper Height Define the height of the paper for this paper type. This value is in the unit of measure specified by Unit of Measure. Unit of Measure Enter a user defined code (00\UM) to define the quantity in which to express an inventory item. For example, CS (case) or BX (box). Form-specific information indicates the unit of measure in which the paper height and width are entered. For example, IN = Inches and MM = Millimeters. Columns Per Page Define the number of columns per page. For example, 80 or 132. Characters Per Inch (CPI) Define the horizontal printing density in characters per inch. You should only define values that are supported by your printer.
Line Per Page Define the number of lines per page. For example, 60 or 66. Line Per Inch (LPI) Define the line spacing in lines per inch. You should only define values that are supported by your printer.
Values are:
4 - IBM 5219, 5224, 5225, and 3287 printers only
6 - IBM 5224 printer only
8 - IBM 5224 printer only
9 - IBM 5225 printer only
Note: The standard computer print is 6 LPI and 10 CPI. If you are printing on 8 1-2-inch x 11-inch paper, typically you would specify 8 LPI and 15 CPI.
Maximum Number of Output Tray Define the maximum number of paper trays available on the printer you are setting up. Output Tray Name Define the output tray for a given batch print job. -
7.5.2 Defining a Default Printer
To define a default printer:
-
On the Printers menu (GH9013), select the Printers (P98616) program.
-
On the Printers form, click Define Default Printer.
The Work With Default Printers form appears.
-
Click Add.
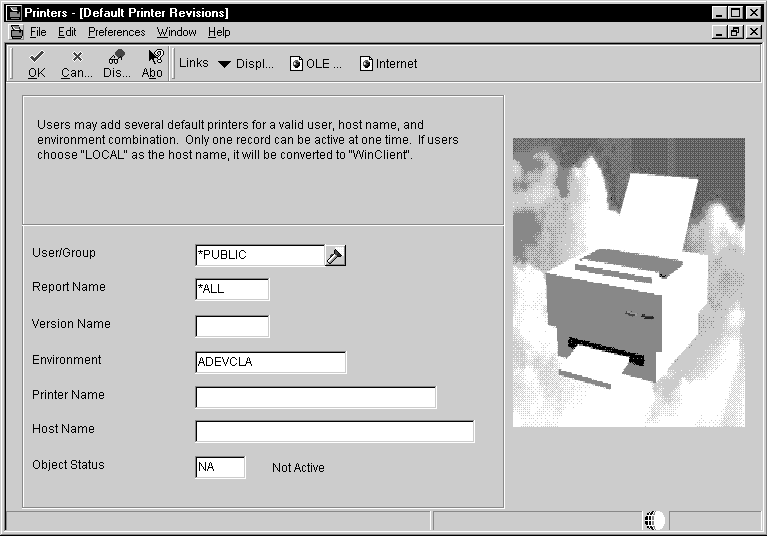
-
On Default Printer Revisions, complete these fields and then click OK.
Field Description User\Group Click the visual assist to select either a particular user for this printer or to select an entire group. Report Name Click the visual assist to select a specific report to print. Enter *ALL for all reports. Version Name Click the visual assist to select a specific report to print. If the value in the Report Name field is *ALL, the system populates the Version Name field with the default value of *ALL and makes the field unavailable for subsequent modification. Environment JD Edwards EnterpriseOne provides a default value for this field based on the environment that you are currently logged onto. Enter *ALL for all environments. You can change this information. Printer Name Enter the name of your printer. Host Name Enter the name of the host server where reports will be processed. The visual assist displays the appropriate host names based on the printer name you select. To use this printer for all hosts in your environment, enter *ALL. Object Status Define the new printer as the default printer by changing its status to active. If an error occurs, it means that another printer is currently the active default. Change the original default printer to inactive before making the new printer active. Change multiple statuses from the Work With Default Printers form, as explained at the end of this task. -
Click OK, and then click Cancel to access the Work With Default Printers form.
-
To change the status of a default printer, select a default record and, from the Row menu, select Change Status.
If another printer is already set as the active default, an error occurs. To change the original default printer to inactive, select it, select Change Status on the Row menu, and then select the new printer as the default.
7.6 Enabling Multiple Concurrent Table Conversions
If you are planning to run your Table Conversions on the Enterprise Server, you must set specific values in the JDE.INI jde.ini on your Enterprise Server in order to enable multiple Table Conversions to run simultaneously.
To enable multiple concurrent table conversions:
-
Open the
JDE.INIjde.inion your Enterprise Server using an ASCII editor compatible with the operating system. -
Add or update the following entries and their respective values in the
[JDEIPC]section:[JDEIPC] maxNumberOfResources=2000 maxNumberOfSemaphores=1000
Note:
The above values are sufficient to run four Table Conversions at once. To run more, you may need to increase these values. The symptom of the values being set too low is that the Table Conversion will fail almost immediately on the server with this error message in itsjde.log:
IPC2100004 ... maxNumberOfResources parameter (2000) exceeded on
allocation of IPCData. Please increase it in INI.
If you plan on running more than four concurrent Table Conversions, refer to the JD Edwards EnterpriseOne Tools System Administration Guide for details on calculating the correct values for the anticipated workload on your machine.