3 Working with the Deployment Server
This chapter discusses:
-
Section 3.3, "Local Oracle Enterprise Edition (OEE) Considerations"
-
Section 3.4, "Obtaining and Preparing the Deployment Server Install Image"
-
Section 3.5, "Working with JDBC Drivers on the Deployment Server"
-
Section 3.8, "Adding Additional Environments (Rerunning the Deployment Server Installer)"
-
Section 3.9, "Downloading and Installing the Latest Software"
-
Section 3.10, "Troubleshooting Deployment Server Installation"
3.1 Installing Microsoft Windows Visual Studio
Before running the Deployment Server Installation, install the Visual Studio 2008 SP1 RunTime. Refer to Section 1.3.1, "Accessing Minimum Technical Requirements (Certifications)" in this guide. The Visual Studio 2008 RunTime is available from the Microsoft Download Center. Download and install one of the following:
Microsoft Visual C++ 2008 SP1 Redistributable Package (x86) - 32-bit vcredist_x86.exe
Microsoft Visual C++ 2008 SP1 Redistributable Package (x64) - 64-bit vcredist_x64.exe
Note:
Choose the 32-bit or the 64-bit installer that is appropriate for the Microsoft Windows platform on which the OUI Installation for Deployment Server will be run.3.2 Understanding the Deployment Server
The Deployment Server for JD Edwards EnterpriseOne must reside on an Intel Pentium-based computer running Microsoft Windows. The JD Edwards EnterpriseOne software installation and upgrade programs enable you to create and maintain installation plans and deploy Release 9.1 to the Enterprise Servers and workstations.
Beginning with JD Edwards EnterpriseOne Applications Release 9.1, the Deployment Server installation program is based on the Oracle Universal Installer (OUI). You can use the OUI to:
-
Install the JD Edwards EnterpriseOne Deployment Client on a local or remote Deployment Server
This installation includes attaching and importing the Planner and Workbench tables into the local database on the Deployment Server.
Also beginning with Release 9.1, only the Oracle Enterprise Edition (OEE) database is supported as the local database on the Deployment Server.
Note:
The Oracle Universal Installer (OUI) requires the Microsoft Visual Studio 2008 VS2008SP1 Run Time. Refer to the section of this guide entitled: Section 3.1, "Installing Microsoft Windows Visual Studio".A local OEE database must exist before you can run the OUI-based Deployment Server installer. The JD Edwards program called InstallManager is used to start the installation of the local OEE database.
No separate end-user licensing is required for installation of the local OEE database. It should be noted, however, that the installed OEE database is not fully functional relative to the commercial versions of the Oracle databases that are available.
For additional considerations, refer to Section 3.3, "Local Oracle Enterprise Edition (OEE) Considerations".
Caution:
If you are upgrading to JD Edwards EnterpriseOne Applications Release 9.1, this is the order in which you should proceed:-
Install the Deployment Server as described in Section 3.6, "Installing the Deployment Server".
-
Install the latest Tools Release as described in Section 3.9.1, "Installing the Latest Tools Release and Latest Tools Release Patch to the Deployment Server".
-
Install the latest Planner Update ESU on the deployment server and run special instructions as described in Section 3.9.2, "Installing the Latest Planner Update and Running the Special Instructions".
-
Run the Workbench on Pristine environment as described in Chapter 6, "Working With Installation Workbench".
-
Apply the Planner Update ESU to the Pristine environment.
-
Build an Update Package as described in the JD Edwards EnterpriseOne Package Management Guide.
3.3 Local Oracle Enterprise Edition (OEE) Considerations
The Deployment Server installer includes the OEE database (version 11gR2) for local use by the Deployment Server. The installation includes GUI tools for database administration.
Caution:
Because the Deployment Server installer must have access to a local OEE database, you must install the 32-bit database client prior to installing the Deployment Server.This section discusses these topics:
-
Section 3.3.1, "32-Bit Oracle Database Client (Required for both 32-bit and 64-bit versions of OEE)"
3.3.1 32-Bit Oracle Database Client (Required for both 32-bit and 64-bit versions of OEE)
If you installed OEE on a 64-bit version of Microsoft Windows, you must also install a 32-bit version of the Oracle database client and then copy your tnsnames.ora file to a subdirectory under the database client installation directory.
Caution:
Because the Deployment Server installer must have access to a local OEE database, you must install the 32-bit database client prior to installing the Deployment Server.To install a 32-bit Oracle database client:
-
Download the 32-bit Oracle 11g database client from the Oracle Software Delivery Cloud located at this link:
-
Install the database client.
Caution:
PATH environment variable. If you installed the 64-bit Oracle database, the installer placed the path to the database (for example,c:\Oracle\E1local\bin) at the start of the Windows PATH environment variable. Then when you installed the 32-bit Oracle database client, the installer placed the path to the database client (for example,c:\Oracle\product\11.2.0\client_1\bin) at the start of the Windows PATH environment variable.When EnterpriseOne runs, it looks for database drivers in each directory from start to finish in the PATH. The first occurrence of a driver DLL that EnterpriseOne finds will be loaded. This means that the path to the 32-bit Oracle database client must come BEFORE the path to the 64-bit Oracle database.
If you installed the 64-bit database and 32-bit database client in that order, the order in the PATH should be correct. However, if you installed them in the opposite order, you need to correct the order in the PATH.
To reverse the order of the 64-bit database and 32-bit database client paths in the Windows PATH, follow these steps:
-
From the Start button, select Control Panel and then System.
-
On the left side of the window that comes up, click Advanced system settings.
-
Click the Advanced tab.
-
Click Environment Variables….
-
In the "System variables" box, highlight the variable Path and click Edit….
-
In the "Variable value" field, cut the 32-bit database client's path and the following semicolon (for example,
c:\Oracle\product\11.2.0\client_1\bin;). -
Paste the client's path and semicolon at the start of the Path value.
-
Click OK.
-
Click OK to exit from the Environment Variables window.
-
Click OK to exit from the System Properties window.
-
Close the Control Panel's System window.
-
-
After you install the Deployment Server, you can copy this
tnsnames.orafile that the installation delivered:From:
\\<deployment server name>\<release>\clientTo:
<32-bit Oracle Client Install Dir>\network\admin
3.3.2 EnterpriseOne Application P96717
Best practices in JD Edwards EnterpriseOne environments are to never directly modify an EnterpriseOne database outside of EnterpriseOne. You should always use the JD Edwards EnterpriseOne application P96717 to perform the following Oracle database actions:
-
Import Tablespace
-
Export Tablespace
-
Create Tablespace
-
Drop Tablespace
3.3.3 Best Practices for OEE Performance
You should always verify that your Deployment Server machine meets the MTRs (refer to Section 1.3.1, "Accessing Minimum Technical Requirements (Certifications)"). The local Oracle database performs best on hard drives that are not fragmented or full. Additionally, the following table lists some guidelines for minimum configurations.
| Specification | Recommendation |
|---|---|
| RAM | 2 GB minimum |
| Page File Size | Minimum setting should be two times the amount of memory |
| Disk Space Usage | Oracle database engine requires approximately 1.7 GB of disk space
JD Edwards EnterpriseOne specifications require approximately 1.7 GB of disk space When fully loaded, best performance is obtained if the hard drive on the Deployment Server machine has at least 20% free space. |
| Local Database Name | Ensure that any reference in data sources and .ini files refer to the local database name in the exact mixed case, which is:
E1Local Failure to use the exact mixed case will lead to decreased performance of JD Edwards EnterpriseOne on the Deployment Server. |
3.3.4 Microsoft Windows Internet Protocol Version 4 (IPv4)
The JD Edwards EnterpriseOne Deployment Server requires Microsoft Windows Internet Protocol Version 4 (IPv4) for connectivity. It cannot function using IPv6.
If your Deployment Server is not working as expected, use this procedure to determine if the problem is due to your Windows machine using IPv6 and if so, to remedy:
-
After installing the local Oracle database, use a text editor to open the
log.xmlfile which is typically located in this directoryC:\Oracle\diag\tnslsnr\[MACHINE NAME]\listener\alert\. -
Examine the contents of the
log.xmlfile for indicators that the machine is using IPv6 addresses.IPv6 addresses can be distinguished by alphanumeric digits separated by colons, rather than periods as in IPv4 addresses.
One example is if you see
host_addr='::1'>. This indicates an IPv6 address, which in this case is the machine's local loopback address, whose equivalent IPv4 address is 127.0.0.1.Another example that indicates the use of IPv6 is if this string exists:
host_addr='fe80::7045:1aba:cb6d:1b50%13' -
If you see references to IPv6 addresses in the logs after installing the Oracle local database, then you may need to deinstall the Deployment Server and Oracle database as described in the chapter of this guide entitled: Chapter 26, "Deinstalling the Local OEE from the Deployment Server,".
Also, you may possibly need to perform additional cleanup for the Oracle Database as described in the section of this guide entitled: Section 26.4, "Manual Cleanup of a Deinstalled Oracle Database on the Deployment Server".
-
After the deinstall and cleanup is complete, you must apply a software patch from Microsoft to disable IPv6 before reinstalling the Oracle local database and EnterpriseOne Standalone or Web Development Client. The Microsoft patch for disabling IPv6 is at the following link:
How to disable IPv6 or its components in Windows
http://support.microsoft.com/kb/929852On the above Microsoft web page, click the link labelled Disable IPv6 (Microsoft Fix it 50409).
-
After you apply the Microsoft patch to disable IPv6, you can reinstall the Oracle database and EnterpriseOne Standalone Client using the procedures in this guide.
MICROSOFT DISCLAIMER ON DISABLING IPV6
Important: Internet Protocol version 6 (IPv6) is a mandatory part of Windows Vista and later versions. We do not recommend that you disable IPv6 or its components, or some Windows components may not function. For more information, see the "What are Microsoft's recommendations about disabling IPv6?" question in IPv6 for Microsoft Windows: Frequently Asked Questions at this link:
3.4 Obtaining and Preparing the Deployment Server Install Image
You install the Deployment Server Install image from DVD images obtained from the Oracle e-delivery web site:
To install from images downloaded from the Oracle e-delivery web site:
-
Create a parent download directory on a disk with at least 15 GB free space. For example:
c:\DepSvr\Disk1 -
Download the source DVD images for the JD Edwards EnterpriseOne Deployment Server into the directory you created in Step 1.
-
You must use either the 7-Zip or WinZip program to unzip each of the DVD images into the directory you created in Step 1 (to verify successful extraction see Caution below).
Note:
During the extraction if you receive a message indicating that..\META-INF\MANIFEST\MFalready exists, at the prompt you can choose either Ignore or Replace.Caution:
You cannot use the built-in Microsoft Windows Explorer functionality to extract the zip files otherwise the result is an incomplete install image. You must use WinZip or 7Zip.To verify a successful extraction, check the file size of
SPEC_MASTER.DBF. This file should be 1.8 GB.After unzipping all DVDs, you should have a structure that looks like this:
c:\DepSvr\Disk1\
                 DeploymentServer\
                 Install\
                 META-INF\
                 Misc\
                 stage\
                 InstallManager.exe
                 InstallManager.htm
                 InstallManager.ico
                 ONEWORLD.ICO
                 OracleLogo.gif
                 README.TXT
Caution:
The directories contained on the Disk2, Disk3, Disk4, Disk5, and Disk6 images are all at the same hierarchal level as the\Disk1\DeploymentServerdirectory.When your unzip operation is complete, all the files must be in the same structure as the
\Disk1\DeploymentServerdirectory.You should not have either a Disk2, Disk3, Disk4, Disk5, or Disk6 directory.
3.5 Working with JDBC Drivers on the Deployment Server
The Deployment Server requires database-specific JDBC drivers for several purposes as described below. This section describes:
3.5.1 Obtaining the JDBC Drivers
Based on the database being used on your JD Edwards EnterpriseOne Enterprise Server, you should obtain the required java-based JDBC driver files from your database vendor. Access the current Minimum Technical Requirement (MTR) listing from My Oracle Support for the proper JDBC driver files to obtain. For help with locating MTRs, refer to Section 1.3.1, "Accessing Minimum Technical Requirements (Certifications)". Place the driver files in the location specified in the section of this guide entitled: Section 3.5.2, "Copying the JDBC Drivers to the Deployment Server".
In addition, for JD Edwards EnterpriseOne Release 9.1, all installations of OEE on the Deployment Server require a driver for local database connectivity on the Deployment Server (required to build and deploy ESUs) and to perform installations of the Web Development Client (workstation). You can locate the Oracle database driver in these locations:
-
Oracle Enterprise Edition Database (on your JD Edwards EnterpriseOne Enterprise or Database Server)
Your installation of an Oracle 11gR2 database product includes the Oracle JDBC driver(s). Typically the driver is located in this directory of your Oracle 11gR2 installation:
\jdbc\lib -
Oracle Technology Network (OTN)
http://www.oracle.com/technetwork/indexes/downloads/index.html
You cannot have multiple Oracle JDBC driver files (such as ojdbc5.jar and classes12.jar) in the same folder (\misc) or else the drivers will conflict, which will cause access failure to the Oracle database on your Enterprise Server. The Oracle JDBC driver (for example, ojdbc5.jar) is added to the \misc folder by the Deployment Server installer.
Note:
You must manually copy the driver files from the installed location to the location specified in the section of this guide entitled: Section 3.5.2, "Copying the JDBC Drivers to the Deployment Server".3.5.2 Copying the JDBC Drivers to the Deployment Server
Caution:
This step must be done before starting the installer, as one of its first steps the installer attempts to load all jar files needed for the process.After you have obtained the JDBC driver(s) from the database vendor(s), you should copy the driver file(s) (and, if applicable, any associated license files) in this directory on the Deployment Server:
x:\DepSvr\Disk1\Misc
where "x" is a drive name, and
where DepSvr\Disk1\Misc is the Deployment Server install image.
You must supply this directory location and name when you run the Deployment Server Installer.
3.6 Installing the Deployment Server
Caution:
Microsoft Windows 2008. If you are running the JD Edwards EnterpriseOne Deployment Server on a Microsoft Windows 2008 platform, you must be signed onto the machine as administrator. Additionally you must run all JD Edwards EnterpriseOne installers and processes 'as Administrator '.Due to the security model on Microsoft Windows 2008, failure to run the JD Edwards EnterpriseOne processes 'as Administrator ' will likely result in random and unpredictable failures in the processes at run time.
Caution:
Remote Desktop. If you are using Remote Desktop to connect to the Deployment Server, you must use the/admin argument to launch Remote Desktop. For example:
C:\WINDOWS\system32\mstsc.exe /F /admin
If you do not run Remote Desktop with the /admin argument, Microsoft Windows blocks several important installer functions although Microsoft Windows reports success to the installer. For example, some registry entries will be missing and the Share for the Deployment Server will not be correctly created.
The Oracle Universal Installer (OUI) process creates temporary files during the install. By default these are placed on the c: drive of your Windows-based Deployment Server. You may need a sizable amount of free space on your c: drive in order to complete the installation successfully.
For Microsoft Windows 2008, pay special attention to the various Cautions in the steps in this chapter.
This table lists the mandatory and optional components of the Deployment Server installation.
| Server | Mandatory Component | Optional Components |
|---|---|---|
| Deployment Server | Deployment Client
EnterpriseOne Files |
Development environment
Prototype environment Pristine environment Production environment |
The installation process for the Deployment Server performs these functions:
-
Installs the objects from the CDs.
-
Creates the path code directory structures (such as PS910 and PD910) based on your selections.
-
Updates the Microsoft Windows Registry.
Note:
You can run the Deployment Server and the Platform Pack installation concurrently (assuming the installation programs are run on different machines).After verifying the support structure as shown in the section of this guide entitled: Section 3.4, "Obtaining and Preparing the Deployment Server Install Image", you can install the Deployment Server. This process installs the Deployment Server from CDs.
Note:
You must install the Deployment Server locally; you cannot install the Deployment Server from a remote machine. However, you can choose to install JD Edwards EnterpriseOne files and environments on a remote machine using a mapped drive. Prior to installing to a remote machine, you must have already setup the drive with network mapping.This section describes these topics:
-
Section 3.6.3, "Before Launching the Deployment Server Installer"
-
Section 3.6.5, "Using InstallManager to Install a Local Database on the Deployment Server"
-
Section 3.6.7, "Understanding the JD Edwards EnterpriseOne Deployment Server Installer"
3.6.1 Prerequisites
Before you run the installation program, shut down all programs running on the Deployment Server that could cause DLL conflicts (such as Microsoft SQL Services, Internet Explorer, Microsoft Word, or Adobe Acrobat). You can restart these programs after you finish installing the Deployment Server.
3.6.2 Installation Process Flow
The diagram below illustrates the process flow and the various installation paths.

3.6.3 Before Launching the Deployment Server Installer
Before you launch the Deployment Server installer, you should obtain the JDBC drivers for the Enterprise Server database and also for your local database, which is Oracle Enterprise Edition (OEE). You can place the JDBC drivers in the CD images directory on your Deployment Server either before or after running OUI to install the Deployment Server; however, it is preferable that you copy the drivers before running OUI. For instructions on obtaining and placing the requisite JDBC drivers, refer to the section Section 3.5, "Working with JDBC Drivers on the Deployment Server".
Note:
The Deployment Server OUI installer delivers the requisite JDK/JVM.You can install the Deployment Server using any of these methods:
-
Directly from the Deployment Server installation DVD.
-
From a copy of the Deployment Server installation DVD that exists on a hard disk drive.
-
From a downloaded and unzipped image of the installation DVD that was obtained from the Oracle E-Delivery web site.
3.6.4 Understanding Destination Paths
Each Oracle product that is installed on a machine has what is termed an Oracle Home directory or path. This is a directory that contains all the files associated with the product. This path has a name as well. You can specify a name that is intuitive so you do not have to remember the path.
When you install the JD Edwards EnterpriseOne Deployment Server, you specify an Oracle Home and name for that installation as well. For example, you may enter C:\JDEdwards\E910 as the Oracle Home path and JDE DEP910_HOME as the Oracle Home name. Following the this example, your Oracle Home on the Deployment Server would be:
| Oracle Home Path | Oracle Home Name | Comment |
|---|---|---|
C:\JDEdwards\E910 |
JDE_DEP910_HOME | This is the Oracle Home of the Deployment Server |
3.6.5 Using InstallManager to Install a Local Database on the Deployment Server
If you have not already installed the database engine and a database called E1Local does not exist on your Deployment Server, use the procedures in this section to install these requisite components before installing the JD Edwards EnterpriseOne Deployment Server. If the local database engine is already installed and an E1Local database exists, do not reinstall the database engine; go to the section entitled: Section 3.6.7, "Understanding the JD Edwards EnterpriseOne Deployment Server Installer".
If you want to install the local database under the default location (that is, c:\Oracle), you can run InstallManager to do so. If you want to install into another directory, you must run the database installation program OEESetup.exe from a command prompt and provide one or more arguments.
This section discusses these topics:
-
Section 3.6.5.1, "Using InstallManager to Install a Local Database in the Default Location"
-
Running OEESetup to Install a Local Database in a Directory Other Than the Default Location
3.6.5.1 Using InstallManager to Install a Local Database in the Default Location
-
Obtain the appropriate disk images from Oracle Software Delivery Cloud for the local database you wish to install on your Deployment Server.
-
Log on to the Deployment Server as a user with Administrator rights.
Caution:
Ensure that the Administrator account name that you use does not contain any special characters. -
If you have not already done so, expand all disk images to be under a common directory called Disk1 on your Deployment Server.
Tip:
Refer to the preceding Tip: Installation Methods for a list of various installation methods.Caution:
Microsoft Windows 2008. For Windows/2008, if you are using a physical DVD and the installation starts automatically, you must cancel this process and start the installation manually.Caution:
Microsoft Windows 2008. On the Microsoft Windows 2008 platform, you must right-click on the executable and select Run as Administrator from the drop-down. -
From the Disk1 image, execute the
InstallManager.exefile from the root folder.\Disk1\InstallManager.exeCaution:
Microsoft Windows 2008. On the Microsoft Windows 2008 platform, you must right-click on the executable and select Run as Administrator from the drop-down.
-
On JD Edwards Install Manager, select this link to install the local OEE database:
EnterpriseOne Database Engine
-
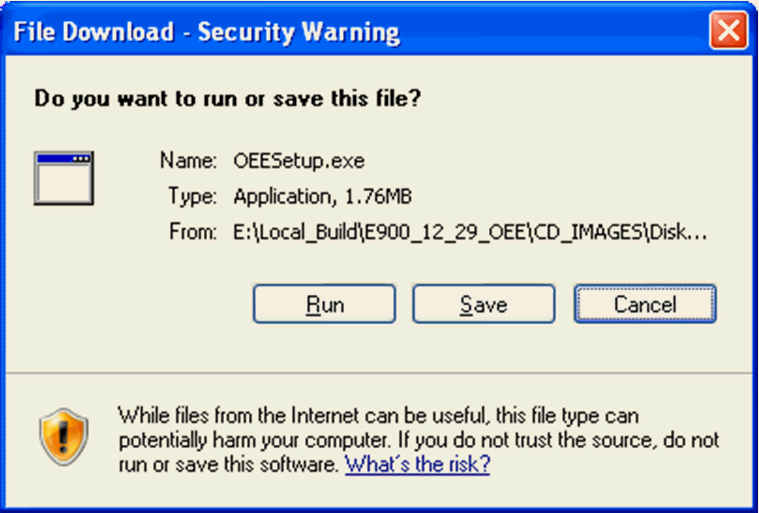
Click the Run button to launch the
OEESetup.exeinstaller.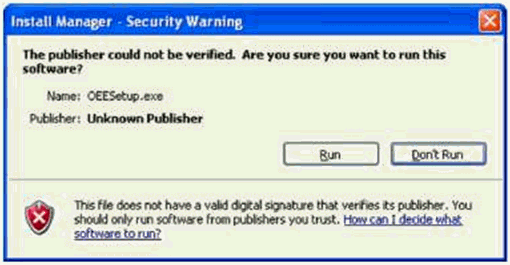
-
If you receive an Install Manager - Security warning dialog with the message "The publisher could not be verified", click the Run button to begin the installation of the local database. This installation process can take quite some time. Upon completion a local database called E1Local will exist.
Caution:
You must reboot your machine before continuing with the installation of the JD Edwards EnterpriseOne Deployment Server as described in the next section in this guide entitled: Section 3.6.7, "Understanding the JD Edwards EnterpriseOne Deployment Server Installer".3.6.5.2 Running OEESetup to Install a Local Database in a Directory Other Than the Default Location
-
Obtain the appropriate disk images from Oracle Software Delivery Cloud for the local database you wish to install on your Deployment Server.
-
Log on to the Deployment Server as a user with Administrator rights.
Caution:
Ensure that the Administrator account name that you use does not contain any special characters. -
If you have not already done so, expand all disk images to be under a common directory called Disk1 on your Deployment Server.
Tip:
Refer to the preceding Tip: Installation Methods for a list of various installation methods.Caution:
Microsoft Windows 2008. On the Microsoft Windows 2008 platform, if you are using a physical DVD and the installation starts automatically, you must cancel this process and start the installation manually.Caution:
Microsoft Windows 2008. On the Microsoft Windows 2008 platform, you must right-click on the executable and select Run as Administrator from the drop-down. -
Open a command prompt window.
Caution:
Microsoft Windows 2008. On the Microsoft Windows 2008 platform, you must right-click on the command prompt's executable (cmd.exe) and select Run as Administrator from the drop-down. -
From within the command prompt window, change directory (cd) to directory that contains the extracted contents of the Disk1 image. For example:
DeploymentServer\OneWorld Client Install\ThirdParty\ORACLE -
Run the following command:
OEESetup.exe -i installation_directorywhere
the -i switch tells
OEESetup.exewhere to install the local database E1Local. If both this switch and theinstallation_directoryargument are omitted, the local database will be installed under the default locationc:\Oracle. If the default location is used, the database will then reside in this directory (instead of a user-specific directory):c:\Oracle\E1LocalThe argument i
nstallation_directoryis optional; it represents the path where the local database will be installed. Do not includeE1Localas part of this path. If this argument is not provided, you will be prompted for the path as shown below: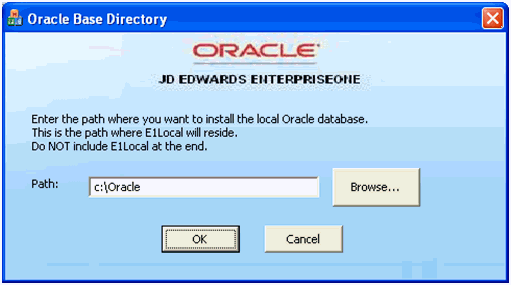
-
If you specified the -i switch but did not provide the
installation_directoryargument, you will see the above screen. On the screen entitled Oracle Base Directory, in the Path field, enter or browse to the directory into which you want to install the local Oracle database. For example:c:\OracleNote:
This installation process can take quite some time. Upon completion a local database called E1Local will exist in the specified directory. Using the example above, the database would be installed in this directoryc:\Oracle\E1LocalCaution:
You must reboot your machine before continuing with the installation of the JD Edwards EnterpriseOne Deployment Server as described in the next section in this guide entitled: Section 3.6.7, "Understanding the JD Edwards EnterpriseOne Deployment Server Installer".
3.6.6 Examine the Local Database Installer Logs
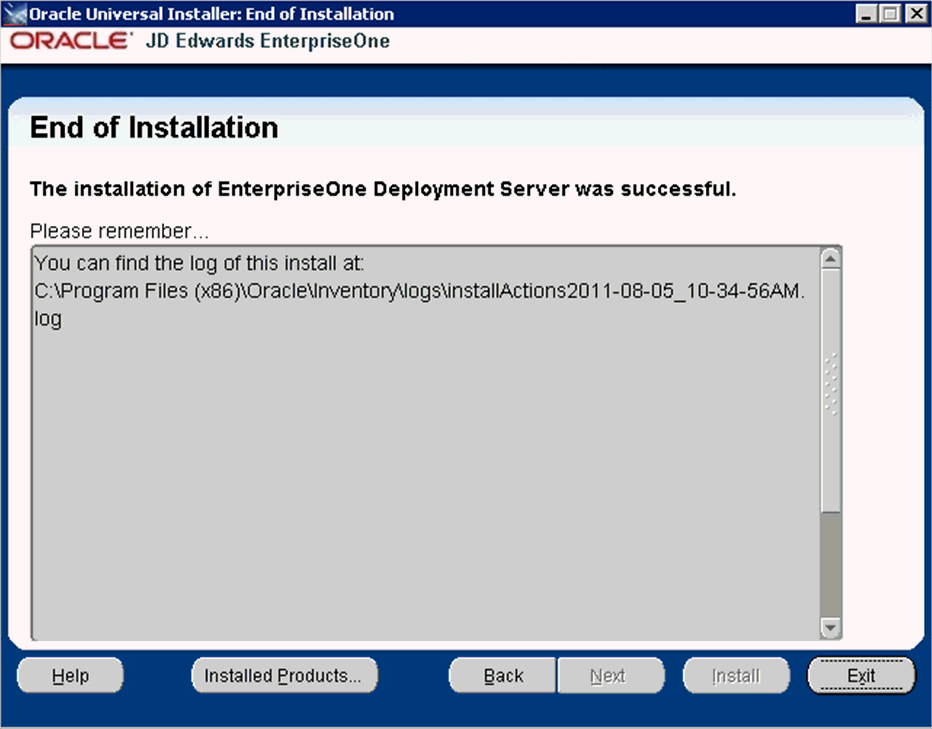
Even though the screen indicates that the installation was successful, you should perform the following checks to verify that the database truly installed correctly:
-
Examine the log file
-
The log file is in this folder:
C:\Program Files\Oracle\Inventory\logs -
The log file name is named:
installActionsyyyy-mm-dd_hh-mm-ssAM|PM.logwhere the syntax is:
-
yyyyis the year -
mmis the month -
ddis the day of the month -
hhis the hour -
mmis the minutes -
ssis the seconds -
AM|PMis either AM or PM -
For additional details on log file names and location, refer to the section of this chapter entitled: Section 3.10.2, "OEE Installer Logs".
-
-
-
Verify that the OEE services exist and are running
-
From the Microsoft Windows Control Panel, navigate to Administrative Tools > Services.
-
In the list of Services, look for these services:
OracleE1LocalTNSListener
OracleServiceE1LOCAL
-
If either of the above services is missing, it indicates that there was a problem in completing all the installation and configuration steps. You should examine the logs specified in the table in the section of this guide entitled: Section 3.10.2, "OEE Installer Logs".
To remedy you will probably need to deinstall the database engine using the steps in the section of this guide entitled: Section 26.5, "Using the OUI Installer to Deinstall JD Edwards EnterpriseOne from the Deployment Server" , reboot the Deployment Server machine, and then reinstall the OEE database.
-
3.6.7 Understanding the JD Edwards EnterpriseOne Deployment Server Installer
A local OEE database engine and a database called E1Local must already exist on this machine. If not, use the procedures in the preceding section entitled: Section 3.6.5, "Using InstallManager to Install a Local Database on the Deployment Server".
This section describes:
-
Section 3.6.7.1, "Understanding EnterpriseOne Files Location"
-
Section 3.6.7.2, "Running the JD Edwards EnterpriseOne Deployment Server Installer"
3.6.7.1 Understanding EnterpriseOne Files Location
The software component called EnterpriseOne Files is a pre-defined grouping of files that can be installed on your local machine or a mapped network drive. It includes EnterpriseOne system files and pathcodes for these four (4) environments:
-
Development
-
Prototype
-
Pristine
-
Production
By default the installer assumes the local machine is the Deployment Server. As such it provides a default value for your Oracle Home path.
You cannot change this local path value after the installation is complete; it must remain whatever value you specified at the time of installation.
Optionally you can choose to install EnterpriseOne (E1) Files to a remote machine as the Deployment Server. If you do so, the installer creates a unique "planner client" on the local machine that contains only the Planner pathcode. You should only set up one "planner client" machine to do the Deployment Server jobs such as applying software updates, running installation plan, and so on.
Using a Remote Machine as the Deployment Server
If you intend to use a remote machine as the Deployment Server, prior to running the Deployment Server installer you must first map a network drive using this procedure:
-
On the remote Deployment Server, create a folder as the target location in which the installer will place the EnterpriseOne (E1) files. For example:
E:\JDEdwards\E910 -
Using the example above, share the target folder
E910with full permissions. -
Caution:
Because the Deployment Server installer must be run as an Administrator, you must also map a network drive as an Administrator.Start a Command Prompt as Administrator and map a network drive on the local machine to the remote Deployment Server machine. For example, map
Z:\to\\Remote_Deployment_Server_Machine_name\E910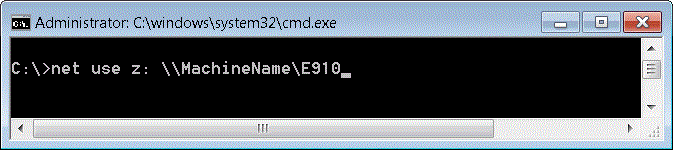
Tip:
You can verify that the drive is being mapped as an Administrator by confirming that "Administrator:" is displayed in the title bar of the Command Prompt window.The below screen shows a sample of a properly mapped network drive for the remote Deployment Server:
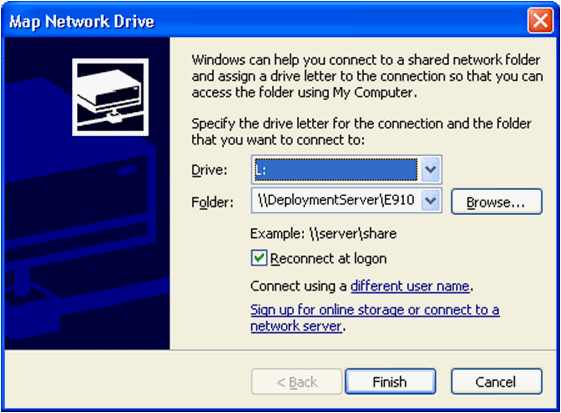
Note:
In a later separate process described in Section 3.6.7.2, "Running the JD Edwards EnterpriseOne Deployment Server Installer", when you are prompted by the installer for the location of the remote Deployment Server, in the location field you can browse to or enter the mapped drive including the drive letter designation. Using the above example in Step 3, the value would be theZ:drive. Using the above screen shot as an example, the value would be theL:drive.The same installer validates the location that you enter for the remote location. If the mapping to the remote location is not valid or the directory specified in Step 1 above does not exist on the remote machine, the installer will not continue.
Note:
The installer validates the location. If the mapping to the remote location is not valid the installer cannot continue. Likewise the directory specified in Step 1 must exist on the remote machine or else the installer cannot continue.
3.6.7.2 Running the JD Edwards EnterpriseOne Deployment Server Installer
Use the procedure in this section to install the JD Edwards EnterpriseOne Deployment Server.
-
Log on to the Deployment Server as a user with Administrator rights.
Caution:
Ensure that the Administrator account name that you use does not contain any special characters such as ampersands, asterisks, or underscores. -
Locate the disk 1, which is either a physical disc or disc image directory, for the Deployment Server installation DVD.
Tip:
Refer to the preceding Tip: Installation Methods for a list of various installation methods.Caution:
Microsoft Windows 2008. For Windows/2008, if you are using a physical DVD and the installation starts automatically, you must cancel this process and start the installation manually.Caution:
Microsoft Windows 2008. On the Microsoft Windows 2008 platform, you must right-click on the executable and select Run as Administrator from the drop-down.You must right-click on the executable and select Run as Administrator from the drop-down.
-
From disk1, execute the
InstallManager.exefile from the root folder. For example:\Disk1\InstallManager.exe -
On JD Edwards Install Manager, select this link:
EnterpriseOne E910 Deployment Server
-
If you get the above prompt, click the Run button to execute the Deployment Server OUI installer, which is called by the
setup.exeprogram. This process opens a Microsoft Windows command window as shown in the below example.
After the OUI installer is launched, the command window is closed and the Welcome screen is displayed.

-
On Welcome, select the Next button.
-
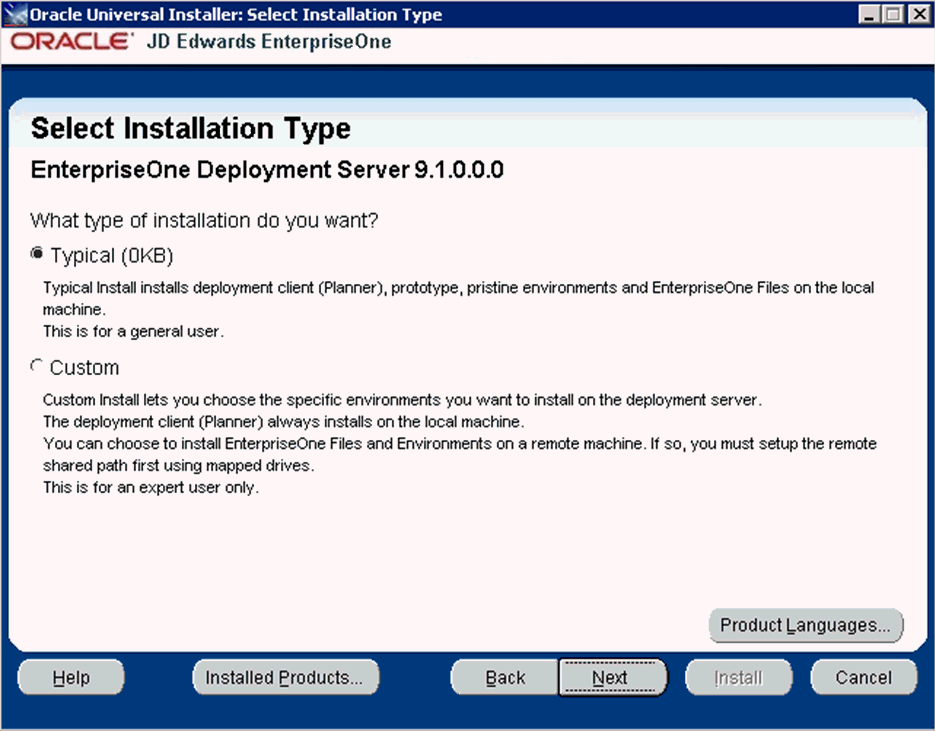
On Select Installation Type, select the appropriate radio button for these installation types:
-
Typical
The Typical selection installs environments for Deployment Client (Planner), prototype, pristine and also installs JD Edwards EnterpriseOne files on the local machine. This selection is recommended for the general user.
-
Custom
The Custom selection lets you choose the specific environments you want to install on the deployment server. The deployment client (Planner) is always installed on the local machine. You may choose to install JD Edwards EnterpriseOne Files and environments on a remote machine. In that case, first you need to setup a mapped drive as described in the section of this guide entitled: Section 3.6.7.1, "Understanding EnterpriseOne Files Location". This selection is only recommended for an expert user.
-
-
After you have selected an installation type, select the Next button.
-
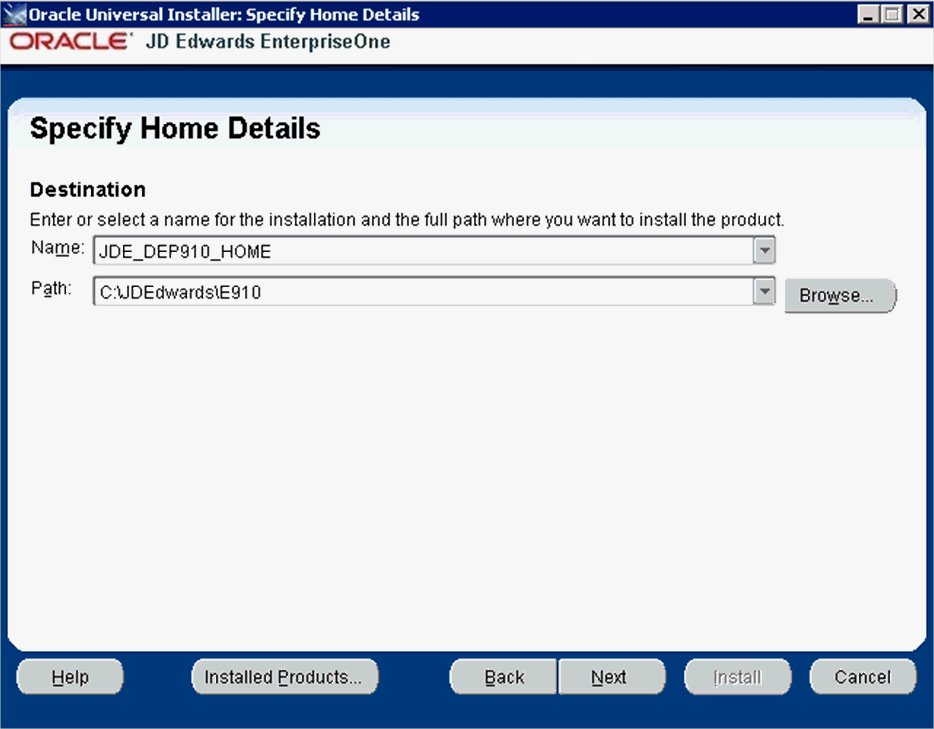
On Specify Home Details, you must specify an Oracle Home path and a name for that path.
Tip:
For more information about Oracle Homes and recommendations for naming the Oracle Homes for the JD Edwards EnterpriseOne Deployment Server, see the section in this guide entitled: Section 3.6.4, "Understanding Destination Paths".Each Oracle product that is installed on a machine has what is termed an Oracle Home path. This path contains all the files for each Oracle product. This path has a user-specified name as well.
On Specify Home Details, complete these fields:
Field Description Name Enter a name for the Oracle Home for the JD Edwards EnterpriseOne Deployment Server. For example: JDE_DEP910_HOME
Path The path you enter here is for the Oracle Home path where the E1 Deployment Server will be installed. For example, the path might be: C:\JDEdwards\E910Do not specify the same Oracle Home name or path into which you installed the local database; however, you can specify a path that is a subdirectory of the database's Parent Oracle Home.
For local installation, you must use the default value. For remote installation, this value must be the letter designation of the mapped drive. For additional details, refer to the section of this chapter entitled: Section 3.6.4, "Understanding Destination Paths".
-
Select the Next button.
Tip:
If you chose Typical installation on the preceding screen (Select Installation Type), you can skip directly to Step 16 located later in this task to complete the Deployment Server installation.If you chose Custom installation on the preceding screen (Select Installation Type), proceed with the following steps.
Note:
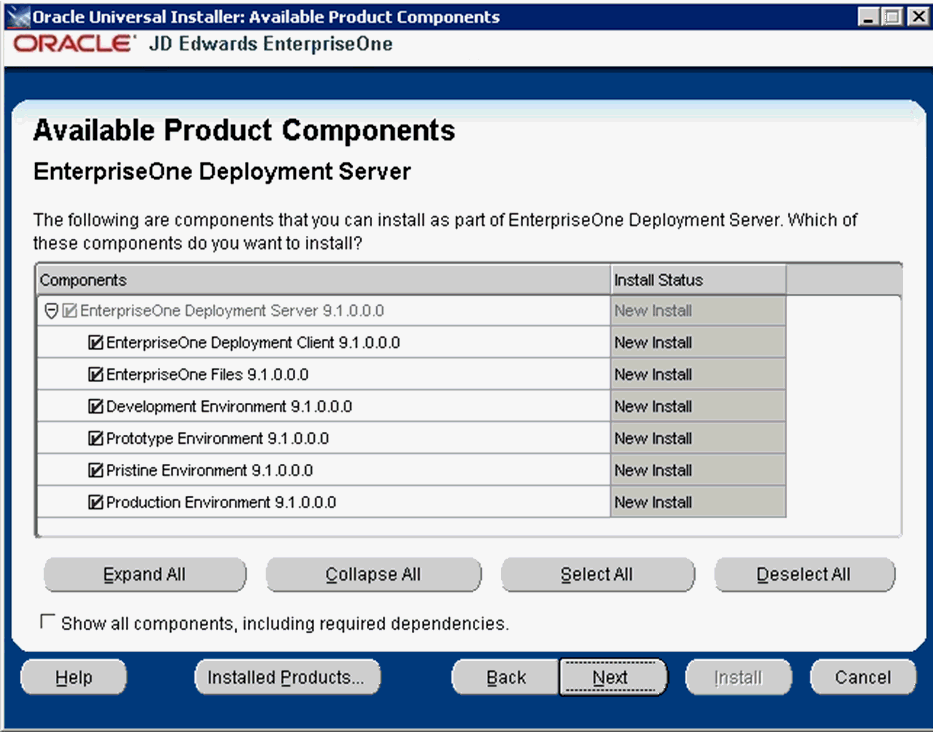
The Available Product Components screen and subsequent screens until the Summary are displayed if you chose Custom installation on Select Installation Type in Step 7. -
On Available Product Components, EnterpriseOne Deployment Server, enable the checkboxes to select these features components you want to install:
-
EnterpriseOne Deployment Client
The selection for EnterpriseOne Deployment Client is mandatory in order to select other components. If you do not select this component, you cannot select any other components. This installs the planner pathcode and databases on the local machine. You will be given an option to install other components on a remote share.
-
EnterpriseOne Files
The selection for EnterpriseOne Files includes mandatory system files. If you do not select this component you cannot select any other environment components. Likewise, if you re-run the JD Edwards EnterpriseOne Deployment Server Installer to add an environment it will check to ensure that these files are already installed and you will not be given an option to install the environment on a machine, drive, or directory that is different from that which contains the JD Edwards EnterpriseOne files.
-
Development Environment
-
Prototype Environment
-
Pristine Environment
-
Production Environment
Tip:
You can use the Select All button to select all components.
-
-
On Specify EnterpriseOne Files Location, you can accept the default local value or enter a mapped network drive.
The installer provides a default value which is your Oracle Home path. For example:
C:\JDEdwards\E910If you prefer to install JD EnterpriseOne Files to a remote Deployment Server, you can specify a mapped drive. For example:
Z:\For more on the proper use of mapped drives and network drives, refer to the following Caution.
Caution:
You cannot enter a network path such as:\\machine_name\network_shareIf you enter a network path instead of a mapped drive, the installer will give an error.
When you click Browse to select the drive, if the mapped remote drive is not listed, perform these steps:
-
Start a Command Prompt session by right clicking and selecting Run as Administrator.
This command prompt opens on the Microsoft 2008 Server with Administrator:cmd in the header.
-
In the command window, type this command:
net use z: \\<MachineName>\<SharedPath>where
z:is the drive on which you mapped drive exists.
-
-
Select the Next button.
-
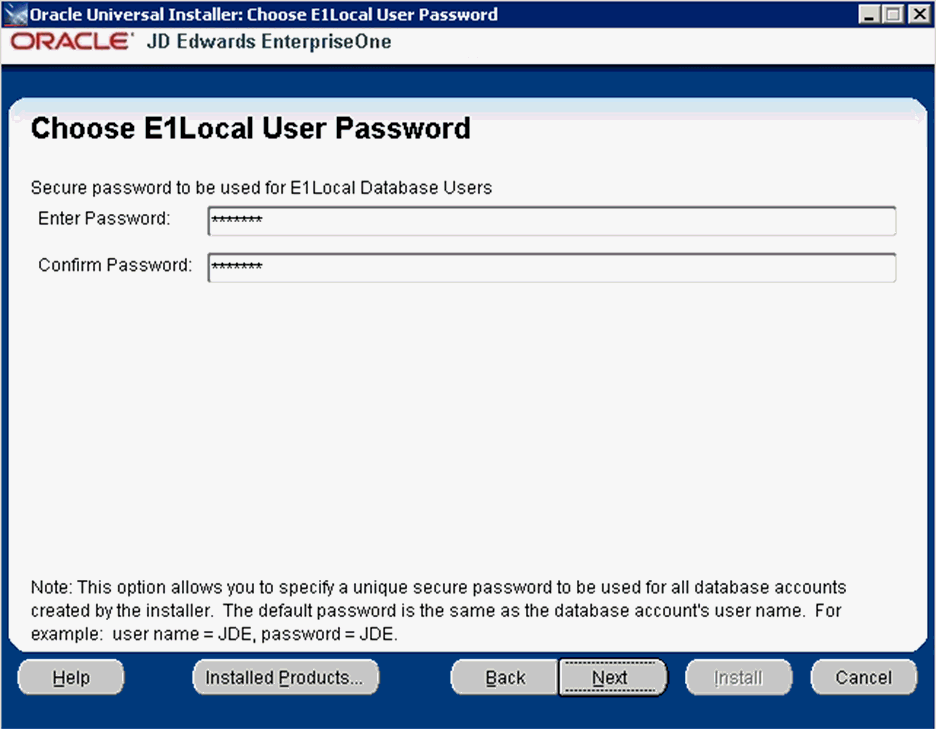
On Choose E1Local User Password, you can specify a secure password to be used for the E1Local Database Users on the Deployment Server. This unique password will be used for all database accounts created by the Deployment Server installer.
The default password is the same as the user name of the database account. For example, if the user name of the local database account is JDE, the default password is JDE.
If you do not specify a E1Local user password, by default the installer will use this value: DEFAULT. You cannot leave this field blank.
-
Select the Next button.
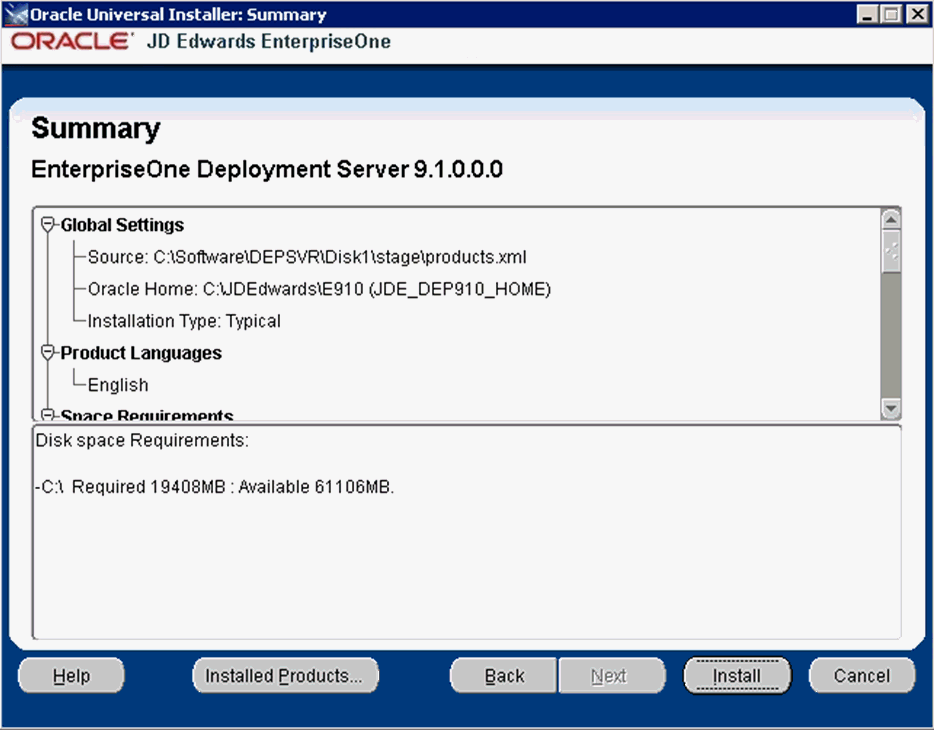
Sample Summary Screen for Typical Installation
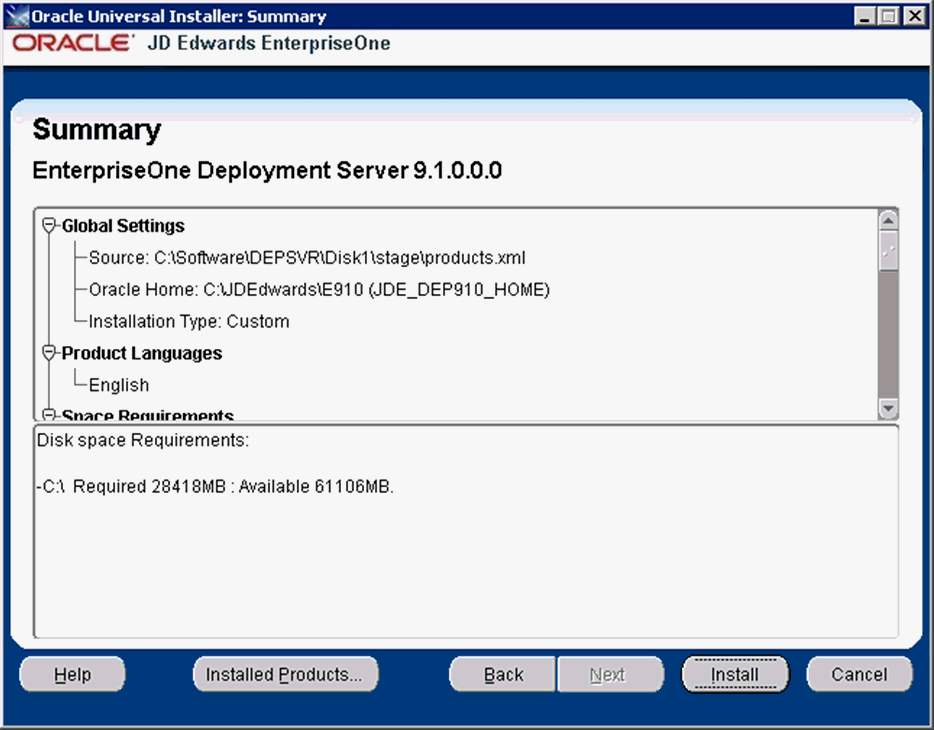
Sample Summary Screen for Custom Installation
-
On Summary, verify the list of items to be installed is correct.
If there is insufficient disk space to complete the installation is available on the Deployment Server target machine, an error message is displayed.
-
Click the Install button.
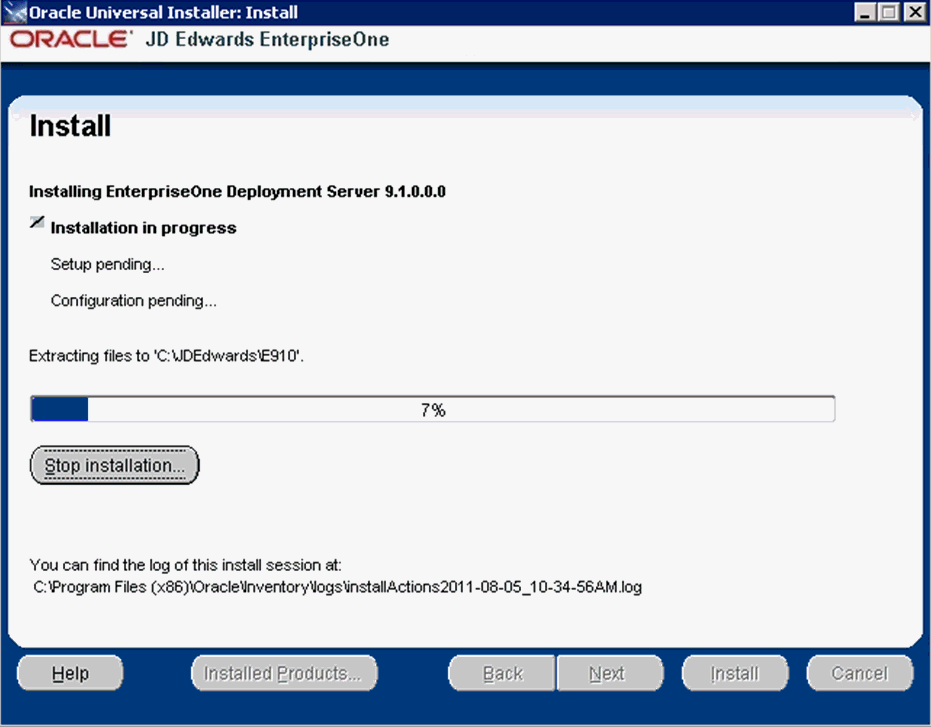
The JD Edwards EnterpriseOne Deployment Server Installer displays a panel showing the ongoing status of the installation.
-
When the installation of the database finishes, the End of Installation screen is displayed.
Caution:
Examine the Installer Logs. Even though the screen indicates that the installation was successful, you should you should always check the logs before you attempt to run the Deployment Server. The file is named log.txt and is located in the Deployment Server installation directory. For example:C:\Program Files (x86)\Oracle\Inventory\logs\InstallActions\ installActionsyyyy-mm-dd_hh-mm-ssPM.logFor additional details on log file names and location, refer to the section of this chapter entitled: Section 3.10.2, "OEE Installer Logs".
-
On End of Installation, select the Exit button.
3.7 Cataloging for DB2 UDB
You must catalog the DB2 UDB databases on any machines that need to connect to the DB2 UDB database server. For example, client machines, Deployment Server, or Enterprise Server (if different than database server. This procedure makes the databases known to the connecting machines.
From the machine where you want to catalog:
-
Map a drive to the location where the DB2 database scripts reside; typically they are located in:
\\<deployment_server>\E910\database -
Edit the
catalog_db.batfile so that the variable values, such as instance name, as applicable to your installation. Thecatalog_db.batfile contains comments describing how to set the variables contained therein. -
Start the DB2 UDB Command Window.
-
Change directory to location where the DB2 UDB database scripts reside.
-
Run the
catalog_db.batbatch file.
3.8 Adding Additional Environments (Rerunning the Deployment Server Installer)
Caution:
If you want to add an additional environment that you did not install when you first ran the Deployment Server Installer, you must re-run the installer from the original disk image. You cannot re-run the installer using the OUI-based installer.You can only use the installer located accessed by Start > All Programs > Oracle - JDE_DEP910_HOME > Oracle Installation Products > Universal Installer for deinstalling the Deployment Server.
To rerun the Deployment Server Installer, follow the instructions in the preceding section of this chapter entitled: Section 3.6, "Installing the Deployment Server"
3.9 Downloading and Installing the Latest Software
Caution:
You must start Change Assistant as Administrator. Right-click on the shortcut and select 'Run as Administrator from the drop-down.Before continuing with the upgrade, download and install the latest Tools Release, Tools Release Patch, and Planner Update ESU from the JD Edwards EnterpriseOne Update Center.
Note:
The order in which the following Tools Release and updates are applied is very important. Do not deviate from the order described in these procedures.This section discusses:
3.9.1 Installing the Latest Tools Release and Latest Tools Release Patch to the Deployment Server
To install the latest tools release and latest tools release patch:
-
From the JD Edwards EnterpriseOne Update Center home page, download the latest Tools Release Patch (for example, 9.1.1.0) and Tools Release documentation.
-
Using the Tools Release documentation, install the Tools Release Patch to the Deployment Server.
Caution:
You must right-click on the executable and select Run as Administrator from the drop-down.
Note:
If you have ever used the Drag and Drop method of moving between Tools Releases for service packs, it is necessary to run theReconfigureMSDE utility to encrypt the "system" database user's password. Refer to the section of this guide entitled: Section 3.10.5.9, "Encrypting the Password of the Local Oracle Database".3.9.2 Installing the Latest Planner Update and Running the Special Instructions
Caution:
As part of the local database installation, which is bundled with the Deployment Server Installer, the password for the system user on the E1Local database is encrypted. If you re-set this password, several JD Edwards EnterpriseOne functions will fail. If you should inadvertently reset the password, you can encrypt it again to the expected default password. Refer to the section of this guide entitled: Section 3.10.5.9, "Encrypting the Password of the Local Oracle Database".To install the latest planner update:
-
From My Oracle Support, download the latest planner update for your Tools Release to the Deployment Server.
-
Run the self-extracting executable and follow the on-screen instructions to install the planner update on the Deployment Server.
Caution:
You must apply the Planner Update ESU to the Pristine environment in order to get the latest Table Conversion changes, among other important changes.You must right-click on the executable and select Run as Administrator from the drop-down.
-
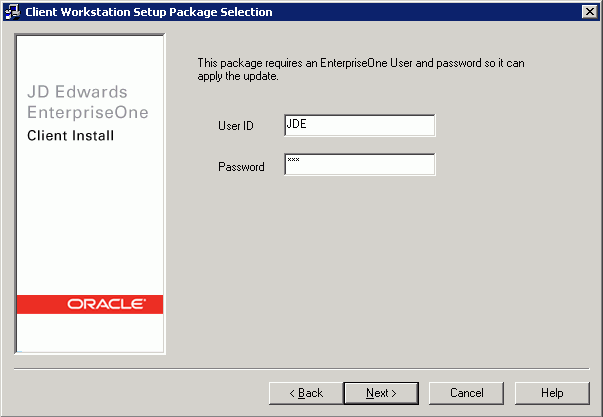
You must enter a valid JD Edwards EnterpriseOne user and password to initialize the Planner.
The shipped values are JDE for the user and JDE for the password.
Note:
The above login screen is displayed so the Planner Update can update the metadata specifications on the Deployment Server. -
When the installation finishes, view the JD Edwards EnterpriseOne Deployment Server Setup form to confirm that the installation was successful.
Tip:
If the folder into which you expanded the Planner Update is empty, you should run the self-extracting executable (JMnnnnn.exe) again. When the Welcome screen comes up, click on Cancel to quit. -
Follow the steps in the Special Instructions, which are contained within an HTML file that is shipped with the Planner Update. The special instructions file is in this directory with this file name:
x:\download_directory\planner_update_id\E910SpecialInstructions.htmwhere
download_directoryis the directory where you downloaded the Planner Update.Caution:
Every time you apply a new Planner Update you must run both of these:-
SpecialInstrs.bat -
R98403XB XJDE0002
-
3.10 Troubleshooting Deployment Server Installation
This section discusses:
3.10.1 Verify Local Planner Tablespaces are Not Attached
If you are re-installing your Deployment Server, you must ensure that the local Planner tablespaces (OEE) are not attached. To detach the tablespaces, run these batch files:
jdedwards\e910\planner\data\detach_planner.bat
jdedwards\e910\planner\data\detach_metadata.bat
3.10.2 OEE Installer Logs
This section lists the log files for installations on the Deployment Server:
-
x:\jdedebug.logNote:
The location is defined by this jde.ini setting:
[DEBUG]
DebugFile=d:\jdedebug.log -
x:\jde.logNote:
The location is defined by this jde.ini setting:
[DEBUG]
JobFile=D:\jde.log -
C:\ReconfigureMSDE.log -
\InstallLogs\attach_plannerdata.log -
\InstallLogs\attach_plannerspec.log -
\InstallLogs\Configurexxxspec.logWhere
xxxdenotes that there are several of these logs, which contain logging for predefined package specs. For example:ConfigureDV910FAspec.log -
X:\JDEdwards\E910\Detachxxx.logWhere
xxxdenotes that there are several of these logs, which contain logging for predefined package specs. For example:DetachDV910FAspec.log
See Also
For OEE-specific logs, refer to Section 3.10.5.1.2, "OEE Logs" in this chapter.
3.10.3 Configuration Files
Note:
This section is provided for reference. You are not required to manually configure these files because the Deployment Server installer configures the .ini files appropriately for the OEE local database.The data source definitions for OEE are defined in these configuration files:
-
jde.ini -
jdbj.ini
The following lists some of the settings within the various configuration files that are related to the local database.
-
jde.ini[DB SYSTEM SETTINGS] Type=E LOBFlag=Y [DB SYSTEM SETTINGS ' SECONDARY] Type=E LOBFlag=Y
-
jdbj.iniThe
jdbj.inifile specifies location of thetnsnames.orafile.The
jdbj.inifile also specifies the JDBC driver for Oracle asojdbc5.jar, which replaces the version (classes12.jar) used in prior releases of JD Edwards EnterpriseOne.[JDBj-BOOTSTRAP DATA SOURCE] databaseType=E lob=true [JDBj-SPEC DATA SOURCE] databaseType=E lob=true [JDBj-JDBC DRIVERS] ORACLE=oracle.jdbc.driver.OracleDriver
Caution:
The shippedjdbj.inifile in the following folder contains specifications for each database type:System\OC4J\j2ee\home\applications\ webclient.ear\webclient\WEB-INF\classesYou must manually comment out (with a semicolon) every database driver that you are not using. For example, if you are connecting to only Oracle databases, your file would look like this:
[JDBj-JDBC DRIVERS]
ORACLE=oracle.jdbc.driver.OracleDriver
;AS400=com.ibm.as400.access.AS400JDBCDriver
;SQLSERVER=com.microsoft.sqlserver.jdbc.SQLServerDriver
;UDB=COM.ibm.db2.jdbc.app.DB2Driver
3.10.4 Path Code Master (F98611)
The Path Code Master (F98611) contains changes to support OEE. It contains values for use of EMDBSY column to indicate type of specs and type of local database. These values are used by JDB, JDBj, and Package Build.
| EMDBSY Value | Spec Type | Local DB Type |
|---|---|---|
| 0 | TAM | MSDE |
| 1 | XML | MSDE |
| 2 | TAM | SSE |
| 3 | XML | SSE |
| 5 | XML | Oracle |
3.10.5 Oracle Enterprise Edition
This section discusses these topics:
-
Section 3.10.5.3, "EnterpriseOne Access to the Local Oracle Database"
-
Section 3.10.5.5, "Verifying the Local Oracle Database Installation"
-
Section 3.10.5.8, "Administering the Local Oracle Database Using SQL Plus"
-
Section 3.10.5.9, "Encrypting the Password of the Local Oracle Database"
-
Section 3.10.5.10, "Decrypting the Password of the Local Oracle Database"
-
Section 3.10.5.11, "Import and Export Tablespaces to the Local Oracle Database"
3.10.5.1 File Locations
This section discusses the location for these critical files:
3.10.5.1.1 Oracle Installation Directory
Deployment Server. The default installation location of the local Oracle database on the Deployment Server is:
C:\Oracle\E1Local
Note:
This location can be changed at installation time.Client. The default installation location of the local Oracle database on the Web Development Client (also called the Administration client or fat client or workstation) is:
C:\Oracle\E1Local
Note:
This location can be changed at installation time.3.10.5.1.2 OEE Logs
The following table lists the locations of the various log files.
| Log File | Location |
|---|---|
| Import for Planner databases | <E1_install_dir>\planner\Data\Imp*.log |
| Import for Planner specs | <E1_install_dir>\planner\spec\Imp*.log |
| Oracle import log for package specifications (created during Install and also during Package Workbench) | <E1_install_dir>\<pathcode>\package\<pkg_name>\Spec\imp*.log and Imp*.log |
| Oracle export log for specifications (created during Install and also during Package Workbench) | <E1_install_dir>\<pathcode>\package\<pkg_name>\Spec\exp*.log and Exp*.log |
| Local Oracle database runtime | C:\Oracle\diag\rdbms\e1local\e1local\alert\ |
| Local Oracle database listener | C:\Oracle\diag\tnslsnr\<this_machine>\listener\alert\ |
Log for ReconfigureMSDE.exe |
C:\ReconfigureMSDE.log |
| Local Oracle database install logs | c:\Program Files\Oracle\Inventory\logs |
Log for OEESetup.exe |
c:\OEEInstall.log |
3.10.5.1.3 tnsnames.ora
The tnsnames.ora file is located in these directories:
..\Oracle\E1Local\NETWORK\ADMIN
..\System\OC4J\j2ee\home\applications\webclient.ear\webclient\WEB-INF\classes
3.10.5.2 Rebooting the Deployment Server
You must reboot the Deployment Server after installing or deinstalling the local Oracle database.
3.10.5.3 EnterpriseOne Access to the Local Oracle Database
The Deployment Server Installation Workbench generates and encrypts a password and then changes the local Oracle database "system" and "sys" accounts' passwords to that password. During the rest of the Installation Workbench and at runtime of the Deployment Server, the local Oracle database is accessed via the "system" account and this generated and encrypted password.
This table lists the relationship between the local Oracle database accounts and the password.
| Local Oracle Database Account | Default Password |
|---|---|
| System | Generated and encrypted by the Deployment Server installer. |
| Sys | Generated and encrypted by the Deployment Server installer. |
| JDE | JDE
Note: The default password may be changed by DBA but if Security Server is not used, it must match the password of EnterpriseOne user JDE. |
| <tablespace_name>
For example:
|
<tablespace_name>
For example:
Note: The default password may be changed by DBA. This value does not affect the runtime operation of JD Edwards EnterpriseOne because it does not access the local Oracle database in this manner. |
3.10.5.4 Process Explorer
If you cannot delete the directory for the E1Local Oracle Home because a process has it locked, you can use Process Explorer to determine which process has it locked, and subsequently kill that process.
To obtain Process Explorer, you can download and install a free version at this link:
http://technet.microsoft.com/en-us/sysinternals
To use Process Explorer:
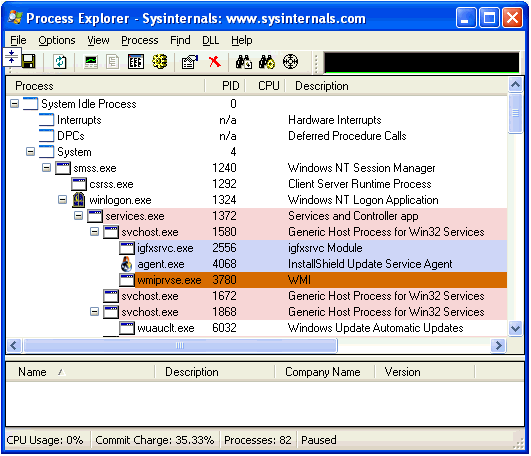
-
Navigate to Find > Find Handle or DLL....
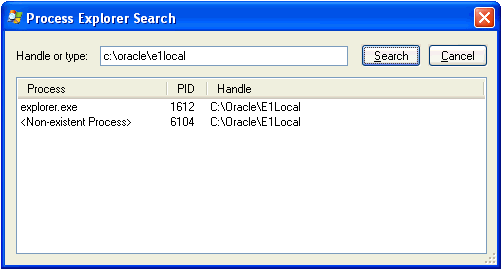
-
In the Handle or type field, enter the full name of the directory that cannot be deleted. For example:
c:\oracle\e1local -
Click the Search button.
-
On the search results screen, note the PID(s) (Process IDs) that are associated with the specified directory.
-
Cancel the Process Explorer Search window to return to Process Explorer.
-
Use Process Explorer to kill the identified process(es).
Note:
If one or more of the processes is Windows Explorer (explorer.exe), killing it may cause the computer to lock up. If that happens, you will need to reboot the Deployment Server machine.The process
Oracle.exeis the local Oracle database engine. If it has a file locked, you can stop the service OracleServiceE1LOCAL. -
If one or more of the processes locks a file in the directory you are trying to delete even after rebooting, you may have to determine which service is automatically starting that process and change the service to manual startup. Then reboot the Deployment Server machine and delete the directory.
3.10.5.5 Verifying the Local Oracle Database Installation
To verify that the installation of the local Oracle database was successful:
-
Inspect the latest logs in these directories:
<E1_install_dir>\InstallLogsC:\Program Files\Oracle\Inventory\logs -
Resolve any issues that are identified in the logs.
3.10.5.6 Deployment Server Installation Problems
You cannot reinstall the local Oracle database using the Deployment Server installer if there are indications that the local Oracle database already exists. The Deployment Server installer will skip the installation of the local Oracle database if either of these conditions is true:
-
The local Oracle database service OracleServiceE1LOCAL is running.
-
This registry key exists:
\HKEY_LOCAL_MACHINE\SOFTWARE\Wow6432Node\ORACLE\KEY_E1Local
3.10.5.7 Runtime Problems
This section discusses:
3.10.5.7.1 Jde.log shows ORA-12541: TNS:no listener
Verify that the Oracle listener service OracleE1LocalTNSListener is running. It is possible that the service may not have started due to slow bootup of the machine.
3.10.5.7.2 User gets a pop-up window prompting for E1Local DB user and password and Jde.log shows OCI0000141 - Error - ORA-01017: invalid username/password; logon denied
Verify that the E1Local database system account password is valid. If the following command executes successfully, it means that the password is not encrypted. If so, you must encrypt the password in order to enable database access.
SQLPlus.exe system/admin@E1Local
where "admin" is the password. This password may have been set to "admin" by one of the EnterpriseOne database scripts, or it may be a plain-text word that someone set by running ReconfigureMSDE.
If the password was decrypted with ReconfigureMSDE, you should re-encrypt it using ReconfigureMSDE.exe. Refer to to the section of this guide entitled: Section 3.10.5.9, "Encrypting the Password of the Local Oracle Database".
3.10.5.7.3 tnsnames.ora
When the Deployment Server installer installs the local Oracle database (E1Local), the \bin directory is added to the start of the Windows PATH. If you have both the local Oracle database and the Oracle client installed (for example, if you are connecting to an Oracle database on a machine other than the Deployment Server), the local Oracle database version of the executables and tnsnames.ora are used. In order to maintain functionality of the Oracle client, you should add the remote database server tnsnames entries into the tnsnames.ora used by E1Local, which is located in this directory:
<OEE_installation_path>\network\admin
By default, the <OEE_installation_path> is C:\Oracle\E1Local, but the actual value is specified during OEE installation.
3.10.5.8 Administering the Local Oracle Database Using SQL Plus
The command-prompt program SQLPlus.exe and GUI program SQL Developer are provided with the installation of the local Oracle database using the Deployment Server installer. You can use either tool to access the local Oracle database where both the user and default password are the same as the tablespace name. If using SQLPlus, the command to sign into a database is:
SQLPlus.exe <user>/<password>@E1Local
For example, if the tablespace JDESY910 exists in the E1Local database, use the following to sign in:
SQLPlus.exe JDESY910/JDESY910@E1Local
3.10.5.9 Encrypting the Password of the Local Oracle Database
JD Edwards EnterpriseOne connects to the local Oracle database (E1Local) through the system account using an encrypted password. Some of the administrative database scripts on the Deployment Server decrypt this password before submitting database commands. Upon exit, such programs subsequently then re-encrypt the password. If one of these scripts fails to complete (for example, it is killed or it otherwise dies) before it can encrypt the password again, EnterpriseOne will not be able to connect to the database. You can determine if this is the case by attempting to sign into the local Oracle database using this command:
SQLPlus.exe system/admin@E1Local
where "admin" is the default password that the scripts use.
If you can sign in, the password must still be decrypted. You must re-encrypt the system account password using the following steps for EnterpriseOne to operate correctly:
-
Locate this program:
<E1_install_dir>\system\bin32\ReconfigureMSDE.exe -
Right click on
ReconfigureMSDE.exeand select Run as administrator.Tip:
Do not let the "MSDE" part of the program name mislead you. This program was originally created when EnterpriseOne supported Microsoft's MSDE database. It was not renamed when support for OEE was added. -
Be sure the E1Local database is selected.
-
Enter the "system" user's old password (in this case, enter "admin" without the quotes) in the field "Change from password…."
-
Under "To password", click on "Encrypted E1 Password."
-
Click OK.
-
Click OK.
-
Watch the status bar at the bottom of the dialog for informational messages.
-
If changing the password fails, attempt to stop and restart the database services OracleServiceE1LOCAL and OracleE1LocalTNSListener and then retry
ReconfigureMSDE.exe.
3.10.5.10 Decrypting the Password of the Local Oracle Database
To decrypt the system account password:
-
Locate this program:
<E1_install_dir>\system\bin32\ReconfigureMSDE.exe -
Right click on
ReconfigureMSDE.exeand select Run as administrator.Tip:
Do not let the "MSDE" part of the program name mislead you. This program was originally created when EnterpriseOne supported Microsoft's MSDE database. It was not renamed when support for OEE was added. -
Be sure the E1Local database is selected.
-
Under "Change from password…", click on "Encrypted E1 Password."
-
Enter the "system" user's new password in the field "To password."
-
Reenter the new password and click OK.
-
Click OK.
-
Watch the status bar at the bottom of the dialog for informational messages.
-
If changing the password fails, attempt to stop and restart the database services OracleServiceE1LOCAL and OracleE1LocalTNSListener and then retry
ReconfigureMSDE.exe.
Caution:
If you manually decrypt the system account password, ensure that you re-encrypt the password before attempting to run JD Edwards EnterpriseOne. If the password is not encrypted, JD Edwards EnterpriseOne will fail because it cannot access the local Oracle database.3.10.5.11 Import and Export Tablespaces to the Local Oracle Database
You can use the JD Edwards EnterpriseOne application P96717 to import and export tablespaces except the Planner. To import or export the Planner tablespaces, you must use scripts that are delivered with the installation of the Deployment Server. The scripts are located in this directory:
For Planner Databases:
<E1_install_dir>\planner\data
For local metadata repository database (for example, specs and serialized objects):
<E1_install_dir>\planner\spec
This section discusses:
-
Section 3.10.5.11.1, "Import Tablespace Script (attach_planner.bat)"
-
Section 3.10.5.11.2, "Export Tablespace Script (detach_planner.bat)"
3.10.5.11.1 Import Tablespace Script (attach_planner.bat)
To use the import tablespace script:
-
Navigate to the directory
JDEdwards\E910\planner\dataand run this script:TestPlannerDBs.bat -
Edit the
attach_planner.batfile such that any tablespaces that you do not intend to import are commented out. These lines start with:call %DATA_PATH%\IMPORT_TABLESPACE.BAT -
Open a command prompt window by right-clicking on a Command Prompt shortcut and selecting Run as administrator.
-
Change directory to the location of the batch files.
-
Run the batch file to import the tablespace using this syntax:
attach_planner.bat <Oracle_dir> <E1_install_dir>where
<Oracle_dir>is the parent of the E1Local directory.For example:
attach_planner.bat c:\Oracle c:\JDEdwards\E910Note:
This import batch file for the local metadata repository is in the spec directory:attach_metadata.bat
3.10.5.11.2 Export Tablespace Script (detach_planner.bat)
To use the export tablespace script:
-
Edit the
jdedwards\E910\planner\data\detach_planner.batfile such that any tablespaces that you do not intend to import are commented out. These lines start with:call %DATA_PATH%\EXPORT_TABLESPACE.BAT -
Open a command prompt window by right-clicking on a Command Prompt shortcut and selecting Run as administrator.
-
Change directory to the location of the batch files.
-
Run the batch file to import the tablespace using this syntax:
detach_planner.bat <Oracle_dir> <E1_install_dir>where
<Oracle_dir>is the parent of the E1Local directory.For example:
detach_planner.bat c:\Oracle c:\JDEdwards\E910Note:
This export batch file for the local metadata repository is in the spec directory:detach_metadata.bat
3.10.5.12 Updating the InstallManager.htm File
To install a database or the Development Client onto a Development Client machine, the user runs this program:
\\<deployment server name>\<release>\OneWorld Client Install\InstallManager.exe
This program displays a Graphical User Interface that provides several options for the user to perform. The options that InstallManager.exe displays are read from the file InstallManager.htm that resides in the same directory as InstallManager.exe.
The JD Edwards EnterpriseOne administrator can edit this file to rename the options or to add new options. Instructions are inside the file.
Caution:
AlthoughInstallManager.htm is in HTML format, it is a restricted HTML that the InstallManager.exe can read. Some text file editing programs add extraneous HTML tags that InstallManager.exe cannot recognize.
The Microsoft Windows program Notepad.exe is an example of a program that is known to not add these extra tags, making it safe to use. Before you make any changes to the file, it is good practice to save a copy in case any changes that you make are not recognized by InstallManager.exe when it reads it.
Note that the installation path of the Development Client's installer (setup.exe) changed with Tools Release 9.1. This means that you will need to change the path of the Development Client's installer in the InstallManager.htm when you first install Tools Release 9.1 onto a Deployment Server that has a tools release prior to 9.1 installed.
The following is an example of a line in a pre-9.1 InstallManager.htm that creates the link to install the Development Client (this should be on a single line):
<a class="sectionItem" id="LaunchLink" link="setup.exe" href="InstallManager.htm">EnterpriseOne Client</a>
The Development Client's installer prior to Tools Release 9.1 is called setup.exe. It should be in the same directory as InstallManager.exe and InstallManager.htm. The value of the link in the above line should be a path and executable for the installer. If a relative path is used (for example, the path starts with neither a drive letter followed by a colon nor a backslash), the path is relative to the location of InstallManager.exe. If no path is given, Setup.exe and InstallManager.exe are in the same directory.
Here is an example of a similar line for Tools Release 9.1 (this should be on a single line):
<a class="sectionItem" id="LaunchLink" link="install\setup.exe" href="InstallManager.htm">EnterpriseOne Client</a>
Note the addition of this relative path: install. With Tools Release 9.1, the Development Client's installer (which, is also called setup.exe) is now located in a subdirectory called install under the path where InstallManager.exe resides.
3.10.5.13 Deployment.inf and <Package_name>.inf
The following lists specific settings within the Deployment.inf and <Package_name>.inf for OEE.
-
Deployment.inf[ThirdPartyApps]ORACLE=ThirdParty\ORACLE\OEESetup.exe,
-
<Package_name>.inf(example from aDV910FA.inffile)[Oracle Databases] JDELocal_DV910=ORACLE SPEC_DV910FA=ORACLE [JDELocal_DV910] SourceTableSpace=JDELocal Server=127.0.0.1 UserID=SYSTEM DataFileDestDir=$DDV910DATA\JDELocal_DV910.dbf DumpFileDestDir=$DDV910DATA\JDELocal_DV910.dmp [SPEC_DV910FA] SourceTableSpace=SPEC_DV910FA Server=127.0.0.1 UserID=SYSTEM DataFileDestDir=$DDV910\Spec\SPEC_DV910FA.dbf LogFileDestDir=$DDV910\Spec\SPEC_DV910FA.dmp