A Generating JD Edwards EnterpriseOne Serialized Objects
Note:
To generate objects using an Release 9.1 application server, you must use JDK Version 1.6 on the client machine. Additionally, you must modify thegen_oas.bat file on the client machine to point to the location of your JDK Version 1.6.Starting with application release 8.12, JD Edwards EnterpriseOne specs are delivered in XML format, which allows for on-demand generation of serialized objects from these XML specs. Objects are now automatically generated when the first user accesses an application, and the only objects not automatically generated are FDA-created portlets.
Note:
If you are running JD Edwards EnterpriseOne application version 8.9, 8.10, 8.11, or 8.11 SP1 with the 8.96 Tools Release, refer to the 8.95 version of the guide to install and configure eGenerator. The tasks described in this appendix are only valid for the JD Edwards EnterpriseOne 8.12 application.eGenerator can still be used to manually generate serialized objects. It is the only method for generating FDA-created portlets, so is required if you installed a JD Edwards EnterpriseOne Portal. eGenerator is also an optional path for generating any set of objects, including a complete set of objects.
The eGenerator allows manual control over the process that turns JD Edwards EnterpriseOne specifications into Java code, which enables you to access JD Edwards EnterpriseOne applications in HTML. The JD Edwards EnterpriseOne forms and applications that you generate, either manually from eGenerator, or automatically using on-demand generation, are serialized Java objects. JD Edwards EnterpriseOne stores these objects in a database (in serialized object tables F989998 & F989999), and retrieves them at runtime.
eGenerator requires a specific machine configuration. While it is possible to configure a web server as the generation machine for release 8.12, you should dedicate a separate generation machine for this process. The configuration of this machine depends on the release of JD Edwards EnterpriseOne you installed.
For a list of all requirements for the generation machine, refer to Chapter 1, "Accessing Certifications (formerly Minimum Technical Requirements)" in this guide.
If you upgraded to JD Edwards EnterpriseOne from a previous release and customized your JD Edwards EnterpriseOne objects, you should first test your custom modifications, then generate serialized JAS objects from the upgraded path code.
Complete the tasks below to install eGenerator and generate JD Edwards EnterpriseOne JAS objects from a set of JD Edwards EnterpriseOne objects.
-
Section A.7, "Generating a List of Objects (Bulk Generation)"
-
Section A.9, "Generating Other Selected Objects Using JD Edwards EnterpriseOne 8.12"
A.1 Installing eGenerator
This section discusses the tasks you follow to install the eGenerator:
-
Section A.1.2, "Installing the Generator Program (JD Edwards EnterpriseOne 8.9 only)"
-
Section A.1.3, "Preparing JD Edwards EnterpriseOne for Serialized Objects"
A.1.1 Prerequisites
Before you install the eGenerator, verify that the tasks below are completed for your version of JD Edwards EnterpriseOne:
-
Tasks for JD Edwards EnterpriseOne 8.9:
-
Install a JD Edwards EnterpriseOne client that is running at the same Tools Release level as the HTML Server. For instructions on installing a JD Edwards EnterpriseOne client, see the JD Edwards EnterpriseOne Development Client Installation Guide.
Note:
Make sure you install an appropriate database client for your JD Edwards EnterpriseOne client. -
The Web Development client cannot be installed using JD Edwards EnterpriseOne 8.9. Instead, complete the task below, Section A.1.2, "Installing the Generator Program (JD Edwards EnterpriseOne 8.9 only)", to configure the JD Edwards EnterpriseOne client.
-
-
Tasks for JD Edwards EnterpriseOne 8.10, 8.11, and 8.11 SP1:
-
Complete the task: "Copying the JDBC Drivers and the tnsnames.ora file to the Deployment Server" in the JD Edwards EnterpriseOne Development Client Installation Guide.
Caution:
This task must be completed by a JD Edwards EnterpriseOne system administrator before you complete any of the tasks below. -
Install the Web Development Client to set up eGenerator.
If the Web Development Client installs successfully, eGenerator is automatically configured to run without modifying any of the files used in the generation process.
Refer to the JD Edwards EnterpriseOne Development Client Installation Guide for instructions to install the Web Development Client.
-
-
Secondary tasks for all JD Edwards EnterpriseOne releases:
-
Complete this task if you are using DB2 UDB on the Enterprise Server.
On the Generation machine, open the
db2cli.inifile and comment out or remove the LobCachSize parameters under database aliases associated with JD Edwards EnterpriseOne. This file is typically located underDB_HOME\SQLLIB\.
-
A.1.2 Installing the Generator Program (JD Edwards EnterpriseOne 8.9 only)
Complete this task to install and configure the generator program on the generation machine. If you are using JD Edwards EnterpriseOne 8.10, 8.11, or 8.11 SP1, skip this task.
To install the generator program
-
On the generation machine, open Microsoft Windows Explorer and navigate to this directory on the Deployment Server:
\\<deployment_server>\EnterpriseOne\OneWorld Client Install\Third Party\WebDevFeature -
Run the
OH4A_setup.exefile.The program runs automatically and complete the installation with no input from the installer.
-
From Microsoft Windows Explorer, navigate to this directory on the generation machine:
x:\B9\system\OC4J\j2ee\home\applications\webclient.ear\webclient -
Open
gen_oas.batin a text editor. -
Replace this line in the
gen_oas.batfile:set JAVA_PGM=C:\B9\system\JRE\1.4\bin\java.exe
with this line:
set JAVA_PGM=<WebSphere Install Location>\AppServer\java\bin\java.exewhere <WebSphere Install Location> is the location where WebSphere is installed.
-
Replace this line in the
gen_oas.batfile:set GEN_CLASSPATH=%GEN_CLASSPATH%;%J2EE_HOME_LIB%\servlet.jar
with these three lines:
set GEN_CLASSPATH=%GEN_CLASSPATH%;<WebSphere Install Location>\AppServer\lib\j2ee.jar
set GEN_CLASSPATH=%GEN_CLASSPATH%;<WebSphere Install Location>\AppServer\lib\xalan.jar
set GEN_CLASSPATH=%GEN_CLASSPATH%;<WebSphere Install Location>\AppServer\lib\xerces.jar
-
Save the changes to the
gen_oas.batfile.
A.1.3 Preparing JD Edwards EnterpriseOne for Serialized Objects
Before you generate serialized Java objects in JD Edwards EnterpriseOne, complete this task to link to the JD Edwards EnterpriseOne serialized object tables on the Java generation machine.
Complete this task to configure the [JDBj-SPECDATASOURCE] section of the jdbj.ini file to point to the JD Edwards EnterpriseOne serialized object tables. If this file does not point to the correct database, you cannot access the JD Edwards EnterpriseOne serialized object tables. Alternately, you can comment out this section. If the [JDBj-SPECDATASOURCE] section is commented out or deleted from the jdbj.ini file, the HTML Server uses the Object Configuration Manager (OCM) to access the serialized object tables.
To link to the JD Edwards EnterpriseOne server database:
-
Using a text editor, open the
jdbj.inifile located in the following directory:<JAS_HOME>\EA_JAS_80.ear\webclient.war\WEB-INF\ -
Modify the
[JDBj-SPECDATASOURCE]section of thejdbj.inifile to point to the JD Edwards EnterpriseOne database server containing the serialized object tables, or comment out this section to use the OCM to access these tables. -
Save the
jdbj.inifile.
A.2 Logging In
Using eGenerator, you can generate JD Edwards EnterpriseOne objects in one of these ways:
Each method of generation has a specific way to log into eGenerator. Select the task that corresponds to the way you want to generate objects.
A.2.1 Running the eGenerator Diagnostic Tool
eGenerator now includes an application that is automatically launched every time eGenerator is started. This application is a diagnostic tool that checks the configuration of eGenerator and reports incorrect settings. The diagnostic tool categorizes errors into two types: fatal and non-fatal. If a fatal error is detected, the application displays an error message and does not enable eGenerator to launch. If a non-fatal error is detected, the application displays an error message but enables you to continue with the Generation process.
Note:
The auto diagnostic tool can be suppressed by launchinggen.bat with the -nodiag parameter.The auto diagnostic tool performs these operations for general use:
The auto diagnostic tool performs these operations for general use for Direct Generation:
| Operation | Fatal Error |
|---|---|
| Generates a Web Code Level Object, which is used by JAS at startup to determine if its code matches the generated objects. | X |
Checks the location of the jas.ini file and validates these key parameters in the file. |
|
| Checks the location of the location of the jas logs. |
| Operation | Fatal Error |
|---|---|
| Verifies that the Tools Release of the JAS code on the generation machine matches the Tools Release of the JAS code on the HTML Server (fatal error). | X |
A.2.2 Generate to the Web Server
Complete this task if you want to generate objects to the web server. If you want to bypass the Web server and generate objects directly to a database, skip this task and complete the next task below.
To generate to the web server
-
On your generation machine, select your configuration below, navigate to the corresponding directory, and run the
launchGen.batfile in that directory:-
For JD Edwards EnterpriseOne 8.10, 8.11, or 8.11 SP1 running WebSphere:
x:\<release>\JAS -
For JD Edwards EnterpriseOne 8.9 (either application server)
x:\<release>\system\OC4J
Note:
If you do not want to run the diagnostic program, include the parameter-nodiagin the command statement when you runlaunchGen.bat. See the section, Section A.2.1, "Running the eGenerator Diagnostic Tool", for more information about the autodiagnostic tool. -
-
On JD Edwards EnterpriseOne Sign On, log on to a Java environment in JD Edwards EnterpriseOne (for example, JPY900).
Tip:
After you click OK to log on to a JD Edwards EnterpriseOne environment, it can take up to 2 minutes for JD Edwards EnterpriseOne to complete the log on process.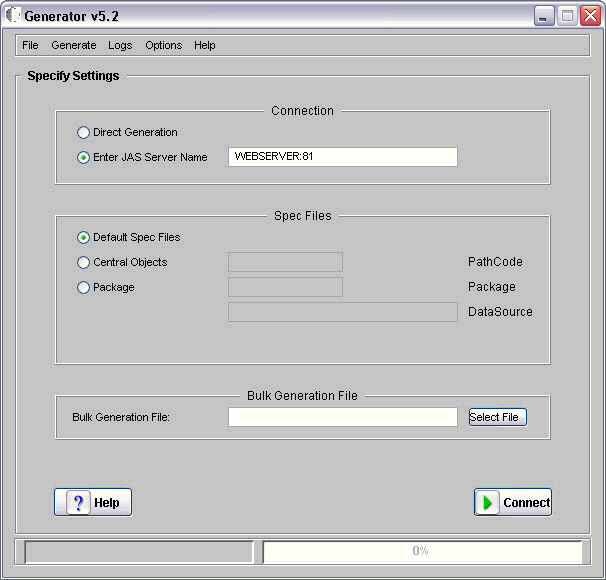
-
On Generator, complete this field:
-
JAS Server NameEnter
machine name:port, where machine name is the name of your web server and port is the port number for the EnterpriseOne instance.eGenerator generates all objects to this Web server.
-
-
Select where the specs exist for generation. You can generate specs from a specific set of Central Objects or a particular path code. By default,
Default Spec Fileswill be used. Default Spec Files reside on the local machine.Choose one of the following options:
-
To generate specs from a particular set of Central Objects:
Click the
Central Objectsradio button, and enter thePath Codewhere the specs are stored.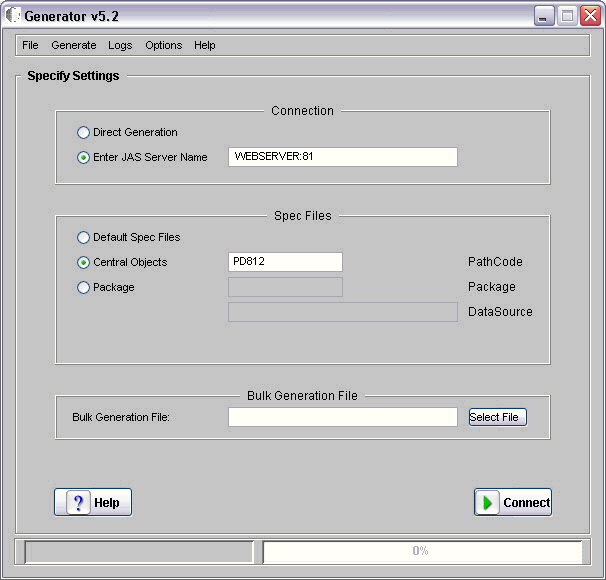
-
To generate specs from a specific package:
Click the
Packageradio button, and enter the name of thePackageand theDataSourcewhere the specs are stored.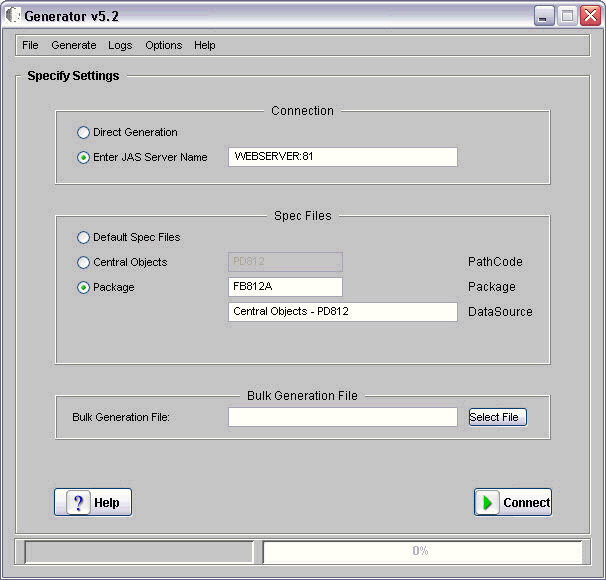
-
-
Click Connect.
The system connects to the Web server that you indicated. A message appears on the status bar when login is complete.
Once you have logged in to a Web server, skip the following task and refer to the sections below it for information on how to generate objects.
A.2.3 Bypass the Web Server and Generate Serialized Objects Directly to the Serialized Object Tables
Select direct generation by clicking the Direct Generation radio button in the Connection section on the eGenerator application.
In this mode, the generator initializes a "mini" JAS Server instance on the generation machine. During generation, the generator will by-pass the actual JAS Server and store the objects directly to the serialized object tables. After you complete this task, you can set up the HTML Server to read from the pre-populated serialized object tables.
Advantages:
-
Can generate objects before setting up the HTML Server.
-
Faster for all forms of generation.
-
Easier to maintain.
Disadvantages: You have to configure the generation machine.
Complete this task to generate objects directly to a database.
To generate objects directly to a database
-
Run
launchGen.bat.Note:
If you do not want to run the diagnostic program, include the parameter-nodiagin the command statement when you runlaunchGen.bat. See the section, Section A.2.1, "Running the eGenerator Diagnostic Tool", for more information about the autodiagnostic tool. -
On JD Edwards EnterpriseOne Sign On, log in to a Java environment (for example, JPY9).
-
Click the Direct Generation radio button.
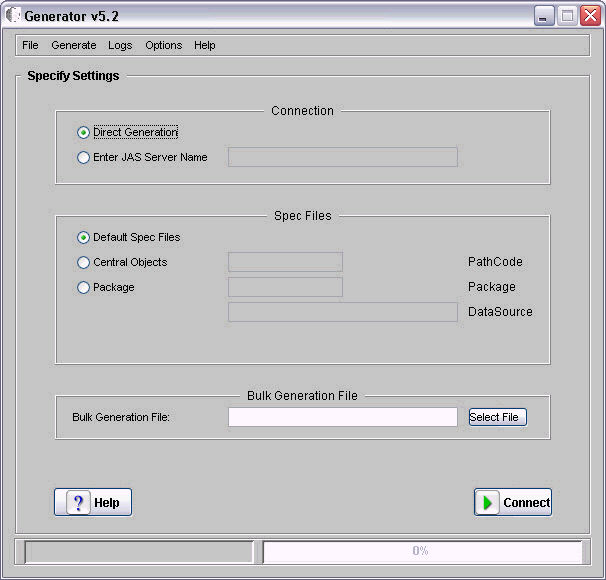
In Direct Generation Mode the eGenerator locates the serialized object database by looking for the database server in the
server=setting of theJDBj-SPEC DATA SOURCEsection of thejdbj.inifile located on the generation machine. -
Click Connect.
The system bypasses the Web server and connects directly to the database specified in the
jdbj.inifile.
A.3 Configuring eGenerator
eGenerator includes a number of options you can set up for your particular environment. The configuration process consists of these tasks:
A.3.1 Setting eGenerator Options
Before generating objects, you can define a variety of parameters that affect how the eGenerator functions.
To set eGenerator options
-
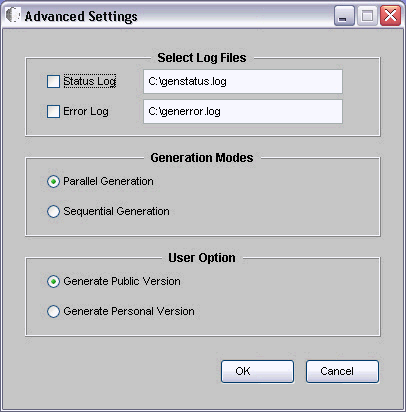
From the pull-down menu, select OptionsAdvanced Settings.
-
On Advanced Settings, select the options appropriate for your generation requirements
-
Logging
Specify whether to log the generation process by clicking the check boxes next to the Status and Error logs. You can also enter the location of the log files. Logging is crucial for troubleshooting problems with the generation process.
-
Generation Modes
Specify if the generation of All Objects will be done in parallel mode or sequential mode by checking the appropriate radio button.
For more information on Generation Modes, see Section A.3.1.1, "Generation Modes".
-
User Option
You can generate a public version of the applications or a personal version by choosing the relevant option. Personal versions are only available to the person who created the versions, and are only intended for developers.
-
A.3.1.1 Generation Modes
The eGenerator has these modes for generating web objects:
A.3.1.1.1 Sequential Generation
In this mode the web objects are generated one after the other when you select the Generate-All Objects option. You can set this mode by clicking OptionsAdvanced Settings, then clicking Sequential Generation.
Advantages:
-
Most stable mode of generation.
-
Requires the least system resources, e.g. memory.
-
Safe to use during a JITI (Just in Time Install) process.
Disadvantage: The generation process can take longer.
A.3.1.1.2 Parallel Generation
This is the default mode of generation. You can turn off this mode of generation by clicking Advanced Settings, then clicking Sequential Generation.
In this mode of generation the web objects are generated concurrently when you select the Generate-All Objects option
Advantage: Faster than Sequential Generation, especially with multi-processor workstations and fast database connections.
Disadvantages:
-
Cannot be used when the user doesn't have the full set of spec files, because JITI might occur.
-
If a JITI occurs during parallel generation, the spec files can get corrupted.
A.3.2 Choosing Languages
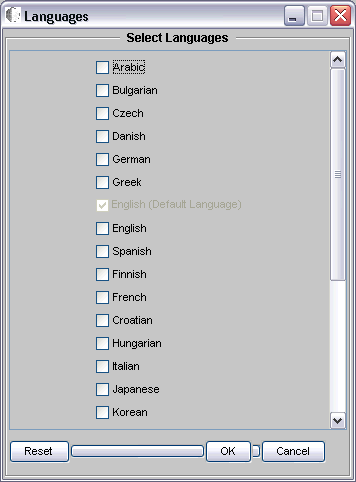
You can generate applications and reports in the language you desire by selecting any of the supported languages on the eGenerator application.
Note:
You must install the Language CD for each language you want to use.To select languages
-
On eGenerator, select OptionsLanguages from the pull-down menu.
-
Click the check box next to each of the languages you want to use.
-
Click OK.
A.3.3 Configuring the genapp.ini File
The genapp.ini file contains the list of applications that you want generated in a mode other than the default mode, which is mode 1. In the genapp.ini file, you can list applications you want generated in one of the other modes: Mode 2 or Mode 3.
Do not modify this file unless you created custom applications using Mode 2 or Mode 3.
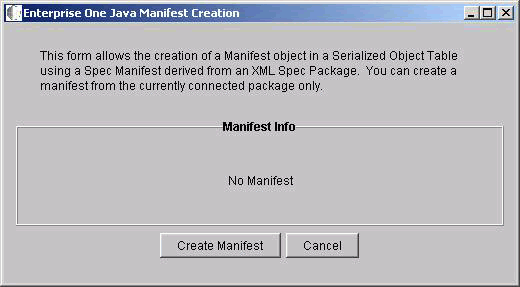
A.4 Generating the Serialized Object Manifest
The section describes how to generate the manifest for the set of objects in the serialized object tables. For an overview of the serialized object manifest and a description of the package discovery process, refer to Chapter 10, "Understanding EnterpriseOne HTML Server Package Discovery".
To generate serialized object manifests
-
From the pull-down menu, select GenerateManifest.
-
Click Create Manifest.
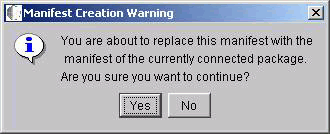
-
Click Yes.
The program creates the manifest and closes the window.
-
To view the manifest that was created, from the pull down menu, select GenerateManifest.
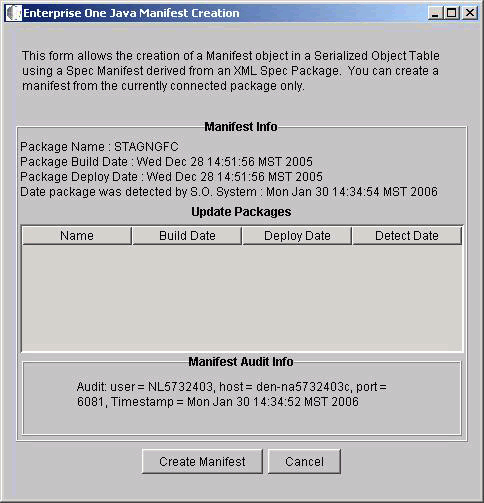
The Manifest Info section displays the name of the package, the build date, and the deployment date. This manifest shows that no update packages were deployed.
The
Manifest Audit Infofield contains information about the user and the machine that created the manifest.
A.5 Generating an FDA-Created Portlet
You can create Portlets using EnterpriseOne Form Design Aid. Before these portlets can be used by the portal server, you must manually generate them from eGenerator.
To generate a FDA-created portlet
-
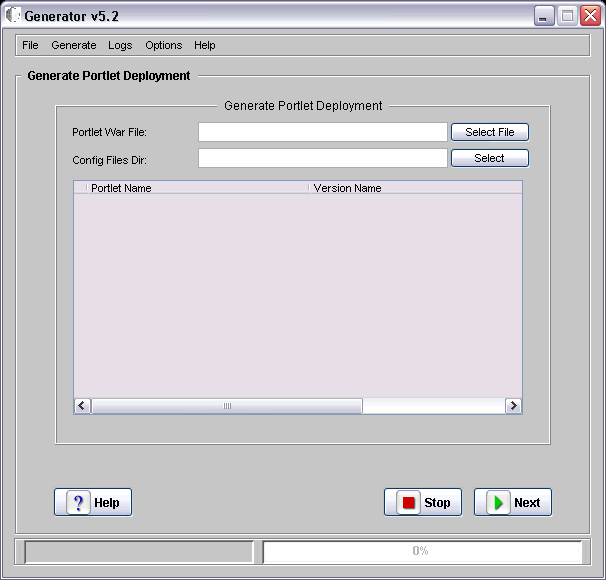
On eGenerator, select GeneratePortlet Deployment.
-
Select the
.warfile that you want to generate.Typically, the
.warfile for the local version of Collaborative Portal resides inC:\B9\system\Generator\WebClient_Portal.war.eGenerator reads the local specifications for JD Edwards EnterpriseOne and lists all portlets it discovers.
-
Select the version you want to generate.
eGenerator creates a new portlet descriptor file and bundles it into a new
WebClient_Portal.warfile.Note:
For an overview of portlet creation and deployment, see Generating Portlets for Collaborative Portal in the JD Edwards EnterpriseOne Tools 8.98 Development Tools: Form Design Aid Guide. -
Clear the check box next to any portlet that you do not want to generate, and click Start.
If multiple versions of an application exist, each version is listed.
A.6 Generating All Standard Serialized Objects
eGenerator can generate a complete set of Java Serialized Objects from JD Edwards EnterpriseOne objects. These serialized objects enable you access to all JD Edwards EnterpriseOne objects when you run your web server. If, however, you only want to generate a partial set of objects, skip this task and complete the relevant task in the section: Section A.9, "Generating Other Selected Objects Using JD Edwards EnterpriseOne 8.12".
Complete this task to generate a complete set of JD Edwards EnterpriseOne objects.
To generate all JD Edwards EnterpriseOne objects
-
From the pull-down menu, select FileCore Objects.
For more information on generating core objects, see Section A.9.1, "Generating Core Objects".
-
If the core objects generate successfully, from the pull-down menu, select GenerateAll Objects .
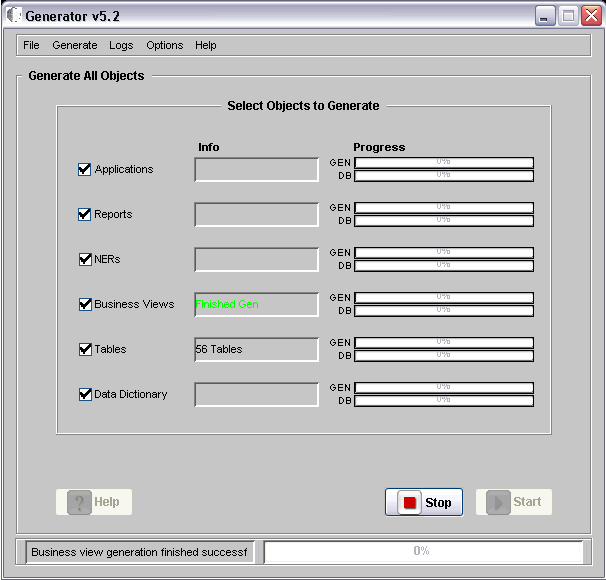
-
On Generate All Objects, check all the objects listed.
-
Click Start.
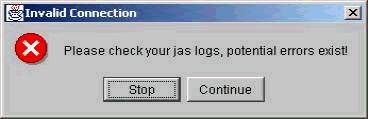
eGenerator checks the database connection before it attempts to generate objects.
If it cannot connect to the database, eGenerator displays this screen:
-
If this screen displays, click Stop and verify the connection to the database.
-
If the last Generate-All session did not conclude successfully, eGenerator displays a screen with the details of the failed generation.
Select one of these options:
-
To resume the previous generation process, click RESUME OLD SESSION. You should select this option, which restarts the previous process from the point of failure. Once the previous process completes, you can repeat this task to generate the new set of objects.
-
To cancel the previous generation process and generate the new objects, click CREATE NEW SESSION.
Select this option if you are currently generating a complete new set of all object types.
In either case, an object set starts generating. The progress of object generation is displayed on the screen: the blue progress bar indicates the progress of the generation process, and the green progress bar indicates the progress of objects inserted into the database.
If the database insertion of objects is not complete when the generation is done, the eGenerator displays the number of objects remaining in the queue.
Once all the objects are inserted into the database, the program displays a message that the "Generation completed successfully."
-
A.7 Generating a List of Objects (Bulk Generation)
If you are running EnterpriseOne release 812, the JAS servers generates objects on demand. To reduce the performance impact of on-demand generation, you can manually generate a list of the most frequently used applications from a list defined in a text file, and let other applications or reports to be generated on demand.
A sample text file named BulkGen.txt is included with the HTML Server or Web Development Client under the WEB-INF directory. This file contains sample entries in the format that can be read by the eGenerator. Modify this file to include just the large, frequently used applications.
To run the bulk generation file
-
Run
launchGen.bat. -
On eGenerator, complete this field:
-
Bulk Generation File: Enter the name of the file, or click Select File, and select the Bulk Generation File.
It may take some time for the system to connect to the file.
-
-
Select a
Connectionoption (eitherDirect GenerationorJAS Server). -
Select
Default Spec Files. -
Click Connect.
-
Log on to JD Edwards EnterpriseOne and click OK.
-
From the pull-down menu at the top of the screen, select FileBulk Generation.
-
Click Start.
eGenerator will generate all the objects listed in the file you selected. When the process is complete, eGenerator displays a message:
Generation Completed Successfully.
Tip:
The update package build generates aGeneratorList.txt file in the work directory of the package. The GeneratorList.txt file is a well formed bulk generation file that lists the objects included in the update package. You can use this file for Bulk Generation after deploying the update package.A.8 Verifying the Generation Process
Complete these tasks to verify the generation is successful:
A.8.1 Checking Log Files
eGenerator enables you to automatically display the Status Log and Error Log files by selecting these options from a menu.
To display the Status Log
-
On eGenerator, select LogsStatus Log from the pull-down menu.
To display the Error Log
-
On Generator, select LogsError Log from the pull-down menu.
A.8.2 Checking Database Acknowledgements
The status log records whether an object is successfully inserted in the database. This enables the user to monitor the generation process and verify that objects are successfully generated.
These acknowledgments will not be printed for data dictionary Items or Data Structures, however, because they are too numerous to be printed on the command line screen.
Below is an example of the output:
Generating application P01012 ...
-->Database Ack:ER_P01012_W01012D successfully inserted into database
-->Database Ack:P01012_HTML_W01012D successfully inserted into database
-->Database Ack:ER_P01012_W01012B successfully inserted into database
-->Database Ack:P01012_HTML_W01012B successfully inserted into database
-->Database Ack:ER_P01012_W01012A successfully inserted into database
-->Database Ack:P01012_HTML_W01012A successfully inserted into database App
generation finished Generating 2 NERs -->Database Ack: ER_P01012_W01012C
successfully inserted into database -->Database Ack: P01012_HTML_W01012C
successfully inserted into database -->Database Ack: NER_PlugAndPlay_P0101
successfully inserted into database NER generation finished Generating 1 PO
Data Structure Items PO Data Structure generation finished Generating 2
Business Views Business View generation finished Generating 5 Tables Table
generation finished Generating 294 Data Dictionary Items Data Dictionary
generation finished Generating 30 Data Structure Items Data Structure
generation finished -->Database Ack:NER_UpdateChangedGeoCode successfully
inserted into database -->Database Ack: PODATAP01012 successfully inserted
into database -->Database Ack:VIEW_V0101E successfully inserted into
database -->Database Ack: TABLE_F0101 successfully inserted into database
-->Database Ack: TABLE_F0111 successfully inserted into database
-->Database Ack: TABLE_F0116 successfully inserted into database
-->Database Ack: TABLE_F03012successfully inserted into database
-->Database Ack: TABLE_F0401 successfully inserted into database
A.9 Generating Other Selected Objects Using JD Edwards EnterpriseOne 8.12
When you deploy an update package of JD Edwards EnterpriseOne objects, you can either depend on the on-demand feature of the HTML Server to generate serialized objects, or you can manually generate selected objects using eGenerator. eGenerator includes several methods of generating a partial set of serialized objects. All but one method, "Generating objects using the Bulk Generation File," are performed by selecting options from the eGenerator screen. The Bulk Generation file enables you to type selected objects directly into a text file and run this file in eGenerator.
Complete one of these tasks to generate a partial set of serialized objects.
A.9.1 Generating Core Objects
The core objects are the foundation objects required by other JD Edwards EnterpriseOne components. Generating these objects enables the Java server to run Task Explorer and the Portal without installing specific applications.
To generate core objects
-
On eGenerator, select FileCoreObjects from the pull-down menu.
eGenerator begins generating the core objects and their dependent Data Dictionary Items.
The eGenerator displays the status of the generation once the process is complete.
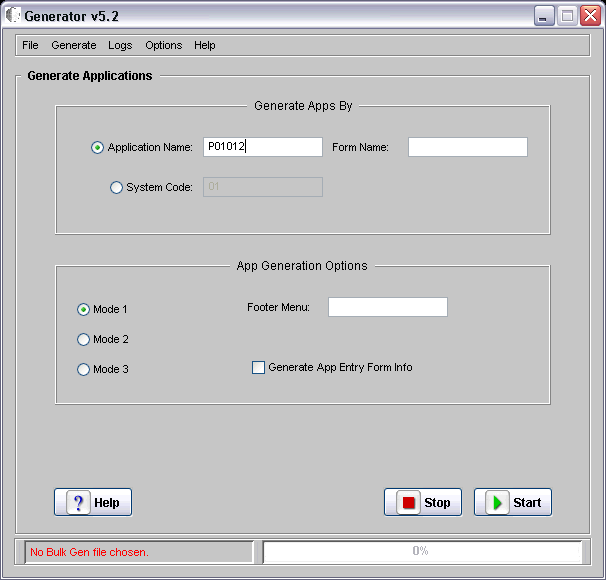
A.9.2 Generating Applications
Complete one of these tasks to generate one or more applications:
-
From the pull-down menu, select Generate -> Applications.
-
Select
Application Name, and enter the program number of the application (for example, P01012). -
Click Start.
The Generator generates all forms contained in the application and all dependent objects used by the application.
-
Check the Status Log for status of generation.
To generate applications by system code
-
From the pull-down menu, select Generate ->Application.
-
Select
Generate by System Code, and type the number of the System Code in the field to the right.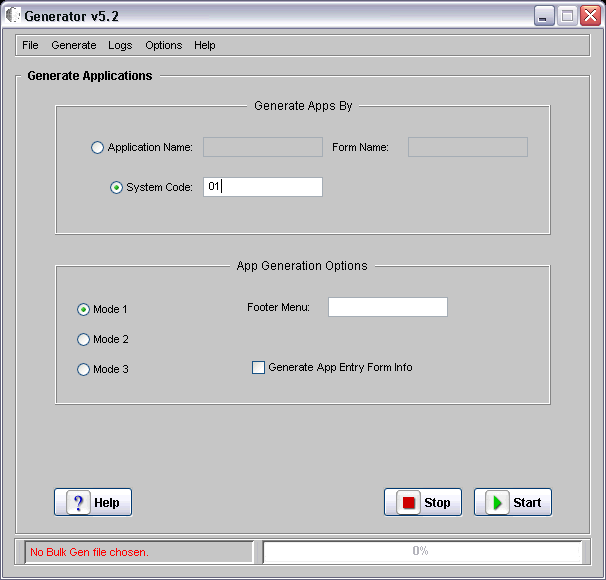
-
Click Start.
eGenerator fetches all the applications under that system code.
-
Confirm the applications were generated by checking the status and error logs.
-
Use this SQL command to verify the applications reside in the database:
SQL>
select wboid from f989999 where wboid like 'P%W%';
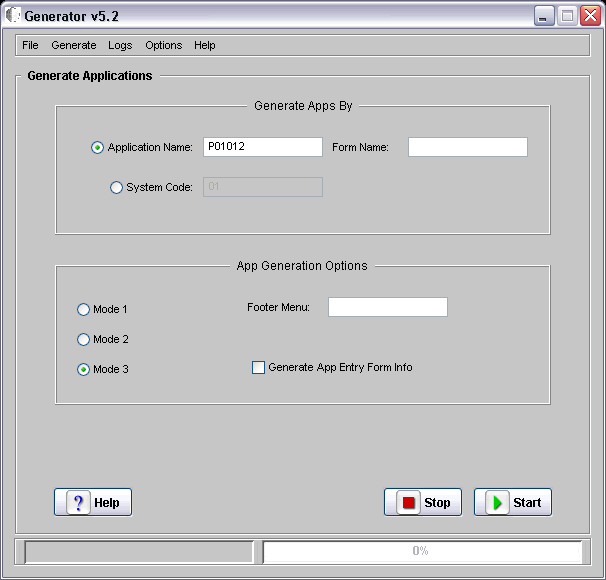
You can generate applications by modes 1, 2 or 3. These modes determine the look and feel of the applications. For more information on Generation Modes, see the section "Generating Options" in Designing JD Edwards EnterpriseOne Web Applications.
To generate applications by mode
-
From the pull-down menu, select Generate -> Application.
-
Select a mode.
-
Click
Application Name, and enter the name of an application (for example, P01012). -
Click Start.
A.9.3 Generating Forms
To generate a form
-
From the pull-down menu, select GenerateApplications.
-
Enter the form name in the
Form Namefield, for example, P01012_W01012A. -
Click Start.
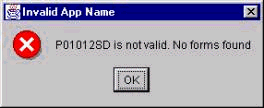
If the form name is invalid, this error message appears:
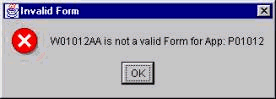
If the application name is invalid, this error message appears:
-
Check the status log for the generation status.
A.9.4 Generating Reports
Complete one of these tasks to generate one or more reports:
-
From the pull-down menu, select Generate -> Reports.
-
Enter the name of a report, (for example, R0006P).
-
Click Start.
-
Check the status log for the generation status.
The Generator generates all versions of the report and their corresponding data selection, data sequencing, and Print Information Objects.
-
Confirm the presence of the objects by checking the Status logs, or use this query to check the database:
SQL>
select wboid from f989999 where wboid like '%<report_name>%';
-
From the pull-down menu, select Generate -> Reports.
-
Enter a Report Name and Report Version, for example, R0006P, and XJDE0001.
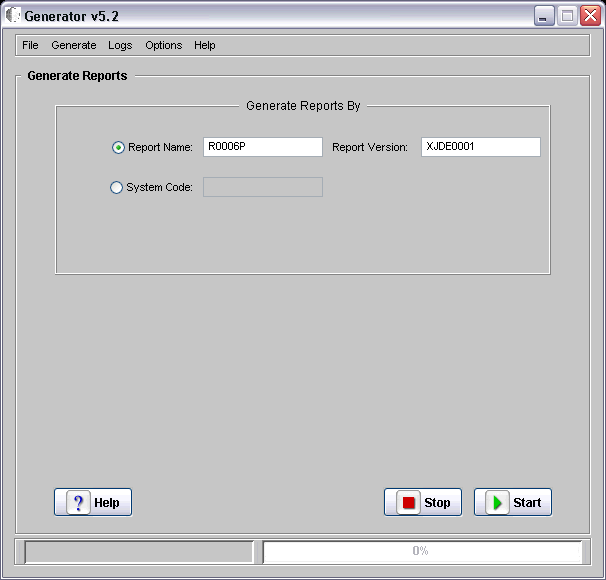
-
Click Start.
The Generator generates the version and any dependent objects.
-
Check the status log for the generation status.
To generate reports by system code
-
From the pull-down menu, select Generate ->Reports.
-
Select
Generate by System Code, and enter a number for the code. -
Click Start.
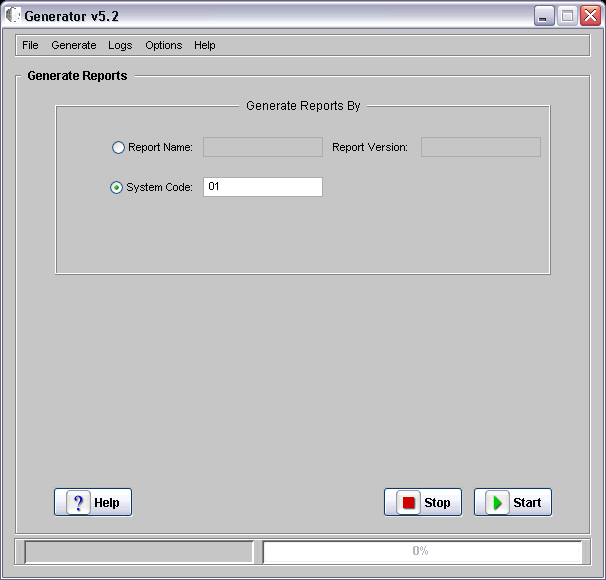
eGenerator fetches all the reports under that system code.
-
Check the status and error logs to confirm that all the reports for that system code were generated.
A.9.5 Generating NERs
To generate NERs
-
From the pull-down menu, select GenerateNERs.
-
Enter the name of an NER, for example, GetObjectDesc.
Note:
NERs are case sensitive.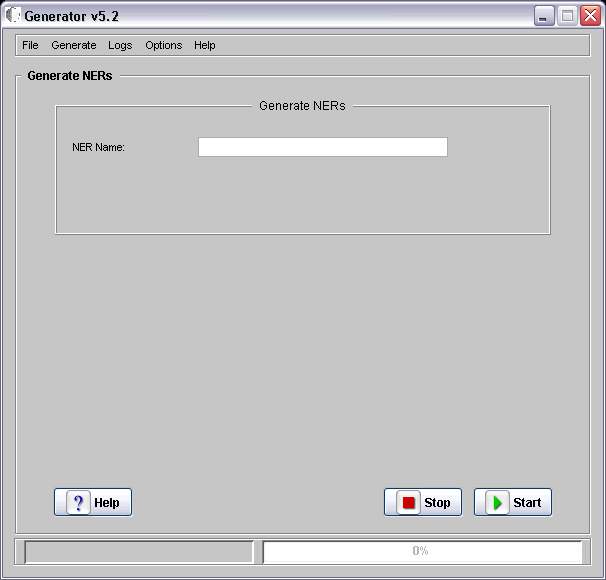
-
Click Start.
-
Check the status log for the generation status.
-
Use this SQL command to verify that the objects reside in the database.
SQL>
select wboid from f989999 where wboid like '<NER_ name>'
A.9.6 Generating Data Dictionary Items
To generate Data Dictionary items
-
From the pull-down menu, select Generate -> Data Dictionary.
-
Generate any data dictionary item, for example, OBNM.
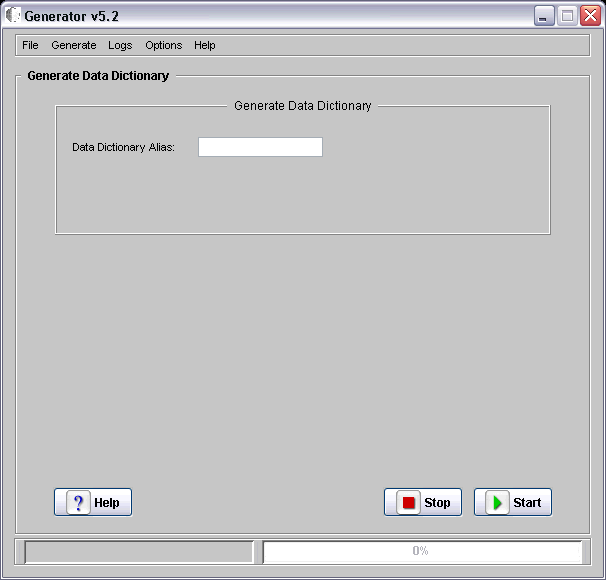
-
Check the status log for the generation status.
-
Use this SQL command to verify that the objects reside in the database.
SQL>
select wboid from f989999 where wboid like 'DICT_<dd_name>';
A.9.7 Generating Tables
To generate tables
-
From the pull-down menu, select Generate -> Tables.
-
Enter a table number, for example, F9860.

-
Click Start.
eGenerator generates the table and all data dictionary items used by the table.
-
Check the status log for the generation status.
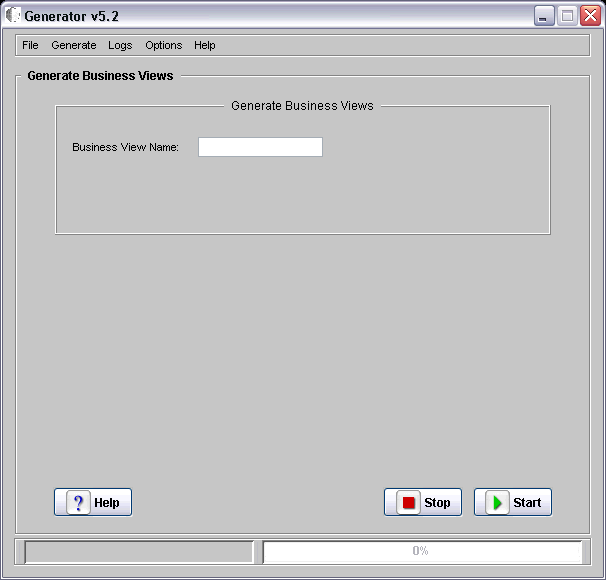
A.9.8 Generating Business Views
To generate business views
-
From the pull-down menu, select Generate -> Business Views.
-
Enter the name of a business view, for example, e.g. V9001B.
-
Click Start.
eGenerator generates the View and all associated tables and data dictionary items.
-
Check the status log for the generation status.
A.9.9 Generating Data Structures
To generate data structures
-
From the pull-down menu, select Generate -> Data Structures.
-
Enter the name of a data structure, for example, D9800150C.
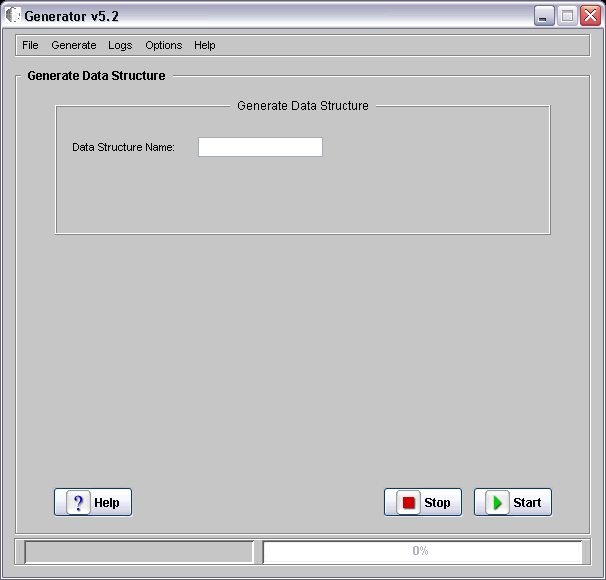
-
Click Start.
eGenerator generates the data structure.
-
Check the status log for the generation status.
-
Use this SQL command to verify that the objects reside in the database:
SQL> select wboid from f989999 where wboid like 'DSTR_ <datastructure_name>'