4 Installing and Configuring WebSphere 7.0
Note:
This guide refers to the current IBM hardware and software systems, where the IBM hardware is Power Systems and the operating system is IBM i. Except where specifically noted, in this guide the term "IBM i" refers to both the current and legacy IBM hardware and software products identified in the JD Edwards EnterpriseOne Certifications, including iSeries, AS/400, and OS/400.Complete these tasks to install and configure WebSphere:
4.1 Determining the Installation Scenario
Below are two scenarios for installing WebSphere 7.0 on the HTML Server:
Complete the installation tasks for the scenario that matches your configuration.
4.1.1 Single Machine Scenario
Complete the tasks in this scenario if you have only one machine running the Application Server. The JD Edwards EnterpriseOne Web Server can be on the same machine as the Application Server or on a separate machine.
| Task | Reference Section |
|---|---|
| Installing WebSphere 7.0 Application Server | Section 4.2, "Installing WebSphere 7.0" |
4.1.2 Multimachine Scenario
Complete the tasks in this scenario if you have multiple machines running the Application Server and one machine running the Deployment Manager.
| Task | Reference Section |
|---|---|
| Follow the task list in the Single Machine Scenario to install the Application Server on other machines. | Section 4.2, "Installing WebSphere 7.0" |
| Create a Profile | Creating a ProfileSection 4.2.5, "Creating a Profile (Optional)" |
Note:
To make the Deployment Manager aware of the Application Servers, you must add nodes to the Deployment Manager. See the Network Deployment Guide for JD Edwards EnterpriseOne for specific information about this task.4.2 Installing WebSphere 7.0
Complete the relevant tasks in this section to install WebSphere 7.0. Do not complete all of these tasks. Instead, determine which of the above scenarios you want to implement, and complete only the tasks listed for that scenario.
4.2.1 Installing WebSphere 7.0
Complete the tasks below to install the WebSphere 7.0 Application Server. You must complete all of these tasks for the WebSphere Application Server to run correctly.
Select one of the following two methods to install WebSphere 7.0 on an IBM i machine:
-
Section 4.2.1.1, "Installing WebSphere 7.0 from a workstation (recommended)"
-
Section 4.2.1.2, "Installing the WebSphere 7.0 directly from an IBM i Machine (Not Recommended)"
4.2.1.1 Installing WebSphere 7.0 from a workstation (recommended)
Note:
The procedures shown are using the Network Deployment version of WebSphere. Although functionally equivalent for purposes of installation, if you are using the Base version, your procedure will vary accordingly. It is okay to use WebSphere 7.0 Network Deployment CD to install WebSphere Application Server for a base/standalone configuration.Note:
If you have another version of WebSphere, for example 6.1 installed on the same system and it is not running during 7.0 installation, 7.0 installation may assign the same ports used by 6.1 profiles. Either change the ports assign to the 7.0 profile or bring up 6.1 profiles during the 7.0 installation to avoid the port conflict.To install WebSphere 7.0 from a workstation:
-
Insert the CD for WebSphere Application Server Network Deployment v7.0 for i5/OS into the CD ROM drive of any PC with a Windows operating system.
-
The launchpad will start if autorun function is turned on. If not, navigate to the
x:\WASdirectory (where x is the letter of the CD ROM drive), and start the launchpad by executing theinstall.exefile. -
Click the link entitled: Launch the installation wizard for WebSphere Application Server Network Deployment.
-
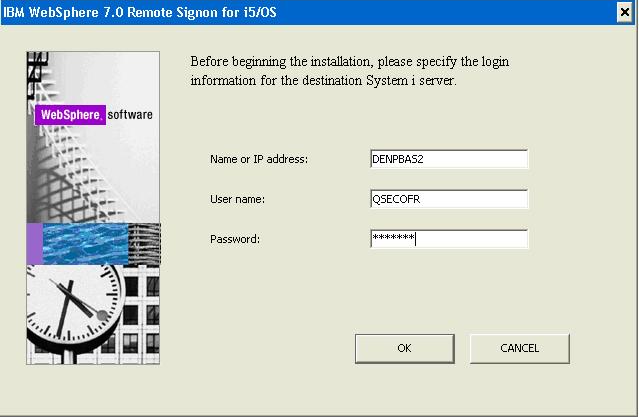
When prompted by the wizard, enter the name of the machine, username, and password. For example:
Field Value Name DENPBAS2 Username QSECOFR Password YOUR_QSECOFR_PASSWORD -
On the login screen, after you have entered the login credentials, click the OK button to login.
-
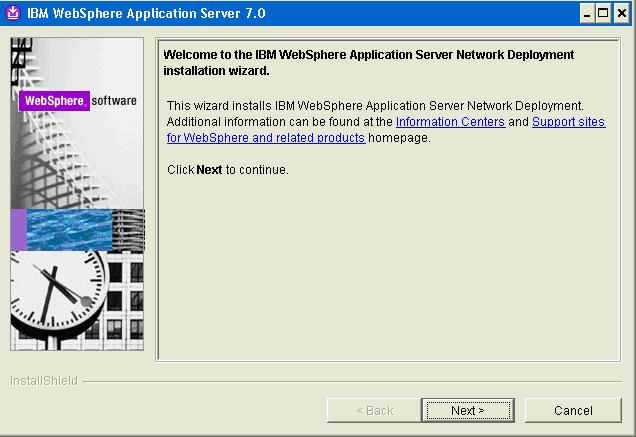
On the Welcome screen, click the Next button.
-
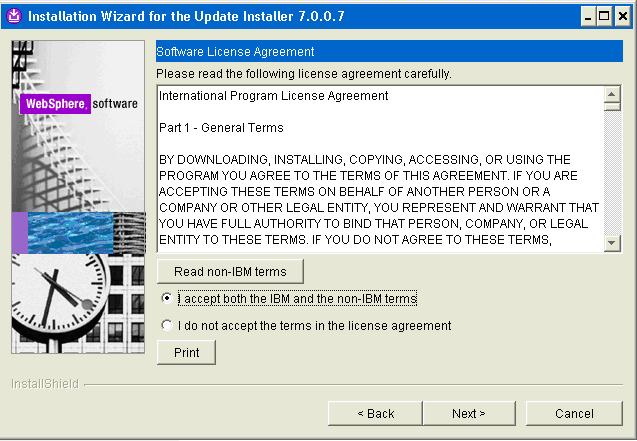
On Software License Agreement, accept the License Agreement and click the Next button.
The installer performs a System Prerequisite Check.
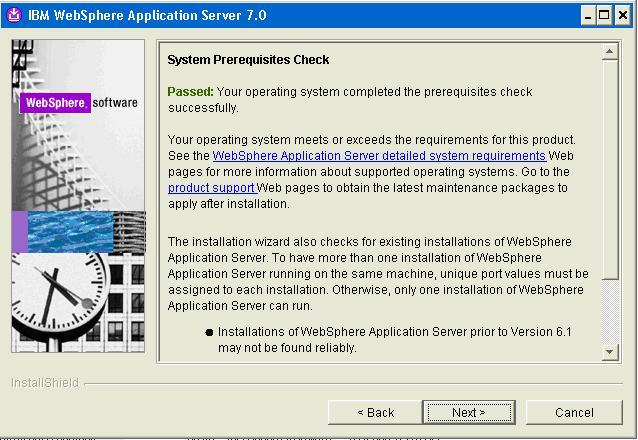
-
On System Prerequisites Check, if the system indicates the check passed click the Next button.
-
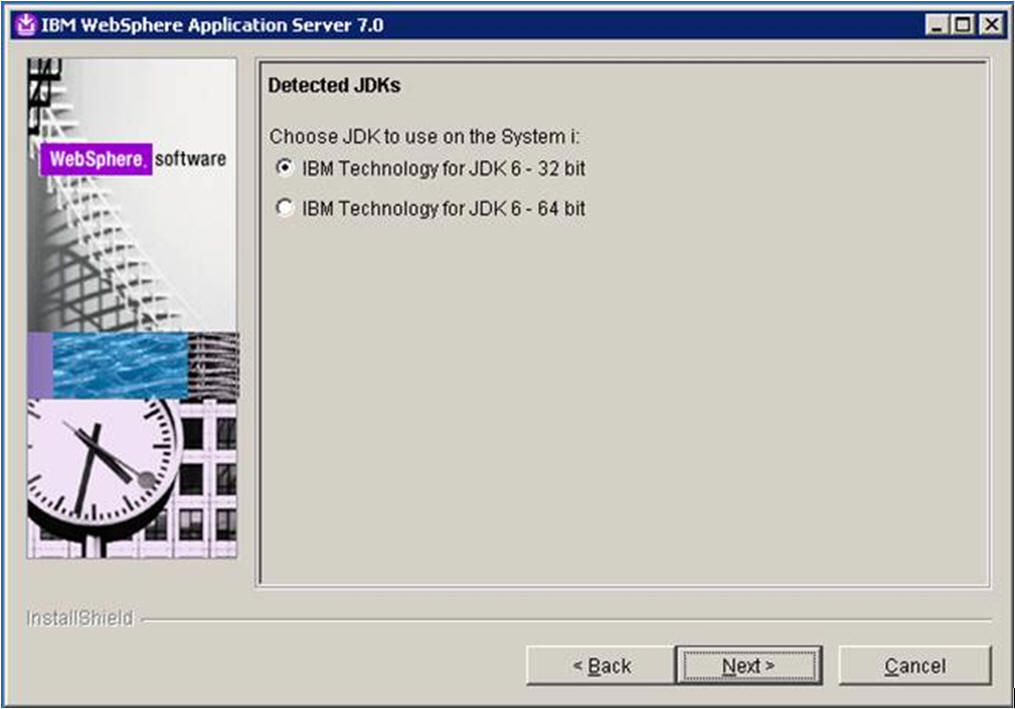
On Detected JDKs, select the radio button for IBM Technology for JDK6 - 32bit.
Note:
The IBM WebSphere 7 installer detects and displays the available JDKs on the IBM i machine. For this installation intended for use with JD Edwards EnterpriseOne you must choose IBM Technology for JDK 6 - 32 bit. After installation, you should only run WebSphere 7 in the 32-bit mode only. For more information, refer to the section of this guide entitled: Section 4.2.4, "Enabling IBM Technology for 32-bit Java Virtual Machines". -
Click the Next button.
-
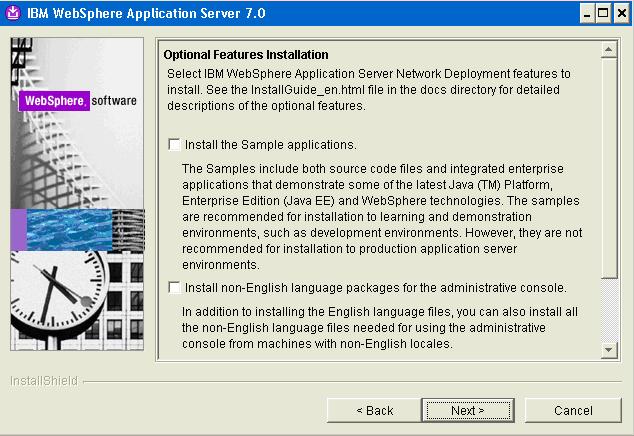
On Optional Features Installation, ensure that the Install the Sample applications checkbox is cleared. Install non-English language support as necessary.
-
Click the Next button.
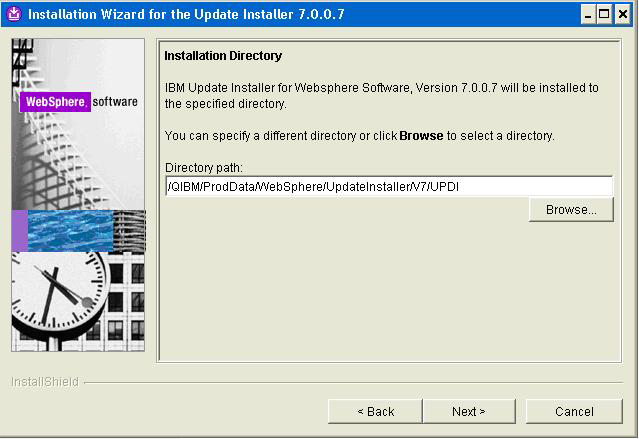
-
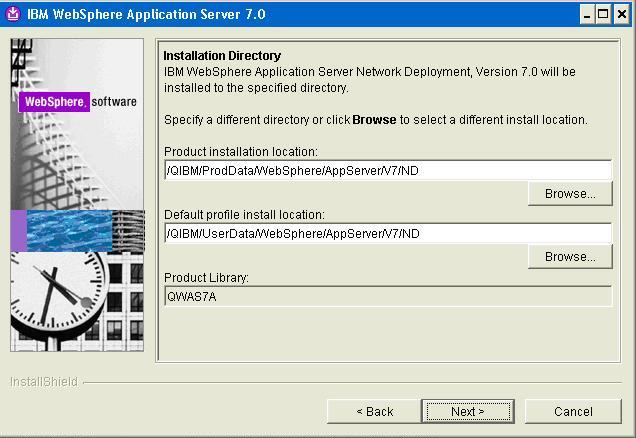
On Installation Directory, accept the default installation location, or enter a different path and click the Next button.
Tip:
It is recommended that you select the default installation location unless otherwise required.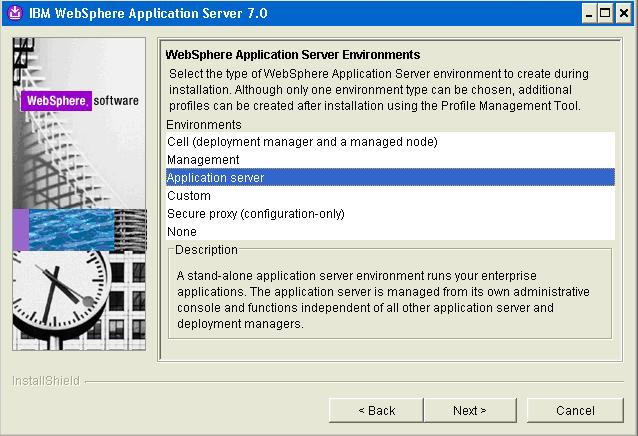
-
On the WebSphere Application Server Environments, select Application Server to create an Application Server profile. This will create a standalone application server profile called default.
Note:
If you are setting up in a federated nodes (that is, cell) configuration, you can create one of two basic types of environments:-
Cell (deployment manager and a managed node)
-
Management > Deployment Manager
-
-
Click the Next button.
-
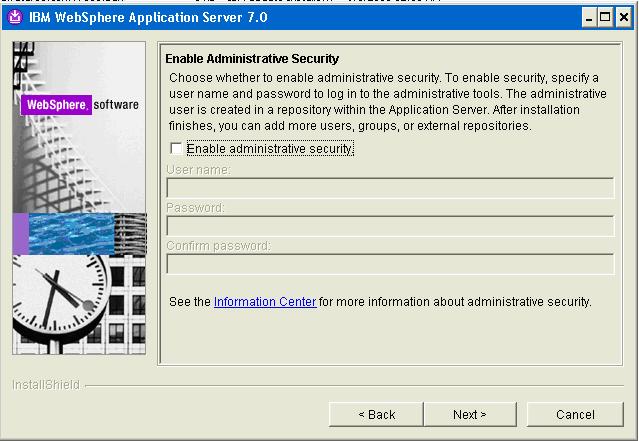
On Enable Administrative Security, the checkbox for the application server profile is checked by default. You can choose either to:
-
Clear the checkbox for Enable administrative security to disable server administrative security, or
-
If the checkbox is enabled for Enable administrative security, server administration security will be enabled and you must enter the User ID and Password
When you enable the checkbox the fields on this screen are enabled and you must enter valid credentials for the WebSphere administrator for this installation.
Tip:
JD Edwards EnterpriseOne Business Services Server. If you are using these instructions to install a JD Edwards EnterpriseOne Business Services Server into this WebSphere instance, you must enable administrative security. -
-
Click the Next button.
-
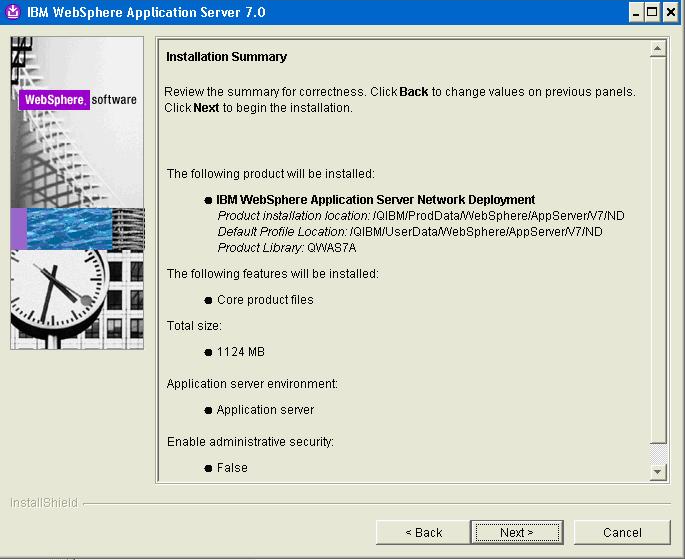
On Installation Summary, review the information summary and click the Next button to start the installation process.
Tip:
The installation process can take a while to complete and the time taken is dependent on the sizing of your IBM i hardware.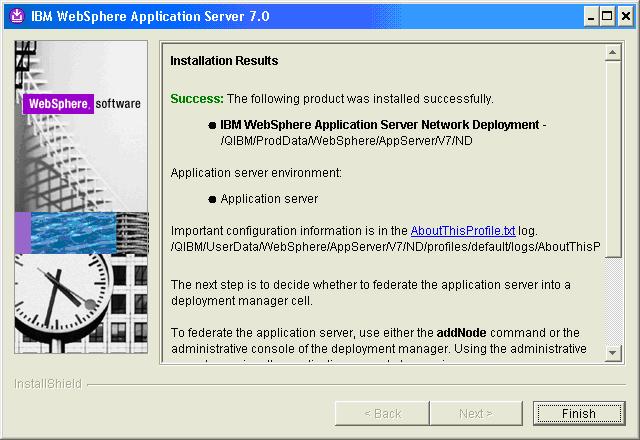
-
On Installation Results, you can click on the AboutThisProfile.txt link to see the port assignment for this profile. Note the Administrative console port on which AppSrv01 will be running (for example, 9060). You can use Profile Management Tool to create as many profiles as you like. Each profile is a separate instance of the WebSphere running on a different set of ports.
The First steps menu is launched.
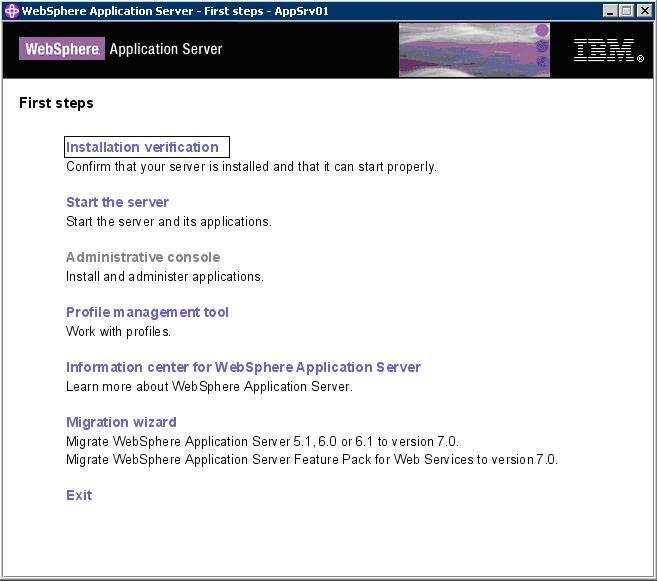
-
On the First steps menu, click Installation verification to verify the installation.
After you click Installation verification, you can verify the success of the installation by reviewing the contents of the resulting display. For example:
-
Ensure that the Installation Verification utility completes with a success message.
-
Close the First steps output and click Exit on the First steps screen.
This completes the profile creation activity.
4.2.1.2 Installing the WebSphere 7.0 directly from an IBM i Machine (Not Recommended)
To install the WebSphere 7.0 directly from an IBM i machine:
-
Insert the WebSphere Application Server in the CD-ROM drive on the IBM i machine.
-
Start the QSHELL environment using these commands on the IBM i console:
strqshcd /QOPT/WebSphere/WASNote:
Navigation through the directories is not case-sensitive. -
Start the installation by entering the following command:
Setup -console -
Replace the installation path or accept this default path:
/QIBM/ProdData/WebSphere/AppServer/V7/ND -
Select the components to install.
-
Review the summary page and enter [1] to start the install.
Do not exit the Qshell session or signoff until the installation process is complete.
When the message INSTCONFSUCCESS is displayed, the install process is complete.
Tip:
The installation process can take a while to complete and the time taken is dependent on the sizing of your IBM i hardware.
4.2.2 Installing the WebSphere Update Installer
The Update Installer for WebSphere Software includes a new installation program for IBM WebSphere Version 7.0, Installation Wizard starting with Fix Pack 7. Update Installer V7.0.0.7 is backwards compatible. You can use a single instance of the V7.0.0.7 Update Installer to apply maintenance and updates to IBM WebSphere Application Server V7.0.0.x. You can use a single installation of the Update Installer to install maintenance packs on all the WebSphere software products such as WebSphere Application Server, Java SDK, IBM HTTP Server, and Web server plug-ins.
Note:
Before installing the WebSphere Update Installer from CD, check IBM WebSphere Application Server v7.0 Fix Pack web site to see if a newer version of the Update Installer is required to install the fix pack. Download and install the newer version of WebSphere Update Installer, if needed.Caution:
Before you can install Refresh or Fix pack for WebSphere software, you need to install the Update Installer engine as described in this procedure.To install the WebSphere update installer:
-
If you are running WebSphere, stop all the WebSphere processes and then stop the WebSphere subsystem (such as QWAS7).
-
Download the latest Update Installer from IBM web site that match with the update you wish to install to a workstation.
-
Extract the downloaded image to a temporary location and start the launchpad by executing the
install.exefile. -
When prompted by the wizard, enter the name of the machine, username, and password. For example:
Field Value Name DENPBAS2 Username QSECOFR Password YOUR_QSECOFR_PASSWORD -
On the login screen, after you have entered the login credentials, click the OK button to login.

-
On the welcome screen, click the Next button.
-
On Software License Agreement, review the License Agreement and select a radio button to accept or decline.
If you chose to accept, click the Next button to continue.
Caution:
If you do not accept the terms of the license agreement, you cannot continue with the installation.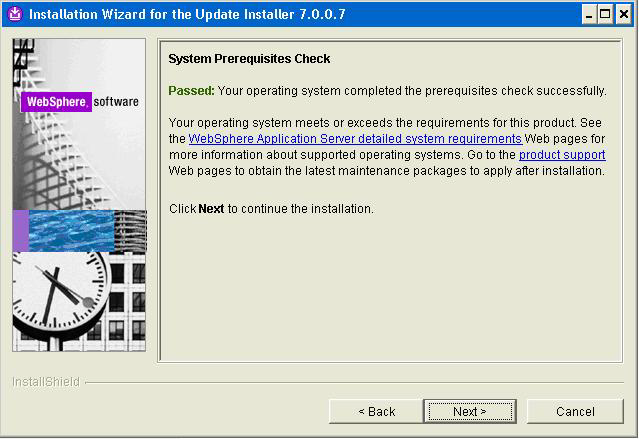
-
On System Prerequisites Check, the Installer performs a verification of system requirements.
-
After the Installer indicates the check was successful, click the Next button to continue.
-
On Installation Directory, enter or browse to a valid location where you want to install WebSphere Application Server Network Deployment. For example:
/QIBM/ProdData/WebSphere/UpdateInstaller/V7/UPDI -
Click the Next button.
-
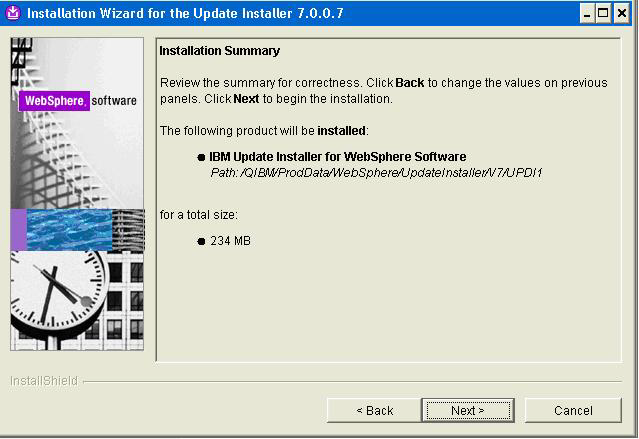
On Installation Summary, click the Next button to begin the installation.
4.2.3 Installing the Fix Pack
Note:
You will have to install the Group PTF based on the WebSphere MTR for the Group PTF. The Group PTF could contain a newer WebSphere Application Server FixPack than the JD Edwards EnterpriseOne Certification for WAS FixPack. Do not use the update installer to apply the WAS FixPack that comes with the group PTF. The WebSphere FixPack should be applied by downloading the required FixPack separately and applied using the steps described in this section.The installation process for Refresh Packs and Fixpacks is same. Refresh Packs update the base software release level and Fix Packs create minor updates to the Refresh Packs. This task describes the process of installing a Fixpacks, but the same process applies for Refresh Packs as well.
Refer to the Certifications to determine the requirements for your configuration. Apply all the required Refresh Packs and Fixpacks using the following process as an example.
To install the fix pack:
-
If you are running WebSphere, stop the WebSphere processes and the
QWAS7subsystem. -
Refer to the JD Edwards EnterpriseOne Certifications to determine the supported Fix Packs, and download these supported Fix Packs for WebSphere Application Server 7.0 from the IBM web site.
-
Unzip the downloaded file for the WebSphere Application Server onto a Windows computer.
-
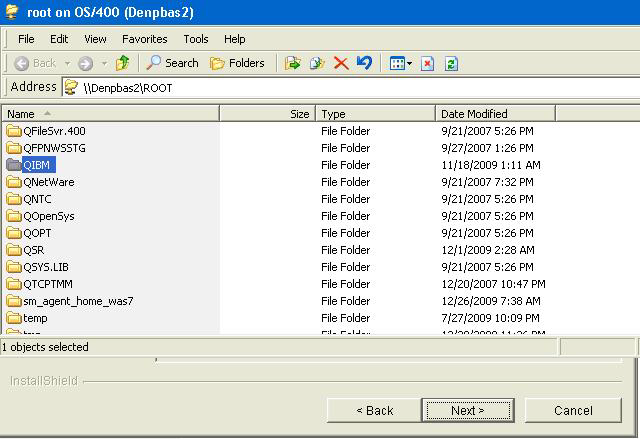
Map the drive to the IBM i machine. For example:
\\IBMi_machine_name\ROOTThe system requests the user name and password.
-
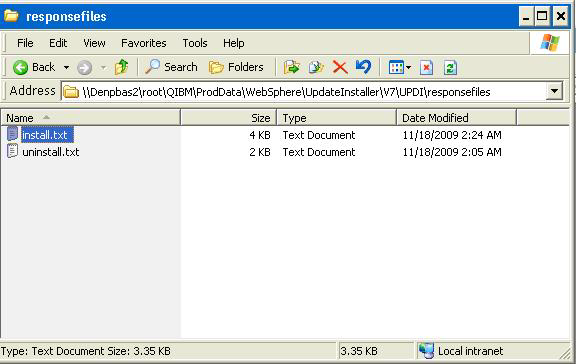
Copy the Fix Pack to this directory:
/QIBM/ProdData/WebSphere/UpdateInstaller/V7/UPDI/maintenanceA sample screen shot is shown below.
-
Modify
install.txtfile, which is located in this directory:/QIBM/ProdData/WebSphere/UpdateInstaller/V7/UPDI/responsefiles-
Specify the Fix Pack to install (that is, the one that you copied in previous step). For example:
-W maintenance.package="/QIBM/ProdData/WebSphere/UpdateInstaller/V7/UPDI/
maintenance/7.0-7.0.0-WS-WAS-i5osPPC-FP00000xx.pak"
-
Specify WebSphere 7 product directory. For example:
-W product.location="/QIBM/ProdData/WebSphere/AppServer/V7/ND"
A sample screenshot of the
install.txtshowing the relevant sections is shown below: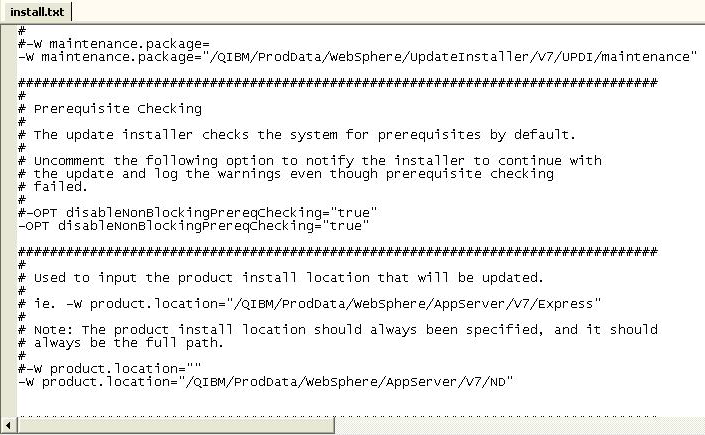
-
-
On the IBM i command line, enter this Start Qshell command:
STRQSH -
Navigate to this directory:
/QIBM/ProdData/WebSphere/UpdateInstaller/V7/UPDI -
Enter this command:
./update -options responsefiles/install.txtThe update program runs for several minutes and installs the WebSphere Fix Pack.
4.2.4 Enabling IBM Technology for 32-bit Java Virtual Machines
Note:
WebSphere Application Server Network Deployment 7.0 is supported with V6R1 and V5R4 only. EnterpriseOne supports IBM Technology for Java (32-bit JVM) with WebSphere Application Server 7.0. and Classic JVM (64-bit JVM) is also supported with EnterpriseOne and WebSphere Application Server 7.0.Classic JVM (64-bit JVM) is the default configuration for WebSphere v7.0 on V6R1 and V5R4 i5/OS. Use the steps below to switch to IBM Technology for Java (32-bit JVM)
To enable IBM technology for java (J9 JVM – 32 bit JVM on i5/OS) support:
-
Stop all the WebSphere server processes.
-
Stop this WebSphere 7 subsystem:
QWAS7 -
Open QShell using this command:
STRQSH -
Change the directory using this command:
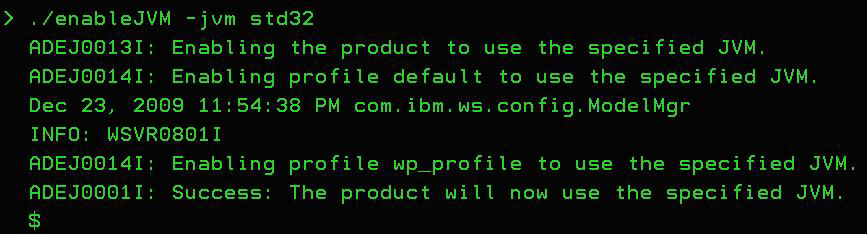
cd /QIBM/PRODDATA/WebSphere/AppServer/v7/ND/bin -
Enter this command:
./enableJVM -jvm std32Once the command completes successfully the following message is displayed, which indicates that the 32-bit J9 JVM is enabled for all the profiles within WebSphere:
-
Start the application server processes.
4.2.5 Creating a Profile (Optional)
Complete this task to create a profile on the IBM i machine. The installation process of WebSphere 7 may have created profile(s) depending on the environment you selected using this navigation:
Cell > Application Server > Management > Deployment Manager
You can skip this step if you do not need additional profile.
Note:
The <WAS_PROD_HOME> directory which is also referenced throughout this guide is typically located in this directory structure:/QIBM/ProdData/WebSphere/AppServer/V7/ND
Note:
The user-specific WebSphere data is maintained in a separate directory, which is also referenced throughout this guide. For example:<WAS_USER_HOME>
The <WAS_USER_HOME> directory is typically located in this directory structure:
/QIBM/UserData/WebSphere/AppServer/V7/ND/profiles/<profileName>
For example:
/QIBM/UserData/WebSphere/AppServer/V7/ND/profiles/AppSrv01
To create a profile:
-
On the IBM i command line, enter this Start Qshell command:
STRQSH -
On the Qshell command line, enter this command to change to the directory that contains the script:
cd <WAS_PROD_Home>/bin -
Enter this command to run the manageprofiles script:
./manageprofiles -create -profileName <profile_name> -templatePath <template_path>where:
<profile_name> is the name of the profile that is created.
<template_path> is the path to the profile template from which to create the profile.
The following is an example of a command for creating an application server profile that does not have the sample applications installed:
/.manageprofiles -create -profileName AppSrv01 -templatePath /QIBM/ProdData/WebSphere/AppServer/V7/ND/profileTemplates/defaultFor more information on the
manageprofilesscript, enter the following command or see IBM Infocenter for IBM i:./manageprofiles -create -help -
After you create a profile, check for the INSTCONFSUCCESS message indicating that the profile creation was successful. Verify the
AboutThisProfile.txtfile to obtain the list of port numbers.
4.3 Running WebSphere
These tasks describe how to start and stop WebSphere and configure the Administrative Console.
Tip:
These tasks are optional before you install the Oracle JD Edwards EnterpriseOne HTML WebServer.4.3.1 Starting the IBM HTTP Server
Refer to Section 6.2, "Starting the IBM HTTP Server for the IBM i Instance".
4.3.2 Stopping the IBM HTTP Server
Refer to Section 6.4, "Stopping the IBM HTTP Server for the IBM i Instance".
4.3.3 Starting WebSphere
To start WebSphere:
-
On the IBM i command line, enter this command to start the subsystem:
STRSBS QWAS7/QWAS7 -
On the IBM i command line, enter the Start Qshell command:
STRQSH -
On the Qshell command line, enter this command to change to the directory that contains the script:
cd <WAS_USER_HOME>/bin -
Enter the command:
./startServer server1
4.3.4 Stopping WebSphere
To stop WebSphere:
-
On the IBM i command line, enter the Start Qshell command:
STRQSH -
On the Qshell command line, enter this command to change to the directory that contains the script:
cd <WAS_USER_HOME>/bin -
Enter this command to stop the server:
./stopServer server1Tip:
To determine if the server is already running, open a command prompt, navigate to the<WAS_USER_HOME>/bindirectory, and enter this command:./serverstatus allTip:
If the profile is a secure profile to determine if the server is already running, open a command prompt, navigate to the<WAS_USER_HOME>/bindirectory, and enter this command:./serverstatus all -user <WAS_Admin_UserId> -password <WAS_Admin_Password>
4.3.5 Using the WebSphere Web Administrative Console
Note:
WebSphere administration is completely browser-based.The WebSphere Web Administrative Console is accessible from any supported Web browser. The default URL is
http://<machinename>:<profile_port>/admin
where <machinename> is the name of the server where you installed the WebSphere Application Server, and <profile_port> is the admin port that you used during the profile creation wizard (for, example, 9060).
To check the port number, open this file:
<WAS_USER_HOME>/logs/AboutThisProfile.txt
Search for the value of key Administrative console port.
4.3.6 Testing the WebSphere Application Server
To test the WebSphere Application Server:
-
Ensure that the WebSphere Application Server (default name is
server1) is started as explained in Section 4.3.3, "Starting WebSphere". -
Ensure that the IBM HTTP Server is started.
-
Start a web browser.
-
Enter this URL to test the WebSphere Administration Console:
http://<machine_name>:<http_port>/snoopwhere
machine_nameis the name of the server where you installed IBM HTTP Server, andwhere
http_portis the port of your IBM HTTP Server. The default value is 80.For example:
http://localhost:80/snoopTip:
If your Web Server is not on the same machine as WebSphere, you might need to copy the plug-in configuration file from the WebSphere machine to the Web Server machine.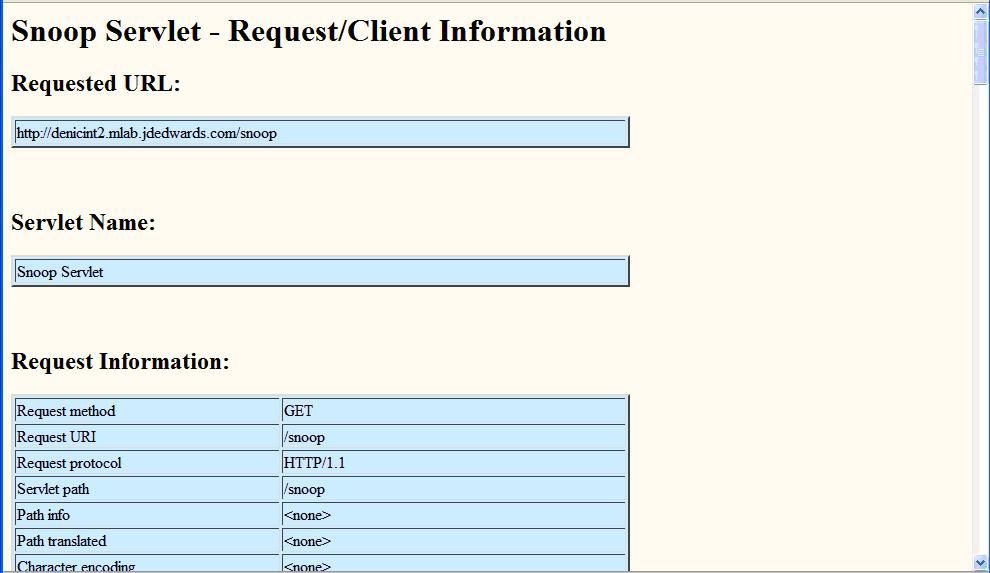
Upon successful execution, the resulting page should display information similar to the above. This indicates that your WebSphere Application Server is successfully installed and functioning.
4.4 Generating the Web Server Plug-in
Note:
If an HTTP server instance has not been created and linked to a WebSphere Application Server profile as shown in the next chapter, no web server will exist.Whenever you install new enterprise applications, or create new virtual hosts, you must regenerate the Web Server plug-in.
To generate the WebSphere plug-in for a single machine:
-
Log on to the WebSphere Administrative console.
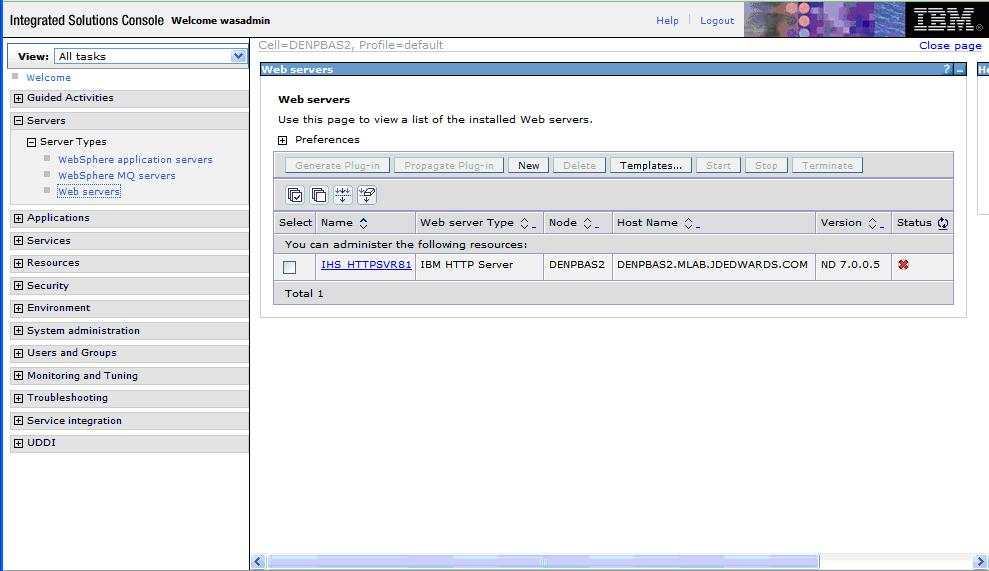
-
On the left navigation pane, select Servers > Web servers.
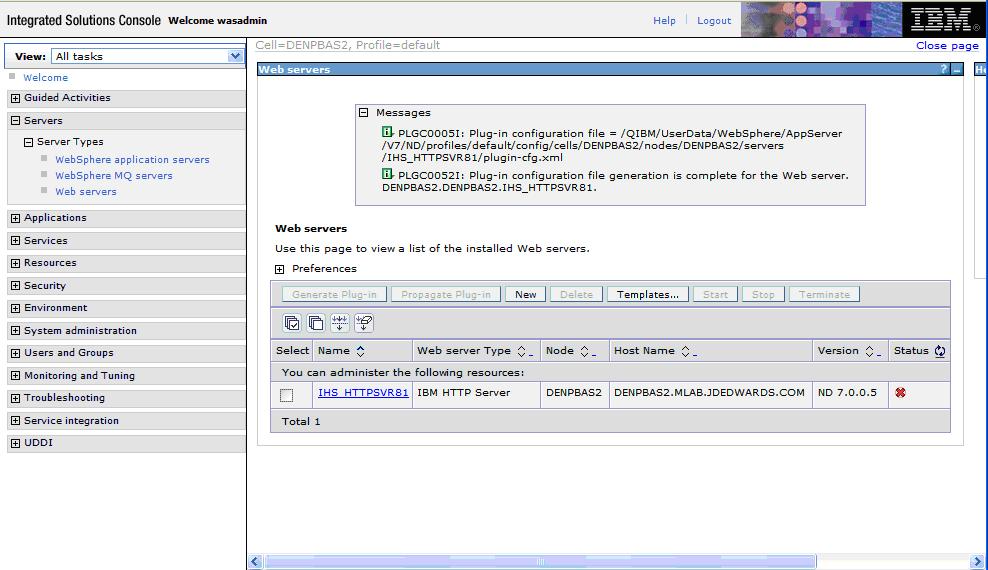
-
Select the web server for which you want to generate plug-in (for example, IHS_HTTPSVR81), and click the Generate Plug-in button.
Note:
Federated (Clustered) Web Servers. If you are using WebSphere Application Server and running JD Edwards EnterpriseOne as part of a federated (or clustered) web server, you may need to regenerate the WebSphere global plugin configuration after deploying the newest tools release. This is required when new servlets have been added to the tools release you are deploying.To update (regenerate) plugins, refer to the following procedure.
To update (regenerate) and propagate the global web server plugin configuration:
-
Log on to the Deployment Manager Administration Console using the Dmgr01 profile.
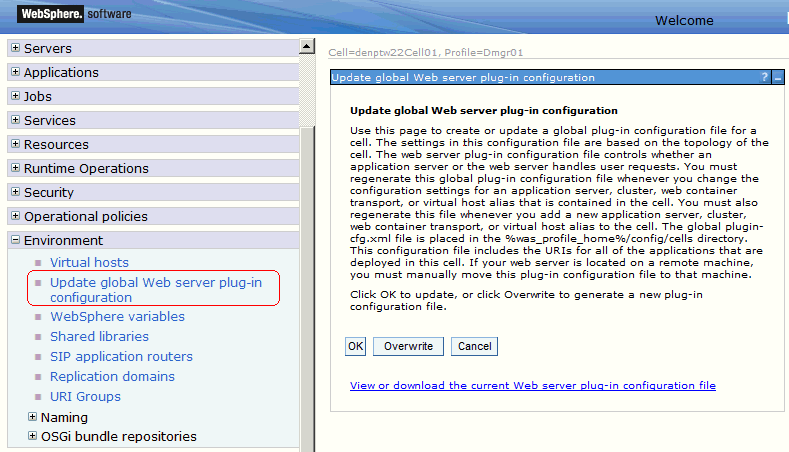
-
Expand the Environment node and select Update global Web server plug-in configuration.
-
Review the content in the right-hand pane and note the location of the plug-in file in the description. For example, the description might say:
The global plugin-cfg.xml file is placed in the %was_profile_home%/config/cells directory.
-
Click the OK button.