4 Working with Oracle VM Templates for JD Edwards EnterpriseOne
This chapter describes how to work with Oracle VM Templates for JD Edwards EnterpriseOne that are specifically designed to be installed and run on Oracle Exalogic machines. The installation, configuration, and setup of an Oracle Exalogic machine is beyond the scope of this document. Refer to this link for applicable Oracle Exalogic documentation:
http://docs.oracle.com/cd/E18476_01/index.htm
See Also
-
For tuning recommendations for using the VM templates and the non-virtualized database on Exalogic, refer to the guide entitled: JD Edwards EnterpriseOne In-Memory Applications Configuration Guide for Oracle Exa Systems.
This chapter contains the following topics:
-
Section 4.1, "Implementing the Oracle Database With or Without Oracle VM Templates"
-
Section 4.3, "Working with Temporary Virtual Machines on Exalogic"
-
Section 4.6, "Working with VM Templates for Oracle Exalogic using EMOC"
-
Section 4.7, "Starting EnterpriseOne Virtual Machine on Oracle Exalogic"
-
Section 4.8, "Changing Base Configurations of the JD Edwards EnterpriseOne Templates"
4.1 Implementing the Oracle Database With or Without Oracle VM Templates
The installation process allows you to deploy the JD Edwards EnterpriseOne database server either as an Oracle VM virtual machine or to a non-virtualized database server. You can choose to run the Oracle database as follows:
-
VM on an Exalogic machine
Oracle does not recommend this configuration for production environments. However, deploying all Oracle VM templates, including the Oracle Database template, to Exalogic can be convenient for non-production environments, such as evaluation or testing.
-
Oracle Enterprise Database on a Non-Virtualized Machine
This is the recommended configuration for production environments. The non-virtualized database could be an Oracle Exadata, Oracle Database Appliance (ODA), RAC, or other similar machine. In this case you would not use a VM template, but instead you would install the database using a special version of the EnterpriseOne Platform Pack installer that is designed to work with the other base and optional Oracle VM Templates that are described in this guide. To use this installer refer to chapter of this guide entitled: Chapter 5, "Working with the Platform Pack in Silent Mode for a Non-Virtualized Database Server".
4.2 Completing the Pre-Install Worksheet
You can use the Pre-Install Worksheet in this section to gather information required to answer the questions for which you will be prompted by the template installer as it executes. Prior to installing any template, it is highly recommended that you complete the Pre-Install Worksheet with the requisite information. By doing so you will reduce the potential for errors due to incorrect data entry information.
Caution:
The scripts to configure the JD Edwards EnterpriseOne system are not tied to actual configuration of the system. That is, before you run the scripts you must know the IP address, hostname, and system configuration of the target machine in order to match to the expected configuration of EnterpriseOne. Filling out the Pre-Install Worksheet helps guarantee an accurate and valid configuration.Caution:
The implementation of the JD Edwards EnterpriseOne delivered with the Oracle VM Templates has Demo data loaded in the DV910 environment. Refer to Appendix C, "Security and Demo Data Configuration" for additional details.Tip:
Contact your network administrator to attain valid network settings for your network prior to creating new VM Guests.The following image shows the Pre-Install Worksheet:
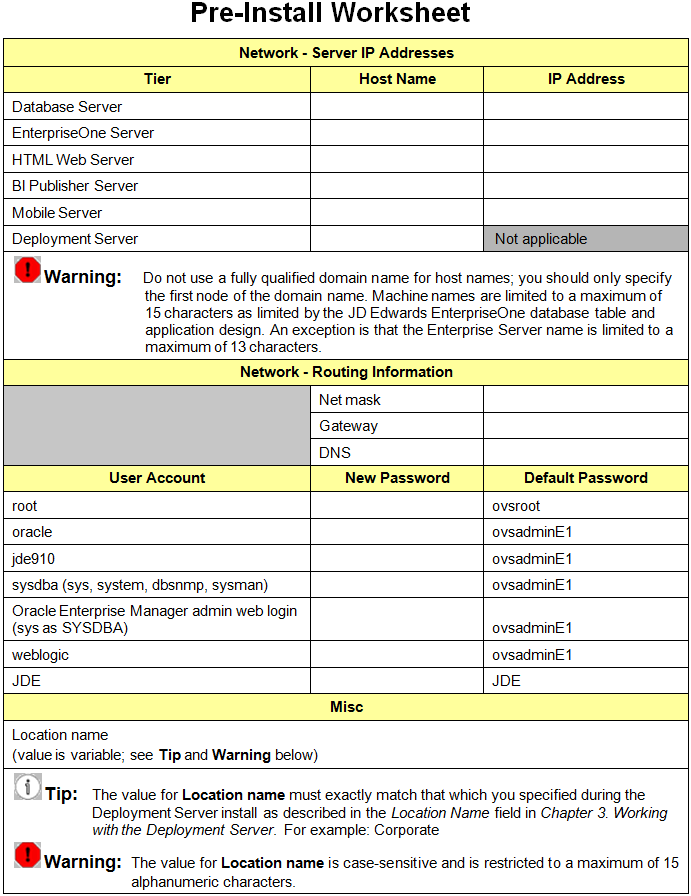
Description of the illustration pre_install_wksht.gif
4.3 Working with Temporary Virtual Machines on Exalogic
When working with Oracle Exalogic machines it is helpful to set up a temporary Virtual Machine with access to a Web/Dav storage space. The temporary VM can be used to stage the VM templates and the Web/Dav provides a location to upload the templates into the Enterprise Manager Ops Center system. This is not the only way to perform these steps, however these instructions in this guide assume this method.
The following procedure assumes that a specific directory structure has been created and that the various VM files have been downloaded to the structure. You should also enable Web/Dav for this structure.
Temporary Directories for Base Templates
…/E1_VM_TMP/SYS
…/E1_VM_TMP/ENT
…/E1_VM_TMP/DB (optional; see Note below)
…/E1_VM_TMP/WB
Temporary Directories for Optional Templates
…/E1_VM_TMP/BIP
…/E1_VM_TMP/BSSV
Note:
Installing the Oracle database as a VM template is optional as described in the section of this guide entitled: Section 4.1, "Implementing the Oracle Database With or Without Oracle VM Templates".4.4 Working with the Download Files
You can obtain the download files for the Oracle VM Templates for JD Edwards from the Oracle Software Cloud (https://edelivery.oracle.com. The following table lists all available download files for Oracle VM Templates for JD Edwards EnterpriseOne:
| Image File Name | Description |
|---|---|
| V40217-01 | Oracle VM Template for JD Edwards EnterpriseOne 9.1.2 and tools 9.1.3.3 - Oracle Linux 5.8 System |
| V40218-01 | Oracle VM Template for JD Edwards EnterpriseOne - Oracle Exalogic 2.0.4.0.0 Base Guest Template for Exalogic Linux2 |
| V40208-01 | Oracle VM Template for JD Edwards EnterpriseOne 9.1.2 and Tools 9.1.3.3 Enterprise Server 1 of 2 |
| V40209-01 | Oracle VM Template for JD Edwards EnterpriseOne 9.1.2 and Tools 9.1.3.3 Enterprise Server 2 of 2) |
| V40210-01 | Oracle VM Template for JD Edwards EnterpriseOne 9.1.2 and Tools 9.1.3.3 - HTML Server (WebLogic Server 10.3.5) |
| V40211-01 | Oracle VM Template for JD Edwards EnterpriseOne 9.1.2 and Tools 9.1.3.3 - Database Server (Oracle Database 11.2.0.3) 1 of 6 |
| V40212-01 | Oracle VM Template for JD Edwards EnterpriseOne 9.1.2 and Tools 9.1.3.3 - Database Server (Oracle Database 11.2.0.3) 2 of 6 |
| V40213-01 | Oracle VM Template for JD Edwards EnterpriseOne 9.1.2 and Tools 9.1.3.3 - Database Server (Oracle Database 11.2.0.3) 3 of 6 |
| V40214-01 | Oracle VM Template for JD Edwards EnterpriseOne 9.1.2 and Tools 9.1.3.3 - Database Server (Oracle Database 11.2.0.3) 4 of 6 |
| V40215-01 | Oracle VM Template for JD Edwards EnterpriseOne 9.1.2 and Tools 9.1.3.3 - Database Server (Oracle Database 11.2.0.3) 5 of 6 |
| V40216-01 | Oracle VM Template for JD Edwards EnterpriseOne 9.1.2 and Tools 9.1.3.3 - Database Server (Oracle Database 11.2.0.3) 6 of 6 |
| V40202-01 | JD Edwards EnterpriseOne 9.1.2 and Tools 9.1.3.3 - Deployment Server for Use with Express Installation 1 of 6 |
| V40203-01 | JD Edwards EnterpriseOne 9.1.2 and Tools 9.1.3.3 - Deployment Server for Use with Express Installation 2 of 6 |
| V40204-01 | JD Edwards EnterpriseOne 9.1.2 and Tools 9.1.3.3 - Deployment Server for Use with Express Installation 3 of 6 |
| V40205-01 | JD Edwards EnterpriseOne 9.1.2 and Tools 9.1.3.3 - Deployment Server for Use with Express Installation 4 of 6 |
| V40206-01 | JD Edwards EnterpriseOne 9.1.2 and Tools 9.1.3.3 - Deployment Server for Use with Express Installation 5 of 6 |
| V40207-01 | JD Edwards EnterpriseOne 9.1.2 and Tools 9.1.3.3 - Deployment Server for Use with Express Installation 6 of 6 |
| V40219-01 | Oracle VM Template for JD Edwards EnterpriseOne 9.1.2 and Tools 9.1.3.3 - Non Virtualized Database Server (Oracle Database 11.2.0.3) |
| V40220-01 | Oracle VM Template for JD Edwards EnterpriseOne 9.1.2 and Tools 9.1.3.3 - BSSV and ADF Server (WebLogic Server 10.3.5) (1/2) |
| V40221-01 | Oracle VM Template for JD Edwards EnterpriseOne 9.1.2 and Tools 9.1.3.3 - BSSV and ADF Server (WebLogic Server 10.3.5) (2/2) |
| V40222-01 | Oracle VM Template for JD Edwards EnterpriseOne 9.1.2 and Tools 9.1.3.3 - BI Publisher Server 11.1.1.7.1 (1/5) |
| V40223-01 | Oracle VM Template for JD Edwards EnterpriseOne 9.1.2 and Tools 9.1.3.3 - BI Publisher Server 11.1.1.7.1 (2/5) |
| V40224-01 | Oracle VM Template for JD Edwards EnterpriseOne 9.1.2 and Tools 9.1.3.3 - BI Publisher Server 11.1.1.7.1 (3/5) |
| V40225-01 | Oracle VM Template for JD Edwards EnterpriseOne 9.1.2 and Tools 9.1.3.3 - BI Publisher Server 11.1.1.7.1 (4/5) |
| V40227-01 | Oracle VM Template for JD Edwards EnterpriseOne 9.1.2 and Tools 9.1.3.3 - BI Publisher Server 11.1.1.7.1 (5/5) |
| V39172-01 | JD Edwards EnterpriseOne 9.1.3.3 Server Manager Installer Windows (1/2) |
| V39174-01 | JD Edwards EnterpriseOne 9.1.3.3 Server Manager Installer Windows (2/2) |
| V39175-01 | JD Edwards EnterpriseOne 9.1.3.3 Server Manager Installer Linux |
4.5 Extracting the Oracle VM-Templated for EnterpriseOne Application and System Images to the FTP or HTTP Server
Files within the images are either split into a series of numbered zip files or a single zip file. If the file is a single unnumbered zip file, you can simply unzip the file into the tgz format file. The files that are delivered in a series of zip files must be unzipped and merged. These zip files must merged into a tgz (tarred gzip file). The tgz (gzipped tar archive) format file that can be loaded directly into OVM for JD Edwards EnterpriseOne.
This section includes these tasks:
-
Section 4.5.2, "Working with .zip and .tgz files for the Exalogic System Image"
-
Section 4.5.5, "Working with .zip and .tgz files for the EnterpriseOne Image for the HTML Server"
4.5.1 Working with the vm.cfg Files
Unique *vm.cfg files are delivered with the System image, as described in the next section entitled: Section 4.5.2, "Working with .zip and .tgz files for the Exalogic System Image". You must use tgz files to upload a pair consisting of the X86 system file (E1_X86_SYS_913.tgz) and one of the Application image files (E1_DB_DSK_913.tgz, E1_WB_DSK_913.tgz or E1_ENT_DSK_913.tgz) as a template. The template can then be cloned as a Virtual Machine. Refer to the following sections for instructions on creating the tgz files for the System, servers, and applications:
-
Section 4.5.2, "Working with .zip and .tgz files for the Exalogic System Image"
-
Section 4.5.5, "Working with .zip and .tgz files for the EnterpriseOne Image for the HTML Server"
Note:
The*vm.cfg files that are delivered with the Exalogic system will replace the *vm.cfg files that are included with all other Oracle VM Templates for EnterpriseOne application images.Before you upload the System, Server, or Application images, you will need to pair and rename each of the above *vm.cfg files with the appropriate System or application image as shown in the table below:
| Matrix of Images and vm.cfg Files | |||
|---|---|---|---|
| System, Server, or Application | Pair with Image File | Delivered *.cfg File | Renamed .cfg File |
| System | E1_EXA_SYS_9133.img |
Not appicable | Not appicable |
| Enterprise Server | E1_ENT_DSK_9133.img |
EXA_ENT_vm.cfg |
vm.cfg |
| Database Server | E1_DB_DSK_9133.img |
EXA_DB_vm.cfg |
vm.cfg |
| HTML Server | E1_WB_DSK_9133.img |
EXA_WB_vm.cfg |
vm.cfg |
| BI Publisher Server | E1_OVR_DSK_9133.img |
EXA_OVR_vm.cfg |
vm.cfg |
| Mobile Server | E1_MBL_DSK_913.img |
EXA_MBL_vm.cfg |
vm.cfg |
Tip:
You only need the system and one application image on the FTP server at a time. You can extract and stage the files somewhere else and move the tgz file to the FTP or HTTP site for upload.4.5.2 Working with .zip and .tgz files for the Exalogic System Image
This section describes how to unzip and extract the Exalogic system image and vm.cfg file into a temporary virtual machine. These instructions assume you followed the recommendation and have created a directory structure on your Exalogic machine as described in the section of this guide entitled: Section 4.3, "Working with Temporary Virtual Machines on Exalogic".
-
Download the Exalogic System image (V40218-01) file into this directory:
…/E1_VM_TMP/SYS -
Use this command string to extract the V40218-01.zip file:
cat V40218-01.zip | tar -xvf - -
There are six files within the tgz file:
-
E1_EXA_SYS_9133.img -
EXA_ENT_vm.cfg -
EXA_WB_vm.cfg -
EXA_OVR_vm.cfg -
EXA_MBL_vm.cfg
-
You must rename each of the above files to vm.cfg and pair them with their appropriate image before you upload them. Refer to the preceding section in this guide entitled: Section 4.5.1, "Working with the vm.cfg Files".
4.5.3 Working with .zip and .tgz Files for the JD Edwards EnterpriseOne Image for the Enterprise Server
This section describes how to unzip and tar the images for the JD Edwards EnterpriseOne image for the Enterprise Server.
-
Download the Enterprise Server image files (
V40208-01.zipandV40209-01.zip) into this directory:…/E1_VM_TMP/ENT -
Unzip the files using these commands:
unzip V40208-01.zipunzip V40209-01.zipThe unzipped files are:
-
e1_ent_9133.tgzDiskPart00.zip -
e1_ent_9133.tgzDiskPart01.zip
-
-
Merge the unzipped files and extract the
*.imgfile using this command:cat e1_ent_9133.tgzDiskPart*.zip | tar -xvf - -
The extracted file is:
-
E1_ENT_DSK_9133.img
-
-
Locate the
vm.cfgfrom extracted Exalogic System image, which has been renamed from the delivered file as described in the section of this guide entitled: Section 4.5.1, "Working with the vm.cfg Files"). If you followed the recommendation in this guide, once extracted the delivered file is located in this directory:…/E1_VM_TMP/SYS -
Copy the
vm.cfgfile located in the previous step to this Enterprise Server image extracted directory using this command:cp ../SYS/vm.cfg. -
Also copy the system image to this Enterprise Server image directory using this command:
cp ../SYS/E1_EXA_SYS_9133.img. -
Build this Oracle VM template for EnterpriseOne Enterprise Server for uploading by executing the following command:
tar -czvf E1_ENT_VM.tgz ./System.img ./E1_ENT_DSK_9133.img ./vm.cfg -
Once the
E1_ENT_VM.tgzfile is built it can be uploaded. The intermediate files can be deleted.
4.5.4 Working with .zip and .tgz files for the JD Edwards EnterpriseOne Image for the Database Server
This section describes how to unzip and tar the images for the JD Edwards EnterpriseOne image for the Database Server.
Note:
As described in the section of this guide entitled: Section 4.1, "Implementing the Oracle Database With or Without Oracle VM Templates", optionally you can choose to install the JD Edwards EnterpriseOne Database Server on a non-virtualized machine such as Oracle Exadata, Oracle RAC, Oracle Database Appliance (ODA), or any other database server. In that case, you would not install the VM template for the database server. Instead you would use a special version of the JD Edwards EnterpriseOne Platform Pack installer as described in the chapter of this guide entitled: Section 5, "Working with the Platform Pack in Silent Mode for a Non-Virtualized Database Server".-
Download the six (6) Database Server image files (
V40211-01.zipthroughV40216-01.zip) into this directory:…/E1_VM_TMP/DB -
Unzip using this command:
unzip V40211-01.zipunzip V40212-01.zipunzip V40213-01.zipunzip V40214-01.zipunzip V40215-01.zipunzip V40216-01.zipThe unzipped files are:
-
e1_db_9133.tgzDiskPart00.zip -
e1_db_9133.tgzDiskPart01.zip -
e1_db_9133.tgzDiskPart02.zip -
e1_db_9133.tgzDiskPart03.zip -
e1_db_9133.tgzDiskPart04.zip -
e1_db_9133.tgzDiskPart05.zip
-
-
Merge the unzipped files and extract the
*.imgfiles using this command:cat e1_db_9133.tgzDiskPart*.zip | tar -xvf - -
Locate the
vm.cfgfrom extracted Exalogic System image, which has been renamed from the delivered file as described in the section of this guide entitled: Section 4.5.1, "Working with the vm.cfg Files"). If you followed the recommendation in this guide, once extracted the delivered file is located in this directory:…/E1_VM_TMP/SYS -
Copy the
vm.cfgfile located in the previous step to this Database Server image extracted directory using this command:cp ../SYS/vm.cfg. -
Also copy the system image to this Database Server image directory using this command:
cp ../SYS/E1_EXA_SYS_9133.img. -
Build this Oracle VM template for the Database Server for uploading by executing the following command:
tar -czvf E1_DB_VM.tgz ./System.img ./E1_DB_DSK_9133.img ./vm.cfg -
Once the
E1_DB_VM.tgzfile is built it can be uploaded. The intermediate files can be deleted.
4.5.5 Working with .zip and .tgz files for the EnterpriseOne Image for the HTML Server
This section describes how to unzip and tar the images for the JD Edwards EnterpriseOne image for the HTML Server.
-
Download the HTML Server image file (
V40210-01.zip) into this directory:…/E1_VM_TMP/WB -
Unzip using this command:
unzip V40210-01.zipThe unzipped files are:
-
e1_wb_9133.tgz
-
-
Unzip the file and extract the
*.imgfile using this command:tar -xvf e1_wb_9133.tgz -
Locate the
vm.cfgfrom extracted Exalogic System image, which has been renamed from the delivered file as described in the section of this guide entitled: Section 4.5.1, "Working with the vm.cfg Files"). If you followed the recommendation in this guide, once extracted the delivered file is located in this directory:…/E1_VM_TMP/SYS -
Copy the
vm.cfgfile located in the previous step to this HTML Server image extracted directory using this command:cp ../SYS/vm.cfg. -
Also copy the system image to this HTML Server image directory using this command:
cp ../SYS/E1_EXA_SYS_9133.img. -
Build this Oracle VM template for the HTML Server for uploading by executing the following command:
tar -czvf E1_WB_VM.tgz ./System.img ./E1_WB_DSK_9133.img ./vm.cfg -
Once the
E1_WB_VM.tgzfile is built it can be uploaded. The intermediate files can be deleted.
4.5.6 Working with .zip and .tgz files for the JD Edwards EnterpriseOne Image for the BI Publisher Server
This section describes how to unzip and tar the images for the JD Edwards EnterpriseOne image for the BI Publisher Server, which is primarily used to support the functionality of JD Edwards EnterpriseOne OneView Reporting (OVR).
-
Download the five (5) BIP Server image files (
V40222-01.zipthroughV40227-01.zip) into this directory:…/E1_VM_TMP/BIP -
Unzip using this command:
unzip V40222-01.zip
unzip V40223-01.zip
unzip V40224-011.zip
unzip V40225-01-01.zip
unzip V40227-01-01.zip
The unzipped files are:
-
e1_ovr_9133.tgzDiskPart00.zip -
e1_ovr_9133.tgzDiskPart01.zip -
e1_ovr_9133.tgzDiskPart02.zip -
e1_ovr_9133.tgzDiskPart03.zip -
vm.cfg
-
-
Merge the unzipped files and extract the
*.imgfile using this command:cat e1_ovr_9133.tgzDiskPart*.zip | tar -xvf - -
Locate the
vm.cfgfrom extracted Exalogic system image (refer to Section 4.5.2, "Working with .zip and .tgz files for the Exalogic System Image"), which is located in this directory:…/E1_VM_TMP/SYS -
Copy the
vm.cfgfile located in the previous step to this BIP Server image extracted directory using this command:cp ../SYS/vm.cfg. -
Also copy the system image to this BIP Server image directory using this command:
cp ../SYS/E1_EXA_SYS_9133.img. -
Build this Oracle VM template for the BIP Server for uploading by executing the following command:
tar -czvf E1_OVR_VM.tgz ./System.img ./E1_OVR_DSK_9133.img ./vm.cfg -
Once the
E1_OVR_VM.tgzfile is built it can be uploaded. The intermediate files can be deleted.
4.5.7 Working with .zip and .tgz files for the JD Edwards EnterpriseOne Image for the Mobile Server
This section describes how to unzip and tar the images for the JD Edwards EnterpriseOne image for the Mobile Server.
-
Download the two (2) Mobile Server image files (V40220-01 and V40221-01) into this directory:
…/E1_VM_TMP/BSSV -
Unzip using this command:
unzip V40220-01.zipunzip V40221-01.zipThe unzipped files are:
-
e1_mbl_9133.tgzDiskPart00.zip -
e1_mbl_9133.tgzDiskPart01.zip -
vm.cfg
-
-
Merge the unzipped files and extract the
*.imgandvm.cfgfiles using this command:cat e1_mbl_9133.tgzDiskPart*.zip | tar -xvf - -
Locate the
vm.cfgfrom extracted Exalogic system image (refer to Section 4.5.2, "Working with .zip and .tgz files for the Exalogic System Image"), which is located in this directory:…/E1_VM_TMP/SYS -
Copy the
vm.cfgfile located in the previous step to this BSSV Server image extracted directory using this command:cp ../SYS/vm.cfg. -
Also copy the system image to this BSSV Server image directory using this command:
cp ../SYS/E1_EXA_SYS_9133.img. -
Build this Oracle VM template for the BSSV Server for uploading by executing the following command:
tar -czvf E1_MBL_VM.tgz ./System.img ./E1_MBL_DSK_9133.img ./vm.cfg -
Once the
E1_MBL_VM.tgzfile is built it can be uploaded. The intermediate files can be deleted.
4.6 Working with VM Templates for Oracle Exalogic using EMOC
The installation, configuration, and setup of an Oracle Exalogic machine is beyond the scope of this document. Refer to this link for applicable Oracle Exalogic documentation:
http://docs.oracle.com/cd/E18476_01/index.htm
However, for purposes of this documentation, this section illustrate one method of uploading and creating Virtual machine using Oracle Enterprises Manager Ops Center (EMOC). This method covers the creation of a virtual machine and the configuration of the network setting on that virtual machine. The example in this section assumes the uploading of the BIP template in support of OneView reporting application. The procedure is the same for other templates.
Caution:
This example does not cover the configuration of the Exalogic inside of EMOC including the configuration of networks and IP. The use of the information on the Pre-Install Worksheet is still valid (refer to the section of this guide entitled: Section 4.2, "Completing the Pre-Install Worksheet").Caution:
The setup and configuration of a vServer Types on Oracle Exalogic is beyond the scope of this guide. Refer to the Oracle Exalogic guide for more information.The section describes these tasks:
-
Section 4.6.1, "Uploading VM Templates to Oracle Exalogic Using EMOC"
-
Section 4.6.2, "Create a VM on Exalogic from the Server Template"
4.6.1 Uploading VM Templates to Oracle Exalogic Using EMOC
To upload VM templates to Oracle Exalogic using EMOC:
-
Log on to EMOC.
-
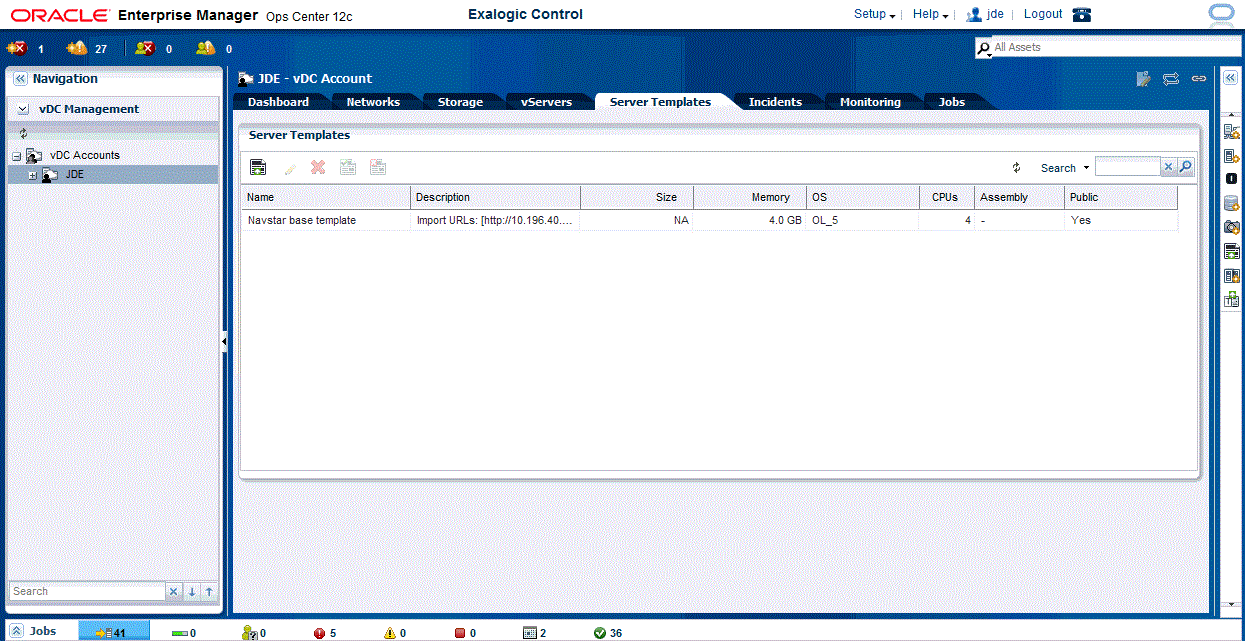
On EMOC, select the account on the left side menu, in this example JDE, and then select the Server Templates tab.
-
Click the Upload icon (left-most).
-
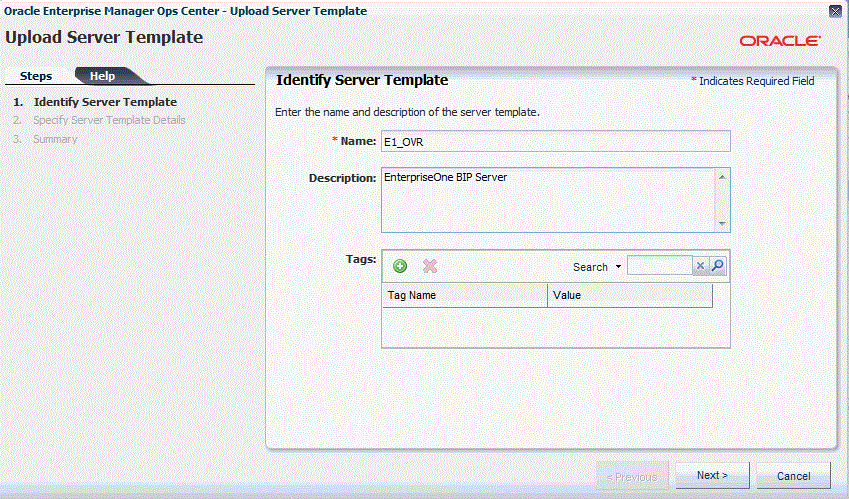
On Identify Server Template, complete these fields:
-
Name
Enter a name for the template. For example, E1_OVR.
-
Description
Enter a description for the template. For example, EnterpriseOne BIP Server.
-
-
Click the Next button.
-
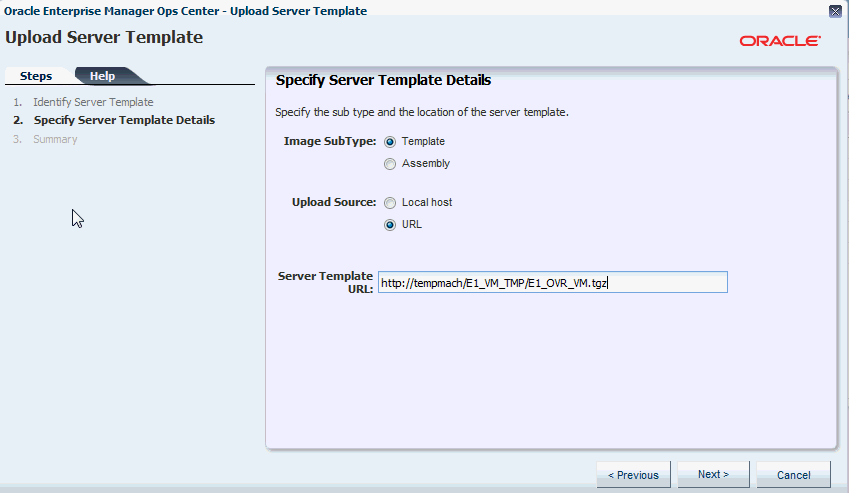
On Specify Server Template Details, select these radio buttons:
-
Templates
-
URL
Complete this field:
-
Server Template URL
Enter the URL for the Server Template that you want to upload. For example:
http://tempmach/E1_VM_TMP/BIP/E1_OVR_VMNote:
The value that defaults into this field is the temporary space which was previous enabled with WEB/DAV. You must modify this value with the actual location of your files to upload, where "tempmach" is the machine on which you are creating the temporarily uploaded directory. The directory value that you would specify in this example is consistent with the values in the preceding sections of this document describing the setup of the temporary upload location. In this case for the BIP Server, refer to Section 4.5.6, "Working with .zip and .tgz files for the JD Edwards EnterpriseOne Image for the BI Publisher Server".Note:
The setup and configuration of a vServer Types on Oracle Exalogic is beyond the scope of this guide. Refer to the Oracle Exalogic guide for more information.
-
-
Click the Next button.
-
On Summary, verify your entries and click the Finish button.
Note:
You can monitor the status of the upload from the jobs tabs. When complete, the following screen is displayed.Note:
The setup and configuration of a vServer Types on Oracle Exalogic is beyond the scope of this guide. Refer to the Oracle Exalogic guide for more information.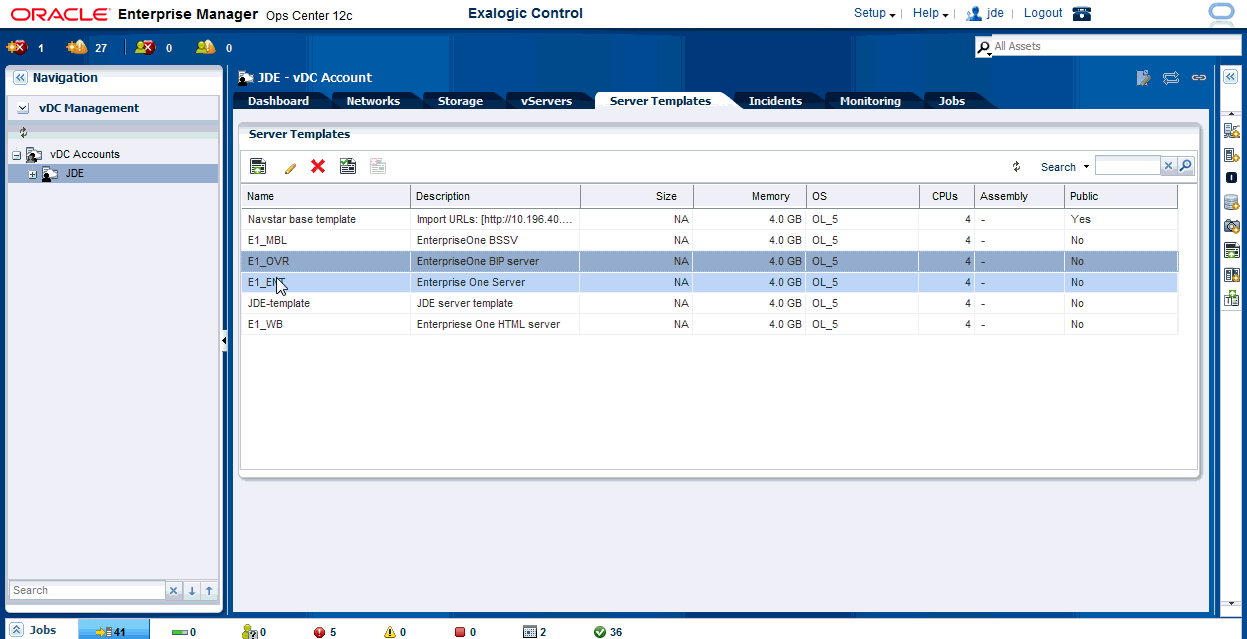
-
On Server Templates, verify that the template you uploaded is displayed in the list.
-
Repeat this process for each of the Oracle VM templates for JD Edwards EnterpriseOne that want to install on Exalogic, making appropriate changes for the name of the template and the location of the tgz file to upload.
4.6.2 Create a VM on Exalogic from the Server Template
To create a VM from the Server Template that you uploaded in the previous section:
-
From EMOC, in the left hand pane, navigate to vDC Management > vDC Accounts > JDE, where JDE is the name of the account used in this guide for the VM Templates for JD Edwards EntepriseOne on Oracle Exalogic.
-
Right click on the JDE node to display the action dialog and select this option:
Create Virtual Server
-
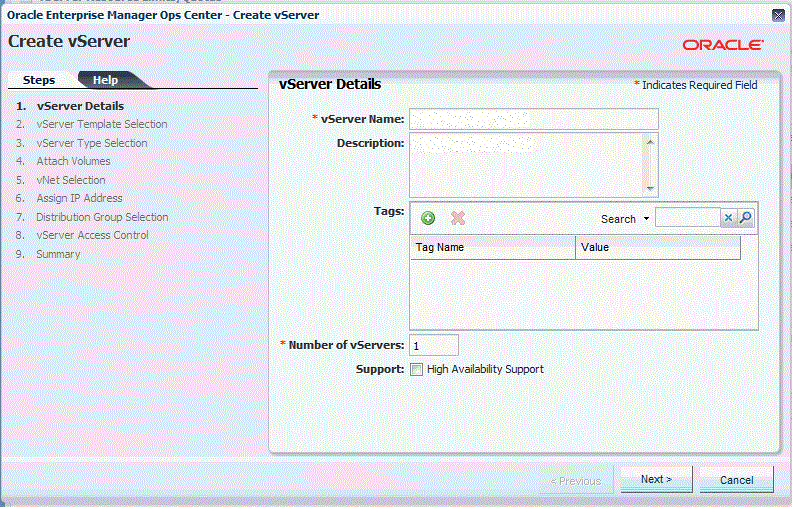
On vServer Details, complete these fields:
-
VServer Name
This field is required. Enter any name for the VM of the EnterpriseOne server you are creating. This can be the machine name.
-
Description
Enter a description for the VM of the EnterpriseOne server you are creating. For example, you might enter such values as EnterpriseOne BSSV, EnterpriseOne BIP, EnterpriseOne Enterprise Server, or EnterpriseOne HTML Server.
Also on vServer Details, ensure this radio button is not checked:
-
Support: High Availability Support
-
-
Click the Next button.

-
On vServer Template selection, highlight the available server template that you want to create. The names displayed are those you chose when you uploaded the template. For example, E1_MBL.
-
Click the Next button.
-
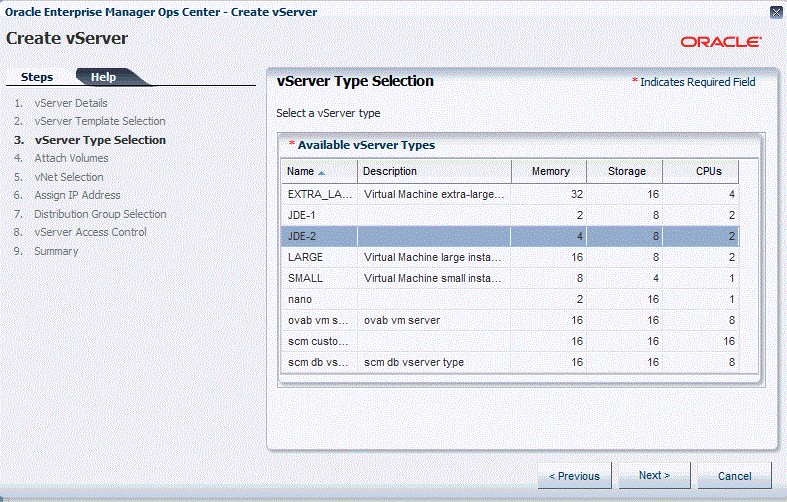
On vServer Type Selection, highlight the available vServer Type that you want to create. This examples shows two vServer types that were previously created:
-
JDE-1
As shown, this vServer is defined for 2 GB of memory, 8GB storage, and 2 CPUs.
-
JDE-2
As shown, this vServer is defined for 4 GB of memory, 8GB storage, and 2 CPUs.
-
-
Click the Next button to continue with the highlighted vServer type.
-
The next step is for attaching volume groups. In this example, no volume groups are selected. Therefore, you can click Next to continue.
-
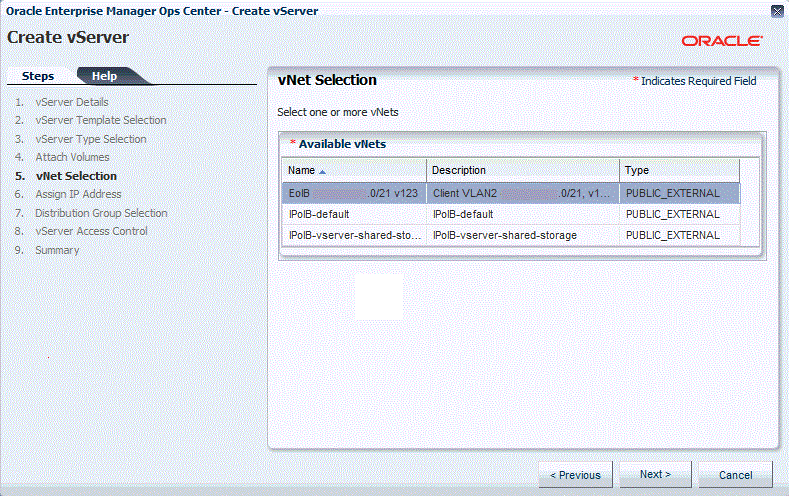
On vNet Selection, highlight a configured network that you want to use with the VM.
Note:
The setup and configuration of a vNet on Exalogic is beyond the scope of this guide. Refer to the Exalogic guide for more information. -
Click the Next button.
-
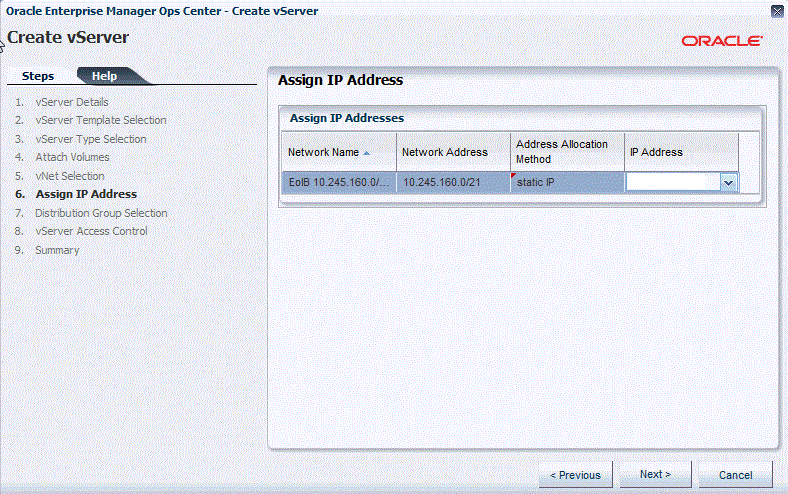
On Assign IP Address, it is assumed the for Address Allocation Method the static IP address is selected, and that for IP Address the particular IP address for this VM is selected. This example also assumes that the Address Allocation Method and the IP address have been previously configured with the Exalogic.
Note:
The setup and configuration of IP addresses on Exalogic is beyond the scope of this guide. Refer to the Exalogic guide for more information. -
Click the Next button.
-
The next steps are for Distribution Group Selection and vServer Access Control. In this example, these are not configured so you can click Next until you get to the Summary screen.
-
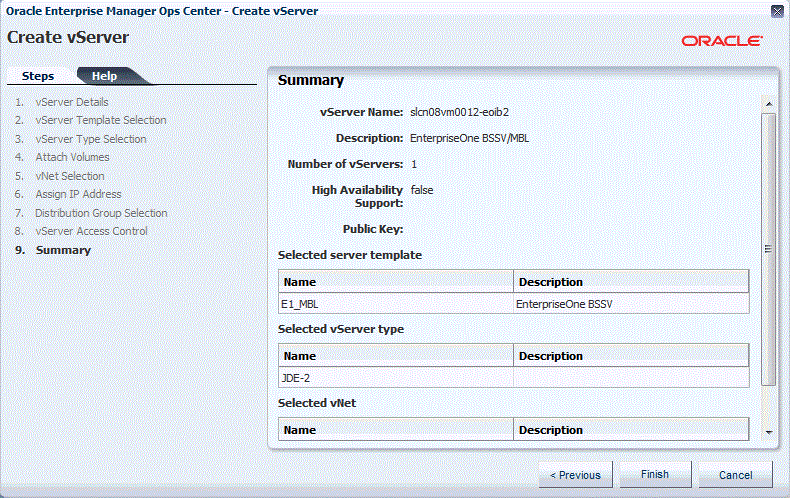
On Summary, review your selections and click Finish.
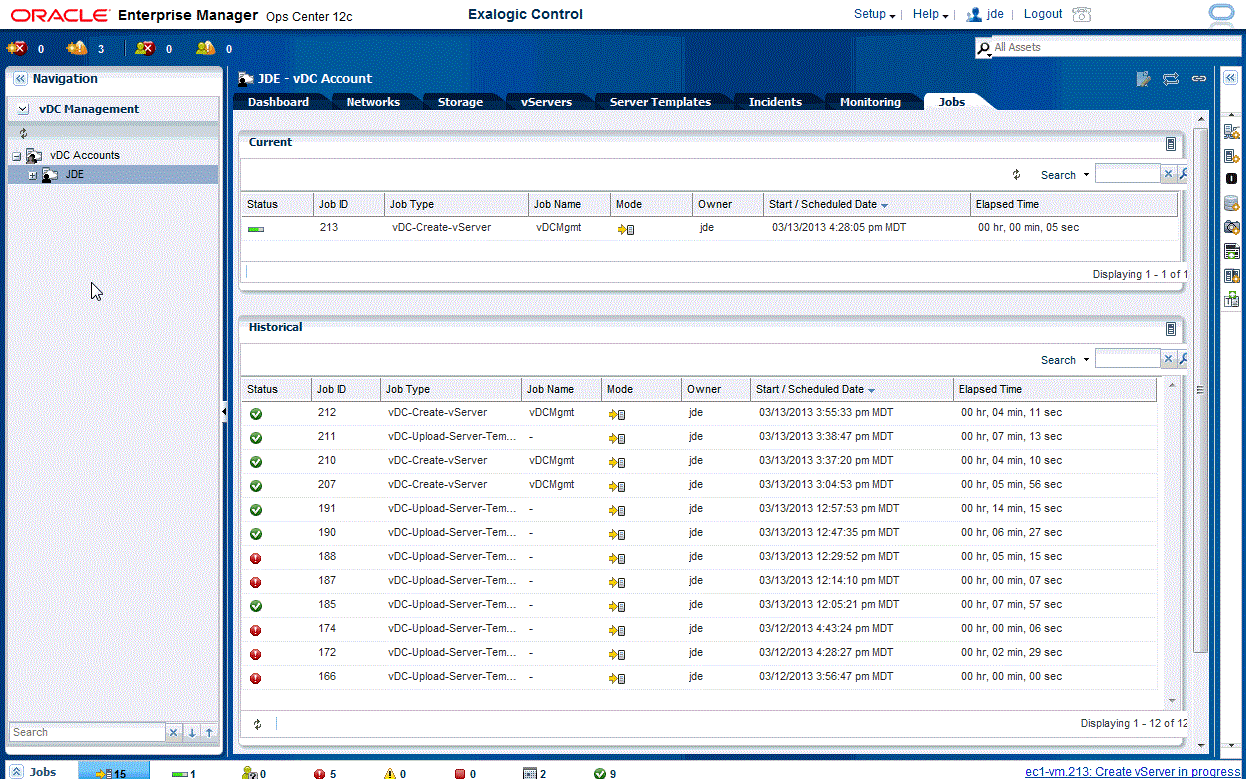
You can review the progress of the VM from the Jobs tab as shown in the example below.
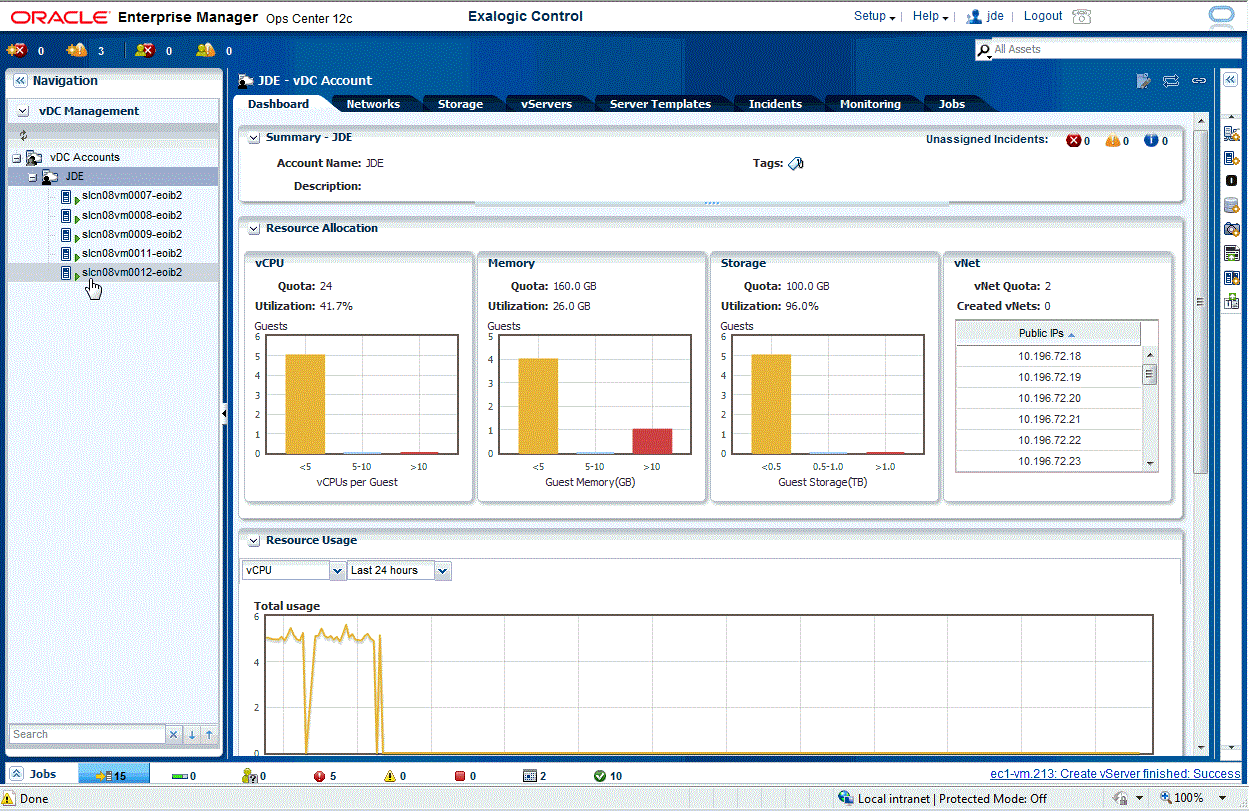
When the VM creation is complete, the new VM is displayed in the vServer tabs listing and under the account (JDE in the example shown below) in the left hand menu of EMOC.
4.6.3 Configuring the Network for the Exalogic Base System Template
With the ExaLogic system, the EMOC will set up the reolv.conf, ifcfg-bond0, and network files. The JD Edwards EnterpriseOne CVM templates require a manual setup as detailed in this section.
Normally on Linux systems, the network is configured before the root user logs on. In those cases, the network configuration is used to update this file:
/etc/sysconfig/jdedwards
When the Exalogic system starts, the network is not configured so setup of the above jdedwards file does not occur as expected. Therefore, you must manually edit the file to specify the correct server name and IP address. An example of an improperly setup jdedwards file is shown below.
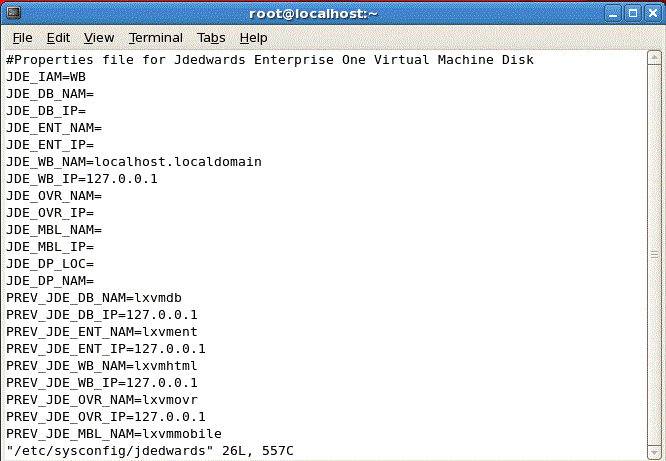
In the preceding example, incorrect values are supplied for these settings:
-
JDE_WB_NAM=localhost.localdomain -
JDE_WB_IP=127.0.0.1
Edit the /etc/sysconfig/jdedwards file to supply valid values for the specific server that you are configuring. As previously mentioned, this procedure assumes you are configuring an HTML server. Therefore, in this case you would need to modify these settings to match the actual settings for your environment:
-
JDE_WB_NAM=nameEnter the name of your HTML server. You should be able to find this value on your Pre-Install Worksheet.
-
JDE_WB_IP=ip_addressEnter the IP address of your HTML server. You should be able to find this value on your Pre-Install Worksheet.
Caution:
Make very sure that values are correct. The name is an alphanumeric value that may contain only a '-' or '_' special character and which cannot be greater than 15 characters. TheEOne_cfg.kshscript tests these values as they entered through it. However, by directly entering the values into thejdedwardsfile as described in this procedure, there will be no further edits or tests of values performed by the system.
The example in the preceding procedure assumed an HTML server. For other templates the values for localhost.localdomain and associated IP address for the server will have a different set of values pairs. Refer to the following table for a list of servers and their associated settings.
| IJDE_IAM= | Value Pair | Name |
|---|---|---|
| ENT | JDE_ENT_NAM
JDE_ENT_IP |
EnterpriseOne Server Template |
| WB | JDE_WB_NAM
JDE_WB_IP |
EnterpriseOne HTML Template |
| DB | JDE_DB_NAM
JDE_DB_IP |
EnterpriseOne Database Template (optional) |
| OVR | JDE_OVR_NAM
JDE_OVR_IP |
EnterpriseOne BIP Template (optional) |
| MBL | JDE_MBL_NAM
JDE_MBL_IP |
EnterpriseOne BSSV Template (optional) |
| not applicable | JDE_DP_NAM
JDE_DP_LOC |
EnterpriseOne Deployment Server |
Caution:
Do not use this option to change the name and IP address values for any system that has not previously been configured:EOne_cfg.ksh -chg
The -chg option is designed to move the current setting to the previous setting. In this case that would change the previous name to localhost.localdomain. Therefore, if this command was used, then when the EOne_cfg.ksh script is run to synchronize the value it would not find any setting of localhost.localdomain and would fail to update with the new name. You can use the -chg option for changing an already-configured system.
Caution:
If, as described in this procedure, you choose to manually edit the/etc/sysconfig/jdedwards file to provide all values, the system will not check to ensure the values are valid. As a result, for all settings no edits for valid values are performed. The EOne_cfg.ksh script, when ran with no parameters, will only prompt and check for blank values in the /etc/sysconfig/jdedwards file. If there are no blanks entries in the /etc/sysconfig/jdedwards then the system does not edit the file.
When EOne_cfg.ksh is ran with the -syn option the values in the /etc/sysconfig/jdedwards file are applied to relevant EnterpriseOne configurations on the local system. No edits are performed when running EOne_cfg.ksh -syn.
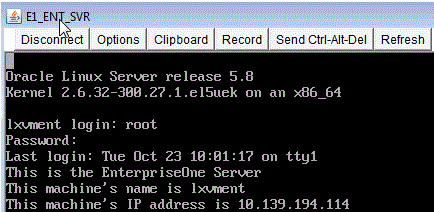
4.7 Starting EnterpriseOne Virtual Machine on Oracle Exalogic
When the Oracle Exalogic VM system is finished starting and configuring, it will clear the screen and prompt for login. Login into the VM as the root user. The root user account has been configure to determine what type of EnterpriseOne application image this system is and its hostname and IP. The type of system should be displayed and the machine's hostname and the IP address.
-
On the command line for your Oracle Exalogic VM system, run this script:
EOne_cfg.ksh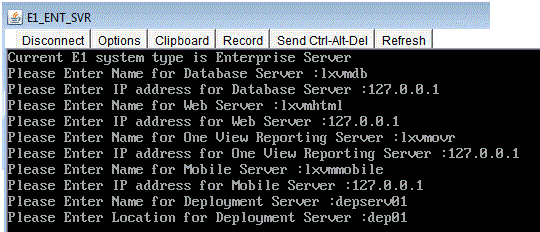
-
The script prompts for the following values (which should be recorded on the configuration Worksheet; refer to Section 4.2, "Completing the Pre-Install Worksheet"):
-
Name for Database Server
For example, lxvmdb.
Caution:
You must not use a fully qualified name. You can only use a 15 character alphanumeric string with no special characters.Note:
Regardless if you are using a non-virtualized database server, you must still supply a value here for the database name you are using. -
IP address for Database Server
For example, 127.0.0.1.
Note:
Regardless if you are using a non-virtualized database server, you must still supply a value here for the IP address of the database server you are using. -
Name for Web Server
For example, lxvmhtml.
Caution:
You must not use a fully qualified name. You can only use a 15 character alphanumeric string with no special characters. -
IP address for Web Server
For example, 127.0.0.1.
-
IP address for the One View Reporting Server (also called BIP Server)
For example, 127.0.0.1.
Note:
This value can be blank if you are not implementing this optional server. -
Name for the Mobile Server (also called the BSSV Server)
For example, lxvmmobile.
-
IP address for the Mobile Server (also called the BSSV Server)
For example, 127.0.0.1.
Note:
This value can be blank if you are not implementing this optional server. -
Name for Deployment Server
For example, depserv01.
Caution:
The value you enter here must be a maximum of 15 alphanumeric characters (no special characters). You should not use the fully qualified name. If you enter a fully qualified name in this field, the system will accept the value. However, a failure within JD Edwards EnterpriseOne will occur when you attempt to run a UBE from the Development Client. If so, to remedy you should refer to the section of this guide entitled: Section 3.9.6, "UBE Submission Failed on the Development Client". -
Location for Deployment Server
For example, dep01.
-
-
Press Enter after entering each value.
-
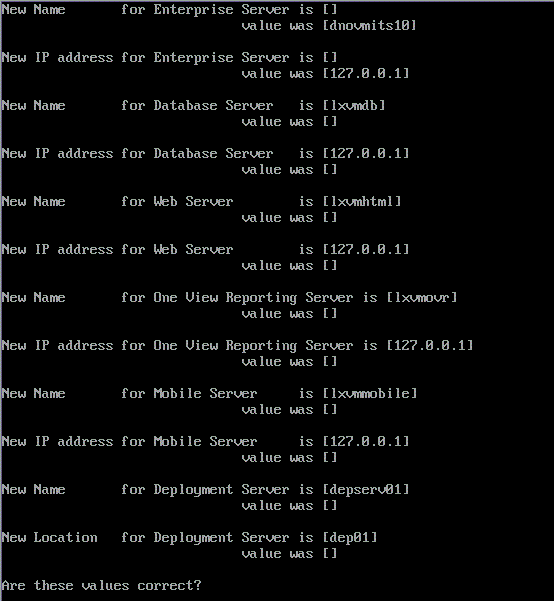
When done the script displays the configuration items and the values you provided. The script prompts the user to accept the values. If the values are correct enter a ”y” and press enter.
Caution:
If you press ”n” for NO, the process ends.
As the script executes it updates this file:
/etc/sysconfig/jdedwardsNote:
You must re-run theEOne-cfg.kshscript (passing the-synoption) on each Oracle Exalogic VM for JD Edwards EnterpriseOne to apply and synchronize the configuration values for each JD Edwards EnterpriseOne server. This is a different process on each enterprise application. The execution of this script for the Enterprise Server and HTML Server is very fast. If you are using a VM for your Database Server, it takes longer to execute due to the size of the database. -
On the Oracle Exalogic VM for the JD Edwards EnterpriseOne Enterprise Server, execute this command:
EOne_cfg.ksh -syn -
You are prompted to confirm values that will be used to update JD Edwards EnterpriseOne system.
-
On the Oracle Exalogic VM for the JD Edwards EnterpriseOne HTML Server, execute this command:
EOne_cfg.ksh -syn -
You are prompted to confirm values that will be used to update JD Edwards EnterpriseOne system.
-
Note:
This step is only applicable of your database is an Oracle VM. If you are using a non-virtualized database, you skip to the next Step 10.On the Oracle Exalogic VM for the JD Edwards EnterpriseOne Database Server, execute this command:
EOne_cfg.ksh -synThe Database sync process takes between 10 to 15 minutes to complete for the first execution. The
EOne_cfg.kshprompts for verification of correct values. If you press ”n” for NO the process ends. If you press ”y” for Yes the process creates the SQL statements to update the database with new hostnames. After the SQL statement is created it is executed. Upon each execution the system generates this messageThe Oracle base remains unchanged with value /u01/app/oracleThese messages come from the account profile of the oracle user. In order to execute the SQL statements the
EOne_cfg.kshscript must switch to the oracle account. You will see the profile message repeatedly as shown in the following example: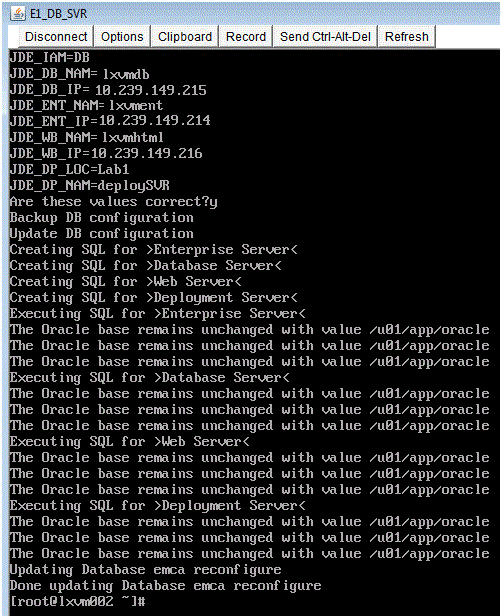
The last step of the
EOne_cfg.kshsync process is to check if the Oracle Database EMCA has been configured. The base database image is shipped with EMCA deconfigured. If EMCA has been configured, this means the image thatEOne_cfg.kshis running on has been cloned from a fully configured database. In that caseEOne_cfg.kshsync process deconfigures EMCA. Reconfiguring EMCA is responsibility of the database user. This configuration contains system passwords and should be different for each customer. The log file/tmp/update_dba_emca.logcontains a default EMCA command that customer may use to guide how they wish to reconfigure EMCA. -
At this point you can start the JD Edwards EnterpriseOne services.
-
For applicable servers (see Note below), restart the Server Manager agent by executing the
restartAgentscript in this directory:/u01/jdedwards/jde_home/SCHFA/bin/restartAgentNote:
This step is not applicable to the BIP server which does not use the Server Manager agent.
4.8 Changing Base Configurations of the JD Edwards EnterpriseOne Templates
The JD Edwards EnterpriseOne VM templates can be used in multiple configurations. You can change the base configurations of the JD Edwards EnterpriseOne templates to match your specific implementation. For example, the starting configuration could be a setup with an Enterprise Server, a Web Server and a Database Server - all on virtual machines. Alternately, the configuration could be for all of the above plus an optional OneView Reporting (also called BIP) and/or a Mobile (also called BSSV) Server.
The configuration scripts as designed to allow the changes to the configuration of virtual machines after the initial install. Consider the following scenario. An initial configuration is set with the Enterprise, HTML, and Database Servers. Subsequent to the initial configuration, you might want to add the optional OneView Reporting (also called BIP) and/or a Mobile (also called BSSV) Server. The procedure to add either or both is the same.
In the first example, when the base configuration was set up, the name and IP for the name and IP address values were left blank for the non-installed optional OneView Reporting (also called BIP) and/or a Mobile (also called BSSV) Server. To add them to the configuration you must run the EOne_cfg.ksh scripts again. First you run the scripts to add the new virtual machines to the configuration files, and then you run the scripts a second time to synchronize those settings.
The procedure depends on whether the Database Server is virtualized (installed with an Oracle VM Template) or non-virtualized, as described in these sections:
-
Section 4.8.1, "Changing Base Configurations if the Database Server is Virtualized (VM Template)"
-
Section 4.8.2, "Changing Base Configurations if the Database Server is non-Virtualized"
4.8.1 Changing Base Configurations if the Database Server is Virtualized (VM Template)
Use this procedure if you have previously installed Oracle VM Templates without the optional servers, and if now you want to add one or more optional server types. Use this procedure if your Database Server is virtualized (that is, installed using an Oracle VM Template:
-
From the command line of the server onto which you want to install an optional Oracle VM Template, run this configuration script and supply all the existing and the new server information:
EOne_cfg.ksh -
From the command line of the server onto which you want to install an optional Oracle VM Template, run the
EOne_cfg.kshconfiguration script with the-synswitch:EOne_cfg.ksh -syn -
On the Database Server, run the configuration script and supply all the existing and the new server information:
EOne_cfg.kshCaution:
Before you run theEOne_cfg.ksh -synon the database machine you must run the following command to allow the oracle user to reset the expiration date on the oracle database passwords:chmod o+r /u01/jdedwards/vmScripts/userUnlock.sql -
On the Database Server, run the
EOne_cfg.kshconfiguration script with the-synswitch:EOne_cfg.ksh -synCaution:
After you run theEOne_cfg.ksh -synon the database machine you should run the following command to reset the expiration date on the oracle database passwords for the oracle user:chmod o-r /u01/jdedwards/vmScripts/RAN.userUnlock.sqlEnter the above command as a single contiguous line with no returns.
4.8.2 Changing Base Configurations if the Database Server is non-Virtualized
Use this procedure if you have previously installed Oracle VM Templates without the optional servers, and if now you want to add one or more optional server types. Use this procedure if your Database Server is non-virtualized (that is, installed on a non-virtualized database server such as Oracle Exadata, Oracle RAC, or Oracle Database Appliance (ODA).
-
From the command line of the server onto which you want to install an optional Oracle VM Template, run this configuration script and supply all the existing and the new server information:
EOne_cfg.ksh -
From the command line of the server onto which you want to install an optional Oracle VM Template, run the
EOne_cfg.kshconfiguration script with the-synswitch:EOne_cfg.ksh -syn -
On the Enterprise Server, run the configuration script and supply all the existing and the new server information:
EOne_cfg.ksh -
On the Enterprise Server, run the script
gen_sql.kshwith the code for the new server. The code for the BIP server is OVR. The code for the BSSV server is MBL. Run either or both of the following commands depending on which server you want to add.OneView Reporting Server (also called BIP Server)
gen_sql.ksh OVRMobile Server (also called BSSV Server)
gen_sql.ksh MBLThese scripts produce SQL statements that you must run as described in the next step.
-
To run the SQL statements produced by the scripts run in the previous step, execute either or both of the following commands depending on which server you want to add:
OneView Reporting Server (also called BIP Server)
exe_gen_sql.ksh OVRMobile Server (also called BSSV Server)
exe_gen_sql.ksh MBLAfter these scripts are run, your database is updated for the selected server(s).