4 Working with Oracle VM Templates for JD Edwards EnterpriseOne
This chapter contains the following topics:
-
Section 4.1, "Implementing the Oracle Database With or Without Oracle VM Templates"
-
Section 4.3, "Working with the Oracle VM Image Files for JD Edwards EnterpriseOne"
-
Section 4.4, "Working with JD Edwards OVM Tools (config.sh Configuration Script)"
4.1 Implementing the Oracle Database With or Without Oracle VM Templates
The installation process allows you to deploy the JD Edwards EnterpriseOne database server either as an Oracle VM virtual machine or to a non-virtualized database server. You can choose to run the Oracle database as follows:
-
VMs on a Linux x86 machine
You can deploy all Oracle VM templates, including the Oracle Database template, to a Linux x86 machine. This is fully support ed for both non-production environments, such as evaluation or testing, as well as production environments.
-
Oracle Enterprise Database on a Non-Virtualized Machine
The non-virtualized database could be an Oracle Exadata, Oracle Database Appliance (ODA), Oracle Real Application Cluster (RAC), or other similar machine. In this case you would not use a VM template for the database, but instead you would install the database using a special version of the EnterpriseOne Platform Pack installer that is designed to work with the other base and optional Oracle VM Templates that are described in this guide. To use this installer refer to chapter of this guide entitled: Chapter 7, "Working with the Platform Pack in Silent Mode for a Non-Virtualized Database Server".
4.2 Completing the Pre-Install Worksheet
You can use the Pre-Install Worksheet in this section to gather information required to answer the questions for which you will be prompted by the template installer as it executes. Prior to installing any template, it is highly recommended that you complete the Pre-Install Worksheet with the requisite information. By doing so you will reduce the potential for errors due to incorrect data entry information.
Caution:
The scripts to configure the JD Edwards EnterpriseOne system are not tied to actual configuration of the system. That is, before you run the scripts you must know the IP address, hostname, and system configuration of the target machine in order to match to the expected configuration of JD Edwards EnterpriseOne. Filling out the Pre-Install Worksheet helps guarantee an accurate and valid configuration.Caution:
The implementation of the JD Edwards EnterpriseOne delivered with the Oracle VM Templates has Demo data loaded in the DV910 environment. Refer to Appendix C, "Security and Demo Data Configuration" for additional details.Tip:
Contact your network administrator to attain valid network settings for your network prior to creating new VM Guests.The following image shows the Pre-Install Worksheet:
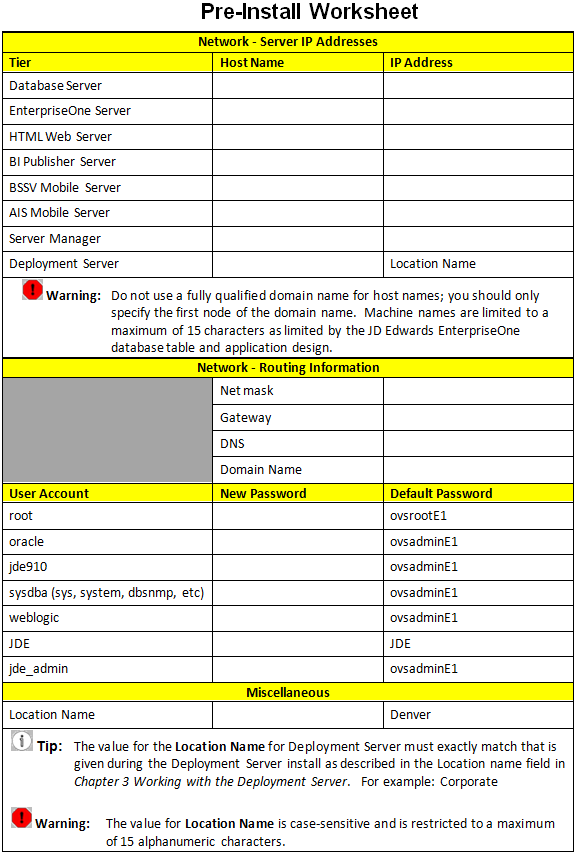
Description of the illustration pre_install_wksht_ovm7.gif
4.3 Working with the Oracle VM Image Files for JD Edwards EnterpriseOne
The JD Edwards EnterpriseOne Oracle VM (OVM) system implementation requires either an FTP or HTTP server to upload images files into the OVM repository. Once that configuration is in place, you can download the EnterpriseOne System and Application zip files from the Oracle Software Delivery Cloud (https://edelivery.oracle.com).
The JD Edwards EnterpriseOne OVM is delivered in these zip files and images:
-
One (1) zip file containing JD Edwards EnterpriseOne OVM Tools for Template Extraction and Configuration
-
One (1) System Image
This is the Linux 5.8 VM system.
-
Seven (7) Application Images
These are the JD Edwards EnterpriseOne components:
-
Enterprise Server
-
Database Server
-
HTML Server
-
BI Publisher Server
-
Mobile Server
-
Application Interface Services (AIS) Server
-
Server Manager (Linux-based)
-
Disk Space Requirements:
For disk space requirements for each of the above-listed zip file or image, refer to the section of this guide entitled: Section 1.6, "Disk Space Requirements".You can obtain the download files for the Oracle VM Templates for JD Edwards from the Oracle Software Cloud (https://edelivery.oracle.com. The following table lists all available download files for Oracle VM Templates for JD Edwards EnterpriseOne:
| Image File Name | Description | Download Directory |
|---|---|---|
| V43846-01 | JD Edwards EnterpriseOne 9.1.2 and Tools 9.1.4.4 - Deployment Server for Use with Express Installation 1 of 6 | NA |
| V43847-01 | JD Edwards EnterpriseOne 9.1.2 and Tools 9.1.4.4 - Deployment Server for Use with Express Installation 2 of 6 | NA |
| V43848-01 | JD Edwards EnterpriseOne 9.1.2 and Tools 9.1.4.4 - Deployment Server for Use with Express Installation 3 of 6 | NA |
| V43849-01 | JD Edwards EnterpriseOne 9.1.2 and Tools 9.1.4.4- Deployment Server for Use with Express Installation 4 of 6 | NA |
| V43850-01 | JD Edwards EnterpriseOne 9.1.2 and Tools 9.1.4.4- Deployment Server for Use with Express Installation 5 of 6 | NA |
| V43851-01 | JD Edwards EnterpriseOne 9.1.2 and Tools 9.1.4.4 - Deployment Server for Use with Express Installation 6 of 6 | NA |
| V43852-01 | Oracle VM Template for JD Edwards EnterpriseOne 9.1.2 and Tools 9.1.4.4 Enterprise Server 1 of 2 | JDE_ENT |
| V43853-01 | Oracle VM Template for JD Edwards EnterpriseOne 9.1.2 and Tools 9.1.4.4 Enterprise Server 2 of 2 | JDE_ENT |
| V43854-01 | Oracle VM Template for JD Edwards EnterpriseOne 9.1.2 and Tools 9.1.4.4 - HTML Server (WebLogic Server 12.1.2.0) | JDE_WEB |
| V43855-01 | Oracle VM Template for JD Edwards EnterpriseOne 9.1.2 and Tools 9.1.4.4 - Database Server (Oracle Database 12.1.0.1) 1 of 7 | JDE_DB |
| V43856-01 | Oracle VM Template for JD Edwards EnterpriseOne 9.1.2 and Tools 9.1.4.4 - Database Server (Oracle Database 12.1.0.1) 2 of 7 | JDE_DB |
| V43857-01 | Oracle VM Template for JD Edwards EnterpriseOne 9.1.2 and Tools 9.1.4.4 - Database Server (Oracle Database 12.1.0.1) 3 of 7 | JDE_DB |
| V43858-01 | Oracle VM Template for JD Edwards EnterpriseOne 9.1.2 and Tools 9.1.4.4 - Database Server (Oracle Database 12.1.0.1) 4 of 7 | JDE_DB |
| V43859-01 | Oracle VM Template for JD Edwards EnterpriseOne 9.1.2 and Tools 9.1.4.4 - Database Server (Oracle Database 12.1.0.1) 5 of 7 | JDE_DB |
| V44308-01 | Oracle VM Template for JD Edwards EnterpriseOne 9.1.2 and Tools 9.1.4.4 - Database Server (Oracle Database 12.1.0.1) 6 of 7 | JDE_DB |
| V45140-01 | Oracle VM Template for JD Edwards EnterpriseOne 9.1.2 and Tools 9.1.4.4 - Database Server (Oracle Database 12.1.0.1) 7 of 7 | JDE_DB |
| V43861-01 | Oracle VM Template for JD Edwards EnterpriseOne 9.1.2 and tools 9.1.4.4 - Oracle Linux 5.8 System | JDE_EXA |
| V43862-01 | Oracle VM Template for JD Edwards EnterpriseOne - Oracle Exalogic 2.0.4.0.0 Base Guest Template for Exalogic Linux x86-64 (64 bit) | JDE_EXA |
| V43863-01 | Oracle VM Template for JD Edwards EnterpriseOne 9.1.2 and Tools 9.1.4.4 - Non Virtualized Database Server (Oracle Database 12.1.0.1) | NA |
| V43864-01 | Oracle VM Template for JD Edwards EnterpriseOne 9.1.2 and Tools 9.1.4.4 - BSSV and ADF Server (WebLogic Server 10.3.5) (1/2) | JDE_MBL |
| V43865-01 | Oracle VM Template for JD Edwards EnterpriseOne 9.1.2 and Tools 9.1.4.4 - BSSV and ADF Server (WebLogic Server 10.3.5) (2/2) | JDE_MBL |
| V43866-01 | Oracle VM Template for JD Edwards EnterpriseOne 9.1.2 and Tools 9.1.4.4 - BI Publisher Server 11.1.1.7.1 (1/5) | JDE_BIP |
| V43867-01 | Oracle VM Template for JD Edwards EnterpriseOne 9.1.2 and Tools 9.1.4.4 - BI Publisher Server 11.1.1.7.1 (2/5) | JDE_BIP |
| V43868-01 | Oracle VM Template for JD Edwards EnterpriseOne 9.1.2 and Tools 9.1.4.4 - BI Publisher Server 11.1.1.7.1 (3/5) | JDE_BIP |
| V43869-01 | Oracle VM Template for JD Edwards EnterpriseOne 9.1.2 and Tools 9.1.4.4 - BI Publisher Server 11.1.1.7.1 (4/5) | JDE_BIP |
| V43870-01 | Oracle VM Template for JD Edwards EnterpriseOne 9.1.2 and Tools 9.1.4.4 - BI Publisher Server 11.1.1.7.1 (5/5) | JDE_BIP |
| V43871-01 | Oracle VM Template for JD Edwards EnterpriseOne 9.1.2 and Tools 9.1.4.4 - Application Interface Services Server (Weblogic Server 12.1.2.0) | JDE_AIS |
| V43872-01 | Oracle VM Template for JD Edwards EnterpriseOne 9.1.2 and Tools 9.1.4.4 - Server Manager (Weblogic Server 12.1.2.0) (1/4) | JDE_SM |
| V43873-01 | Oracle VM Template for JD Edwards EnterpriseOne 9.1.2 and Tools 9.1.4.4 - Server Manager (Weblogic Server 12.1.2.0) (2/4) | JDE_SM |
| V44309-01 | Oracle VM Template for JD Edwards EnterpriseOne 9.1.2 and Tools 9.1.4.4 - Server Manager (Weblogic Server 12.1.2.0) (3/4) | JDE_SM |
| V44310-01 | Oracle VM Template for JD Edwards EnterpriseOne 9.1.2 and Tools 9.1.4.4 - Server Manager (Weblogic Server 12.1.2.0) (4/4) | JDE_SM |
| V43874-01 | Oracle VM Templates for JD Edwards EnterpriseOne 9.1.2 and Tools 9.1.4.4 Readme | NA |
| V43875-01 | Oracle VM Templates for JD Edwards EnterpriseOne 9.1.2 and Tools 9.1.4.4 - Configuration Utility and Manifest | JDE_OVM |
4.4 Working with JD Edwards OVM Tools (config.sh Configuration Script)
This release the Oracle VM Templates for JD Edwards EnterpriseOne includes a set of tools to help with the configuration of the VM images in zip files that you downloaded as listed in the preceding section of this guide entitled: Section 4.3, "Working with the Oracle VM Image Files for JD Edwards EnterpriseOne".
This section describes these tasks:
4.4.1 Installing the JD Edwards OVM Tools
The JD Edwards OVM tools (called JDE_OVM) are included in the VV43875-01.zip file. You should place this zip file on a work machine with adequate disk space for this zip and the total of each image you intend to install.
Disk Space Requirements:
For disk space requirements for each of the above-listed zip file or image, refer to the section of this guide entitled: Section 1.6, "Disk Space Requirements".The V43875-01.zip file contains files which comprise the JDE_OVM tools that you can use to extract and configure the JD Edwards EnterpriseOne VM templates. In order to use the JDE_OVM tools, you must have these packages installed
-
lvm2-2.02.88-8.100.3.el1(only required for Exalogic) -
dialog-1.0.20051107-1.2.2Note:
Thedialogpackage is available from the Oracle Linux repository.
On a work machine on which you intend to install the JD Edwards OVM Tools and VM images:
-
Create a directory into which you will place the
V43875-01.zipfile which contains the JD Edwards OVM Tools. For example:mkdir -p /OVS/configTest -
Place the downloaded
V43875-01-01.zipinto the directory you created in the previous step. -
Unzip the file using this command:
unzip V43875-01.zipThe unzip action should have created a directory named
JDE_OVM. -
Change directory to
JDE_OVM, which should have been created in the previous step.cd JDE_OVMThis directory should contain the following extracted files:
-
config.sh -
Help.doc -
jdedwards.conf -
OVM7.mft -
setup.sh
-
4.4.2 Creating the Directory Structure for the Oracle VM Templates for JD Edwards EnterpriseOne
You will run the setup.sh script to create an empty but complete directory structure that supports all the VM templates supported by the current release. As it executes the script reads the manifest file (*.mft) for the current release and informs you which Oracle eDelivery part number files go into each directory. This helps you to obtain the required image files for your implementation and place them in the appropriate directory so that can be further configured and deployed by the JDE_OVM tools.
To create the directories for the Oracle VM Templates for JD Edwards EnterpriseOne, run this script:
setup.sh
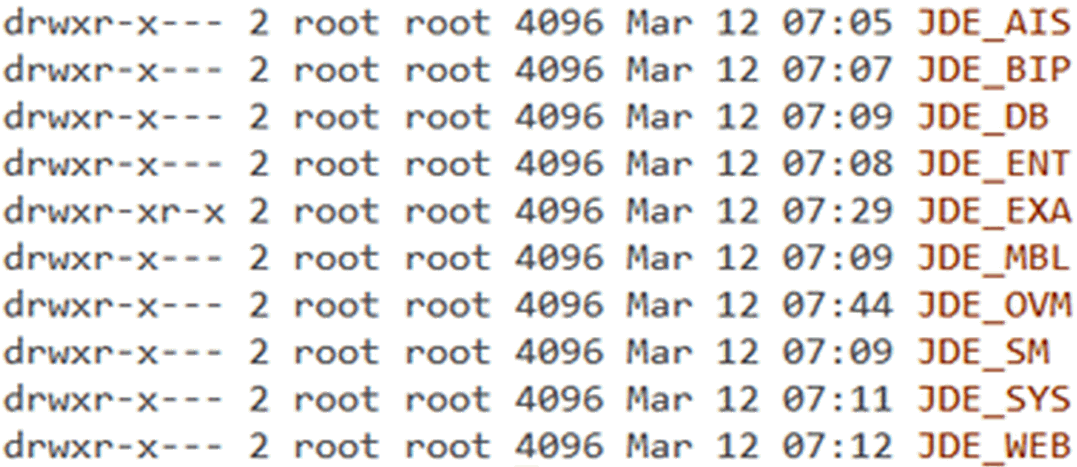
This script creates directories for all the Oracle VM templates for JD Edwards EnterpriseOne, as shown in the right-most field in this example:
Caution:
Although thesetup.sh creates the complete directory structure (which is empty at this point), you only need to download and configure the templates that you intend to use in your installation. You should not delete the directories the template directories that are created by the setup.sh script. These directories are shown in the graphic above and listed alphabetically here as well:
-
J
DE_AIS -
JDE_BIP -
JDE_DBIf you are planning for a non-virtualized database you should delete the
JDE_DBdirectory or leave it empty (that is, you should not upload the database image into it). If this directory does not exist or does not contain a database Oracle VM image, then theconfig.shruns in a mode that assumes a non-virtualized database and configures accordingly. -
JDE_ENT -
JDE_EXA -
JDE_MBL -
JDE_OVM -
JDE_SM -
JDE_SYS -
J
DE_WEB
4.4.3 Working with the Configuration Script
You can use the config.sh configuration script to perform these functions:
-
Verify the correct files exist in the correct locations
-
Extract and merge multi-part files
-
Copy system images
-
Prompt for input of server names and IP address
-
Configure and pair the System and Application images
Deploy the paired System and Application image files
This section describes these functions of the config.sh script:
-
Section 4.4.3.11, "Configuring for a Non-Virtualized or Exadata Database"
-
Section 4.4.3.12, "Adding an Additional Enterprise Server (Standalone)"
-
Section 4.4.3.13, "Adding an Additional HTML Server (Standalone)"
For an installation on an x86 Linux machine
-
Ensure the
dialog-1.0.20051107-1.2.2package exists on the machine on which you are running theconfig.shscript. -
Ensure the
lvm2-2.02.88-8.100.3.el1package does not exist on the machine on which you are running theconfig.shscript. -
Run the
config.shscript with the-nodepstartup parameter:> config.sh -nodepNote:
The display of adialogmenu requires a screen that supports a resolution of 120x48. Further, you must either have a connection package that supports screen scale or else you must the administrative console.
For an installation on an Exalogic machine
-
Ensure the
dialog-1.0.20051107-1.2.2package exists on the machine on which you are running theconfig.shscript.Note:
Thedialogpackage is available from the Oracle Linux repository. -
Ensure the
lvm2-2.02.88-8.100.3.el1package exists on the machine on which you are running theconfig.shscript. -
Run the
config.shscript with no startup parameters:> config.sh
The procedures in this section illustrates a typical execution of the config.sh script using a virtualized database (Oracle VM Template). This example assumes the values shown on the Example Pre-Install Worksheet shown below.
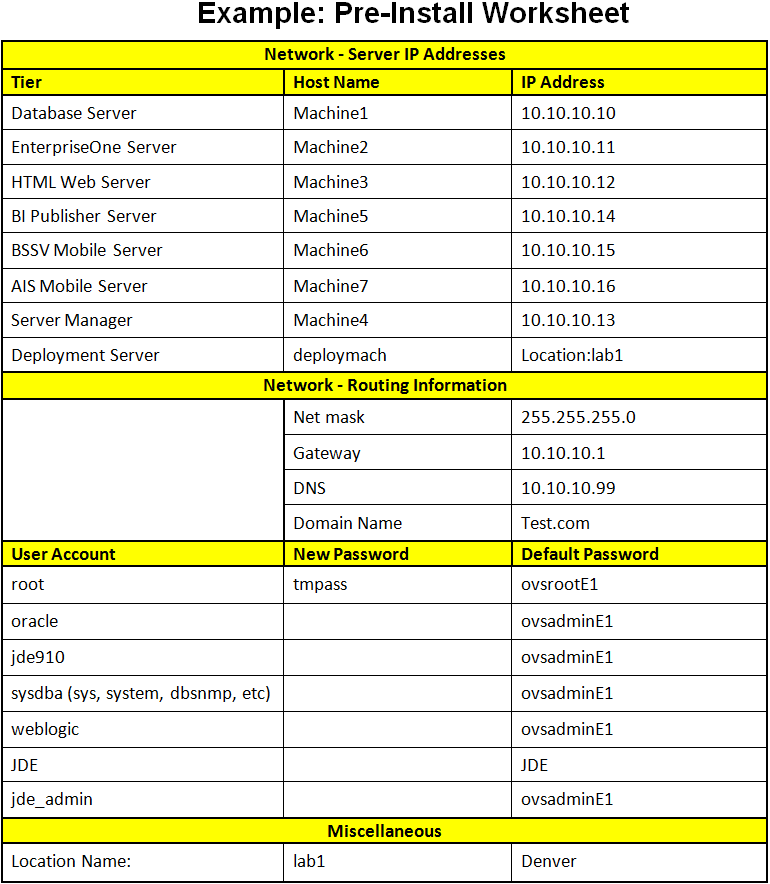
Description of the illustration ex_pre_install_wksht_ovm7.gif
4.4.3.1 Manifest Check
This section describes the Manifest function of the config.sh script.
-
Launch the
config.shscript. -
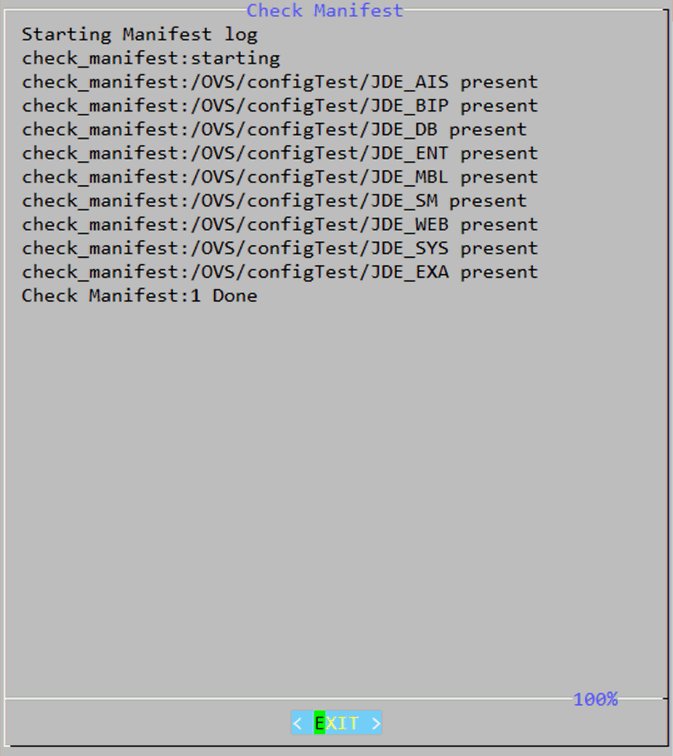
The first function of the Manifest Check, which first checks the contents of the
OMV7.mftfile. Next it checks for the existence of the required of the directory structure that was created when you ran thesetup.shscript.Below is an example of a successful Manifest Check.
Note:
The preceding example of Manifest Check shows the directory structure with a path containing/OVS/configTest. This is a variable value that depends on the structure you have defined for your installation. -
The preceding screen example shows the Manifest Check process has completed successfully. You can determine that the entire process completed successfully when you see the Manifest:1 Done message at the bottom of the screen.
Press the Enter key to continue with script processing.
4.4.3.2 Extract and Merge
After the Manifest Check, the config.sh script continues with the Extract and Merge functions.
-
The following screen shows the starting of the Extract All function.
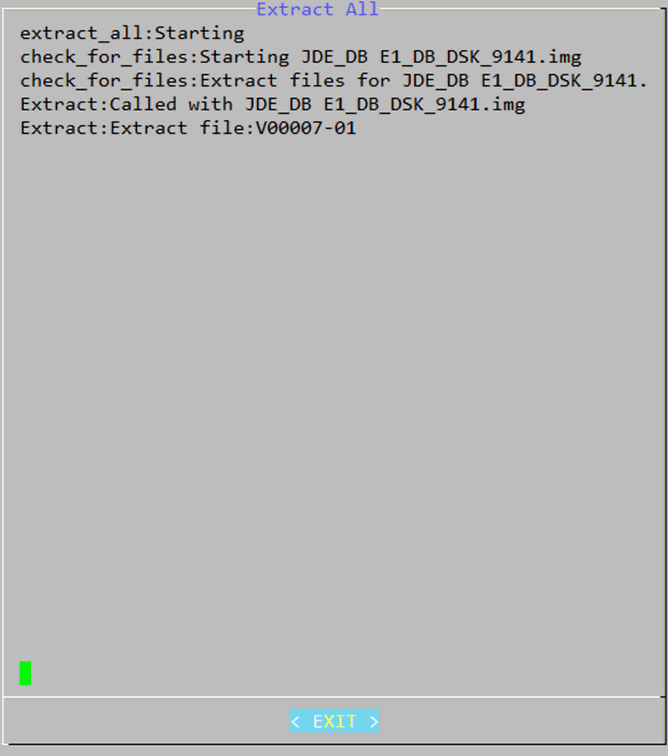
The preceding screen example shows that the JDE_DB directory was checked. Since no image was located in that directory, the next step is to check the manifest to determine which files are required to build a database image. The first file (in this example
V00007-01.zip) was found and therefore can be extracted as shown in the following screen example.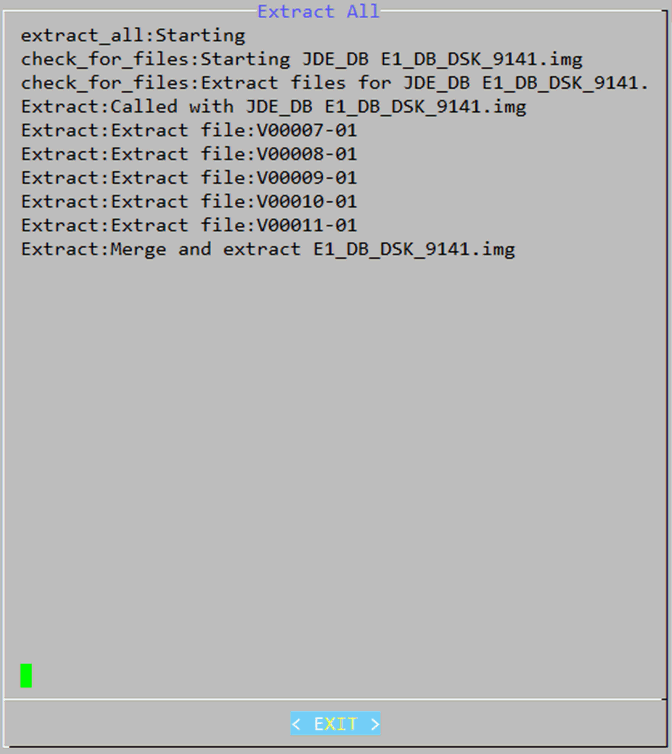
The above example indicates that all the part files for the database image have been located and unzipped. Subsequently these parts are able to be merged into the database image filed:
E1_DB_DSK_9141.img.Note:
The values for part number files and release version are variable and dependent on a particular release of the Oracle VM Templates for JD Edwards EnterpriseOne. -
After all the part files are located, the merge of these parts into the image file begins, as shown in the following example:
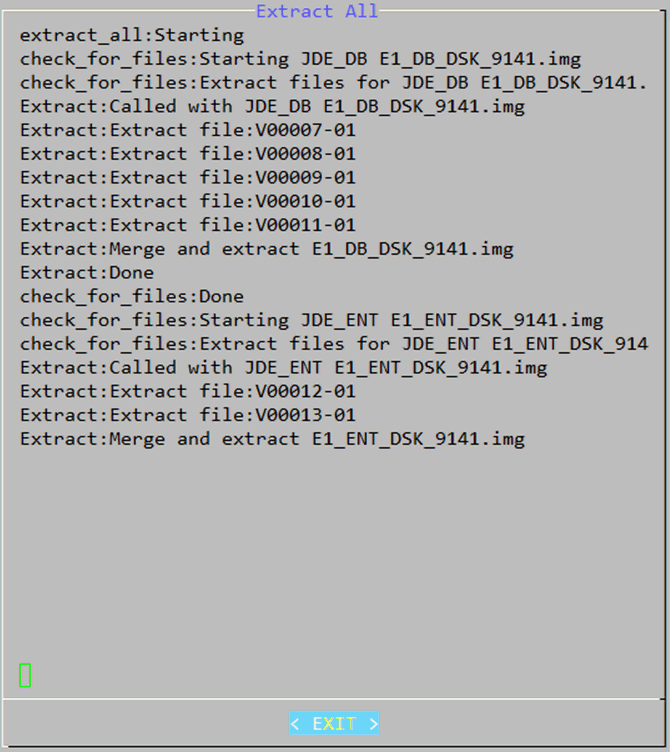
This preceding examples shows that the image for the database (
E1_DB_DSK_9141.img) was successfully merged and the process has moved on to the EnterpriseOne image, found the parts file for that image, unzipped the part files, and has started to merge them into the Enterprise Server image (E1_ENT_DSK_9141.img). -
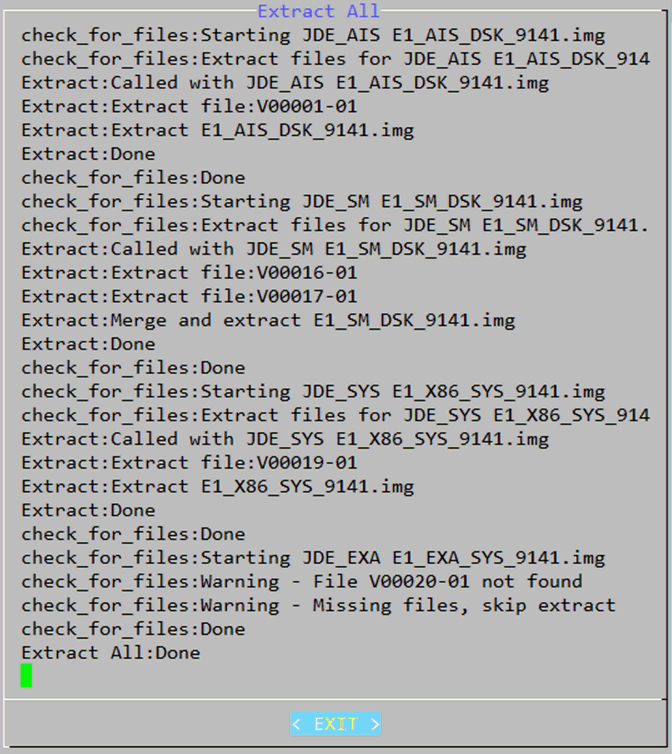
The following screen example shows the Extract and Merge process has completed successfully. You can determine that the entire process completed successfully when you see the Extract All: Done message at the bottom of the screen. You should not press the Enter key until you see this message. Depending on the performance of your machine, this process can take up to an hour or more.
Note:
In this example, note that there were no part files found for theE1_EXA_SYS_9144.img. If you were not installing this Oracle VM template for JD Edwards EnterpriseOne and therefore had not downloaded the image files, this may be normal for your installation.Regardless, note that the normal behavior of the script is to display a Warning that required files were not found for a certain image, and then continue the process. You will need to be familiar with the intended topology of installed components and check the log afterwards to determine if the Warnings can be ignored for your installation, or if you need to obtain the required components and re-run the configuration.
-
When the process is complete as indicated by the Extract All: Done message, press the Enter key to proceed to the next step in the configuration script process.
4.4.3.3 Copy System
After the Extract and Merge completes, the config.sh script continues with the System Copy functions.
-
As shown in the following example, the config.sh script begins to the Copy System functions to pair System files with each JD Edwards EnterpriseOne application image that you downloaded and want to configure and install.
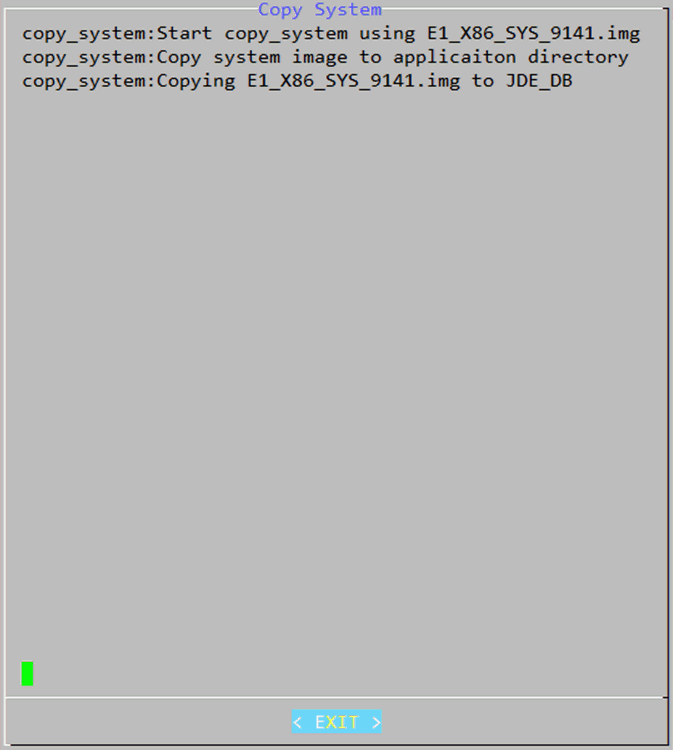
The above screen shot shows the start of the process to copy a system image file that is to be paired with each JD Edwards EnterpriseOne application image. In this example, the
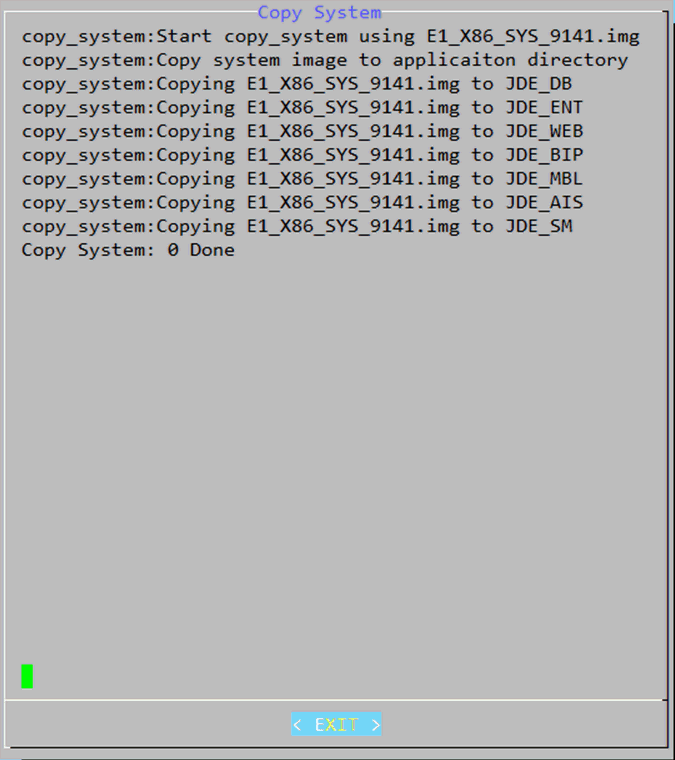
config.shscript previously determined that the only System image was for an x86 type system; therefore this is the image that it is copied. If theconfig.shscript had not previously detected an x86 System part file download and only detected an Exalogic System download, then it would have skipped the x86 System copy and begun with a copy of the Exalogic System. If both types of Systems were detected, the x86 System is set as the default and the script processing continues. In order to implement an Exalogic System, the Exalogic image must be the only image download that exists in theJDE_SYSdirectory.As shown in the following screen shot, the copy of the System continues for each detected D Edwards EnterpriseOne application image that you downloaded and therefore intend to install and configure.
-
When the config.sh script displays the message Copy System: 0 Done, press the Enter key to continue.
4.4.3.4 Server Configuration
After the Copy System completes, the config.sh script continues with the Server Configuration functions, which include:
-
Server Name
-
IP Address
-
Additional Server Configuration
-
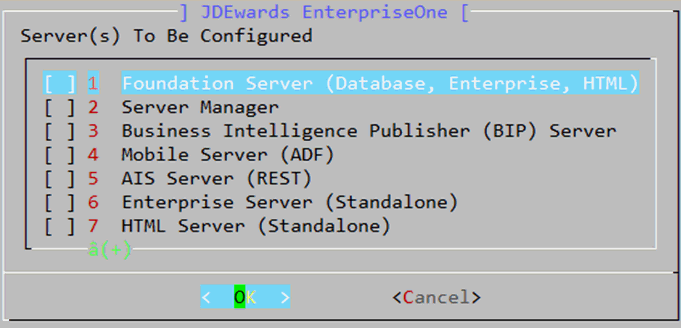
On JDEdwards EnterpriseOne, Server(s) To Be Configured, at a minimum, you must choose to configure Line Item 1, which is a combination servers called the Foundation Server. This combined server group includes the JD Edwards EnterpriseOne servers for the Database, Enterprise Server, and HTML Server. This is the minimum viable combination of servers for JD Edwards EnterpriseOne using Oracle VM Templates.
The other line items in this list are for optional JD Edwards EnterpriseOne servers. The term "Standalone" refers to a server of the selected type that are additional to those included in the mandatory Foundation Server group. That is, you can choose to install multiple EnterpriseOne Servers if you want to separate logic and batch functions, and you can install multiple HTML servers for scaling and performance.
-
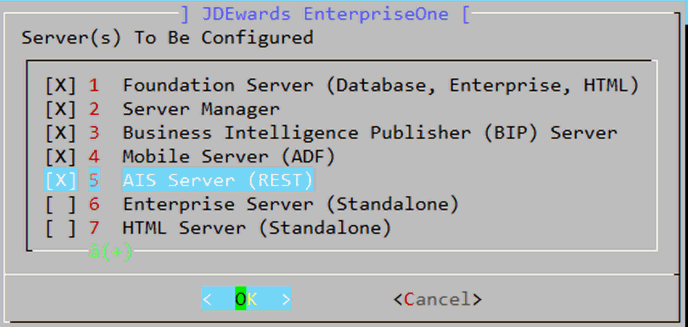
For purposes of the example in this guide, all servers will be configured (not including additional "Standalone" servers), as shown in the preceding screen shot.
To select servers to be configured, use the Up Arrow and Down Arrow keys to highlight a row. Once the row is highlighted, you can select the row by pressing the Space Bar. An [X] between the square brackets indicates the line item is selected.
-
Once you have selected each server that you want to configure, press the Enter key to proceed.
4.4.3.5 JD Edwards Foundation Setup
After you have selected the servers to configure, the config.sh script continues with the JD Edwards Foundation Setup.
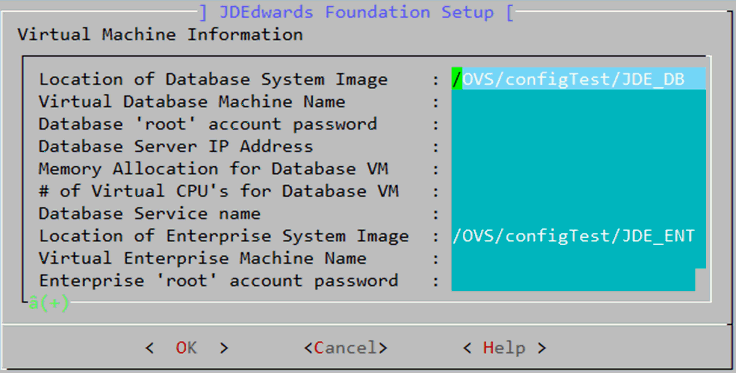
For this setup, you to will need to provide this information for each server in the Foundation System:
-
Server Name
-
Server IP Address
-
Starting Memory Size (in Megabytes)
-
Number of CPUs Allocated to the Server
-
Database Server Name
-
Net Mask, Gateway, Domain, and one DNS Server
-
On JDEdwards Foundation Setup, confirm that the values that are detected for Line Items 1 and 8 are valid.
-
Use your Pre-Install Worksheet to enter values for each remaining Line Item.
Use the Up Arrow and Down Arrow keys to highlight a row for which you want to enter a value. When you reach the bottom of the screen it will automatically scroll to show remaining Line Items. Once you have entered all required values, press the Enter key to proceed.
Caution:
The entered values will be edited for syntax only. This mean if you enter a valid length server name but misspelled it, the value will still be accepted. At this point in the process the server name is not checked against a DNS server. The same is true of the IP address.The following sequence of four (4) screens shows example values for a completed Foundation Setup.
Note:
The values shown in these screens are example values for purposes of this documentation (derived from the example Pre-Install Worksheet). Your values will be different.Note:
The Memory allocation shown in this example is specified as 4096, which is measured in M bytes (therefore equals 4 GB).Note:
If your installation uses a VM template for the Oracle database, the Database Service Name must be ovsorcl for configuration of Oracle VM templates for JD Edwards EnterpriseOne.If your installation uses a non-virtualized or Exadata database, refer to the section of this guide entitled: Section 4.4.3.11, "Configuring for a Non-Virtualized or Exadata Database".
Caution:
If your configuration includes an Exalogic machine, at this step you must know the IP you will be using. You cannot later use the EMOC option to automatically select an IP.Caution:
Do not attempt to manually change the location of the image files. This is set relative to where theJDE_OVMdirectories is located.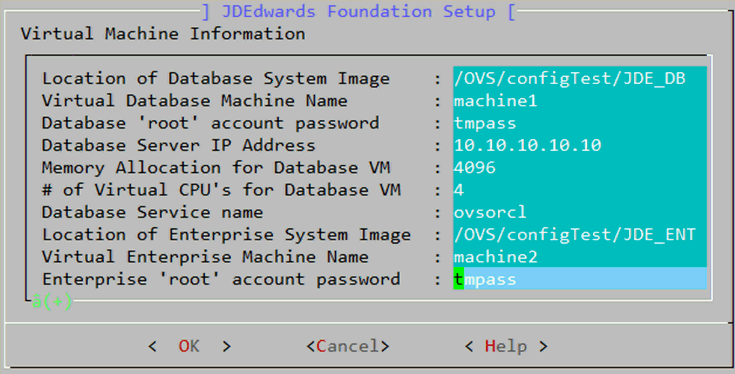
Use the Down Arrow key to scroll to the next page.
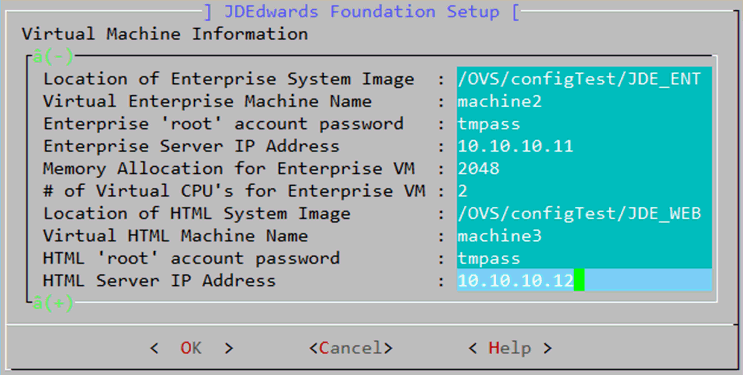
Use the Down Arrow key to scroll to the next page.
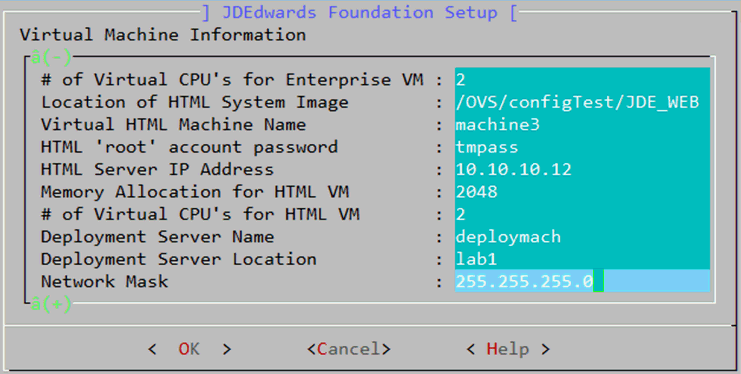
Use the Down Arrow key to scroll to the next page.
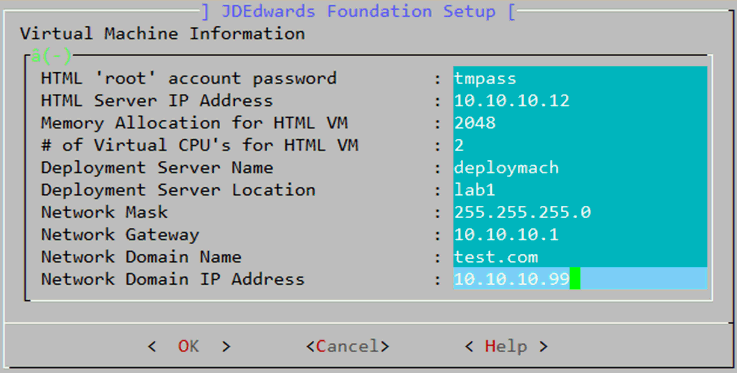
-
Once you have entered values for all fields to configure all three of the Foundation Servers, you should save the values by pressing the Tab key until the <OK> selection is highlighted, and then press the Enter key.

-
On the confirmation dialog, Save configure changes and continue?, use the Tab key to highlight the <Yes> selection and press the Enter key to confirm that you want to save the changes and continue.
-
After you have entered values for all the Foundation Servers, the
config.shscript performs Configuration Check Results for these servers.The results are displayed as shown in the example below. This example shows that the first set of values have passed the validation checks performed by the config.sh script. This validation is for syntax only, and does not guarantee connectivity as no networking checks are performed at this point in the process. In the following example, the value 56% at the bottom of the screen indicates that more information is available for these results. Use the Down Arrow key to scroll down to the next page of results.
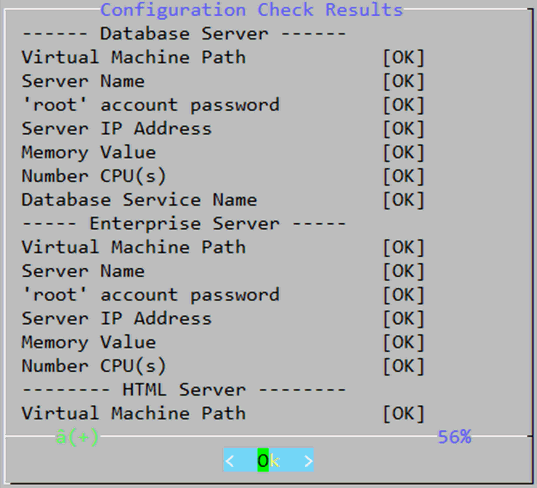
-
On Configuration Check Results, verify that the first set of parameters pass the check. This is indicated by [OK] results in the square brackets.
-
Use the
Up Arrowand Down Arrow keys to scroll through the complete set of results. The final results screen, indicating 100% complete, is shown below.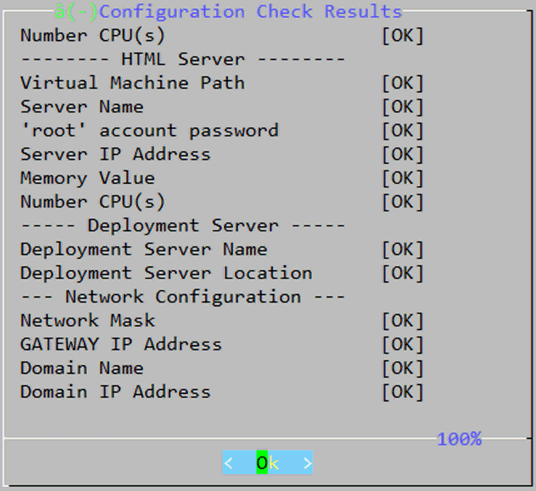
-
If the value for a field fails the syntax check, reports if a field fails the syntax check, the display will show ERROR in the square brackets. In this case, you should press the Return key to return to the setup screen. After you correct the value, press the Return key to accept the revised value and resume the syntax check. Verify the results are reported as [OK].
-
On Configuration Check Results, after you have confirmed the syntax check results are 100% complete and all values have a status of [OK], use the Tab key to highlight the <OK> selection at the bottom of the screen, and press the Enter button to continue.
4.4.3.6 JD Edwards Server Manager Setup
After you have successfully configured values for your Foundation Servers, if you have downloaded the Server Manager files and the files were detected by the Manifest Check, the config.sh script prompts you to configure this server.
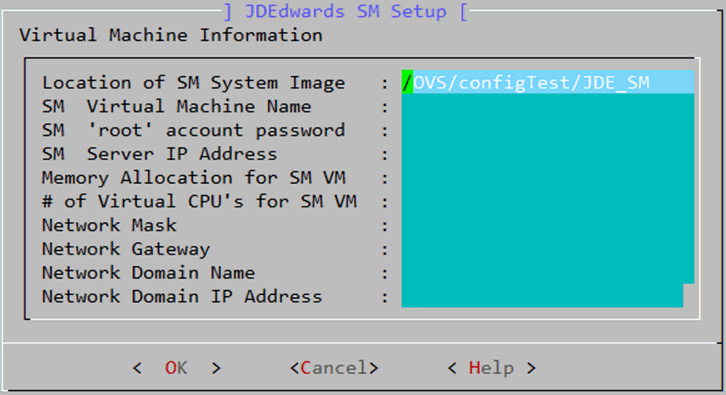
-
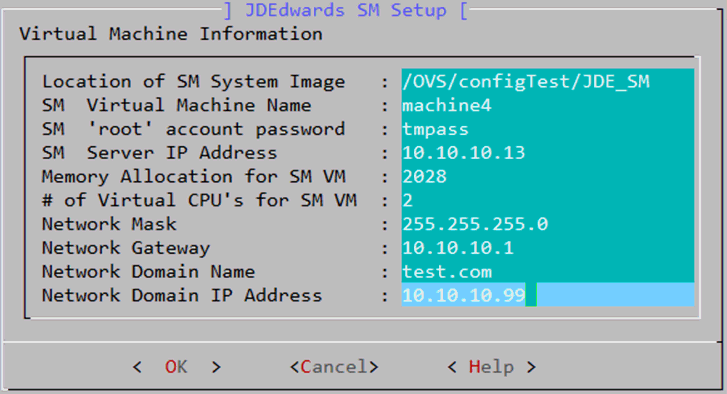
On JDEdwards SM Setup, use the Up Arrow and Down Arrow keys to navigate through each setting and enter valid values. These values should be recorded on your Pre-Install Worksheet.
The values shown in the following screen shot assume the values that from the Example Pre-Install Worksheet used in this guide.
-
After you have entered values for each setting, use the Tab key to highlight the <OK> selection, and then press the Enter key to accept the values.
The
config.shscript then performs a syntax check of the values and displays the Configuration Check Results. For example: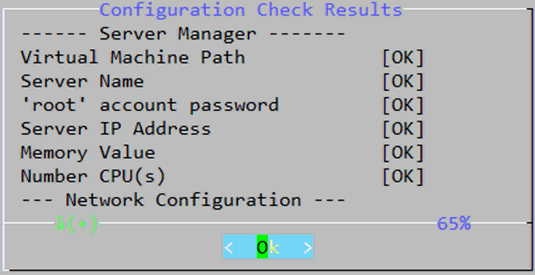
-
On Configuration Check Results, use the Up Arrow and Down Arrow keys to scroll through all the selections to verify that the results are [OK] for each setting.
-
Use the Tab key to highlight the <OK> selection, and then press the Enter key to accept the values.
4.4.3.7 JD Edwards BIP Server Setup
If you have downloaded the BIP Server files and the files were detected by the Manifest Check, the config.sh script prompts you to configure this server.
-
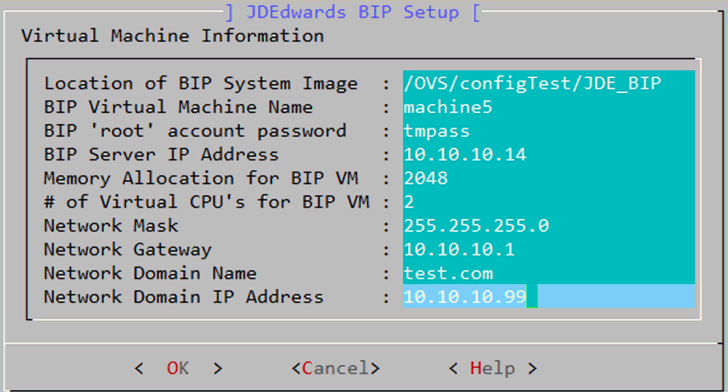
On JDEdwards BIP Setup, use the Up Arrow and Down Arrow keys to navigate through each setting and enter valid values. These values should be recorded on your Pre-Install Worksheet.
The values shown in the following screen shot assume the values that from the Example Pre-Install Worksheet used in this guide.
-
After you have entered values for each setting, use the Tab key to highlight the <OK> selection, and then press the Enter key to accept the values.
The
config.shscript then performs a syntax check of the values and displays the Configuration Check Results. For example: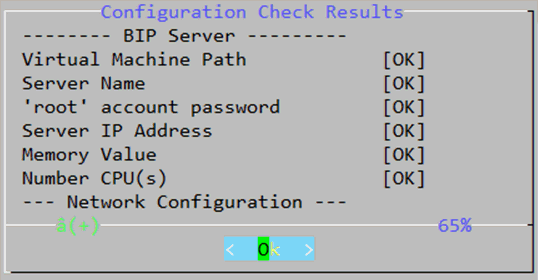
-
On Configuration Check Results, use the Up Arrow and Down Arrow keys to scroll through all the selections to verify that the results are [OK] for each setting.
-
Use the Tab key to highlight the <OK> selection, and then press the Enter key to accept the values.
4.4.3.8 JD Edwards Mobile Server Setup
If you have downloaded the Mobile Server files and the files were detected by the Manifest Check, the config.sh script prompts you to configure this server.
-
On JDEdwards Mobile Setup, use the Up Arrow and Down Arrow keys to navigate through each setting and enter valid values. These values should be recorded on your Pre-Install Worksheet.
The values shown in the following screen shot assume the values that from the Example Pre-Install Worksheet used in this guide.
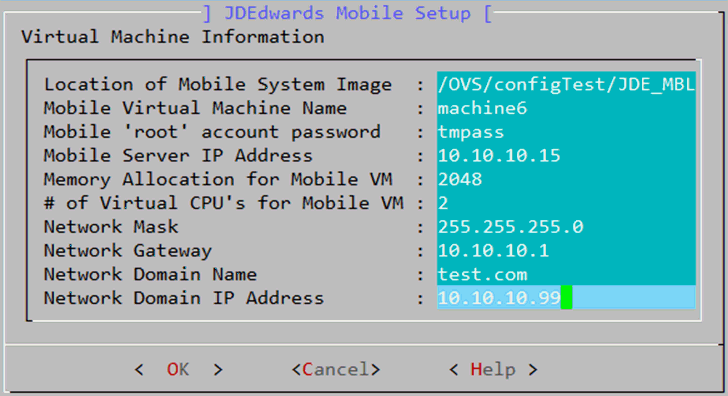
-
After you have entered values for each setting, use the Tab key to highlight the <OK> selection, and then press the Enter key to accept the values.
The
config.shscript then performs a syntax check of the values and displays the Configuration Check Results. For example: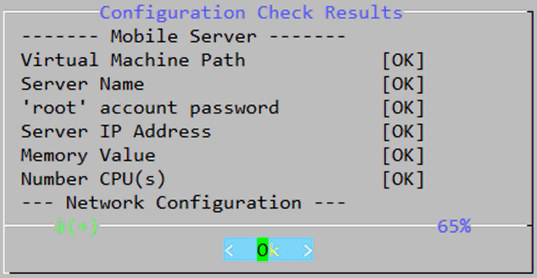
-
On Configuration Check Results, use the Up Arrow and Down Arrow keys to scroll through all the selections to verify that the results are [OK] for each setting.
-
Use the Tab key to highlight the <OK> selection, and then press the Enter key to accept the values.
4.4.3.9 JD Edwards AIS Server Setup
If you have downloaded the AIS Server files and the files were detected by the Manifest Check, the config.sh script prompts you to configure this server.
-
On JDEdwards AIS Setup, use the Up Arrow and Down Arrow keys to navigate through each setting and enter valid values. These values should be recorded on your Pre-Install Worksheet.
The values shown in the following screen shot assume the values that from the Example Pre-Install Worksheet used in this guide.
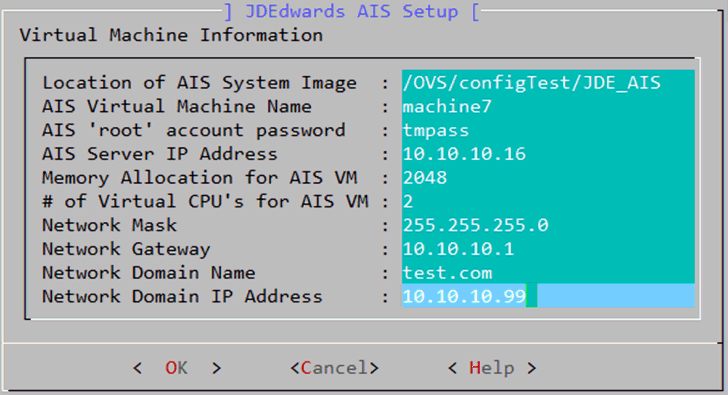
-
After you have entered values for each setting, use the Tab key to highlight the <OK> selection, and then press the Enter key to accept the values.
The
config.shscript then performs a syntax check of the values and displays the Configuration Check Results. For example: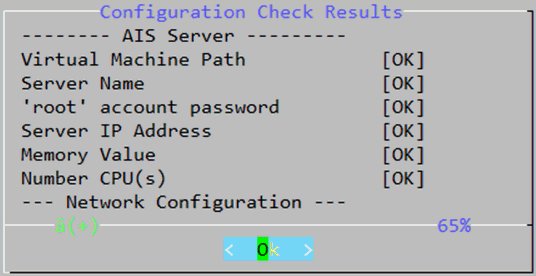
-
On Configuration Check Results, use the Up Arrow and Down Arrow keys to scroll through all the selections to verify that the results are [OK] for each setting.
-
Use the Tab key to highlight the <OK> selection, and then press the Enter key to accept the values.
4.4.3.10 Completing the config.sh Script
When the final selected configuration is saved, the config.sh script mounts the System image file and the JD Edwards configuration file is written to the system. In addition the config.sh script performs the specified changes for the network configuration and passwords on the System image file.
The following shows an example of the System mounting the HTML application system and writing the configuration.

When all System and application paired images are mounted and the file written, the config.sh script ends and the user is returned to the command line.
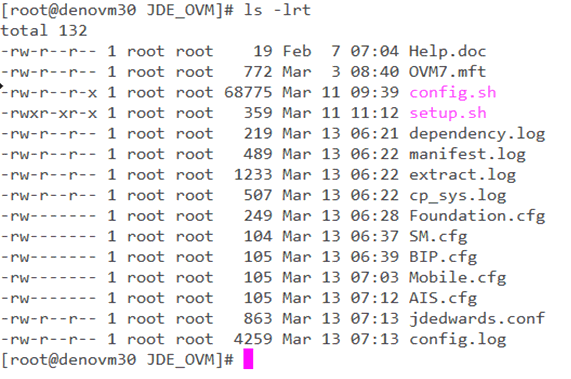
The following shows the state of the system after the config.sh script has run. There are several log files (with .log extensions). Also the values for the settings of each server configuration is saved in a file with a .cfg extension. Any time you re-run the config.sh script it reads the values from these files.
You must pair each image that you wish to run as an Oracle VM template with a System image.
-
Change to the directory that contains the prepared image (the preparation is done by executing the
config.shscript). For example:cd JDE_ENT -
Use this command to tar and zip the JD Edwards EnterpriseOne Foundation System and either the Enterprise Server or HTML Server Standalone images along with their respective
vm.cfgfiles:tar -czvf e1_XXX.tgz e1_x86_sys.img e1_XXX.img vm.cfgwhere
XXXis the application type (such asJDE_ENTorJDE_WEB) along with the release level. For example, to pair the Enterprise Server you would issue this command:tar -czvf e1_ent_914.tgz vm.cfg E1_X86_SYS_9141.img E1_ENT_DSK_ 9141.img vm.cfgThis results in the zipped file named
e1_ent_914. tgzthat contains the paired files for the Foundation System and the Enterprise Server. -
Move the zip file to a configured FTP or HTTP enabled location and deploy it as an Oracle VM Template for JD Edwards EnterpriseOne.
-
Repeat this process for each configured template that you have configured with the
config.shscript and that you wish to deploy.
4.4.3.11 Configuring for a Non-Virtualized or Exadata Database
You can configure your OVM templates for JD Edwards EnterpriseOne system to use a non-virtualized database or an Exadata database system. In this configuration you must manually remove the JDE_DB directory that was created when you configured the Foundation System.
When you re-run the config.sh script you are prompted for required database values. These values are required to configure connections with the other JD Edwards EnterpriseOne applications that are deployed.
-
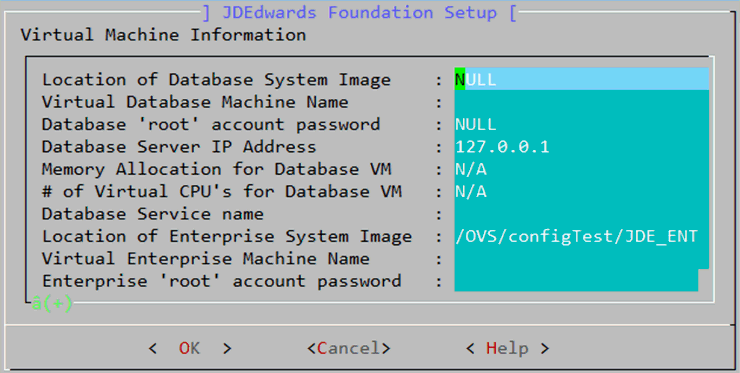
Note the values
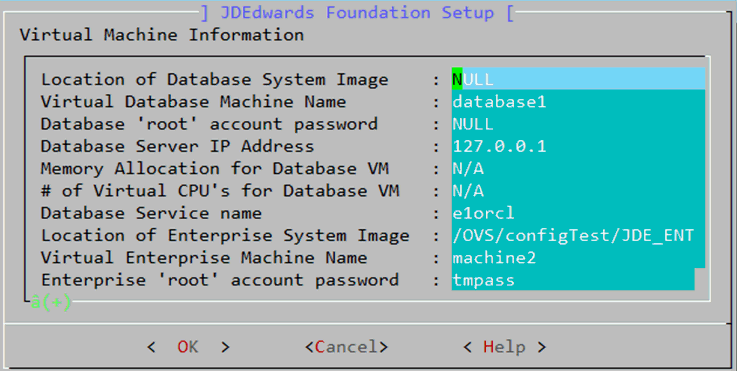
NULLandN/Ain certain fields, as shown as above. These values are supplied if theconfig.shscript cannot locate the database directory (JDE_DB), which you should have manually deleted prior to re-running the script for purposes of configuring a non-virtual database.On JDEdwards Foundation Setup, use the Up Arrow and Down Arrow keys to navigate through each setting and enter valid values. The values you enter here are required to setup the database connections for the other Oracle VM templates in the JD Edwards EnterpriseOne deployment.
The values shown in the following screen shot assume the values that from the Example Pre-Install Worksheet used in this guide.
-
After you have entered values for each setting, use the Tab key to highlight the <OK> selection, and then press the Enter key to accept the values.
The
config.shscript then performs a syntax check of the values and displays the Configuration Check Results. For example: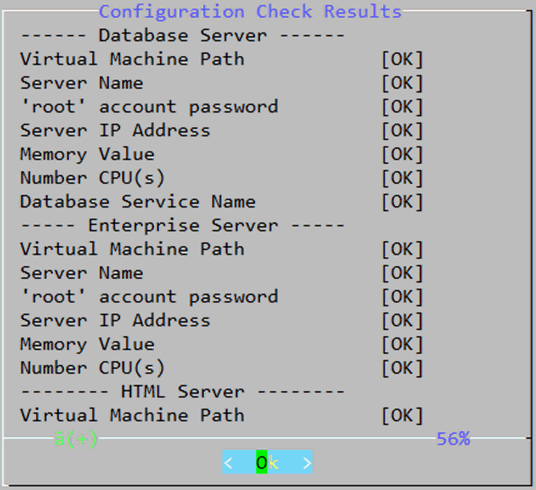
-
On Configuration Check Results, use the Up Arrow and Down Arrow keys to scroll through all the selections to verify that the results are [OK] for each setting.
-
Use the Tab key to highlight the <OK> selection, and then press the Enter key to accept the values.
4.4.3.12 Adding an Additional Enterprise Server (Standalone)
Optionally you can deploy additional Enterprise Servers as Oracle VM Templates for JD Edwards EnterpriseOne. You can use these additional servers to separate logic and batch jobs or you may want use extra servers for scaling.
-
Before you can deploy an additional Enterprise Server template, you must first configure and deploy the Foundation System. Then re-run the
config.shscript.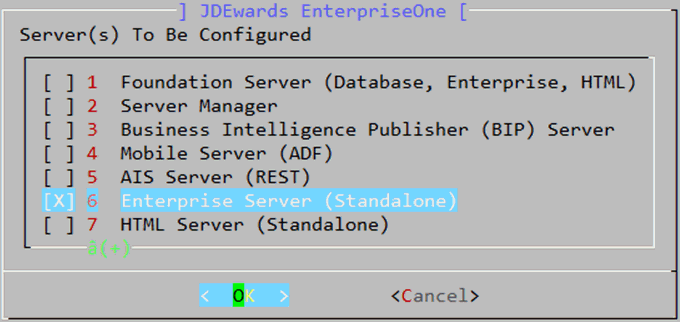
-
On JDEdwards EnterpriseOne, use the Up Arrow and Down Arrow keys to highlight the line item for Enterprise Server (Standalone). Once the row is highlighted, you can select the row by pressing the Space Bar. An [X] between the square brackets indicates the line item is selected.
-
Once you have selected Enterprise Server (Standalone), use the Tab key to highlight the OK selection and press the Enter key to proceed.
-
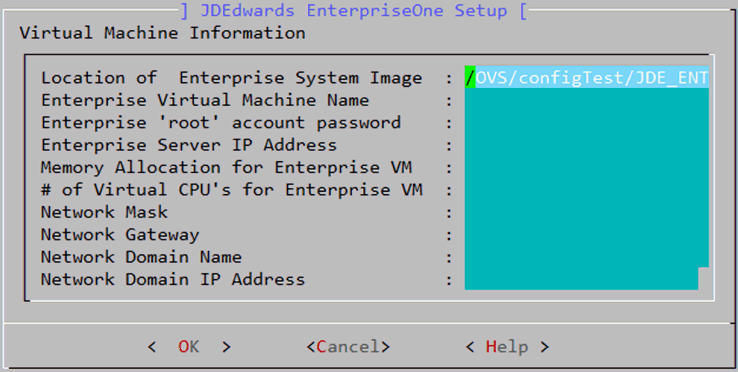
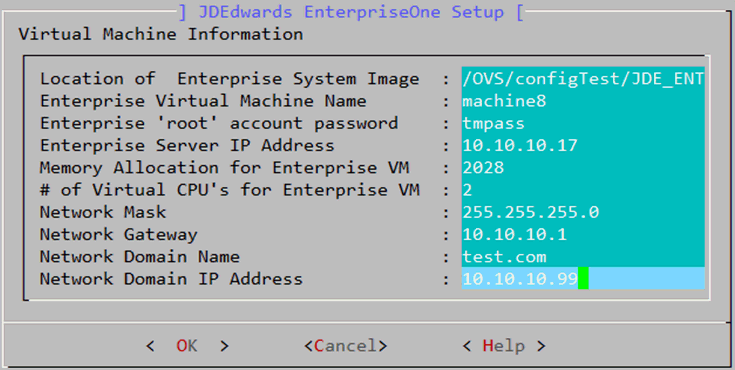
On JDEdwards EnterpriseOne Setup, use the Up Arrow and Down Arrow keys to navigate through each setting and enter valid values. The values you enter here are required to setup the database connections for the other Oracle VM templates in the JD Edwards EnterpriseOne deployment.
The values shown in the following screen shot assume the values that from the Example Pre-Install Worksheet used in this guide.
-
After you have entered values for each setting, use the Tab key to highlight the <OK> selection, and then press the Enter key to accept the values.
The
config.shscript then performs a syntax check of the values and displays the Configuration Check Results. For example: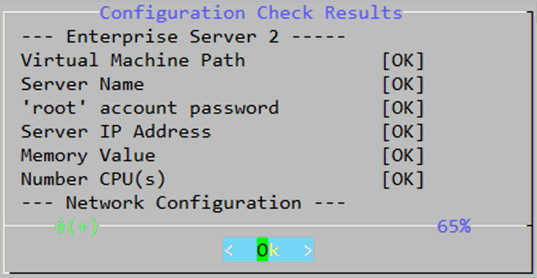
-
On Configuration Check Results, use the Up Arrow and Down Arrow keys to scroll through all the selections to verify that the results are [OK] for each setting.
-
Use the Tab key to highlight the <OK> selection, and then press the Enter key to accept the values.
Note:
The system uses the information from the Foundation setup to rewrite the System image in theJDE_ENTdirectory with the new EnterpriseOne setup. You must manually pair and deploy this new Foundation System image with this new Standalone Enterprise Server as described in the following section in this guide entitled: Section 4.4.3.14, "Deploying an Additional Enterprise Server or HTML Server (Standalone) as a VM Template".Caution:
The process of configuring an additional Enterprise Server as a VM template does not configure the JD Edwards EnterpriseOne CNC table with the information for this new server.
4.4.3.13 Adding an Additional HTML Server (Standalone)
Optionally you can deploy additional HTML Servers as Oracle VM Templates for JD Edwards EnterpriseOne. You can use these additional servers for scaling.
-
Before you can deploy an additional HTML Server template, you must first configure and deploy the Foundation System. Then re-run the
config.shscript.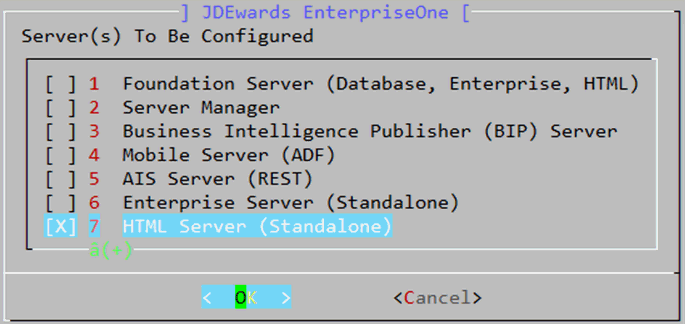
-
On JDEdwards EnterpriseOne, use the Up Arrow and Down Arrow keys to highlight the line item for HTML Server (Standalone). Once the row is highlighted, you can select the row by pressing the Space Bar. An [X] between the square brackets indicates the line item is selected.
-
Once you have selected HTML Server (Standalone), use the Tab key to highlight the OK selection and press the Enter key to proceed.
-
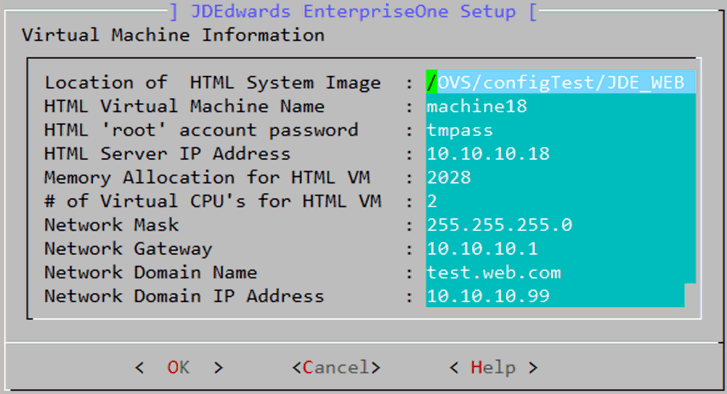
On JDEdwards EnterpriseOne Setup, use the Up Arrow and Down Arrow keys to navigate through each setting and enter valid values. The values you enter here are required to setup the database connections for the other Oracle VM templates in the JD Edwards EnterpriseOne deployment.
The values shown in the above screen shot assume the values that from the Example Pre-Install Worksheet used in this guide.
-
After you have entered values for each setting, use the Tab key to highlight the <OK> selection, and then press the Enter key to accept the values.
The
config.shscript then performs a syntax check of the values and displays the Configuration Check Results. For example: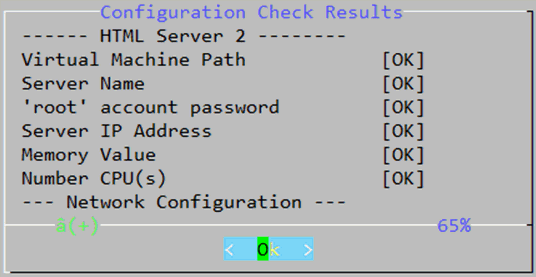
-
On Configuration Check Results, use the Up Arrow and Down Arrow keys to scroll through all the selections to verify that the results are [OK] for each setting.
-
Use the Tab key to highlight the <OK> selection, and then press the Enter key to accept the values.
Note:
The system uses the information from the Foundation setup to rewrite the System image in theJDE_WEBdirectory with the new EnterpriseOne setup. You must manually pair and deploy this new Foundation System image with this new HTML Enterprise Server as described in the following section in this guide entitled: Section 4.4.3.14, "Deploying an Additional Enterprise Server or HTML Server (Standalone) as a VM Template".Caution:
The process of configuring an additional HTML Server as a VM template does not configure the JD Edwards EnterpriseOne CNC table with the information for this new server.
4.4.3.14 Deploying an Additional Enterprise Server or HTML Server (Standalone) as a VM Template
Once you have created an additional Enterprise Server or HTML Server as a Standalone as described in the preceding sections, use this procedure to pair and deploy the images with the JD Edwards EnterpriseOne Foundation System that was also updated during those procedures.
To tar and zip the JD Edwards EnterpriseOne Foundation System and the Standalone files together:
-
Change to the directory of the application you wish to build. For example:
Enterprise Server
cd JDE_ENTor
HTML Server
cd JDE_WEB -
Use this command to tar and zip the JD Edwards EnterpriseOne Foundation System and either the Enterprise Server or HTML Server Standalone images along with their respective
vm.cfgfiles:tar -czvf e1_XXX.tgz e1_x86_sys.img e1_XXX.img vm.cfgwhere XXX is the application type, such as JDE_ENT or JDE_WEB along with the release level. For example, issuing this command:
tar -czvf e1_ent_914.tgz vm.cfg E1_X86_SYS_9141.img E1_ENT_DSK_9141.img vm.cfgresults in the zipped file
e1_ent_914.tgzwhich contains the paired files for the Foundation System and the Enterprise Server (Standalone), as illustrated in the following screen shot: -
At this point you can move the zip file to a configured FTP or HTTP enable location and deploy it as an Oracle VM Template for JD Edwards EnterpriseOne.