11g Release 1 (11.1.2)
Part Number E20376-02
Contents
Previous
Next
|
Oracle® Fusion
Applications Compensation Management Implementation Guide 11g Release 1 (11.1.2) Part Number E20376-02 |
Contents |
Previous |
Next |
This chapter contains the following:
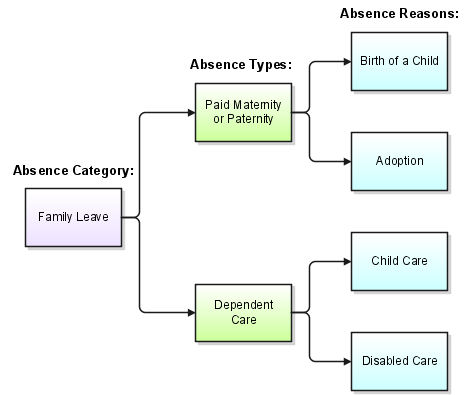
To facilitate reporting and analysis of employee absences, you can distinguish between absence categories, absence types, and absence reasons.
An absence category (such as family leave) contains a set of related absence types, such as paid maternity and dependent care. Additionally, an absence type (such as paid maternity or paternity) can contain reasons, such as the birth of a child and adoption.
The following graphic shows examples of absence types, categories, and reasons and how they are related:
You can extend the list of predefined categories using the ABSENCE_CATEGORY lookup type. Some absence categories may be predefined for your legislation.
Defining an absence type is a two-step process:
Defining the absence element to maintain a running total of absences taken by an employee (optional).
Defining the absence type and optionally associating a category, reasons, and the absence element with it.
You can provide reasons to select from when recording employees' time taken for an absence type. For example, if you need information to analyze the particular family-related responsibilities that cause employees to miss work, you can use the ABSENCE_REASON lookup type to define reasons for absence types. You define absence reasons independently of an absence type so that you can use the same reasons for multiple absence types.
When you create an absence type, you can specify whether the application should maintain an increasing absence balance, a decreasing balance, or no absence balance.
An increasing balance for an absence type starts with no time entered and increases as you enter the hours or days absent. For example, if the Compassionate Leave absence type has an increasing balance, the balance starts from zero for each employee and increases by the number of hours entered for each absence of this type.
Set up a decreasing balance if your enterprise sets a maximum time allowed for an absence type. (If the absence type is used for an accrual plan, it is simpler to use an increasing balance and an accrual formula that records an up-front accrual amount.)
For example, suppose your enterprise allows certain employees 32 hours leave per year for professional development. The Professional Leave absence type can have a decreasing balance, and an initial entry of 32 hours. If you record an employee absence of 4 hours for this absence type, the decreasing balance shows 28 hours still available to be taken.
Note
Decreasing absence balances require more maintenance than increasing balances. They need a prorated initial balance entry for all eligible new hires throughout the year, and require resetting each year for all eligible employees.
If you do not want to maintain an absence balance, you do not need to create and associate an absence element with the absence type.
When you set up an absence type, you can determine how absences are processed in payroll runs. Choose the type of element to associate with the absence type:
Use a nonrecurring absence element.
Use a recurring absence element (only if you use Oracle Fusion Global Payroll and enable proration).
Nonrecurring absence elements are valid for the payroll period in which the absence starts. The application creates the entry only when you enter the absence end date. The element entry records the full value of the absence duration even if the end date falls beyond the payroll period.
For example, if you enter an absence that starts on May 24 and ends on June 5 for someone on a monthly payroll, the element entry is dated May 1 to May 31 and records the full value of the absence duration (13 days).
Use a recurring absence element if you want the payroll run to process absences that have not ended. To process the absence element and calculate the absence duration in each payroll period, you use a payroll formula that handles proration.
Recurring absence element entries start on the absence start date and end on the absence end date (if there is an end date). If the absence starts or ends in the middle of a payroll period, the payroll run detects and processes the absence using the proration functionality.
When you create an absence element for an absence type, your choice of element classification determines how absence entries display on the statement of earnings. You must use one of the following classifications:
Information classification or Absence classification
Standard Earnings classification
Use either of these classifications if you want to:
Process absences in a single calculation.
Prevent absence entries from appearing on the statement of earnings that the payroll run generates.
Note
Although both the Information classification and Absence classification work in the same way, you can select either classification depending on your reporting requirement.
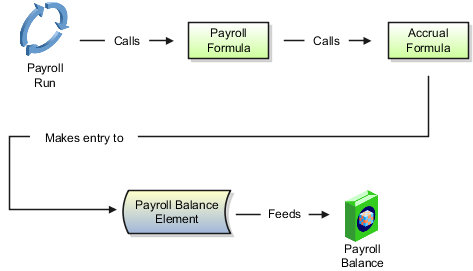
Since payroll runs do not process elements in the Information or Absence classifications, you can use an Earnings element to manage the calculation and payment of absences. For example, you can define a skip rule for an Earnings element that triggers processing when it finds an entry for the absence element. The payroll formula associated with the Earnings element uses the database item of the absence element to retrieve the total number of absences. Then the formula uses another database item to retrieve the salary or hourly rate to calculate the total absence pay for the period and, if necessary, reduce the regular earnings.
The following figure depicts the relation between the Absence element, Earnings element, skip rules, and the payroll formula associated with the Earnings element:

Use this classification if you want to:
Process absences individually in each payroll period.
Treat absence entries as earnings.
This approach creates a one-line entry on the statement of earnings for each absence type. For example, you can use this classification if your employees submit timecards, and you want absences taken by these employees to show on the statement of earnings.
You can choose to record absences for an absence type at the person level or at the assignment level.
If you choose to record absences at this level, the absence entries will apply to the primary assignment of a person. For example, if a person has just a single assignment and they record an absence, you can set up the absence type to use the person level so that the absence applies to the primary assignment.
This level enables you to record absences for individual assignments of a person. For example, if your employees work for Organization A (their primary assignment) from Monday to Thursday, and work at Organization B (their secondary assignment) on Fridays, you may want to record and approve absences for every assignment separately. For reporting purposes, HR Specialists can suggest replacement workers for individual assignments.
To determine how the application calculates the duration of absences for an absence type, you can use work schedules, or a formula, or working hours defined for the assignment.
If you enable work schedules for an absence type, the application calculates the duration of the absences based on the employees' work schedule (during the start and end dates) and applicable calendar events for their primary assignment. You set up availability information such as shifts, schedules, and calendar events, and assign them to appropriate levels in your workforce structures.
You can write a formula to calculate absence duration from the start and end dates entered for an absence. A default formula may have been supplied for your localization. However, you may want to override it with a formula that takes into account special work hours or shift patterns.
You must make a copy of the predefined TEMPLATE_ABSENCE_DURATION formula to make changes, and save the formula at any of the following workforce structure levels:
|
Level |
Formula Name to Use |
|---|---|
|
Enterprise |
BG_ABSENCE_DURATION |
|
Legislation |
LEGISLATION_ABSENCE_DURATION |
|
Legislative Data Group |
CORE_ABSENCE_DURATION |
If you have not enabled work schedules and there is no absence duration formula, the application calculates the difference between the absence end date and the absence start date to determine the duration. The application uses the working hours used by the assignment for the calculation.
While recording an absence, when you enter an absence start date and end date, the application automatically calculates the absence duration.
The absence duration calculation depends on whether the absence type was set up to use work schedules or an absence duration formula.
If the absence type was set up to use work schedules, the application considers the primary work schedule that was set up for the primary assignment of the employee (or for the selected assignments if the absence type was set up to record absences for multiple assignments) to determine the number of working days or hours during the start and end dates of the absence. The application also considers calendar events that may apply to the employee during the absence period to determine the total absence duration.
If the absence type was not set up to use work schedules, the application searches for the absence duration formula in the following order:
Enterprise level
Legislation level
Legislative Data Group level
If there is no absence duration formula, the application uses the assignment working hours to calculate duration as the difference between the absence start and end dates.
This example demonstrates how to create absence types and absence elements to manage absences that employees record.
The following table summarizes key decisions for this scenario.
|
Decisions to Consider |
In This Example |
|---|---|
|
What types of absences can employees record? |
Sick leave and vacation leave |
|
Who is eligible for sick leave and vacation leave? |
All employees are eligible for sick leave. However, only full-time employees are eligible for vacation leave. |
|
Should absence entries generate payments? |
No |
|
How must payroll runs process the absences? |
Payroll runs must process the entire absence duration in the pay period in which the absence starts. |
|
Should an absence balance for each employee be maintained? |
Yes, select the Increasing option when you create the absence type so that new absence entries must add to the absence balance. |
|
How must the absence duration be calculated? |
Using work schedules. Select Yes in the Enable Work Schedules option. |
|
Can employees change the absence duration that is automatically calculated when they record an absence? |
No. |
Create two absence elements to store an aggregate of absences relating to sick leave and vacation leave. These elements must use the Absence classification so that they do not generate payments. Define eligibility criteria for the vacation leave element so that only full-time employees can record absences of this type. Create two absence types for sick leave and vacation leave.
|
Field |
Value (for the Sick Leave absence element) |
Value (for the Vacation Leave absence element) |
|---|---|---|
|
Primary Classification |
Absence |
Absence |
|
Name |
Sick Leave |
Vacation Leave |
|
Reporting Name |
Sick Leave |
Vacation Leave |
|
Effective Date |
January 1, 2010 |
January 1, 2010 |
|
Should every person eligible for the element automatically receive it? |
Yes |
Yes |
|
At which employment level should this element be attached? |
Assignment |
Assignment |
|
Does this element recur each payroll period, or does it require explicit entry? |
Nonrecurring |
Nonrecurring |
|
Process the element only once in each payroll period |
Yes |
Yes |
|
Can a person have more than one entry of this element in a payroll period? |
Yes |
Yes |
|
Field |
Value |
|---|---|
|
Name |
Duration |
|
Display Sequence |
1 |
|
UOM |
Day |
|
Field |
Value |
|---|---|
|
Employment Category |
Full Time Employment |
|
Field |
Value (for the Sick Leave absence type) |
Value (for the Vacation Leave absence type) |
|---|---|---|
|
Name |
SickLeave |
Vacation Leave |
|
Legislative Data Group |
Select the legislative data group in which you created the Sick Leave absence element. |
Select the legislative data group in which you created the Vacation Leave absence element. |
|
Valid From |
January 1, 2010 |
January 1, 2010 |
|
Auto Override |
No |
No |
|
Record at Person Level |
Yes |
Yes |
|
Allow Absence Overlaps |
No |
No |
|
Enable Work Schedules |
Yes |
Yes |
|
Element Name |
Sick Leave |
Vacation Leave |
|
Units |
Days |
Days |
|
Input Value |
Duration |
Duration |
|
Balance |
Increasing |
Increasing |
This example demonstrates how to use a formula to calculate the duration of absences recorded by employees.
The following table summarizes key decisions for this scenario.
|
Decisions to Consider |
In This Example |
|---|---|
|
What unit of time must employees record their absences in? |
Days |
|
What should the formula consider when calculating the absence duration? |
The calculation must exclude weekends and public holidays from the absence duration. |
Make a copy of the predefined absence duration formula and save it in the same legislative data group (LDG) as your absence type. Create a formula function that refers to a public holiday user table to calculate the number of holidays to exclude from the absence duration. Ensure that you do not enable work schedules for the absence type.
|
Field |
Value |
|---|---|
|
Formula Name |
LEGISLATION_ABSENCE_DURATION |
|
Formula Type |
Absence |
|
Legislative Data Group |
The LDG you select must be the one you created your absence type in. |
|
Effective Start Date |
A date that is earlier than or on the effective start date of the absence element |
Note
The above step is optional. Removing this logic will enable you to manage your formula better. The formula will work as expected even if you retain these instances.
     .
     .
     .
IF ((date_start WAS DEFAULTED)
OR  (date_end  WAS DEFAULTED)) THEN
   duration = TO_CHAR((DAYS_BETWEEN(date_end,date_start) + 1 - DAYSOFF(date_start,date_end)))
     .
     .
     .
Navigate to the Manage Elements page, and check that the absence element:
Is effective on the current date
Exists in the legislative data group that you want to create the absence type in
Includes a proration group (if the element is recurring)
Includes at least one input value with the unit of measure as Days or Hours
Enter a negative value for the absence element when you are creating entries in batches. For example, if you enter -16 hours, a decreasing balance starts at 16 hours.
Accrual plans are based on elements, formulas, accrual bands, and net accrual calculation rules. You can configure all of these to reflect the plan policies of your enterprise.
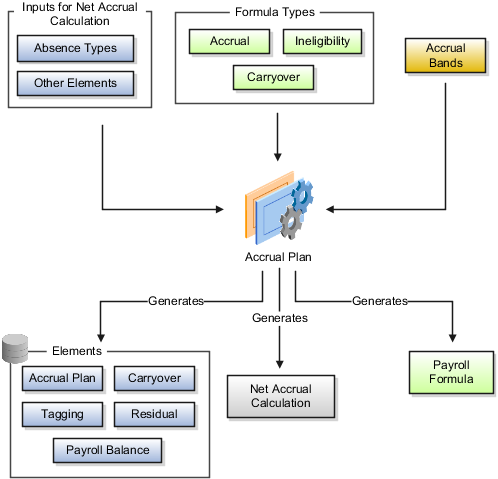
You can associate multiple absence types with an accrual plan. Recording absences of these types reduce the net accrual of an employee enrolled in the accrual plan.
You can include other elements to add to or subtract from the gross accrual in the net accrual calculation; for example, accrued time that is bought or sold, or time that you may have transferred from an accrual plan that the employee was previously enrolled in.
You use accrual bands to define accrual benefits, such as maximum accrual per accrual term, maximum carryover, and ceiling.
The following table explains the role of formula types in accrual plans.
|
Formula Type |
Role |
|---|---|
|
Accrual |
Calculates gross accrued time to date. |
|
Accrual Carryover |
Used by the Calculate Carry-Over process to calculate the accrued time an employee can carry over to the next accrual term, when it is effective from, and when it expires. |
|
Accrual Ineligibility |
Checks whether an employee is eligible to use accrued time on the effective date of an absence entry. You associate this formula with the accrual plan only if you plan to enter absences using the Generic Batch Loader spreadsheet. |
|
Payroll formula (only for Oracle Fusion Global Payroll users using a payroll balance) |
Runs the accrual formula during a payroll process and returns the gross accrual amount to the payroll balance element, which feeds the payroll balance. The formula is generated when you create the accrual plan. |
The following table explains the role of elements that the accrual plan generates.
|
Element |
Role |
|---|---|
|
Accrual plan |
Use to enroll employees in the accrual plan. This element represents the accrual plan and has the same name. |
|
Carry-Over |
Used by the Calculate Carry-Over process to store unused time at the end of the accrual term that must carry over to the next accrual term. |
|
Residual |
Used by the Calculate Carry-Over process to store unused leaves that cannot be carried over to the next accrual term. |
|
Tagging (only for Oracle Fusion Global Payroll users) |
Used by the payroll run to track retrospective absences to include in the net accrual calculation. You can also use this element to track entries of other elements you included in the accrual plan. |
|
Payroll balance (only for Oracle Fusion Global Payroll users using a payroll balance) |
Used by the payroll run to feed the payroll balance that stores gross accruals. |
You can specify the following accrual plan rules on the Accrual Plan page in accordance with the leave policy of your enterprise:
Accrual start rule
Accrual term and frequency
Ineligibility period
Gross accrual maintenance
Accrual bands
Net accrual calculation rules
Note
If you do not specify values for any of the above plan rules, the accrual plan uses the default values in the associated accrual formula.
You use an accrual start rule to determine when newly enrolled employees start to accrue time. For example, some accrual plans allow new hires to accrue time from the date of their hire. If the predefined start rules that are available on the Accrual Plan page do not meet your requirements, you can add your own rule directly in the accrual formula.
You can specify the type of the accrual term and its length during which employees accrue time. For example, you can define an accrual term of one calendar year that restarts on January 1, or on the employee's annual hire date. You define the frequency at which employees accrue time during an accrual period, for example, two days every pay period, or two days every month.
You can define a period, such as six months from the date of hire in which newly hired employees accrue time, but not use it until the end of the period. Although you can define the ineligibility period in the Accrual Plan page, if you have more complex rules to incorporate, you can include those rules in the accrual formula.
Oracle Fusion Global Payroll users can choose to store gross accruals in a payroll balance. The advantage is that the gross accruals are calculated since the last payroll run, and not for the entire accrual term, thus reducing the number of calculations.
Use accrual bands to define accrual benefits for employees. You can create as many bands as you require.
The accrual plan generates the net accrual calculation for enrolled employees. By default, the absence types that you associate with the accrual plan appear as deductions in the calculation. However, you can include other elements to customize the calculation.
By default, the payroll accrual formulas (Accrual Payroll Calculation formula and Accrual Payroll Balance Calculation formula) start the accrual from January 1, and the simple accrual formulas (Accrual Simple Multiplier and Accrual Simple Balance Multiplier), from June 1.
The formula uses the start rule you specified for the accrual plan in the Accrual Plan page.
On the basis of the start rule, the formula calculates the start date from the employee's hire date and compares it with the plan enrollment date. Accrual begins on whichever of these two dates is later.
The following table describes how the formula interprets each start rule.
|
Start Rule |
How the Formula Interprets It |
|---|---|
|
Hire Date |
Accruals begin from the first full pay period following the hire date. If the hire date is on the first day of the pay period, the participant starts to accrue time as of that date. For example, if the hire date of a participant on a monthly payroll falls on January 10, 2011, and the pay period starts on the first of every month, accruals start on February 1, 2011. If the hire date falls on January 1, 2011, then the participant starts to accrue time on the same day. |
|
Beginning of calendar year |
Accruals begin from the start of the year following the year of hire. For example, a participant with a hire date of January 1, 2011 starts to accrue time from January 1, 2012. |
|
Six months after hire |
Accruals begin from the first full pay period after the six-month anniversary of the hire date. If the six-month anniversary falls on the first day of the pay period, the participant starts to accrue time as of that date. For example, a participant on a semi-monthly payroll who is hired on 9 February, 2011 completes six months service on 9 August, 2011. The participant starts to accrue time on the first day of the second pay period in August. If the hire date was on 1 February, 2011, the participant starts to accrue time on the first day of the first pay period in August. The period of ineligibility does not apply to accrual plans using this start rule. |
There are two ways to change the start rules:
You can enter additional start rules as values for the ACCRUAL_START_TYPE lookup type, which provides a list of values for the Accrual Start field. You must add a statement to your copy of the predefined formula to calculate the accrual start date using your new start rule.
You can ignore the Accrual Start field and calculate the start date entirely within the formula. To do this, copy the predefined formula and replace the section that calculates the accrual start date with your own formula statements.
If you have configured your accrual plan to use length-of-service accrual bands, or an ineligibility period, the predefined accrual formula contains statements to automatically determine the employee's length of service.
For individual accrual plan participants, you can enter a continuous service date when enrolling a participant in a plan to override the default date from which a plan starts its length of service calculations. For example, you enter a continuous service date if employees who already have accumulated periods of service in your enterprise transfer from one place to another.
The predefined accrual formula calculates the length of service from the first day of the month of an employee's hire date. For example, an employee hired on January 14, 2010, completes one year of service on January 1, 2011, and an employee hired on December 31, 2010, completes one year of service on December 1, 2011.
Note
The default length of service start date (or the overriding continuous service date) is not the same as the accrual start date, which is determined by the accrual start rules selected on the Accrual Plan page or set within the accrual formula.
When you create an accrual plan using the Accrual Plan page, you must select one of the following options to determine the accrual term start date and duration:
Hire date
Rolling
Simple
The accrual term starts on the hire date and restarts on each anniversary. For example, if the enrolled employee's hire date is January 1, 2011, the accrual term starts on this date and restarts on January 1, 2012. The start date is not affected by the entry of a continuous service date when the employee enrolls in the accrual plan. Although the continuous service date affects length-of-service calculations (for accrual bands and ineligibility period calculations), it does not affect the accrual term.
An accrual term of this type has a duration of one calendar year, but does not have a fixed start date. Accruals are always calculated for the previous twelve months. Carryover is not relevant because the accrual term never ends, but rolls forward. Employees lose the accrued time if they do not use it within twelve months.
If you choose the simple option, you must specify the length of the term and the date when the accrual term must start.
You can set up accrual plans that require participants to work for a period of time before they are eligible to take leave. Participants accrue time at the usual rate during this period, but the time does not add to their net accrual until the period of ineligibility expires. Also, the predefined formulas do not carry over the accrued time to the next accrual term if the end of the current accrual term falls within the ineligibility period. You can specify the ineligibility period in the following locations:
Accrual Plan page
Accrual formula
Accrual Ineligibility Formula
The accrual formula uses the period you specify in the net accrual calculations. The predefined accrual formula calculates the ineligibility period from the continuous service date (if it was entered on the accrual plan element entry) or from the hire date.
If you have a more complex rule (for example, you want to use a user table to determine an employee's ineligibility period on the basis of grade), you can include the rules directly in the accrual formula.
If you plan to use the generic batch loader to upload absence records, and you want the batch loader to check the ineligibility rules for the absences, you must include the rules in the ineligibility formula and associate it to the accrual plan. You can use the predefined formula as a starting point.
Note
If your enterprise policy requires you to record individual absences as well as upload absences in batches, ensure that the ineligibility rules in the accrual formula and the ineligibility formula are the same for consistent results.
You can use accrual bands in your accrual plan to include plan rules that increase accrual benefits for participants on the basis of their length of service, job, grade, or number of hours worked.
Each accrual band comprises the following aspects:
Employee coverage rules
Accrual benefits
The predefined length-of-service range type defines accrual bands for varying lengths of service. For example, you can create an accrual band for employees who have completed 0 through 2 years of service, and another band, for employees who have completed over 3 years of service. The predefined accrual formula, by default, contains calculations to determine the accrual band for an employee on the basis of length-of-service bands that you defined in the Accrual Plan page. Alternatively, you can modify the formula to use bands on the basis of other factors, such as grade, or job.
To create accrual bands based on two types of employment criteria, use band groups. For example you could create band groups for jurisdictions and create different length of service bands within each group.
You can provide values to the following accrual benefits for each accrual band:
Amount of time an employee accrues per accrual term
Maximum time that an employee can carry forward to the next accrual term
Maximum accrued time that an employee can hold at any time
Accrual bands enable you to vary accrual benefits to employees on the basis of employment criteria, such as length of service or grade. The following examples illustrate the different ways in which you can use accrual bands.
You can create an accrual band (in the Accrual Plan page) for employees who have, for example, completed 1 through 5 years of service, and another for employees who have completed over 6 years of service, as shown in the following table.
|
Range Type (Length of Service) |
Annual Rate |
Maximum Carryover |
Ceiling |
|---|---|---|---|
|
1 through 5 |
15 |
15 |
45 |
|
6 through 99 |
20 |
15 |
60 |
If you want to determine the accrual band on the basis of other employment criteria, such as grade, you must add a lookup value to the PER_ACCRUAL_BAND_RANGE lookup type, create grade-based bands in the accrual plan pages, and modify the accrual formula so that the required employment information (for example, the employee's grade) is available by way of a database item or a function for accrual band calculations. The following table lists sample grade-based accrual bands.:
|
Range Type (Grade) |
Annual Rate |
Maximum Carryover |
Ceiling |
|---|---|---|---|
|
A.1 through A.4 |
15 |
15 |
45 |
|
B.1 through B.2 |
10 |
15 |
30 |
You may want to, for example, create accrual bands of varying lengths of service for employees who belong to specific geographic locations. In this case, you must add the location band group as a lookup value to the PER_ACCRUAL_BAND_GROUP lookup type, create accrual bands using that band group in the Accrual Plan page, and modify the accrual formula so that the required employment information is available by way of a database item or a function for accrual band calculations. The following table lists accrual bands that are grouped by the location band group.
|
Band Group (Location) |
Range Type (Length of Service) |
Annual Rate |
Maximum Carryover |
Ceiling |
|---|---|---|---|---|
|
Paris |
1 through 5 |
15 |
15 |
45 |
|
6 through 10 |
20 |
15 |
60 |
|
Tokyo |
1 through 3 |
10 |
10 |
30 |
|
4 through 5 |
15 |
15 |
45 |
Assume that your enterprise wants to change its leave policies every year in accordance with government regulations. In this case, ignore the Accrual Bands region in the Accrual Plan page, and instead, navigate to the Manage User Tables page to create date effective rows to hold the accrual band information. Include the GET_TABLE_VALUE function in your accrual and carryover formulas to access the accrual band that is effective on the date of the accrual calculations. Here is a sample user table that contains date-effective accrual bands.
|
Effective Date |
Range Type (Length of Service) |
Annual Rate |
Maximum Carryover |
Ceiling |
|---|---|---|---|---|
|
1 April, 2010 |
1 through 5 |
15 |
15 |
45 |
|
6 through 10 |
20 |
15 |
60 |
|
1 April, 2011 |
1 through 5 |
10 |
15 |
30 |
|
6 through 10 |
15 |
15 |
45 |
If you use Oracle Fusion Global Payroll, you can set up your accrual plan to use a payroll balance to store gross accruals. The advantage is that the gross accruals are calculated since the last payroll run, and not for the entire accrual term, thus reducing the number of calculations, especially when you use batch processes such as Check Writer to calculate accruals for each assignment. The Accrual Payroll Balance Calculation formula and the Accrual Simple Balance Multiplier formula support payroll balances.
The payroll balance reset date that you must specify when you create an accrual plan determines the period of time over which the balance accumulates before it resets to zero. You can select any of the following predefined dates on which the balance must reset to zero every calendar year.
|
Reset Date |
Description |
|---|---|
|
January 1 |
Balance resets on January 1 every calendar year or on the start date of the first payroll period of the year that contains this date. |
|
June 1 |
Balance resets on June 1 every calendar year or at the end of the payroll period that contains this date. |
|
Hire date |
Balance resets on the anniversary of the employee's hire date or on the start date of the payroll period that contains this date. |
A balance dimension is automatically selected when you choose a predefined reset date. If you want the payroll balance to accumulate over a different period of time, or reset on a different date, you can create your own dimension and select it when you create the accrual plan.
The components required to maintain an accrual balance (payroll formula, payroll balance, and the payroll balance element) are generated automatically, so no additional setup is required. The following figure illustrates how the payroll run maintains gross accruals in a balance:
When the payroll run processes an accrual plan element entry, it calls a payroll formula associated with the accrual plan element. This formula passes the following information to the accrual formula that calculates the gross accrual:
Name of the database item of the payroll balance for the accrual formula to retrieve the number of days or hours currently in the payroll balance.
Date to begin calculating new accruals, which is the day after the Date Paid of the last payroll period in which the assignment was processed.
Calculation date, which is the date paid of the current payroll run.
The accrual formula returns the new gross accrual to an element that feeds the balance.
Note
The payroll formula, the payroll balance, the element that feeds the balance, and element eligibility are generated automatically when you save the accrual plan.
If the accrual formula finds retrospective absences or other assignment changes that affect the net accrual, it recalculates accruals for the whole accrual term and updates the gross accrual balance.
For example, assume that an accrual plan starts at the beginning of the calendar year, and has a ceiling of 10 days, and 2 days accrual per month. The employee has a net accrual of 10 at the end of May. The June payroll run does not award any new accrual to this employee because the net accrual must not exceed the ceiling. However, in July, the employee records 5 days vacation in May, retrospectively. The July payroll run recalculates the accrual and updates the gross accrual balance to 14. The net accrual is now 9 (14 minus 5).
The net leave accrual for employees is calculated when they review their accrual balances. The accrual formula that calculates the net accrual uses the net calculation rules that you defined in the Accrual Plan page for the calculation.
The net calculation rule in the accrual plan indicates the element entries that must add to or subtract from the gross accrual to calculate the net accrual.
The accrual formula uses the following calculation to determine an employee's net accrual:
Net Accrual = (Gross accrual + Carried over time) - Absences (+/-) Other elements
The following table describes the variables used in the calculation:
|
Variable |
Description |
Source |
|---|---|---|
|
Gross accrual |
Sum of accruals to date in the current accrual term |
Calculated by Accrual formula |
|
Carried over time |
Hours or days carried over from the previous accrual term |
Obtained from the plan's carryover element |
|
Absences |
Confirmed absences in the current accrual term recorded up to the effective date. |
Obtained from the absence element entries to the plan's absence types. |
|
Other elements |
Elements (for example, leaves that are bought or sold) that you want to add or subtract from the gross accrual |
Obtained from the net calculation rules in the Accrual Plan page. |
Note
You cannot change the predefined calculation rules for carried over time and absences.
When you create an accrual plan, the default net accrual calculation takes into account absences (belonging to the absence types you associated with the accrual plan) and any carried over leaves from the previous accrual term. While you cannot change these predefined rules, you can add rules to take into account other values that you want to add to or subtract from the gross accrual.
You may want to provide employees the benefit of selling back time that they accrued, but could not use it to take leave during the accrual term. For this purpose, you can define and link an element to store this amount. Ensure that the element is a nonrecurring one, belongs to the Information classification, and contains input values to store the duration (with the same units as you selected for the accrual plan), and the effective date. In the Accrual Plan page, associate this element to the accrual plan as a deduction (use the Subtract option) in the net calculation rules.
The above example also applies to the scenario where you want employees to be able to buy additional time. In the Accrual Plan page, you associate the element that stores this amount as an addition in the net calculation rules.
Under certain circumstances, apart from the time that employees carry over each accrual term, you may want to allow employees to carry over some amount of time for several plan terms and not subject the time to the usual expiry date. For this purpose, after running the Calculate Carryover process, store the time in a nonrecurring information element (apart from the Carryover element). In the Accrual plan page, add this element as an addition in the Accrual plan page.
If you want to consider unused time from another plan when the employee enrolls into the current accrual plan, store the unused time in a nonrecurring information element and associate that element as an addition in the Accrual Plan page.
Leave liability is the total monetary value of the employee's unused leave time in the current accrual term. You can change the leave liability calculation to suit your enterprise requirements.
To determine the liability amount, which appears on the Manager Resources dashboard, the net accrual is automatically multiplied by the employee's pay rate. The following lines in the accrual formula determine the pay rate.
.
.
.
E = GET_ASSIGNMENT_SALARY()
accrual_units = ACP_UNITS
Currency_Code = get_text('ASG_SALARY_CURRENCY_CODE')
IF (accrual_units =  'H') THEN
(
   Pay_Rate_Per_Unit =  get_number('ASG_SALARY_HOUR_PAY')
)
ELSE
(
   Pay_Rate_Per_Unit =  get_number('ASG_SALARY_DAY_PAY')
)
To consolidate the liability amounts for all employees for accounting purposes, you create a payroll balance that stores the aggregate amount and include the liability amount calculation in the payroll formula that the accrual plan generates. When you run the payroll, the payroll formula calculates the liability amount and adds it to the payroll balance.
The following figure shows how the payroll run maintains the leave liability amount in a payroll balance.

Ensure that you create the Employer Liability element and the Liability payroll balance. The pay value of the employer liability element must feed the payroll balance. For the accrual plan element, you must create a result rule that passes the Current Liability Increment formula result value to the pay value of the Employer Liability element. The payroll formula must return the Current Liability Increment value as a result of the liability calculation, as shown in the following example.
DEFAULT FOR ACP_ACCRUAL_PLAN_ID is 0
DEFAULT FOR ACP_PAYROLL_START_DATE is '4712/12/31 00:00:00' (date)
DEFAULT FOR ACP_PAYROLL_CALCULATION_DATE is '4712/12/31 00:00:00' (date)

/* XXXXXXXXXX is automatically substituted with the liability balance dimension that you create. */
DEFAULT FOR XXXXXXXXXX is 0

/* START OF ACCRUAL CALCULATIONS */
.
.
.

/* Calculate pay rate */

E= GET_ASSIGNMENT_SALARY()
accrual_units = ACP_UNITS
Currency_Code = get_text('ASG_SALARY_CURRENCY_CODE')

IF (accrual_units =  'H') THEN
(
   Pay_Rate_Per_Unit =  get_number('ASG_SALARY_HOUR_PAY')
)
ELSE
(
   Pay_Rate_Per_Unit =  get_number('ASG_SALARY_DAY_PAY')
)

.
.
.

/* Calculate the liability amount on the basis of the pay rate. */

Current_Liability_Increment =
((PLAN_BALANCE_ASG_LEAVE_YTD + Total_Accrued_Amt) * Pay_Rate_Per_Unit) - LEAVE_LIABILITY_BALANCE_ASG_YTD
*/

/* For liability calculation, the return statement should include the Current Liablity Increment value: */

RETURN Total_Accrued_Amt, Current_Liability_Increment
This example demonstrates how to create an accrual plan to conform to a specific leave policy of an enterprise.
The following table summarizes key decisions for this scenario:
|
Decisions to Consider |
In This Example |
|---|---|
|
Who is eligible for the vacation accrual plan? |
All employees |
|
Which accrual category must the accrual plan belong to for reporting purposes? |
Vacation |
|
When must the accrual term start? |
12 months from hire date |
|
When must newly hired employees enroll in the accrual plan? |
On their hire date |
|
How frequently do regular and part-time employees accrue time? |
2 days per month (prorated for part-time employees) |
|
How many leaves can employees carry over to the next accrual term? |
Employees of grades 1, 2, and 3 can carry forward a maximum of 15 days to the next accrual term. Employees of grades 4 and 5 can carry forward a maximum of 10 days to the next accrual term. |
|
When must the carried over leave expire? |
At the end of 1 year |
|
What is the maximum number of leaves that employees can accrue? |
45 days |
|
Which accrual formula must the accrual plan use? |
Accrual Simple Multiplier |
Use the Manage Elements page to create an absence element to store absences taken by employees, and define eligibility criteria. Create the absence type on the Manage Absence Types page and link the absence element you created. Modify the accrual formula using the Manage Fast Formula page to include statements to calculate accrual amounts and ceilings for both part-time and full-time employees. Use the Manage Common Lookups page to create a Grades lookup value so that you can define accrual bands for varying grade ranges.
Create the accrual plan on the Manage Accrual Plans page. In this example, use this page to specify the length and type of the accrual term, the date when new employees start to accrue leave, and accrual bands that determine the accrual amounts for different grades.
|
Grade |
Ineligibility Period |
|---|---|
|
1 through 3 |
2 months |
|
4 through 5 |
3 months |
     .
     .
     .
Accrual_Rate  = ROUND(Term_Accrual_Rate / No_Of_Periods,2) * <<database item to retrieve employee's FTE>>
     .
     .
     .
     .
     .
     .
Emp_grade = <<database item to retrieve employee grade>>

IF (GET_ACCRUAL_BAND('NN',Emp_grade) = 0) THEN
(
  Accrual_Band_Id    = GET_NUMBER('ACCRUAL_BAND_ID')
  Max_Carryover      = GET_NUMBER('MAX_CARRY_OVER')
  Term_Accrual_Rate  = GET_NUMBER('TERM_ACCRUAL_RATE')
  Ceiling_Amt        = GET_NUMBER('CEILING')
)
     .
     .
     .
|
Field |
Value |
|---|---|
|
Accrual Plan Name |
Vacation Leave Plan |
|
Accrual Category |
Vacation Leave |
|
Accrual Start |
Hire date |
|
Accrual Units |
Days |
|
Absence Type |
Vacation |
|
Accrual Term Type |
Hire date anniversary |
|
Accrual Frequency |
Standard, 1 month |
|
Period of Carryover Expiry |
1 year |
|
Accrual Formula |
Accrual Simple Multiplier |
|
Carryover Formula |
Accrual Simple Carryover |
|
Band Range |
Grade |
|
Grade |
Annual Rate |
Ceiling |
Maximum Carryover |
|---|---|---|---|
|
1 through 3 |
24 |
45 |
15 |
|
4 through 5 |
24 |
45 |
10 |
The accrual formula calculates the gross accrual on the basis of time that employees accrue in each accrual period. The type of accrual formula that you want to associate with your accrual plan depends on how you want to implement the following plan rules:
Type of accrual period
Gross accrual maintenance
Use the following table to decide which formula to select for your accrual plan. For example, if you want your employees to accrue time per payroll period and you want to maintain gross accruals using a payroll balance, you must base your formula on the Accrual Payroll Balance Calculation formula.
|
Plan Rule Implementation |
Accrual Payroll Calculation Formula |
Accrual Payroll Balance Calculation Formula |
Accrual Simple Multiplier Formula |
Accrual Simple Balance Multiplier Formula |
|---|---|---|---|---|
|
Accruals per payroll period |
Yes |
Yes |
No |
No |
|
Accruals per calendar period, such as month |
No |
No |
Yes |
Yes |
|
Gross accrual maintenance using payroll balance |
No |
Yes |
No |
Yes |
Note
The Accrual Payroll Calculation formula and the Accrual Simple Multiplier formula incorporate the same rules as the accrual formulas that use balances, except that they cannot be called from the payroll run to maintain a balance of gross accruals.
Use the following table to compare the differences in the default calculation methods of the Accrual Payroll Balance Calculation formula and the Accrual Simple Balance Multiplier formula. You can also use the table to check if you can change a particular plan rule on the Accrual Plan page
|
Plan Rule |
Default Calculation Method (Accrual Payroll Balance Calculation) |
Default Calculation Method (Accrual Simple Balance Multiplier) |
Changeable on Accrual Plan Page |
|---|---|---|---|
|
Length of accrual term |
One year. |
One year. |
Yes |
|
Accrual term start date |
January 1. Accrual calculations restart at the beginning of each calendar year. |
June 1. Accrual calculations restart at the beginning of each June. |
Yes |
|
Accrual frequency |
On the basis of the enrolled employee's pay periods. For example, employees on a monthly payroll accrue time on the last day of their pay period, independently of payroll runs. |
Monthly. |
Yes, if you select Simple as the accrual frequency type. |
|
Accrual amount |
2 days per pay period. |
2 days per month. |
Yes |
|
Ceiling |
20 days. |
20 days. |
Yes |
|
Maximum carryover |
20 days. |
20 days. |
Yes |
|
Length of service calculation (for accrual bands and ineligibility period) |
Uses continuous service date (if present) or hire date. |
Uses continuous service date (if present) or hire date. |
No, but you can enter the continuous service date in the accrual plan element using the Manage Element Entries page. |
|
Accrual start date for new hires |
Based on start rules that you can select when you create the accrual plan. |
Based on start rules that you can select when you create the accrual plan. |
Yes |
|
Period of ineligibility |
Based on the period that you can define in the Accrual Plan page. Accrued time is not credited to the employee until the end of the ineligibility period. |
Based on the period that you can define in the Accrual Plan page. Accrued time is not credited to the employee until the end of the ineligibility period. |
Yes |
|
Effective dates of carried-over time |
Sets the effective start date to December 31 of the accrual term year that was processed by the Calculate Carry-Over process. Carried-over time expires a year later. For example, the carried-over time with the effective start date December 31, 2010 expires on December 31, 2011. |
Sets the effective start date to May 31 of the accrual term year that was processed by the Calculate Carry-Over process. Carried-over time expires a year later. For example, the carried-over time with the effective start date May 31, 2010 expires on May 31, 2011. |
Yes. The Calculate Carry-Over process calculates the effective dates according to the carryover expiry duration that you specify. |
|
Calculation of gross accruals |
Sums accruals in all full pay periods that end on or before the calculation date in the current accrual term. The formula also considers in its calculation any employee termination date, and changes in assignment status. |
Sums accruals in all full months that end on or before the calculation date in the current accrual term. The formula also considers in its calculation the employee termination date (if present). |
No |
|
Calculation of gross accruals for suspended assignments |
Calculates the number of active working days of the assignment in the payroll period, multiplies the normal accrual rate by the number of active days, and divides it by the number of total working days, to prorate the accrual. |
Does not process changes in assignment status |
No |
Although you can incorporate accrual plan rules from the Manage Accrual Plans page, you can incorporate more complex rules in the accrual formula directly. Use these examples to incorporate your plan rules into the Accrual Simple Multiplier formula.
Caution
Before modifying a predefined formula, you must copy it first and then modify the copy.
If you want to use an accrual start rule other than the predefined ones, you must first define the new rule as a value for the PER_ACCRUAL_START_RULE lookup type. Then modify the formula section that determines the accrual start rule on the basis of the following sample statements:
     .
     .
     .
ELSE IF (ACP_START_RULE = <your new lookup value>) THEN
        (
     First_Eligible_To_Accrue_Date  = <your new calculation to determine the start date>
     )
To determine the accrual rate, the predefined formula by default considers the amount of time that an employee must accrue in the accrual term and the number of accrual periods, both of which you can define on the Accrual Plan page. You can override the default calculation. In the following example, part-time employees accrue 3 hours for every 75 hours worked:
Accrual_Rate = ACP_HOURS_WORKED / 75
In the above statement, ACP_HOURS_WORKED is a database item that you must add to the accrual plan element input value that contains the number of hours worked by the enrolled employee.
The accrual amount that you define on the Accrual Plan page enables enrolled employees to accrue time each period. If, for example, you want employees to accrue their full entitlement of 20 days at the start of every calendar year, use the following basic formula:
INPUTS ARE
Calculation_Date (date)

Accrued_amt = 20

Effective_start_date = to_date('0101'||to_char(calculation_date, 'YYYY'),'DDMMYYYY')
Effective_end_date = to_date('3112'||to_char(calculation_date, 'YYYY'),'DDMMYYYY')
Accrual_end_date = to_date('0101'||to_char(calculation_date, 'YYYY'),'DDMMYYYY')

RETURN Accrued_amt,
       Effective_start_date,
       Effective_end_date,
       Accrual_end_date
Note
The above formula does not contain ineligibility rules or start rules, and does not calculate the accrual for part years (for example, for employees joining the plan midway through a year).
The predefined formula uses the continuous service date (if it was entered for the enrolled employee) to determine when a newly hired employee begins to accrue time. The formula uses the ACP_CONTINUOUS_SERVICE_DATE database item for this purpose. If you are using a different database item for the continuous service date, then replace the database item used in the following formula lines with the new database item:
IF (ACP_CONTINUOUS_SERVICE_DATE WAS DEFAULTED) THEN
(
	Continuous_Service_Date = ACP_HIRE_DATE
)
ELSE IF(ACP_CONTINUOUS_SERVICE_DATE > Calculation_Period_SD) THEN
(
	Total_Accrued_Amt = 0
	Continuous_Service_Date = ACP_CONTINUOUS_SERVICE_DATE
)
ELSE
(
	Continuous_Service_Date = ACP_CONTINUOUS_SERVICE_DATE
)
.
.
.
IF Continuous_Service_date = ACP_CONTINUOUS_SERVICE_DATE THEN
(
	Actual_Accrual_Start_Date = Continuous_service_Date
)
If you want employees to accrue no time (or accrue time differently) while on certain types of leave, such as maternity leave or study leave, use the GET_ASG_INACTIVE_DAYS function to check the status of the assignment, and include the appropriate rules. In the following example, employees do not accrue time while their assignment is inactive:
Assignment_Inactive_Days = GET_ASG_INACTIVE_DAYS(Period_SD, Period_ED)
IF Assignment_Inactive_Days <> 0 THEN
	(
		Working Days = GET_WORKING_DAYS(period_SD, Period_ED)
		IF Working_Days = Assignment_Inactive_Days THEN
			(
				Multiplier = 0
			)
		ELSE
			(
				Multiplier = 1 - (Assignment_Inactive_Days / Working Days)
			)
	)
If you decide to customize the predefined accrual plan formulas, you can incorporate your own plan rules, using functions and database items to access extra inputs. However, there are constraints on what you can change in the formulas.
You must take a copy of any predefined formula that you want to use and associate the copy with your accrual plan. This approach enables you to refer to the predefined formula if the changes you make to your own formula do not work to your expectations.
Use the predefined accrual formula functions and database items to access extra inputs for calculations in your custom accrual plan formulas. You can define and register any additional functions you require to incorporate your plan rules. However, your formula must use the same input statements and return statements that exist in the predefined formula.
The predefined accrual formulas contain calculations to ensure that the employee is entitled to accrue time. Although you can include your own calculations in the custom formula, your formula must include the following calculations:
|
Calculation |
Description |
|---|---|
|
Termination date |
Check whether there is a termination date for the assignment. If the termination date is before the calculation date, calculate the accrual as of the termination date. If your formula does not handle partial accrual periods, check whether the termination date is before the end of the first accrual period; if yes, set gross accrual to zero. |
|
Enrollment end date |
Check whether an end date exists for the assignment's enrollment in the plan. If the end date is before the calculation date, calculate the accrual as of the end date. If your formula does not handle partial accrual periods, check whether the enrollment end date is before the end of the first accrual period; if yes, set gross accrual to zero. |
|
Calculation date |
Check whether the calculation date is before the end of the first accrual period; if yes, set gross accrual to zero (unless your formula handles partial accrual periods). |
|
Hire date |
Check the employee's hire date or continuous service date. If your formula handles partial accrual periods, check that this date is before the calculation date, and if not, set the gross accrual to zero. If your formula does not handle partial periods, check that this date is before the start of the last full accrual period used in the current calculation. If the employee has not worked for a full accrual period before the calculation date, set the gross accrual to zero. |
|
Start date for newly enrolled employees |
Check when the employee must start to accrue time. This is typically the date of enrollment in the plan or, if your formula does not handle partial accrual periods, the first period starting on or after the date of enrollment in the plan. If this date (or period) is after the calculation date (or period), set the gross accrual to zero. |
|
Ineligibility period |
Check if an ineligibility period exists. Set the gross accrual to zero if the ineligibility period is still in force on either of these dates:
|
|
Inactive assignments |
Check whether the employee's assignment is active throughout the period for which you want to calculate accruals. Depending on your plan rules, your employees might not accrue time when their assignments are inactive, or they might accrue time at a reduced rate during this period. You can use the GET_ASG_INACTIVE_DAYS function to check the assignment status on each day from the start date to the end date of the period and return the number of inactive working days. |
If you plan to write your own carryover formula for use with accrual plans, you must ensure that the formula uses the same input and return statements that exist in the predefined formula.
You can use functions and database items to access additional inputs. Contexts are available to the formulas automatically.
Input Variables
The following table lists the input variables that you must use in your carryover formula.
|
Input Variable |
Description |
|---|---|
|
calculation_date |
Any date within an accrual term |
|
accrual_term |
Method to calculate the time to carry over. Specify PREVIOUS as the value for this input if you want the formula to calculate carryover for the previous accrual term (before the calculation date). Specify CURRENT if you want the formula to calculate carryover for the accrual term that the calculation date spans. |
Return Values
The following table lists the return values that you must use in your carryover formula.
|
Return Value |
Description |
|---|---|
|
max_carryover |
Amount of time the employee can carry over to the next accrual term. |
|
effective_date |
Last day of the accrual term for which the carryover is calculated |
|
expiry_date (optional) |
Date when the carryover expires if employees do not use it |
If you plan to write your own accrual formula for use with accrual plans, you must ensure that the formula uses the same input and return statements that exist in the predefined formula.
You can use functions and database items to access additional inputs. Contexts are available to the formulas automatically.
Contexts
Without using inputs or database items, you can directly access the following values for use with functions in formulas of type Accrual:
PAYROLL_ASSIGNMENT_ID
ACCRUAL_PLAN_ID
LEGISLATIVE_DATA_GROUP_ID
PAYROLL_ID
Input Variables
The following table lists the input variables that you must use in your accrual formula.
|
Input Variable |
Description |
|---|---|
|
Calculation_Date |
Date through which you want to calculate the gross accrual |
|
Accrual_Start_Date (only if you are using a payroll balance) |
Date when accrual calculations must start. If this value is null, accrual calculations start from the beginning of the accrual term. |
|
Accrual_Latest_Balance (only if you are using a payroll balance) |
Latest accrual balance for the accrual term up to the day before the start of the accrual calculations (Accrual_Start_Date). A payroll balance stores the latest balance. |
Return Values
The following table lists the return values that you must use in your accrual formula.
|
Return Value |
Description |
|---|---|
|
Enrollment_Start_Date |
Date when the employee has enrolled in the accrual plan |
|
Enrollment_End_Date |
Date when the accrual plan enrollment expires |
|
Continuous_Service_Date |
The service date that was entered using an input value on the accrual plan element |
|
Accrual_Start_Date |
Start date of the accrual term. Depending on plan rules, this date may be the plan enrollment date, hire date, adjusted service date, or other date. |
|
Accrual_End_Date |
Date through which you want to calculate the gross accrued time. However, if the employee was terminated, this return value contains the termination date. If the employee has left the plan, this value contains the end date of the plan's element entry. |
|
Accrual_Rate |
Amount of time that the employee accrues per year. The value that is returned depends on accrual bands. |
|
Ceiling_Amt |
The maximum time that the employee can accrue. The value that is returned depends on accrual bands. |
|
Max_Carryover |
Maximum time that the employee can carry over to the next accrual term. The value that is returned depends on accrual bands. |
|
Accrued_Amt |
Gross accrued time for the current accrual term |
|
Entitled_Amt |
Net accrual for the current accrual term |
|
Pay_Rate_Per_Unit |
The monetary value of one unit of time that the employee has accrued |
|
Currency_Code |
The currency code used to express the monetary value of one unit of accrued time. |
If you plan to write your own ineligibility formula for use with accrual plans, you must ensure that the formulas use the same input and return statements that exist in the predefined formula
Input Variables
You must specify as input the calculation date that indicates the effective date of the enrolled employee's accrual plan element entry.
Return Values
You must specify the assignment_eligible return value. The value will be set to Y (eligible) or N (ineligible).
You can use the predefined accrual formula functions for calculations in your custom accrual plan formulas.
You can create and register any additional functions you require to incorporate your plan rules.
CALCULATE_PAYROLL_PERIODS ( )
The function uses the payroll id context. It calculates the number of payroll periods in one year for that payroll, and sets the global variable PAYROLL_YEAR_NUMBER_OF_PERIODS to that value.
For example, the function sets the global variable to 12 for a calendar month payroll.
GET_ABSENCE (calculation date, start date)
Returns the total number of whole absences (having start and end dates) that an accrual plan covers between a date interval.
For example, the following formula statement returns the total number of absences that were taken between January 1, 2010 and 31 December, 2010.
TOTAL_ABSENCE = GET_ABSENCE ('01-JAN-2010(date), '31-DEC-2010'(date))
Parameters
Start Date
Date when you want to start searching for absences.
End Date
Date up to which you want to search for absences.
GET_CARRY_OVER (calculation date, start date)
Returns the number of days or hours recorded on the carryover element entry with an effective date on or between the two input dates. If more than one element entry is effective between these dates, the function sums the hours or days.
Carryover element entries may also have an expiry date, after which any unused carryover time is lost. If the calculation date is after the expiry date, the function calculates the absences between the start date and the calculation date. If the total absence duration equals or exceeds the carryover, the function returns the total carryover because all of the time was used before it expired. If the total duration is less than the total carryover, the function returns the total duration of the absences taken before the carried over time expired. The rest of the carried over time is lost.
For example, if an employee carried over ten days, and takes six days of leave up to the expiry date, the function returns six. The employee loses the four days of carried over time remaining after the expiry date.
GET_NET_ACCRUAL (calculation date, plan id, accrual start date, accrual latest balance)
Returns the net accrual at the calculation date.
Parameters
Calculation Date
Date through which you want to calculate the net accrual.
Plan ID
Identifies the accrual plan to use to calculate the net accrual.
Accrual Start Date
Start date of the accrual term.
Accrual Latest Balance
Latest gross accrual stored in a payroll balance.
RESET_ACCRUALS ( )
Returns a value (Y or N) that indicates whether the PTO_RESET_ACCRUALS pay action parameter was set.
GET_OTHER_NET_CONTRIBUTION (calculation date, start date)
Returns between two dates the total amount of time stored in elements that you added to the net calculation on the Accrual Plan page. This calculation does not consider absence entries stored in the absence element or carried-over time stored in the carryover element.
GET_PAYROLL_PERIOD (date)
Determines the payroll period that spans the specified date and assigns values to the following global variables:
PAYROLL_PERIOD_START_DATE
PAYROLL_PERIOD_END_DATE
PAYROLL_PERIOD_NUMBER
Use the GET_DATE and GET_NUMBER functions to retrieve the values from the global variables.
GET_ACCRUAL_BAND (years_of_service)
Determines the appropriate accrual band for the specified length of service of the employee. The function assigns values to the following global variables:
ANNUAL_RATE: Amount of time to accrue for the current accrual term at this band
UPPER_LIMIT: Length of service that the employee must complete for the next band to apply.
CEILING
The following statements show how to use this function then use the GET_NUMBER function to retrieve the values it sets in the global variables:
   .
   .
   .
   .
IF ( GET_ACCRUAL_BAND(Years_Service) = 0 THEN

Annual_Rate = GET_NUMBER('ANNUAL_RATE')
Upper_Limit = GET_NUMBER('UPPER_LIMIT')
Ceiling = GET_NUMBER('CEILING')

ELSE

( <your statements to include error processing> )

)
GET_ASSIGNMENT_STATUS (date)
Determines the status of an assignment at a given date. The function assigns values to the following global variables:
ASSIGNMENT_EFFECTIVE_SD (effective start date of the assignment)
ASSIGNMENT_EFFECTIVE_ED (effective end date of the assignment)
ASSIGNMENT_SYSTEM_STATUS (status of the assignment)
For example, the following statement returns the status of the assignment on 01 January, 2011:
ERROR = GET_ASSIGNMENT_STATUS
('01-JAN-2011' (date))
GET_ASG_INACTIVE_DAYS (period start date, period end date)
Returns the number of working days between the input dates when the assignment status was inactive.
GET_EARLIEST_ASGCHANGE_DATE (p_legislative_data_group_id, p_pay_assignment_id, p_event_group, p_start_date, p_end_date, p_recalc_date)
Returns the earliest date when changes to the assignment were first detected between two dates.
Parameters
p_legislative_data_group_id
The legislative data group ID of the assignment.
p_pay_assignment_id
The assignment's pay assignment ID
p_event_group
The name of the event group that contains the events you want to track
p_start_date
Date when you want to start scanning for retrospective changes to the assignment
p_end_date
Date through which you want to scan for retrospective changes to the assignment
p_recalc_date
Date, normally today's date or the effective date you selected, on which you want to scan for retrospective events that may have occurred during the input dates.
GET_PERIOD_DATES (base date, UOM, calculation date, number)
Returns the start and end dates of the accrual period that spans the input date. The function assigns the start date to the PERIOD_START_DATE global variable, and the end date, to the PERIOD_END_DATE global variable.
For example, assume that an accrual plan was set up to allow employees to accrue time once in two months in a calendar year. The following usage of the GET_PERIOD_DATES function populates the PERIOD_START_DATE global variable with 1-MAR-2010, and the PERIOD_END_DATE global variable, with 30-APR-2010.
GET_PERIOD_DATES('1-JAN-2010',
'M', '15-APR-2010', 2)
If the calculation date is earlier than the base date, then the function calculates the accrual periods backwards from the base date.
Parameters
Base Date
Date to start calculating the accrual period dates from. Usually, this is the start date of the accrual term.
Calculation Date
Date for which you want to determine the accrual period that spans it.
UOM
Type of division that determines accrual periods. Valid units are D (days), M (months), W (weeks).
Number
The duration of the accrual period.
GET_START_DATE (accrual start date, start of accrual term)
Returns the date when the accrual formula must start calculating accruals.
If you are using a payroll balance and there are retrospective absence entries that have not already been used in an accrual calculation, the function returns the earliest start date of these entries.
However, in the predefined formula, if any unprocessed retrospective element entries are found, the formula always calculates accruals from the beginning of the accrual term.
If you are not using a payroll balance, the function returns the start date of the accrual term.
GET_WORKING_DAYS (start date, end date)
Returns the number of working days between the input dates
CALCULATE_HOURS_WORKED (p_std_hours, p_std_freq, p_range_start, p_range_end)
Returns the number of working hours between two dates.
For example, assuming that the assignment works 40 hours per week, the following statement returns the number of working hours between 01 January, 2010 and 31 January, 2010:
E = CALCULATE_HOURS_WORKED (40, "Weekly", '01-Jan-2010', '31-Jan-2010')
The values that you can specify for the p_std_freq parameter are:
Weekly
Monthly
Yearly
PUT_MESSAGE (expression)
Adds a message for debugging purposes.
For example, use this function to generate a message from the accrual formula if an employee is not eligible to accrue time.
GET_ELEMENT_ENTRY ( )
Returns a value that indicates whether an assignment has enrolled in the accrual plan. the value 1 indicates that an element entry exists, and the value 0 indicates that no element entry exists.
GET_PAYROLL_DETAILS (p_payroll_id, p_date_in_period)
Returns payroll details, such as the start date of the payroll period, the end date, and the number of the payroll period that spans the input date. The function accepts the following parameters:
p_payroll_id: The ID of the payroll
p_date_in_period: The date for which you want to determine the payroll details
Parameters
p_payroll_id
The ID of the payroll
p_date_in_period
The date for which you want to determine the payroll details
GET_PAYROLL_DTRANGE (p_payroll_id)
Returns the start and end dates of the specified payroll.
GET_PAYROLL_ID (p_pay_assignment_id, p_payroll_id, p_date_in_period)
Returns the effective payroll ID for an assignment on an input date.
GET_RETRO_ELEMENT ( )
Retrieves retrospective elements to be tagged as processed.
GET_TERMINATION_DATE (p_assignment_id)
Returns the termination date of an assignment and sets the PER_TERMINATION_DATE context with this value.
SET_ACCRUAL_BALANCE (p_pay_assignment_id, p_element_type, p_element_type_id, p_input_value_id, p_accrual_band_id, p_absence_type_id, p_absence_attendance_id, p_start_date, p_end_date, p_contributed_amt)
Sets the accrual balance details. The function accepts the following parameters:
Parameters
p_pay_assignment_id
The assignment for which you want to set the accrual balance details
p_element_type
The type of element for which you want to set the details. Valid types are Accrual, Carryover, Absence, or other types of elements you may have added to the net calculation rules when you created the accrual plan.
p_element_type_id
The ID of the element for which you want to set the balance details
p_input_value_id
The ID of the input value of the element for which you want to set the balance details
p_accrual_band_id
The ID of the accrual band that applies to the assignment
p_absence_type_id
The name of the absence type. This parameter is applicable when you want to set details for the absence element type.
p_absence_attendance_id
The ID of the absence record. This parameter is applicable when you want to set details for the absence element type.
p_start_date
If you are using this function to set details for the Absence element type, then set the value of this parameter to the start date of the absence. For setting details for the Carryover element type, specify the effective date of the carried over time.
p_end_date
If you are using this function to set details for the Absence element type, then set the value of this parameter to the end date of the absence. For setting details for the Carryover element type, specify the date when the carried over time expires.
p_contributed_amt
If you are using this function to set details for the additional elements you added in the net calculation rules, set the value of this parameter to the total amount of time recorded in those elements.
The accrual formula recalculates gross accrual when you:
Record an employee absence that is associated with an accrual plan.
Review leave entitlement for employees from the Review Accrual Balance page.
Run the Calculate Accrual Carryover process.
Run your payroll (only for Oracle Fusion Global Payroll users).
Review a statement of earnings online.
To be visible, your accrual plan formulas must:
Be effective on today's date
Exist in the legislative data group that you want to create the accrual plan in
Belong to the appropriate formula type:
Accrual formulas must belong to the Accrual type.
Carryover formulas must belong to the Accrual Carryover type
Ineligibility formulas must belong to the Accrual Ineligibility type.
Absence entitlement plans are based on absence benefit plans, absence entitlement bands, absence types, work schedules, and a payroll element. You can configure all of these to reflect the plan policies of your enterprise.
The following figure shows the components of an absence entitlement plan.

The Evaluate Absence Plan Participation process enrolls eligible employees in an absence benefit plan. You must associate an absence benefit plan with the following benefit components:
|
Component |
Description |
|---|---|
|
Eligibility profile |
The Participation and Rate Eligibility formula that you associate with the eligibility profile determines which absence entitlement plan applies for the type of recorded absence. |
|
Life Events |
Recording an absence start or end date, or deleting an absence, creates an absence life event, which is detected by the Evaluate Absence Plan Participation process. |
For the absence benefit plan, you must create a standard benefit rate. You must associate the following formulas with the rate:
Rate Value Calculation formula, to calculate the length of service of the enrolled employee for entitlement band calculations.
Extra Inputs formula, to determine absence information, such as the absence start date and end date, and the absence benefit plan ID.
The Evaluate Absence Plan Participation process updates the payroll element with the values that these formulas return.
Note
You create the formulas only once. Subsequently, you can use the same formulas for all your absence entitlement plans.
You must create a recurring element for payroll runs to process. By default, the Evaluate Absence Plan Participation process updates the payroll element with the following values that the Rate Value Calculation formula and the Extra Inputs formula return:
Absence type
Absence start and end dates
Length of service
Absence benefit plan ID of the enrolled employee
According to your requirements, you can include other input values and write formulas to feed those values to display absence entitlements on an employee's pay advice.
You create an absence entitlement band group and associate it with an absence entitlement plan. The band group uses length of service to determine the amount of leave an employee can take and the percentage of payment that applies for each day of absence.
You must associate at least one absence type with the absence entitlement plan. Recording absences of these types entitles the employee to the benefits of the associated absence entitlement plan.
By default, the Evaluate Absence Plan Participation process uses the work schedule that employees currently follow to determine the working days during an absence. You can create a default work schedule and associate it with the entitlement plan. The process uses the default schedule to determine working days if it does not find a schedule assigned to the employee.
The Evaluate Absence Plan Participation process enrolls eligible employees in an absence benefit plan and identifies the absent days for which the enrolled employee is entitled to receive payment under an absence entitlement plan. The process records the entitlement information in a database table. You can write formulas to determine pay amounts on the basis of this information.
The rules that you specify in the absence entitlement plan control the entitlement calculation.
The parameters that you enter when you run the process determine the plans and people that are processed.
|
Parameter |
Description |
|---|---|
|
Effective Date |
The date through which you want the process to evaluate absences. |
|
Validate |
If you select Rollback and run the process, you can check your results and correct errors before using the Save option to commit the results to the database. |
|
Legal Entity, Payroll, Organization Name, Benefits Group, Location, Postal Code Ranges, Person Type, Person Name |
You can run the process for a specific employee or all employees associated with a workforce structure level, such as a legal entity, or for employees associated with other levels, such as a payroll or benefit group. |
|
Audit Log |
If you select Yes, the process creates a file that lists the eligibility results for each person that the process evaluated. |
|
Limit by Person's Organization |
If you select Yes, the process only handles compensation objects that are associated with the employee's organization. |
The following diagram illustrates how the process determines the absence entitlement days.

Recording an absence triggers absence life events.
When you run the Evaluate Absence Plan Participation process, it detects these life events and searches for all absence benefit plans. For each absence benefit plan that it finds, the process runs the Eligibility and Participation formula associated with that plan to determine whether an absence entitlement plan exists for the combination of the absence benefit plan and the absence type that was used to record the absence. If an absence entitlement plan exists, the process enrolls the employee in the absence benefit plan.
The process then runs the following formulas associated with the absence benefit plan's standard rate and updates the payroll element:
Rate Value Calculation formula, to determine the length of service of the enrolled employee
Extra Inputs formula, to calculate other values such as the absence start and end dates, and the absence benefit plan ID
On the basis of the rules you set up in the absence entitlement plan, the process updates the following tables:
BEN_GAP_ABSENCE_PLANS
BEN_GAP_DAILY_ABSENCES
The information in the BEN_GAP_DAILY_ABSENCES table indicates the entitlement for the employee for each absent day. Each row in this table contains the following columns:
|
Column |
Description |
|---|---|
|
Plan ID |
Absence benefit plan ID of the enrolled employee. |
|
Absence date |
The absent day that the process calculated entitlement for |
|
Work pattern day |
Indicates whether the absent day was a working day (WORKON) or a non working day (OFFWORK) |
|
Entitlement band |
The entitlement band that applies on the absent day |
|
Duration |
Duration of absence on the absent day (for example, a value of 1 indicates a full day of absence and a value of 0.5 indicates a half day of absence.) |
|
Duration in Hours |
Duration of absence in hours on the absent day |
|
Working days per week |
The number of days in a week that the employee is scheduled to work |
|
FTE |
Full-time equivalent of the employee. |
The information in the BEN_GAP_ABSENCE_PLANS table stores absence type and absence plan information for each employee. Each row in this table contains the following columns:
|
Column |
Description |
|---|---|
|
GAP_ABSENCE_PLAN_ID |
The primary key for this table |
|
ASSIGNMENT_ID |
The assignment ID of the employee |
|
ABSENCE_ATTENDANCE_ID |
The type of the absence that was recorded |
|
PL_ID |
The absence benefit plan ID |
|
LAST_GAP_DAILY_ABSENCE_DATE |
The date when the absence entitlement information was last updated in the table. |
You must set up your absence entitlement bands to express leave time as one of the following units of measure:
Working days
Working hours
Calendar days
Calendar weeks
Choose this option if you want the Evaluate Absence Plan Participation process to determine the working days from a work schedule assigned to the employee's primary assignment or a default work schedule that you associated with the absence entitlement plan. For example, if the absence start date is January 1, 2011 and the absence end date is February 25, 2011 and the employee follows a five-day work schedule, then the process calculates entitlement for 40 days.
If you use this option, the process determines the working hours on the basis of the standard working hours of the employee's primary assignment. For example, if the absence start date is January 3, 2011 and the absence end date is February 1, 2011 and the employee's standard working hours are from 8 a.m. to 5 p.m. on all weekdays with Saturdays and Sundays as holidays, then the process calculates entitlement for 176 hours.
Choose this option if you want the process to express the time in terms of calendar days. For example, if the absence start date is January 1, 2011 and the absence end date is March 1, 2011, then the process calculates entitlement for 60 days.
This option is especially useful to create maternity absence plans. For example, if the absence start date is January 3, 2011 and the absence end date is August 1, 2011, then the process calculates entitlement for 30 weeks.
An assessment period is essentially a time period during which the Evaluate Absence Plan Participation process calculates the total absent time recorded. On the basis of this calculation, the process determines the leave time available for the current period of absence. When you create an absence entitlement plan, you must choose one of the following assessment period types:
Fixed year - hire start date
Fixed year - defined start date
Rolling backward
Event based
If you choose this option, you must determine, on the Absence Entitlement page, the type of hire date to use for the calculation:
Service date of the employee's present legal employer
Enterprise service date
You define the start date of the assessment period, for example, the start of the financial year, or the start of the calendar year. The entitlement calculation computes the total duration of absent time from the start date you define to the absence start date.
In a rolling-backward period, the absence entitlement calculation is based on the total duration of absence time taken for a specific amount of time that precedes the absence start date. For example, if you specify a one year rolling period, and the employee's absence start date is January 1, 2011, then the calculation counts the number of absences taken from January 2, 2010.
Use this option if you want to create an entitlement plan for a maternity scheme. The entitlement calculation is based on the qualifying date that you select. You can set the qualifying date to a specific date before the expected week of childbirth, or the date when the employee starts her maternity absence.
When you specify an assessment period for an absence entitlement plan, you must select an overlap rule that determines how the Evaluate Absence Plan Participation process treats absences that overlap the assessment period. The examples in this topic will help you understand how you can:
Use the Include rule to assess absences that overlap current and previous periods
Use the Exclude rule to ignore the entire absence that overlaps the current and previous periods
Use the Split rule to assess absences falling within the current period only
This rule applies to rolling-backward assessment periods only. If an absence overlaps the beginning of the rolling period, then the entire absence is considered in the current assessment period.
For example, assume that you have defined a six-month rolling-backward assessment period in your entitlement plan and set up bands that entitle employees to 20 days of absence at full pay and a further 15 days at half pay. An employee starts sick leave on June 7, 2011 and the assessment period starts on January 1, 2011. The employee was paid previously under the same entitlement plan while on sick leave for a period of 15 working days from December 20, 2010 to January 7, 2011. Because the previous absence overlaps the current assessment period and you configured the entitlement plan to use the Include rule, the employee receives full pay for the first 5 (20 - 15) days of the absence and half-pay for the next 15 days.
The following figure shows the usage of the Include rule in this scenario.
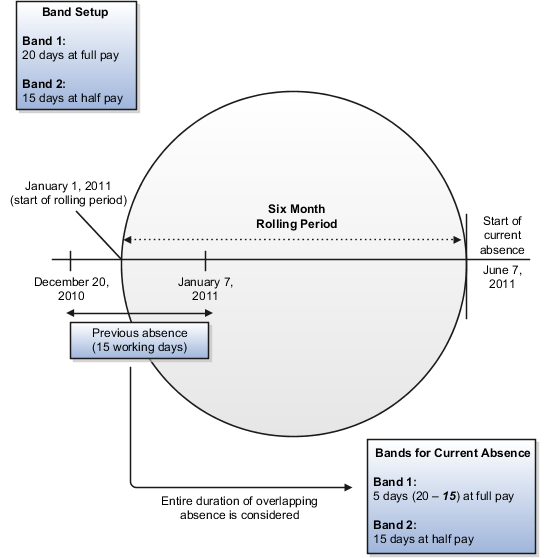
If an employee is absent at the beginning of an assessment period, then this rule ignores the entire absence that overlaps the period.
In the example used in the previous scenario, for an entitlement plan that uses the Exclude rule, the employee receives full pay for the first 20 days of the absence and half pay for the next 15 days. Because you used the Exclude rule, even though the previous absence overlaps the current assessment period, the employee receives the entitlement band benefits for the current absence without any deductions.
The following figure shows the usage of the Exclude rule in this scenario.
This rule assesses overlapping absences that fall within the current period only. In the example used in the previous scenario, for an entitlement plan that uses the Split rule, the employee receives full pay for the first 15 (20 - 5) days of the absence and half pay for the next 15 days.
The following figure shows the usage of the Split rule in this scenario.
When you define an assessment period in an absence entitlement plan, you can choose to exclude from the assessment period absences belonging to specific plan types. The assessment period extends back in time by the length of any such absences.
Assume that according to your enterprise's long term sick leave policy, the entitlement to employees must exclude any unpaid absences during a six-month assessment period. You configured the absence entitlement plan to add the plan type that records the unpaid absences in the Extend Assessment Period region. An employee starts sick leave on May 2, 2011. Earlier during the year, the employee was on unpaid leave for a period of 5 days from February 28, 2011 to March 4, 2011. Because the unpaid absence dates fall within the six-month assessment period, the period's start date moves back 5 days (the duration of the unpaid absence) to October 26, 2010 and calculates the number of absent days from that date while retaining the length of the assessment period's duration.
The calculation also considers any absences that may overlap the beginning of the extended assessment period. For example, in this scenario, assume that you set up the entitlement plan to include in the current assessment period the entire duration of absences that overlap. The employee was on sick leave for 10 working days from October 18, 2010 to October 29, 2010, for which sick pay was already awarded. In the present assessment period, the calculation considers those 10 absent days in the entitlement calculation.
The following figure illustrates that the length of the assessment period remains the same even though it starts five days earlier than the original date of November 1 because of the five-day unpaid leave during the period. It also shows that the entitlement calculations include the entire duration of a previous absence in the current assessment period, even though only 4 absence days overlap with the revised assessment period, starting October 26.
When you create an absence entitlement plan, you can specify how the Evaluate Absence Plan Participation process must round off fractional amounts of time available in an absence entitlement band to determine the current absence entitlement.
Suppose that you have set up an absence entitlement plan that uses a fixed assessment period of 1 year and rounds leave entitlements down to the nearest whole day. Employees are entitled to 20 calendar days of sickness at full pay. An employee had 13 days and 2 hours sick leave within the current assessment period, and is starting another 10 days of sick leave. At the beginning of this leave, the remaining entitlement is 6.75 days. Under the entitlement plan's rounding rules, the employee receives full pay for 6 days of the current absence.
In the previous scenario, if you had set up the absence entitlement plan to round up entitlement balances to the nearest half day, then at the start of the second absence, the employee is entitled to payment up to 7 days in Band 1.
In the previous scenario, if you had set up the absence entitlement plan to round down entitlement balances to a single decimal place, then at the start of the second absence, the employee is entitled to payment up to 6.7 days (rounded down from 6.75 days) in Band 1.
Use the scenarios in this topic to understand how you can create absence entitlement bands for an absence entitlement plan.
For a specific band, you can vary the amount of absent time for which you want to pay employees by length of service. For example, you want employees who have completed between 5 and 10 years of service to receive 75% of pay for up to 10 days of absence. However, you want employees who have completed between 11 and 20 years to receive the same pay percentage, but up to 20 days of absence. In this scenario, you must create multiple length-of-service ranges for a single band. The following table illustrates the information that you must enter as part of the entitlement band:
|
Band |
Length-of-Service Range |
Entitled Leave Time |
Eligible Pay Percentage |
|---|---|---|---|
|
1 |
5 through 10 |
10 days |
75% |
|
1 |
11 through 20 |
20 days |
75% |
You want all employees who have completed 5 years of service to receive 100% of pay for up to 10 days of leave, and 75% of pay up to a further 15 days of leave. The following table illustrates the information that you must enter as part of the entitlement bands to achieve this scenario:
|
Band |
Length-of-Service Range |
Entitled Leave |
Eligible Pay Percentage |
|---|---|---|---|
|
1 |
5 through 99 |
10 days |
100% |
|
2 |
5 through 99 |
15 days |
75% |
You can create multiple absence entitlement bands with each band containing multiple ranges of lengths of service. You can associate for each length-of-service range a corresponding number of absent days for which you want eligible employees to receive payment. For example, you want employees who have completed less than 5 years of service to be eligible for 75% of pay for up to 10 days of absence and 50% of pay for a further 15 days of absence. Employees who have completed more than 5 years of service are eligible for full pay up to 10 days of absence and 75% of pay for a further 15 days of absence. The following table illustrates the information that you must enter as part of the entitlement band to achieve this scenario:
|
Band |
Length-of-Service Range |
Entitled Leave Time |
Eligible Pay Percentage |
|---|---|---|---|
|
1 |
0 through 5 |
10 days |
75% |
|
1 |
5 through 99 |
15 days |
75% |
|
2 |
0 through 5 |
15 days |
50% |
|
3 |
5 through 99 |
10 days |
100% |
The Evaluate Absence Plan Participation process runs the Participation and Rate Eligibility formula to enroll eligible employees in an absence benefit plan. The formula output indicates whether an absence entitlement plan exists for the type of absence recorded.
You must associate the formula with an eligibility profile of an absence benefit plan. The formula must belong to the Participation and Rate Eligibility formula type. Provide a meaningful name for the formula so that you can easily identify it.
Contexts
The following contexts are available to this formula.
BUSINESS_GROUP_ID
ASSIGNMENT_ID
DATE_EARNED
PGM_ID
PL_ID
OPT_ID
LER_ID
Database Items
The following database items are available to formulas of this type.
All columns except attribute columns from the tables:
ben_ler_f
ben_pgm_f
ben_pl_f
ben_pl_typ_f
ben_opt_f
The database items are based on the employee's assignment ID.
Return Values
The following return value is available to this formula.
|
Return Value |
Data Type |
Required |
Description |
|---|---|---|---|
|
ELIGIBLE |
Char |
Yes |
The value of this variable is Y if an entitlement plan exists for the type of absence recorded. The value is N if no entitlement plan exists. |
Errors
If any other return value is passed back to the formula, then you can process errors with BEN_91329_FORMULA_RETURN.
Sample Formula
You can either write your own formula, or use the following text to create the formula on the Fast Formula page:
DEFAULT FOR BEN_ABS_ABSENCE_CATEGORY IS '_DEFAULT_'
DEFAULT FOR BEN_ABS_ABSENCE_TYPE_ID  IS -987123654
DEFAULT FOR BEN_PLN_PL_ID IS -987123654

l_yn = 'N'
l_error = 0
l_absence_type_lookup_code = ' '
l_absence_type_list_name = ' '
l_truncated_yes_no = ' '
l_error_message = ' '
l_absence_type_meaning = ' '
l_absence_category = ' '


l_pl_id = BEN_PLN_PL_ID
l_absence_type_id = BEN_ABS_ABSENCE_TYPE_ID
l_abs_typ_id = to_char(l_absence_type_id)


l_absence_type_meaning = BEN_CHK_ABS_TYPE (l_abs_typ_id,l_yn)

IF NOT ISNULL(l_absence_type_meaning) = 'Y' THEN
(
  l_yn = 'Y'
)

ELIGIBLE = l_yn
RETURN ELIGIBLE
When an employee records a long term absence, the Evaluate Absence Plan Participation process enrolls the employee in an absence benefit plan and runs the Extra Inputs formula to update the payroll element with details, such as the absence type, absence start and end dates, and the ID of the absence benefit plan that the employee was enrolled in.
You must associate the formula with a benefit rate for an absence benefit plan. The formula must belong to the Extra Input formula type. Provide a meaningful name for the formula so that you can easily identify it.
Contexts
The following contexts are available to this formula:
BUSINESS_GROUP_ID
ASSIGNMENT_ID
DATE_EARNED
ORGANIZATION_ID
JURISDICTION_CODE
PGM_ID
PL_ID
OPT_ID
LER_ID
PL_TYP_ID
ACTY_BASE_RT_ID
Database Items
The following database items are available to formulas of this type:
All columns except attribute columns from tables:
ben_ler_f
ben_pgm_f
ben_pl_f
ben_pl_typ_f
ben_opt_f
ben_acty_base_rt_f
The database items are based on the employee's assignment ID.
Input Variables
The following input values are available to this formula.
|
Input Value |
Data Type |
Required |
Description |
|---|---|---|---|
|
BEN_ABS_IV_ABSENCE_ATTENDANCE_ID |
Char |
Yes |
Absence record ID |
|
BEN_ABS_IV_ABSENCE_ATTENDANCE_TYPE_ID |
Char |
Yes |
Absence type ID |
|
BEN_ABS_IV_DATE_START |
Char |
Yes |
Absence start date |
|
BEN_ABS_IV_DATE_END |
Char |
Yes |
Absence end date |
|
BEN_ABS_IV_ABSENCE_DAYS |
Char |
Yes |
Absence duration |
Return Values
The following return values are available to this formula.
|
Return Value |
Data Type |
Required |
Description |
|---|---|---|---|
|
l_absence_id |
Char |
Yes |
Absence record ID |
|
l_plan_id |
Char |
Yes |
Absence benefit plan ID that the employee enrolled in |
|
l_absence_start_date |
Char |
Yes |
Absence start date |
|
l_absence_end_date |
Char |
Yes |
Absence end date |
|
l_absence_type |
Char |
Yes |
Type of absence recorded |
Errors
If type casting of variables causes errors, then you can process those errors with BEN_92311_FORMULA_VAL_PARAM.
Sample Formula
You can either write your own formula, or use the following text to create the formula in the Fast Formula page:
/*
Set default values for database items.
*/
DEFAULT FOR BEN_ABS_ABSENCE_TYPE IS '_DEFAULT_'
DEFAULT FOR BEN_PLN_PL_ID IS -987123654

/* Other database items.
DEFAULT FOR BEN_ABS_ABSENCE_TYPE_ID IS -987123654
DEFAULT FOR BEN_ABS_ABSENCE_CATEGORY IS '_DEFAULT_'
DEFAULT FOR BEN_ABS_ABSENCE_CATEGORY_CODE IS '_DEFAULT_'
DEFAULT FOR BEN_ABS_ABSENCE_CATEGORY_ID IS -987123654
DEFAULT FOR BEN_ABS_REASON IS '_DEFAULT_'
DEFAULT FOR BEN_ABS_REASON_CODE IS '_DEFAULT_'
DEFAULT FOR BEN_ABS_REASON_ID IS -987123654
DEFAULT FOR BEN_ABS_DATE_START IS '1951/01/01 00:00:00'(DATE)
DEFAULT FOR BEN_ABS_DATE_END IS '1951/01/01 00:00:00'(DATE)
DEFAULT FOR BEN_ABS_SICKNESS_START_DATE IS '1951/01/01 00:00:00'(DATE)
DEFAULT FOR BEN_ABS_SICKNESS_END_DATE IS '1951/01/01 00:00:00'(DATE)
DEFAULT FOR BEN_ABS_DATE_NOTIFIED IS '1951/01/01 00:00:00'(DATE)
DEFAULT FOR BEN_SMP_DUE_DATE IS '1951/01/01 00:00:00'(DATE)
DEFAULT FOR BEN_SMP_MPP_START_DATE IS '1951/01/01 00:00:00'(DATE)
DEFAULT FOR BEN_SMP_ACTUAL_BIRTH_DATE IS '1951/01/01 00:00:00'(DATE)
DEFAULT FOR BEN_SMP_LIVE_BIRTH_FLAG IS 'Y'
DEFAULT FOR BEN_SSP_EVIDENCE_DATE IS '1951/01/01 00:00:00'(DATE)
DEFAULT FOR BEN_SSP_EVIDENCE_SOURCE IS '_DEFAULT_'
DEFAULT FOR BEN_SSP_MEDICAL_TYPE IS 'SICKNESS'
DEFAULT FOR BEN_SSP_EVIDENCE_STATUS IS 'ACTIVE'
DEFAULT FOR BEN_SSP_SELF_CERTIFICATE IS 'N'
DEFAULT FOR BEN_ABS_ACCEPT_LATE_NOTIFICATION_FLAG IS 'Y'
DEFAULT FOR BEN_ABS_PREGNANCY_RELATED_ILLNESS IS 'N'
DEFAULT FOR BEN_SMP_NOTIFICATION_OF_BIRTH_DATE IS '1951/01/01 00:00:00'(DATE)
DEFAULT FOR BEN_SSP_EVIDENCE_RECEIVED_DATE IS '1951/01/01 00:00:00'(DATE)
DEFAULT FOR BEN_SSP_ACCEPT_LATE_EVIDENCE_FLAG IS 'Y'
*/

/*
Set default values for formula inputs.
*/
DEFAULT FOR BEN_ABS_IV_ABSENCE_ATTENDANCE_ID IS '_DEFAULT_'
DEFAULT FOR BEN_ABS_IV_ABSENCE_ATTENDANCE_TYPE_ID IS '_DEFAULT_'
DEFAULT FOR BEN_ABS_IV_DATE_START IS '_DEFAULT_'
DEFAULT FOR BEN_ABS_IV_DATE_END IS '_DEFAULT_'
DEFAULT FOR BEN_ABS_IV_ABSENCE_DAYS IS '_DEFAULT_'

/* Other available inputs.
DEFAULT FOR BEN_ABS_IV_ABS_ATTENDANCE_REASON_ID IS '_DEFAULT_'
DEFAULT FOR BEN_ABS_IV_ABSENCE_HOURS IS '_DEFAULT_'
DEFAULT FOR BEN_ABS_IV_DATE_NOTIFICATION IS '_DEFAULT_'
DEFAULT FOR BEN_ABS_IV_DATE_PROJECTED_END IS '_DEFAULT_'
DEFAULT FOR BEN_ABS_IV_DATE_PROJECTED_START IS '_DEFAULT_'
DEFAULT FOR BEN_ABS_IV_SSP1_ISSUED IS '_DEFAULT_'
DEFAULT FOR BEN_ABS_IV_LINKED_ABSENCE_ID IS '_DEFAULT_'
DEFAULT FOR BEN_ABS_IV_SICKNESS_START_DATE IS '_DEFAULT_'
DEFAULT FOR BEN_ABS_IV_SICKNESS_END_DATE IS '_DEFAULT_'
DEFAULT FOR BEN_ABS_IV_PREGNANCY_RELATED_ILLNESS IS '_DEFAULT_'
DEFAULT FOR BEN_ABS_IV_MATERNITY_ID IS '_DEFAULT_'
DEFAULT FOR BEN_PIL_IV_PER_IN_LER_ID IS '_DEFAULT_'
DEFAULT FOR BEN_ABS_IV_ATTRIBUTE_CATEGORY IS '_DEFAULT_'
DEFAULT FOR BEN_ABS_IV_ATTRIBUTE1 IS '_DEFAULT_'
DEFAULT FOR BEN_ABS_IV_ATTRIBUTE2 IS '_DEFAULT_'
DEFAULT FOR BEN_ABS_IV_ATTRIBUTE3 IS '_DEFAULT_'
DEFAULT FOR BEN_ABS_IV_ATTRIBUTE4 IS '_DEFAULT_'
DEFAULT FOR BEN_ABS_IV_ATTRIBUTE5 IS '_DEFAULT_'
DEFAULT FOR BEN_ABS_IV_ATTRIBUTE6 IS '_DEFAULT_'
DEFAULT FOR BEN_ABS_IV_ATTRIBUTE7 IS '_DEFAULT_'
DEFAULT FOR BEN_ABS_IV_ABS_INFORMATION_CATEGORY IS '_DEFAULT_'
DEFAULT FOR BEN_ABS_IV_ABS_INFORMATION1 IS '_DEFAULT_'
DEFAULT FOR BEN_ABS_IV_ABS_INFORMATION2 IS '_DEFAULT_'
DEFAULT FOR BEN_ABS_IV_ABS_INFORMATION3 IS '_DEFAULT_'
DEFAULT FOR BEN_ABS_IV_ABS_INFORMATION4 IS '_DEFAULT_'
DEFAULT FOR BEN_ABS_IV_ABS_INFORMATION5 IS '_DEFAULT_'
DEFAULT FOR BEN_ABS_IV_ABS_INFORMATION6 IS '_DEFAULT_'
DEFAULT FOR BEN_ABS_IV_ABS_INFORMATION7 IS '_DEFAULT_'
*/

/*
Declare input values.

Use the following naming convention for the inputs:
BEN_ABS_IV_
*/

INPUTS ARE BEN_ABS_IV_ABSENCE_ATTENDANCE_ID(TEXT)
,BEN_ABS_IV_ABSENCE_ATTENDANCE_TYPE_ID(TEXT)
,BEN_ABS_IV_DATE_START(TEXT)
,BEN_ABS_IV_DATE_END(TEXT)
,BEN_ABS_IV_ABSENCE_DAYS(TEXT)

/* Other available inputs
,BEN_ABS_IV_ABS_ATTENDANCE_REASON_ID(TEXT)
,BEN_ABS_IV_ABSENCE_HOURS(TEXT)
,BEN_ABS_IV_DATE_NOTIFICATION(TEXT)
,BEN_ABS_IV_DATE_PROJECTED_END(TEXT)
,BEN_ABS_IV_DATE_PROJECTED_START(TEXT)
,BEN_ABS_IV_SSP1_ISSUED(TEXT)
,BEN_ABS_IV_LINKED_ABSENCE_ID(TEXT)
,BEN_ABS_IV_SICKNESS_START_DATE(TEXT)
,BEN_ABS_IV_SICKNESS_END_DATE(TEXT)
,BEN_ABS_IV_PREGNANCY_RELATED_ILLNESS(TEXT)
,BEN_ABS_IV_MATERNITY_ID(TEXT)
,BEN_PIL_IV_PER_IN_LER_ID(TEXT)
,BEN_ABS_IV_ATTRIBUTE_CATEGORY(TEXT)
,BEN_ABS_IV_ATTRIBUTE1(TEXT)
,BEN_ABS_IV_ATTRIBUTE2(TEXT)
,BEN_ABS_IV_ATTRIBUTE3(TEXT)
,BEN_ABS_IV_ATTRIBUTE4(TEXT)
,BEN_ABS_IV_ATTRIBUTE5(TEXT)
,BEN_ABS_IV_ATTRIBUTE6(TEXT)
,BEN_ABS_IV_ATTRIBUTE7(TEXT)
,BEN_ABS_IV_ABS_INFORMATION_CATEGORY(TEXT)
,BEN_ABS_IV_ABS_INFORMATION1(TEXT)
,BEN_ABS_IV_ABS_INFORMATION2(TEXT)
,BEN_ABS_IV_ABS_INFORMATION3(TEXT)
,BEN_ABS_IV_ABS_INFORMATION4(TEXT)
,BEN_ABS_IV_ABS_INFORMATION5(TEXT)
,BEN_ABS_IV_ABS_INFORMATION6(TEXT)
,BEN_ABS_IV_ABS_INFORMATION7(TEXT)
*/

/*
Initialise standard default values.
*/
l_null                         = RPAD('X',0,'Y')
l_default                      = '_DEFAULT_'
l_default_date                 = '1951/01/01 00:00:00'(date)
l_default_canonical_date       = '1951/01/01 00:00:00'
l_default_number               = -987123654
l_default_canonical_number     = '-987123654'

l_absence_id_iv = BEN_ABS_IV_ABSENCE_ATTENDANCE_ID

/* 1. Check that a default value was not used for the absence attendance ID.

If an absence attendance id was not found, the default value is used.
This may occur if this formula is used in a plan that does not have an absence
"context" available. Ensure that you select Absence as the option type of the
associated plan type. Ensure that you select Absence as the type of the associated
life event reasons.
*/
IF NOT l_absence_id_iv = l_default THEN
(

l_absence_id = TO_NUMBER(l_absence_id_iv)
l_plan_id = BEN_PLN_PL_ID
l_absence_start_date_dt = BEN_ABS_IV_DATE_START
l_absence_type = BEN_ABS_ABSENCE_TYPE
l_absence_end_date = BEN_ABS_IV_DATE_END
)
ELSE
(
l_absence_id                   = l_default_number
l_plan_id                      = l_default_number
l_absence_start_date           = l_null
l_absence_end_date             = l_null
l_absence_type                 = l_null
)

RETURN l_absence_id
,l_plan_id
,l_absence_start_date
,l_absence_end_date
,l_absence_type
When an employee records a long term absence, the Evaluate Absence Plan Participation process enrolls the employee in an absence benefit plan and runs the Rate Value Calculation formula to determine the enrolled employee's length of service. The process uses the length of service to determine the entitlement bands that apply during the absence period.
You must create the formula for the standard benefit rate that you want to associate with the absence benefit plan. The formula must belong to the Rate Value Calculation formula type. Provide a meaningful name for the formula so that you can easily identify it.
Contexts
The following contexts are available to this formula:
BUSINESS_GROUP_ID
ASSIGNMENT_ID
DATE_EARNED or p_effective_date
Database Items
The database items available to this formula are based on the employee's assignment ID.
Return Values
The following return value is available to this formula.
|
Return Value |
Data Type |
Required |
Description |
|---|---|---|---|
|
LENGTH_OF_SERVICE |
Number |
Yes |
A number that indicates the length of service of the enrolled employee. |
Sample Formula
You can either write your own formula, or use the following text to create the formula in the Fast Formula page:
/*
Set default values.
*/

DEFAULT FOR BEN_ABS_DATE_START IS '1951/01/01 00:00:00'(date)
DEFAULT FOR PER_ASG_REL_DATE_START IS '1951/01/01 00:00:00'(date)

/*
Initialize standard default values.
*/
l_null = RPAD('X',0,'Y')
l_default = '_DEFAULT_'
l_default_date = '1951/01/01 00:00:00'(date)
l_default_canonical_date = '1951/01/01 00:00:00'
l_default_number = -987123654
l_default_canonical_number = '-987123654'
l_length_of_service = -987123654

/*
Determine the absence start date and the employee hire date.
*/
l_absence_start_date = BEN_ABS_DATE_START
l_employee_hire_date = PER_ASG_REL_DATE_START

/*
Check that an absence start date is available for processing.

If an absence start date was not found, the default value is used.
This may occur if this formula is used in a plan that does not have
an absence "context" available. Ensure that you select Absences as
the option type of the associated plan type. Ensure that you select
Absence as the type of the associated life event reasons.
*/
IF NOT l_absence_start_date = l_default_date THEN
(
/*
Check that an absence start date is available to process.

If an employee hire date was not found, the default value is used.
This may occur if the person was not an eligible person type.
Check the associated eligibility profile to ensure that only persons
belonging to the Employee person type are selected for plan enrollment.
*/
IF NOT l_employee_hire_date = l_default_date THEN
(
  /*
  Calculate the length of service.
  */

  l_length_of_service = FLOOR( MONTHS_BETWEEN (l_absence_start_date, l_employee_hire_date)))
)

LENGTH_OF_SERVICE = l_length_of_service
RETURN LENGTH_OF_SERVICE
This example demonstrates how to create an absence entitlement plan for employees taking long term absences related to sickness.
The following table summarizes key decisions for this scenario.
|
Decisions to Consider |
In This Example |
|---|---|
|
Who is eligible for the sickness absence entitlement plan? |
Full-time employees |
|
Which type of absence must employees going on long term sick leave record? |
Sick Plan Leave |
|
How should absence payments be processed in payroll runs? |
By means of a recurring information element so that absence payments are processed into a single calculation for the current payroll period. |
|
What units must entitlement bands express leave time in? |
Working days |
|
How much leave time are employees entitled to payment for under this entitlement plan? |
Employees who have completed less than 5 years of service are entitled to receive 100% pay for the first 15 absent days, 75% pay for a further 20 days, and no pay for a further 10 days of absence. Employees who have completed 5 years of service are entitled to receive 100% pay for the first 30 days of absence, 75% pay for a further 20 days, and 50% for a further 15 days of absence. |
|
Should fractional leave time in entitlement bands be rounded off? |
Yes, round off leave time up to the nearest whole day. |
|
What is the assessment period for this entitlement plan? |
Fixed period that starts from the employee's hire date anniversary |
|
How must absences that overlap at the beginning of the assessment period be processed? |
Consider only those absent days that fall in the current assessment period. |
Before you start, ensure that you create life events, an eligibility profile, and associated formulas. You can reuse these for any sickness or maternity absence entitlement plans that you create subsequently.
Create an absence type for employees to record absences. Create a recurring payroll element to record the absence entitlement details. Create a benefit plan and associate with it the eligibility profile and life events that you created. Create a standard benefit rate for the absence benefit plan and associate with it formulas that determine the employee's length of service and other absence information to update the payroll element. Create absence entitlement bands that determine the amount of leave time that the employee is entitled to. Finally, create an absence entitlement plan and associate with it the entitlement bands, the absence type, the absence benefit plan, and other plan rules.
The following diagram shows the tasks to complete in this example.
Participation and Rate Eligibility formula, to determine whether an absence entitlement plan exists for the type of absence recorded
Rate Value Calculation formula, to calculate the employee's length of service
Extra Inputs formula, to determine other absence information
|
Field |
Value |
|---|---|
|
Name |
Sick Plan Leave |
|
Valid From Date |
January 1, 2011 |
|
Field |
Value |
|---|---|
|
Legislative Data Group |
Enter your legislative data group |
|
Primary Classification |
Information |
|
Field |
Value |
|---|---|
|
Name |
Sick Plan Pay Element |
|
Reporting Name |
Sick Plan Pay Element |
|
Effective Date |
January 1, 2011 |
|
At which employment level should this element be attached? |
Payroll Relationship Level You must select this value because, during enrollment, the Evaluate Absence Plan Participation process considers only those elements defined at the payroll relationship level. |
|
Can a person have more than one entry of this element in a payroll period? |
Yes |
|
Input Value |
User Display |
User Enterable |
|---|---|---|
|
Attendance ID |
Yes |
Yes |
|
Absence Type |
Yes |
Yes |
|
Plan ID |
Yes |
Yes |
|
Absence Start Date |
No |
No |
|
Absence End Date |
No |
No |
|
Length of Service |
Yes |
Yes |
|
Field |
Value |
|---|---|
|
Element Link Name |
SickPlan_Pay_Element_Link |
|
Relationship Type |
Standard |
|
Payroll Statutory Unit |
Select your payroll statutory unit. |
|
Field |
Value |
|---|---|
|
Plan Type Name |
Medical Leave Plans |
|
Option Type |
Absences You must select this value because the Evaluate Absence Plan Participation process considers only those benefit plans that belong to a plan type configured with the Absences option type. |
|
Field |
Value |
|---|---|
|
Plan Name |
Sickness Plan |
|
Plan Type |
Medical Plans |
|
Usage |
Not in program |
|
Status |
Active |
|
Inception Date |
January 1, 2011 |
|
Year Period |
From January 1, 2011 to December 31, 2011 |
|
Tab |
Information |
|---|---|
|
Participation |
Add the eligibility profile that you created. |
|
Life Event |
Add the absence end life event that you created |
|
Field |
Value |
|---|---|
|
Enrollment Method |
Automatic You must select this value so that the Evaluate Absence Plan Participation process automatically enrolls eligible employees into the absence benefit plan. |
|
Field |
Absence Start Life Event |
Absence End Life Event |
|---|---|---|
|
Enrollment Period Start Date Rule |
As of event date |
As of event date |
|
Enrollment Period End Date Rule |
As of event date |
As of event date |
|
Coverage start rule |
Event |
Event |
|
Rate start rule |
Event You must select this value so that the standard benefit rate for the absence benefit plan calculates the enrolled employee's length of service when the event occurs. |
Event |
|
Previous Rate End Rule |
End of Pay Period You must select this value to enable the payroll run to process this element. When an absence end date is recorded, the Evaluate Absence Plan Participation process updates the element entry's end date with the last day of the current payroll period. |
End of Pay Period |
|
Field |
Value |
|---|---|
|
Effective Start Date |
January 1, 2011 |
|
Legal Employer |
Select your legal employer |
|
Rate Name |
Sickness Plan Rate |
|
Plan |
Sickness Plan |
|
Status Rule |
Active |
|
Rate Display Type |
Any |
|
Activity Type |
Any |
|
Element and Input Values Required |
Yes |
|
Assign on Enrollment |
Yes |
|
Display on Enrollment |
Yes |
|
Tax Type Code |
Not Applicable You must select this value because the calculated amount in the case of absence benefit plans is the length of service, which does not require a tax type code. |
|
Payroll Element |
Sick Plan Pay Element |
|
Element Input Value |
Length of Service |
|
Input Value Calculation Formula |
Select the Extra Input formula that you created. |
|
Value Passed to Payroll |
Defined Amount You must select this value because the amount to pass to the element entry during enrollment is the length of service of the employee. |
|
Field |
Value |
|---|---|
|
Calculation Method |
Calculate for Enrollment Formula You select this value so that the Evaluate Absence Plan Participation process uses a formula to calculate the length of service of the enrolled employee. |
|
Post Enrollment Calculation Formula |
Select the Rate Value Calculation formula that you created. |
|
Input Value |
Formula Return Variable Name |
|---|---|
|
Attendance ID |
l_absence_id |
|
Plan ID |
l_plan_id |
|
Absence Type |
l_absence_type |
|
Field |
Value |
|---|---|
|
Name |
Sick Plan Bands |
|
Unit of Measure |
Working days |
|
Band |
Sequence |
Length of Service |
Entitled Leave Time |
Pay Percentage |
|---|---|---|---|---|
|
Band 1 |
1 |
0 through 5 years |
15 days |
100% |
|
Band 1 |
1 |
5 through 99 years |
30 days |
100% |
|
Band 2 |
2 |
0 through 5 years |
20 days |
75% |
|
Band 2 |
2 |
5 through 99 years |
20 days |
75% |
|
Band 3 |
3 |
0 through 5 years |
10 days |
No pay |
|
Band 4 |
4 |
5 through 99 years |
15 days |
50% |
|
Field |
Value |
|---|---|
|
Name |
Sickness Plan Entitlement |
|
Legislative Data Group |
Select your legislative data group. |
|
Plan Name |
Sickness Plan |
|
Scheme |
Occupational Sick Pay |
|
Start Date |
January 1, 2011 |
|
Absence Type |
Sick Plan Leave |
|
Assessment Period Type |
Fixed Year - Hire Start Date |
|
Employment Event |
Enterprise Service Date |
|
Overlap Rule |
Split |
|
Band Entitlement Name |
Sickness Plan Bands |
|
Schedule Name |
Select a default schedule to determine working days if the application finds no schedule assigned to the enrolled employee. |
|
Full-Time Rounding |
To nearest whole day |
This example demonstrates how to create an absence entitlement plan for employees taking maternity leave.
The following table summarizes key decisions in this scenario.
|
Decisions to Consider |
In This Example |
|---|---|
|
Who is eligible for the maternity absence entitlement plan? |
Full-time employees |
|
Which type of absence must employees taking maternity leave record? |
Maternity Plan Leave |
|
What units must entitlement bands express leave time in? |
Calendar weeks |
|
How much leave time are employees entitled to payment for under this entitlement plan? |
Employees who complete 1 year of service and who intend to return to work after their maternity leave are entitled to receive payment for 8 weeks at full pay followed by 16 weeks at 50% pay. Employees who complete 1 year of service and who are not returning to work are entitled to receive payment for the first 6 weeks at 90% pay followed by 12 weeks at 45% pay. |
|
When must employees start to receive maternity pay? |
From the date on which they start their maternity leave |
|
How must absences that overlap at the beginning of the assessment period be processed? |
Use the Exclude rule to ignore any absences that overlap the current assessment period. |
Before you start, ensure that you create life events, an eligibility profile, and associated formulas. You can reuse these for any sickness or maternity absence entitlement plans that you create subsequently.
Create an absence type for employees to record absences. Create a recurring payroll element to record the absence entitlement details. Create a benefit plan and associate with it the eligibility profile and life events that you created. Create a standard benefit rate for the absence benefit plan and associate with it formulas that determine the employee's length of service and other absence information to update the payroll element. Create absence entitlement bands that determine the amount of leave time that the employee is entitled to. Finally, create an absence entitlement plan and associate with it the entitlement bands, the absence type, the absence benefit plan, and other plan rules.
The following figure shows the tasks to complete in this example.
Participation and Rate Eligibility formula, to determine whether an absence entitlement plan exists for the type of absence recorded
Rate Value Calculation formula, to calculate the employee's length of service
Extra Inputs formula, to determine other absence information
|
Field |
Value |
|---|---|
|
Name |
Sick Plan Leave |
|
Valid From Date |
January 1, 2011 |
|
Field |
Value |
|---|---|
|
Legislative Data Group |
Enter your legislative data group |
|
Primary Classification |
Information |
|
Field |
Value |
|---|---|
|
Name |
Sick Plan Pay Element |
|
Reporting Name |
Sick Plan Pay Element |
|
Effective Date |
January 1, 2011 |
|
At which employment level should this element be attached? |
Payroll Relationship Level You must select this value because, during enrollment, the Evaluate Absence Plan Participation process considers only those elements defined at the payroll relationship level. |
|
Can a person have more than one entry of this element in a payroll period? |
Yes |
|
Input Value |
User Display |
User Enterable |
|---|---|---|
|
Attendance ID |
Yes |
Yes |
|
Absence Type |
Yes |
Yes |
|
Plan ID |
Yes |
Yes |
|
Absence Start Date |
No |
No |
|
Absence End Date |
No |
No |
|
Length of Service |
Yes |
Yes |
|
Field |
Value |
|---|---|
|
Element Link Name |
MaternityPlan_Pay_Element_Link |
|
Relationship Type |
Standard |
|
Payroll Statutory Unit |
Select your payroll statutory unit. |
|
Field |
Value |
|---|---|
|
Plan Type Name |
Medical Leave Plans |
|
Option Type |
Absences You must select this value because the Evaluate Absence Plan Participation process considers only those benefit plans that belong to a plan type configured with the Absences option type. |
|
Field |
Value |
|---|---|
|
Plan Name |
Maternity Plan |
|
Plan Type |
Medical Plans |
|
Usage |
Not in program |
|
Status |
Active |
|
Inception Date |
January 1, 2011 |
|
Year Period |
From January 1, 2011 to December 31, 2011 |
|
Tab |
Information |
|---|---|
|
Participation |
Add the eligibility profile that you created. |
|
Life Event |
Add the absence end life event that you created |
|
Field |
Value |
|---|---|
|
Enrollment Method |
Automatic You must select this value so that the Evaluate Absence Plan Participation process automatically enrolls eligible employees into the absence benefit plan. |
|
Field |
Absence Start Life Event |
Absence End Life Event |
|---|---|---|
|
Enrollment Period Start Date Rule |
As of event date |
As of event date |
|
Enrollment Period End Date Rule |
As of event date |
As of event date |
|
Coverage start rule |
Event |
Event |
|
Rate start rule |
Event You must select this value so that the standard benefit rate for the absence benefit plan calculates the enrolled employee's length of service when the event occurs. |
Event |
|
Previous Rate End Rule |
End of Pay Period You must select this value to enable the payroll run to process this element. When an absence end date is recorded, the Evaluate Absence Plan Participation process updates the element entry's end date with the last day of the current payroll period. |
End of Pay Period |
|
Field |
Value |
|---|---|
|
Effective Start Date |
January 1, 2011 |
|
Legal Employer |
Select your legal employer |
|
Rate Name |
Maternity Plan Rate |
|
Plan |
Maternity Plan |
|
Status Rule |
Active |
|
Rate Display Type |
Any |
|
Activity Type |
Any |
|
Element and Input Values Required |
Yes |
|
Assign on Enrollment |
Yes |
|
Display on Enrollment |
Yes |
|
Tax Type Code |
Not Applicable You must select this value because the calculated amount in the case of absence benefit plans is the length of service, which does not require a tax type code. |
|
Payroll Element |
Maternity Plan Pay Element |
|
Element Input Value |
Length of Service |
|
Input Value Calculation Formula |
Select the Extra Input formula that you created. |
|
Value Passed to Payroll |
Defined Amount You must select this value because the amount to pass to the element entry during enrollment is the length of service of the employee. |
|
Field |
Value |
|---|---|
|
Calculation Method |
Calculate for Enrollment Formula You select this value so that the Evaluate Absence Plan Participation process uses a formula to calculate the length of service of the enrolled employee. |
|
Post Enrollment Calculation Formula |
Select the Rate Value Calculation formula that you created. |
|
Input Value |
Formula Return Variable Name |
|---|---|
|
Attendance ID |
l_absence_id |
|
Plan ID |
l_plan_id |
|
Absence Type |
l_absence_type |
|
Field |
Value |
|---|---|
|
Name |
Maternity Plan Bands Return |
|
Unit of Measure |
Calendar weeks |
|
Band |
Sequence |
Length of Service |
Entitled Leave Time |
Pay Percentage |
|---|---|---|---|---|
|
Band 1 |
1 |
5 through 99 years |
8 weeks |
100% |
|
Band 2 |
2 |
5 through 99 years |
16 weeks |
50% |
|
Field |
Value |
|---|---|
|
Name |
Maternity Plan Bands Not Returning |
|
Unit of Measure |
Calendar weeks |
|
Band |
Sequence |
Length of Service |
Entitled Leave Time |
Pay Percentage |
|---|---|---|---|---|
|
Band 1 |
1 |
5 through 99 years |
6 weeks |
90% |
|
Band 2 |
2 |
5 through 99 years |
12 weeks |
45% |
|
Field |
Value |
|---|---|
|
Name |
Maternity Plan Entitlement |
|
Legislative Data Group |
Select your legislative data group. |
|
Plan Name |
Maternity Plan |
|
Scheme |
Occupational Maternity Pay |
|
Start Date |
January 1, 2011 |
|
Absence Type |
Maternity Plan Leave |
|
Assessment Period Type |
Event Based |
|
Period Qualifying Date |
Leave Begin Date |
|
Employment Event |
Enterprise Service Date |
This example demonstrates how to create absence life events. Recording long term absences for employees triggers these life events, which the Evaluate Absence Plan Participation process detects to determine absence entitlements for the enrolled employee.
You must create life events with person changes that cover the following events:
Recording an absence start date
Recording an absence end date
Deleting an absence
|
Field |
Person Change: Absence Start |
Person Change: Absence End |
Person Change: Absence Delete |
|---|---|---|---|
|
Name |
Plan Absence Start |
Plan Absence End |
Plan Absence Delete |
|
Table Name |
PER_ABSENCE_ATTENDANCES |
PER_ABSENCE_ATTENDANCES |
PER_ABSENCE_ATTENDANCES |
|
Old Value |
Any Value |
Any Value |
No Value |
|
New Value |
Any Value |
Any Value |
Any Value |
|
Field |
Life Event: Absence Start |
Life Event: Absence End |
Life Event: Absence Delete |
|---|---|---|---|
|
Name |
Plan Absence Start |
Plan Absence End |
Plan Absence Delete |
|
Type |
Absence |
Absence |
Absence |
|
Life Event Operation Code |
Start Event |
End Event |
Delete Event |
|
Person Change (Person Changes tab) |
Plan Absence Start |
Plan Absence End |
Plan Absence Delete |
This example demonstrates how to create an eligibility profile for absence benefit plans. When you record long term absences for employees, the Evaluate Absence Plan Participation process enrolls employees in the absence benefit plan on the basis of the criteria defined in the eligibility profile.
In this example, according to your enterprise policy, you must set up the eligibility profile to first check whether the employee works full-time and then check, with the help of a formula, whether an absence entitlement plan exists for the type of absence recorded.
Create an eligibility profile for full-time employees and associate with it the Participation and Rate Eligibility formula.
|
Field |
Value |
|---|---|
|
Name |
Full-Time Employees |
|
Status |
Active |
|
Assignment To Use |
Any Assignment - Benefit Relationship |
|
Field |
Value |
|---|---|
|
Sequence |
1 |
|
Full Time or Part Time |
Full-time employment |
|
Field |
Value |
|---|---|
|
Sequence |
2 |
|
Formula |
Select the Participation and Rate Eligibility formula that you created. |
|
Copyright © 2011, Oracle and/or its affiliates. All rights reserved. Legal Notices |
|