11g Release 1 (11.1.2)
Part Number E22380-03
Contents
Previous
Next
|
Oracle® Fusion
Applications Post-Installation Guide 11g Release 1 (11.1.2) Part Number E22380-03 |
Contents |
Previous |
Next |
This chapter contains the following:
Setting Up Informatica Identity Resolution
Setting Up Sales Prediction Engine
The E-Mail Marketing Server is a combination of components designed to support high volume, personalized e-mail messages, and to track e-mail bounces and click-through responses. The bounce handling daemon (BHD) tracks e-mail messages that cannot be delivered, parses the returned e-mail messages, and records the cause of the e-mail bounce.
The bounce handling daemon installation program is available on the Fusion Applications companion disk. Prior to installing the program, ensure you have provisioned the Marketing application, noting the SOA host and port, and determined the designated server to place the daemon. The designated server must have port 25 available.
Note
It is recommended that you place the bounce handling daemon in the DMZ. Optionally, you can place the bounce handling daemon behind an inbound mail transfer agent (MTA). The approach that you choose depends on the configuration of your network, DMZ, existing inbound mail transfer agent, and firewall.
Complete the following steps to install and configure the bounce handling daemon:
Using the companion disk, locate
and run the installation program: fusionbhd/Disk1/runInstaller. Provide information when prompted, such as the JDK location, designated
BHD server installation directory, and the http or https protocol,
host and port for the Marketing SOA URL.
Navigate to the WLS_HOME/config/fwmconfig directory and copy the files and
directory listed below to the $HOME/bhd/fusionapps/crm/ewm/bhd/bin directory.
jps-config-jse.xml
default-keystore.jks
bootstrap directory (including the cwallet.sso)
Update the root user permissions to allow read, write, and execute access to the jps-config-jse.xml and default-keystore.jks files and the bootstrap directory.
Update the root user permissions to allow read, write, and execute access to the BHD server installation directory, it's subdirectories and files. The top level BHD server installation directory is specified during the install process.
Grant read access to the fusionapps/crm/ewm/bhd/logs directory to nonroot users to provide availability to application log files.
Sign in as a root user and enter the following to start the BHD service for port 25:
|
Server Platform |
Action |
|---|---|
|
UNIX |
Navigate to the fusionapps/crm/ewm/bhd directory and enter the following command:
|
|
MS Windows |
Run the bhd.exe executable file. |
For more information on provisioning, see the Oracle Fusion Applications Quick Installation Guide. For more information on configuring other aspects of the e-mail server for marketing, see the Oracle Fusion Applications Marketing Implementation Guide.
To use the SMS marketing campaign capability within Oracle Fusion Customer Relationship Management, you need to enable it after installing Oracle Fusion Applications. Customers interested in SMS marketing campaigns will need to complete SMPP Driver configuration in the SOA suite component Oracle User Messaging Service.
An instance of the SMPP driver is already installed as part of the Oracle Fusion Applications installation and is a part of the Oracle User Messaging Service, but it does not point to any User Messaging Server. To configure the SMPP driver, you need to have an account with an SMPP driver gateway vendor. For configuration instructions and the list of verified/approved 3rd party SMPP driver gateway vendors (available in the table titled SMPP Driver Gateway Vendors), refer to the section Configuring Oracle User Messaging Server in the Oracle Fusion Middleware Administrator's Guide for Oracle SOA Suite.
Important
Before proceeding with the enabling process, ensure that you have access rights to update and deploy applications on the WebLogic Administration Console and Oracle Enterprise Manager associated with the Customer Relationship Management domain.
Sign in to the WebLogic Administration Console associated with the Customer Relationship domain.
Under Deployments, you see the application usermessagingdriver-smpp in the Installed state.
Expand usermessagingdriver-smpp and navigate to Targets tab. The Current Targets column shows (None specified), indicating that no target is configured.
On the console, switch to the Lock and Edit mode, update the target to all servers in the CRM_SOACluster, and save the changes.
While remaining in the Lock and Edit mode for the console, navigate to Deployments, select the check box next to usermessagingdriver-smpp and click Update. The Update Application Assistant wizard appears.
For the Deployment Plan Path field, click Change Path and select the Fusion Applications specific deployment plan APPTOP/instance/applications/ums/crm/usermessagingdriver-smpp_FusionPlan.xml.
Proceed to the subsequent screen of the Update Application Assistant wizard and select Release Configuration to commit the changes made until this point. The state of the application usermessagingdriver-smpp changes to Active.
Sign out of WebLogic Administration Console.
Sign in to the Oracle Enterprise Manager associated with the Customer Relationship Management domain.
Expand CRMDomain - User Messaging Service, right-click the application usermessagingdriver-smpp and select SMPP Driver Properties from the context menu.
Configure the driver and apply the changes.
Restart the application usermessagingdriver-smpp to bring into effect the driver configuration changes.
You can now use the SMS Marketing capability of Oracle Fusion Customer Relationship Management.
The Data Quality (DQ) product provides two offerings: Matching and Address Cleansing. These are independent functions and are set up separately.
Matching is the identification of potential duplicates for organizations, persons and locations. Potential duplicate records identified by DQ are surfaced by other Oracle Fusion Applications in a variety of ways such as duplicate prevention in real-time, when a customer record is created or duplicate identification in batch mode.
Address Cleansing is the process of correction and validation of address data, based on postal requirements. For example, if a user enters valid values for zip code, city, and country, DQ may return a value for state. Likewise, if a user enters valid values for city, state, and country, DQ automatically supplies a zip code value.
Setting up DQ would entail two sequential steps:
Setting up the DQ Engine (Informatica Identity Resolution [IIR])
Setting up the Fusion DQ Connector to IIR, by performing DQ tasks, using the Functional Setup Manager
Note
You can find the IIR vendor documentation in <PROV.TOP>/InformaticaIR/pdf directory within the IIR Installation.
Verify the installation of IIR and perform setup operations.
Note
If you are working on the 64-bit operating systems of Oracle Enterprise Linux, Windows, AIX, or Solaris Sparc, when you provision CRM using the provisioning framework, an instance of IIR (64 Bit) is automatically provisioned along side. However, for Solaris X-64 Bit platform, IIR does not get provisioned. You need to install it manually on any of the other 64-Bit operating systems. Except for the manual installation of IIR on a different platform, all the setup steps for Solaris X-64 Bit platform are identical to other platforms.
Once Fusion Application environment is provisioned by Oracle Fusion Application Provisioning Framework, do the following to verify IIR installation:
Check whether InformaticaIR directory exists under PROV.TOP.
Check whether IIR is already running
using ps -ef | grep InformaticaIR. There
should be eight processes (or four pairs of parent-child processes)
running per server.
Note
If IIR post-provisioning verifications fail, perform IIR maintenance activities.
This table lists the processes that run when IIR is working.
|
Server Name |
Process Name |
Port |
Purpose |
|---|---|---|---|
|
License Server |
|
1601 |
Meant for licensing matching requests. You can configure the value of this port. |
|
Search Server |
|
1666 |
Serves an incoming matching request. Connects to the Rulebase server for system or Rulebase information. |
|
Connection Server |
|
1667 |
Meant for improving performance of search clients. |
|
Console Server |
|
1669 |
Enables Informatica IR Console Client to access the Rulebase and other files and to launch other IIR utilities. |
|
Rulebase Server |
|
1668 |
Meant for accessing the IIR Rulebase in the database
and is relevant only for matching. There is no separate process for
this. It is started as part of |
An instance of IIR uses seven ports. If IIR is provisioned
through the framework, the value of the license server port is determined
by the value of the property provisioning.setup.app-ports.core.iir.port that is set in the provisioning plan. If IIR is installed manually,
the value of the license server port is determined by IIR_INSTANCE_1_PORT in the install.props file.
The seven ports are listed here. For example, if the
port value set for provisioning.setup.app-ports.core.iir.port uses the default value 1601, the ports occupied for Informatica
Identity Resolution would have the following values:
SSA_LIPORT= <value set for the
property provisioning.setup.app-ports.core.iir.port>=1601
SSA_SEPORT=1666
SSA_COPORT=1667
SSA_RBPORT=1668
SSA_CSPORT=1669
SSA_XMPORT=1670
SSA_HTPORT= <value set for the
property provisioning.setup.app-ports.core.iir.port> + 11= 1612
Note
The value of SSA_LIPORT can be found in <PROV.TOP>/InformaticaIR/env/envs and the values of all other ports can be found in <PROV.TOP>/InformaticaIR/env/isss.
When post-provisioning checks are successful, perform these post-provisioning operations sequentially to set up IIR:
IIR Matching Setup.
IIR Address Cleansing Setup.
Oracle Fusion Data Quality Connector Setup.
When you use the configurations provided by Oracle Fusion Trading Community Data Quality, matching consists of initial indexing and index synchronization.
Perform the following for initial indexing:
Log in to the Informatica Identity Resolution (IIR) Host machine.
Enter cd <PROV.TOP>/InformaticaIR/bin.
Run setfusionEnv.sh.
Start the Informatica IR Console
using ./idsconc -a option.
On the launched console, select Rulebase Type as SSA and Alias as rtunitrb.
Click OK.
Select Yes for a new Rulebase.
In Informatica IR Console, navigate to System - New - Create a system from SDF.
Enter the following information:
System Name: FusionDQRealtime.
System Definition
File: <FULLPATH>/InformaticaIR/ids/FusionDQRealtime.sdf.
DB Type: SSA.
Alias: fusion_s01.
Go to System and select System Name as FusionDQRealtime.
Click OK.
Go to System - Load IDT.
Use Loader Definition list to load the following ID tables one by one:
load_location.
load_organization.
load_org_address.
load_person.
load_per_address.
load_per_phone.
Click OK for each ID table.
The IIR load jobs launched from the Informatica IR Console pull the data from the Oracle Fusion Applications database and create keys for them. It then prepares the data in the IIR Server and uses SQL loader to load the data back into the Oracle Fusion Applications database. During this process, if any load job fails and a fix has been applied, you must delete the corresponding .dat file from the PROV.TOP//InformaticaIR/ids directory and then refresh the applicable ID table.
To refresh an ID table:
Go to System - Refresh.
Select Refresh Selected Objects.
Choose the ID table name to refresh.
Click OK.
Once initial indexing is done, you can continue with adding or editing records, but you must synchronize the index as follows:
Start the Update Synchronizer on IIR
Start the Oracle Fusion Synchronization Oracle Enterprise Scheduler job.
The Update Synchronizer is a batch job that runs in the IIR Server. Primary function of an Update Synchronizer is to take records in the no source access (NSA) table periodically, create the keys for them, and synchronize these to identity tables (IDTs) and identity indexes (IDXs). The records in NSA are created by the Oracle Fusion Synchronization Oracle Enterprise Scheduler job. Once the Update Synchronizer has completed the job, it would clear the records from NSA.
Starting Up Update Synchronizer: You can start the Update Synchronizer from the Informatica IR Console.
Log in to Informatica IR Console.
Go to System and select System Name as FusionDQRealtime.
Go to Tools - Synchronizer - Run Synchronizer.
Click OK.
Select the All option for IDT Name and retain the rest of the defaults.
Click OK.
Shutting Down Update Synchronizer: Once started, the Update Synchronizer can be left running for the lifecycle of the IIR Server unless there is a need to shut it down.
Log in to Informatica IR Console.
Double click Update Synchronizer under Launched Jobs to open the Synchronize window.
Select Yes. The Synchronizer terminates within 60 seconds.
Close the Synchronize window after shutdown.
When there is loss of connectivity with the database, Update Synchronizer stops functioning. You must then restart it.
Oracle Fusion Applications Installer installs a demo version of AddressDoctor postal reference data and product license keys that you can use to test address cleansing functionality; however, this demo is restrictive and provides you with a small subset of the complete functionality. For using the complete functionality, you must request for production license and postal reference data.
If you are using demo keys and data, no specific setup
is required for address cleansing server. You can quickly verify the
setup using PROV.TOP/InformaticaIR/bin > asmcli
-b. When successful, it launches the Address Standardization
Module (ASM) client.
AddressDoctor postal reference data and product license keys are not sold or distributed by Oracle. To acquire a license key and postal reference data, contact Informatica/AddressDoctor by sending an e-mail to OracleAV@informatica.com. The AddressDoctor license key restricts the use of address validation to the purchased countries or territories and represents a twelve (12) month subscription to the postal reference data. Once AddressDoctor receives the e-mail request through OracleAV@informatica.com, an AddressDoctor representative will contact you to define the requirements and complete the transaction. Once finalized, AddressDoctor will provide the license key and download credentials/instructions for accessing the postal reference data. Notification of regular updates to the postal reference data will be provided through e-mail.
Once the production license key and postal reference data are obtained, perform the following:
PROV.TOP/InformaticaIR/bin
>  idsdown
.
PROV.TOP/InformaticaIR/bin
>  cd PROV.TOP/InformaticaIR/ssaas/ad5/ad/db
.
PROV.TOP/InformaticaIR/ssaas/ad5/ad/db
> cp mylocation/key
. Here, Key is a text file that contains the license provided by AddressDoctor.
PROV.TOP/InformaticaIR/ssaas/ad5/ad/db
> cp mylocation/[*.MD]
. Here, [*.MD] stands for the postal reference data file. AddressDoctor supports
248 countries and each MD file is per country or a group of countries.
Each of these files should be copied to this directory.
Once you complete the Informatica Identity Resolution (IIR) matching and cleansing setups, you must ensure that Oracle Fusion Applications is connected to the data quality engine.
To connect Oracle Fusion Applications to the data quality engine:
Map Oracle Fusion Applications to IIR Matching server.
Log in to the Functional Setup Manager application as an administrator user.
Under Assigned
Implementation Tasks, search for Manage Server Configuration setup tasks.
Select Go to Task. This opens the task-flow page.
Click Search to find all existing configurations.
In the Search Results, select Realtime and BatchBasic Server.
Select Actions - Edit.
Enter the Server Address and Server Port of the IIR Matching Server. The default port is 1666. To know the
current port, use grep SSA_SEPORT=$<PROV.TOP>/InformaticaIR/env/isss.
Select Enable Match Operation.
Click Save and Close.
Map Oracle Fusion Applications to IIR Cleansing server.
Log in to the Functional Setup Manager Application as an administrator user.
Under Assigned
Implementation Tasks, search for Manage Server Configuration setup tasks.
Select Go to Task. This opens the task-flow page.
Click Search to find all existing configurations.
In the Search Results, select Realtime Cleanse Server.
Select Actions - Edit.
Note
Repeat the steps to select Batch Cleanse Server from the search results and edit it.
Enter the Server Address and Server Port of the IIR Cleansing server. The default port is 1666. To know the
current port, use grep SSA_SEPORT=$<PROV.TOP>/InformaticaIR/env/isss.
Select Enable Cleanse Operation.
Click Save and Close.
Note
By default, the IIR server instance is the same for both matching and cleansing, but you can configure separate instances if required.
Set up multiple Informatica Identity Resolution (IIR) instances to make use of client load balancing capabilities of IIR to implement failover. You can configure the Oracle Fusion Data Quality Connector to allow Oracle Fusion Applications to speed up data quality management operations and to avoid overload by sending matching and cleansing calls to different IIR instances. Note that the multiple instances do not require any data or repository replication and can work with one Oracle Fusion Application Database.
Note
The setup mentioned in this section is not mandatory and should be used only based on use cases, and in a specific deployment scenario.
Use multiple instances of the IIR and setup the Oracle Fusion Data Quality Connector appropriately to make use of load balancing to implement failover as follows:
Load Balancing by matching and cleansing on different dedicated hosts
Load balancing by matching with a secondary match server
Load balancing and failover by matching and cleansing using a secondary instance
For more information on these load balancing and failover scenarios, refer to the topics in the Related Topics section of this topic.
Note
Informatica Identity Resolution (IIR) Server does not support native server load balancing.
Take note of the following assumptions and constraints before using multiple instances of the IIR and the Oracle Fusion Data Quality Connector setup for load balancing and failover:
CRM is provisioned with only one instance of IIR. Consequently, load balancing and failover using multiple instances of the IIR and the Oracle Fusion Data Quality Connector setup require manual installation of IIR for every additional instance. Since the installation of IIR through provisioning includes a bare minimum of IIR schema objects required in Oracle Fusion Applications Database, make sure that those schema objects are not installed again during the manual installation of IIR.
Load balancing cleansing is not described as a separate scenario. Instead, the steps for load balancing and failover of cleansing operations are included as optional steps in the scenarios for load balancing and failover of matching operations.
One or more instances of Oracle Fusion Applications and IIR may be installed on an Oracle Fusion Applications host.
You cannot load balance and failover the update synchronizer. It can run only on one host.
Any rollback of changes, for example
reverting to a single instance, while load balancing using a secondary
server requires a delete_secondary_server.sql and also requires the bouncing of application servers hosting Oracle
Fusion Applications that use real-time data quality.
Use this procedure for load balancing with no specific requirement for high availability, or failover, by performing the matching and cleansing operations on dedicated hosts.
This figure provides a visual representation of the load balancing process achieved by matching and cleansing on different dedicated hosts.
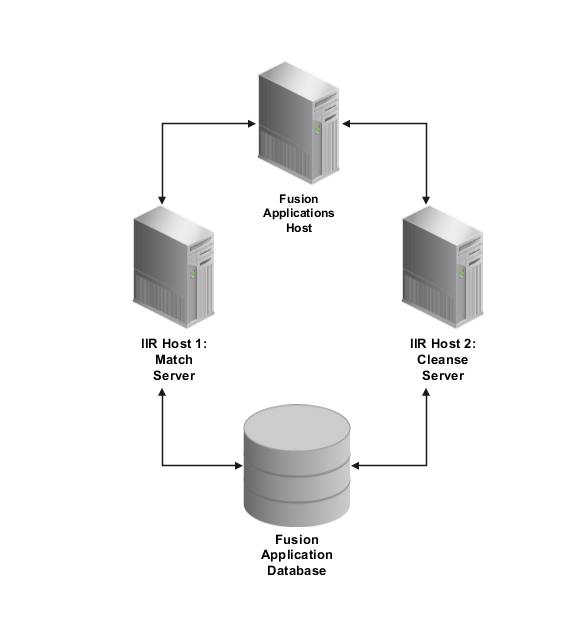
Use the following steps to configure the IIR hosts:
Manually install Informatica Identity
Resolution (IIR) on the secondary host, making sure INSTALL_IIR_OBJECTS=N. In other words, make sure that the
schema objects installed during installation of IIR through provisioning
are not installed again during the manual installation of IIR. For
more information, see: Manually Installing Informatica Identity Resolution:
Procedures
Perform all the matching setup steps in the primary IIR host.
Perform all the cleansing setup steps in the secondary IIR host.
Use the following steps to configure Oracle Fusion Data Quality Connector:
In the Real-time and Batch Basic Server, enter the server address and server port of the primary IIR host, the IIR Matching Server.
In the Real-Time Cleanse Server and Batch Cleanse Server, enter the server address and server port of the secondary IIR host, the IIR cleansing server.
Use this procedure for load balancing with no specific requirement for high availability, or failover, by performing the matching operations on a secondary match server.
This figure provides a visual representation of the load balancing process for matching operations achieved by matching with a secondary match server.

Use the following steps to configure the secondary match server:
Manually install Informatica Identity
Resolution (IIR) on the secondary match server, making sure INSTALL_IIR_OBJECTS=N. In other words, make
sure that the schema objects installed during installation of IIR
through provisioning are not installed again during the manual installation
of IIR. For more information, see: Manually Installing Informatica
Identity Resolution: Procedures.
Make sure IIR on the secondary match
server has access to an Oracle DB client to connect to the Fusion
Application Database and the tnsnames.ora has all the relevant SID information. Shut down IIR on the secondary
match server.
Perform all the matching setup steps using IIR on primary match server. Shut down IIR on primary match server.
Run the create_secondary_server.sql in <PROV.REPOSITORY>/fusion_iir/iir/sql by passing the following parameters, when prompted
This table describes the parameters and their values required for the creation of the secondary server.
|
Parameter |
Value |
|---|---|
|
Host |
IIR Secondary Host Name or IP |
|
Port |
IIR Secondary Port |
|
Server Operation Code |
|
|
Server Number |
1 |
|
Create Server Only |
N (This would create all required Secondary IIR Server related parameters) |
(Optional; execute only if you want to load balance cleansing operations) Run the SQL command in step 4 twice, each time with exactly the same parameters except for the Server Operation Code parameter, which should be run with the following values:
Server Operation Code   --  IIR_RT_CLEANSE
Server Operation Code   --  IIR_BT_CLEANSE
Additionally, ensure that all the postal directories and license codes are set up on Host 2, as specified in cleansing setup.
Start IIR on primary match server.
Start IIR as a search server only on the secondary match server by doing the following:
<PROV.TOP>/InformaticaIR/bin > bash
<PROV.TOP>/InformaticaIR/bin  > . ./setfusionEnv.sh
<PROV.TOP>/InformaticaIR/bin  > . ../env/isss
<PROV.TOP>/InformaticaIR/bin  > ./ssasrsv -n{SEPORT2} -h{RBHOST1}:{RBPORT1} -1$SSATOP/iirlog/idssrsv.log -2$SSATOP/iirlog/idssrsv.err -3$SSATOP/iirlog/ids.dbg &
Note
The Search Server in Host 2 is started by pointing its port (SEPORT2) to the Rulebase Server's host (RBHOST1) and port (RBPORT1) in the primary match server. Here:
SEPORT2 = Search Server Port (SSA_SEPORT defined in InformaticaIR/env/isss on IIR Host 2. The default port is 1666).
RBHOST1 = Hostname or IP of IIR Host 1
RBPORT1 = Rulebase Server Port (SSA_RBPORT defined in InformaticaIR/env/isss on IIR Host 2. The default port is 1668.
Restart the Oracle Fusion Applications instances that require data quality management to enable Oracle Fusion Data Quality Connector to commence load balancing and failover.
Use this procedure for load balancing to implement high-availability, or failover, by performing both matching and cleansing operations using a secondary instance of Informatica Identity Resolution (IIR).
This figure provides a visual representation of the load balancing and failover process achieved by matching and cleansing using a secondary instance.
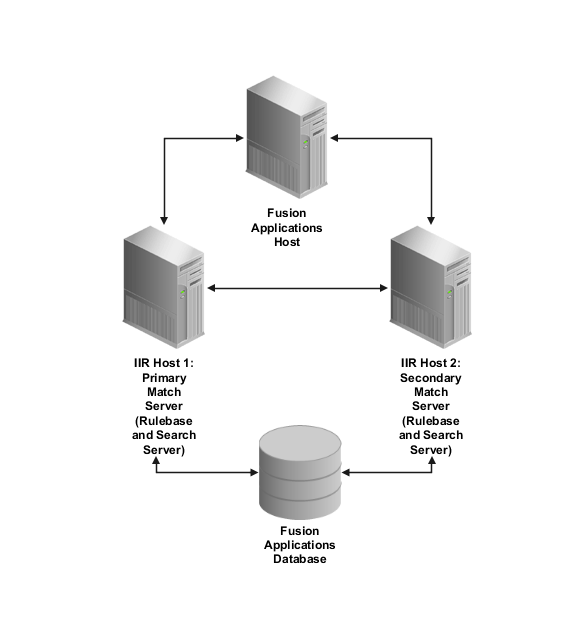
Use the following steps to configure the secondary instance of Informatica Identity Resolution (IIR) to load balance and failover matching and cleansing:
Manually install Informatica Identity
Resolution (IIR) on the secondary host, making sure INSTALL_IIR_OBJECTS=N. In other words, make sure that the
schema objects installed during installation of IIR through provisioning
are not installed again during the manual installation of IIR. For
more information, see: Manually Installing Informatica Identity Resolution:
Procedures.
Note
Since there are two fusion application instances in this scenario, the secondary IIR instance may already be installed. In such cases, you need to only configure the Oracle Fusion Data Quality Connector so that it points to the same Oracle Fusion Database as the primary IIR instance. For more information, see: Oracle Fusion Data Quality Connector Setup: Procedures.
Make sure IIR on the secondary host
has access to an Oracle DB client to connect to the Fusion Application
Database and the tnsnames.ora has all
the relevant SID information. Shut down IIR on the secondary host.
Perform all the matching setup steps using IIR on primary host. Shut down IIR on primary host.
Run the create_secondary_server.sql in <PROV.REPOSITORY>/fusion_iir/iir/sql by passing the following parameters, when prompted
This table describes the parameters and their values required for the creation of the secondary server.
|
Parameter |
Value |
|---|---|
|
Host |
IIR Secondary Host Name or IP |
|
Port |
IIR Secondary Port |
|
Server Operation Code |
|
|
Server Number |
1 |
|
Create Server Only |
N (This would create all required Secondary IIR Server related parameters) |
(Optional; execute only if you want to load balance cleansing operations) Run the SQL command in step 4 twice, each time with exactly the same parameters except for the Server Operation Code parameter, which should be run with the following values:
Server Operation Code   --  IIR_RT_CLEANSE
Server Operation Code   --  IIR_BT_CLEANSE
Additionally, ensure that all the postal directories and license codes are set up on Host 2, as specified in cleansing setup.
Start IIR on primary host, Host 1, by starting the Rulebase Server first followed by starting the Search Server.
<PROV.TOP>/InformaticaIR/bin> bash
<PROV.TOP>/InformaticaIR/bin  > . ./setfusionEnv.sh
<PROV.TOP>/InformaticaIR/bin  > . ../env/isss
<PROV.TOP>/InformaticaIR/bin  > ./ssasrsv -m{RBPORT1} -gFusionRBSG,ssa:rtunitrb -w1 -1$SSATOP/iirlog/priRB.log -2$SSATOP/iirlog/priRB.err -3$SSATOP/iirlog/priRB.dbg &
<PROV.TOP>/InformaticaIR/bin  >./ssasrsv -n{SEPORT1}  -gFusionRBSG,ssa:rtunitrb -1$SSATOP/iirlog/priSE.log -2$SSATOP/iirlog/priSE.err -3$SSATOP/iirlog/priSE.dbg &
Start IIR on the secondary host, Host 2, by starting the Rulebase Server first, followed by starting the Search Server.
<PROV.TOP>/InformaticaIR/bin> bash
<PROV.TOP>/InformaticaIR/bin  > . ./setfusionEnv.sh
<PROV.TOP>/InformaticaIR/bin  > . ../env/isss
PROV.TOP>/InformaticaIR/bin  >./ssasrsv -m{RBPORT2} -gFusionRBSG,ssa:rtunitrb -w1-1$SSATOP/iirlog/secRB.log -2$SSATOP/iirlog/secRB.err -3$SSATOP/iirlog/secRB.dbg &
<PROV.TOP>/InformaticaIR/bin  >./ssasrsv -n{SEPORT2}  -gFusionRBSG,ssa:rtunitrb -1$SSATOP/iirlog/secSE.log -2$SSATOP/iirlog/secSE.err -3$SSATOP/iirlog/secSE.dbg &
Note
RBPORT1 and RBPORT2 respectively
are the ports for the Rulebase Server on IIR Host 1 and IIR Host 2
respectively. The values for these parameters should respectively
be the value of SSA_RBPORT in InformaticaIR/env/isss on Hosts 1 and 2.
SEPORT1 and SEPORT2 respectively
are the ports for the Search Server on IIR Host 1 and IIR Host 2.
The values for these parameters should respectively be the value
of SSA_SEPORT in InformaticaIR/env/isss on Hosts 1 and 2.
The parameter w1 specifies that the polling frequency of the Secondary Server to determine if the Primary Server is active is one second. For example, if the value of the parameter is set to w10 then the polling frequency of the Secondary Server to determine if the Primary Server is active will be 10 seconds.
The steps 5 and 6 essentially start the Rulebase Servers in a group, making sure, that even if one matching instance fails, the other can continue to function. Only one rulebase server (primary) in the group is permitted to respond to queries and the other (secondary) server periodically polls the primary server to determine if it is active.
In the scenario in which load balancing is done by matching with a secondary match server, if the primary server (Host 1) fails, matching will stop functioning unless it is restored.
In contrast, in the present scenario, if the primary server (Host 1) fails, the secondary server (Host 2) takes the role of the primary server, with no expectation of Host 1 to be restored. However, there is a small latency in the secondary server assuming the role of the primary server and there could be a loss of the matching functionality during this temporary latency period.
Restart the Oracle Fusion Applications instances that require data quality management to enable Oracle Fusion Data Quality Connector to commence load balancing and failover.
Administration and maintenance includes start up and shutdown activities of the Informatica Identity Resolution (IIR) server and how Oracle database interacts with the IIR server. It also includes locking and unlocking of the Rulebase and how you can use the Informatica IR Console Client.
To start the IIR server, enter the following commands:
<PROV.TOP>/InformaticaIR/bin> bash
<PROV.TOP>/InformaticaIR/bin>. ./setfusionEnv.sh
Note
If you are using C Shell, use the command source setfusionEnv.csh
<PROV.TOP>/InformaticaIR/bin> ./liup
<PROV.TOP>/InformaticaIR/bin> ./idsup
<PROV.TOP>/InformaticaIR/bin> ./idsconc -a
Note
Start the Update Synchronizer from the IIR Admin Console. However, after starting the Update Synchronizer, shut down the IIR Admin Console, For more information on Starting Up and Shutting Down Update Synchronizer, refer to the topic Informatica Identity Resolution Matching Setup: Procedures.
To shutdown the server, enter the following commands:
Note
If the Update Synchronizer is running (check for the updsync process), stop it from the IIR Admin
Console. After stopping the Update Synchronizer, shut down the IIR
Admin Console. For more information on Starting Up and Shutting Down
Update Synchronizer, refer to the topic Informatica Identity Resolution
Matching Setup: Procedures.
<PROV.TOP>/InformaticaIR/bin> bash
<PROV.TOP>/InformaticaIR/bin>. ./setfusionEnv.sh
Note
If you are using C Shell, use the command source setfusionEnv.csh
<PROV.TOP>/InformaticaIR/bin> ./idsdown
<PROV.TOP>/InformaticaIR/bin> ./lidown
Note
It is strongly recommended that you verify the Informatica Identity Resolution after every startup or a restart.
Before handing over an environment for business use, you need to perform certain checks to determine if IIR is in working condition. Perform the checks after performing any of following activities:
Setting Up Informatica Identity Resolution sever for the first time
Restarting the Informatica Identity Resolution sever for any reason such as after a maintenance window or a scheduled downtime (patching, bouncing the database, troubleshooting and so on)
If any of the IIR configuration checks fail, the data quality functionality will not work. For information on troubleshooting, refer to the Troubleshooting Informatica Identity Resolution and Data Quality Setup: Overview help topic listed in the Related Topics section.
Perform the following checks to verify Informatica Identity Resolution (IIR) configuration:
IIR Server Check: Verify that the total number of processes running for IIR search components is eight.
The following table lists the names and numbers of the processes running for IIR search components.
|
IIR Search Component Process Name |
Number of Processes |
|---|---|
|
ssasrsv |
2 |
|
ssalisv |
2 |
|
ssacssv |
2 |
|
ssacosv |
2 |
On a Linux operating system, run the following command
to verify that the total number of processes running for IIR search
components is eight: ps -ef | grep InformaticaIR
| grep -v updsync
IIR Update Synchronizer Check: Verify that the total number of processes running for Update Synchronizer is two.
On a Linux operating system, run the following
command to verify that the total number of processes running for Update
Synchronizer is two: ps -ef | grep InformaticaIR
| grep updsync
IIR Test Search Client Check: Use the following steps to perform this check:
Run the following command to get
the search client: grep SSA_HTPORT <PROV.TOP>/InformaticaIR/env/isss
Use a browser and the following URL
syntax to access the client application: http://Your_IIR_Host_Env_IP_Address:SSA_<HTPORT>/systems
Here is a placeholder example: http://xyz123.us.zzz.com:1612/systems
Select any system from the drop-down list and click Next.
Type an appropriate value and click Submit Search.
Note that there are no errors.
IIR ASM Server Check: Use the following steps to perform this check:
In the command line on $InformaticaIR/bin enter ./asmcli -b to bring up the console.
Note that the console comes up without any issues.
Shut the console down.
IIR Wiring Check: Verify that the data quality Web Services are up and running and EM is accessible. Use the following steps to perform this check:
Sign in to Oracle Enterprise Manager.
From the Navigation menu, select Fusion Applications - Oracle Fusion Customer Relationship Management.
Select CrmCommonApp and then select CRMCommonServer_1.
Under the Web Services section, select DQRealTimeService and click Test to launch the Web Service Tester.
On the Test Web Service Page, select cleanseAddress from the Operation drop down list.
On the Request tab, select Custom Policy security option and enter the
Policy URL syntax oracle/wss11_username_token_with_message_protection_client_policy and the username and password for a user who has the ZCH_MASTER_DATA_MANAGEMENT_APPLICATION_ADMINISTRATOR_JOB role. For example, in development environments, this could be MDM_ADMIN_V1.
Under Input Arguments, select XML View.
Run the following blocks of code by selecting the corresponding operation from the drop-down list for each blocks of code and clicking Test Web Service.
Select the operation cleanseAddress from the Operation drop-down list and submit the following payload:
<soap:Envelope xmlns:soap="http://schemas.xmlsoap.org/soap/envelope/">
<soap:Body xmlns:ns1="http://xmlns.oracle.com/apps/cdm/dataQuality/realTime/publicModel/types/">
<ns1:cleanseAddress>
<ns1:input xmlns:ns2="http://xmlns.oracle.com/apps/cdm/dataQuality/realTime/publicModel/">
  <ns2:DataQualityRequestId />
  <ns2:ConfigCode>RT_LOC_CLEANSE</ns2:ConfigCode>
  <ns2:ErrorCode />
  <ns2:Message />
  <ns2:DataQualityAddress>
  <ns2:DataQualityRequestId />
  <ns2:DataQualityRecordType />
  <ns2:AddressLine1>500 oracle pky</ns2:AddressLine1>
  <ns2:AddressLine2 />
  <ns2:AddressLine3 />
  <ns2:AddressLine4 />
  <ns2:City />
  <ns2:Country>US</ns2:Country>
  <ns2:CountrySubEntity />
  <ns2:LocationIdentifier />
  <ns2:PostalCode>94065</ns2:PostalCode>
  </ns2:DataQualityAddress>
  </ns1:input>
  </ns1:cleanseAddress>
  </soap:Body>
  </soap:Envelope>
Select the operation matchOrganization from the Operation drop-down list and submit the following payload:
<soap:Envelope xmlns:soap="http://schemas.xmlsoap.org/soap/envelope/">
<soap:Body xmlns:ns1="http://xmlns.oracle.com/apps/cdm/dataQuality/realTime/publicModel/types/">
<ns1:matchOrganization>
<ns1:input xmlns:ns2="http://xmlns.oracle.com/apps/cdm/dataQuality/realTime/publicModel/">
  <ns2:DataQualityRequestId />
  <ns2:ConfigCode>RT_ORG_DUP_PREV</ns2:ConfigCode>
  <ns2:ErrorCode />
  <ns2:Message />
  <ns2:DataQualityOrg>
  <ns2:OrganizationName>Yamaha</ns2:OrganizationName>
  </ns2:DataQualityOrg>
  </ns1:input>
  </ns1:matchOrganization>
  </soap:Body>
  </soap:Envelope>
Check if the responses to the above
requests do not return the following ErrorCode:
<ns0:ErrorCode>ERRORED</ns0:ErrorCode>
<ns0:Message>ZCQ_CMN_ENG_CONNECT_ERR</ns0:Message>
If any of the responses contain this ErrorCode , it indicates that IIR is either not wired or
is not functional.
If you are setting up IIR for matching, you must understand
how the IIR Server interacts with the Oracle database. When you start
an IIR server, the Rulebase Server also starts, but it does not connect
to the Oracle database until the first client makes a request. This
can be a search request, for example, a match call made from Oracle
Fusion Applications, or, it can be an administrator request, for example,
a user starting the Informatica IR Console client. A Rulebase server
uses and maintains this connection unless IIR is brought down with
an idsdown command. Once a Rulebase
server connects to the Oracle database, it creates a lock that ensures
that no other Rulebase server connects to the Rulebase.
When the IIR server is up and the Oracle database is shutdown or crashes, or if there is a network issue that affects connectivity, the Rulebase lock remains active. In such cases where a lock is active, all future search requests fail with an error that indicates there is another Rulebase server running.
This table lists various situations that can occur after the IIR and Oracle database connection has been established.
|
Possibility |
Procedure |
|---|---|
|
Shutting down Oracle database. |
Shut down the IIR Server before shutting down the Oracle database. Else, the Rulebase is locked and it fails all future requests. Once Rulebase is locked, you need to manually unlock it. |
|
Database crashes or there is a connectivity issue. |
Unlock the Rulebase manually. |
|
IIR server crashes or reboots due to power outage, or any similar case. |
Rulebase is automatically unlocked by the first client. Requires no manual intervention. |
|
IIR is shut down improperly, for example, with the Update Synchronizer running. |
The Rulebase can become corrupt. Clean the Rulebase or create it again. |
Every time an IIR server starts, a new pair of parent and child Rulebase also start. The parent server generates a new unique ID and this ID is stored in the Rulebase. In case of a Rulebase lock, if the ID generated by the parent is not equal to the ID stored in the Rulebase, the child server fails to start.
You must unlock the Rulebase manually. To do this, set an environment variable to the same ID that locks the Rulebase. Here is an example of a message that appears when a Rulebase lock is in force:
IS ANOTHER RULEBASE SERVER RUNNING?
Rulebase sdb:file:c:\a3i\ids\rule
In use by ssa.identitysystems.com IP=203.2.203.109 on port=1668, SSA_RB_RESTART_ID=281753650
For this message, enter <PROV.TOP>/InformaticaIR/bin
> set SSA_RB_RESTART_ID=281753650 and then start the IIR
server.
When the Rulebase server starts, it uses the environment variable to unlock the Rulebase when the two IDs match. It then uses the freshly generated parent ID to lock it again. A locked Rulebase can be unlocked only once using the same ID.
You can use the Informatica IR Console client for the following operations:
For creating and indexing IIR search systems.
Starting or monitoring the Update Synchronizer.
Perform test searches using the search client or enabling search traces to understand or debug search behavior.
For advanced configuration, where an existing system is edited using the System Editor to change its behavior.
These are the restrictions on using the Informatica IR Console client:
The console client is not a multiuser
application when it is used with -a (administrative)
option, which has read and write privileges. Only single invocation of
the client is possible with -a option.
Without -a option, the Rulebase opens read only.
Once the administration operations have been performed, there is no need for the client to be open. Close it after use. For example, after starting the Update Synchronizer, you can close the console client but this does not affect the synchronizer.
If the Informatica IR Console client is left connected for several days and there is a database or network interruption, the following situations can occur:
If the Update Synchronizer fails, it cannot be restarted through the client unless the client is restarted.
Client loses all functionality except for Tools and Search Client unless restarted.
You do not need to restart the IIR server for restarting client connection.
Clients such as Console Client or Fusion Real-Time and Batch that connect to IIR, pass a mandatory parameter called rulebase name. It is an alias for the connection string required by IIR to connect to the FUSION_DQ schema in the Fusion Application Database. The alias is defined in a file called ssadb.dic in <PROV.TOP>/InformaticaIR/ids directory.
The following example shows how a typical ssadb.dic would look like.
rtunitrb odb:0:fusion_dq/fusion_dq@rws65311
fusion_s01 odb:1:fusion_dq/fusion_dq@rws65311
btunitrb odb:1:fusion_dq/fusion_dq@rws65311
fusion_s02 odb:2:fusion_dq/fusion_dq@rws65311
zcqsrc odb:99:fusion_dq/fusion_dq@rws65311
The alias rtunitrb is
the alias for the rulebase name. The remaining aliases are used for
different purposes. For example, fusion_s01 is used to create the FusionDQRealtime System, zcqsrc is used by the loader process to get source data
from Oracle Fusion and so on.
Note
The setup mentioned here is not mandatory and should be used only based on use cases, and in a specific deployment scenario.
In Oracle Fusion, the predefined alias for the rulebase
name is rtunitrb. If there is ever
a need to change the rulebase name, you can change it in the dictionary
file, and ensure that the change is also carried over to the Server
Operation Page (used in IIR Matching). For example, if rtunitrb is changed to foo, then the rulebase alias in the Server Operation Page
should be changed from ssa:rtunitrb to ssa:foo. If you made this change while the server
was up and running, you need to restart the IIR Server to bring the
change into effect.
It is recommended to create a backup copy of the ssadb.dic file and store it as a template for future use, before encrypting it. It is also recommended to replace the password on the backup copy with an empty string. You can later provide a password for this backed up copy, if you intend to use it.
Access the directory where PERL is available, either using $PATH or the absolute path and do the following:
On Windows, run the following commands:
PROV.TOP\InformaticaIR\bin > isss.bat
PROV.TOP\InformaticaIR\bin > perl convfusiondict.pl <password>
On Oracle Enterprise Linux, run the following commands:
PROV.TOP/InformaticaIR/bin >. .setfusionEnv.sh
Note
If using C-SHELL, use source
setfusionEnv.csh instead of setfusionEnv.sh
PROV.TOP/InformaticaIR/bin > perl convfusiondict.pl <password>
Note
In these commands, <password> can be any string that the administrator chooses. Password protects the dictionary file from being edited (either to add a new entry or delete an existing entry). In Oracle Fusion, this password is a place holder to run the iirdict utility.
After ssadb.dic is encrypted, there may be occasions where the password for FUSION_DQ might be changed by a database administrator, as part of security due diligence.
To change the password for ssadb.dic, do the following.
Take a backup of the existing ssadb.dic (as mentioned in the earlier section).
Delete the existing ssadb.dic (in use).
Enter the new password for the backup up file and rename the file to ssadb.dic.
Encrypt the file as mentioned earlier.
This help topic describes the provisioning and platform support, software requirements, and the steps for the manual installation of Informatica Identity Resolution (IIR).
Use this information to determine whether you need to install IIR manually.
When CRM is provisioned using the provisioning framework, an instance of IIR (64 Bit) is provisioned on the following platforms: OEL 64 Bit, Windows 64 Bit, AIX 64 Bit, Solaris Sparc 64 Bit.
However, IIR is not provisioned as part of CRM Provisioning for the Solaris X-64 Bit platform. For this platform, install IIR manually on any of the supported platforms such as OEL 64 Bit. Except for the manual install, IIR setup steps for Solaris X-64 Bit platform are identical to those for other platforms such as OEL 64 Bit.
Use this information to ensure compliance with the software requirement for the manual installation of IIR.
The host on which IIR is installed should have access to an Oracle DB Client for connecting to the Fusion Application Database.
The host should have its GNU
libc version 2.5 or later.
The size of FUSION_TS_DQ (the default table space for the Oracle Fusion data quality and
hence the repository for IIR), should have a table space size at least
10 times the size of the data. The data here represents the fields
used in FusionDQ Realtime.sdf.
Use the following steps to manually install IIR on the OEL 64 Bit platform.
Unzip the following files in an appropriate location
IIR_901sp1_linux_amd64.zip
Fusion-Exts-IIR-901sp1.zip
Note
This file resolves to fusion_iir after unzipping.
Go to the fusion_iir directory and edit theinstall.props file to make sure the properties described in the following table
are populated correctly.
Note
This table describes the properties and their values that must be populated correctly for installing IIR manually. None of the properties except the ones mentioned in this table should be modified.
|
Properties |
Value Descriptions (To be Replaced with Actual Values) |
Sample Values |
|---|---|---|
|
|
Oracle home for DB client used by IIR |
|
|
|
|
|
|
|
Library path on IIR host |
|
|
FUSION_STAGE_DIR |
Directory where Fusion Ext Zip is unzipped |
|
|
IIR_STAGE_DIR |
Directory where IIR Zip is unzipped |
|
|
IIR_VERSION |
Name of the version to which that the IIR unzip resolves |
IIR_901sp1_linux_amd64 |
|
IIR_DB_HOSTNAME |
Fusion application DB host |
|
|
IIR_DB_PORT |
Fusion application DB port |
|
|
IIR_DB_SID |
Fusion Application DB SID |
|
|
IIR_DB_USER |
|
|
|
IIR_DB_PASSWD |
Credentials for |
|
|
IIR_INSTALL_LOG_LOC |
Location to which Install logs should go |
|
|
IIR_INSTANCE_1_PORT |
Start port for the license server |
1660 (if available, this port should work fine as the default port |
|
INSTALL_IIR_OBJECTS |
Yes or No |
No (if IIR is installed as a Secondary Server; for more information, see: Setting up Multiple Informatica Identity Resolution Instances: Overview |
Execute the following command after
changing to the fusion_iir directory: runInstaller.sh install.props.
It typically takes about 8 to 12 minutes to install IIR.
Note
Use the same steps to install IIR on the Windows 64
Bit platform, except for running runInstaller.bat in fusion_iir
This overview contains various troubleshooting methods pertaining to the Informatica Identity Resolution (IIR) and Data Quality (DQ), which help an administrator examine the symptoms, identify possible root causes, and take necessary steps to restore their normal functionality.
The log files (ids.dbg) in IIR or iirlog contain useful information that can help in diagnosing the root cause of the functional problems.
The troubleshooting process involves the following scenario checks:
Matching Service
Matching Server Administration (including Synchronizer)
Cleansing Service
Cleansing Server Administration
The troubleshooting steps for each scenario are grouped, and each group forms a tier. Since different root causes may share the same symptoms, the tiers are arranged in the ascending order of complexity. For effective resolution of the problem, you need to go through these tiers in the same order as presented here. Proceed to the next tier only when you are unable to confirm the root cause in the current tier.
Note
For all the scenario checks, it is assumed that IIR is running with 8 InformaticaIR processes, and that its intra-connectivity is established on the DQ Server Configuration using the correct Host and Port information.
The Matching Service troubleshooting is spread across five tiers. Each tier indicates certain symptoms, lists possible root causes, contains the log descriptions, and prescribes the recovery procedure. While following the troubleshooting process, ensure that as part of the recovery procedure, you check for UPD locks on the Update Synchronizer before bringing up IIR.
|
Stage |
Checkpoint |
|---|---|
|
Symptoms |
Fusion DQ Realtime Match Services or Fusion DQ Batch
Match Jobs fail with an Engine Connection Error |
|
Possible Root Cause |
IIR is not connected. To confirm, go to DQ Matching Configuration page and check whether the Server Operation for Matching is set up with Host and Port information for IIR. |
|
IIR Logs |
NA |
|
Recovery |
Setup Server Host and Port using Manage Server Configuration FSM task. |
|
Stage |
Checkpoint |
|---|---|
|
Symptoms |
Fusion DQ Realtime Match Services fail with an Engine
Connection Error |
|
Possible Root Cause |
Some of the parameter values for the Matching Configuration, are incorrect. For example, the path where the IIR Server logs are written to (Verbosity Path) is modified to an invalid path by either providing a nonexistent path or the path convention is incorrect), by an Administrator. For example, d:/temp is an invalid path and thus causes failure. |
|
IIR Logs |
|
|
Recovery |
Revert the value of the Verbosity Path field to NULL. Thus, by default the IIR would write to InformaticaIR/iirlog. |
|
Stage |
Checkpoint |
|---|---|
|
Symptoms |
Fusion DQ Realtime Match Services or Fusion DQ Batch
Match Jobs fail with an Engine Connection Error |
|
Possible Root Cause |
Any of the following:
|
|
IIR Logs |
|
|
Recovery |
Follow each recovery instruction and proceed to the next step in the given order only if the current step does not fix the issue. Also, shut down IIR before performing these steps and restart it later as per instructions given for the Matching Setup.
|
|
Stage |
Checkpoint |
|---|---|
|
Symptoms |
Fusion DQ Realtime Match Services work normally, but Fusion DQ Batch Match Jobs (using Match within Batch) fail, resulting in an error. |
|
Possible Root Cause |
A typical case of DB connectivity where locks gets created on certain Rule base tables while Update Synchronizer (UPDSYNC) was still running. As a result, the Rule base is locked and cannot be accessed. The IIR Real time Services uses the Search API (which caches Rule base Information) and Scoring API (used by Match with in Batch), but it fails because it cannot access the Rule base Information. |
|
IIR Logs |
|
|
Recovery |
Shut down and start IIR after checking UPD locks and unlocking them as per the instructions in Update Synchronizer troubleshooting. |
The Matching Server Administration troubleshooting is spread across four tiers. Each tier indicates certain symptoms, lists possible root causes, contains the log descriptions, and prescribes the recovery procedure. While following the troubleshooting process, ensure that as part of the recovery procedure, you check for UPD locks on the Update Synchronizer before bringing up IIR.
|
Stage |
Checkpoint |
|---|---|
|
Symptoms |
When starting the IIR Admin Console Client, it shows a pop up with a confirmation message "Rulebase doesn't exist. Do you want to create it again". Note This popup also appears when you create a Rulebase for the first time during initial setup. However, it is an indication of problem if it appears while starting IIR Admin Console as part of regular maintenance, after the Rulebase has been created. |
|
Possible Root Cause |
Any of the following:
|
|
IIR Logs |
|
|
Recovery |
Following each recovery instruction and proceed to the next step in the given order only if the current step does not fix the issue. Also, shut down IIR before performing these steps and restart it later as per instructions given for the Matching Setup.
|
|
Stage |
Checkpoint |
|---|---|
|
Symptoms |
|
|
Possible Root Cause |
Any of the following:
|
|
IIR Logs |
|
|
Recovery |
Follow each recovery instruction and proceed to the next step in the given order only if the current step does not fix the issue. Also, shut down IIR before performing these steps and restart it later as per instructions given for the Matching Setup.
|
|
Stage |
Checkpoint |
|---|---|
|
Symptoms |
Starting the IIR Admin Console fails with an error: "connection lost to peer". |
|
Possible Root Cause |
DB connectivity issues caused by either DB shut down, or DB crash or network connectivity issues, when IIR was running. |
|
IIR Logs |
|
|
Recovery |
Close the Admin Console and restart IIR as per the Server Administration instructions. |
|
Stage |
Checkpoint |
|---|---|
|
Symptoms |
When starting or shutting down IIR UPD Synchronizer from an active Admin Console, the Synchronizer fails with an error: "connection lost to peer". |
|
Possible Root Cause |
DB connectivity issues caused by either DB shut down, or DB crash or network connectivity issues, when IIR was running. |
|
IIR Logs |
|
|
Recovery |
Close the Admin Console and restart IIR as per the Server Administration instructions. |
The root cause of Update Synchronizer (UPD) locks is either an incorrect shut down where the Search Server was shut down while UPD was still running followed by ending the UPD process or an abrupt loss in DB connectivity when UPD was processing rows to be synchronized. To restore normal functioning of IIR, you need to delete the UPD locks.
To detect UPD locks, if there are any, run the command ./lockmgr list uq -rssa:<rulebase alias> -h<IIR
RB Host>:<IIR RB Port> -l in <PROV.TOP>/InformaticaIR/bin. For example, if you run the following command:
./lockmgr list uq -rssa:rtunitrb -haufsn4ayf04:1668 -l
it returns the following details:
sorted locks:
uq: updsync:1302896463:6826
  obj: idtsyncsystem
    id: system=fusiondqrealtime
      type: w
      lock: ip=144.23.252.42 pid=31928
host='aufsn4agf04.oracleoutsourcing.com' ps='80154501
/u01/APPLTOP/fusionapps/InformaticaIR/bin/updsync-t60-m100-haufsn4agf04.oracle
outsourcing.com:1668-rssa:rtunitrb-vus-pf'
Note
UPD Locks should be deleted only when you find them, even when UPD has been shut down and you do not have any UPDSYNC process running.
To delete the locks, run the command ./lockmgr del uq -rssa:<rulebase alias> -h<IIR
RB Host>:<IIR RB Port> in <PROV.TOP>/InformaticaIR/bin. For example,
./lockmgr del updsync:1302896463:6826 -rssa:rtunitrb -haufsn4ayf04:1668
The Cleansing Service troubleshooting is spread across four tiers. Each tier indicates certain symptoms, lists possible root causes, contains the log descriptions, and prescribes the recovery procedure.
|
Stage |
Checkpoint |
|---|---|
|
Symptoms |
Fusion DQ Cleansing Services or Fusion DQ Batch Cleanse
Jobs fail with an Engine Connection Error |
|
Possible Root Cause |
IIR connection setup is missing or incorrect in the cleansing configuration. Using the Manage Server Configuration FSM task, check the Server Host and Port information for the cleansing servers. |
|
IIR Logs |
NA |
|
Recovery |
Setup IIR Host and Port in Cleansing Configuration page |
|
Stage |
Checkpoint |
|---|---|
|
Symptoms |
Fusion DQ Cleansing Services or Fusion DQ Batch Cleanse
Jobs fail with an Engine Connection Error |
|
Possible Root Cause |
ASM Key stored in InformaticaIR/ssaas/ad5/ad/db has expired. |
|
IIR Logs |
|
|
Recovery |
Get the correct ASM key from Address Doctor and replace the existing key in the file called key in InformaticaIR/ssaas/ad5/ad/db. Subsequently, restart the IIR Server. |
|
Stage |
Checkpoint |
|---|---|
|
Symptoms |
Fusion DQ Cleansing Services or Fusion DQ Batch Cleanse
Jobs fail with an Engine Connection Error |
|
Possible Root Cause |
ASM Key stored in InformaticaIR/ssaas/ad5/ad/db is either incorrect or corrupt. |
|
IIR Logs |
|
|
Recovery |
Get the correct ASM key from Address Doctor and replace the existing key in the file called key in InformaticaIR/ssaas/ad5/ad/db. Subsequently, restart the IIR Server. |
|
Stage |
Checkpoint |
|---|---|
|
Symptoms |
Fusion DQ Cleansing Services or Fusion DQ Batch Cleanse
Jobs fail with an Engine Connection Error |
|
Possible Root Cause |
ASM Key stored in InformaticaIR/ssaas/ad5/ad/db does not exist. |
|
IIR Logs |
|
|
Recovery |
Get the correct ASM key from Address Doctor and create a file called key in InformaticaIR/ssaas/ad5/ad/db. Subsequently, restart the IIR Server. |
The Cleansing Server Administration troubleshooting process indicates certain symptoms, lists possible root causes, contains the log descriptions, and prescribes the recovery procedure.
|
Stage |
Checkpoint |
|---|---|
|
Symptoms |
The IIR Cleansing Console does not respond to the
start command |
|
Possible Root Cause |
ASM Key stored in InformaticaIR/ssaas/ad5/ad/db has either expired, is either incorrect or corrupt, or does not exist. |
|
IIR Logs |
|
|
Recovery |
Get the correct ASM key from Address Doctor and replace the existing key in the file called key in InformaticaIR/ssaas/ad5/ad/db. Subsequently, restart the IIR Server. |
To run the Oracle Fusion Sales Prediction Engine in Oracle Fusion Applications Customer Relationship Management (CRM), perform the following post-installation tasks if you deployed Oracle Business Intelligence Applications and have created the Oracle Business Analytics Warehouse. For information on deploying and setting up Oracle Business Intelligence Applications, refer to the Oracle Fusion Middleware Configuration Guide for Oracle Business Intelligence Applications.
However, if you deployed only Oracle Transactional Business Intelligence, you need not perform these steps to run the Oracle Fusion Sales Prediction Engine.
You can create the Data Warehouse objects using the Sales Predictor Repository Creation Utility (RCU). To run the Sales Predictor RCU , ensure that the Oracle Business Intelligence Application (OBIA) Data Warehouse database and the related schema including database objects such as tables, are available. The Sales Predictor RCU creates Sales Predictor related Data Warehouse database objects such as Oracle Data Mining tables, views, packages, Oracle Real-time Decisions (RTD) Inline Service Processing tables, and the purge package in the existing OBIA schema.
Initiate the Sales Predictor RCU following these instructions.
Access the rcuBIZSPApps.zip file (available with the FAINTEG label) from the following location, and extract its contents to a local directory.
In Windows NT, the location is /fainteg/shiphome/rcu/nt/rcuBIZSPApps.zip
In Linux, the location is /fainteg/shiphome/rcu/linux/rcuBIZSPApps.zip
Run the following command pointing to the BIN folder within the local directory:
In Windows NT, use rcu -variables BI_SCHEMA_NAME=<OBIA Schema name>
In Linux, use ./rcu -variables BI_SCHEMA_NAME=<OBIA Schema name>
Note
<OBIA Schema name> refers to the name of the OBIA schema that is used, and is an input parameter for the Sales Predictor RCU.
The Sales Predictor RCU wizard appears.
On the Welcome page, click Next and on the Create Repository page, ensure that the default option Create is selected and click Next.
On the Database Connection Details page, provide the following information and click Next.
Host Name: Name of the server where the database is located.
Port: The database port number.
Service Name: The service name of the database.
Username: SYS. It is the user name associated with an administrative role.
Password: Password used in combination with the user name to access the database.
Role: SYSDBA. It is the role with administrative access rights.
The provided information is processed through a prerequisite check.
On the confirmation dialog box, click OK.
On the Select Components page, select the Oracle Application Components, and click Next.
On the confirmation dialog box, click OK.
On the Schema Passwords page, ensure that the Use same passwords for all schemas option is selected. Selecting this option provides the password used with the existing OBIA Schema Name.
Enter the password again to confirm it, and click Next.
On the Map Tablespaces page, click Next and on the confirmation box that subsequently appears, click OK.
On the Summary page, review the database information provided until this point. If necessary, click Back to change details in the previous pages.
Click Create to create the Data Warehouse objects. The Completion Summary page confirms the successful creation of the objects.
The Data Warehouse requires a Java Naming and Directory Interface (JNDI) data source connection named DWDS that points to the Online Analytical Processing (OLAP) database residing on Oracle BI server. To create the data source using the RTD WebLogic Server console, follow these instructions.
In the WebLogic Server console, open Services - JDBC - Data Sources and click New.
On the JDBC Data Source Properties page, provide the following details and click Next.
Name: Fusion_OLAP_DS
JNDI Name: DWDS
Database Type: Oracle
Database Driver: Oracle Driver (Thin) for Instance connections
On the Transaction Options page, ensure that the default property Supports Global Transactions is selected, and click Next.
On the Connection Properties page, provide the following values, and click Next.
Database Name: The Unique System ID (SID) of the database
Host Name: The name of the computer that hosts the database
Port: The port number of the database
Database User Name: User credential to access the database
Password: The password used in combination with the Database User Name to access the database
On the Test Database Connections page, review the details provided until this point, test the connectivity to the database, and click Next.
Select the Oracle BI Server where you want to make the data source available, and click Finish.
To enable connectivity to Data Warehouse, you must set the value for the profile option.
Note
You can set the value for this profile option using Applications Core Setup, if you have roles allowing access to do so. The Application Implementation Administrator abstract role provides the necessary access.
Sign in to the Oracle Fusion Applications Core Setup.
Under the Tasks menu on the left side of the page, click Manage Administrator Profile Values. The Manage Administrator Profile Values tab appears.
In the Profile Option Code field, enter ZCA_WAREHOUSE_ENABLED_BI and click Search. The profile option appears in the search results.
In the Profile Values region, select the result item associated with the searched profile option, and under the Profile Value column, set the value to Yes.
Click Save.
The Sales Predictor Inline Service within RTD uses the profile option to point to the Data Warehouse tables.
You can point RTD to the Data Warehouse in one of the following ways:
Restart the RTD application server. The Sales Predictor Inline Service is reloaded and points to the Data Warehouse.
Manually redeploy the Sales Predictor Inline Service if restarting the RTD application server does not work. Before you manually redeploy, ensure that the following prerequisites are met:
You have roles allowing access to deploy the Sales Predictor Inline Service.
Java Development Kit (JDK) 1.6 or higher version is available and running on the same server
You must have access to the command line tool zip file rtd-deploytool-11.1.1.zip. The zip file resides within the RTD client zip file (rtd_client_11.1.1.3.0.zip), which is available in the BI_MW_HOME/Oracle_BI1/clients/rtd directory.
To manually redeploy the Sales Predictor Inline Service, follow these instructions.
Extract the contents of the file rtd_client_11.1.1.3.0.zip to a local directory.
In the local directory, go to the folder ./client/CommandLineDeploy, locate rtd-deploytool-11.1.1.zip and extract its contents to a folder.
In that folder, locate ./OracleBI/RTD/deploytool folder and within that folder, open a command prompt terminal.
Note
Ensure that the JDK classpath is set for the command prompt terminal.
Run the command: java -jar deploytool.jar -deploy -server <Server Host> -port <Port>
-terminateSessions true <Full path of Directory/ Zip File>.
When prompted, provide the user name and password to connect to the RTD server.
The message Deploymentstateid: id. Deployed SPE_ILS.zip to server port in state: Development appears indicating completeness of deployment of the Sales Predictor Inline Service.
The Oracle Fusion Sales Prediction Engine can also use data from the following Data Warehouse entity tables to make more accurate predictions:
Assets
Service Agreements
Orders
Also, it is necessary to load either Assets or Orders tables into the corresponding Data Warehouse table. Once the data in the Data Warehouse entity tables are ready, you can go to the Schedule Predictive Model Training page to run the model training process.
For more information on OBIA, see Oracle Fusion Middleware Configuration Guide for Oracle Business Intelligence Applications.
|
Copyright © 2011, Oracle and/or its affiliates. All rights reserved. Legal Notices |
|