| Oracle® Fusion Middleware Developer's Guide for Oracle SOA Suite 11g Release 1 (11.1.1.6.1) Part Number E10224-12 |
|
|
PDF · Mobi · ePub |
| Oracle® Fusion Middleware Developer's Guide for Oracle SOA Suite 11g Release 1 (11.1.1.6.1) Part Number E10224-12 |
|
|
PDF · Mobi · ePub |
This chapter describes how to use conditional branching in a BPEL process service component. Conditional branching introduces decision points to control the flow of execution of a BPEL process service component. This chapter also describes how to use while and repeatUntil activities to define conditional branching and specify XPath expressions that enable you to bypass execution of activities.
This chapter includes the following sections:
Section 11.3, "Creating a While Activity to Define Conditional Branching"
Section 11.4, "Creating a repeatUntil Activity to Define Conditional Branching"
Section 11.5, "Specifying XPath Expressions to Bypass Activity Execution"
For additional information on creating conditional branching in a SOA composite application, see the Fusion Order Demo application.
BPEL applies logic to make choices through conditional branching. You can use the following activities to design your code to select different actions based on conditional branching:
Switch activity (in a BPEL version 1.1 project)
Enables you to set up two or more branches, with each branch in the form of an XPath expression. If the expression is true, then the branch is executed. If the expression is false, then the BPEL process service component moves to the next branch condition, until it either finds a valid branch condition, encounters an otherwise branch, or runs out of branches. If multiple branch conditions are true, then BPEL executes the first true branch. For information about how to create switch activities, see Section 11.2.1, "Defining Conditional Branching with the Switch Activity in BPEL 1.1."
If activity (in a BPEL version 2.0 project)
Enables you to use an if activity when conditional behavior is required for specific activities to decide between two or more branches. The if activity replaces the switch activity that appeared in BPEL 1.1 processes. For information about how to create if activities, see Section 11.2.2, "Defining Conditional Branching with the If Activity in BPEL 2.0."
While activity
Enables you to create a while loop to select between two actions. Section 11.3, "Creating a While Activity to Define Conditional Branching" describes while activities.
Many branches are set up, and each branch has a condition in the form of an XPath expression.
You can program a conditional branch to have a timeout. That is, if a response cannot be generated in a specified period, the BPEL flow can stop waiting and resume its activities. Chapter 15, "Using Events and Timeouts in BPEL Processes" explains this feature in detail.
Note:
You can also define conditional branching logic with business rules. See Oracle Fusion Middleware User's Guide for Oracle Business Rules and the WebLogic Fusion Order Demo application for details.
This section describes how to define conditional branching with the following activities:
Switch activity in a BPEL version 1.1 project
If activity in a BPEL version 2.0 project
Assume you designed a flow activity in the BPEL process service component that gathered loan offers from two companies at the same time, but did not compare either of the offers. Each offer was stored in its own global variable. To compare the two bids and make decisions based on that comparison, you can use a switch activity.
Figure 11-1 provides an overview of a BPEL conditional branching process that has been defined in a switch activity.
To create a switch activity:
In the Component Palette, expand BPEL Constructs.
Drag a Switch activity into the designer, as shown in Figure 11-2.
The Switch activity has two switch case branches by default, each with a box for functional elements. If you want to add more branches, select the entire switch activity, right-click, and select Add Switch Case from the menu.
In the first branch, double-click the condition box.
A dialog for entering a condition is displayed, as shown in Figure 11-3.
In the Label field, enter a name for the condition branch. When complete, this name is displayed in Oracle BPEL Designer.
In the Description field, enter a description of the capabilities of this condition branch.
In the Condition field, click the Expression Builder icon to access the Expression Builder dialog.
Create your expression.
bpws:getVariableDate('loanOffer1','payload','/loanOffer/APR') >
bpws:getVariableData('loanOffer2','payload','/loanOffer/APR')
In this example, two loan offers from completing loan companies are stored in the global variables loanOffer1 and loanOffer2. Each loan offer variable contains the loan offer's APR. The BPEL flow must choose the loan with the lower APR. One of the following switch activities takes place:
Click OK.
The expression is displayed. The value you entered in the Label field of the dialog becomes the name of the condition branch. Figure 11-4 provides details.
Click OK.
Add and configure additional activities as needed. Figure 11-5 provides details.
A switch activity, like a flow activity, has multiple branches. In Example 11-1, there are only two branches shown in the .bpel file after design completion. The first branch, which selects a loan offer from a company named United Loan, is executed if a case condition containing an XPath boolean expression is met. Otherwise, the second branch, which selects the offer from a company named Star Loan, is executed. By default, the switch activity provides two switch cases, but you can add more if you want.
Example 11-1 Switch Activity
<switch name="switch-1">
     <case condition="bpws:getVariableData('loanOffer1','payload',
     '/autoloan:loanOffer/autoloan:APR') >
     bpws:getVariableData('loanOffer2','payload','/autoloan:loanOffer/autoloan:APR
     ')">
" name="Choose_the_Loan_with_the_Lower_APR">
               <bpelx:annotation>
                   <bpelx:general>
                       <bpelx:property name="userLabel">Choose the Loan with
                        the Lower APR</bpelx:property>
                   </bpelx:general>
               </bpelx:annotation>
          <assign name="selectUnitedLoan">
            <copy>
               <from variable="loanOffer1" part="payload">
               </from>
               <to variable="selectedLoanOffer" part="payload"/>
            </copy>
         </assign>
     </case>
     <otherwise>
         <assign name="selectStarLoan">
          <copy>
            <from variable="loanOffer2" part="payload">
            </from>
            <to variable="selectedLoanOffer" part="payload"/>
          </copy>
         </assign>
     </otherwise>
</switch>
You can use an if activity when conditional behavior is required for specific activities to decide between two or more branches. Only one activity is selected for execution from a set of branches. The if activity consists of a list of one or more conditional branches that are considered for execution in the following order:
The if branch
Optional elseif branches
An optional else branch
The first branch whose condition evaluates to true is taken, and its contained activity is performed. If no branch with a condition is taken, then the else branch is taken (if present). The if activity is complete when the contained activity of the selected branch completes, or immediately when no condition evaluates to true and no else branch is specified.
The if activity is a BPEL version 2.0 feature that replaces the switch activity that was included in BPEL version 1.1.
Example 11-2 shows the if activity syntax.
Example 11-2 If Activity
<if standard-attributes>
   standard-elements
   <condition>some conditon expression</condition>
   activity
   <elseif>*
      <condition>some condition expression</condition>
      some activity
   </elseif>
   <else>?
      some activity
   </else>
</if>
To create an If activity:
In the Component Palette, expand BPEL Constructs.
Drag an If activity into the designer.
The if and else conditions are displayed, as shown in Figure 11-6.
If you want to add elseif conditions, highlight the If activity, and select the Add icon to invoke a menu.
Click the if branch.
In the Condition field, enter a condition, as shown in Figure 11-7. You can also click the XPath Expression Builder icon to invoke the Expression Builder dialog.
Click OK.
Drag and define additional activities into the if condition, as needed. These activities are executed if the if condition evaluates to true.
Click the elseif branch (if you added this branch).
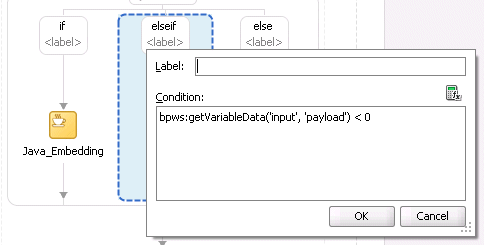
In the Condition field, enter a condition, as shown in Figure 11-8.
Figure 11-8 elseif Branch of the If Activity
Click OK.
Drag and define additional activities into the elseif condition, as needed. These activities are executed if the if branch did not evaluate to true, and this elseif branch evaluates to true.
Click the else label.
Enter a condition or drag and define additional activities into the else condition, as needed. These activities are executed if the if and any elseif branches did not evaluate to true, and this else branch evaluates to true.
Figure 11-9 shows a completed if activity in which each branch includes contained activities.
Example 11-3 provides an example of the .bpel file after design completion. The if activity has if, elseif, and else branches defined. The first branch to evaluate to true is executed.
Example 11-3 If Activity
<sequence>
<!-- receive input from requester -->
<receive name="receiveInput" partnerLink="client" portType="tns:Test"
operation="process" variable="input" createInstance="yes"/>
<!-- assign default value -->
<assign>
<copy>
<from>'Value is greater than zero'</from>
<to>$output.payload</to>
</copy>
<assign>
<copy>
<from>'Value is greater than zero'</from>
<to>$output.payload</to>
</copy>
</assign>
<!-- switch depends on the input value field -->
<if>
<condition>$input.payload > 0</condition>
<extensionActivity>
<bpelx:exec name="Java_Embedding" version="1.5" language="java">
System.out.println("if condition is true.\n");
</bpelx:exec>
</extensionActivity>
<elseif>
<condition>bpws:getVariableData('input', 'payload') < 0</condition>
<assign>
<copy>
<from>'Value is less than zero'</from>
<to>$output.payload</to>
</copy>
</assign>
</elseif>
<else>
<assign>
<copy>
<from>'Value is equal to zero'</from>
<to>$output.payload</to>
</copy>
</assign>
</else>
</if>
<!-- respond output to requester -->
<reply name="replyOutput" partnerLink="client"
portType="tns:Test" operation="process" variable="output"/>
</sequence>
Another way to design your BPEL code to select between multiple actions is to use a while activity to create a while loop. The while loop repeats an activity until a specified success criteria is met. For example, if a critical web service is returning a service busy message in response to requests, you can use the while activity to keep polling the service until it becomes available. The condition for the while activity is that the latest message received from the service is busy, and the operation within the while activity is to check the service again. Once the web service returns a message other than service busy, the while activity terminates and the BPEL process service component continues, ideally with a valid response from the web service.
To create a while activity:
In the Component Palette, expand BPEL Constructs.
Drag a While activity into the designer.
Click the + sign to expand the while activity.
The while activity has icons to allow you to build condition expressions and to validate the while definition. It also provides an area for you to drag an activity to define the while loop.
Drag and define additional activities for using the while condition into the Drop Activity Here area of the While activity (for example, a Scope activity).
The activities can be existing or new activities.
Click the XPath Expression Builder icon to open the Expression Builder dialog.
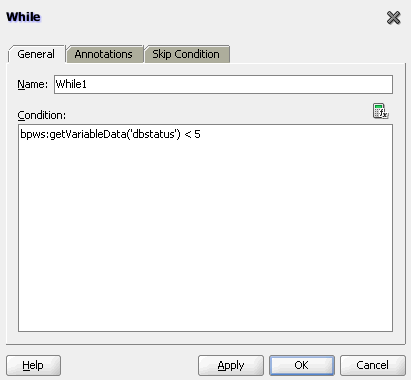
Enter an expression to perform repeatedly, as shown in Figure 11-10. This action is performed until the given boolean while condition is no longer true. In this example, this activity is set to loop while less than 5.
Figure 11-10 While Activity with an Expression
Click OK when complete.
Example 11-4 provides an example of the .bpel file after design completion. The while activity includes a scope activity. The scope activity includes sequence and fault handlers at the top level. The sequence includes invoke and assign activities and fault handlers that define a catchAll containing assign and wait activities wrapped in a sequence.
The code in Example 11-4 calls an external service. If the external service throws a fault, the fault handler catches the fault and increments the dbStatus variable value.
Therefore, the exit condition of the while loop is either of the following:
There is no exception, upon which the dbStatus value is set to a value of 10, which results in the while condition evaluating to false.
After throwing a fault five times, the dbStatus value is 5, and the while condition returns false.
Example 11-4 While Activity
<while name="While_1" condition="bpws:getVariableData('dbStatus') > 5">
      <scope name="Scope_1">
<faultHandlers>
          <catchAll>
            <sequence name="Sequence_2">
              <assign name="assign_DB_retry">
                <copy>
                  <from expression="bpws:getVariableData('dbStatus') + 1"/>
                  <to variable="dbStatus"/>
                </copy>
              </assign>
              <wait name="Wait_30_sec" for="'PT31S'"/>
            </sequence>
          </catchAll>
        </faultHandlers>
        <sequence name="Sequence_1">
          <invoke name="Write_DBWrite" partnerLink="WriteDBRecord"
                  portType="ns2:WriteDBRecord_ptt" operation="insert"
                  inputVariable="Invoke_DBWrite_merge_InputVariable"/>
          <assign name="Assign_dbComplete">
            <copy>
              <from expression="'10'"/>
              <to variable="dbStatus"/>
            </copy>
          </assign>
        </sequence>
      </scope>
    </while>
Note:
The while activity code fragment in Example 11-4 uses a BPEL 1.1 construct of bpws:getVariableData('dbStatus'). For BPEL 2.0, variables are referenced directly using $ sign and dot (.) notation. For example:
<while name="While1">
   <condition>$inputVariable.payload/client:counter > 0
   </condition>
If the body of an activity must be performed at least once, use a repeatUntil activity instead of a while activity. The XPath expression condition in the repeatUntil activity is evaluated after the body of the activity completes. The condition is evaluated repeatedly (and the body of the activity processed) until the provided boolean condition is true.
Note:
This activity is supported in BPEL version 2.0 projects.
To create a repeatUntil activity:
In the Component Palette, expand BPEL Constructs.
Drag a Repeat Until activity into the designer.
Double-click the Repeat Until activity.
Enter a name or accept the default value.
In the Condition field, click the XPath Expression Builder icon to enter an XPath expression condition.
The Expression Builder dialog is displayed.
Enter a boolean XPath expression condition, and click OK.
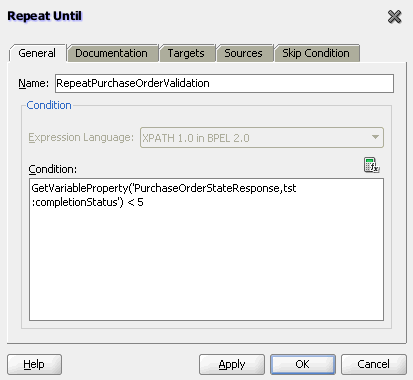
The condition you entered is displayed in the Repeat Until dialog, as shown in Figure 11-11.
Figure 11-11 Completed Repeat Until Dialog
Click Apply, then OK.
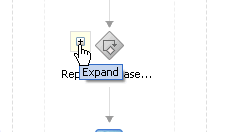
Expand the Repeat Until activity, as shown in Figure 11-12.
Figure 11-12 repeatUntil Activity Being Expanded
Design the body of the activity by dragging in activities from the Component Palette and defining their property values. These activities are evaluated until the XPath expression condition is evaluated to true.
Example 11-5 provides an example of the .bpel file after design completion. In this scenario, purchase order validation must be performed at least once, then repeatedly, based on evaluating the completion status until the status is updated to 5.
Example 11-5 repeatUntil Activity
<repeatUntil>
   <sequence>
      <invoke name="PurchaseOrderValidation" ... />
      <receive name="receiveValidation"
         partnerLink="PurchaseOrderValidation"
         operation="returnPurchaseOrderValidation"
         variable="PurchaseOrderStatusResponse" />
   </sequence>
   <condition>
      bpel:getVariableProperty(
      "PurchaseOrderStatusResponse","tst:completionStatus") < 5
   </condition>
</repeatUntil>
Oracle provides an extension that enables you to specify an XPath expression in an activity in BPEL versions 1.1 and 2.0 that, when evaluated to true, causes that activity to be skipped. This functionality provides an alternative to using a switch activity for conditionally executing activities. The skip condition for activities is specified as follows:
<activity bpelx:skipCondition="boolean-expr"/>
The bpelx:skipCondition attribute causes an XPath expression to be evaluated immediately upon creation of the activity instance. If the skip expression returns a false boolean value, the activity is executed. If the skip expression returns a true boolean value, the activity is completed immediately and execution moves to the activity immediately following that one.
This construct is equivalent to a switch/case structured activity with a single case element with a condition that is the opposite of the skip condition.
Example 11-6 provides an example of bpelx:skipCondition attribute use in BPEL 1.1. If myvalue is 0, the expression evaluates to true, and the assign activity is skipped. If myvalue is 10, the expression evaluates to false, and the copy operation of the assign activity is executed.
Example 11-6 Use of bpelx:skipCondition Attribute in BPEL 1.1
<assign bpelx:skipCondition="bpws:getVariableData('input',
 'payload','/tns:inputMsg/tns:myvalue') <= 0">
    <copy>
        <from expression="'Value is greater than zero'"/>
        <to variable="output" part="payload"
 query="/tns:resultMsg/tns:valueResult"/>
    </copy>
</assign>
The equivalent functionality used with a switch activity is shown in Example 11-7.
Example 11-7 Equivalent Functionality with a Switch Activity
<switch>
    <case condition="bpws:getVariableData('input',
 'payload','/tns:inputMsg/tns:value') > 0">
        <assign>
            <copy>
                <from expression="'Value is greater than zero'"/>
                <to variable="output" part="payload"
 query="/tns:resultMsg/tns:valueResult"/>
            </copy>
        </assign>
    </case>
</switch>
In BPEL 2.0, the bpelx:skipCondition syntax appears as a child element of an activity. Example 11-8 provides an example of an assign activity with this convention.
Example 11-8 Use of bpelx:skipCondition Attribute in BPEL 2.0
<assign name="Assign4">
<bpelx:skipCondition>ora:getNodeValue($inputVariable.payload/client:input) > 5
</bpelx:skipCondition><copy>
            <from>"dummy result"</from>
            <to>$outputVariable.payload/client:result</to>
          </copy></assign>
You can also use built-in and custom XPath functions within the skip condition expression. Example 11-9 provides several examples.
Example 11-9 Built-in and Custom XPath Functions
<assign bpelx:skipCondition="bpws:getVariableData( 'crOutput', 'payload',
 '/tns:rating' ) > 0">

<assign bpelx:skipCondition="custom:validateRating()" ... />

<assign xmlns:fn='http://www.w3.org/2005/xpath-functions'
 bpelx:skipCondition="fn:false()" ... />
If an error is thrown by the XPath expression evaluation, the error is wrapped with a BPEL fault and thrown from the activity.
An event is added to the BPEL instance audit trail for activities that are bypassed due to the skip condition expression evaluating to true. Even if the skip condition evaluates to false (meaning the activity is performed), the fact that a skip condition expression was evaluated is still logged to the audit trail for debugging purposes.
If the XPath engine fails to evaluate the boolean value, bpws:subLanguageFault is thrown. This is the same fault thrown when a switch/case condition does not evaluate to a boolean value. This is also logged to the audit trail for debugging purposes.
To specify XPath expressions to bypass activity execution:
In the Component Palette, expand BPEL Constructs.
Drag the activity into the designer in which to create the skip condition.
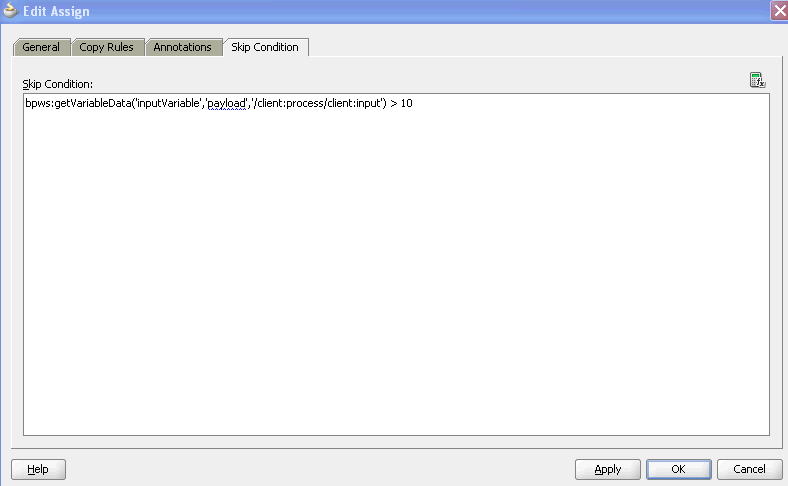
Click the Skip Condition tab.
Specify an XPath expression that, when evaluated to true, causes an activity to be skipped. Figure 11-13 provides details.
Figure 11-13 Skip Condition XPath Expression
Click Apply, then OK.
The code segment in the .bpel file defines the specific operation after design completion.
For example, the XPath expression shown in Example 11-10, when evaluated to true (for example, input is 20), causes the assign activity to be skipped.
Example 11-10 skipCondition Attribute For Bypassing Activity Execution
<sequence name="main">
. . .
. . .
<assign name="Assign_1"
                bpelx:skipCondition="number(bpws:getVariableData('inputVariable','payload','/client:
 process/client:input')) > 10">
    <copy>
       <from expression="'Assign Block is not Skipped'"/>
          <to variable="inputVariable" part="payload"
             query="/client:process/client:input"/>
    </copy>
</assign>
. . .
. . .
</sequence>