11g Release 1 (11.1.3)
Part Number E20387-03
Contents
Previous
Next
|
Oracle® Fusion
Applications
Product Information Management Implementation Guide 11g Release 1 (11.1.3) Part Number E20387-03 |
Contents |
Previous |
Next |
This chapter contains the following:
Product Management Features by License: Overview
Managing Product Child Value Sets: Explained
Managing Default Item Class: Explained
Managing Item Statuses: Explained
Managing Item Types: Explained
Managing Cross-Reference Types: Explained
Managing Related Item Subtypes: Explained
Managing Descriptive Flexfields for Items: Explained
What's the difference between lifecycle phase types and lifecycle phases
Define Basic Product Structure
Managing Item Structure Type Details: Explained
Assigning Items to Categories: Explained
Publishing Catalogs: Explained
FAQs for Define Basic Catalogs
Transactional Attributes: Explained
FAQs for Define Advanced Items
New Item Request Definition Phase: Explained
New Item Requests Workflow Processes: Explained
New Item Request Approval Phase: Explained
Define Customers for Product Management
Defining the Import Process for Customers and Consumers: Points to Consider
Performing What-If Analysis on Data Import Batches: Worked Example
Defining the Import Process for Customers and Consumers: Worked Example
FAQs for Define Customers for Product Management
How can I view the errors that occurred during preimport processing
What happens if I purge a data import batch
Why can't I purge a data import batch
Why did I receive a message that the data enrichment process was declined
Can I try and import a batch again
Why can't I view the import process details
How can I create item relationships between items and customers
Define Data Quality for Products
Product Information Management is comprised of three products.
Oracle Fusion Product Model
Oracle Fusion Product and Catalog Management
Oracle Fusion Product Hub
|
Product License |
Features |
|---|---|
|
Oracle Fusion Product Model All Oracle Fusion customers are licensed to use. |
Define Basic Items |
|
Define Basic Catalogs |
|
Define Basic Product Structures |
|
Oracle Fusion Product and Catalog Management |
Define Advanced Items (also will get Define Basic Items by dependency in ADR) |
|
Define Change Orders |
|
Define Product Rules |
|
Define Advanced Product Structures (also will get Define Basic Product Structures by dependency in ADR) |
|
Manage Advanced Item Profile Options |
|
Define New Item Requests |
|
Oracle Fusion Product Hub |
Define Product Source System |
|
Define Advanced Catalogs (also get Define Basic Catalogs by dependency in ADR) |
|
Define Data Quality for Products |
|
Manage Advanced Item Profile Options |
Value sets are specific to the application in which they will be used. In the Oracle Product Information Management application, value sets are used primarily for defining attributes where the values that an attribute can have is limited to a specific set of values.
Value sets can be edited or new value sets can be created from the Manage Product Value Sets page. The Edit icon launches the Edit Value Sets page, which redraws in the same region of the local area. The Create icon launches the Create Value Sets page, which redraws in the same region of the local area.
A value set is defined by the value set code and is specific to the module of an application in which the value set is to be used, such as Item Class.
The validation type determines how the value of field is validated for the assigned value set. The following are the seeded values:
Format Only
Independent
Dependent
Subset
Table
The value data type determines the data type for the value set. The following are the seeded values:
Character
Number
Date
Date/Time
The Manage Product Child Value Sets task uses the same page as the Manage Product Value Set task.
A child value set is used to define variants for stock-keeping units or SKUs. A SKU contains the common properties for an item. For example, a shirt can be produced with colors; white, red, yellow, and blue. The variant is used to represent the colors of the shirt.
You define child value sets as follows:
Create a value set with validation type of independent, for example All Colors.
Select the new value set in the Manage Product Value Sets results table, for example All Colors.
Click Manage Values, create several values, for example Blue, Red, Green, Yellow, and Black.
Create a value set with validation type of Subset and enter the first value set you created for the independent value set, for example: Summer Colors.
Select the value set Summer Colors in the Manage Product Value Set result table.
Click Manage Values and then click the Add icon. The dialog will show a list of values based on the value set named Summer colors. Select two of them.
The value set Summer Colors is a child of All Colors.
The Root Item Class is seeded and all item classes are created as children of the Root Item Class. For Oracle Fusion Product Model customers, only the Root Item Class is available. The Manage Default Item Class task enables Product Model customers to manage item class templates, descriptive flexfields, attachment categories and lifecycle phases. The Manage Default Item Class task launches an edit page for the Root Item Class.
The functionality for the Root Item Class is defined using three tabs:
The Basic tab enables descriptive flexfields and attachment categories to be viewed and managed for the Root Item Class.
The Lifecycle Phases tab enables one or more lifecycle phases of a lifecycle to be associated with an item class.
The Templates tab is where you define and manage item templates for the item class.
In the Item Status table, select a status code to display the associated attribute groups and attributes as well as control information.
You can create or edit or delete item statuses on the Manage Item Statuses page. Inactive dates are used to specify the date after which the item status will no longer be active. Operational attribute groups and attributes corresponding to the selected item status are displayed in the Details section. Select a value for the status from choice list for the attribute. Whenever the status is applied to the item, the value of the attribute may change. If the status will have no value, select No.
Select the Usage value of None or Defaulted or Inherited in the choice list for the Usage field that corresponds to how the attribute value will change based on the item status value:
Defaulted-Sets the values of the item status attributes when the status value changes, but allows the overriding of the value during import and update of item.
Inherited-Sets the values of the item status attributes when the status value changes, but overrides cannot occur.
None-The item status attribute values will not be changed.
Any change made to an item status is not applied automatically to existing items, but will be applied during the editing of an item when the item status value is changed.
Item types are managed on the Manage Item Types page.
There are 32 seeded item types and you can edit them or create additional item types.
Item types are date-enabled and are made active or inactive by adjusting the Start Date and End Date.
To benefit from the use of item types, you must enable them by selecting the Enable checkbox.
Cross-References provide the functionality to map additional information about an item in the form of a value and cross-reference type. For example, the cross-reference can map between an item and an old part number, where the value is the value for the old part number and the type is Old Part Number. Cross-Reference Types are part of item relationships where the item relationship type is Cross-Reference. There are no values seeded for cross-reference types. You define the values using the Manage Cross Reference Types task. Cross-reference types are date-enabled and can be made active or inactive by adjusting the values of the Start Date and End Date. To benefit from using item relationship for cross-reference, you must enable cross-reference types by checking the Enable checkbox.
You can import items and item-related information using interface tables. This import data is loaded into the production tables using the Import Item task in Functional Setup Manager.
The Import Item task in Functional Setup Manager creates an Enterprise Storage Server (ESS) process that takes the data that is loaded in the interface tables and uses the import process to move the data to the production tables. The import processes will perform all of the validations necessary to ensure the data imported is correct prior to moving the data into the production tables.
Access the Enterprise Storage Server and provide a process name (job definition) such as Item Import Process.
In Functional Setup Manager, access the All Tasks tab on the Overview page, and search for the Import Item task with the name of your ESS process definition, then click the Go to Task icon in the search results for that Import Item task.
The parameters for the item import process are
Batch ID: Associate the interface table to an item batch definition.
Organization: Select an organization to be used for the import.
Process Only: Determines how the data is processed. The choices are:
Create
Sync
Update
Process All Organizations: Select Yes if the import contains items that will be imported to multiple organizations.
Delete Processed Rows: Select Yes to delete rows that are imported without errors
Click Submit and the Request Number will be displayed.
Access Monitor Item Imports in Functional Setup Manager to search for specific Enterprise Storage Server processes and monitor their status in the search results table.
A related item is an item relationship between two existing items. How the two items are related is defined by a subtype. Multiple subtypes for related items are seeded, and you define additional subtypes on the Manage Related Item Subtypes page.
You can use descriptive flexfields to capture additional information about items beyond what is provided by the predefined set of operational attributes in Oracle Fusion Product Model.
If you are not using Oracle Fusion Product and Catalog Management, then you cannot create user-defined attribute groups and attributes. However you can use descriptive flexfields associated at Item level to create fields to capture information about items. Like other descriptive flexfields, item descriptive flexfields have context segments and context-sensitive segments whose values are validated on entry by value sets. You can define the value sets to control what values users can enter in a descriptive flexfield segment. Examples of information that you might capture are size and volumetric weight.
Manage this flexfield type by using the Manage Item Descriptive Flexfields task, which you can access by searching for flexfield tasks on the Setup and Maintenance Overview page.
Use descriptive flexfields associated at Item Revision level to capture item revision information whose values may differ between revisions of the same item.
Manage this flexfield type by using the Manage Item Revision Descriptive Flexfields task, which you can access by searching for flexfield tasks on the Setup and Maintenance Overview page.
When defining descriptive flexfields associated with item relationships, you must use certain prefixes when naming the context segments, in order for the segments to be displayed for the respective relationships.
The prefixes required for naming the context segments
are listed in the following table, with their corresponding item relationship
types. For example, if you define an item relationship descriptive
flexfield with a context segment named RELATED_RELATIONSHIP_ATTRIBUTES, then the value segments of this context will be displayed for Related
Item Relationships when users conduct transactions in that context.
For another example, when users navigate to a UI of a particular object,
such as a Competitor Item, they see the contexts whose internal name
has the prefix COMP.
|
Relationship Type |
Prefix for Context Segment |
|---|---|
|
Competitor Item Relationship |
COMP |
|
Customer Item Relationship |
CUST |
|
Item Cross-reference Relationship |
XREF |
|
GTIN Relationship |
GTIN |
|
Manufacturer Part Number Relationship |
MFG |
|
Related Item Relationship |
RELATED |
|
Source System Item Relationship |
SYS |
Manage this flexfield type by using the Manage Item Relationship Descriptive Flexfields task, which you can access by searching for flexfield tasks on the Setup and Maintenance Overview page.
When defining descriptive flexfields associated with trading partner items, you must use certain prefixes when naming the context segments, in order for the segments to be displayed for the respective trading partner type.
The prefixes required for naming the context segments
are listed in the following table, with their corresponding trading
partner types. For example, if you define a trading partner item descriptive
flexfield with a context segment named COMP_TPI_ATTRIBUTES, then the value segments of this context will be displayed for Competitor
Item when users conduct transactions in that context..
|
Trading Partner Type |
Prefix for Context Segment |
|---|---|
|
Competitor Item |
COMP |
|
Customer Item |
CUST |
|
Manufacturer Item |
MFG |
Manage this flexfield type by using the Manage Trading Partner Item Descriptive Flexfields task, which you can access by searching for flexfield tasks on the Setup and Maintenance Overview page.
Lifecycle validation enforces compatible lifecycle phases between parent and component items in an item structure, at the structure name level. For example, an item in the Design lifecycle phase can only have component items that are in the same lifecycle phase or the next phase. The only exception is for items in the Obsolete lifecycle phase, because this is considered the end of life for an item. Items in the Obsolete lifecycle phase cannot be added to a new structure.
The lifecycle phases for a computer component lifecycle might be:
Concept
Design
Prototype
Pre-Production
Retirement (Obsolete)
Lifecycle phase types are seeded and describe the type of lifecycle phase. They are Design, Obsolete, Preproduction or Prototype, and Production.
Lifecycle phases must be created by the user by selecting one of the seeded lifecycle phase types.
Value sets are specific to the application in which they will be used. In the Oracle Product Information Management application, value sets are used primarily for defining attributes where the values that an attribute can have is limited to a specific set of values.
Value sets can be edited or new value sets can be created from the Manage Product Value Sets page. The Edit icon launches the Edit Value Sets page, which redraws in the same region of the local area. The Create icon launches the Create Value Sets page, which redraws in the same region of the local area.
A value set is defined by the value set code and is specific to the module of an application in which the value set is to be used, such as Item Class.
The validation type determines how the value of field is validated for the assigned value set. The following are the seeded values:
Format Only
Independent
Dependent
Subset
Table
The value data type determines the data type for the value set. The following are the seeded values:
Character
Number
Date
Date/Time
Item structure type is a seeded value that enables you to define the composition of an item. You can add additional structure names and specify item attachment categories that need to be available when viewing or managing structures. Item structure types provide a common set of metadata to all structures defined under it.
A structure type enables you to classify and characterize item structures throughout the lifecycle of an item. You can define an unlimited number of structure names for a structure type, enabling you to create several different structures of the Item Structure Type that you can use for comparison.
A seeded structure name (Primary) is available. Only the description and lifecycle validation flag can be updated for this structure name. It will always be active.
You can associate item attachment categories with a structure type.
A catalog is a collection of categories that you use to classify items. You can organize the categories into a hierarchy the represents a taxonomy. You create new categories only in the context of a catalog. You can add existing categories to one or more catalogs, either from another catalog or as shared categories from a source catalog.
You can set the Catalog Content value to Items at all levels which allows items to be assigned to any level within the category hierarchy, not only to the leaf levels.
The following diagram shows the relationships of the catalog components.
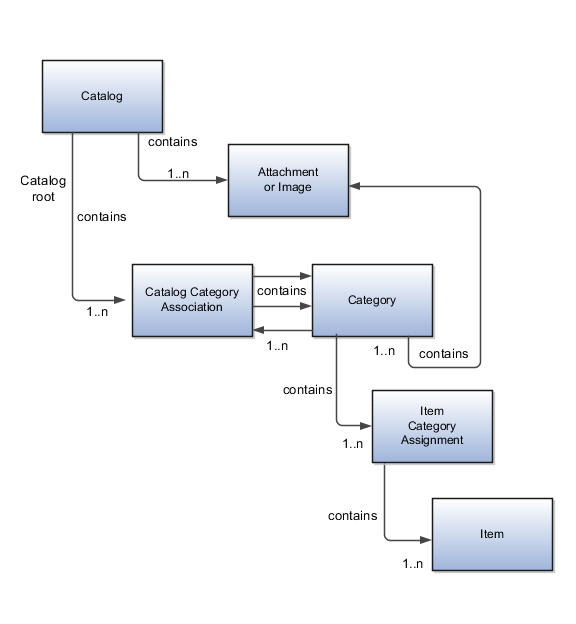
A catalog is a collection of categories that are organized to define a classification of items. The top most level of a catalog is the catalog root. All categories for the first level in the category hierarchy are associated with the catalog root through the catalog category association component.
A category is a component of a catalog that represents a portion of the classification defined by the categories and category hierarchy in the catalog. You can associate a category to a catalog through the catalog category association. Both the shared category and the native category are associated thorough the catalog category association.
Catalog category association represents the relationship between a catalog and a category, or a parent category and a child category. Each catalog category association represents one relationship between the catalog and a category or one relationship between a parent category and a child category.
Item category assignment represents the assignment of the item to a category in a catalog. Each item category assignment represents the relationship between a category and an item.
An item represents objects such as a product, service or template. An item is assigned through the item category assignment component.
Information is associated to the catalog and/or category, or both, through the attachment framework. Multiple attachments are supported but you can associate only a single attachment or attachment type image with a catalog or category.
The format of a catalog is defined at the time the catalog is created and controls the behavior of the catalog at runtime.
When you format a catalog the layout controls three main areas and includes the following tasks, some fields are required, and others are optional.
Catalog configuration
Date enablement
Category sharing
You can configure the catalog, and this affects how the content behaves. The catalog configuration contains a set of attributes that define the catalog configuration. These attributes interact to define the runtime behavior of the catalog.
The configuration functions are:
Catalog code: A unique identifier that is used.
Catalog structure: The key flexfield structure used to define the catalog.
Controlled at: Controls how items are assigned to categories and has two values. The first value is master level, which enables the automatic assignment of items to all child organizations associated with the master organization, if the current context is a master organization. The second value is organization level, which assigns the item only to the organization in the current context.
Default category: Applies any time a new item is created. The newly created item is assigned to this category within the catalog automatically. The automatic assigned is controlled by the functional area.
Catalog content: Controls what content can be added to the catalog and where the content can be added. This attribute has three values:
The Item at leaf levels allows items to be added only to the bottom level categories in the hierarchy.
The Items at all levels allows items to be assigned to any category in the hierarchy regardless of level.
Categories only allows categories to be added only to the catalog.
Allow multiple item category assignment: When this option is selected, you can assign an item to one or more categories in the catalog. The default is deselected, which means that each item can be assigned to only one category in the catalog.
Enable hierarchies for categories: When this option is selected, you can create a hierarchy for the catalog. The default is deselected, which means that the catalog cannot have a hierarchy and categories are associated with the catalog root.
Enable automatic assignment of categories: When this option is selected, the catalog is built by automatically associating all categories, based on matching the catalog structure value to the category structure value.
The date enablement function controls when the catalog is in an active state or inactive state by using the start date and end date attributes.
The category sharing function enables sharing by reference to categories from a designated source catalog.
The sharing function has these attributes:
Source catalog: A catalog that does not have sharing enabled from which categories, category hierarchies, and assigned items can be added to the catalog.
Sharing content: Controls what content can be added from the source catalog. This attribute has three values:
Categories only: Only categories without assigned items can be shared.
Items only: Only categories with assigned items can be shared.
Items and categories: All categories can be shared.
You can change a default category so that you can use it for item creation, or modify the inactive date so that the category is no longer used as you update a catalog. You can correct mistakes or reclassify the category due to shifting relationships within the category hierarchy.
You can view and edit a catalog on the Edit Catalog page when you have editing rights. For users that do not have rights to edit, the page is in read only mode.
The following aspects are important regarding managing and editing catalog details:
Catalog header region
Catalog detail tab
Category hierarchy tab
This region contains the catalog name and description, the selection of the default category and the start and end date for the catalog.
The Detail tab contains:
The configuration attributes for the catalog that controls the runtime behavior for the catalog.
The sharing attributes for the catalog which controls the source catalog that will be used for sharing from and what content can be shared.
The additional information which contains the descriptive flexfields defined for the catalog.
This contains the category hierarchy region in which the category hierarchy can be created and maintained. In addition, items can be assigned, and the usage of the category in other catalog can be viewed, and the attributes for the category and catalog category association can be edited.
The automatic assignment catalog feature enables you to reduce the cost of creating and maintaining a catalog. It is a simple way to create a nonhierarchical catalog because you do not have to add categories manually to the catalog.
All categories that have the same category structure value as the catalog are automatically assigned and associated to the catalog when you create a catalog category association for each category. Note that if you create a category in another catalog with the same structure value as the automatic assignment catalog, the category is added to your catalog. The categories displayed for auto assignment catalogs are refreshed only at startup and after you save.
The automatic assignment feature is enabled during catalog creation when you select the Enable automatic assignment of category check box. When you open a new catalog, any categories that have the same category structure value as the catalog structure value for the catalog are automatically assigned to the catalog.
For example, Purchasing may maintain a master catalog containing all categories that represent commodities. Each commodity team can create categories for their commodity in their own catalog.
The master catalog for Purchasing is named Purchasing and is configured during creation to support the automatic assignment of categories.
The Electronic commodity team creates a catalog named Electronics and proceeds to create categories that represent the classification of their commodity. The Electronic commodity team creates the categories televisions, computers, and home theaters.
The other commodity teams create and maintain separate catalogs.
Because you enabled automatic assignments for the Purchasing catalog, any categories created by the commodity teams are added to the catalog automatically. The Purchasing managers can view the collection of all commodities represented as categories in the Purchasing catalog.
You can assign items to categories on the Edit Catalog page, category hierarchy tab, on the category detail item tab. You can assign items only to active categories and categories where the Category Content field value is Items and Categories or Items Only. In addition, you can configure catalogs to control item assignment to categories within the catalog by selecting the Allow multiple item category assignment check box, which allows items to be added to all levels of the category hierarchy.
You select items from a choice list and add them to the category. The choice list is filtered based on a set of rules:
Item data level security: Displays only the items that the user has permission to view and assign.
Organization context: Based on the organization context that is controlled by a choice list in the item table header, only the items assigned to organizations are displayed.
You also control item assignment by selecting the value of the Controlled at check box. If you select the Master Level value and the organization context is a master organization, the items are automatically assigned to all child organizations that are associated with the master organization.
Other applications can use catalog data if you export the catalog content. For example, you may want to export catalog content to use as a monthly report of all items assigned to a specific catalog. You can use the default publish template provided in hyper text markup language (HTML). You can specify the content and layout of the catalog information. When the catalog is published, you select the format and initiate the creation of the content in the file.
The following aspects are important regarding catalog data to be published:
Publish a catalog
Type of catalog content that can be published
You initiate a search for a catalog from the Manage Catalogs page, select the row corresponding to the catalog that you want to publish and select the Publish action. The application generates the report based on the default template in HTML format, and the locale prior to creation of the file. You can select a new template or format from the report window. The content displayed for items, categories, catalog categories, and catalog is based on the publish template.
The default catalog publish template allows the publication of the catalog header details, category hierarchy, category details, and category item assignments. The order of a published report begins with the catalog header and the catalog category details. If the category has a child relationship then the catalog category association details for the child category follows. If the child category has a hierarchy, then the complete hierarchy under the category is published with the catalog category association details and categories details.
Categories can be shared across multiple catalogs allowing catalog content to be reused and saving the work needed to maintain multiple copies of the categories. In the case of category sharing, the category structure in the source catalog can be different than the native catalog.
Categories can be shared using two methods; the first method is directly associating the category to the catalog. The category is added to the catalog and can be edited in the catalog or any catalog the category is associated to. The items assigned to the category are not shared, but are assigned to the category in context with the catalog the category is associated. For example if the category name or description is changed in one catalog, the change will be reflected in all catalogs where the category is associated, but if items are assigned to a category, the assignment will be for that single catalog.
The second method of sharing categories is adding a category by reference into the catalog. During the creation of the catalog, sharing can be enabled by specifying a single source catalog that will be used for sharing by reference and setting the value of the sharing content to control what content will be shared from the source catalog. The advantage of using sharing by reference is source catalog content can be shared to multiple catalogs and maintained in a single place, the source catalog. In addition, the referenced content can be more than one category, for example a complete category hierarchy and any assigned items to categories in shared content can also be reference within the catalog.
Categories can be organized to represent classification taxonomies. The hierarchy organizations for categories have parent and child relationships that form a tree structure. The category hierarchy is created and maintained within the Edit Catalog page, category hierarchy tab. The category hierarchy is shown in true relationship to the way it is defined.
The category hierarchy can be created using two methods: the first is manually creating the hierarchy by adding referenced categories, duplicating categories or creating category for the catalog.
The second method for creating the hierarchy is by importing the category hierarchy through the spreadsheet interface. The category hierarchy can be exported from other catalog or other sources, edited and imported into a new catalog, additionally it can be added manually to the spreadsheet.
The category hierarchy can be edited using Move Category. The catalog category association cannot be deleted, but can be end dated to make the catalog category association inactive. The category hierarchy table provides a choice list filter that controls what catalog category associations and categories area displayed based on the date enablement. The category hierarchy can also be edited by exporting the complete hierarchy, editing it and importing the category hierarchy back into the catalog.
You can select and duplicate a category as a quick way to create a similar category configuration. Selecting the Duplicate icon action launches a Create Category dialog that has attribute fields populated based on the selected category attribute values. The category name is prefixed with Copy_ followed by the name of the selected category. You fill in the required field information in the key flexfield segment values which are blank. Once the category attributes are updated and the key flexfield segments values are entered, the OK button adds the newly created category into the category hierarchy of the selected category you have configured.
Categories are catalog components that are associated to a catalog for purpose of classification of items. You can add existing categories to the point of selection which can be a category in the hierarchy or the root of the catalog. If no category is selected, the default is the root of the catalog.
You can add categories by selecting the Add Category field and selecting the value Add Category. You can then search for existing categories based on the value of the catalog structure for the catalog. You can narrow the search for existing categories by using the Advance Search region in the dialog. You can add each selected category by selecting the Apply button and the add category region remains open. The OK button adds a category if a category is selected and then closes the dialog.
Adding a shared category is similar to adding an existing category except the category is selected from the catalog that has been designated as a source catalog. The sharing content attribute value determines what content is shared from the source catalog. A category within a source catalog that has been added to a native catalog is also known as a referenced category. You use the drop list menu from the Add Categories menu, and the Shared Category option will be disabled if the catalog has not been configured for category sharing.
You can attach an image from your desktop or from a configured repository to a catalog or a category, or both. The image is displayed in the catalog detail and the category detail section of the catalog page. Only one image can be associated with a catalog or category. To attach an image, select the green plus icon to launch the Manage Attachment dialog. The image attachment type can have values of File or Repository File/Folder and is selected in this dialog. The title you provide for the image attachment will appear under the image that is displayed in the catalog. The description you provide is not displayed. Browse will allow you to select the file to be used as the image for the catalog or category. After the information is entered in to the dialog, you click the OK button to load the image and the image attachment title will be displayed under the image. The image will not initially be displayed until the catalog is saved. The image can be replaced with another image by selecting the red X to delete the existing image and entering a new image.
When you are ready to create or edit an item class, you must decide whether to allow items to be created under the item class.
To create an item class, perform the following steps:
Create a list of all items.
Classify or categorize these items (Item classes).
Define any parent child relationships (Item Class Hierarchy).
Gather the unique types of specifications required for each type of classification at a high level (user-defined attribute groups).
Gather the unique specifications required within the group (user-defined attributes).
If there are specified values that must be used, define them (value sets and values).
Item classes can be used for classification purposes and in some case, item creation may not be allowed. By optionally setting the item creation allowed attribute to No, item creation under an item class can be prevented. However, a child item class of such a item class may be allowed for item creation. For example:

This will prevent items from being created in Computers and Desktop and allow items to be created for Green Desktops and Gaming Desktops. Optionally, specify a date on which the item class will become inactive. You cannot specify an inactive date that is later than the inactive date of an item class parent, nor can you specify an inactive date that has already passed. Also, all children of a parent item class with an inactive date should be made inactive at the same time or earlier.
Attachment categories enable you to categorize and classify attachments to an item. To classify item attachments, associate attachment categories with item catalog categories. Associated attachment categories are inherited down through the item class hierarchy.
Item classes can be set up for item numbers and descriptions so that they are automatically generated when net items are created. This ensures that new items created in item classes have a consistent numbering scheme. Versioning control allows new versions to be created for all items of item class. An integrated workflow definition allows creation of custom new item request definition for new items created. This definition workflow enables you to route the definition and approval of an item using various steps. When creating a new item, various aspects of an item like base operational attributes, user-defined attributes, structures, attachments, categories associated, organization assignments, are defined by various people in the organization using a workflow process.
You can control item creation, viewing and update access by assigning a role on the item class to a principal or group of users. Security allows a person or a group to have privileges on an item of item class in each organization. This is inherited and hence a person who has a privilege in a parent item class will automatically have the same privilege in the child item classes.
Attributes that exist for each instance of an item and the values for the attributes can be different for different instances of an item.
For example:
The number of megabytes (MB) or gigabytes (GB) of e-mail storage on a digital subscriber line (DSL) account.
The monogram text on a shirt pocket.
The color of a music player.
These attributes are defined at the item class and their attribute value is captured at the time of a transaction by downstream applications. The metadata values of these attributes are maintained at the item class. Order orchestration and order capture are two examples of applications currently using transactional item attributes. All transactional attributes must be associated with a value set.
The following metadata values can be defined for an attribute.
Required: Indicates whether the attribute value is required at the transaction.
Default Value: Indicates the default value of the attribute.
Value Set: Indicates the value set associated with the attribute.
Read Only: Indicates whether the attribute value is read only.
Hidden: Indicates whether the attribute is not shown.
Active: Indicates whether the attribute is active or inactive.
Transactional attributes are inherited across the item class hierarchy. The metadata is data-effective. Changes in the metadata will be reflected immediately at the item level. For example:
Any of the metadata of a TIA belonging to a specific domain, if modified in the child item class would break the inheritance. Any changes done at the parent item class for this TIA would not get inherited. Multiple records with same date range can exist if they belong to different domains. For example, TIA Memory is associated with Domain DOO and Order Capture. Each of the domains may use a different set of metadata for its own purpose. Hence, for the same date range, two different records can exist. Only Start Dates for a TIA would be entered by a user. End date would be calculated automatically based on the next Date Effective record.
Users can modify (either Start Date and metadata) of a future effective record. Records with Starting date as Past cannot be modify or edited.
Only start dates can be set to permit updating by a user, and the end date of a record will automatically be pulled from the next record.
Any changes performed in the parent item class would be inherited by the child item class. If the corresponding record is modified in the child, then these changes will not be inherited.
Item pages provide a mechanism with which to customize the user interface.
Pages and attribute groups enable you to structure your data.
Benefits include:
You can combine and sequence attribute groups into pages.
There is no limit on the number of attribute groups associated with a page
Pages can be created at item class and are inherited down the item class hierarchy.
Attribute groups can be added to pages sequentially and based on this sequence, these attribute groups are shown in items
Attributes groups can be added for an inherited page at the child item class.
Functional Item pages are another type of special pages which are used to associate pages already created for use in the application. Application scope indicates the application which uses these pages and the usage indicates the specific use of the configured pages.
You can associate attributes for the purpose of standardization and matching, to be performed when items are created. You restrict the attributes to be processed for standardization or matching or both. Selecting Standardization allows the data quality engine to return the standardized values for these attributes. Matching allows the data quality engine to return any existing items which matches the value of these attributes and are potential duplicates.
Sequential lifecycles phases enable you to track and control the lifecycle phases of items. Each phase represents a set of tasks and deliverables that are required before promoting the item to the next phase. You can associate lifecycle phases to an item class which are created elsewhere. Lifecycle phases are inherited down the item class hierarchy and new lifecycle phases can be added to child item classes. For example, the lifecycle phases for a computer component item class might be: Concept, Prototype, Production, and Retirement.
Template is a defined set of attribute values used during item creation. When you apply a template to an item, you overlay or default-in the set of attribute values to the item definition. For example, every time users in a particular organization create new items, the attributes, as defined and approved by the organization appear in the appropriate fields. No user guesswork is required, and time is saved during the creation of items with a similar form, fit and function. Templates are created for each item class. Templates are specific to organization. Templates are inherited down the item class hierarchy. You can define both operational attributes and user defined attributes for each template.
Search formats provide a convenient way to save frequently used search criteria. Search formats created at item class will be available to all users. Search formats are always created in the context of item class. Display formats enable you to predefine search display views. You can use these views to look at different sets of item attributes that are returned by the search. Display formats created at item class will be available to all users. Display formats are always created in the context of item class.
An import format identifies the base and user-defined attributes in an item class that are imported into the application using a spreadsheet. Consequently, when you import item business entities from a spreadsheet, the items are all imported into the particular item class defined in the import format. These imported item business entities inherit all the attribute groups defined for the specific item class. You cannot edit the layout of an import format once it is created.
To create an item class, select a parent item class on the Item Class Search Results page and select Create. Provide the required information, and optionally include additional details, such as attribute groups, pages, templates, and search and display formats.
Create a template for item class and then define the Overview and Specification tabs of the item class template.
The item class hierarchy provides a logical classification and grouping of similar products, and also acts as a template for product definition by enabling the association and inheritance of data elements and policies that are shared by products.
The item class hierarchy provides a logical classification and grouping of similar products, and also acts as a template for product definition by enabling the association and inheritance of data elements and policies that are shared by products.
The following components are required for creating change orders:
Change priorities are used to identify the criticality of a change while change reasons are used to categorize and establish the cause or reason for a change.
Processes and rules can be defined around change priorities and change reasons so that change orders with a high priority or with safety related reasons get priority over other change orders or they get routed through different levels of approvals.
Predefined values for change priorities and change reasons:
Priorities: High, Medium, and Low
Reasons: Cost, Quality, and Safety
Additional values for change priorities and change reasons can be added by accessing the task's Manage Change Reasons and Manage Change Priorities in Functional Setup Manager.
Status indicates a stage in a change order's lifecycle. You can create new statuses within predefined status types.
Predefined values for status type:
Open, Interim Approval, Approval, Scheduled and Completed
New statuses can be added and managed by accessing the Manage Change Statuses task in Functional Setup Manager.
Each change order is created within a change order type.
Change order types contain the following information:
Number generation method
Workflow
Propagation rules
Change statuses enable you to manage a change order through its life cycle. You can define statuses to indicate various states of a change.
Changes are managed through their statuses. Each status is associated with a set of predefined Business Process Execution Language (BPEL) processes. For example, the process for Open status is set to send request comment notifications to users while the Interim Approval and Approval statuses are tied to Approval Management extensions (AMX) and triggers approval rules.
Status types are predefined statuses that determine the behavior of change order when it is in that status. for example, when a change order is in Open status, then change can be authored. A status type is used to categorize statuses.
Predefined statuses:
Open: The change order can be updated. Item changes are typically authored while a change order is in this status.
Note
A predefined request comment notification is associated with the Open status. The change order cannot move to the next status until this notification has a response. The notification is then sent automatically to the assignee and the requestor.
This automatic notification can be bypassed by removing the assignees. If the notification is bypassed and the BPEL process is set to automatically promote then the change order automatically moves to the next status. Otherwise, you need to manually move the change order to the next status.
Refer to Notifications for list of status types and their default notifications.
Interim Approval: An intermediate approval on the item changes before the final approval. This status can be configured along with Open status to allow users to author item changes progressively.
There is an approval workflow associated with this status type which is based on AMX rules as shown in Status Types Sequence below.
Approval: This status is used to track approvals. A change order cannot be updated while in this status. Once approval is granted, AMX rules automatically promote the change order to Scheduled status.
Scheduled: The changes are ready to be pushed into production on the effective date given on a change order line. The change order cannot be updated in this status.
Completed: All change lines are completed. A change cannot be reopened or canceled once in this status. All change order types are configured to end in the Completed status by default.
You can explicitly promote or demote a change order to its different statuses. Change orders may also be promoted or demoted to the next status automatically after the completion of the workflow in a specific status.
The following table shows which of the status types require user configuration to enable automatic promotion, which status types have automatic promotion enabled by default, and which status types can be set for automatic demotion
|
Status Type |
User configuration required during Setup for automatic promotion |
Default automatic promotion |
Change order can be set for automatic demotion |
|---|---|---|---|
|
Open |
Yes |
No |
No |
|
Interim Approval |
Yes |
No |
Yes |
|
Approval |
No |
Yes |
Yes |
|
Scheduled |
No |
Yes |
No |
|
Completed |
No |
No |
No |
The following list shows a typical status sequence on a change order type:
Draft
Open 1
Interim Approval 1
Open 2
Interim Approval 2
Approval
Scheduled
Completed
This status sequence would drive the lifecycle of a change order as follows:
In the initial open status (Open 1), item changes to certain attributes can be authored which are then routed through an interim approval (Interim Approval 1).
Once interim approval for those changes is granted, changes to additional attributes which might be tied to the attributes changed in the initial open status (Open 1) can now be authored in the subsequent open status (Open 2) which are then routed through a second interim approval (Interim Approval 2).
All these changes then get routed for final approval during the Approval status. After approval the change order gets scheduled and is completed once the changes are pushed into production on the effective date specified at the change order line.
The predefined statuses are organized within status types and can also be used as change statuses.
You can also create new change statuses specific to your business processes on the Access the Manage Change Statuses page in Functional Setup Manager.
When you create a change status, select a status type and optionally, the date when the status will be disabled.
Note
You cannot add a status to a change order type once it is disabled.
Change order types are the basis of new change orders. A change order type includes information on how a change order is generated, processed, and propagated
When you define or edit a change order type, you specify information for the following:
Specify a method for generating numbers for change orders that use this change order type.
Each change order type contains lifecycle processes based on predefined and user-defined statuses. You can associate different statuses to the change order type and sequence them to define a workflow.
Specify the organizations from which a change order might be propagated. For each specified source organization, select one or more target organizations or organization hierarchies where the change order can be propagated.
Change order propagation rules determine how changes are propagated from one organization to one or more different organizations.
This allows you to implement changes in multiple organizations by propagating change orders to organizations (eliminating the need create change orders in each selected organization) while still having the flexibility to adapt implementation schedules based on individual organizations. Organization hierarchies can also be used to propagate changes to multiple organizations.
Propagation rules are associated with the change order type that you select for the new change order. You define propagation rules when you create a change order type or edit an existing one on the Propagation Rules tab.
Specify the organizations from which a change order might be propagated. For each specified source organization, select one or more target organizations or organization hierarchies where the change order can be propagated.
Each change order type can be configured to support propagation from different organizations and propagation to different organizations or organization hierarchies.
Change order statuses are used to determine when a change order gets propagated to different organizations.
For each organization or organization hierarchy that you add to the propagation rule:
Select a change order status for propagation.
Choose auto-propagate and the propagation rule will execute automatically when the change order enters the specified status.
Select the status of the propagated change in the organizations selected for propagation. This is the status the propagated change is set to in the selected organizations.
Set one of the specified organizations or organization hierarchies as default for the propagating organization.
There are three number generation methods.
The three number generation methods are:
Sequence Generated
User-Defined
Rules
If the new item request numbering method is sequence generated, then all item number requests will be automatically generated based on the sequence generation rules specified. You can specify a prefix, starting number, increment, and suffix. Enter a starting number and an increment value to determine the sequencing
You enter the new item request number at the time of creation.
New item request number is generated based on the rule set associated with it.
Rules can require approval through a change order when certain changes are made to an item.
Approval required rules are triggered when you make these changes to an item and will add the changes to a new or existing change order.
Approval required rules are supported for the following areas
Items
Item revisions
Item supplier
Changes to item attributes and structures fall under item and item revisions
Changes to item revision attributes and item supplier associations fall under item supplier
If an approval required rule is triggered on any item changes that fall into one of the three areas listed above, then all changes authored for that item that fall under that area will be added to a change order.
For example, a rule is defined that requires approval if a primary structure is created for any item.
During a single session directly editing an item, a user changes the value of an item level attribute and then creates a primary structure for that item.
On saving the data, the approval required rule will be triggered because of the new primary structure and the user is prompted to either create a new change order or add to an existing one.
When the new change order is created or an existing change order is updated, then the change to the value of the item attribute will also get added to the change order along with the primary structure change for required approval.
The approvals can be from individual users or from multiple users in a predefined user group. Because individual rules can be made for specific item revisions, attributes, or structures one rule can require approvals from one user group when an attribute is changed, while changes made to a different attribute will require approvals from a different user group.
For example, the new primary structure rule described above requires approvals from members of the TestApprovalGroup user group.
Another rule is defined that requires approval if the scheduled date when changes will be implemented for an item is later than the date 01/01/2012, then approvals are required from the COApprovalSAG approval group
This means that if the user n creates a primary structure for that item, and specifies a scheduled date for the item that is later than 01/01/2012, approval responses are required from both the COApprovalSAG and TestApprovalGroup approval groups.
Change order approval rules are defined and managed through BPM Worklist. For information on how approval rules are defined and managed, refer to the Oracle Fusion Middleware Developer's Guide for Oracle SOA Suite
Rules are used to define integrity constraints on the attributes of items and structures. Integrity constraints can be defined on operational as well as on user-defined attributes. Integrity constraints are often business rules, created using the rules framework. Rules encapsulate a single integrity constraint. For example, Min Speed < Max Speed.
Rule sets gather multiple rules together and are associated with an association type. For example, attribute groups, item classes, change types or structure types, They also list valid business entities. For example, item, item supplier, and item revision. This enables the expressions entered to be validated by checking for allowable attributes.
If the rule set is assigned to an attribute group, then only the attributes in that group can be used in the expressions.
If the rule set is assigned to an item class, then only the attribute groups valid for that item class will be used.
New Item Request and Change Order Type associations are used to generate New Item Request and Change Order numbers.
Rules are applied to each business entity separately.
Rules cannot cross business entity boundaries. They also ensure that item attributes will not be checked against an item supplier attribute. Attributes across association types cannot coexist in a rule. For example, item attributes and item supplier attributes cannot be used in the same rule expression. Also, if an attribute group is a multiple-row group (for example, an attribute group in which an attribute can have several data rows associated with it), then that attribute group will not use attributes from other attribute groups in its expressions.
There are three types of rule sets and rules:
Validation
Assignment
Composite
Validation rule sets are those rule sets that you use to validate a condition based on attribute values defined for the item. They are typically used to model predefined business rules on an item.
The rules that make up the integrity validations and assignments follow a simple, spreadsheet like syntax. Each attribute is referenced by its attribute group name followed by the attribute name. For example, Physical_Attributes.NetWeight. In this example, Physical_Attributes is the internal name of the attribute group, and NetWeight is the internal name of the attribute.
Assignment rule sets are used to determine the value of an item attribute based on the specified condition. As a general rule, rule sets for assignments should be executed before validations, since it permits you to write validation conditions ensuring that the result of the assignments are valid.
You create an empty rule set with the appropriate context. All the attribute groups in the selected item class are available for authoring rules.
On the Edit Rule Set page, create a rule. For example, Lead Percent is Total Lead Mass divided by Unit Weight.
After you create a rule, validate and save it. This enters the first assignment rule into the rule set. Then, if necessary, enter subsequent rules. Note that rules are executed in the sequence they are listed in the rule set. Therefore, if an attribute's expression depends on a previously calculated value, you must ensure that the previous value appears ahead of the attribute and is therefore computed first.
Composite rules can contain both validation and assignment rule sets. They can be used to aggregate rule sets that operate on different attribute groups and item classes.
You create a composite rule set on the Manage Rule Sets page. To define a composite rule set of mixed type, ensure it contains both validation and assignment rule sets. Set the type to Mixed, enabling the creation of a rule set that contains both assignment and validation rule sets. Then add assignment and validation rule sets to the composite rule set.
Rules are not active until you assign them to an appropriate business entity. You do this on Manage Rule Set Assignments page.
Finally, you test the validations by going to the Item Update screens and editing the appropriate attribute groups. Updated values are validated against the rules, and error messages appear on the screen.
Item rules are used to define the integrity constraints of attributes of items and structures. Integrity constraints are defined on operational as well as user-defined attributes. Integrity constraints are often business rules, created using the rules framework. For example, Min Speed < Max Speed or Lead Time < 4 Days.
Item rules can also be used to derive values of certain attributes based on the state of the item.
A group of Product Information Management rules for items and related objects.
Review your notifications, go to the Manage New Item Requests tab and select the row containing your new item request. From the Actions menu, select Promote. In the Promote dialog box, you can select from the available phases to promote the new item request. You also must enter a comment when promoting to the next phase.
There are three number generation methods available. Sequence Generated, User-Defined, and Rules.
Return type can be generic, in which case you specify the target attribute group and target attribute to which the value will be assigned. Otherwise, return type is an item description and item numbers.
Rules are not active until they are assigned to an appropriate business entity. You use the Setup Rule Set Assignments link to assign a rule set to either an item, item revision, or item supplier business entity.
Return type can be generic, in which case you can specify the target attribute group and target attribute for the value to be assigned to. Otherwise return type can be item description and item number to generate assignment rules.
Rule sequence dictates the order in which rules are executed. They are typically entered in 10s, but can be 1, 2, 3 or 100, 200, 300.
Rule-builder expressions enable you to specify the body of a rule. For example, an If Expression or a Validation Condition. Note that right-click functionality is enabled to assist in selecting attributes that participate in the rule expression.
Severity can be warning, reject, or needs approval
In the case of warning, a message is displayed to the user but they are allowed to continue.
In the case of reject, a message is displayed and the user must fix the issue before proceeding.
In the case of needs approval, changes made by the user must be approved through a change order.
A validation condition is evaluated when the result of an "If Expression" is "True." Only when the validation condition evaluates to "False" will a message be displayed. For example, if you created a rule where the width of an item is greater than its length and the validation condition is false, if a user tried to define an item where the width of the item is greater, a message will display saying the length must be greater than the width.
Assignment rule sets are used to determine the value of an item attribute based on a specified condition.
Validation rule sets specify the rules to determine the validity of an item.
Assignment rule sets are used to determine the value of an item attribute based on a specified condition.
Validation rule sets specify the rules to determine the validity of an item.
Both assignment and validation type rule sets can be added to a composite rule set thus creating a hierarchy.
The user message is displayed when the validation condition evaluates to FALSE. They can be displayed by the module consuming the rules framework and also, be displayed as a dialog box.
There are three number generation methods.
The three number generation methods are:
Sequence Generated
User-Defined
Rules
If the new item request numbering method is sequence generated, then all item number requests will be automatically generated based on the sequence generation rules specified. You can specify a prefix, starting number, increment, and suffix. Enter a starting number and an increment value to determine the sequencing
You enter the new item request number at the time of creation.
New item request number is generated based on the rule set associated with it.
During the definition phase, definition notifications are routed to participants for them to complete the item's definition tasks.
From the Manage New Item Requests page, search for the New Item Request.
Launch the new item request from the Search Results table by clicking on a new item request link. That will take you to the New Item Request page.
Click on the Details sub tab and select the definition row. In the definition Workflow Details table, select Expand All from the Actions menu.
Click the Go to Task icon for the entity that needs definition. The item page appears where you enter the item information. The item definition page is rendered dynamically for each participant, where you can only enter the attributes or item entities for which you are responsible for.
There are four predefined New Item Request (NIR) workflow statuses which enable you to perform various tasks when a new item request is created. You cannot create new statuses or delete statuses.
The four statuses are:
Open
Definition
Approval
Completed
New item request attributes and items are defined and updated when the workflow status is open. A seeded request comment notification is associated with this status and the new item request cannot move to the next status until this notification has been responded to. The notification will be sent to the assignee and the requester of the new item request. However, to bypass the notification, assignees can be removed through customization by a programer. Assignees would then need to promote the new item request to the next status manually or set it to automatically promote to the next status in the Business Process Execution Language (BPEL) process.
In the definition workflow status, you define the item information, such as specifications, structures, and packs. Additional items cannot be added in this workflow status. The definition workflow steps are defined at the item class level. Based on the definition steps, a notification is sent to those responsible for defining the item. Once the item is defined, you then promote the new item request to approval status manually or to be automatically approved in the BPEL process.
When approval is granted, the new item request cannot be modified. Approval notifications are sent to the approvers based on the rules set up in Approval Management Extensions (AMX). Once the new item request is approved, the status is automatically changed to completed.
During the completed phase, the NIR is in its final stage and its lifecycle is completed. It cannot be modified.
During the approval phase of a new item request, approval notifications are routed to the participants.
The approvals can be from individual users or from multiple users in a predefined user group. From the notification, you can approve or reject the new item request.
New item approval rules are defined and managed through the Approval Management Engine. For information on how approval rules are defined and managed, refer to the Oracle Fusion Middleware Developer's Guide for Oracle SOA Suite.
There are three number generation methods available. Sequence Generated, User-Defined, and Rules.
Manage source system attributes for the import and data quality options of the data being consolidated and imported into Oracle Product Information Management Data Hub.
The set up of a source system is accomplished by Oracle Trading Community Model.
The task of managing source systems involves the editing of the additional attributes that you associate with a source system. These attributes control data quality and import options.
Data quality and import options defined for a source system are defaulted for a batch, thus eliminating the need to redefine them when you are creating batches.
Import objects are business entities that can be imported into the trading community model registry, for example, competitors, partners or resource teams. When you create a data import batch you should choose which business entity, or object, you are importing from the batch into the trading community model registry. For example, if you are responsible for resource management, you might want to import objects such as employee resource and resource team.
The import process flow will change according to which object you have selected. There are two import process flows for the following sets of objects:
Customer, reference, competitor, and custom party.
Employee resource, resource team, partner, and partner contact.
When you select these objects you will receive the option to check for duplicates within the import batch before the import, and the option to check for duplicates between the import batch and the trading community model registry before import. You will also be able to choose to preview data before it is imported, specify if addresses will be cleansed before import, and set the how many errors you will allow before the import is terminated.
If you choose to import these objects you will not be able to deduplicate the batch or registry data. However, you will be able to choose to preview data before it is imported, specify if addresses will be cleansed before import, and set the how many errors you will allow before the import is terminated.
You can use the import process to import a batch from the interface tables into the Trading Community Model registry. Before the data is imported into the registry you need to decide if you want to use the data quality services and if so, how you want to configure the data quality services. The data quality services are:
Batch deduplication
Registry deduplication
Import to registry options
Within the batch deduplication page you can decide if you want to identify and resolve duplicates within the batch that you are importing from the interface tables. If you want to check for duplicates you need to choose what match configuration rule you want to use to identify duplicates for each entity. Then you need to specify what action will be taken on the persons, organizations, and address duplicates found within the batch. Your specified actions will be performed on the batch before the data is imported into the registry.
Similar to batch deduplication, registry deduplication identifies duplicates between the data in the batch and the data in the registry before the data is imported into the registry. If you want to check for duplicates you need to choose what match configuration rule you want to use to identify duplicates for each entity. Then you need to specify what action will be taken on the persons, organizations, and address duplicates found in the registry deduplication check. Your specified actions will be performed when you import the batch into the registry.
When defining an import process you can decide whether to run the import process in preview mode, or you can choose to load the data directly into the registry without previewing the data. You can also choose to cleanse addresses prior to import, and you can define an error limit for the batch.
You can choose to run the import batch in preview mode, or you can skip the preview and load the data directly into the registry.
If you select to run the batch in preview mode you will be able to review information about the level of duplicates or incorrect addresses in the batch data before the data is actually imported. You will also be able to preview how many records will be created and how many records will be updated for each entity. You can then continue to import the batch, or you can amend the match configuration rules and actions to be taken on the identified duplicates and then rerun the batch to review the data again.
If you do not want to review the batch data before it is imported into the registry, then you can choose to skip the preview and allow the data to be loaded into the registry as soon as preprocessing is complete. You may prefer not to preview the batch data if the data source is frequently used.
Note
The Define Import: Import to Registry page is the only place that you can specify if you want to run the batch in preview mode. Once the option to skip the preview mode is selected, and you submit the batch for processing, you will not be able to review the batch data before it is imported.
You can choose to validate the addresses in the interface tables before importing them into the registry. The addresses are validated using an integrated third party service that verifies addresses and corrects them if they are incorrect.
You can define how many process errors can be generated by the import batch process before the process terminates automatically. Error reports are generated by the application for you to review.
This example demonstrates how to perform What-If analysis on a data import batch that has been processed and has completed with a status of pre-import completed. The match configuration is redefined and the import process is resubmitted. The batch deduplication actions are then amended, and the batch import is completed.
The following table summarizes key decisions for this scenario.
|
Decisions to Consider |
In This Example |
|---|---|
|
Do you want to redefine batch deduplication match configuration? |
Yes, a different match configuration is selected for the organizations entity. |
|
Do you want to redefine registry deduplication match configuration? |
Yes, a different match configuration is selected for the persons entity. |
|
What actions do you want to take on Persons, Organizations, and Addresses duplicates? |
|
The results of the batch and registry deduplication are not as expected and so the match configurations need to be redefined.
You want to view the What-If analysis for the new match configurations that you selected for the batch.
This example demonstrates how to create an import batch, and how to define the import process data quality services you want to use on the data prior to completing the import.
Note
Once an import is completed, the data is loaded into the Trading Community Model registry.
Create an import batch containing customer and consumer objects, load the import data into the interface tables, and configure the data import process so that you can view the batch in preview mode to check that all duplicate data are removed.
|
Field |
Value |
|---|---|
|
Batch Name |
Customer Import Batch |
|
Source System |
Comma separated values |
|
Object |
Customer and Consumer |
|
Estimated Number of Records |
300 |
|
Batch Description |
Import of customer data |
You want to check the batch for address, organization, and person duplicates; you also want to remove all of these duplicates from the batch.
|
Field |
Value |
|---|---|
|
Addresses |
Batch Location Basic Duplicate Identification |
|
Organizations |
Batch Organization Basic Duplicate Identification |
|
Persons |
Batch Person Basic Duplicate Identification |
|
Field |
Value |
|---|---|
|
Select Action for Persons and Organizations |
Remove all duplicates |
|
Select Action for Addresses |
Remove all duplicates |
You want to check for address, organization, and person duplicates between the import batch and the Trading Community Model registry; you also do not want to import duplicate records.
|
Field |
Value |
|---|---|
|
Addresses |
Batch Location Basic Duplicate Identification |
|
Organizations |
Batch Organization Basic Duplicate Identification |
|
Persons |
Batch Person Basic Duplicate Identification |
|
Field |
Value |
|---|---|
|
Select Action for Persons and Organizations |
Do not import duplicate records |
|
Select Action for Addresses |
Do not import duplicate records |
You want to configure the data import process so that you can view the batch in preview mode, enabling you to review the data after preprocessing. You also want to cleanse addresses before they are imported, and specify an error limit for the batch.
Yes. If the data is still available in the interface tables and the batch status is Preimport Completed, Completed with Errors, Error, or Terminated when Error Limit Reached, then you can redefine the data import process and reimport the batch. However, once a batch has been successfully imported then you will not able to reimport the batch, even if the data is present in the interface tables.
You can view any errors that occurred after submitting the batch for import by selecting the batch in the data import batches Overview page, and then click Report.
You permanently remove all records in the batch from the import interface tables. You should purge batches after the batch has been imported successfully and you are sure that the data in the interface tables is no longer required.
Purging the interface tables improves import performance. To archive imported data, you should copy the data to a set of custom tables.
Data import batches cannot be purged when they have a status of Processing. Purging a batch purges the batch data in the interface tables and so cannot be carried out while the batch is importing the data from the interface tables into the registry.
The Oracle Fusion Trading Community Data Quality service may be unavailable, or you may not have the necessary licenses for the Data Quality service.
Yes. You can reimport a batch to correct validation errors if the import process status is either Preimport Completed, Completed With Errors, Error, or Terminated When Error Limit Reached.
The import process details are only available when you have selected to run the batch in preview mode, and you have submitted the batch for import.
When creating item relationships between items and customers, the customer's information must be imported into the system prior to creating a relationship. The Define Customers for Product Management task list contains tasks that support importing customers into the system. The data import batch process for customers is managed using in the Import Person and Organization task.
You use Catalog Category mapping to map categories of different catalogs to the reporting categories in other catalogs. This feature allows one or more categories within a catalog to be mapped to category in a second catalog. For example, suppose that you want to roll up the costs associated with allow items assigned to a set of categories in catalog. Catalog mapping allows you to select a category in a catalog, and map all the categories in the set to that category. When you use this feature you are required to write code to do the roll up as identified in the example.
The quality of product data is enhanced by the ability to check data quality while creating, editing, or importing items. This ability is provided by the integration of Oracle Fusion Product Hub with Oracle Product Data Quality. Oracle Product Data Quality provides classification, standardization, and matching of items, which are services that refine item data and prevent duplicate items.
In order to provide the ability to check data quality, you must initially define and later maintain a data lens in Oracle Product Data Quality, using metadata extracted from item classes and catalogs. A data lens uses semantic technology and contextual knowledge to clarify and cleanse product data as it enters a data repository.
Classification, standardization, and matching are the features that perform data quality checking.
In Oracle Product Data Quality, after you have initially set up the semantic model, you define rules for the following:
Classification: rules that classify data items as belonging to the appropriate item class based on the values of certain attributes. Classification also includes suggested assignments of items to one or more catalogs and to categories within those catalogs.
Standardization: rules that make the values of specified item attributes consistent with desired norms.
Matching: rules for detecting when an item that is being created or imported matches an item that already exists in the Oracle Fusion Product Hub repository.
Before end users can check data quality in Oracle Fusion Product Hub, you must initially set up the semantic model in Oracle Product Data Quality. The semantic model is a fully configured data lens, which contains detailed contextual information about your data, and which contains your definitions for classification, standardization, and matching.
The foundation for the classification service is the hierarchy of your item classes and item catalogs. Consequently, you must set up the hierarchies for item classes and item catalogs, in Oracle Fusion Product Hub, before you extract metadata for building the semantic model.
Data quality depends primarily on the values of attributes. While defining an item class, select the attributes to be used when checking data quality, in the order that you want them to be applied for data quality checking. All selected attributes are used for classification and standardization. You can also select attributes to be used for matching duplicate items. In Oracle Product Data Quality, you later define the detailed rules for the relationships between these data quality attributes.
When the item hierarchies are in place, select the relevant catalogs and item classes on the Manage Catalogs or Manage Item Classes page, then select Actions - Extract Data Quality Metadata. This action schedules the Data Quality Metadata Extract process, which extracts metadata from the item class and catalog tables of Oracle Fusion Product Hub into an external file. The extract process includes the child hierarchy of the catalog or item class, and all of its attribute information. You can examine the results of the process on the Manage Scheduled Processes page, where you can also directly schedule the Data Quality Metadata Extract process.
In Oracle Product Data Quality, the AutoBuild feature uses extracted metadata for item classes and catalogs to construct the semantic model required for data quality checking.
You can also provide the AutoBuild feature with sample item data by exporting the results of an item search into an external spreadsheet, then transferring that spreadsheet data into Oracle Product Data Quality. To export the data, perform a search on the Manage Items page, then in the Search Results section, select Actions - Export to Excel.
For more information on transferring the extracted metadata, setting up the semantic model, and using AutoBuild, see the documentation for Oracle Product Data Quality, especially the following:
Oracle Product Data Quality PIM Connector User's Guide
Oracle Product Data Quality AutoBuild Reference Guide
As your data store evolves, you can continue to adjust the semantic model, modifying the rules, and extracting item class and catalog metadata.
The following profile options must be set when working with Oracle Product Data Quality.
|
Display Name |
Internal Name |
Description |
|---|---|---|
|
Oracle Product Data Quality DSA name |
EGI_DSA_NAME |
The name of the Oracle Product Data Quality DSA (Data Service Application) that is used to perform data quality checks on items. The default value is PRODUCT_HUB_DSA, which can be changed as needed. |
|
Concurrent Requests for DSA |
EGI_DSA_SERVER_THRESHOLD |
The number of requests that the Oracle Product Data Quality DSA can support at a given time. This value is dependent on the server capacity on the user side. |
|
Copyright © 2011, Oracle and/or its affiliates. All rights reserved. Legal Notices |
|