11g Release 1 (11.1.3)
Part Number E22380-04
Contents
Previous
Next
|
Oracle® Fusion
Applications Post-Installation Guide 11g Release 1 (11.1.3) Part Number E22380-04 |
Contents |
Previous |
Next |
This chapter contains the following:
Setting Up Financial Reporting Center
Setting Up Oracle Document Capture and Oracle Forms Recognition
Setting Up Financial Transactions
The Oracle Fusion Financial Reporting Center provides entry to General Ledger balances financial reporting functions. It provides secure, self-service access to reports that use real time account information.
You can design traditional financial report formats such as balance sheets, profit and loss statements, and cash flow reports. You can also design nontraditional formats for financial or analytic data that include text and graphics.
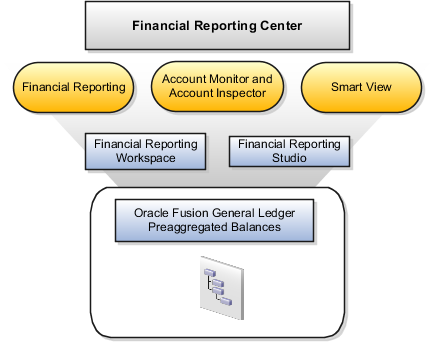
Financial Reporting Center is comprised of numerous components:
Financial Reporting: Financial users and analysts access live reports and books or published snapshot reports and books from previously scheduled batches in a variety of formats. Other functionality includes:
Refreshing report data using runtime points of view or parameters
Drill through capability from parents to other parents
Drill down to detail balances, journal lines, and subledger transactions.
Smart View: Financial analysts view, import, manipulate, distribute, and share data from your Oracle Fusion General Ledger balances in Microsoft Excel.
Account Monitor and Account Inspector: Financial analysts monitor and track key account balances in real time at every level of your dimensions and hierarchies. These tools provide multidimensional account analysis and drill down capability.
Financial Reporting Workspace: Reporting administrators create, open, save, and delete folders and store report objects, reports, and snapshot reports.
Financial Reporting Studio: Report authors use an object-oriented graphical report layout with report objects, such as text boxes, grids, images, and charts, to design reports.
Oracle Fusion Financial Reporting Center is a powerful tool for accessing, designing, and presenting financial reports and analytic data. The steps needed to configure and install the components in Financial Reporting Center consist of:
Configuring Financial Reporting Center
Configuring Workspace Database Connection
Installing Financial Reporting Studio
Installing Smart View
Users access reports through the folder structure in Workspace. Administrators should define the folder structure in Workspace considering security requirements for both folder and reports, as well as report distribution requirements for financial reporting batches. Security should be set up on folders and reports from Workspace so users can only view the folders and the reports that they can access.
For more information on configuring the Financial Reporting Client including user name, password, server, and report structure, see the following:
Oracle Hyperion Enterprise Performance Management System Installation Start Here for Oracle Hyperion Enterprise Performance Management. See especially the following topics:
Installing EPM System Products
Financial Reporting Ports
Oracle Hyperion Enterprise Performance Management System Installation and Configuration Guide for Hyperion Enterprise Performance Management. See especially the following topics:
Configuring EPM System Products
Performing Post Configuration Tasks
Oracle Hyperion Financial Reporting, Fusion Edition Administrator's Guide for Oracle Hyperion Financial Reporting
Administrators need to create database connections from Workspace so users can access the cubes from either Workspace or Financial Reporting Studio.
Note
Ledger setup has to be completed before the database connection can be created. Cubes are created as part of ledger setup. There is a separate cube for each combination of chart of accounts and accounting calendar. A database connection is needed for each cube.
Steps to define a database connection are:
Start at the Navigator by selecting Financial Reporting Center > Launch Workspace
From within Workspace > Navigator > BI Catalog > (main tab), select Tools > Database Connection Manager
Select New button
Enter a user friendly name for the connection
Enter the Essbase server, user and password, and select Application (i.e. cube) and database
For more information on configuring Essbase database connections in Workspace see: Oracle Essbase Database Administrator's Guide for Oracle Essbase
Note
The database connection is available in both Workspace and Financial Reporting Studio. Optionally, it can be setup in Financial Reporting Studio when putting grids on a report. This should only be done by an administrator.
Financial Reporting Studio is client-based software. Report authors need to download the installation files in Workspace from Navigator -> Tools -> Download Desktop Integrator Installer to install Financial Reporting Studio.
After completing the installation, obtain financial reporting server information from your system administrator to connect from the local client to the Oracle Fusion instance.
For more information on configuring Financial Reporting Studio client for users, see the following:
Oracle Hyperion Enterprise Performance Management System Installation and Configuration Guide for Oracle Hyperion Enterprise Performance Management. See especially the following topics:
Installing Financial Reporting Studio and Financial Reporting Print Server
Configuring the Financial Reporting Print Server
Administrative Information for Financial Reporting
Smart View is an Excel add-in that must be loaded to each client. Users need to download the installation files in Workspace from Navigator -> Tools -> Download Desktop Integrator Installer and select to install Smart View.
Note
Since Smart View is an add-in to Microsoft Office products, you can install Smart View only on Windows operating system.
Once Smart View is installed, it must be configured to connect to Oracle Fusion Applications. Obtain the Smart View Shared Connections URL information from your system administrator and enter it in Microsoft Excel using the following navigation path: Smart View -> Options -> Advanced -> Shared Connections URL..
For more information on configuring Smart View client for users, see the following:
Oracle Hyperion Enterprise Performance Management System Installation and Configuration Guide, for Oracle Hyperion Enterprise Performance Management, especially the Installing Smart View topic
Oracle Hyperion Smart View for Office, Fusion Edition User's Guide for Oracle Hyperion Smart View
Oracle Fusion Financials uses Oracle Document Capture to scan payables invoices and import expense receipts. Oracle Fusion Payables also leverages Oracle Forms Recognition for intelligent data recognition for invoice entry.
If you plan to implement Oracle Fusion Expenses and use automated receipt image processing, then you must set up Document Capture and configure it for expenses. If you have licensed Oracle Fusion Automated Invoice Processing, then you must set up Forms Recognition in addition to Document Capture, and configure both for payables.
Note
Document Capture for Expenses and Document Capture for Payables require separate installations and configurations on different computers for the default installation.
To set up Document Capture and Forms Recognition, perform these steps in the specified order:
Configure Document Capture and Forms Recognition network shares
Install and configure Document Capture and Forms Recognition on Windows desktop
Note
For details regarding users and privileges for the setup, refer to the installation guides of Oracle Document Capture and Oracle Forms Recognition.
Oracle Document Capture and Oracle Forms Recognition save images to the Oracle Imaging and Process Management input directory for further processing. Since Document Capture and Forms Recognition are Windows-based products, you need to configure the input directory as a network shared directory so that Document Capture and Forms Recognition can save images to this location.
To install network sharing for Oracle Document Capture and Oracle Forms Recognition:
Verify the Oracle Imaging and Process Management input directory
Configure the Network File System (NFS) shared directory
Configure the Windows mapped network drive for the input directory
To verify the input directory:
Log in to the Enterprise Manager on the Common Domain, as an Administrator.
Log in and navigate to the Domain level.
Select System MBean Browser.
Open the oracle.imaging.config.bean.
Look for the InputDirectories value.
This is the Imaging and Process Management input directory where Imaging and Process Management will check for incoming scanned invoices.
The path will point to a directory on the server running Imaging and Process Management. Oracle recommends that you define this directory as a symbolic link to a directory on a storage server. You should have already determined and set up the physical storage for the Imaging and Process Management input directory. The input directories value should reflect the location of this storage.
Enable the Imaging and Process Management input directory to be accessed by Document Capture or Forms Recognition running on Windows:
The storage server should be running NFS with Common Internet File System (CIFS) enabled for Windows compatible share names.
The Windows share name should be in Universal Naming Convention (UNC) format.
The details for configuring simultaneous NFS and CIFS access to a share vary by system.
Note
The input directory can be created in a location that is not directly accessible to end users; no end user applications need access to this directory.
The storage host must grant input directory access to the Imaging and Process Management Input Agent running on the Common Domain host and at least one Windows user with login access to the server running Oracle Document Capture and Oracle Forms Recognition.
You must log in to the Windows desktop with a user ID that has explicit access to the input directory file share. The Oracle Forms Recognition Windows user can be different from the share Windows user.
This mapping is done on the Windows servers running Oracle Forms Recognition and Oracle Document Capture servers for Expenses only. The drive will not be mapped on individual user machines running Oracle Document Capture client for Invoicing.
Open Windows Explorer.
Right-click on the folder for the PC icon depicting a computer with same name as the PC.
Select Map Network Drive.
Select drive letter, for example Y.
Specify the path for the shared directory on the storage host, using the UNC format: \\<host name>\<name>.
Click OK and verify that the network share now appears in Windows Explorer as the drive letter you specified. If Windows Explorer is unable to create the mapped drive, the issue may be that CIFS is not enabled on the storage host.
Verify that both Windows users and the Imaging and Process Management Input Agent user have read/write access to the Input directory and all of the files it contains. In particular you should ensure that the Imaging and Process Management Input Agent has the ability to read and delete any file written to the input directory by the Windows Oracle Forms Recognition user.
The Oracle Forms Recognition project directory contains directories and files shared by Oracle Document Capture, Oracle Forms Recognition Designer, Oracle Forms Recognition Verifier, and Oracle Forms Recognition Runtime Service. In a typical installation scenario, these applications are not installed on the same computer. However, the project directory must be stored in a shared directory accessible to each application, regardless of where it is installed.
To configure the Oracle Forms Recognition project network share, do the following:
Configure the share for Oracle Forms Recognition project directory
Configure the Windows mapped network drive for the project directory
Enable the Oracle Forms Recognition Project directory to be accessed by Document Capture or Forms Recognition running on Windows.
The storage server share should be configured with Common Internet File System (CIFS) enabled for Windows compatible share names.
The Windows share name should be in universal naming convention (UNC) format.
Only Windows applications require access to this directory.
Note
This directory must be accessible to invoice scanning workstations running Oracle Document Capture. These workstations are typically individual PCs but not servers in the server room.
Configure the storage host to share the Oracle Forms Recognition Project directory with the Oracle Document Capture and Oracle Forms Recognition users.
You must log on to the Windows desktop with a user ID that has explicit access to the Oracle Forms Recognition project file share.
Note
This mapping is done on the following:
Windows servers running Oracle Forms Recognition and Oracle Document Capture servers for Expenses
Servers running Oracle Forms Recognition Designer and Verifier
Invoice scanning workstations running Oracle Document Capture
Perform the following steps to configure the Windows mapped network drive:
In Windows Explorer, identify the folder for the PC icon that displays the same name as that of the actual PC.
Right-click the folder for the PC icon depicting a computer with same name as the PC.
Right-click the folder and select Map Network Drive.
Select a drive letter, for example X.
Specify the path for the shared directory on the storage host, using the UNC format: \\<host name>\<name>.
Click OK and verify that the network share now appears in Windows Explorer as the drive letter you specified. If Windows Explorer is unable to create the mapped drive, the issue may be that CIFS is not enabled on the storage host.
To configure Oracle Document Capture and Oracle Forms Recognition to run on Windows, perform the following tasks in the given order:
Install Prerequisites
Install Oracle Document Capture
Configure Oracle Document Capture for Expenses
Configure Oracle Document Capture for Payables
Install Oracle Forms Recognition Designer and Verifier Service for Payables
Install Oracle Forms Recognition Runtime Service for Payables
Configure Oracle Forms Recognition Runtime Service for Payables
Note
Make sure that you have configured Oracle Document Capture and Oracle Forms Recognition network share before performing these steps. Steps 3 to 5 (configuring Document Capture, and installing and configuring Forms Recognition for Payables) are required only if you have licensed Oracle Fusion Automated Invoice Processing.
For more information on performing post-installation tasks, see the Oracle Document Capture Installation Guide and the Oracle Forms Recognition Installation Guide.
Before you proceed with the installation and configuration of Oracle Document Capture and Oracle Forms Recognition, you need to fulfill the following prerequisites:
Install and Configure Open Database Connectivity
Note
This step is not required for invoice scanning workstations.
Create Data Link
Note
This step is not required for invoice scanning workstations.
Install Java Runtime Environment
To install and configure an Open Database Connectivity (ODBC) definition, make sure your Windows machine has a database client installed. For more information, see Oracle Database Software Downloads on Oracle Technology Network at http://www.oracle.com/technetwork. Perform this step on any computer running Oracle Forms Recognition Runtime Service, Designer or Verifier. The Oracle Database client is needed for ODBC support.
Obtain read-only user ID and password for the Oracle Fusion database schema. Oracle Forms Recognition requires this to synchronize its list of vendors with the database and for any additional validation that you configure Forms Recognition to perform against the Oracle Fusion database.
Ensure an ODBC driver is installed on your Windows machine.
Open the Windows tnsnames file, typically found at: <oracle_home>\network\admin.
Add a new entry for the Oracle Fusion database and save the file.
Open Control Panel - Administrative Tools - Data Source (ODBC).
Add a new system database source name (DSN) entry for the Oracle Fusion database and test the connection.
Close the Control Panel.
To create a data link, perform the following on any computer running Oracle Forms Recognition Runtime Service, Designer or Verifier. The contents of the data link are used later when updating the Oracle Forms Recognition project configuration file.
Click the Windows Start menu button.
Select Run.
Enter Notepad into the Open field and click OK.
Important
Do not right-click on the desktop to create a new file. Windows will assign a hidden file type to the file that will interfere with the following steps.
Click File - Save.
Navigate to the Desktop folder.
In the File name field, enter the following including quote marks: "<odbc_dsn>.udl".
Substitute the actual ODBC data source name for <odbcdsn>.
The file name is the ODBC data source name with the extension udl.
Click Save.
Find the file on the desktop and double-click on it to open the Data Link Properties dialog.
If a text file is opened instead, you need to go back and carefully follow the instructions for creating this file again.
Set Data Source: <ODBC data source name>
Check the Use a specific user name and password option.
Enter the read-only user name and password.
Check the Allow saving password option.
Click the Test Connection button.
Click OK.
Ensure that Java Runtime Environment (JRE) 1.6 or greater is installed. Perform this step on any computer running Oracle Forms Recognition Runtime Service, Designer or Verifier. For more information, see Java Downloads on Oracle Technology Network at http://www.oracle.com/technetwork.
Install Oracle Document Capture from the Companion DVD. You can find the installer at <repository_download_location>/installers/odc. Perform a complete installation. For more information on performing post-installation tasks, see the Oracle Document Capture Installation Guide.
Note
Oracle Document Capture has to be installed separately for Expenses and Payables. For Expenses, Oracle Document Capture is typically installed on the same machine as Oracle Forms Recognition in a server room. Only administrators should have login access to this machine. For Payables, Oracle Document Capture is installed on one or more machines assigned to individual users. Each of these machines must be connected to a scanner for scanning invoices.
If an error occurs while installing Oracle Document Capture, verify if the computer's print spooler service is running (Start - Settings - Control Panel - Administrative Tools - Services). Scroll down until you see Print Spooler. If the status shows that it has not started, right-click the Print Spooler service and select Start. You can now retry installing Oracle Document Capture.
On Windows 2008 R2, Oracle Document Capture may install certain default databases in an unexpected location. If Oracle Document Capture prompts you to create the Capture database during startup, click on the Configure button for Other database platform to update the database information. The provider should be set to Microsoft Jet OLE DB 4.0 by default. Locate capture.db in the system ALLUSERPROFILES\Oracle Document Capture folder. By default, ALLUSERSPROFILES is C:\ProgramData.
If an error occurs while launching Oracle Document Capture Recognition Server, download Oracle Document Capture Patch 2 (12540290) from My Oracle Support (https://support.oracle.com), and install according to the instructions provided.
If a licensing error occurs when running any of the Oracle Document Capture components, download patch 12540290 from My Oracle Support (https://support.oracle.com), and install according to the instructions provided.
To configure Oracle Document Capture for Expenses:
Ensure that the Oracle Document Capture Import-Export Utility is already installed.
Copy the Oracle Document Capture metadata ZIP file - ExmExpenseReportCabinet.zip - from APPLICATIONS_BASE/fusionapps/fin/exm/odc to a temporary directory in the Windows desktop environment.
Go to Start - Oracle Document Capture - Import-Export Utility and sign in (user name: ADMIN, password: admin).
In the Utility, go to File - Import or click on the Import icon and start importing the expense metadata files one by one. Ensure that all files are imported.
If Oracle Document Capture was a standard complete install, then the import process may fail for the recognition server, which is due to third party licensing issues. Go to Add/Remove Programs, run a Change action on the Oracle Document Capture installation, deselect the FaxPress Provider component for the Import Server, and run the import again.
Create the underlying folder structure within Windows Explorer.
Create import folder C:\ODC Projects\EXM\Import. This folder needs to be shared with read and write permissions, so that expense documents can be fed from outside this computer.
Create export folder C:\ODC Projects\EXM\Export.
Launch Oracle Document Capture (user name: ADMIN, password: admin).
Go to Admin - File Cabinets.
Expand Expense Reports - Commit Profile - Expense Report Commit Text.
Change the text file folder and document folder according to the Oracle Imaging and Process Management input agent setup. For the packaged configuration, it is set to folder C:\ODC Projects\EXM\Export. This needs to be changed to the shared mapped drive of the Imaging and Process Management input directory. You can use the letter drive notation (for example: Y:/appmgr/Input).
Launch Oracle Recognition Server. Open Programs - Oracle Document Capture - Oracle Recognition Server.
Open Setup - Batch Jobs. Pause the server if this option is grayed out.
In the General tab, blank out the value for Notify by email.
Check Rename batch option and set New Prefix as ERR.
In the Bar Codes tab, set Validation Rule to mask.
Set Mask to 15 pound signs (#).
In the Fields tab, change the document path in the metadata file through these fields:
Indexed Field Name: IPM Dest1
Indexed Field Name: IPM Dest2
Indexed Field Name: IPM Dest3
Indexed Field Name: IPM Dest4
Dest1~Dest4 compose the full path of the committed image files. These four fields need to be changed to compose the full path (including the ending slash) according to Imaging and Process Management input agent setup. Because there is a character length limit of 40 characters for the default value, the path is separated into four fields.
Launch Oracle Document Capture Import Server. Open Programs - Oracle Document Capture - Import Server.
Server - Pause
Email Provider; create or update existing EXM Email Provider.
Note
This step is optional and requires a non-Secure Sockets Layer (SSL) e-mail server setup. Replace your email server and your email address with real values.
General tab File Cabinet: Expense Reports, Batch Prefix: EXM-EM Email Provider Settings tab
Email Accounts subtab:
Email Server: your e-mail server
Email address: your e-mail address
Set Server - Schedule Event.
Folder - List File Provider - EXM Folder Provider - Frequency: For example, every 30 seconds
Folder - Email provider - EXM Folder Provider - Frequency: For example, every 30 seconds
Note
This step is optional. You must set up an e-mail provider first in order to schedule jobs for it.
Server - Activate
Launch Oracle Recognition Server. Open Programs - Oracle Document Capture - Oracle Recognition Server.
Server - Pause
Set Server - Schedule - Schedule Event - Expense Reports - Frequency: For example, every 30 seconds
Server - Activate
Launch Oracle Document Capture Commit Server.
Server - Pause
Set Server - Schedule - Schedule Event - File Cabinet - Expense Reports - Frequency: For example, every 30 seconds
Server - Activate
The following procedure describes the Oracle Document Capture configuration for an invoice scanning workstation, for example, a PC connected to a scanner.
To configure Oracle Document Capture for Payables:
Ensure that the Oracle Document Capture Import-Export Utility is already installed.
Copy the Oracle Document Capture metadata ZIP files from APPLICATIONS_BASE/fusionapps/fin/ap/odc to a temporary directory in the Windows desktop environment.
Go to Start - Oracle Document Capture - Import-Export Utility, and sign in (user name ADMIN, password: admin).
In the Utility, go to File - Import, click Import and start importing the Payables metadata files:
ApInvoiceOfrCabinet.zip
ApInvoiceOdcCabinet.zip
Launch Oracle Document Capture (user name ADMIN, password: admin).
Go to System - Batch Setup.
Set Path to Network Batch Folder to the following directory: C:\Program Files\Oracle\Document Capture\Batch.
Set Enter Path to Network Commit Folder to the mapped shared drive you set up previously. You can use the letter drive notation (for example: Y:/appmgr/Input). Alternatively, if the Oracle Document Capture Commit Server was used, provide the universal naming convention (UNC) path.
Click OK .
Go to System - Manage Macros and choose Category Electronic Document Provider, select macro AP-I/PM-Commit-Macro, and click the Design icon.
In the macro, search for the line containing /slot/ems7795/appmgr/provisioning/mw_home/instance/domains/adcdag14.us.oracle.com/CommonDomain/IPM/InputAgent/Input and replace it with the path set up as the Imaging and Process Management InputDirectories property.
Click the Play icon to run the macro.
Go to System - Manage Macros, choose Category Scan of ISIS, and select macro AP-OFR-Scan-ISIS-Macro. Click the Edit icon to open it, and then click the Play icon to run it.
Close the macro editor.
Close the Manage Macros dialog.
Go to Admin - File Cabinets.
Choose the Payables Invoice with OFR node from the tree view on the left hand side of the window.
In the File Cabinet Index Fields panel, you should see a single row with field name URN:
(URN, Alpha Numeric, 40, NA, NA, Yes)
Expand on Commit Profiles under the node Payables Invoice with OFR.
In the Commit Profiles panel, AP_INV_OFR should be checked.
Select AP_INV_OFR in the left hand panel; Commit Driver should be set to Commit Text File.
Click the Configure button next to the Commit Driver field to open the Commit Text File Settings dialog.
Verify that Do not create Commit Text File is checked.
Set the Document Folder field to <mapped network drive>\OFR_Projects\AP\Import.
Verify that Create a folder per committed batch is checked and that Store in subfolders is not checked.
Click OK .
Choose Scanning - Manage Scan Profiles to open the Manage Scan Profiles window.
Select Payables Invoice with OFR - Image Source .
Set Default Import Folder to C:\images.
Click the Save icon and close the Manage Scan Profiles window.
Close Oracle Document Capture.
Install Oracle Forms Recognition Designer and Verifier for Payables from the Companion DVD. You can find the installer at <repository_download_location>/installers/ofr. During installation, deselect the Runtime Service so that you only install the Designer Application and Advanced Verifier. You will install the Runtime Service subsequently on a different machine.
You would need only one installation of the Designer. You will install one instance of Verifier on the same computer as Designer. If you will have additional concurrent Verifier users, you will need to install additional instances of Verifier on separate computers.
For more information on performing post-installation tasks, see the Oracle Forms Recognition Installation Guide.
Install Oracle Forms Recognition from the Companion DVD, and ensure that Oracle Forms Recognition and Oracle Document Capture are installed on two separate machines. You can find the installer at <repository_download_location>/installers/ofr. However, for Expenses, both Oracle Forms Recognition and Oracle Document Capture can be installed on the same server. During installation, deselect the Designer Application and Advanced Verifier options so that you only install the Runtime Service. The Designer Application and Advanced Verifier were already installed in the earlier step of the configuration process.
This instance of Oracle Forms Recognition should be installed on a secure server accessible only to administrators. Depending on the volume of invoices that you process and your desired processing window, you may need to install Oracle Forms Recognition Runtime Service on additional servers.
For more information on performing post-installation tasks, see the Oracle Forms Recognition Installation Guide.
To configure Oracle Document Capture and Oracle Forms Recognition to run on Windows, perform the following tasks in continuation of the tasks in Part 1.
To configure Oracle Forms Recognition for Payables, perform the following steps.
Copy project files to the shared projects directory
Update Oracle Fusion Payables configuration files
Update payables project initialization (INI) file
Configure Oracle Forms Recognition designer
Configure Oracle Forms Recognition runtime service
Configure Oracle Forms Recognition runtime service manager
Configure Oracle Forms Recognition Verifier
You need to copy the project files from the Oracle Forms Recognition Designer installation to the mapped drive corresponding to the Oracle Forms Recognition project share. This allows the Runtime Service, Verifier and Designer to use a single project. To perform this step, you must log on to the machine where Designer is installed. The Oracle Forms Recognition project share should have already been mapped to a drive letter on this machine.
To copy project files to a working folder:
Create a new OFR_Projects folder on the drive mapped to the shared projects directory.
Copy <installation directory>:\Program Files\Oracle\Forms Recognition\Projects\AP to <mapped drive>:\OFR_Projects. The files in <installation directory>:\Program Files\Oracle\Forms Recognition\Projects\AP also serve as backups of the active files in <mapped drive>:\OFR_Projects.
To update Oracle Fusion Payables configuration files:
On any computer with a drive mapped to the shared Oracle Forms Recognition project directory, navigate to <mapped drive>:\OFR_Projects\AP\Global.
Rename the file AP_Packaged_Project_1004a.ini as a backup, and copy APPLICATIONS_BASE/fusionapps/fin/ap/ofr/AP_Packaged_Project_1004a.ini to <mapped drive>:\OFR_Projects\AP\Global.
Rename the copied file from AP_Packaged_Project_1004a.ini to AP Packaged Project_1004a.ini such that the file name excluding the extension is identical to the project file: AP Packaged Project_1004a.sdp.
To configure Oracle Document Capture and Oracle Forms Recognition to run on Windows, perform the following tasks in continuation of the tasks in Part 2.
To update the payables project INI file:
Click the Windows Start menu button.
Select Run.
Enter Notepad in the Open field.
Click OK.
Open the data link (*.udl) that you previously created and saved to the desktop.
From the *.udl file, copy the whole string starting with Provider=. Once you save the INI file, the UDL file is no longer needed and can be deleted.
Open the AP Packaged Project_1004a.ini file (under <mapped drive>:\OFR_Projects\AP\Global) .
Replace the connection string for the following line with the text copied from the UDL file: SQL_VL_01_ConnectionString=.
Set ASA_OP_01_AlphaNum=YES.
Update attribute ASA_VL_01_ImportODBCDSN with the system DSN name of the Oracle Fusion database.
Update attribute with new SQL statement.
ASA_VL_01_ImportODBCSelect=SELECT TO_CHAR ( PVS.VENDOR_ID )|| CHR(126) ||
TO_CHAR ( PVS.VENDOR_SITE_ID ) VENDOR_INDEX,
 PVS.VENDOR_ID, PV.PARTY_NAME VENDOR_NAME,
 PVS.VENDOR_SITE_ID, LOC.ADDRESS1, LOC.ADDRESS2, LOC.CITY, LOC.POSTAL_CODE,
 LOC.STATE, LOC.COUNTRY, PVS.INVOICE_CURRENCY_CODE CURRENCY_CODE
 FROM FUSION.HZ_PARTIES PV, FUSION.HZ_PARTY_SITES PS ,
FUSION.POZ_SUPPLIER_SITES_V PVS, FUSION.HZ_LOCATIONS LOC
 WHERE PV.PARTY_ID = PS.PARTY_ID AND PVS.PARTY_SITE_ID = PS.PARTY_SITE_ID
AND NVL (PV.PARTY_TYPE, 'NULL') <> 'EMPLOYEE' AND PVS.PAY_SITE_FLAG = 'Y'
AND NVL (PVS.EFFECTIVE_END_DATE, SYSDATE) >= SYSDATE AND NVL
(PVS.INACTIVE_DATE, SYSDATE) >= SYSDATE AND PVS.LOCATION_ID =
loc.location_id ORDER BY PVS.VENDOR_ID, PVS.VENDOR_SITE_ID;
Update attribute ASA_VL_01_ImportODBCUser with the read-only user name.
Update attribute ASA_VL_01_ImportODBCPWD with the read-only account password.
Search for SRC_VL and update the following attributes as indicated. SRC_VL attributes not specifically shown below should by default be left blank.
SRC_VL_ID=VENDOR_INDEX
SRC_VL_SiteID=VENDOR_SITE_ID
SRC_VL_Name=VENDOR_NAME
SRC_VL_Address1=ADDRESS1
SRC_VL_Address2=ADDRESS2
SRC_VL_City=CITY
SRC_VL_Zip=POSTAL_CODE
SRC_VL_State=STATE
SRC_VL_Country=COUNTRY
SRC_VL_ExternalVendorID=VENDOR_ID
Search for VND_ and update the following attributes.
VND_OP_ValidateFromASSA=YES
VND_OP_CheckConditionVendors=NO
VND_VL_AlphNumSiteSeparator=~
VND_OP_IgnorePOVendor=YES
Search for the string CSV_VL_01_FormatLine1 and replace the portion starting with /slot/emsxxx . . . ./Input/ with the path set up as the Imaging and Process Management InputDirectories property. Keep the | character in front of the path and the portion starting with <%TNF>.tif>|||| . . . fully intact.
Verify your changes.
Save the file.
Close the file.
To configure Oracle Forms Recognition designer:
In Windows Explorer, double-click on <mapped drive>:\OFR_Projects\AP\Global\AP Packaged Project_1004a.sdp.
Note
You are using the shared project directory and not the installation directory.
Log in. (By default, the user is administrator, and there is no password.)
Choose Options - Settings to open the Settings dialog.
Select the Input tab.
Set both Batch-Root and Image Root directories to: <mapped drive>:\OFR_PROJECTS\AP\Batches
Select the Runtime tab.
Set Export Directory to the Imaging and Process Management input directory in the mapped network drive, for example y:\appmgr\Input.
Click OK.
Choose View - Definition Mode to open a tabbed panel on the left side of the window.
Select the Classes tab and select the Invoices node.
Click the Fields tab.
Right-click on VendorASSA and choose Properties to open another tabbed pane on the right side of the window.
On the left side of window, select the ODBC Import tab.
From the droplist, select the ODBC DSN that you defined earlier.
Click the Import button.
Import updates field names in the Analysis tab and may display an error message. If so, this is expected and not a concern.
Click the Analysis tab.
Select the Enable alphanumeric identifier option.
Select the ID radio button for the VENDOR_INDEX column and deselect the Search option for VENDOR_INDEX, VENDOR_ID, and VENDOR_SITE_ID.
Update Class name format to [Vendor_ID]_[Vendor_Name].
Ensure Field context format is:
[VENDOR_INDEX]
[VENDOR_NAME]
[ADDRESS1]
[ADDRESS2]
[CITY] [STATE] [POSTAL_CODE]
Deselect the Enable address analysis option.
Return to the ODBC Import tab and click Import again.
Import should complete with no errors this time.
Click OK .
Once you have completed customization on the payables project, update the following Runtime Service properties to ensure that the Payables Imaging flow works properly. You will create two Runtime Service Instances. One will be configured for Optical Character Recognition (OCR), Classification and Extraction. The other instance will be configured for Import and Export. If you need to scale up the capacity of your Oracle Forms Recognition installation, you can create additional Runtime Service instances to perform OCR, Classification and Extraction. You can create these by copying settings from the existing instance. You should only have one Runtime Service instance per server performing Import and Export. In this default configuration, you need to run both Runtime Service instances.
Run Oracle Forms Recognition Runtime Service.
In Console Root\Runtime Server, under Runtime Server Administration, perform the following.
Right-click on Runtime Server Administration and choose New RTS Group. Name the new instance FusionAP.
Right-click on FusionAP and choose New Machine
In the Available Oracle Forms Recognition field on the Group Management dialog box, enter localhost.
Keeping the cursor in the Available Oracle Forms Recognition field, press the Enter key. The dialog box will close and the computer will now appear as a node under FusionAP.
Right-click the computer node that you just created and from the context menu, select New - RTS instance.
In the name field, enter AP and click OK.
Right-click AP and select Properties.
On the General tab, do the following.
Note
All file paths in the Runtime Service must be specified as UNC paths. You cannot specify a path using a mapped drive letter because Windows services are not allowed access to mapped drives. This is a limitation of Windows services in general. The UNC path will appear as \\<server_name>\<share_name>.
Ensure that the Use project file option is checked and the file specified is <UNC path>\OFR_Projects\AP\Global\AP Packaged Project_1004a.sdp.
Ensure that the Batch Root and Image Root fields are specified as <UNC path>:\OFR_Projects\AP\Global\AP\Batches.
Ensure that the Export path is set to the UNC for the Imaging and Process Management input directory.
Set the Batch Scanning Delay and Mode to Wait to 5 seconds.
On the Workflow tab, click the Import button.
On the Import tab, do the following:
Set the Import Directory to: <UNC path>\OFR_Projects\AP\Global\AP\Import.
This is the directory where you will set up Oracle Document Capture to commit the image batches.
Check the 1 batch per subdirectory, 1 folder per batch option in the Document Grouping section.
Select Always Import Documents Import Condition.
Note
This is for initial testing only. You may wish to adjust this setting in production.
Deselect the Automatic option and specify type as tif in the Document Type section.
Select the OCR+Export+Clean Up tab
Uncheck the Generate protocol file for each exported batch option.
Click OK.
Right-click on the AP Runtime Service and select Export.... Export AP settings to a file under <mapped drive>:\OFR_Projects\AP.
Create a second Runtime Service instance under FusionAP named AP_IMP.
Do not configure the instance.
Right-click on AP_IMP and select Import....
Import the settings files that you exported from AP.
AP and AP_IMP will now have identical settings.
Right-click on AP and select Properties....
On the Workflow tab, click the Import and Export buttons to disable these features.
Click OK.
The AP Runtime Service instance is now configured for OCR, Classification, and Extraction.
Right-click on the AP Runtime Service instance and select Export.... Replace the previously exported settings file <mapped drive>:\OFR_Projects\AP. You can configure additional OCR, Classification and Extraction Runtime Service instances by importing these settings into additional Runtime Service instances.
Right-click on AP and select Properties....
On the Workflow tab, click the OCR, Classification, and Extraction buttons to disable these features.
Click OK.
The AP_IMP Runtime Service instance is now configured for Import and Export only.
The Oracle Forms Recognition runtime service manager processes invoice images and exports them to a shared network drive. By default, services cannot access shared drives. The resolution to this issue is to grant the service rights to the user who is granted access to the shared network drive. You must know the password for this user.
Select Start - Control Panel - Administrative Tools.
Select Services.
Right-click Oracle Forms Recognition Runtime Service Manager and select Properties.
Select the Log On tab.
Select the This account radio button, and enter the user name and password of the user granted shared network drive access.
Click Apply and then click OK .
Complete this step if you have licensed the "Fusion Automated Invoice Processing option.
Launch the Oracle Forms Recognition Verifier.
Click Options - Settings. The Oracle Forms Recognition Verifier Properties dialog box appears.
In the Use Project File field, enter <mapped drive>:\OFR_Projects\AP\Global\AP Packaged Project_1004a.sdp.
In the Batch Root field, enter <mapped drive>:\OFR_Projects\AP\Batches . Image Root automatically synchronizes with Batch Root.
Click OK. The dialog box closes.
Click File - Save and close the Verifier.
Financial transactions between an enterprise and its corporate card issuer need to be carried out in a highly secured environment. To process such transactions, you must establish a secured connectivity between the two. The following sections cover two important security related aspects pertaining to such transactions.
If you are implementing the corporate card feature in Oracle Fusion Expenses, you must set up a secured directory to receive the transaction files sent by the corporate card issuer through a secured connection. Ensure that the Oracle Fusion Enterprise Scheduler Server and the Upload Corporate Card Transactions process must have read/write access to the secured directory to read the transaction file and upload the transactions into the Oracle Fusion Expenses application. For more information on corporate card transaction files and how they are processed, see the Oracle Fusion Applications Financials Implementation Guide.
You need this setup if you are implementing the corporate cards feature in Oracle Fusion Expenses, and automatically downloading the corporate card transaction files from the American Express server using Upload Corporate Card Transactions process.
Oracle Fusion Applications use the certificate store located at APPTOP/fusionapps/wlserver_10.3/server/lib/fusion_trust.jks to store all trusted root certificates. Since you connect to an external server, you must verify if all trusted root certificates that are required to connect to the external servers using HTTPS are present in this certificate store. To verify the entries in the certificate store, use the following command:
keytool -list -keystore fusion_trust.jks -storepass password
where the password is
the administrator password provided at the time of provisioning Oracle
Fusion applications.
For more information on downloading corporate card transaction files from American Express, see Oracle Fusion Applications Financials Implementation Guide.
Oracle Fusion Advanced Collections Dunning feature utilizes Oracle Business Intelligence Publisher to distribute dunning letters to customers via e-mail, fax or print. To use this feature, you must configure Oracle Business Intelligence Publisher to connect to the deploying company's internal e-mail, or the print or fax servers.
Financial transactions contain sensitive information and must be carried out in a secure and encrypted mode. In Oracle Fusion Financials, you have the facility to enable encryption process for various payment information. To use that functionality, you must perform the following configuration after installing Oracle Fusion Applications.
Perform the following steps to enable encryption of payment information.
Create and empty Oracle Wallet ewallet.p12 using the Oracle Wallet Manager utility.
Do one of the following to create the wallet:
Let the Payments automatically generate a secure key and create the wallet
Generate a custom secure key by copying a file containing the bits of the key to the same directory as the empty Oracle wallet ewallet.p12
Ensure that the Encryption feature is turned on. You can check it on the setup user interface of the Manage System Security Options task.
After the wallet is created, ensure that you securely delete the file containing the key bits, using a utility that supports secure delete.
For more information, refer to the chapter Define Funds Capture and Payments Security in the Oracle Fusion Applications Financials Implementation Guide.
To transmit or receive payment information from a payment system through a firewall, you will need to configure the communication channel used to communicate with the payment system. You need to do the following:
Configuring and Deploying a Tunnel
Setting up SSL Security for Communicating with Payment System Servlet
To communicate with a payment system through a firewall, you may need to use the tunneling feature of Oracle Payments. Tunneling feature in Oracle Payments is used to deliver data, such as a payment file or settlement batch, using two protocols, one of which encapsulates the other. Tunneling is also referred to as delegated transmission, since the initial transmission from Oracle Payments is a request to an external module (the Transmission Servlet) to deliver data using an independent transmission protocol. The name of the transmission protocol, its parameters, and the actual data to be delivered are encapsulated within the body of the tunneling transmission protocol.
The purpose of tunneling is to allow connectivity between Oracle Payments and external payment systems without compromising network security. Processor payment systems, for example, often require protocols, such as FTP or IP socket connectivity to receive payment instruction files. Instead of creating breaches in their firewall to accommodate these connectivity requirements, users can instead deploy the Payments Transmission servlet on a host outside their firewall and then tunnel or delegate requests to it from the Oracle Payments engine. The Oracle Payments Transmission Servlet does not use the applications database, and can be completely isolated from the intranet of the deployment environment.
Oracle Payments uses a customized tunneling protocol called the Oracle Fusion Payments Tunneling Protocol. This protocol uses HTTP POST as its underlying transmission mechanism (HTTPS is also supported). When it sends a request, it places an XML message header within the body of the request meant to identify the tunneled or encapsulated protocol, as well as the parameters to use when invoking it, such as host name, user name, and password for FTP. The data to be delivered is sent after the XML message header is sent.
Important
Oracle Payments application, by itself, does not support the tunneling or encapsulation of a tunneling protocol.
As a Payments-supported transmission protocol, the
Oracle Payments Tunneling Protocol implements the oracle.apps.financials.payments.sharedSetup.transmissions.publicModel.util.TunnelingFunction interface. The following table presents the parameters and descriptions
of the Oracle Payments Tunneling Protocol.
|
Parameter |
Description |
|---|---|
|
WEB_URL |
The HTTP/HTTPS URL of the Transmission Servlet executing the protocol |
|
USERNAME/PASSWORD |
The username and password used to access the servlet if its URL is secured by HTTP authentication |
The Oracle Payments Transmission Servlet is the module which executes tunneled or delegated transmission requests sent from the Oracle Payments engine. The servlet receives the Payments HTTP XML Delivery Envelope requests and parses them into XML message header and transmission data components. The format of the XML message header is defined by an XML DTD file named DeliveryEnvelope.dtd. The message header specifies the transmission protocol as well as the parameters to pass to the tunneled/encapsulated transmission protocol, using its Java class name and entry function name. The Transmission Servlet then dynamically loads the Java class implementing the tunneled protocol, and initiates it by passing to it the transmission parameters parsed from the XML message header and the transmission data.
This behavior is identical to that of the Oracle Payments
engine. Any protocol can be tunneled, as long as it implements the oracle.apps.financials.payments.sharedSetup.transmissions.publicModel.util.TransmitFunction interface. Therefore, any custom-defined protocol can be tunneled
or encapsulated to the servlet, provided the Java class which implements
it is in the CLASSPATH of the servlet's application container. To
deploy the servlet to a different host, such as the one in a DMZ network
zone, you must copy FinPmtTransmitServlet.war to the Transmission Servlet's new servlet container. If you want
the servlet to support any new transmission protocol that you develop,
their Java code must be deployed to the TransmitServlet's web application
domain.
Tunneling is configured through the Oracle Payments transmission configuration user interface. A tunneling transmission configuration is specified as any other transmission configuration, but the protocol is always Payments HTTP XML Delivery Envelope protocol. Once the tunneling protocol is configured, it can use or encapsulate any regular, non-tunneling transmission configuration, by specifying a value for the tunneling configuration field in the transmission configuration user interface. Once that is done, ensure that you set up your payment system to support the tunneling protocol, and that your corresponding funds capture process profiles and payment process profiles specify the tunneling configuration.
When Oracle Payments communicates with the payment system servlets, the information exchanged may be sensitive information such as credit card numbers. If the communication is not secure, it poses a security risk.
The security risk is higher under the following circumstances.
When Oracle Payments and the payment system servlets are installed on separate machines
When Oracle Payments is deployed and operates outside your firewall
To set up a payment system servlet with secured sockets layer, enable HTTPS on the middle-tier server where the servlet resides. If funds capture profiles are not defined for the payment system, change the BASE URL parameter of the payment system to use the https: protocol. Otherwise, change the URLs on any transmission configurations set up to be used with that payment system to contain HTTPS.
Oracle B2B Server is an Oracle SOA Suite component that manages interactions between deploying companies and trading partners such as suppliers. Oracle Fusion Payables supports an inbound Oracle B2B flow using Oracle B2B Server for receiving invoices from suppliers in XML format. Trading partners can use this B2B feature to communicate electronically by sending documents in XML format. The B2B XML invoices use the same XML standard 171_Process_Invoice_002 (version 7.2.1) developed by the Open Applications Group (OAG). For more information on B2B XML Invoices, see the Oracle Fusion Applications Procurement, Payables, Payments, and Cash Guide. Customers or deploying companies who want to receive and process invoices in XML format (complying to OAG standards) that are provided by the suppliers, need to perform the following post-installation configurations.
Host Company Configuration
Supplier Configuration
Note
These configurations are required only if customers or deploying companies want to use the B2B XML invoice feature.
Perform the following steps to complete Host Company configuration.
Set up the Oracle B2B Server.
Set up Oracle Supplier Network for the Host Company
Note
This step is required only if customers use Oracle Supplier Network as the communication channel.
Set up B2B Site Code
To set up the Oracle B2B Server, do the following:
Create a supplier trading partner.
Note
The Oracle B2B Server is preloaded with the supported OAG document schemas and sample trading partners such as MyCompany which is the host company trading partner, and ApSampleTradingPartner which is the supplier trading partner. However, you can create your own supplier trading partners as instructed here.
Sign in to the Oracle B2B Server.
On the left, click Add on the Partner toolbar. The Partner Name dialog box appears.
Enter the name of the trading partner and click OK. A confirmation message appears. The new supplier trading partner is listed in the Partner region.
On the Documents tab, click Add to add a document definition for the supplier trading partner. The Select Document Definition dialog box appears.
Select OAG - 7.2.1 - PROCESS_INVOICE_002 - OAG_DEF and click Add. The document definition is added to the supplier and is displayed under Documents.
For the document definition, clear the check box under Receiver.
In the Partner region, select the new supplier trading partner, and on the Agreement toolbar, click Add to add a new agreement between the host company and the new supplier trading partner.
Enter the name of the agreement.
On the process train, click the Select Document Definition train stop. The Select Document Definition dialog box appears.
Select the PROCESS_INVOICE_002 document definition mapped to the supplier trading partner and click OK.
Under Agreement Parameters, ensure that the Functional Ack check box is clear, and click Save.
To validate the agreement, click Validate.
Click Deploy. An information message appears, indicating successful deployment of the agreement.
Set up a listening channel.
Note
Oracle B2B Server supports multiple protocols for sending/receiving messages between trading partners. You can choose a protocol that is best suited for your company. Refer to the Oracle B2B Server documentation or online help to learn about each protocol and which parameters need to be set up. Listening channel can be set up at the global level (applicable to all trading partners) or at the trading partner level.
Do one of the following:
To set up a global listening channel, click Administration and click the Listening Channel tab.
To set up a trading partner listening channel, click Partners and click the Channels tab.
No need to set up a listening channel if Oracle Supplier Network is used by the suppliers to send the B2B invoice payload.
Note
When Oracle Supplier Network is used, the only required setup to communicate with the supplier trading partner is to add a Generic Identifier on the B2B Server, using the IP address of the Oracle Supplier Network server as the value of the identifier. The Generic Identifier entry is added to the Identifiers table on the Profile tab of the trading partner page. If you do not know the IP address of the Oracle Supplier Network server, consult your system administrator.
Save the changes to complete the set up.
Set up Oracle Supplier Network for the Host Company if the supplier uses Oracle Supplier Network to send the B2B invoice payload. To complete the setup, perform the following:
Sign into the Oracle Supplier Network using the registered account.
Access Messaging - Communication Parameters and select HTTPS URL Connection as the Delivery Method.
Click Modify to update the delivery method parameter values.
Enter the URL of the B2B HTTP receiver. Consult your system administrator if you do not know the value.
Enter the User ID and password for Oracle Supplier Network.
Note
You can specify different values for the Test and Production environments.
Access Messaging - Transaction Management.
Add the OAG PROCESS_INVOICE_002 document from the list of available documents if it is not already added.
From the Action drop down list, select Receive.
From each Delivery Method drop down list (OSN Test Delivery Method and OSN Production Delivery Method), select HTTPS URL Connection and click Submit.
On the Trading Partners tab, in the Add Trading Partners region, click Add to add supplier trading partners. You can add all the supplier trading partners who send invoice payloads to the host company.
Set up the B2B Site Code.
For each supplier site that is enabled for B2B communication,
the host company assigns a B2B Site Code to the site and communicates
it to the supplier. Supplier has to provide this B2B Site Code in
the invoice payload in the <PARTNER><PARTNRIDX> element, with <PARTNER><PARTNRTYPE> =
Supplier within the <INVHEADER> element. To assign a B2B Site Code to a supplier site, navigate
to the Manage Suppliers UI in the Fusion application. Search for the
supplier and then open the supplier site. Enter a value into the B2B
Supplier Site Code. Click Save. This code needs to be communicated
to the suppliers manually so that they can include it in their invoice
payloads.
To assign a B2B Site Code to a supplier site, do the following:
In Oracle Fusion Applications, access Suppliers - Manage Suppliers.
Search for the specific supplier and open the relevant supplier site.
On the Edit Site tab, in the B2B Trading Partner Information region, enter the site code (the site code set by the host company in Oracle B2B Server) in the B2B Supplier Site Code field.
Click Save.
Communicate the same site code to the suppliers.
The following configuration steps must be performed by suppliers if they are using Oracle Supplier Network to send the invoice payload.
Sign in to the Oracle Supplier Network using the registered account.
Access Messaging - Communication Parameters and select HTTPS URL Connection as the Delivery Method.
Click Modify to update the delivery method parameter values.
Enter the URL of the B2B HTTP receiver.
Enter the User ID and password for Oracle Supplier Network.
Note
You can specify different values for the Test and Production environments.
Access Messaging - Transaction Management.
Add the OAG PROCESS_INVOICE_002 document from the list of available documents if it is not already added.
From the Action drop down list, select Send.
From each Delivery Method drop down list (OSN Test Delivery Method and OSN Production Delivery Method), select HTTPS URL Connection and click Submit.
On the Trading Partners tab, in the Add Trading Partners region, click Add to add host company trading partner.
|
Copyright © 2011, Oracle and/or its affiliates. All rights reserved. Legal Notices |
|