 Using the GenerateTree Function
This chapter discusses the GenerateTree function.
Using the GenerateTree FunctionThis section provides an overview of HTML trees and discusses how to:
Build HTML tree pages.
Use HTML tree rowset records.
Use tree actions (events).
Initialize HTML trees.
Process events passed from a tree to an application.
Add mouse-over ability to HTML trees.
Add visual selection node indicators.
Specify override images.
 Understanding HTML Trees
Use the GenerateTree function to display data in a tree format. The result of the GenerateTree function is an HTML string, which can appear in an HTML area control. The tree generated by GenerateTree is called an HTML tree.
The GenerateTree function displays data from a rowset. You can populate this rowset using existing record data. You can also use the tree classes to display data from trees created using PeopleSoft Tree Manager.
To use this function, you must set up a page for displaying the data and populate a standalone rowset with the data to be displayed.
The following example shows an HTML tree:
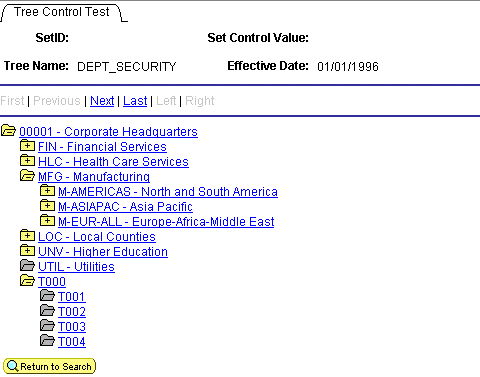
HTML tree example
The positional links at the top of the page (First, Previous, Next, Last, Left, Right) enable the user to navigate around the tree. These links are automatically generated as part of the execution of GenerateTree.
When a node is collapsed, a plus sign appears on the node icon, and the node's children are hidden. When a node is expanded, all child nodes appear, and the icon displays a minus sign. Icons without a plus or minus sign are terminal nodes, which have no children and cannot be expanded or collapsed.
Building HTML Tree Pages
The page you use to display the HTML tree must contain:
An HTML area used to display the HTML tree.
A character field that has a page field name, is at least 46 characters long, and is invisible.
Note. The edit box should be invisible, but not display-only. An invisible edit box cannot be seen by the user, but it still has a buffer that can be written to. Page fields that have been specified as invisible do not need to be marked as Modifiable from HTML unless they are located on a page that is not active when GenerateTree is called. For example, if your application calls GenerateTree from one page and then saves the result in a field that is displayed by an HTML area on another page in the component, the associated event field must be marked both Invisible and Modifiable from HTML.
Events are sent to the application from the HTML tree using the invisible field. The events are processed by FieldChange PeopleCode that is attached to the invisible field.
This is an example page for an HTML tree:
The large area that is selected in the example is the HTML area that displays the HTML tree. The HTML area is attached to the DERIVED_HTML.HTMLAREA field for this example.
The white edit box is the invisible field used to pass events from the HTML tree to the application. It is attached to the DERIVED_HTML.TREECTLEVENT field for this example.
The edit box must have a page field name. In this example, the page field name is TREECTLEVENT.
Using HTML Tree Rowset Records
The GenerateTree function takes a prebuilt and populated rowset as a parameter. This rowset must have a certain structure and contain certain fields. In the following examples, the rowset is standalone, that is, the rowset is created using the CreateRowset function. The fields necessary for the rowset are contained in the following record definitions:
The header record TREECTL_HRD, containing the subrecord TREECTL_HDR_SBR.
The node record TREECTL_NDE, containing the subrecord TREECTL_NDE_SBR.
The header record is the level zero record of the HTML tree rowset. It contains options for the HTML tree, such as the name of the collapsed node image, the height of the images, the number of pixels to indent each node, and so on.
The node record is the level one record of the HTML tree rowset. It contains the tree data and information about the data, such as the dynamic range leaf, the level, and so on.
The level one scroll area contains a row for each node or leaf in the tree data.
To store additional application data with each node in the tree, you can incorporate the TREECTL_NDE_SBR into a record of your definition and use your record to define the HTML tree rowset.
For example, you might want to store application key values with each node record, so that when a user selects a node, you have the data you need to perform the action that you want.
This table describes the relevant fields in TREECTL_HDR_SBR:
|
Field |
Description |
|
PAGE_NAME |
Name of the page that contains the HTML area and the invisible field used to process the HTML tree events. |
|
PAGE_FIELD_NAME |
Page field name of the invisible field used to process the HTML tree events. |
|
PAGE_SIZE |
Number of nodes or leaves to send to the browser at a time. Set to 0 to send all visible nodes or leaves to the browser. The default value is 0. |
|
DISPLAY_LEVELS |
Number of levels to display on the browser at a time. The default value is 8. |
|
COLLAPSED_IMAGE |
Collapsed node image name. The default value is PT_TREE_COLLAPSED. |
|
EXPANDED_IMAGE |
Expanded node image name. The default value is PT_TREE_EXPANDED. |
|
END_NODE_IMAGE |
End node image name. The default value is PT_TREE_END_NODE. |
|
LEAF_IMAGE |
Leaf image name. The default value is PT_TREE_LEAF. |
|
IMAGE_WIDTH |
Image width in pixels. All four images need to be the same width. The default value is 15 pixels. |
|
IMAGE_HEIGHT |
Image height in pixels. All four images need to be the same height. The default value is 12 pixels. |
|
INDENT_PIXELS |
Number of pixels to indent each level. The default value is 20 pixels. |
|
TREECTL_VERSION |
Version of the HTML tree. The default value is 812. Used with the DESCR_IMAGE field in the TREECTL_HDR_SBR record. |
This table describes the relevant fields in TREECTL_NDE_SBR:
|
Field |
Description |
|
LEAF_FLAG |
If this is a leaf, set to Y. The default value is N. |
|
TREE_NODE |
Node name. |
|
DESCR |
(Optional) Node description. |
|
RANGE_FROM |
The range from value of the leaf. |
|
RANGE_TO |
The range to value of the leaf. |
|
DYNAMIC_FLAG |
If this leaf has a dynamic range, set to Y. The default value is N. |
|
ACTIVE_FLAG |
Set to N for the node or leaf not to be a link. The default value is Y. |
|
DISPLAY_OPTION |
Set to N to display the name only. Set to D to display the description only. Set to B to display both the name and the description. Used for nodes only. The default value is B. |
|
STYLECLASSNAME |
Use to control the style of the link associated with the node or leaf. The default value is PSHYPERLINK. |
|
PARENT_FLAG |
If this node is a parent and its direct children are loaded now, set to Y. If this node is a parent and its direct children are loaded on demand, set to X. If this node is not a parent, set to N. The default value is N. |
|
TREE_LEVEL_NUM |
Set to the level of the node. The default value is 1. |
|
LEVEL_OFFSET |
If a child node is to appear more than one level to the right of its parent, specify the number of additional levels. The default value is 0. |
|
DESCR_IMAGE |
Use to display an image after the node or leaf image and before the name or description. The two images are separated by a space. The new image is not scaled. This field takes a string value, the name of an image definition created in PeopleSoft Application Designer. This field is only recognized if the TREECTL_VERSION field is greater than or equal to 812. |
|
EXPANDED_FLAG |
When the EXPANDED_FLAG of a node is set to Y, the GenerateTree function expects the immediate children of the node to be loaded into the &TREECTL rowset (such as in PostBuild), and GenerateTree generates HTML such that the node is expanded and its immediate children appear. |
See Also
Using HTML Tree Actions (Events)
The GenerateTree function works with an HTML area control and an invisible field. When a user selects a node, expands a node, collapses a node, or uses one of the navigation links, that event (user action) is passed to the invisible field, and the FieldChange PeopleCode for the invisible field is executed.
The FieldChange PeopleCode example program (below) checks for expanding (or collapsing) a node and selecting a node by checking the first character in the invisible field. The following example checks for whether a node is selected:
If Left(TREECTLEVENT, 1) = "S" Then
In your application, you can check for the following user actions:
|
Event |
Description |
|
Tn |
Expand or collapse the node, whichever is the opposite of the previous state. N is the row number of the node in the TREECTL_NODE rowset. |
|
Xn |
Expand the node, but load the children first. The children are loaded in PeopleCode, and then the event is passed to GenerateTree so that the HTML can be generated with the node expanded. N is the row number of the node in the TREECTL_NODE rowset. |
|
F |
Display the first page. |
|
P |
Display the previous page. |
|
N |
Display the next page. |
|
L |
Display the last page. |
|
Q |
Move the display left one level. |
|
R |
Move the display to the right one level. |
|
Sn |
Select the node or leaf. N is the row number of the node or leaf in the TREECTL_NODE rowset. |
Note. Drag-and-drop functionality is not supported in an HTML tree.
Initializing HTML Trees
For this example, the PeopleCode for initializing the HTML tree was put into the PostBuild event of the component that contained the page with the HTML area used with the HTML tree.
The PostBuild PeopleCode Example program is an example of how to initialize the HTML tree using the Tree classes and load only the root node into the HTML tree rowset.
The first time a user expands a node, the direct children of the node are loaded into the HTML tree rowset by the FieldChange PeopleCode Example program, shown in the following section. This chunking functionality enables the HTML tree to support trees of any size with good performance.
You cannot simply copy either the PostBuild or FieldChange PeopleCode example programs into your application. You must modify them to make them work with your data. You must make these changes to the PostBuild PeopleCode to initialize HTML trees:
Set the PAGE_NAME and PAGE_FIELD_NAME fields.
The PAGE_NAME field contains the name of the page that contains the HTML area and the invisible field that processes HTML tree events. The PAGE_FIELD_NAME field is the page field name of the invisible field that is used to process the HTML tree events.
Note. The PAGE_FIELD_NAME field is the page field name of the invisible field, not the invisible field name.
Set tree-specific variables.
The &SET_ID, &USERKEYVALUE, &TREE_NAME, &TREE_DT, and &BRANCH_NAME variables contain specific information about the tree. Set these values to the tree you want to open. In the example PeopleCode that follows, these varaibles are set as follows:
&SET_ID = PSTREEDEFN_VW.SETID;
&USERKEYVALUE = "";
&TREE_NAME = PSTREEDEFN_VW.TREE_NAME;
&TREE_DT = PSTREEDEFN_VW.EFFDT;
&BRANCH_NAME = "";
Set the PAGE_SIZE field.
If you do not want the page to expand vertically to display the tree, set the PAGE_SIZE to a number of rows that will fit inside the HTML area. If some vertical expansion is okay, but you do not want the page to get too large, set the PAGE_SIZE to whatever value you like. Set the PAGE_SIZE to 0 if you do not care how big the page gets.
Set the DISPLAY_LEVELS field to the number of levels that will fit inside the HTML area.
If this field is set too large, wrapping may occur. Positional links at the top of the HTML area enable the user to navigate as the tree expands.
(Optional) Set the DISPLAY_OPTION field.
The default for the DISPLAY_OPTION field is to display both the node name and the description. You can display just the node name or just the description. The values for this field are:
|
Field Value |
Description |
|
N |
Display the name only. |
|
D |
Display the description only. |
|
B |
Display both the name and description. |
(Optional) Set the STYLECLASSNAME field for the root node.
The STYLECLASSNAME field controls the style of the link associated with a node or leaf. The default for the STYLECLASSNAME is PSHYPERLINK. If PSHYPERLINK is not the style you want to use, change this field value to the style you want.
Change the last line to assign the output of GenerateTree to the field attached to the HTML area that will display the tree.
In the example that follows, the HTML area control is the DERIVED_HTML.HTMLAREA. You must specify the record and field name associated with the HTML area control on your page.
The PeopleCode for initializing the HTML tree for this example was put into the PostBuild event of the component that contained the page with the HTML area used with the HTML tree.
This example shows how to initialize the HTML tree using the tree classes and load only the root node into the HTML tree rowset:
Component Rowset &TREECTL;

&NODE_ROWSET = CreateRowset(Record.TREECTL_NODE);
&TREECTL = CreateRowset(Record.TREECTL_HDR, &NODE_ROWSET);

&TREECTL.InsertRow(1);
&REC = &TREECTL.GetRow(2).GetRecord(1);

/* Set the HDR options:

1) PAGE_NAME - Name of the page that contains the HTML Area
and the invisible field that will be used to process the HTML
tree events.
2) PAGE_FIELD_NAME - Page field name of the invisible field that
will be used to process the HTML tree events.
3) PAGE_SIZE - Number of nodes or leaves to send to the browser at
a time.
Set to 0 to send all of the visible nodes or leaves to the browser.
Default value: 0
4) DISPLAY_LEVELS - Number of levels to display on the browser at
a time.  Default value: 8
5) COLLAPSED_IMAGE - Collapsed node image name.
Default value: PT_TREE_COLLAPSED
6) EXPANDED_IMAGE - Expanded node image name.
Default value: PT_TREE_EXPANDED
7) END_NODE_IMAGE - End node image name.
Default value: PT_TREE_END_NODE
8) LEAF_IMAGE - Leaf image name.  Default value: PT_TREE_LEAF
9) IMAGE_WIDTH - Image width.
All four images need to be the same size.  Default value: 15
10) IMAGE_HEIGHT - Image height.  Default value: 12
11) INDENT_PIXELS - Number of pixels to indent each level.
Default value: 20
*/
&REC.GetField(Field.PAGE_NAME).Value = "TREECTL_TEST";
&REC.GetField(Field.PAGE_FIELD_NAME).Value = "TREECTLEVENT";
&REC.GetField(Field.PAGE_SIZE).Value = 15;
&REC.GetField(Field.DISPLAY_LEVELS).Value = 8;
&REC.GetField(Field.COLLAPSED_IMAGE).Value = "PT_TREE_COLLAPSED";
&REC.GetField(Field.EXPANDED_IMAGE).Value = "PT_TREE_EXPANDED";
&REC.GetField(Field.END_NODE_IMAGE).Value = "PT_TREE_END_NODE";
&REC.GetField(Field.LEAF_IMAGE).Value = "PT_TREE_LEAF";
&REC.GetField(Field.IMAGE_WIDTH).Value = 15;
&REC.GetField(Field.IMAGE_HEIGHT).Value = 12;
&REC.GetField(Field.INDENT_PIXELS).Value = 20;

&SET_ID = PSTREEDEFN_VW.SETID;
&USERKEYVALUE = "";
&TREE_NAME = PSTREEDEFN_VW.TREE_NAME;
&TREE_DT = PSTREEDEFN_VW.EFFDT;
&BRANCH_NAME = "";

&MYSESSION = %Session;
&SRC_TREE = &MYSESSION.GetTree();
&RES = &SRC_TREE.OPEN(&SET_ID, &USERKEYVALUE, &TREE_NAME,
&TREE_DT, &BRANCH_NAME, False);

/* Just insert the root node into the &TREECTL Rowset.
If the root node has children, set the &PARENT_FLAG to 'X',
so that its children will be loaded on demand. */

&ROOT_NODE = &SRC_TREE.FindRoot();

If &ROOT_NODE.HasChildren Then
   &PARENT_FLAG = "X";
Else
   &PARENT_FLAG = "N";
End-If;

&NODE_ROWSET = &TREECTL.GetRow(2).GetRowset(1);
&NODE_ROWSET.InsertRow(1);
&REC = &NODE_ROWSET.GetRow(2).GetRecord(1);

/* Set the NODE values:

1) LEAF_FLAG - If this is a leaf set to "Y".  Default value: N
2) TREE_NODE - Node name.
3) DESCR - Node description.  (optional)
4) RANGE_FROM - Leaf's range from value.
5) RANGE_TO - Leaf's range to value.
6) DYNAMIC_FLAG - If this leaf has a dynamic range, set to "Y".
Default value: N
7) ACTIVE_FLAG - Set to "N" for the node or leaf not to be a link.
  Default value: Y
8) DISPLAY_OPTION - Set to "N" to display the name only.
Set to "D" to display the description only.
Set to "B" to display both the name and the description.
Only used for nodes.  Default value: B
9) STYLECLASSNAME - Used to control the style of the link
associated with the node or leaf.  Default value: PSHYPERLINK
10) PARENT_FLAG - If this node is a parent and its direct
children will be loaded now, set to "Y".  If this node is a
parent and its direct children are to be loaded on demand,
set to "X".  Default value: N
11) TREE_LEVEL_NUM - Set to the node's level.  Default value: 1
12) LEVEL_OFFSET - If a child node is to be displayed more than
one level to the right of its parent, specify the number of
additional levels.  Default value: 0
*/
&REC.GetField(Field.LEAF_FLAG).Value = "N";
&REC.GetField(Field.TREE_NODE).Value = &ROOT_NODE.NAME;
&REC.GetField(Field.DESCR).Value = &ROOT_NODE.DESCRIPTION;
&REC.GetField(Field.RANGE_FROM).Value = "";
&REC.GetField(Field.RANGE_TO).Value = "";
&REC.GetField(Field.DYNAMIC_FLAG).Value = "N";
&REC.GetField(Field.ACTIVE_FLAG).Value = "Y";
&REC.GetField(Field.DISPLAY_OPTION).Value = "B";
&REC.GetField(Field.STYLECLASSNAME).Value = "PSHYPERLINK";
&REC.GetField(Field.PARENT_FLAG).Value = &PARENT_FLAG;
&REC.GetField(Field.TREE_LEVEL_NUM).Value = 1;
&REC.GetField(Field.LEVEL_OFFSET).Value = 0;

&SRC_TREE.Close();
DERIVED_HTML.HTMLAREA = GenerateTree(&TREECTL);
Processing Events Passed from a Tree to an Application
To modify the FieldChange PeopleCode to load the direct children of the node into the HTML trees, use the following FieldChange PeopleCode to process the events passed from an HTML tree to an application. The code that processes the load children event loads the direct children of a node the first time the node is expanded by the user. Changes that you must make to the FieldChange PeopleCode are as follows.
Globally change TREECTLEVENT to the name of the invisible field used to process the events.
Set the tree-specific variables.
The &SET_ID, &USERKEYVALUE, &TREE_NAME, &TREE_DT, and &BRANCH_NAME variables contain specific information about the tree. Set these values to the tree you want to open. In the example PeopleCode that follows, they are set like this:
&SET_ID = PSTREEDEFN_VW.SETID;
&USERKEYVALUE = "";
&TREE_NAME = PSTREEDEFN_VW.TREE_NAME;
&TREE_DT = PSTREEDEFN_VW.EFFDT;
&BRANCH_NAME = "";
(Optional) Set the DISPLAY_OPTION field.
The default for the DISPLAY_OPTION field is to display both the node name and the description. You can display just the node name or just the description. The values for this field are:
|
Field Value |
Description |
|
N |
Display the name only. |
|
D |
Display the description only. |
|
B |
Display both the name and description. |
(Optional) Set the STYLECLASSNAME field for the root node.
The STYLECLASSNAME field controls the style of the link associated with a node or leaf. The default for the STYLECLASSNAME is PSHYPERLINK. If PSHYPERLINK is not the style you want to use, change this field value to the style you want.
Change the assignment of the output of every GenerateTree call to the field attached to the HTML area that will display the tree.
In this example, the HTML area control is the DERIVED_HTML.HTMLAREA. You must specify the record and field name associated with the HTML area control on your page.
Change the code that processes the select event to perform the action you want when the user selects a node or leaf.
This section is marked as Process Select Event in the following code sample.
FieldChange PeopleCode Example
The following is the PostBuild PeopleCode example:
Component Rowset &TREECTL; /* process load children event */ If Left(TREECTLEVENT, 1) = "X" Then &ROW = Value(Right(TREECTLEVENT, Len(TREECTLEVENT) - 1)) + 1; &NODE_ROWSET = &TREECTL.GetRow(2).GetRowset(1); &PARENT_REC = &NODE_ROWSET.GetRow(&ROW).GetRecord(1); &PARENT_LEVEL = &PARENT_REC.GetField(Field.TREE_LEVEL_NUM).Value; &ROW = &ROW + 1; &SET_ID = PSTREEDEFN_VW.SETID; &USERKEYVALUE = ""; &TREE_NAME = PSTREEDEFN_VW.TREE_NAME; &TREE_DT = PSTREEDEFN_VW.EFFDT; &BRANCH_NAME = ""; &MYSESSION = %Session; &SRC_TREE = &MYSESSION.GetTree(); &RES = &SRC_TREE.OPEN(&SET_ID, &USERKEYVALUE, &TREE_NAME, &TREE_DT, &BRANCH_NAME, False); /* Find the parent node and expand the tree one level below the parent. Insert just the direct children of the parent node into the &TREECTL Rowset. If any of the child nodes have children, set their PARENT_FLAG to 'X', so that their children are loaded on demand. */ &PARENT_NODE = &SRC_TREE.FindNode(&PARENT_REC. GetField(Field.TREE_NODE).Value, ""); If &PARENT_NODE.HasChildren Then &PARENT_NODE.Expand(2); If &PARENT_NODE.HasChildLeaves Then /* Load the child leaves into the &TREECTL Rowset. */ &FIRST = True; &CHILD_LEAF = &PARENT_NODE.FirstChildLeaf; While &FIRST Or &CHILD_LEAF.HasNextSib If &FIRST Then &FIRST = False; Else &CHILD_LEAF = &CHILD_LEAF.NextSib; End-If; If &CHILD_LEAF.Dynamic = True Then &RANGE_FROM = ""; &RANGE_TO = ""; &DYNAMIC_RANGE = "Y"; Else &RANGE_FROM = &CHILD_LEAF.RangeFrom; &RANGE_TO = &CHILD_LEAF.RangeTo; &DYNAMIC_RANGE = "N"; End-If; &NODE_ROWSET.InsertRow(&ROW - 1); &REC = &NODE_ROWSET.GetRow(&ROW).GetRecord(1); /* Set the NODE values: 1) LEAF_FLAG - If this is a leaf set to "Y". Default value: N 2) TREE_NODE - Node name. 3) DESCR - Node description. (optional) 4) RANGE_FROM - Leaf's range from value. 5) RANGE_TO - Leaf's range to value. 6) DYNAMIC_FLAG - If this leaf has a dynamic range, set to "Y". Default value: N 7) ACTIVE_FLAG - Set to "N" for the node or leaf not to be a link. Default value: Y 8) DISPLAY_OPTION - Set to "N" to display the name only. Set to "D" to display the description only. Set to "B" to display both the name and the description. Only used for nodes. Default value: B 9) STYLECLASSNAME - Used to control the style of the link associated with the node or leaf. Default value: PSHYPERLINK 10) PARENT_FLAG - If this node is a parent and its direct children will be loaded now, set to "Y". If this node is a parent and its direct children are to be loaded on demand, set to "X". Default value: N 11) TREE_LEVEL_NUM - Set to the node's level. Default value: 1 12) LEVEL_OFFSET - If a child node is to be displayed more than one level to the right of its parent, specify the number of additional levels. Default value: 0 */ &REC.GetField(Field.LEAF_FLAG).Value = "Y"; &REC.GetField(Field.TREE_NODE).Value = ""; &REC.GetField(Field.DESCR).Value = ""; &REC.GetField(Field.RANGE_FROM).Value = &RANGE_FROM; &REC.GetField(Field.RANGE_TO).Value = &RANGE_TO; &REC.GetField(Field.DYNAMIC_FLAG).Value = &DYNAMIC_RANGE; &REC.GetField(Field.ACTIVE_FLAG).Value = "Y"; &REC.GetField(Field.DISPLAY_OPTION).Value = "B"; &REC.GetField(Field.STYLECLASSNAME).Value = "PSHYPERLINK"; /* Leaves never have children. */ &REC.GetField(Field.PARENT_FLAG).Value = "N"; &REC.GetField(Field.TREE_LEVEL_NUM).Value = &PARENT_LEVEL + 1; &REC.GetField(Field.LEVEL_OFFSET).Value = 0; &ROW = &ROW + 1; End-While; End-If; If &PARENT_NODE.HasChildNodes Then /* Load the child nodes into the &TREECTL Rowset. */ &FIRST = True; &CHILD_NODE = &PARENT_NODE.FirstChildNode; While &FIRST Or &CHILD_NODE.HasNextSib If &FIRST Then &FIRST = False; Else &CHILD_NODE = &CHILD_NODE.NextSib; End-If; If &CHILD_NODE.HasChildren Then &PARENT_FLAG = "X"; Else &PARENT_FLAG = "N"; End-If; /* If the tree uses strict levels, set the &LEVEL_OFFSET to the number of levels that the child node is to the right of its parent minus 1. */ If &SRC_TREE.LevelUse = "S" Then &LEVEL_OFFSET = &CHILD_NODE.LevelNumber - &PARENT_NODE.LevelNumber - 1; Else &LEVEL_OFFSET = 0; End-If; &NODE_ROWSET.InsertRow(&ROW - 1); &REC = &NODE_ROWSET.GetRow(&ROW).GetRecord(1); &REC.GetField(Field.LEAF_FLAG).Value = "N"; &REC.GetField(Field.TREE_NODE).Value = &CHILD_NODE.Name; &REC.GetField(Field.DESCR).Value = &CHILD_NODE.Description; &REC.GetField(Field.RANGE_FROM).Value = ""; &REC.GetField(Field.RANGE_TO).Value = ""; &REC.GetField(Field.DYNAMIC_FLAG).Value = "N"; &REC.GetField(Field.ACTIVE_FLAG).Value = "Y"; &REC.GetField(Field.DISPLAY_OPTION).Value = "B"; &REC.GetField(Field.STYLECLASSNAME).Value = "PSHYPERLINK"; &REC.GetField(Field.PARENT_FLAG).Value = &PARENT_FLAG; &REC.GetField(Field.TREE_LEVEL_NUM).Value = &PARENT_LEVEL + 1; &REC.GetField(Field.LEVEL_OFFSET).Value = &LEVEL_OFFSET; &ROW = &ROW + 1; End-While; End-If; /* change the parent's PARENT_FLAG from 'X' to 'Y' */ &PARENT_REC.GetField(Field.PARENT_FLAG).Value = "Y"; HTMLAREA = GenerateTree(&TREECTL, TREECTLEVENT); End-If; &SRC_TREE.Close(); Else /* Process select event. */ /* As an example, just display the selected node name or leaf range as a MessageBox. */ If Left(TREECTLEVENT, 1) = "S" Then &ROW = Value(Right(TREECTLEVENT, Len(TREECTLEVENT) - 1)) + 1; &NODE_ROWSET = &TREECTL.GetRow(2).GetRowset(1); &REC = &NODE_ROWSET.GetRow(&ROW).GetRecord(1); If &REC.GetField(Field.LEAF_FLAG).Value = "N" Then MessageBox(0, "", 0, 0, "The selected node is %1.", &REC.GetField(Field.TREE_NODE).Value); Else If &REC.GetField(Field.DYNAMIC_FLAG).Value = "N" Then If &REC.GetField(Field.RANGE_FROM).Value = &REC.GetField(Field.RANGE_TO).Value Then &TEMP = "[" | &REC.GetField(Field.RANGE_FROM). Value | "]"; Else &TEMP = "[" | &REC.GetField(Field.RANGE_FROM). Value | " - " | &REC.GetField(Field.RANGE_TO).Value | "]"; End-If; Else &TEMP = "[ ]"; End-If; MessageBox(0, "", 0, 0, "The selected leaf is %1.", &TEMP); End-If; Else /* process all other events */ HTMLAREA = GenerateTree(&TREECTL, TREECTLEVENT); End-If; End-If; /* done processing the event, so clear it */ TREECTLEVENT = "";
See Also
Using HTML Tree Actions (Events)
Adding Mouse-Over Ability to HTML Trees
To add mouse-over ability to HTML tree elements, you must add fields to the TREECTL_HDR_SBR record and PeopleCode to the program to set the values and the images.
Add the following fields to thr TREECTL_HDR_SBR (tree control header subrecord) record.
COLLAPSED_MSGNUM
COLLAPSED_MSGSET
END_NODE_MSGNUM
END_NODE_MSGSET
EXPANDED_MSGNUM
EXPANDED_MSGSET
LEAF_NODE_MSGNUM
LEAF_NODE_MSGSET
Add the following PeopleCode to set the message set and number for the mouse-over text:
&REC.GetField(Field.EXPANDED_MSGSET).Value = 2;
&REC.GetField(Field.EXPANDED_MSGNUM).Value = 903;
&REC.GetField(Field.COLLAPSED_MSGSET).Value = 2;
&REC.GetField(Field.COLLAPSED_MSGNUM).Value = 904;
&REC.GetField(Field.END_NODE_MSGSET).Value = 2;
&REC.GetField(Field.END_NODE_MSGNUM).Value = 905;
&REC.GetField(Field.LEAF_MSGSET).Value = 2;
&REC.GetField(Field.LEAF_MSGNUM).Value = 906;
Add the following fields fields to the TREECTL_NDE_SBR record:
DESCR_MSGNUM
DESCR_MSGSET
Add PeopleCode to set the DESCR_MSGNUM and DESCR_MSGSET fields.
These two fields should be set to the correct message number and message set values that contain the text to be used as the mouse-over text.
Adding Visual Selection Node Indicators
Sometimes, users need a visual indicator, such as a different color or style, to indicate which node is selected. This example shows a selected node style:

Example of selected node style
To add selected node highlighting:
Add the field NODESELECTEDSTYLE to the TREECTL_HDR_SBR record.
Add PeopleCode to set the NODESELECTEDSTYLE field to provide the highlighting effect.
The NODESELECTEDSTYLE field takes the name of a style class.
The following example uses the PSTREENODESELECTED style:
&REC.GetField(Field.NODESELECTEDSTYLE).Value = "PSTREENODESELECTED";
You can set the style of the selected node when processing the select event.
Note. You also must reset the style of the previous selected node when processing the select event. To find the previous selected node, you can search the node rowset looking for a node with a STYLECLASSNAME equal to the style you set for selected nodes. Alternatively, you can keep a global variable with the index of the node in the rowset. If you keep an index variable, however, you may have to update the index when processing the load children event.
Specifying Override Images
You specify different images to represent the nodes in a tree by using the TREECTL_NODE record.
To specify override images:
Add the following fields to the tree control node record:
OVERRIDE_IMAGE
OVERRIDE_MSGSET
OVERRIDE_MSGNUM
Add PeopleCode to use the override values when writing tree control node records.