34 Set Up Manufacturing Information
This chapter contains these topics:
Set up the information that is needed for process and repetitive manufacturing, such as user defined codes, work day calendars, and constants.
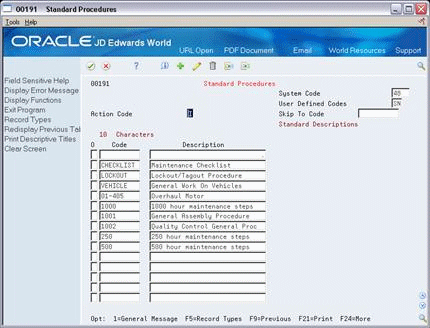
34.1 Setting Up Standard Procedures
From Shop Floor Control, enter 29
From Shop Floor Control Setup(G3141), choose Standard Procedures
You can set up generic messages (48/SN) that represent procedural or message text for your company. Use them to describe a standard procedure for each step in a routing.
The description you define for the code prints on shop floor documents and appears in online inquiries that access data on Enter/Change Routing.
-
Complete the following fields:
-
Character Code
-
Description
-
-
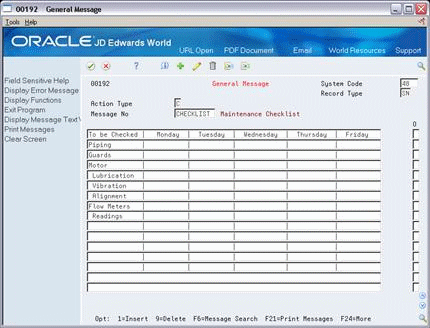
On General Message, complete the following fields to add a message to the code you selected:
-
Message Number
-
Message
-
34.2 Setting Up Employee Labor Rates
From Shop Floor Control, enter 29
From Shop Floor Control Setup(G3141), choose Employee Labor Rates
Employee labor rate codes are generic rates (31/ER) that represent hourly labor rates for your employees. The rate that you define for each employee appears in the Employee Rate field on the Hours and Quantities Entry screen when the employee enters time transactions. For each code, you can define the name or type of employee that the code represents and the hourly labor rate for the employee or job category.
To set up employee labor rates
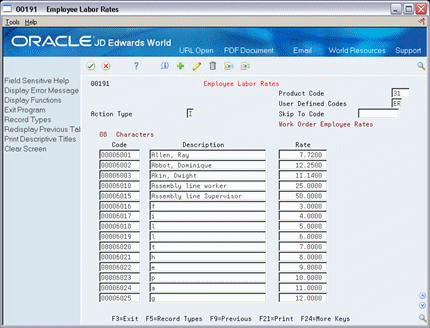
Complete the following fields:
-
Character Code
-
Description
-
Rate
| Field | Explanation |
|---|---|
| Rate | A code used to define rate information in the General Rate/Message Records table (F00191). |
34.3 Setting Up the Shop Floor Calendar
From Shop Floor Control, enter 29
From Shop Floor Control Setup(G3141), choose Shop Floor Calendar
You can define the work days by month and year for each branch or all branches in your system in the Shop Floor Calendar. The system uses this calendar to determine manufacturing schedules.
You can also define calendars by shift and name. The system uses these calendars for line sequencing by shift in repetitive manufacturing.
To increase plant capacity, manufacturers run production lines for more than one shift, as well as run different lines of production on different days of the week. You specify these shifts and lines on the Shop Floor Calendar.
To set up the shop floor calendar
You set up a calendar month by locating the month, year, and branch, and entering any different day types.
On Shop Floor Calendar
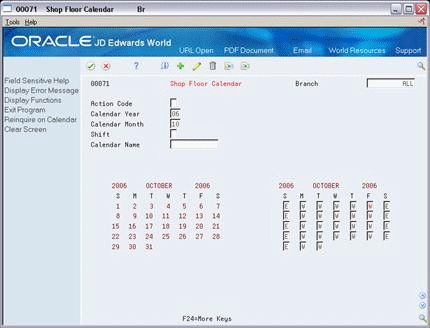
Complete the following fields:
-
Branch
-
Calendar Year
-
Calendar Month
-
Shift (for repetitive manufacturing)
-
Line (for repetitive manufacturing)
-
Type of Day
The calendar on the left shows the actual calendar days for the month and year that you requested. The calendar on the right shows the workdays and non-workdays that you define.
| Field | Explanation |
|---|---|
| Branch | A code that represents a high-level business unit. It can be used to reference a branch or plant that might have departments or jobs, which represent lower-level business units (data item MCU), subordinate to it. For example:
Business unit security is based on the higher-level business unit. Form-specific information This value identifies the branch or plant in which the calendar resides. It must be a valid business unit. |
| Calendar Year | The calendar year. |
| Calendar Month | The calendar month. |
| Shift Code | A user defined code (07/SH) that identifies daily work shifts. In payroll systems, you can use a shift code to add a percent or amount to the hourly rate on a timecard.
For payroll and time entry: If an employee always works a shift for which a shift rate differential is applicable, enter that shift code on the employee's master record. When you enter the shift on the employee's master record, you do not need to enter the code on the timecard when you enter time. If an employee occasionally works a different shift, you enter the shift code on each applicable timecard to override the default. |
| Business Unit | An alphanumeric field that identifies a separate entity within a business for which you want to track costs. For example, a business unit might be a warehouse location, job, project, work center, or branch/plant.
You can assign a business unit to a voucher, invoice, fixed asset, and so on, for purposes of responsibility reporting. For example, the system provides reports of open accounts payable and accounts receivable by business units to track equipment by responsible department. Security for this field can prevent you from locating business units for which you have no authority. Note: The system uses this value for Journal Entries if you do not enter a value in the AAI table. Form-specific information For repetitive manufacturing, this field provides the link to the Work Center Master, which allows the system to create calendars for that production line. You must also identify all shifts for the production line. The Line Scheduling Workbench and Line Sequencing Workbench programs use these shift and line specific calendars to schedule production accordingly. |
34.3.1 What You Should Know About
| Topic | Description |
|---|---|
| Deleting a branch calendar | If you delete a branch calendar for a month and year, the calendar record no longer exists. However, if you locate a month and year that does not exist, it appears with default values. You can then add the record. |
| System defaults | If the shop calendar for the branch, month, and year are not yet defined, the system preloads default work days (Monday through Friday) and weekends (Saturday and Sunday). Holidays are always user defined. |
| Shift calendars | Shift calendars are not used for DRP/MPS/MRP. |
34.4 Setting Up Manufacturing Constants
From Shop Floor Control, enter 29
From Shop Floor Control Setup(G3141), choose Manufacturing Constants
You set up manufacturing constants to maintain general branch or plant information that affects processing throughout the Manufacturing system, such as:
-
When inventory is committed and backflushed
-
Which overhead costs calculations are used
-
Whether work center efficiency is considered when calculating direct labor and overhead
-
Whether an audit trail tracks all changes made to bills of material
-
Whether the system validates bills of material online as you enter them
Information that you define for manufacturing constants affects all areas of the JD Edwards World Manufacturing system, so you should make your choices carefully.
Complete the following tasks:
-
Set up engineering manufacturing constants
-
Set up production manufacturing constants (optional)
-
Set up accounting manufacturing constants
To set up engineering manufacturing constants
On Manufacturing Constants
Figure 34-5 Manufacturing Constants screen
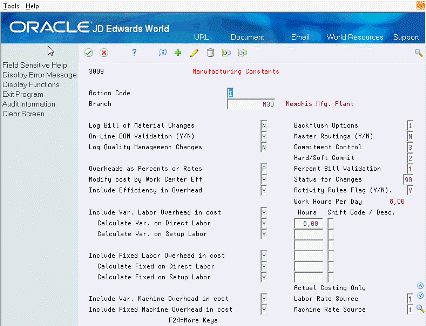
Description of "Figure 34-5 Manufacturing Constants screen"
-
-
On-Line BOM Validation
-
-
Complete the following optional fields:
-
Log Bill of Material Changes
-
Master Routings
-
Percent Bill Validation
-
Activity Rules Flag (Y/N)
-
Actual Costing only:
-
Labor Rate Source
-
Machine Rate Source
-
-
| Field | Explanation |
|---|---|
| Log Bill of Material Changes | This field determines whether changes to the bill of material are recorded in the Bill of Material Change table (F3011). Valid values are:
Y – Yes, log changes. N – No, do not log changes. Blank will assume an N. When you log bill of material changes, the system saves the old bill of material and the new changed bill of material. |
| On-Line BOM Validation (Y/N) | Determines whether the system performs an online component/parent validation and low-level code assignment when you revise a bill of material.
Valid values are: Y – Yes, validate items online. N – No, do not validate items online. Note: JD Edwards World recommends that you validate items online (enter Y) unless your bills of material are extremely large. Important: If you enter N, you must validate the items in batch. Run the Integrity Analysis program (P30601) after bill of material updates and before you run the Cost Simulation (P30820) and the Cost Update program (P30835) or perform a DRP/MPS/MRP generation (P3482). |
| Master Routings (Y/N) | This field controls whether the system uses the master routing for an item or a routing defined for the parent item. Both routings are retrieved from the Routing Master table (F3003). Valid values are:
Y – Yes, use the master routing for an item, if one exists. The Shop Floor Control system will check the Item Cross Reference table (F4104), Cross Reference Type MR, for the parent item. If it finds a cross-reference, the system uses the master routing from the Routing Master table (F3003). If it does not find a cross-reference, the system uses the routing defined for the parent item. N – No, do not check for a master routing for the item. The system will always use the parent item's routing from the Routing Master table (F3003). |
| Percent Bill Validation | This flag designates whether percent bills are allowed to contain fixed or variable components in addition to the 100% formula. If left blank, only percent components will be allowed and it must total 100%. |
| Percent Bill Validation | This flag designates whether percent bills are allowed to contain fixed or variable components in addition to the 100% formula. If left blank, the system allows only percent components and must total 100%. |
| Activity Rules Flag (Y/N) | This flag determines allowable status changes. Prior to turning on the Activity Rules Flag (P3009), establish rules for each Document and Work Order type combination you use in the branch/plant. Activity Rules for Manufacturing Work Orders are optional by branch/plant.
Y - Yes. Use Activity Rules to regulate updates to Work Order and Rate Schedule status codes. With Activity Rules activated, attempted status updates not allowed by the rules generate an error and prevent completion of the requested action. N - No. Do not regulate updates to Work Order and Rate Schedule status codes. |
| Labor Rate Source | If manufactured items are set in Cost Revisions (F4105) to use Sales /Inventory cost method 02, you must select a 1 or 2 in the field. The code specifies the source for labor rates. Valid values are:
1 - Work Center Rates table (F30008) 2 - Employee Labor Rates table (F00191) |
| Machine Rate Source | If manufactured items are set in Cost Revisions (F4105) to use Sales/Inventory cost method 02, you must select a 1 or 2 in the field. The code specifies the source for machine rates. Valid values are:
1 - Work Center Rates table (F30008) 2 - Equipment Rates table (F1301) |
See Also:
-
Setting Up Manufacturing Constants (P3009) in JD Edwards World Product Data Management - Discrete Guide
To set up production manufacturing constants
On Manufacturing Constants
Complete the following optional fields:
-
Backflush Option
-
Commitment Control
-
Hard/Soft Commit
-
Hours
-
Shift Code
| Field | Explanation |
|---|---|
| Backflush Options | Determines how the system performs commitment and release of inventory during the backflush process. Valid codes are:
Note: You must create the work order routing before the parts list. If you are running work order generation, the work order routing and the parts list must be created at the same time. |
| Commitment Control | Determines how the system commits inventory to a work order, and limits the inventory location to which commitments are made. The system activates this field only when you create hard commitments. Valid codes are:
When you set the Commitment Method field in the Item Branch/Plant table to 2 or 3 (lot number or expiration date control), you must set this field to 3. |
| Hard/Soft Commit | Determines how the Shop Floor Control system commits inventory. Valid codes are:
1 – The system performs a hard commitment at the creation of the parts list. The hard commitment remains in effect until inventory is relieved. 2 – The system performs a soft commitment at the creation of the parts list. Changed to a hard commitment during the pick list print process for the work order. The hard commitment remains in effect until inventory is relieved. 3 – The system performs a soft commitment at creation of the parts list. The soft commitment remains in effect until inventory is relieved. Note: When the hard/soft commit option is set to 2 or 3, any line item in the parts list may be hard committed prior to printing or relieving the inventory. Note: When you set the Commitment Method field in the Branch/Plant Constants screen to 2 or 3, you must use 1 or 2 for this field because a hard commitment must be performed. |
| Hours - Work Hours Per Day | The number of work hours that the manufacturing plant operates per day.
Form-specific information For repetitive manufacturing, identify the number of work hours per shift for the specified branch. The Resource Generation program uses the corresponding shift hours to calculate the available resource units for each shift, and the total for the day. Since the shift hours may apply to different days of the week, the system uses the total of the first three hours to define the work hours per day value. |
| Shift Code | A user defined code (07/SH) that identifies daily work shifts. In payroll systems, you can use a shift code to add a percent or amount to the hourly rate on a timecard.
For payroll and time entry: If an employee always works a shift for which a shift rate differential is applicable, enter that shift code on the employee's master record. When you enter the shift on the employee's master record, you do not need to enter the code on the timecard when you enter time. If an employee occasionally works a different shift, you enter the shift code on each applicable timecard to override the default. Form-specific information For repetitive manufacturing, use the six corresponding shift fields to identify all production line shifts for the specified branch. The Resource Generation program uses the corresponding shift hours to calculate the available resource units for each shift, and the total for the day. |
To set up accounting manufacturing constants
On Manufacturing Constants
-
Complete the following fields:
-
Modify Cost by Work Center Efficiency
-
Include Efficiency in Overhead
-
Include Variable Labor Overhead in Cost
-
Calculate Variable on Direct Labor
-
Calculate Variable on Setup Labor
-
Include Fixed Labor Overhead in Cost
-
Calculate Fixed on Direct Labor
-
Calculate Fixed on Setup Labor
-
Include Variable Machine Overhead in Cost
-
Include Fixed Machine Overhead in Cost
-
-
Complete the following optional field:
-
Overheads as Percents or Rates
-
| Field | Explanation |
|---|---|
| Overheads as Percents or Rates | Determines how values for overhead fields (cost components C1 through C4) in the Work Center Rate Revisions table (F30008) are expressed. Valid codes are:
R – Express overhead values as rates (currency values). For example, enter five dollars as 5.00. P – Express overhead values as percents. Enter percents as whole numbers. For example, enter five percent as 5.00. |
| Modify cost by Work Center Eff | Controls whether the cost rollup creates cost component B4 (for labor efficiency) based on the direct labor value (cost component B1) and the Work Center Efficiency percent from the Work Center Revisions table (P30006). Valid values are:
Y – Yes. Create cost component B4. N – No. Do not create cost component B4. |
| Include Efficiency in Overhead | If you specified that you want to modify costs by work center efficiency, this field determines whether the cost rollup includes work center efficiency when calculating overhead values. Valid values are:
Y – Include work center efficiency. N – Exclude work center efficiency. |
| Include Var. Labor Overhead in cost | Controls whether the cost rollup creates cost component C3 (for variable labor overhead) in the Cost Components table (F30026). Valid values are:
Y – Yes. Create cost component C3. N – No. Do not create cost component C3. |
| Calculate Var. on Direct Labor | Determines whether the cost rollup includes direct labor expenses (cost component B1) in the total used to calculate variable labor overhead (cost component C3). Valid values are:
Y – Include direct labor expenses. N – Exclude direct labor expenses. |
| Calculate Var. on Setup Labor | Determines whether the cost rollup includes setup labor expenses (cost component B2) in the total used to calculate variable setup overhead (cost component C3). Valid values are:
Y – Include setup labor expenses. N – Exclude setup labor expenses. |
| Include Fixed Labor Overhead in cost | Controls whether the cost rollup creates cost component C4 (for fixed labor overhead) in the Cost Components table (F30026). Valid values are:
Y – Yes. Create cost component C4. N – No. Do not create cost component C4. |
| Calculate Fixed on Direct Labor | Determines whether the cost rollup includes direct labor expenses (cost component B1) in the total used to calculate fixed labor overhead (cost component C4). Valid values are:
Y – Include direct labor expenses. N – Exclude direct labor expenses. |
| Calculate Fixed on Setup Labor | Determines whether the cost rollup includes setup labor expenses (cost component B2) in the total used to calculate fixed setup overhead (cost component C4). Valid values are:
Y – Include setup labor expenses. N – Exclude setup labor expenses. |
| Include Var. Machine Overhead in cost | Controls whether the cost rollup creates cost component C1 (for variable machine overhead) in the Cost Components table (F30026). Valid values are:
Y – Yes. Create cost component C1. N – No. Do not create cost component C1. |
| Include Fixed Machine Overhead in cost | Controls whether the cost rollup creates cost component C2 (for fixed machine overhead) in the Cost Components table (F30026). Valid values are:
Y – Yes. Create cost component C2. N – No. Do not create cost component C2. |
See Also:
-
Setting Up Manufacturing Constants (P3009) in JD Edwards World Product Data Management - Process Guide
34.5 Setting Up Work Order Activity Rules
From Shop Floor Management (G31), enter 29
From Shop Floor Control Setup (G3141), choose Work Order Activity Rules
Activity Rules for manufacturing can be set up for Work Orders and Rate Schedules to define beginning statuses and allowable status changes by Document Type and Work Order Type.
Branch/Plant in the Manufacturing Constants (P3009) activate Work Order Activity Rules for manufacturing. When the Activity Rules Flag (Y/N) field on the Manufacturing Constants video is set to Y, any programs that set or update the status of a Work Order or Rate Schedule, use these rules and status changes have to follow the allowed status flow. Attempted changes that are not allowed by the rules, generate an error that prevents the corresponding processing.
Create a Branch/Plant
In Manufacturing Constants (P3009) set Activity Rules Flag (Y/N) field to Y to turn on Activity Rules.
To set up Work Order Activity Rules
On Work Order Activity Rules
Figure 34-6 Work Order Activity Rates screen
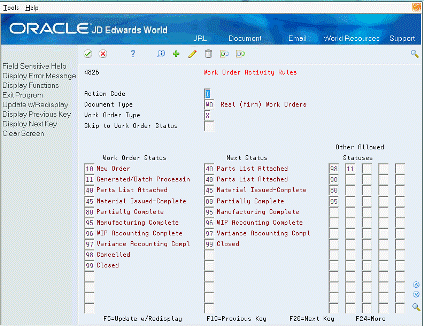
Description of "Figure 34-6 Work Order Activity Rates screen"
-
Complete the following fields:
-
Document Type
-
Work Order Type (this may be left blank)
-
| Field | Explanation |
|---|---|
| Work Order Status | Specifies the From statuses. Some Programs use the first value in this column as the beginning status when none is otherwise specified. |
| Next Status | Specifies the To statuses. Some programs use these values as default To statuses when you enter * in the update status processing option. |
| Other Allowed Statuses | Specifies up to five additional To Statuses for each From status. |
See Also:
-
Setting Up Manufacturing Constants (P3009) in JD Edwards World Product Data Management - Discrete Guide
See Section 35.30, "Work Order Activity Rules - Equipment (P4826)"
SeeSection 35.1, "Manufacturing Work Order Entry (P48013)"
See Section 35.2, "Generate and Print Work Orders (P31410)"
See Section 35.21, "Super Backflush (P31123)"
See Section 36.1, "Enter/Change Rate Schedule (P3109)"
34.6 Setting Up Work Centers
From Shop Floor Control, enter 29
From Shop Floor Control Setup(G3141), choose Enter/Change Work Centers
You can maintain general information about a work center, such as pay points, prime load codes, number of machines and workers, crew size, and backflush locations.
As an alternative to setting up work centers manually, you can use the Work Center Revisions - Z File program (P3006Z) to import an extensive amount of work center data into your system. See Appendix C, "Import Mass Data into Manufacturing Systems" for more information.
34.6.1 Before You Begin
-
Set up your work centers and dispatch groups as valid business units on the Single Business Unit Revisions screen.
On Enter/Change Work Center
Figure 34-7 Enter/Change Work Centers screen
Description of "Figure 34-7 Enter/Change Work Centers screen"
-
To locate your work center record, complete the following field:
-
Work Center
-
-
Complete the following optional fields:
-
Dispatch Group
-
Work Center Type (for repetitive manufacturing)
-
Calendar (for repetitive manufacturing)
-
Crew Size
-
Queue Hours
-
Move Hours
-
Replenishment Hours
-
Location - Issue
-
Location Branch
-
Capacity Standard (for repetitive manufacturing)
-
Capacity Unit of Measure (for repetitive manufacturing)
-
Capacity Minimum (for repetitive manufacturing)
-
Capacity Maximum (for repetitive manufacturing)
-
Hours (for repetitive manufacturing)
-
| Field | Explanation |
|---|---|
| Work Center | An alphanumeric field that identifies a separate entity within a business for which you want to track costs. For example, a business unit might be a warehouse location, job, project, work center, or branch/plant.
You can assign a business unit to a voucher, invoice, fixed asset, and so on, for purposes of responsibility reporting. For example, the system provides reports of open accounts payable and accounts receivable by business units to track equipment by responsible department. Security for this field can prevent you from locating business units for which you have no authority. Note: The system uses this value for Journal Entries if you do not enter a value in the AAI table. |
| Dispatch Group | A super category code to group work centers within an overall business unit. For example, you can group like machines operating out of several work centers that report to one business unit under a dispatch group. |
| Crew Size | The number of people who work in the specified work center or routing operation.
The system multiplies the Run Labor value in the Routing Master table (F3003) by crew size during costing to generate total labor dollars. If the Prime Load Code is L or B, the system uses the total labor hours for backscheduling. If the Prime Load Code is C or M, the system uses the total machine hours for backscheduling without modification by crew size. Form-specific information For Shop Floor Control: If you leave the Hours field on the Routing Revisions screen blank, the system uses the value entered in this field for lead time and scheduling calculations. |
| Move Hours | The planned time in hours that is required to move the order from this operation to the next operation in the same work center.
If the Routing Master values are blank, the default value comes from the work order routing. However, the system uses these values only for backscheduling variable lead time items. Form-specific information If you leave the Hours field on the Routing Revisions screen blank, the system uses the value entered in this field for lead time and scheduling calculations. |
| Replenishment Hours | The time required before a consuming work center will have a replacement container of goods available from this supplying work center.
This value is used only for KANBAN card processing in Shop Floor Control. |
| Work Center Type | Defines the type of work center. Possible values are:
Blank – Stand alone work center 1 – Production line in a repetitive environment 2 – Reporting work station within a production line Form-specific information For repetitive manufacturing, the system verifies the value is not valid as a work center for an operation from the routing. |
| Calendar | Enter the value of the calendar which corresponds to the calendar type. For example, if the calendar type is ROUTE, enter a valid route code to display the calendar for a particular route. |
| Hours | The number of work hours that the manufacturing plant operates per day.
Form-specific information For repetitive manufacturing, identify the number of work hours per shift for the specified work center. Use the six corresponding shift fields to identify all production line shifts for the specified work center. |
| Capacity Std | The standard capacity level at which a production line usually operates. |
| Capacity UOM | Production unit of measure used to express the capacity of a production line. For example Stamps, injections, etc. |
| Capacity Min | The lower limit capacity beyond which the production line should not operate. This value is decided by management based on efficiencies, costs, etc. |
| Capacity Max | The upper limit capacity beyond which a production line can not produce. |
| Shift Code / Description | The number of work hours that the manufacturing plant operates per day.
Form-specific information For repetitive manufacturing, identify the number of work hours per shift for the specified work center. Use the six corresponding shift fields to identify all production line shifts for the specified work center. |
34.6.2 What You Should Know About
34.7 Setting Up Resource Units
From Shop Floor Control, enter 29
From Shop Floor Control Setup(G3141), choose Enter/Change Resource Units
Resource unit information indicates the capacity of a work center on a given day. The system uses this information to backschedule work orders in shop floor control and to calculate available hours for capacity planning.
34.7.1 Before You Begin
-
Define workdays for the branch or plant in the shop floor calendar
The Work With Resource Units screen shows the work hours available each day of a specified month for a work center.
On Enter/Change Resource Units
Figure 34-8 Enter/Change Resource Units screen
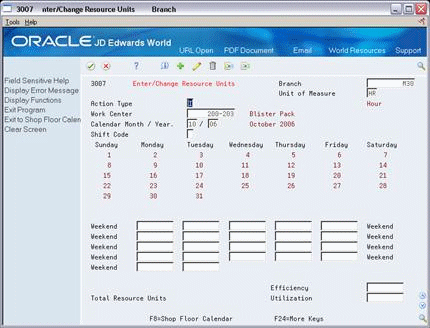
Description of "Figure 34-8 Enter/Change Resource Units screen"
-
Complete the following fields:
-
Branch
-
Unit of Measure
-
Work Center
-
Calendar Month/Year
-
Resource Unit
-
-
Complete the following optional fields:
-
Shift (for repetitive manufacturing)
-
Efficiency
-
Utilization
-
| Field | Explanation |
|---|---|
| Unit of Measure | A user defined code (system 00/type UM) that identifies the unit of measurement for an amount or quantity. For example, it can represent a barrel, box, cubic yard, gallon, an hour, and so on. |
| Work Center | An alphanumeric field that identifies a separate entity within a business for which you want to track costs. For example, a business unit might be a warehouse location, job, project, work center, or branch/plant.
You can assign a business unit to a voucher, invoice, fixed asset, and so on, for purposes of responsibility reporting. For example, the system provides reports of open accounts payable and accounts receivable by business units to track equipment by responsible department. Security for this field can prevent you from locating business units for which you have no authority. Form-specific information This value identifies the available capacity for the work center. |
| Efficiency | A user defined value that indicates how efficiently a work center operates. This value usually refers to people efficiency. When you enter a value in this field, and the Modify Cost by Work Center Efficiency field in the Job Shop Manufacturing Constants table (F3009) is set to Y, the system creates a new cost component (B4) from the cost calculated from the direct labor cost (B1). The system also uses this value to calculate rated capacity.
Example: If the constant is set to Y, the value of this field is 80%, and the direct labor cost is 10, the system creates a B4 cost component for 2 in the Item Cost Component Add-Ons table (F30026). Enter percents as whole numbers, for example, enter 80% as 80.00. |
| Total Resource Units | The total resource units for the month. |
| Utilization | A percentage that indicates how intensively a work center is being used. This value usually refers to machine use. It is the ratio of the direct time charged for production activities to the planned hours. This value is also used to calculate rated capacity.
Enter percents as whole numbers, for example, enter 80% as 80.00. |
| Shift Code | A user defined code (07/SH) that identifies daily work shifts. In payroll systems, you can use a shift code to add a percent or amount to the hourly rate on a timecard.
For payroll and time entry: If an employee always works a shift for which a shift rate differential is applicable, enter that shift code on the employee's master record. When you enter the shift on the employee's master record, you do not need to enter the code on the timecard when you enter time. If an employee occasionally works a different shift, you enter the shift code on each applicable timecard to override the default. Form-specific information You can view the total resources available for a given day by entering an asterisk (*) in this field. For repetitive manufacturing, enter a 1-6 to allow the system to display a specific shift's units, or enter a * to view the total resource availability for the specified time period. While this program displays the total units for the shift/day for work centers defined with a standard capacity and unit of measure in those units, the system stores the data in hours. |
34.7.2 What You Should Know About
34.8 Setting Up Line and Item Relationships
From Shop Floor Control, enter 29
From Shop Floor Control Setup(G3141), choose Line Item Relationships
The Line/Item Relationships program allows you to add, change, and delete data stored in the Line/Item Relationships table. These relationships include lines where an item is produced and the amount of resources consumed by an item on each line. Planning uses the record flagged as the default when the system creates rates. The specification for shift and period is only valid for the default line.
To set up line and item relationships
On Line/Item Relationships
Figure 34-9 Line/Item Relationships screen
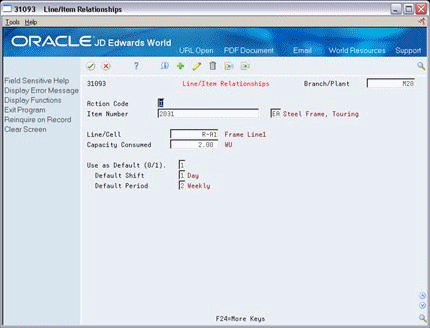
Description of "Figure 34-9 Line/Item Relationships screen"
Complete the following fields:
-
Branch/Plant
-
Item Number
-
Line/Cell
-
Capacity Units
-
Default
-
Shift
-
Period
| Field | Explanation |
|---|---|
| Line/Cell Identifier | Defines a production line or cell. Detailed work center operations can be defined inside the line or cell. For rate based manufacturing to use this value for reporting, this value must match the line cell in the header. |
| Resource units consumed | Indicates how many of the line's resource units are needed to produce one item. |
| Shift Code | A user defined code (07/SH) that identifies daily work shifts. In payroll systems, you can use a shift code to add a percent or amount to the hourly rate on a timecard.
For payroll and time entry: If an employee always works a shift for which a shift rate differential is applicable, enter that shift code on the employee's master record. When you enter the shift on the employee's master record, you do not need to enter the code on the timecard when you enter time. If an employee occasionally works a different shift, you enter the shift code on each applicable timecard to override the default. |
| Month/Week/Day/Shift | A code that determines the frequency of the schedule. Valid codes are:
1 – Monthly 2 – Weekly 3 – Daily 4 – Per Shift |