11 Enter Timecards by Employee
This chapter contains these topics:
-
Section 11.1, "Entering Essential Timecard Information by Employee,"
-
Section 11.5, "Overriding System-Supplied Information Temporarily,"
You can use several methods to manually enter timecards. When you need to enter timecards for individual employees, entering time by employee is usually the most convenient method. You also use this method when you need to temporarily override DBA amounts or copy an employee's labor distribution instructions.
Essential timecard information is the minimum information required to enter a timecard. When you enter essential timecard information for an employee, the system supplies a pay rate and some additional information, such as business unit, account number, tax area, and so on. In some cases, you might need to temporarily override an employee's system-derived information. For example, when an employee who normally works the day shift temporarily works the night shift, you might need to enter a shift differential.
When an employee receives a bonus or lump sum payment, you must enter a timecard for that employee. For employees who charge their time to work orders, you can use time entry to associate hours worked with specific work order numbers. For employees whose timecard information does not often vary, you can use labor distribution instructions to save time during time entry.
Negative time processing lets you correct pay processing errors and provides a solid audit trail that eliminates the need for manual journal entries. You can processes negative time through the payroll cycle for employees of any record type. When you enter a negative value in the Hours field on the by Employee screen, the system calculates associated DBAs and creates all reversing journal entries.
11.1 Entering Essential Timecard Information by Employee
From Payroll Master (G07), choose Time Entry
From Time Entry (G0712), choose by Employee
Essential timecard information is the minimum information required to enter a timecard. You must enter timecard information for all employees who are not set up for autopay. (Autopay employees include salaried employees and hourly employees who are set up for standard hours.) Entering timecards by employee is usually the most convenient method when you need to enter information for individual employees. When you enter essential timecard information by employee, the system supplies additional information, depending on how your system is set up.
To enter essential timecard information by employee
On by Employee
-
Complete the following fields:
-
Employee
-
Date
-
Pay
-
-
To assign a specific batch number, complete the following field:
-
Batch
-
-
Complete one of the following fields:
-
Hours
-
Lump Sum Amount
-
| Field | Explanation |
|---|---|
| WrkDt | The date used as the actual work date or pay period ending date.
Form-specific information If you enter time on a weekly or bi-weekly basis, you can use any date within the pay period. If you enter time daily, use the specific date for that day's transactions. |
| Pay | A code to define the type of pay, deduction, benefit, or accrual.
Pay types are numbered from 1 to 999. Deductions and benefits are numbered from 1000 to 9999. Form-specific information If you are using pay rate tables and have set the processing option to use union rates, you can:
|
| Batch Added: | A number that identifies a group of transactions that the system processes and balances as a unit. When you enter a batch, you can either assign a batch number or let the system assign it through Next Numbers. When you change, locate, or delete a batch, you must specify the batch number.
Form-specific information All timecards must be associated with a batch number. |
11.1.1 What You Should Know About
11.2 Calculating an Employee's Hourly Rate
From Payroll Master (G07), choose Time Entry
From Time Entry (G0712), choose by Employee
Typically, when you enter a timecard for an employee, you do not need to enter an hourly pay rate. The system derives the hourly rate for an employee using information you enter elsewhere in the system. Unless you set the processing options differently, the system uses the following sequence to derive an employee's hourly rate:
-
Time Entry forms
-
Union and job type information from the Union Rates table (F069126) as entered on Pay Rate Tables (P069121)
-
Job type and job step from the Employee Pay Rates table (F060146) as entered on Occupational Pay Rates (P060231)
-
Job type and job step from the Employee Multiple Job table (F060118) as entered on Employee Multiple Job Entry (P060118)
-
Hourly rate from the Employee Master table (F060116) as entered on Employee Entry (P060101)
For each employee, the system stops searching when it finds an hourly rate.
In some cases, you might need to temporarily override an employee's system-derived hourly rate. For example, an employee might receive a higher rate for working in a job other than the employee's regular job. You can use time entry to override an employee's hourly rate for the current timecard.
To calculate an employee's hourly rate
On by Employee
-
Complete the steps for entering essential timecard information.
-
Complete the following field if necessary:
-
Override/Rate
-
-
Access the detail area.
-
Complete any of the following optional fields:
-
Uprate
-
Shift Code (Sh)
-
Shift Differential (D)
-
Percent or Amount (M)
-
| Field | Explanation |
|---|---|
| Rate - Hourly | This is the employee's hourly rate. If applicable, the system adds Pay Type Multiplier and Shift Differential values to the hourly rate.
If you change the value of the data display decimals for this field, you must also change the Hourly Rate (PHRT) and Base Rate (BHRT) fields in Time Entry to have exactly the same data display decimals. Form-specific information Enter an amount in this field to override all rates that would have been derived elsewhere. The system uses this rate to calculate the employee's pay based on the hours you enter. Depending on where the system finds the rates, one of the following occurs:
|
| Uprate | An amount that the system adds to an employee's base hourly rate. For example, you might enter a rate differential for equipment operators when they move from operating one piece of equipment to another piece. The system adds this amount directly to the base rate to calculate gross wages.
The system adds the uprate amount to the base pay rate before it performs any other rate calculations, such as applying a shift differential or pay type multiplier. |
| Sh/D/M | A user defined code (07/SH) that identifies daily work shifts. In payroll systems, you can use a shift code to add a percent or amount to the hourly rate on a timecard.
For payroll and time entry: If an employee always works a shift for which a shift rate differential is applicable, enter that shift code on the employee's master record. When you enter the shift on the employee's master record, you do not need to enter the code on the timecard when you enter time. If an employee occasionally works a different shift, you enter the shift code on each applicable timecard to override the default. |
| Amount - Shift Differential | An additional rate, expressed in dollars or percent, added to an employee's hourly rate, depending on the shift worked. This rate can be applied in one of two ways as defined by the Shift Differential Calculation Sequence (data item CMTH). |
11.3 Entering a Bonus for an Employee
From Payroll Master (G07), choose Time Entry
From Time Entry (G0712), choose by Employee
When an employee receives a bonus or lump sum payment, you must enter a timecard for that employee.
To enter a bonus for an employee
On by Employee
Complete the following fields:
-
Employee
-
Date
-
Batch
-
Pay Type
-
Lump Sum Amount
11.4 Entering Work Order Information
From Payroll Master (G07), choose Time Entry
From Time Entry (G0712), choose by Employee
For employees who charge their time to work orders, you can use time entry to associate hours worked with specific work order numbers.
You can change the display of the detail area (fold) by using Toggle Display Format (F12). If you set up Enhanced Subledger Accounting, you can view and change these values in the detail area. See Work with Enhanced Subledger Accounting in the JD Edwards World General Accounting I Guide for more information.
To enter work order information
On by Employee
-
Complete the steps for entering essential timecard information.
-
Complete the following fields:
-
Account Number
-
Subledger
-
Subledger Type (T)
-
-
Access the detail area.
-
Complete the following optional field:
-
Subledger Phase (Sb.P)
-
| Field | Explanation |
|---|---|
| Account Number | A field that identifies an account in the general ledger. You can use one of the following formats for account numbers:
The first character of the account indicates the format of the account number. You define the account format in the General Accounting Constants program. Form-specific information If you leave this field blank, the system uses the employee's home company and home business unit to retrieve the object account and subsidiary from the accounting rules table. If you enter a business unit followed by a period (.), the system uses this business unit and retrieves the rest of the account number from the accounting rules. To specify a business unit and a subsidiary account, but have the system retrieve the object account from the accounting rules, enter business unit..subsidiary. For Work Orders speed code entry: You can use speed codes to reduce data entry when you enter work order information. When you enter a speed code, the system automatically enters account information that is stored elsewhere in the system. To enter a speed code, enter a back slash (\), the work order number, and a period (.) For example, work order 145648 is entered as \145648. in the Account Number field. When you add the timecard information, the system:
|
| Subldgr | A value such as equipment number or work order number that you can attach to the end of an account number to further define an account and more easily track it. |
| T | A code identifying the type of subledger in the previous field. If you enter a subledger, you must also enter a subledger type. |
| Sb.P | A user defined code (00/W1) that indicates the current stage or phase of development for a work order. You can assign a work order to only one phase code at a time.
Note: Certain forms contain a processing option that allows you to enter a default value for this field. If you enter a default value on a form for which you have set this processing option, the system displays the value in the appropriate fields on any work orders that you create. The system also displays the value on the Project Setup form. You can either accept or override the default value. |
11.5 Overriding System-Supplied Information Temporarily
From Payroll Master (G07), choose Time Entry
From Time Entry (G0712), choose by Employee
When you enter essential timecard information for an employee, the system supplies additional information, depending on how your system is set up. For example, the employee's pay rate might come from the Pay Rate table, and the account number might come from automatic accounting instructions (AAIs).
In some cases, you might need to temporarily override an employee's system-supplied information. For example, you might need to override the account number and job location when an employee works a job other than the employee's regular job.
To override system-supplied information temporarily
On by Employee
-
Complete the steps for entering essential timecard information.
-
Access the detail area.
-
To override system-supplied information, enter values in any of the following fields:
-
Account Number
-
Over/Rate
-
Job Type/Step
-
Job Location (Jobl)
-
Shift Code
-
Shift Differential
-
Shift Method
-
Billing Rate
-
Date Worked
-
Home Company
-
Home Business Unit
-
Tax Area
-
Explanation
-
Record Type
-
Worker's Compensation Insurance Code
-
| Field | Explanation |
|---|---|
| Jobl | This business unit represents the location in which the employee worked. It can be used to indicate that an employee worked at this location, but charged the time to another business unit. This field is used for deriving rates from the Union Pay Rate table and is used exclusively by the Certified Payroll Register. |
11.6 Overriding DBA Amounts Temporarily
From Payroll Master (G07), choose Time Entry
From Time Entry (G0712), choose by Employee
You can temporarily override the DBA amount the system normally calculates. For example, you might need to override DBA amounts for employees who began employment in the middle of a pay period. You can override the DBA amount when you enter time for an employee, but you do not need to actually enter time to override a DBA amount. For example, you can override the DBA amount for an autopay employee or enter the actual time for an hourly employee later.
To override DBA amounts, change the dollar amount (or the hour amount for an hourly accrual) that the system calculates for that DBA during payroll cycle processing. You can enter zero or any adjusted amount.
(Release A9.3 Update) As an alternative to overriding this data manually, you can use the One Time Overrides Z File program (P06OTO1Z) to import an extensive amount of data into your system. See Import Mass Data into Payroll in the JD Edwards World U.S. Payroll II Guide for more information.
When you override DBA amounts temporarily, the system updates the DBA Transaction Detail table (F0609).
To override DBA amounts temporarily
On by Employee
-
Complete the following fields:
-
Employee
-
Date
-
Batch
-
-
Choose the One-Time Override option.
Figure 11-1 DBA One-Time Overrides screen
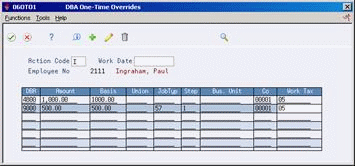
Description of ''Figure 11-1 DBA One-Time Overrides screen''
-
On DBA One-Time Overrides, complete the following field:
-
Date Worked
-
-
Choose the function to copy DBAs or complete the following field:
-
DBA
-
-
Complete the following field:
-
Amount
-
-
Complete any of the following optional fields:
-
Basis
-
Union
-
Job Type
-
Step
-
Business Unit
-
Company
-
Work Tax
-
-
Access the detail area.
Figure 11-2 DBA One-Time Overrides (Detail) screen
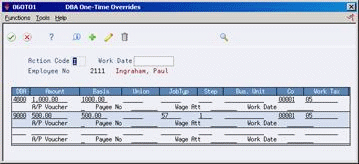
Description of ''Figure 11-2 DBA One-Time Overrides (Detail) screen''
-
To override voucher information, complete the following fields:
-
A/P Voucher
-
Payee Number
-
-
For US payroll only, if you are overriding a wage attachment deduction, complete the following field:
-
If you are overriding a wage attachment deduction, complete the following field:
-
Wage Attachment
-
11.7 Copying Labor Distribution Instructions
From Payroll Master (G07), choose Time Entry
From Time Entry (G0712), choose by Employee
When you enter timecards by employee, you can enter labor distribution instructions for an employee who typically charges time to the same pay types and accounts each pay period. You enter the labor distribution instructions for an employee only once, and then copy them into the employee's timecard each pay period. Copying labor distribution instructions saves time and reduces keying errors.
To copy labor distribution instructions, complete one of the following tasks:
-
Copy labor distribution instructions by hour
-
Copy labor distribution instructions by percentage
11.7.1 Before You Begin
-
Enter labor distribution instructions for the employee. See Section 4.1, "Entering Labor Distribution Instructions."
To copy labor distribution instructions
On by Employee
-
Complete the following fields:
-
Employee
-
Date
-
Batch
-
-
Choose the Copy Labor Distribution Instructions function.
Figure 11-3 Labor Distribution Pay Period screen
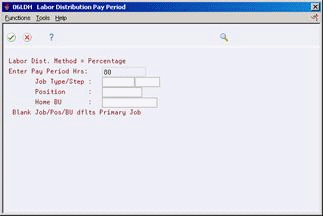
Description of ''Figure 11-3 Labor Distribution Pay Period screen''
-
On Labor Distribution Pay Period, complete the following field:
-
Pay Period Hours
-
-
Choose the Continue function.
-
On by Employee, accept the information as displayed or make changes to any of the fields as needed for this entry.
-
Complete the steps to enter the timecard.