19 Work with Report Design Aid
This chapter contains these topics:
19.1 About Report Design Aid
Report Design Aid (RDA) is a powerful and versatile tool for designing reports.
It uses the same process as the Screen Design Aid (SDA), except:
-
It extends to column 227
-
It has windowing capability
You need to identify only field names, field lengths, and field positions on the report.
JD Edwards World reports are externally defined, which means that all the Data Description Specifications are created and compiled as a printer file, separate from the program object. RDA automatically generates the DDS. It also incorporates the report information into the documentation and adds it to the cross reference facilities. You can print illustrations of each report.
RDA differs from SDA in that its parameters are targeted for print-based output, which includes page skipping, line skipping, and relative positioning.
19.1.1 Example - RDA and DREAM Writer
Figure 19-1 RDA and DREAM Writer Process Flows
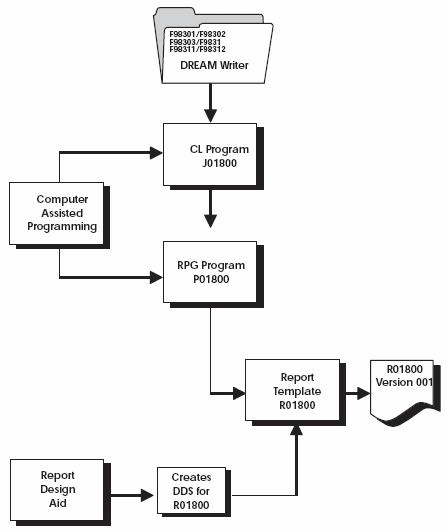
Description of "Figure 19-1 RDA and DREAM Writer Process Flows"
19.1.2 Comparing RDA and SDA - Field Definition Form
| Item | FIELD POSITIONING | FIELD CONDITIONING |
|---|---|---|
| RDA | Row positions are relative to the other rows, not fixed. The location on the report is determined by Space and Skip designations. Column positions are fixed. | A field can optionally appear bold, underlined, and so forth. JD Edwards World does not typically use these features because they impact printer performance. |
| SDA | Both row and column positions are fixed. A field displays on the screen exactly where the Row and Column indicators specify. | A field can appear highlighted, underlined, in reverse image, and so forth JD Edwards World makes use of these attributes for marking fields in error. |
19.1.3 Cover Page Fields
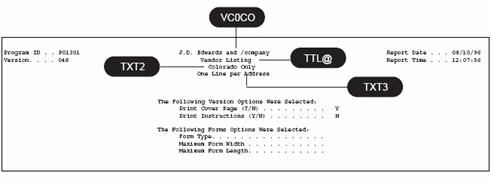
The figure below shows the fields used on the cover page of a report. These fields would indicate your company in a production environment.
The following table provides the field names and a description of each.
| Field | Explanation |
|---|---|
| VC0CO | Name of company 00000 |
| TTL@ | Line 1 of DREAM Writer Version ID if it exists, otherwise it is blank |
| TXT2 | Line 2 of DREAM Writer Version ID, or blank |
| TXT3 | Line 3 of DREAM Writer Version ID, or blank |
19.1.4 Report Header Fields
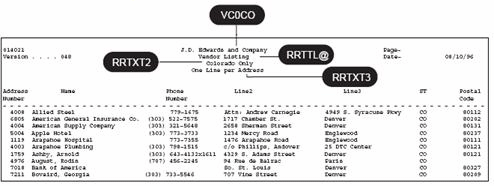
The figure below shows the fields used on the report header. These fields would indicate your company in a production environment.
The following table provides the field names and a description of each.
| Field | Explanation |
|---|---|
| VC0CO | Name of company 00000 |
| RRTTL@ | Default Title from Vocabulary Override |
| RRTXT2 | Line 2 of DREAM Writer Version ID, or blank |
| RRTXT3 | Line 3 of DREAM Writer Version ID, or blank |
19.1.5 What Are the Report Formats?
The first step in designing a new report is determining the format of the report. You should account for all lines of information on the report to correctly define the formats needed and their size.
| FORMAT | FIELD | DESCRIPTION |
|---|---|---|
| Any format | *VTX
*VC0 |
Assigns the first available VTX name to the field and gets a description from the Data Dictionary that you can change.
Assigns the first available VC0 field and assigns a default size of thirty. |
| HEADING1 - contains the standard fields to be printed on the top of every page | VTX001
*PAGE VTX002 *DATE VC0CO RRTTL@ RRTXT2 & RRTXT3 |
The default VTX field which prints the row description, "Page -."
The default special field that inserts the DDS keyword PAGNBR in the source and retrieves the current page number on the report. The default VTX field which prints the row description, "Date -". Special field that retrieves today's date. The name of the default company 000, it displays on the first line of each page. Default Title from Vocabulary Overrides. DREAM Writer overrides that correspond to the second and third header lines of the report. |
| HEADING2 - contains the subheading fields used to describe the level break detail that is to follow | VC0ROW
VC0KEY VC0DSC |
Data Dictionary row description of the level break field.
The value of the level break field. The description of the value of the level break field. |
| DETAIL1 - contains the data line fields | RRxxxx | The value of the data for these fields |
| TOTAL1 - contains the total line fields | VC1ROW
VC1KEY VC1DSC $$XXX |
Data Dictionary row description of the level break field.
The value of the level break field The description of the level break field Value on total line. |
Note:
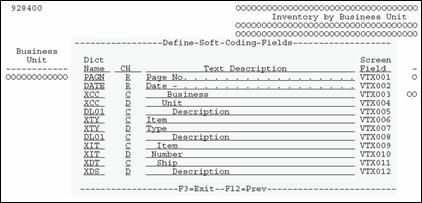
You can have as many formats as you can fit on one RDA form. Just remember to increment the suffix number for each format added as well as any VC fields you may be using.Certain fields are used in RDA when generating reports that contain subheadings or dynamic (hierarchical) totaling. The following illustrates how these fields are used within a report.
Figure 19-6 How Fields are Used Within a Report
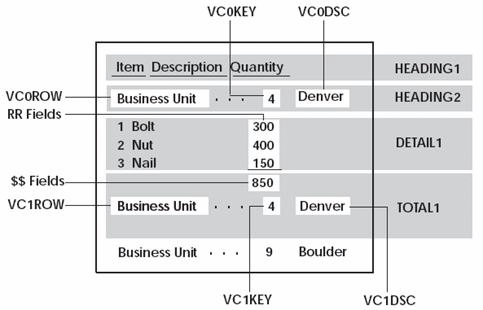
Description of "Figure 19-6 How Fields are Used Within a Report"
19.1.6 What Are the Report Design Standards?
The following is a list of report design standards. Using these standards will give your reports a uniform appearance.
19.1.7 RDA Features
Some features of RDA are:
-
Normal design range of 132 - 198 character reports
-
Validates against the Data Dictionary
-
Automatically adds records to the Vocabulary Overrides file
19.1.8 JD Edwards World Standards for Record Formats
Prefix standards:
-
RR for output fields
-
$$ for total fields
19.1.9 General Aesthetics
When possible, design your reports using the following set of rules:
Column headings should not be wider than the length of the data that appear below them.
Begin fields in column space 2 and do not extend fields beyond column 132 unless necessary.
Use the following as your guides when spacing different report elements:
-
Separate column headings by one space
-
Use both column headings when one heading is not clear enough
Some of the following recommendations can be ignored since most printers in use are not impact printers.
You should always use dashes below column headings instead of underlines. Underlines can impact the performance of printers. You enter dashes as literal fields.
Do not use highlight as it prints a line three times to achieve the highlighted (or boldface) effect, again impacting performance.
To avoid overflow, limit the number of lines in any detail or total format to six or less.
To be consistent with other report programs, use SPACEB and SKIPB instead of SPACEA and SKIPA.
19.1.10 About Designing the Report
DDS statements are being created as you design the report.
-
SPACEB and SPACEA are entered and removed as you add and move fields around.
-
Multiple formats are relative to each other.
| Function | What to use |
|---|---|
| Changing the Report Title | TTL@ |
| Adding a New Field | *, & |
| Updating Existing Fields | * |
| Deleting an Existing Field | *DEL on field definition form |
| Format Name | Displayed in upper right hand corner of form. |
| Field positions | Represent starting positions. |
19.2 Accessing Report Design Aid
You must have access to the source file to enter RDA.
From Software Versions Repository
Figure 19-7 Software Versions Repository screen
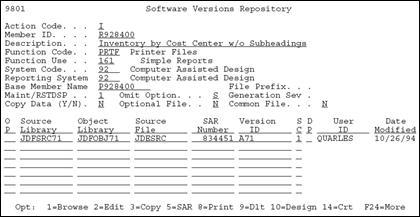
Description of "Figure 19-7 Software Versions Repository screen"
-
Copy the production source code down to a development environment.
-
Choose option 10 on the Software Versions Repository form to go to the appropriate Design Aid form based on the members Function Code value.
-
To go to Report Design Aid, enter "PRTF" or "PRTS" in the Function Code field.
-
19.3 Updating a Field in RDA
The field definition form in RDA is slightly different from SDA.
From Software Versions Repository, choose the design option.
-
Enter "*" in the field you wish to update.
Figure 19-8 Asterisk in the Field to be Updated
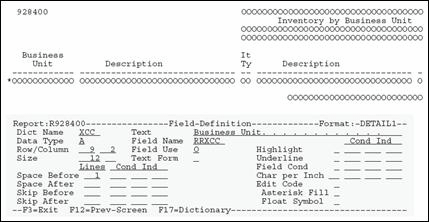
Description of "Figure 19-8 Asterisk in the Field to be Updated"
| Field | Explanation |
|---|---|
| Space Before | Specifies the number of lines a printer device is to space before printing the next lines. |
| Space After | Specifies the number of lines a printer device is to space after printing the next lines. |
| Skip Before | Specifies that the printer device is to skip to a specific line number before it prints the next lines. |
| Skip After | Specifies that the printer device is to skip to a specific line after it prints the next lines. |
| Field Cond | Indicates whether the field conditioning (to print this field or not) is in effect. |
| Char per Inch | Specifies the horizontal printing density.
JD Edwards World specifies this at the report level and this field is not used. |
| Edit Code | Used to specify output formatting of numeric data.
Used in conjunction with *DATE, *TIME, *PAGE. |
| Asterisk Fill | Optionally specify asterisk fill for edit codes 1-4, A-D, and J-M.
An asterisk will print for each zero suppressed in the edited field. |
| Float Symbol | Specify a currency symbol (corresponding to the system value QCURSYM) that will be printed immediately to the left of the left-most digit of an edited field.
Valid for a numeric field that has an edit code of 1-4, A-D, or J-M. |
19.3.1 Understanding the Report Design Aid Function Keys
| Function Key | Description |
|---|---|
| F5 | Shows the Format Display Control portion of a form. |
Figure 19-9 Example F5 - Format Display Control
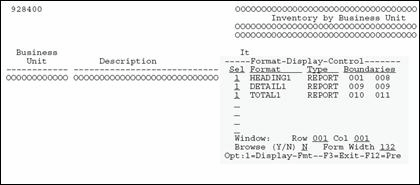
Description of "Figure 19-9 Example F5 - Format Display Control"
| Field | Explanation |
|---|---|
| Sel | Selection.
Controls the display of record formats. |
| Format | Lists the DDS format names.
Valid format names are:
|
| Type | Describes the DDS format type.
Always REPORT or SFORMS in RDA. |
| Boundaries | Two 3-digit numbers that define the range (rows) for the DDS.
|
| Window | Allows you to access fields outside the boundaries. |
| Browse (Y/N) | Indicator that allows you to enable/disable the browse mode. |
| Form Width | Width of the form in print positions. |
Caution:
RDA might automatically adjust displayed formats with those formats that are not displayed.| Function Key | Description |
|---|---|
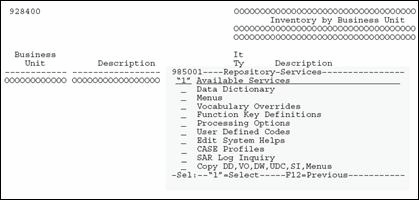
| F6 | Shows the Repository Services portion of a form. |
Figure 19-10 Example F6 - the Repository Services portion
Description of "Figure 19-10 Example F6 - the Repository Services portion"
| Function Key | Description |
|---|---|
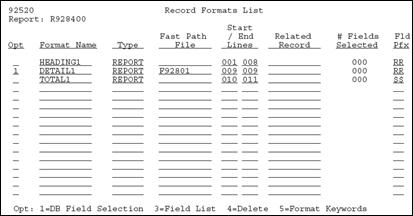
| F10 | Displays the Record Formats List form. |
Figure 19-11 Example F10 - the Record Formats List screen
Description of "Figure 19-11 Example F10 - the Record Formats List screen"
The Record Formats establish the arrangement of fields on your report and in what segment of the page they are to print.
Note:
There should be no gaps between the end line of one format and the start line of the next format. If you make changes to the positioning of a format and leave a gap between formats, RDA will automatically adjust the end lines for you.| Function Key | Description |
|---|---|
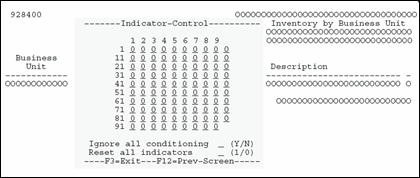
| F14 | Displays the Indicator Control form. |
Example F14 - the Indicator Control form
Figure 19-12 Example F14 - the Indicator Control screen
Description of "Figure 19-12 Example F14 - the Indicator Control screen"
Use this form to turn on/off selected or all indicators to see the resulting print image.
| Function Key | Description |
|---|---|
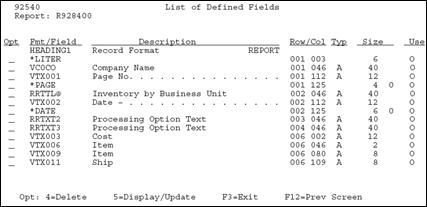
| F16 | Displays the List of Defined Fields form. |
Figure 19-13 Example F16 - the List of Defined Fields screen
Description of "Figure 19-13 Example F16 - the List of Defined Fields screen"
| Function Key | Description |
|---|---|
| F17 | Used to maintain vocabulary override fields. |
You must save your report at least once to update vocabulary overrides by this method. This is because when you are first defining a report, the vocabulary override record is not created until you save the report.
| Function Key | Description |
|---|---|
| F19 | Window Left. |
| F20 | Window Right. |
19.4 Compiling A Report
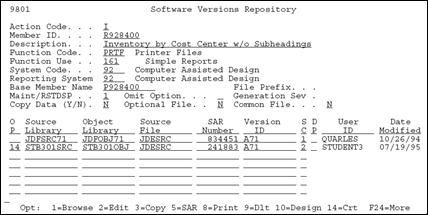
From Software Versions Repository
Figure 19-15 Software Versions Repository screen
Description of "Figure 19-15 Software Versions Repository screen"
-
Enter 14 next to the member in the subfile that you want to create and press Enter.
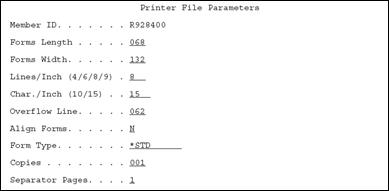
A form of printer file parameters displays.
Figure 19-16 Printer File Parameters screen
Description of "Figure 19-16 Printer File Parameters screen"
-
Do one of the following:
-
Accept the defaults.
-
Change the defaults, as necessary.
-
Note:
Make sure Copies is non-zero.19.5 Changing the Compile Option Defaults for Reports
You must compile reports through the JD Edwards World compiler by this method so that R98COVER and R98RPTH are pulled in for the cover page and help instructions when the Function Code is PRTF. Only one PRTF can be included in an RPG program. Second print files or Special form print files must have a Function Code of PRTS in SVR. Compiling PRTF items through the Production Development Manager (PDM) or some other method will not bring the additional formats in automatically.
To change compile option defaults for reports
The Data Dictionary default values were set for 8 ½ by 14 printer paper.
Change the Data Dictionary defaults for the following data items for your purposes:
| Item | Description |
|---|---|
| #FLN | Forms Length |
| WDTH | Forms Width |
| LPI | Lines Per Inch |
| #CPI | Characters Per Inch |
| #OVF | Overflow Line Number (Usually forms length minus one inch.) |
| #ALN | Alignment (Y/N) |
| #FTY | Form Type |
| #CPY | Number of Copies |
| #SPG | Number of Separator Pages |
Note:
Some severity level 10 errors can occur when your report compiles because of R98COVER (DREAM Writer cover page) and R98RPTH (DREAM Writer help instructions). These are only warning errors.

