2 Set Up BI Publisher
This chapter contains these topics:
-
Chapter 2, "Downloading and Installing BI Publisher Desktop"
-
Chapter 2, "Setting up BI Publisher Enterprise and JDBC Driver Connection"
-
Chapter 2, "Downloading and Installing Oracle Database XE (Optional)"
Prior to creating reports using BI Publisher, you must download and set up the following on your system:
-
BI Publisher Enterprise
This is the user interface for creating, running, and scheduling reports, and you install this on a Java based application server. You must download and install BI Publisher and an OC4J application server. If you prefer to install with a different application server, use the Manual Installation section for your application server in the Oracle Business Intelligence Publisher Installation Guide, which is in the download.
Access Oracle's E-Delivery website using the following URL and follow the instructions to download and install BI Publisher: http://edelivery.oracle.com/.
-
BI Publisher Desktop
This contains a MS Word plug-in to create report templates and you install it on the PC of every one that develops reports.
-
JD Edwards World JDBC Driver
The driver is a software component that allows Java applications, such as BI Publisher, to access the JD Edwards World database. It connects Enterprise to the iSeries so that report data is up-to-date. See the JD Edwards World Java Database Connectivity Guide for more information.
To download the JD Edwards World JDBC Driver, which includes the JD Edwards World Java Database Connectivity Guide, access MyOracle Support, choose Patches and Updates and the choose the JD Edwards products link. On Update Center, choose JD Edwards World Downloads in the Type field, enter JDBC1.1 in the Search for field and click SEARCH. Continue by downloading the item in the Download Basket.
After you set up the JD Edwards World JDBC Driver, you must then set up the BI Publisher and JDBC Driver Connection.
Additionally, your system must contain a database for scheduling reports and other tasks. If you do not have a database to use for scheduling reports, you can optionally download and install the Oracle Database 10g Express Edition (Oracle Database XE) or the mySQL relational database management system. This an entry-level, small-footprint database that is based on the Oracle Database 10g Release 2 code base that is fast to download; free to develop, deploy, distribute; and simple to administer. See Downloading and Installing Oracle Database XE or Downloading and Installing mySQL for more information.
Setting up BI Publisher includes the following:
-
Downloading and Installing BI Publisher Desktop
-
Setting up BI Publisher Enterprise and JDBC Driver Connection
2.1 Before You Begin
Ensure that Microsoft Word is not running.
2.2 Downloading and Installing BI Publisher Desktop
After you install BI Publisher and launch Microsoft Word, notice the Oracle BI Publisher menu.
To download and install BI Publisher Desktop
-
Copy and paste the following into your internet browser address field:
http://edelivery.oracle.com/.
-
Choose the appropriate language or click Continue.
-
Complete the fields on Export Validation and click Continue.
-
Choose Oracle Business Intelligence in the Select a Product Pack field and Microsoft Windows (32-bit) in the Platform field.
-
Click Go.
A list of the results displays in the lower area of the screen.
-
Select the latest version of the Oracle Business Intelligence Media Pack for Microsoft Windows (32 bit) and click Continue.
-
Locate the latest version of Oracle Business Intelligence Publisher Desktop for Microsoft Windows.
-
Download and extract the contents of the zip file to a folder.
-
Locate the following download folder and double-click the BIPublisherDesktop.exe file:
\Windows\Server_Ancillary\Oracle_Business_Intelligence_Publisher\BI_Publisher_Desktop\
-
Follow the prompts in the file.
2.3 Setting up BI Publisher Enterprise and JDBC Driver Connection
Setting up BI Publisher Enterprise and JD Edwards World JDBC Driver includes the following tasks:
-
To set up BI Publisher Enterprise and JDBC Driver connection
-
To test the JDBC connection
To set up BI Publisher Enterprise and JDBC Driver connection
After you install the JD Edwards World JDBC Driver, JD Edwards recommends that you reboot the OC4J server.
To set up the BI Publisher Enterprise and JDBC Driver connection, you need the name of your Systemi, the JD Edwards World Environment name to which you want to connect, and the user name and password to directly access JD Edwards World with J98INIT or J98INITA.
-
From the Windows Toolbar, choose Start, Programs, Oracle BIPHome1, and then Start BI Publisher.
-
After initialized displays in the BI Publisher command window, perform one of the following:
-
From the Windows Toolbar, choose Start, Programs, Oracle BIPHome1, and then BI Publisher Server.
-
Copy and paste the following into your internet browser address field and then change the Server Name:
http://ServerName.com:9704/xmlpserver.
-
-
Sign in by entering Administrator in the User Name and Password fields.
-
On the BIP console, click the Admin tab, and then click the JDBC link under Data Sources.
-
Click Add Data Source.
-
Complete the following fields:
-
JDBC Driver Name
-
Driver Type
-
Database Driver Class
Figure 2-1 Example of screen with Driver Name, Type, and Database Driver Class
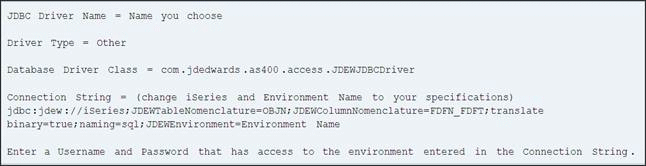
Description of "Figure 2-1 Example of screen with Driver Name, Type, and Database Driver Class"
-
-
Click Apply to save your changes.
-
Click Test Connection to verify a valid connection to your environment.
You receive the message: Connection established successfully.
To test the JDBC connection for Adopted Authority
If you use Adopted Authority, you need to ensure that the individuals using the JDBC Driver have access to the QJDF data area. After you grant the JDBC users access to the QJDF data area, you must test the JDBC connection.
-
Log out.
-
Close the BI Publisher administrative console.
-
Stop and restart the BI Publisher server.
-
Launch the administrative console to test the JDBC connection.
2.4 Downloading and Installing Oracle Database XE (Optional)
BI Publisher is an Oracle product that you can use in conjunction with JD Edwards World software. You must use a Windows based scheduler database and application server with BI Publisher. If you do not have a database, you can download and install Oracle Database XE that includes scheduling functionality.
You can install Oracle Database XE on any size host machine with any number of CPUs (one database per machine), and XE stores up to 4 gigabyte (GB) of user data, use up to 1 GB of memory, and use one CPU on the host machine.
When you install Oracle XE, the system prompts you to create a DB administrator user ID and password. You then create a new BI Publisher user for the scheduler connection in BI Publisher.
To download and install Oracle Database XE
-
Copy and paste the following into your internet browser address field:
http://www.oracle.com/technology/software/products/database/xe/index.html
-
On Oracle Database 10g Express Edition Downloads, click the appropriate Oracle Database 10g Express Edition link.
-
Select the Setup.exe file and follow the prompts to perform the installation.
-
Copy and paste the following into your internet browser address field to access Oracle Database XE:
http://127.0.0.1:8080/apex
-
Log in using your new DB administrator user ID and password.
-
Select the Administration tab and then the Database Users link.
-
Select Create to create a new user ID and password.
-
Select DBA and then select Check All to create User Privileges.
-
Click Create to finish.
-
Access the BI Publisher Enterprise server to setup the scheduler database.
-
Access the Admin tab and select Scheduler Configuration.
-
Enter Oracle 10g in the Database Type field.
-
Enter jdbc:oracle:thin:@ServerName.com:1521:xe in the Connection string field.
-
Enter bip in the Username and Password fields.
-
Enter oracle.jdbc.OracleDriver in the Driver Class field.
-
Click Apply.
-
Log out and log in.
-
Click Test Connection.
-
Click Install Schema.
-
Schedule a report or send an e-mail with a report to test the scheduler database.
Following are examples of a JDBC connection for the Oracle database to use the scheduling functionality.
-
Connection String: jdbc:oracle:thin:@ db-pc-name.company.com:1521:xe
-
Driver Class: oracle.jdbc.OracleDriver
-
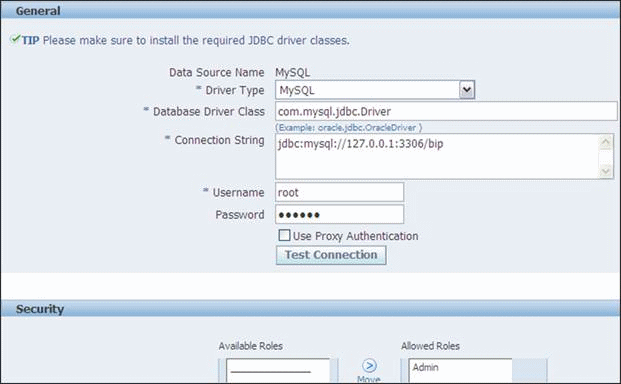
2.5 Downloading and Installing mySQL (Optional)
BI Publisher is an Oracle product that you can use in conjunction with JD Edwards World software. You must use a Windows based scheduler database and application server with BI Publisher. If you do not have a database, you can download and install mySQL that includes scheduling functionality.
-
Copy and paste the following into your internet browser address field to download the JAR (driver):
http://dev.mysql.com/get/Downloads/Connector-J/mysql-connector-java-5.1.7.zip/from/http://mysql.he.net/
-
Locate mysql-connector-java-5.1.7.zip and then locate mysql-connector-java-5.1.7-bin.jar.
-
Extract this file to the same location as the JD Edwards World and the IBM JT400 Jar files.
For example: C:\OraHome_2\oc4j_bi\j2ee\home\applib.
-
Stop and start the BI Publisher server.
-
Log in to BI Publisher, select the Admin tab, and then the Scheduler link.
-
On Scheduler Configuration, complete the following field:
-
Database Type
-
-
Enter jdbc:mysql://127.0.0.1:3306/bip in the Connection String field.
-
Enter root in the User Name field.
-
Complete the following field:
-
Password
-
-
Enter com.mysql.jdbc.Driver in the Database Drive Class field and click Apply.
Figure 2-2 Scheduler Configuration Window
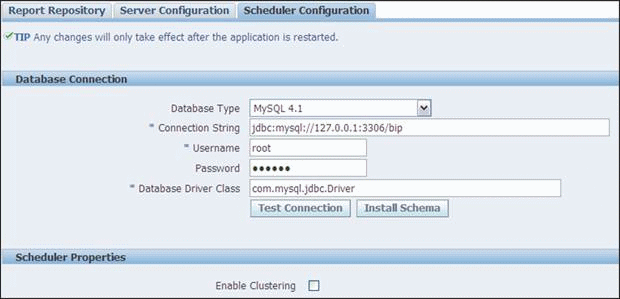
Description of "Figure 2-2 Scheduler Configuration Window"
-
On General, click Test Connection.