27 Work with DREAM Writer
This chapter contains these topics:
-
Section 27.4, "Working with DREAM Writer Version Identification,"
-
Section 27.5, "Entering DREAM Writer Additional Parameters,"
-
Section 27.6, "Working with DREAM Writer Processing Options Revisions,"
-
Section 27.8, "Working with DREAM Writer Data Sequence Setup,"
-
Section 27.9, "Working with DREAM Writer Printer File Overrides,"
-
Section 27.10, "Changing the Date Format on DREAM Writer reports."
27.1 Locating the DREAM Writer Versions List
Oracle supplies the following DREAM Writer versions for JD Edwards World software
-
ZJDE - There can be multiple versions and these versions are defaults. You can typically access these as a version on a menu.
-
XJDE - There can be multiple versions and these versions are examples. You can copy these versions when you create your own versions. An upgrade replaces the XJDE versions.
See Also:
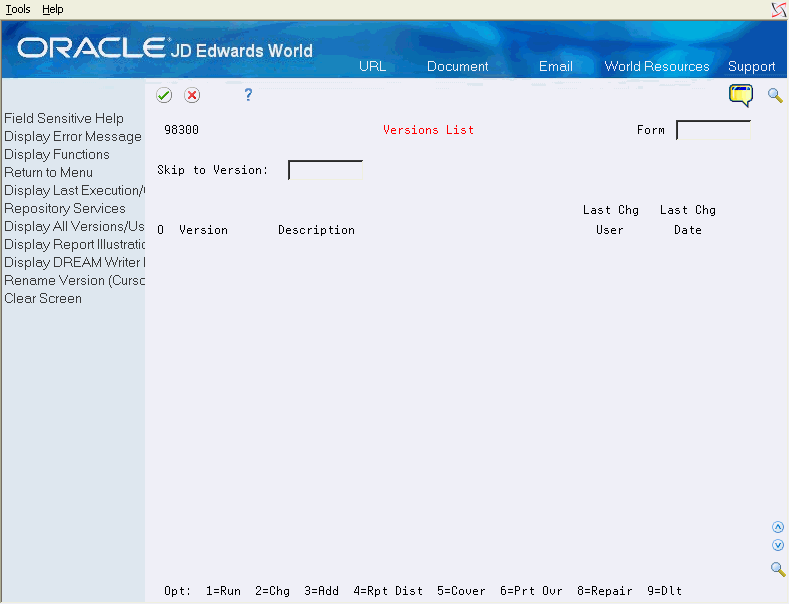
You can use one of the following methods to locate the DREAM Writer Versions List.
-
Locate Versions List using an application menu selection
-
Locate Versions List using the DREAM Writer system menu
From Master Directory (G), choose Address Book
From Address Book (G01), choose Periodic Processing
From Periodic Processing (G0121), choose Reports by Address
To locate Versions List using an application menu selection
Note:
This task demonstrates how to use an application menu selection to run a DREAM Writer report. If you display the DREAM Writer versions list from a menu, you cannot Skip To other form IDs.Read the caution message and press F6.
To view a different report you must return to the Periodic Processes menu (G0121).
To locate Versions List using the DREAM Writer system menu
From Master Directory (G), choose Hidden Selection 27
From Advanced & Technical Operations (G9), choose Run Time Setup
From Run Time Setup (G90), choose DREAM Writer
From DREAM Writer (G81), choose Versions List
-
To restrict users from this option, use one of the supplied menu securities (menu masking or advanced menu security).
-
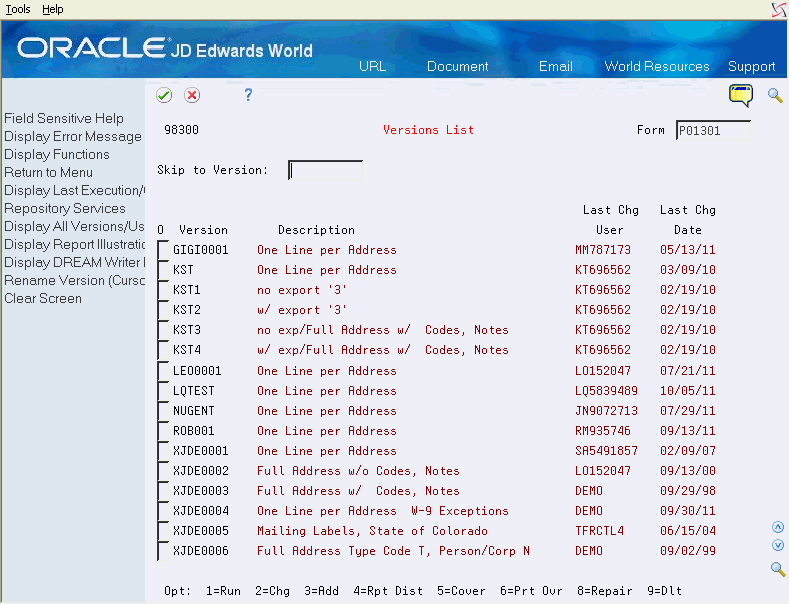
Press F5 to display the Version Owner and the Last Execution Date for each version displayed on the screen. Press F5 to toggle between this view and the Last Change User and Last Change Date view.
Figure 27-3 Versions List (Detail) screen
Description of "Figure 27-3 Versions List (Detail) screen"
The DREAM Writer forms allow you to define or change information as follows:
27.2 Reviewing the Five Steps of DREAM Writer
When you add a new report, you generally access five forms (steps) in sequential order.
The DREAM Writer forms allow you to define or change information as follows:
| Form | Description |
|---|---|
| 1. Version Identification | You can display an internal description as well as up to three lines of report heading information.
You may also change the Version Owner and Language of the version. The following audit fields are also available on this screen: From Version Title, From Version, By User, On Date. |
| 2. Additional Parameters | You define parameters for the job, whether you want the cover page to print, and in which job queue you want to process the job. |
| 3. Processing Options | Use processing options to control the type of report that the system prints. |
| 4. Data Selection | Data selection lets you select the information you want the system to print on the report. You can select records from any field in the based-on file. If you do not specify data, the system prints every record in the file on the report. |
| 5. Data sequencing | Use data sequencing to specify how you want the system to sequence data, how the system totals the data, and how the system creates page breaks. |
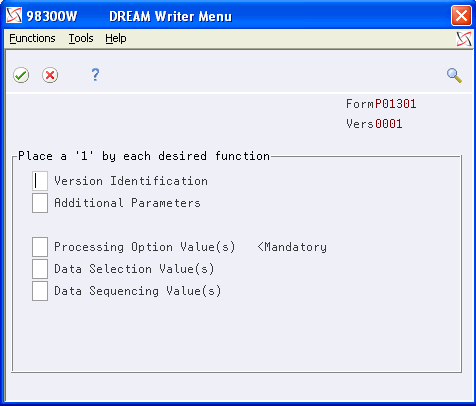
When you change a version, the system displays a form from which you select the functions to which you want to make changes.
The functions you select determine what the system displays.
| Function | Description |
|---|---|
| If you added or copied a version | The system displays the first DREAM Writer screen, the Version Identification screen, where you can start defining information for your version. |
| If you changed a version | The system displays a window in which it lists all DREAM writer function descriptions. You select the functions you want to display based on the information you want to change. |
27.3 Changing or Adding a DREAM Writer Version
Before beginning the five steps of a DREAM Writer, you must choose whether you want to change a current version or add a new version. You can change a version unless the version is set to restrict user access for a report version (Version Security) or you do not have authority through Report Writer Form Security.
As you progress through each step of the DREAM Writer, you can press F12 to return to the previous screen.
Complete the following tasks:
-
Change a version
-
Add a version
From (Versions List) Reports by Address
-
Enter 2 in the field to the left of the version you want to revise.
The DREAM Writer menu displays.
-
Enter 1 in the field to the left of each screen you want to revise.
Whichever functions you selected display in order.
To add a version, you can copy a current version. Security may prevent you from copying certain versions.
From (Versions List) Reports by Address
-
Enter 3 in the option field of the version you want to copy.
DREAM Writer Version Copy displays.
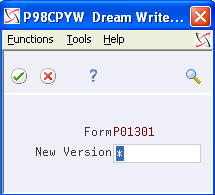
Figure 27-5 DREAM Writer Version Copy screen
Description of "Figure 27-5 DREAM Writer Version Copy screen"
-
Do one of the following from DREAM Writer Version Copy:
-
If you designated a DREAM Writer user prefix in your JD Edwards World user preference, the new version displays the prefix followed by an asterisk (*). Press Enter and the system assigns the next available version number.
-
If you designated a DREAM Writer version prefix at the system level in the QJDF data area, the new version displays this prefix followed by an asterisk (*).
-
If you did not assign a DREAM Writer user prefix in your JD Edwards World user profile or at the system level, a single asterisk (*) displays. Press Enter and the system assigns the next available version number, with no prefix.
-
If you want to assign a new prefix, type the prefix and an asterisk (*). The system appends the next version number to your prefix.
-
If you want to assign a version ID that does not contain any numbers or assign your own number, type the information desired and press Enter.
-
27.4 Working with DREAM Writer Version Identification
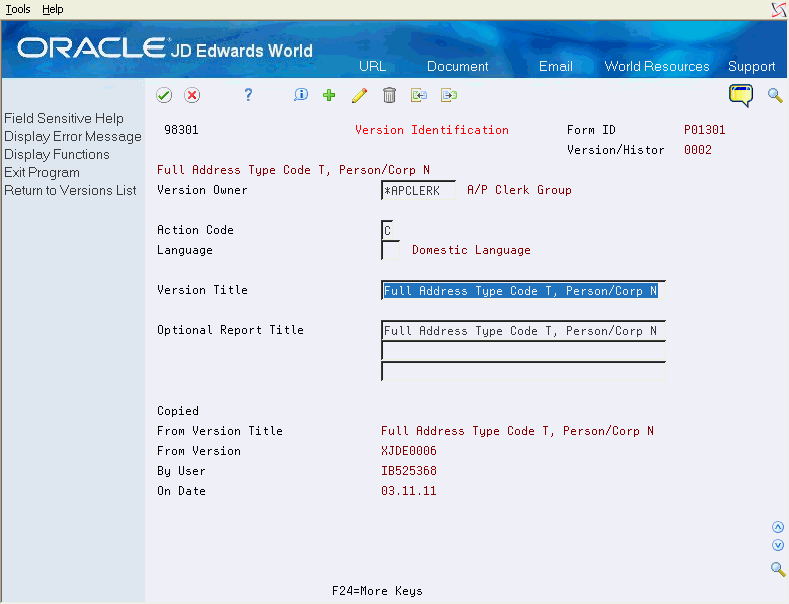
The system allows you a total of four report headings to print on the report. They include:
-
The first report heading, which is always the default company name
-
Lines 2 through 4, are the DREAM Writer Optional Report titles
To work with Version Identification
-
On Version Identification, specify a Version Title for the versions list. It is important to make these titles meaningful.
Figure 27-6 Version Identification screen
Description of "Figure 27-6 Version Identification screen"
-
Specify up to three report titles in the Optional Report Title fields.
-
Enter a user defined code in the Language field if you are adding an alternative language record
The system uses the language on screen displays and printed reports.
-
Press Enter to display the Additional Parameter screen
27.5 Entering DREAM Writer Additional Parameters
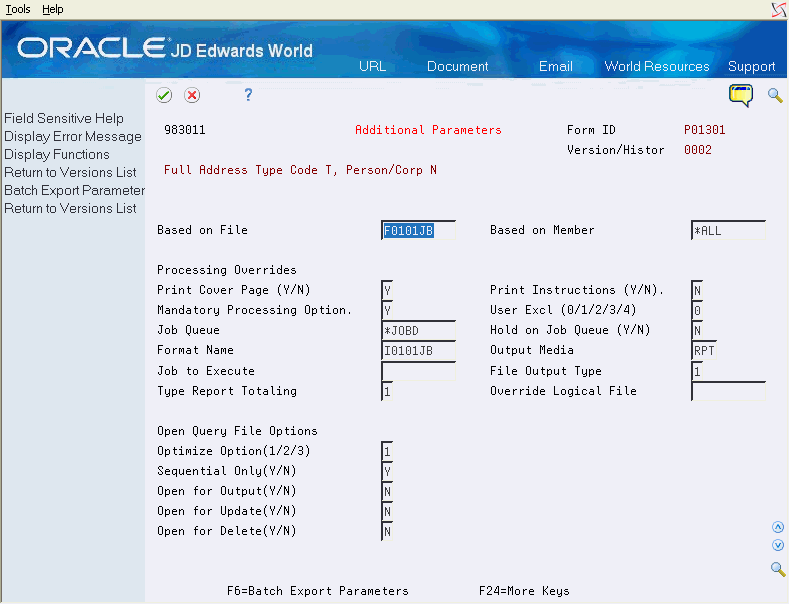
Additional Parameters contains job control parameters. The system displays information about the fields.
When creating a custom DREAM Writer you have greater flexibility using custom files and file record formats. DREAM Writer locates the file that you specify in the Based on File field and retrieves the file record formats on the Additional Parameters screen.
Note:
Changing certain parameters on this screen can cause the report program to halt. Avoid changing Based on File, Based on Member, Format name, and any Open Query File Options without advice from JD Edwards World.To enter additional parameters
Complete the appropriate fields on the Additional Parameters screen and click Enter.
27.6 Working with DREAM Writer Processing Options Revisions
The Processing Options Revisions screen allows you to control the type of report that prints. You can:
-
Select report format
-
Decide which pre-defined template to print
-
Print summary or detail information
-
Print labels or lists
-
-
Control other options
-
Page breaks
-
Totaling and other special calculations
-
Dates
-
Document Types
-
You can have Processing Options Revisions display every time you execute the report. Set this option on the Additional Parameters screen in the Mandatory Processing Option field.
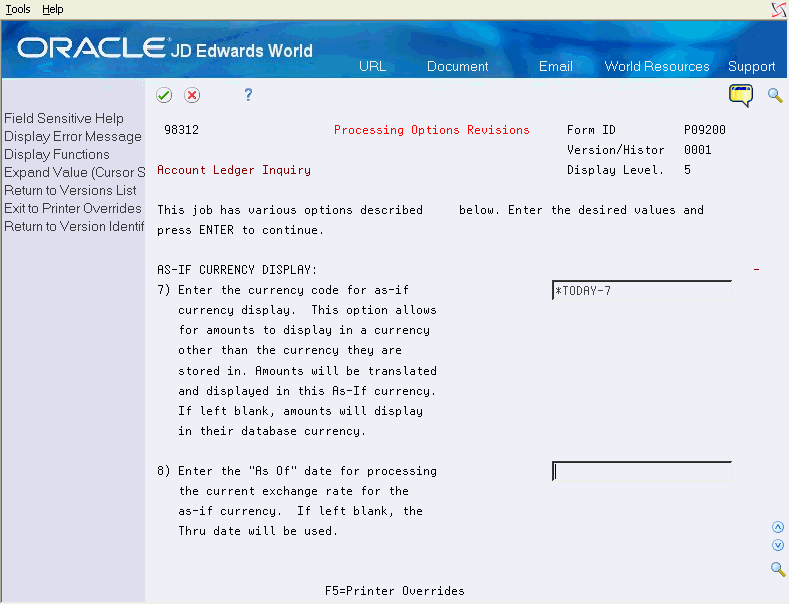
You can use *TODAY with Processing Options date selection. *TODAY with + (plus) or - ( minus) retrieves records with previous or future dates. You can only use + or - for a number of days.
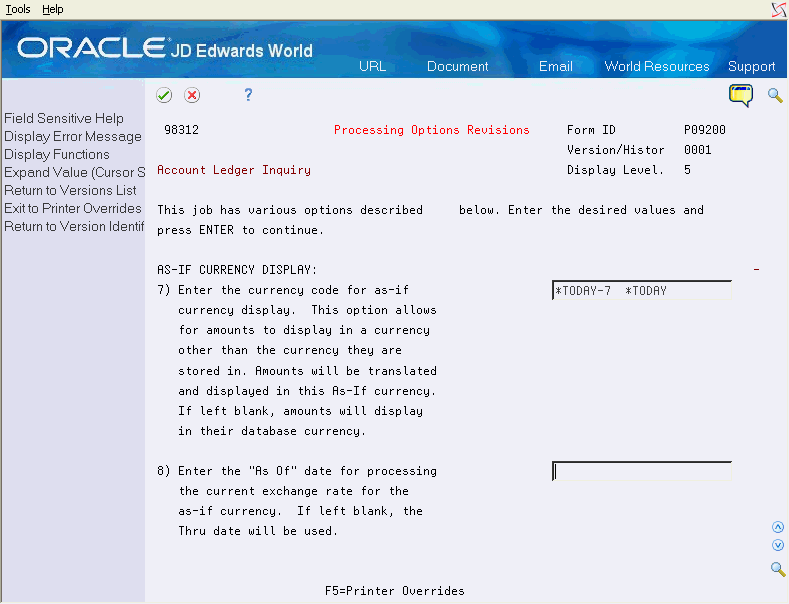
Ranges or a list of values are not valid on a single selection value line.
The following illustrates an acceptable entry:
Figure 27-8 Processing Options Revisions (Acceptable) screen
Description of "Figure 27-8 Processing Options Revisions (Acceptable) screen"
The following illustrates an unacceptable entry:
Figure 27-9 Processing Options Revisions (Not Acceptable) screen
Description of "Figure 27-9 Processing Options Revisions (Not Acceptable) screen"
Each program has a unique set of Processing Options. Some programs contain no processing options.
To work with Processing Options Revisions
-
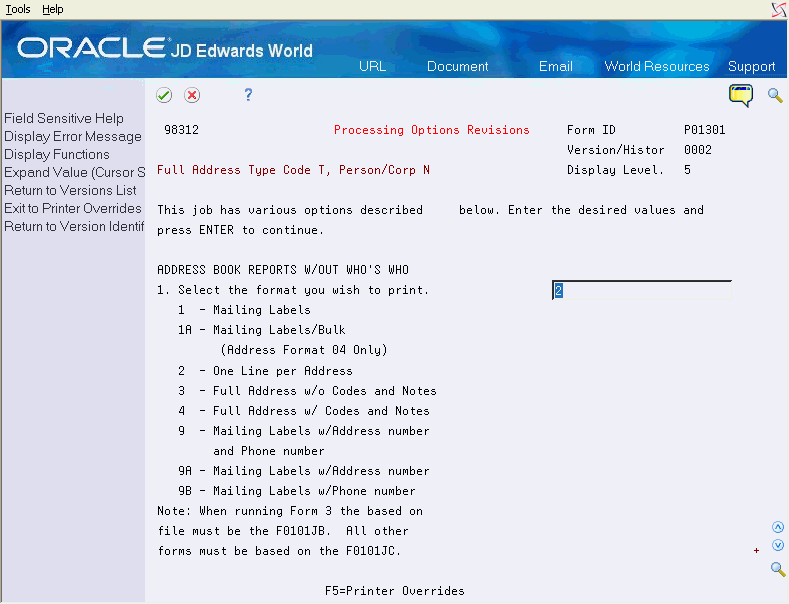
On Processing Options Revisions, enter one of the report format template numbers into the blank field on the right.
Figure 27-10 Processing Options Revisions (Report Template) screen
Description of "Figure 27-10 Processing Options Revisions (Report Template) screen"
-
Page down to the next Processing Options Revisions screen.
-
Repeat the previous steps until the last Processing Options Revisions screen displays.
-
Press Enter.
27.6.1 What You Should Know About
| Processing Options | Description |
|---|---|
| Adding Processing Options | The @OP array file allows you to enter up to 99 processing options. |
| Adding Custom Processing Options | When you create a custom DREAM Writer, you can add custom processing options. Additionally, you can attach a UDC table to a processing option. If you create the UDC table and attach it to the data item in Data Dictionary but the default glossary, not the UDC table displays when you press F1 on the processing option, you must verify the field name. To do so, enter the data item, ensuring that you right justify the value in the Field Name field. Leave the first two spaces blank to specify the file prefix. |
27.7 Working with DREAM Writer Data Selection
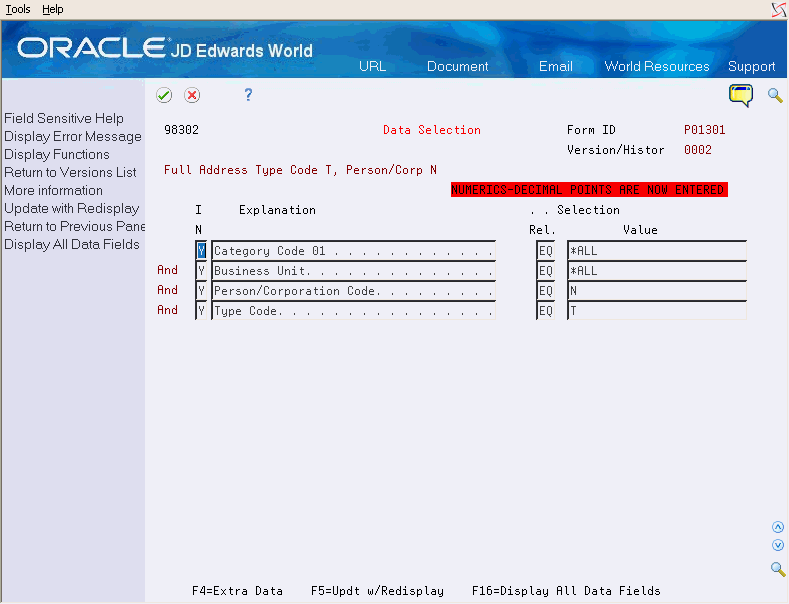
Data selection allows you to select the information you want to print on a report. Select records from any field from the Based-On File. You can use Display all Data Fields (F16) in the Based On File and then make your selections. Specify fields you want the system to suppress when a user chooses Display all Data Fields (F16). Use User Defined Code Type FS for System Code 81. If you do not select any criteria, the report prints every record.
The following are examples of customers in the Address Book Master (F0101). The customers display by alpha name, search type, and location.
| Alpha Name | Search Type | Location or Branch |
|---|---|---|
| A&D Parts Co. | V | DEN |
| Dunlop Const. | C | NYC |
| Eason, Walter | E | DEN |
| EverReady | V | NYC |
| Goldwater's | C | DAL |
| MCI | V | DEN |
| Office Warehouse | V | DEN |
| Olson Payroll | C | DEN |
| Xavier Mrktg. | V | SFO |
| Examples | Alpha Name | Search Type | Location or Branch |
|---|---|---|---|
| Report of all customers Search Type = C | Dunlop Const. Goldwater's Olson Payroll | C C C | NYC DAL DEN |
| All addresses associated with the New York branch Location or Branch = NYC | Dunlop Const. EverReady | C V | NYC NYC |
| All customers associated with the New York branch Search Type = C Location or Branch = NYC | Dunlop Const | C | NYC |
The Selection Rel field uses Boolean logic. Use this in conjunction with the data you enter in the Selection Value field. These two fields allow you to select the specific records that print on your report.
If you enter NE in the Selection Rel field, it must be first in your selection list.
Note:
If you are omitting records, this selection must be the first selection field(s). System syntax requires that you define all omit selections before inclusion specifications. Although this is not necessary for OPNQRYF processing, it is necessary for creating logical files (Additional Parameters Output File Type 2 or 4).Use the Selection Value field with the Boolean logic in the Selection Rel field. The values in these two fields direct the system to select the data you want to print on your report. The following list describes the possible values that you might enter into the Selection Value field:
-
Specific Value selects a record by a specific value. For example, the value could be NYC for New York City. Click Help (F1) from the Selection Value field to see the User Defined Codes screen of valid values.
-
*ALL selects all the records for that field. This is the default.
-
*ZERO or *ZEROES selects null values. For example, used with a relationship of EQ, it would retrieve all records for that field that equal zero.
-
*BLANKS selects blank values. For example, used with a relationship of EQ (equal to), it would retrieve all records for that field that are blank.
-
*TODAY selects all records for that field that have the current day as their dates. The system date is used.
-
*TODAY blank to 9999 selects records based on a run-time calculation of a date by adding or subtracting a number from the current date.
-
*YEAR, *MONTH, *DAY uses the current system value.
-
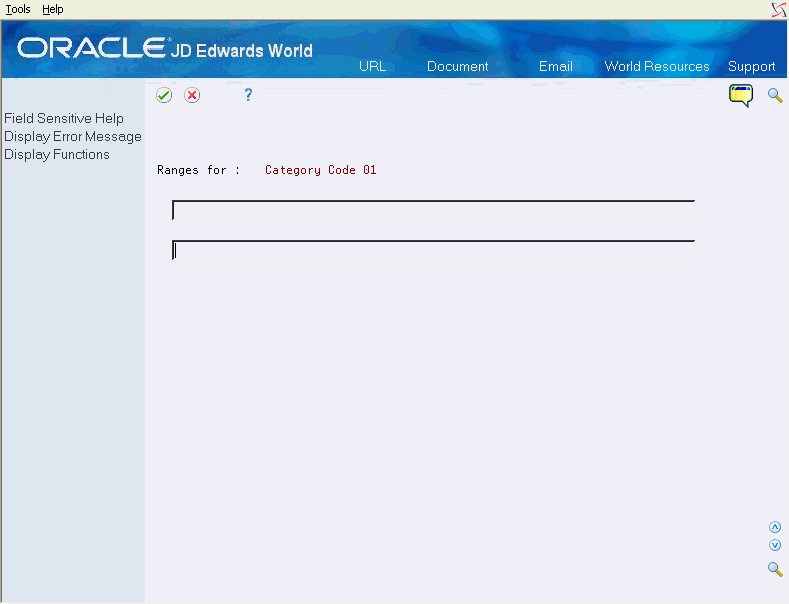
*RANGE Displays another screen when you have pressed Enter, from which you can select an inclusive range of values:
-
Enter values in the From and Through fields for the range.
-
Use only with the EQ and NE relationships.
-
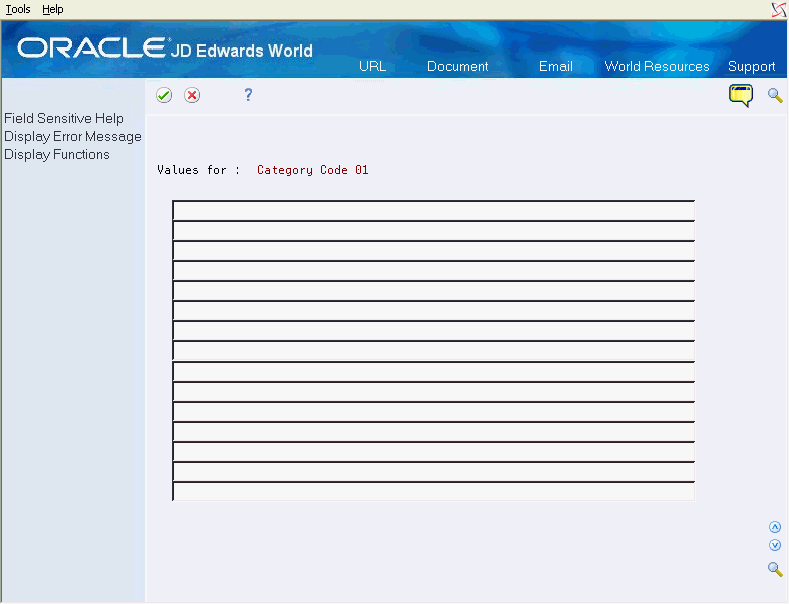
*VALUE or *VALUES displays another screen when you've pressed Enter, from which you can select up to 45 individual values. Only use with the EQ and NE relationships.
-
-
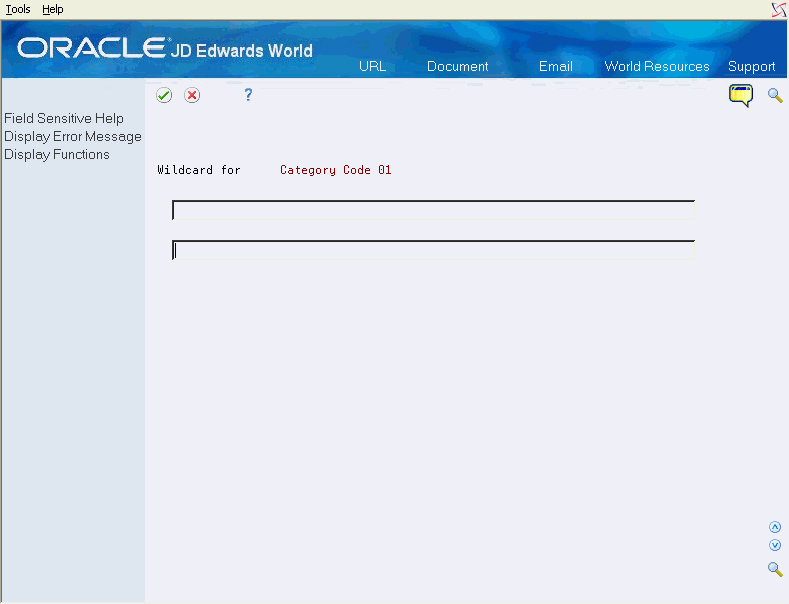
*WILDCARD displays another screen, when you press Enter, from which you use a wildcard search string:
-
Only use with the Open Query File.
-
Enter an asterisk (*) to represent one or more characters.
-
Enter an underscore (_) to represent one character.
-
Enter the search string in the first input field. If desired, you may specify multiple strings for the search.
For the second input field, the first character is used to represent one single position of any valid character, and the second character is used to represent any number of positions of any valid character.
For example: to find descriptions containing "J D Edwards", the first input field will contain: *J*D*Edwards, and the second input field will contain: _*
-
Double quotes are programmatically placed around the *wildcard value.
-
27.7.1 Examples: AND / OR Logic
The following shows first an example of AND logic, followed by an example of OR logic.
For both examples, the list of customers displays as they might appear in the Address Book Master (F0101). The customers display by alpha name, search type, and payables:
| Alpha Name | Search Type | Payables (Y/N) |
|---|---|---|
| A&D Parts Co. | V | Y |
| Dunlop Const. | C | Y |
| Eason, Walter | E | N |
| EverReady | V | Y |
| Goldwater's | C | N |
| MCI | V | Y |
| Office Warehouse | V | Y |
| Olson Payroll | C | Y |
| Xavier Mrktg. | V | Y |
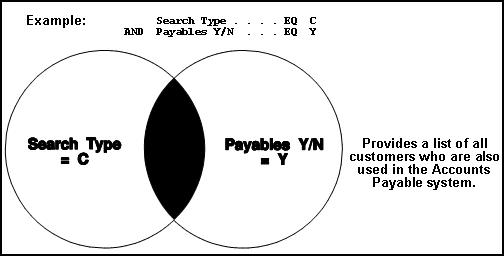
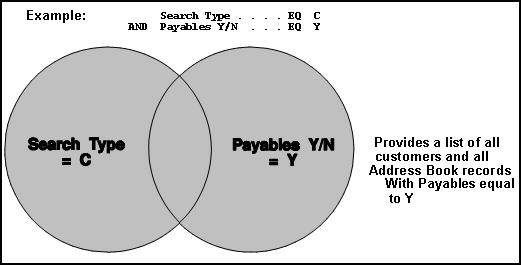
AND Logic includes only the data that the two, or more, fields have in common as the shaded area indicates.
In the example, you select Search Type EQ (equal to) C AND Payables Y/N EQ (equal to) Y.
Report all customers with Search Type = C AND Payables Y/N = Y:
| Alpha Name | Search Type | Payables (Y/N) |
|---|---|---|
| Dunlop Const. | C | Y |
| Olson Payroll | C | Y |
OR Logic includes all data of both fields, as the shaded areas indicate.
In the example, the user selects Search Type EQ (equal to) C OR Payables Y/N EQ (equal to) Y.
Report all customers with Search Type = C OR Payables Y/N = Y:
| Alpha Name | Search Type | Payables (Y/N) |
|---|---|---|
| A&D Parts Co. | V | Y |
| Dunlop Const. | C | Y |
| EverReady | V | Y |
| Goldwater's | C | N |
| MCI | V | Y |
| Office Warehouse | V | Y |
| Olson Payroll | C | Y |
27.7.2 What You Should Know About
This section provides guidelines for data selection:
-
Using CT or CU: When using CT or CU in the Selection Rel field, you must enter a specific value in the Selection Value field. You cannot insert any of the special parameters, such as *VALUES. To search for multiple values using CT or CU, enter OR statements in the data selection. You can only use the CT values in an Open Query File function.
-
Using * TODAY: You can use *TODAY in the Data Selection in any date field that is in the based-on file. Using *TODAY with + (plus) or - (minus) retrieves records with previous or future dates. You can only use + or - for a number of days. For example:
-
*TODAY - 1: selects records where the date field is equal to yesterday's date.
-
*TODAY through *TODAY + 7: use with *RANGE to select any record where the date field contains a value equal to today's date through a week from today.
-
12/31/15 *TODAY 01/01/16 *TODAY + 100: when using *VALUE, you can use a combination of date values and *TODAY values. In this example, the system selects records where the date field is equal to 12/31/2015, 01/01/2016, today's date, and today's date + 100 days
-
-
Using *WILDCARD
-
In the first field enter the search string. For example, enter *LW5511* to find Alpha Names that include those characters. The program will enclose the wild card value in double quotation marks ('xx...'). The default wildcard characters are the _ underline, which you use to denote only one character and the * asterisk which you use to denote one or more characters. The value in this field is similar to the Contains (CT) value in the Selection Rel field, except you must specify multiple strings for the search rather than only one.
-
In the second field you may change the default wildcard characters by entering two characters. The first character accommodates the single character search, representing one single position of any valid character. The second character accommodates multiple character searches, representing any number of positions of any valid characters. If you leave this field blank, the system enters the default _ or * character. You do not need to change the characters from the default unless your search string includes them. For example, you want to find all descriptions containing JD Edwards World. The string in each description can have variations of JD Edwards World. In order to find all of these variations, your wild card value is *J*D*Edwards* (assuming you use the default characters). The system interprets the string as any number of leading characters followed by J, followed by any number of characters, followed by D, followed by any number of characters, followed by Edwards, which is also followed by any number of characters. If you change the value to _J*D*Edwards*, the search is the same except the string can contain only one leading character, as denoted by the _ in front of the J. Double quotes are programmatically placed around the values in the 2 fields.
-
Use an override set of wild card characters, such as % for single character searches and @ for multiple character searches when the string contains one of the default characters. The meaning of each character does not change; it allows you to scan for the strings containing either the _ or the * characters. For example, to search for a string that begins with an * and has Edwards following the *, use *@Edwards@. The system interprets this as the first character is an *, followed by any number of characters, followed by Edwards, followed by any number of characters. The results might include alpha names such as *JD Edwards World or *A.G. Edwards or *Jim Edwards Smith.
-
If you may be scanning a description item that may contain one or the other of the characters '_*'' , then you would want to enter an override set of wildcard characters such as '%@'. The meaning of each character does not change versus the '_*'; it simply allows you to scan for strings containing either the "_" or the "*" character(s).
-
-
Using *VALUES: When using *VALUE or *VALUES, the following screen displays. Note that the selection value of *VALUES only works with the relationship of 'EQ' (equal) or 'NE' (not equal). When the relationship of "NE" is specified the values list represents values you want omitted from selection.
-
Using *RANGES: When using *RANGE or *RANGES, the following screen displays. You will be prompted for a 'from' and 'through' set of values. The 'through' value must be greater than the 'from' value. The selection value of *RANGE only works with the relationship of 'EQ' (equal) or 'NE' (not equal). When the relationship of 'NE' is specified the range of values represents a range you want omitted from selection. Refer to 'NOTE' above for omitted records.
Field Level Help (F1) is not accessible from either the *VALUE or *RANGE forms.
-
On Data Selection, enter 'Y' in the IN (Include in Selection) field next to the fields you want to include in the report.
-
Optionally, complete the following fields:
-
Selection Rel
-
Selection Value
-
-
Choose Update with Redisplay (F5) to update the Data Selection and re-display the screen.
-
Enter the values or range and click Enter.
Note:
The screen will edit and highlight for duplicate values. All invalid values will need to be cleaned up first before the compare for duplicates can occur. The first Enter will highlight all the invalid values. Once these have been fixed the next press of the Enter key will highlight all of the duplicate values. -
Observe the following guidelines:
-
Numeric amounts can now be entered without having to account for the decimal positions. With this change, a message is displayed near the top of the screen to make users aware of the new procedure. An example of numeric data entry is as follows:
-
Formerly, decimal positions implicitly stored in the data files had to be accounted for on data entry. Therefore, a numeric field with two decimal positions, in which a value of one hundred was needed, would have been entered as:1000
-
One hundred, in a numeric field with two decimal positions, may now be entered in any of these forms:
100
100.00
100.
-
-
Field sizes are validated so if the value entered is longer than the field size an error will occur.
-
If you want to select data that is equal to blanks, you must enter '*BLANKS' in the selection value.
-
If you want to select data on negative numbers, the minus sign must be entered on the left.
-
If you want to select on zeros, you may enter either zeros or '*ZEROS' in the selection value.
-
If you want to select data on an amount field, enter the correct number of significant digits for the decimal position of the field as defined in the Data Dictionary. If the field is a monetary amount, do not enter dollar or cent characters. For example, if you want to select on Open Amount greater than $10,000 then specify 'Open Amount GT 1000000'.
-
The relationship of 'CT' (contains) may only be entered with the OPNQRYF function and only on alphanumeric data fields. The use of 'CU' is the same as 'CT', but ignores upper and lower case differences, while 'CT' works only with upper case letters.
-
If the value to be entered contains blanks (leading, trailing or embedded) you must enclose the value with double quotation marks ("), otherwise simply enter the value.
-
A value for a cost center item will be automatically right justified if the 'CC Edit' field contains a 'Y'. The 'CC Edit' field is in the fold area of the video display. By entering CF04 you can view the fold area of the video display.
-
If a question mark (?) is entered in the selection value and the data field associated with the value specifies the use of a specific record type in Descriptive Titles (specified in Data Dictionary definition for the field), the normal question mark facility will be overridden with the display of a window containing all of the valid Descriptive Title values. Any one valid value may be selected by the user for the selection value.
-
All Cost Center security selection is done automatically whether or not the selection is specified. If your report seems to be missing items of data that you think should be on your report you should review your Cost Center security parameters to see if you may not be authorized to some segments of the data.
-
When displaying all data fields from the 'Based On File' using the function key provided, you may suppress any field in the file (i.e., it will not show when pressing the function key), you can place the field in the Descriptive Titles record, System Code 81, Record Type FS. This is useful to limit the fields shown to the ones that you use for selection and avoid those fields that apply to other applications which have not been installed. Conversely, if you notice that a field is missing, you should check the Descriptive Titles record '81' 'FS'. The missing field is probably in this file.
-
-
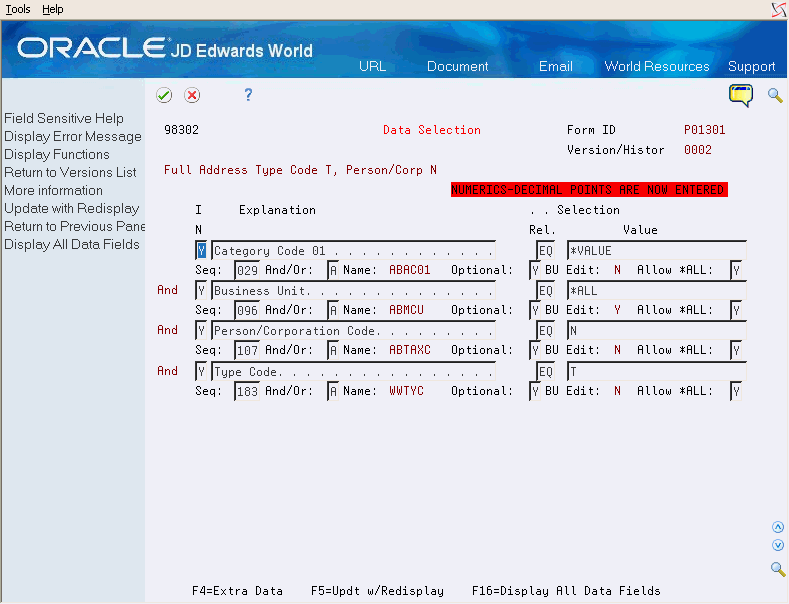
From Data Selection, choose More Information (F4) to display additional fields with the full set of parameters including:
-
SEQ (Sequence Number)
-
And/Or (Inclusion Logic)
-
Optional (Allowing change to Selection Field)
-
CC Edit (Cost Center Security)
-
Use of "*ALL" selection, and
-
Data name override
Figure 27-17 Data Selection (More Information) screen
Description of "Figure 27-17 Data Selection (More Information) screen"
-
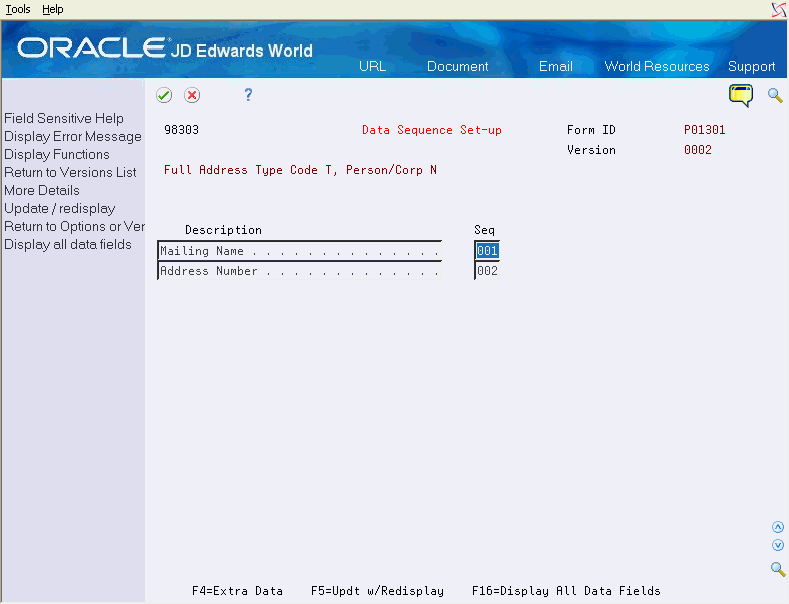
27.8 Working with DREAM Writer Data Sequence Setup
Data sequencing determines the order in which selected records display on the report.
In the following example, the system will list the report lines in alphabetic order by name.
The system lists the report lines in alphabetic order by name. If there are two lines with the same name, the system lists the lines in numeric order according to the address number.
JD Edwards World recommends that you review the program helps prior to changing the data sequence. The Help instructions for certain programs are very explicit that you should not change the data sequence. Some reports have built in sequence assumptions known as level breaks. Changing the sequencing can:
-
Flaw some reports.
-
Cause unpredictable results. This is especially true when running batch jobs that update files.
To work with data sequence setup
-
On Data Sequence Set-up, change the sequence numbers to list the report lines in the sequence your want.
-
Choose Display All Data Fields (F16) to display all Based-On File fields available for sequencing.
-
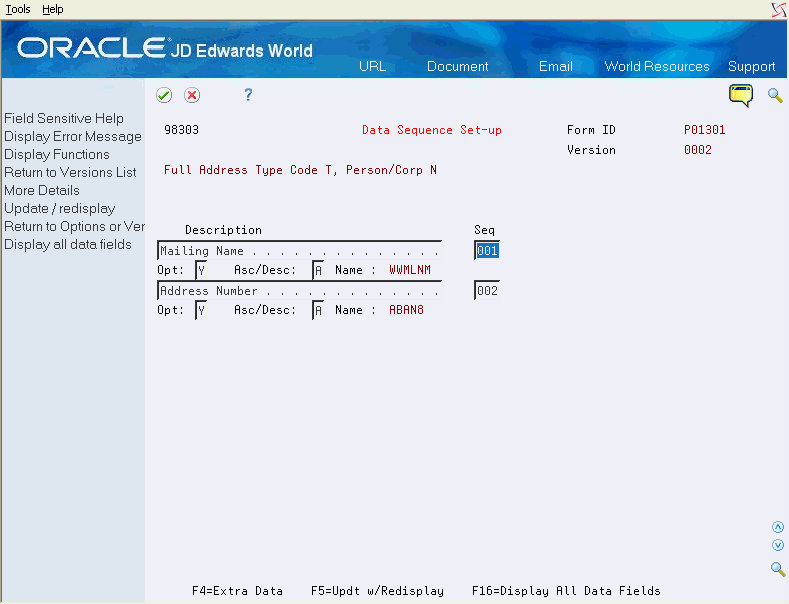
Choose More Details (F4), to display additional fields.
Figure 27-19 Data Sequence Set-up (Details) screen
Description of "Figure 27-19 Data Sequence Set-up (Details) screen"
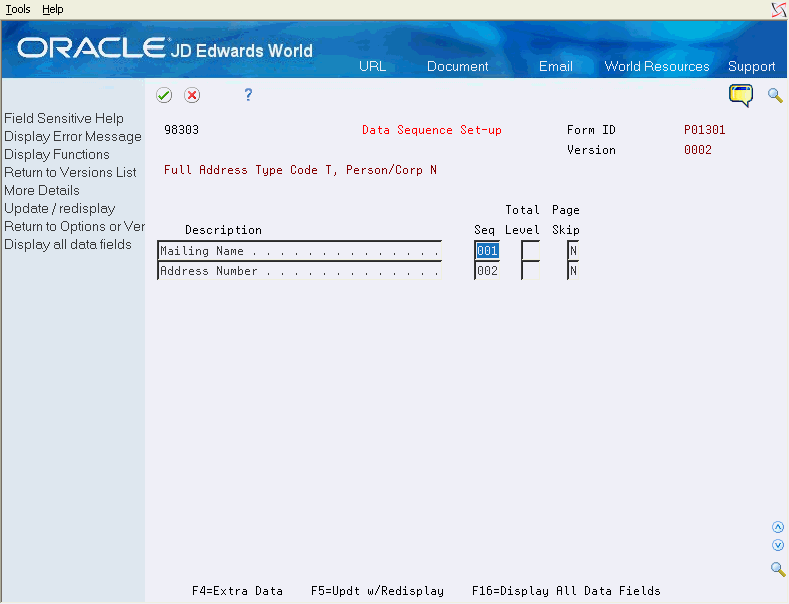
If you change the Type Report Totaling field in Additional Parameters to a value of 2, the system displays two additional columns on the Data Sequence Set-up screen.
Figure 27-20 Data Sequence Set-up (Additional Columns) screen
Description of "Figure 27-20 Data Sequence Set-up (Additional Columns) screen"
27.9 Working with DREAM Writer Printer File Overrides
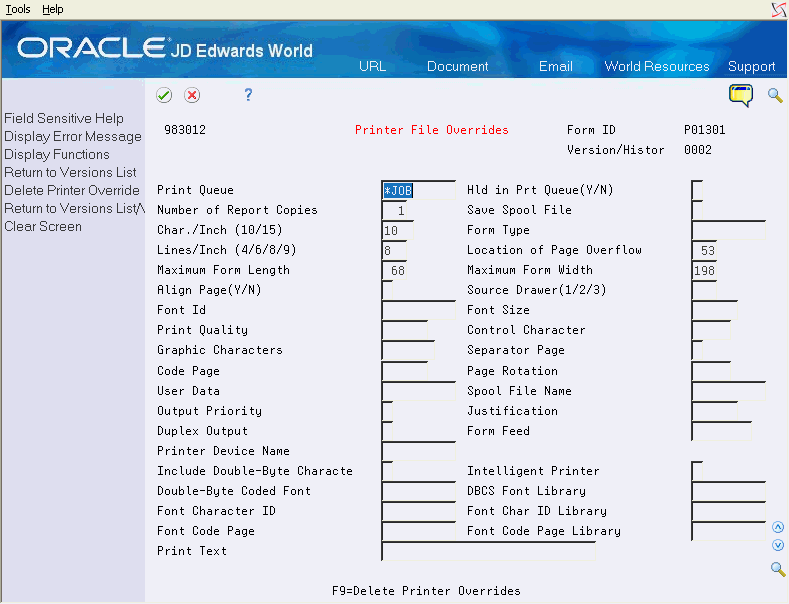
The Printer File Overrides screen controls where and how the report prints. Other Printer File Overrides are set based upon your printer.
To access the Printer File Overrides:
-
Exit to Printer Overrides (F5) on pProcessing Options Revisions
-
Option 6 from the DREAM Writer Versions List
Figure 27-21 Printer File Overrides screen
Description of "Figure 27-21 Printer File Overrides screen"
27.10 Changing the Date Format on DREAM Writer reports
The standard code for DREAM Writer reports uses a 6-digit date and EDTCDE(Y). If your date format is YMD, both leading 00s do not display on the report heading. For example, 9/01/04 displays rather than 09/01/04 for January 4, 2009. User either of the following to change the date format and then recompile the print file. Do not recompile the program.
Print a 4-position year, for example 2009/01/04
In the source code, locate the source line for the report file with the key word DATE. Subtract 2 from the position value (to allow for the extra two digits) and enter (*YY) immediately after the word DATE. For example, if the DATE key word displays as 117DATE, change it to 115DATE(*YY). This retrieves the 4-digit year from System i.
To change the date format with user defined edit codes
You can create an IBM user defined edit code for dates.You can use dashes or slashes in your user defined dates. You must complete this task before compiling the print files. Use the DSPEDTD command for each of the five EDTD codes (5-9) to determine if one exists.
-
On the command line, enter DSPEDTD 9.
-
In the Integer mask field, there are either dashes or slashes. Dates that display with dashes contain two spaces between the 0 (zero) and the first dash. If dashes are acceptable, proceed to the last step.
-
For slashes, enter DLTEDTD 9on the command line.
-
On the command line, enter CRTEDTD EDTD(9) INTMASK('0 / / ') AUT(*ALL). There are 2 spaces between the 0 (zero) and the first slash, 2 spaces between the slashes, and two spaces after the last slash. If you enter this command by pressing F4, press F10 to access the Authority field. On the command line, enter DSPEDTD 9 to ensure the date format is acceptable.
-
On the command line, change the EDTCDE(Y) by entering EDTCDE(9) in the DDS source for your reports. Do not make changes to the DATE keyword. Compile the reports and ensure the date format is acceptable.
