20 Work with Roles
This chapter contains these topics:
A role is a security concept that allows users access to the authority defined for multiple groups. Roles and role-based security affect authorizations at the group level only and may be set up in addition to individual user and *PUBLIC authorizations. If users are not associated with a role, the group the users may be assigned to on their JD Edwards user profile remains in effect. After you have defined roles, you can attach them to users, groups, and library lists using the security maintenance programs. All these relationships, as well as the role itself, have effective dates.
When at least one role is defined and active for a user and a library list, the user must use a role when signing on to that library list (JD Edwards environment). All group authorities are derived solely from the active groups associated with the role. If no roles are defined or active for a user and a library list, the user signs on without a role and may still be a member of a group, as defined on the user profile, for authorization.
20.1 Defining Roles
In JD Edwards World, you may define a security role for a set of related business activities shared by one or more users, groups and library lists (JD Edwards environments). Based on this role setup, when you sign on and select an environment from the Library List Selection screen, a list of valid, active roles appears, allowing you to select one. The role that you select remains the role assigned to you during your user session. If only one role is defined for you and it is valid and active, that role remains automatically assigned to you throughout your session.
To define user profiles for JD Edwards World software, complete the following tasks:
-
Define roles using Role Maintenance
-
Define role/user using Role/User Maintenance
-
Define role/group using Role/Group Maintenance
-
Define role/library list using Role/Library List Maintenance.
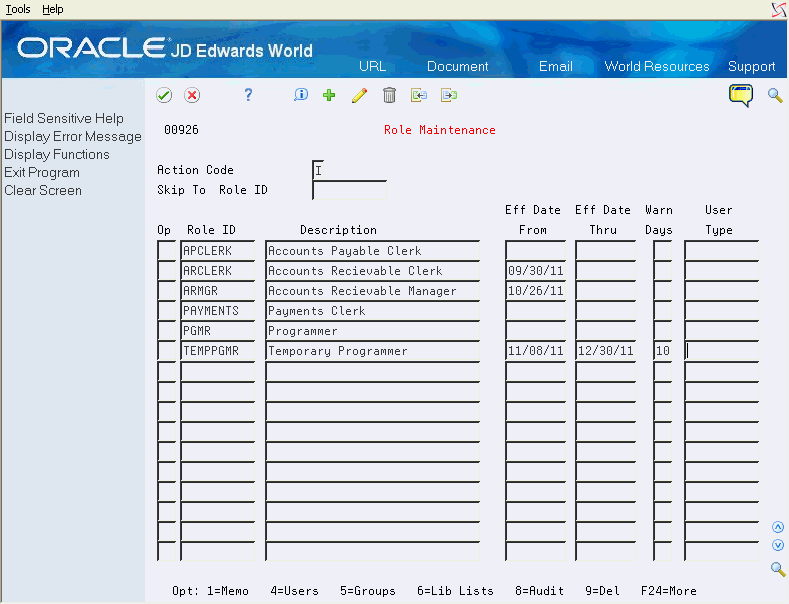
20.1.1 Role Maintenance
You use the Role Maintenance program to set up roles for JD Edwards World role-based security. You may set up roles at any time. and you can set roles to become effective or to expire in advance of the actual dates. This allows you to set up roles to become effective at some point in the future and to set future expiration dates for temporary roles.
From Master Directory (G), choose Hidden Selection 27
From Advanced and Technical Operations (G9), choose Security & System Admin
From Security and System Administration, (G94), choose Role-Based Security Maint
From Role-Based Maintenance (G9402), choose Role Maintenance
On Role Maintenance, enter the roles that you want to define.
| Field | Explanation |
|---|---|
| Skip To Role ID | Allows the user to position the lower, subfile portion of the video to begin at a point other than the first role ID. Roles are presented in alphabetical order by role ID. The lower portion of the screen lists the roles that have been defined. Press <F1> to invoke the Role Search Window (V00926W), and search for available roles. |
| Option | Available options are: 1, 4, 5, 6, 8, and 9. See below for a detailed explanation of each option. |
| Role ID | The role ID may be made up of any characters, but each Role ID must be unique and may not start with ”*”, which could cause the role ID to be confused with group IDs. Press <F1> to invoke the Role Search Window (V00926W), and search for available Roles. |
| Description | The description is a brief name you specify for the role. This description will be displayed to users to help them determine a Role to sign into. |
| Effective Date From | An optional field which sets the date the role becomes effective. If left blank, Effective Date From is not checked.
It may not be greater than the Effective Date Thru field and may not be less than the current date. |
| Effective Date Thru | The Effective Date Thru is an optional field which sets the date the role expires. If left blank, Effective Date Thru is not checked.
It may not be less than the Effective Date From field. Note that this date must be greater than or equal to Effective Date From and may not be less than the current date. |
| Warning Days | This is the number of warning days you wish to give users when a role or a role's relationship to a user, group or library list is about to expire. The warning days will control a message presented to the user when they sign on using the role. Warning days must be entered as a positive integer. |
| User Type | Defines the list of data files that are to be pre-opened at sign-on time when the User signs on with the role. JD Edwards World provides 14 model user types. This is the same as the User Type field on the JD Edwards user profile. |
20.1.2 What You Should Know About
Roles are displayed in sequence by role ID. You may specify a role in the Skip To Role ID field to retrieve a specific role.
| Topic | Description |
|---|---|
| Option 1 – Generic Text Memo | Use this option to enter free-form text with any notes, comments or explanations about the role. If a memo exists for a role, the selection option field displays in reverse image. |
| Option 4 – Role/User Maintenance | Use this option to call the Role/User Maintenance program (P009261) to define role/user relationships and effective dates. |
| Option 5 – Role/Group Maintenance | Use this option to call the Role/Group Maintenance program (P009262) to define role/group relationships and effective dates. |
| Option 6 – Role/Library List Maintenance | Use this option to call the Role/Library List Maintenance program (P009264) to define role/library list relationships and effective dates. |
| Option 8 – Audit Information | Use this option to retrieve audit information for a role record. |
| Option 9 – Delete Role | Use this option to delete a role record. Alternatively, you may clear the subfile record line. If the role has associated records, an error message appears, and you will not be allowed to delete the role. To delete the role, you use the Role/User, Role/Group, and Role/Library List Maintenance screens to remove the associated role records. After removing the associated role record, return to the Role Maintenance screen to delete the role. |
Import and Export capabilities are available on the Role Maintenance screen.
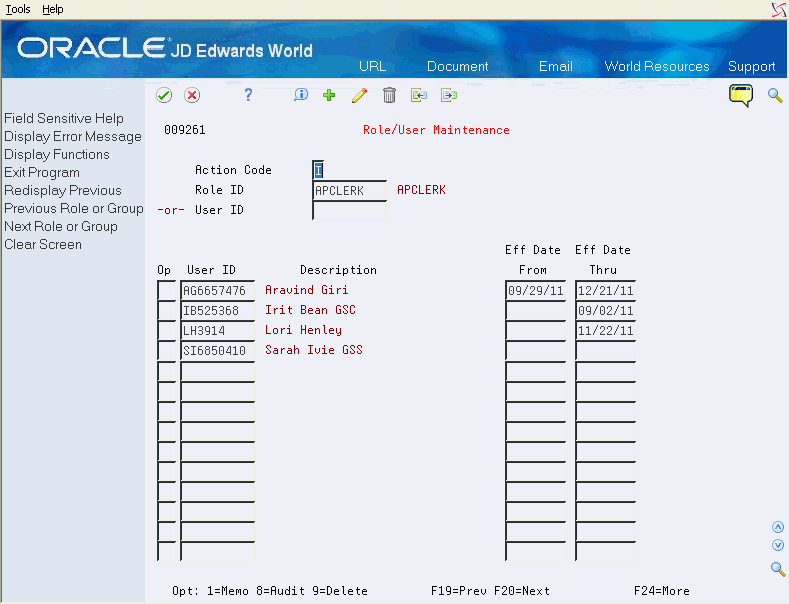
20.1.3 Role/User Maintenance
The Role/User Maintenance program allows you to set up and maintain records associating users with roles for role-based security. You may set up the role/user relationship at any time, and you can set role/user relationships to become effective or to expire in advance of the actual dates. This allows you to set up role/user relationships to become effective at some point in the future and to set future expiration dates for temporary role/user relationships.
From Master Directory (G), choose Hidden Selection 27
From Advanced & Technical Operations (G9), choose Security & System Admin
From Security & System Administration (G94), choose Role-Based Security Maintenance
From Role-Based Maintenance (G9402) choose Role/User Maintenance
On Role/User Maintenance, enter the user(s) that you want to define for a role, or, alternatively, enter the role(s) that you want to define for a user.
| Field | Explanation |
|---|---|
| Role ID | This field allows you to inquire on the users associated with the role entered. The lower, subfile portion of the video will display the users for the role entered. Users are presented in alphabetical order by user ID.
The role ID must be a valid role in the Role file (F00926). Press <F1> to call the Role Search Window (V00926W) and search for available roles. |
| User ID | This field allows you to inquire on the roles associated with the user entered. The lower, subfile portion of the video will display the roles for the user entered. Roles are presented in alphabetical order by role ID.
The user ID must be a valid user set up in the User Information file (F0092). User IDs must not begin with the character '*', which is used to identify a group profile. |
| Option | Available options are: 1, 8, and 9. See below for a detailed explanation on each option. |
| Description | A brief name for the role or user. |
| Effective Date From | Effective Date From is an optional field which sets the date the Role/User association becomes effective. If left blank, Effective Date From is not checked.
It may not be greater than the Effective Date Thru field and may not be less than the current date. |
| Effective Date Thru | The Effective Date Thru is an optional field which sets the date on which the role /user association expires. If left blank, Effective Date Thru is not checked.
It may not be less than the Effective Date From field. Note that this date must be greater than or equal to Effective Date From, and may not be less than the current date. |
The following options are available on the Role/User screen:
| Topic | Description |
|---|---|
| Option 1 – Generic Text Memo | Use this option to enter free-form text with any notes, comments or explanations about the role/user record displayed in the subfile. If a memo exists for a role/user record in the subfile, the subfile option field for that record will display in reverse image. |
| Option 8 – Audit Information | Use this option to retrieve audit information for a role/user record. |
| Option 9 – Delete | Use this option o delete a role/user record. You may alternatively clear the subfile record line. |
| F9 (Redisplay Previous) | Use this option to redisplay the last inquiry. |
| F19 (Previous Role or Group) and F20 (Next Role or Group) | Use this option to inquire on the Users associated with the previous/next Role in the database. |
You may specify a ’D' in the Action Code field to display the V00DWW – Delete Warning Window. This window displays a warning that all user records for the role or all role records for the user will be deleted. You may then confirm the deletion by pressing <F6>, or exit without deleting by pressing <F3>.
Import and Export capabilities are available on the Role/User screen.
20.2 Role/Group Maintenance
The Role/Group Maintenance program allows you to set up and maintain records associating groups with roles for role-based security. You may set up role/group relationships at any time, and you can set role/group relationships to become effective or to expire in advance of the actual dates. This allows you to set up role/group relationships to become effective at some point in the future, and to set future expiration dates for temporary role/group relationships.
From Master Directory (G), choose Hidden Selection 27
From Advanced & Technical Operations (G9), choose Security & System Admin
From Security & System Administration (G94), choose Role-Based Security Maint
From Role-Based Maintenance (G9402), choose Role/Group Maintenance
On Role/Group Maintenance, enter the group(s) that you want to define for a role, or, alternatively, enter the role(s) you want to define for a group. Note that all groups have the prefix ”*”.
Figure 20-3 Role/Group Maintenance screen
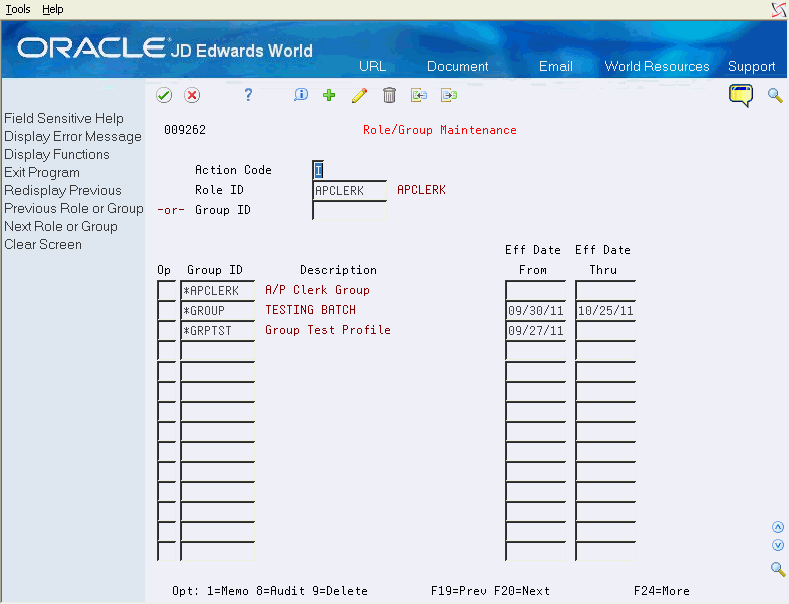
Description of "Figure 20-3 Role/Group Maintenance screen"
| Field | Explanation |
|---|---|
| Role ID | This field allows you to inquire on the groups associated with the role entered. The lower, subfile portion of the video displays the groups for the role entered. Groups are presented in alphabetical order by group ID.
The role ID must be a valid role in the Role file (F00926). Press <F1> to invoke the Role Search Window (V00926W) to search for available Roles. |
| Group ID | This field allows you to inquire on the roles associated with the group entered. The lower, subfile portion of the video will display the roles for the group entered. Roles are presented in alphabetical order by Role ID.
The group ID must be a valid user set up in the User Information file (F0092). Group IDs must begin with the character '*'. |
| Option | Available options are: 1, 8, and 9. See below for a detailed explanation on each option. |
| Description | A brief name for the role or group. |
| Effective Date From | The Effective Date From is an optional field which sets the date the role/group association becomes effective. If left blank, Effective Date From is not checked.
It may not be greater than the Effective Date Thru field and may not be less than the current date. |
| Effective Date Thru | The Effective Date Thru is an optional field which sets the date the Role /Group association expires. If left blank, Effective Date Thru is not checked.
It may not be less than the Effective Date From field. Note that this date must be greater than or equal to Effective Date From, and may not be less than the current date. |
The following options are available on the Role/Group screen:
| Topic | Description |
|---|---|
| Option 1 – Generic Text Memo | Use this option to enter free-form text with any notes, comments or explanations about the role/group record displayed in the subfile. If a memo exists for a role/group record in the subfile, the subfile option field for that record will display in reverse image. |
| Option 8 – Audit Information | Use this option to retrieve audit information for a role/group record. |
| Option 9 – Delete | Use this option to delete a role/group record. You may alternatively clear the subfile record line. |
| F9 (Redisplay Previous) | Use this option to redisplay the last inquiry. |
| F19 (Previous Role or Group) and F20 (Next Role or Group) | Use this option to inquire on the groups associated with the previous/next Role in the database. |
You may specify a ’D' in the Action Code field to display the V00DWW – Delete Warning Window. This window displays a warning that all user records for the role or all role records for the user will be deleted. You may then confirm the deletion by pressing <F6>, or exit without deleting by pressing <F3>.
Import and Export capabilities are available on the Role/Group screen.
The following diagram shows the relationships between the role, user, role/user, group, and role/group files.
Figure 20-4 Relationships Between User, Role, and Group Files
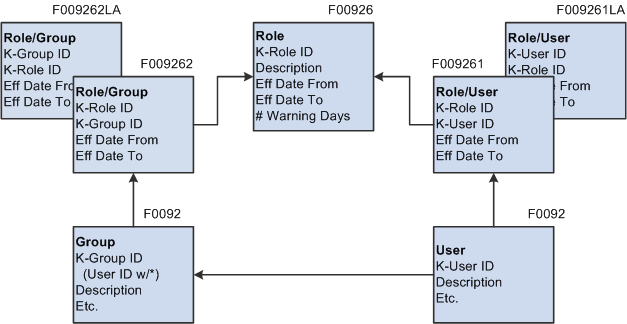
Description of "Figure 20-4 Relationships Between User, Role, and Group Files"
20.3 Role/Library List Maintenance
The Role/Library List Maintenance program allows you to set up and maintain records associating library lists with roles for role-based security. You may set up role/library relationships at any time, and you can set role/library list relationships to become effective or to expire in advance of the actual dates. This allows you to set up role/library list relationships to become effective at some point in the future, and to set future expiration dates for temporary role/library list relationships.
From Master Directory (G), choose Hidden Selection 27
From Advanced & Technical Operations (G9), choose Security & System Admin
From Security & System Administration (G94), choose Role-Based Security Maint
From Role-Based Maintenance (G9402), choose Role/Library List Maintenance
On Role/Library List Maintenance, enter the library list(s) for which you wish to define a role, or, alternatively, enter the role(s) you want to define for a library list.
Figure 20-5 Role/Library List Maintenance screen
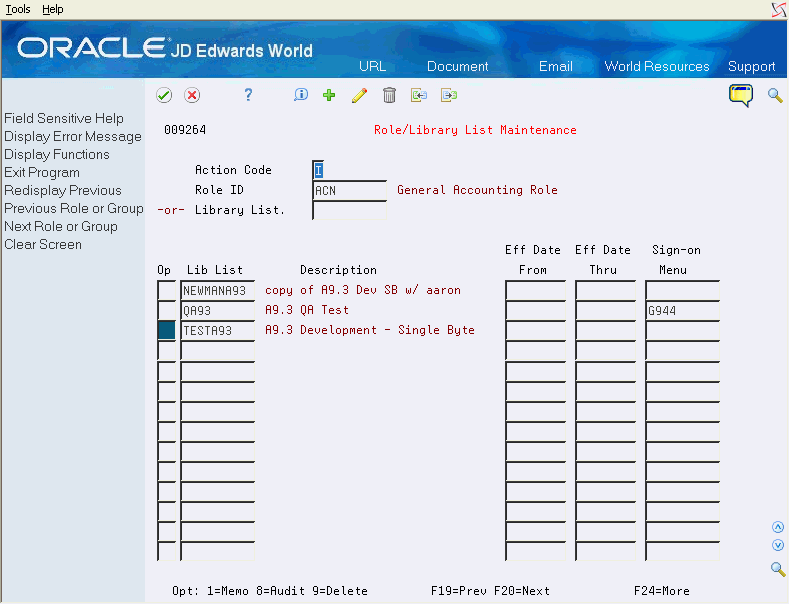
Description of "Figure 20-5 Role/Library List Maintenance screen"
| Field | Explanation |
|---|---|
| Role ID | This field allows you to inquire on the library lists associated with the tole entered. The lower, subfile portion of the video will display the library lists for the role entered. Library lists are presented in alphabetical order by library list name.
The role ID must be a valid role in the Role file (F00926). Press <F1> to invoke the Role Search Window (V00926W), and search for available roles. |
| Library List | This field allows you to inquire on the roles associated with the library list entered. The lower, subfile portion of the video will display the roles for the library list entered. Roles are presented in alphabetical order by role ID.
The Library list name must be a valid library list set up in the Library List Master file (F0094). Group IDs must begin with the character '*'. |
| Option | Available options are: 1, 8, and 9. See below for a detailed explanation on each option. |
| Description | A brief name for the role or library list. |
| Effective Date From | The Effective Date From is an optional field which sets the date the role /library list becomes effective. If left blank, Effective Date From is not checked.
It may not be greater than the Effective Date Thru field and may not be less than the current date. |
| Effective Date Thru | The Effective Date Thru is an optional field which sets the date the role /library list association expires. If left blank, Effective Date Thru is not checked.
It may not be less than the Effective Date From field. Note that this date must be great than or equal to Effective Date From. |
| Sign on Menu | The Sign-on Menu is an optional field which sets the initial World Menu to be displayed when the user signs on to a particular library list (environment) with a particular role. This supports the use of limited Menu access. |
20.3.1 What You Should Know About
The following options are available on the Role/Library List Maintenance screen.
| Topic | Description |
|---|---|
| Option 1 – Generic Text Memo | Use this option to enter free-form text with any notes, comments or explanations about the Role/Library List record displayed in the subfile. If a memo exists for a role/library list record in the subfile, the subfile option field for that record will display in reverse image. |
| Option 8 – Audit Information | Use this option to retrieve audit information for a role/library list record. |
| Option 9 – Delete | Use this option to delete a role/library list record. You may alternatively clear the subfile record line. |
| F9 (Redisplay Previous) | Use this option to redisplay the last inquiry. |
| F19 (Previous Role or Group) and F20 (Next Role or Group) | Use this option to inquire on the library lists associated with the previous/next role in the database. |
You may specify a ’D' in the Action Code field to display the V00DWW – Delete Warning Window. This window displays a warning that all user records for the role or all role records for the user will be deleted. You may then confirm the deletion by pressing <F6>, or exit without deleting by pressing <F3>.
Import and Export capabilities are available on the Role/Library List screen.
The following diagrams show the relationships between the Role, Library Lists, Role/Library List, User, and User/Library List files.
Figure 20-6 Relationships Between Role and Library List Files
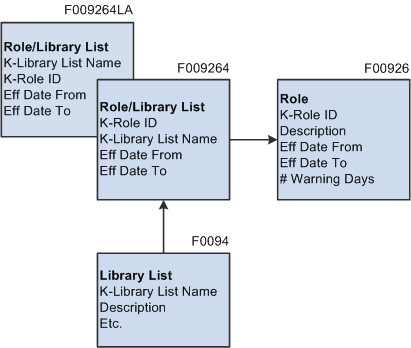
Description of "Figure 20-6 Relationships Between Role and Library List Files"
Figure 20-7 Relationships Between the User, Library List, and Role Files
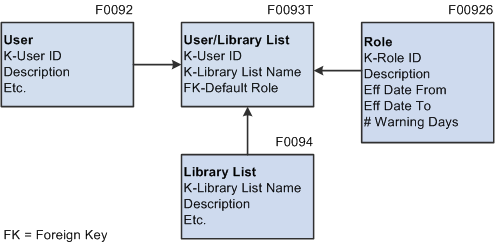
Description of "Figure 20-7 Relationships Between the User, Library List, and Role Files"
20.4 Creating a Role from a Group
The Create Role from Group program reads user records from the JD Edwards User Profile file (F0092) and creates role records in the Role file (F00926) based on the value in the User Class/Group field. Optionally, it can create associated role-based security records in the Role/User (F009261), Role/Group (F009262) and Role/Library List (F009264) files.
You can run this program in proof or final mode. In proof mode, the program generates the report but does not create the role and associated records. If you run this program in final mode, it generates the report and creates role-based security records. After you have created the roles, you can attach them to users, groups and library lists using the role-based security maintenance programs.
20.4.1 Create a Role from a Group
From Master Directory (G), choose Hidden Selection 27
From Advanced & Technical Operations (G9), choose Security & System Admin
From Security & System Administration (G94), choose Role-Based Security Maint
From Role-Based Maintenance (G9402), choose Create Role from Group
A DREAM Writer Version list for P00926C appears. You may create a new version by copying version ZJDE0001.
Figure 20-8 Create Role from Group screen
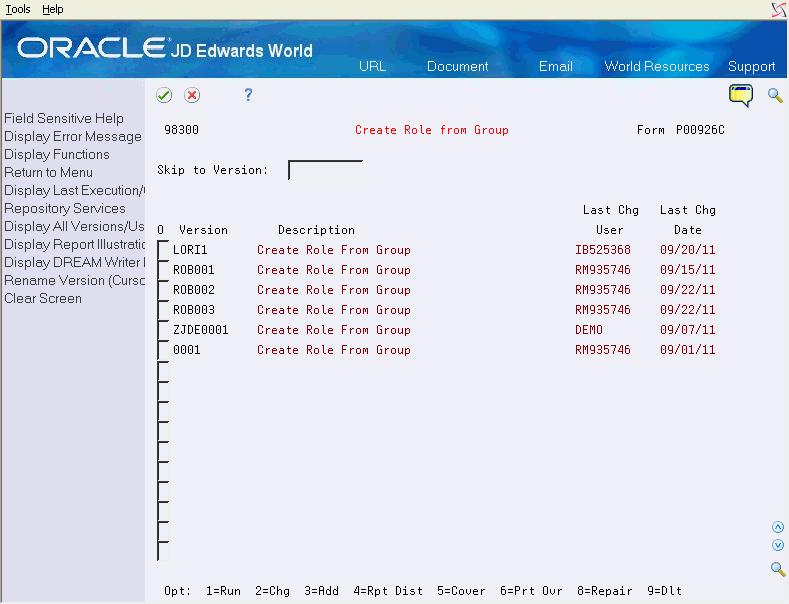
Description of "Figure 20-8 Create Role from Group screen"
Based on the DREAM Writer selection criteria, the program processes selected user records (from F0092). If the user record has a group (ULUGRP) associated with it, that group name (without the '*') is used as the basis for creating a role record in the Role file (F00926). The group name will be used as the role ID and the description.
Additionally, the Role Effective From Date is added to the role record if you entered the value in the processing options. If you set the processing options to update the role associative files, the system adds these records:
-
The role/user record in the F009261 file will be created with the role ID from the Role file and the user ID from the JD Edwards User profile.
-
The role/group record in the F009262 file will be created with the role ID from the Role file and the group ID from the group value in the User profile.
-
The Role/Library List record in the F009264 file is created based on the library lists associated with the user ID in the Library List Control file (F0093). The role ID from the Role file will be used with each library list from the Library List Control file. If the processing option is set to a single library list, only that library list will be created in the Role/Library List file. The group value in the JD Edwards User profile will be deleted from the record in the F0092 file once the role is created, if the processing option for this is set to do so.
In proof mode, the report always shows which records need to be created and which already exist. In final mode, the records will be added to the files. If you run the report for multiple users, the proof and final modes of the report may differ as records are added to the files that may be the same for more than one user
If the user ID in the JD Edwards user profile is a group record (first character = '*'), only the role and the role/group records will be created.
20.4.2 Create Role from Group Processing Options
Use the following processing options to control
-
Proof/Final Mode - This value indicates whether role and associated records are created or not. Final mode will enable updates. Proof mode will not update records. Both modes will produce a report.
-
Remove Group from User - This value indicates whether to remove the group from the user record in JD Edwards User Profile (F0092) once the role record is created.
-
Effective Date for Role - This value is used to populate the beginning for Role Effective Date field on the role records that are created.
-
Create Associated Role/User Records - This value indicates whether to create role/user records (F00926).
-
Create Associated Role/Group Records - This value indicates whether to create role/group records (F009261).
-
Create Associated Role/Library List Records - This value indicates whether to create role/library list records (F009264).
-
Role Library List Addition - This value indicates which library list(s) to create role/library list (F009264) records for. Enter *ALL to include every valid library list associated with a User. Enter a single valid library list value to create the role/library record for only that library list.
20.4.3 Accessing Create Role from Group Option from User Information (V0092N)
You may access the Create Role from Group program (P00926CW) by pressing <F11> from User Information (V0092N). The Create Role from Group program enables you to create a role based on the group in the JD Edwards User Profile.
Figure 20-9 Create Role From Group Window screen
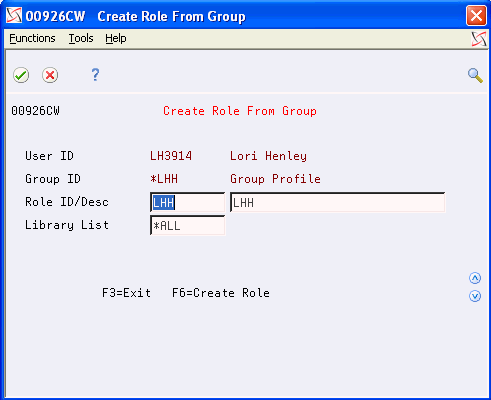
Description of "Figure 20-9 Create Role From Group Window screen"
| Field | Explanation |
|---|---|
| User | The user ID passed from the calling program. Display only. |
| Group | The group ID passed from the calling program. Display only. |
| Role | The role ID. The default value is based on the group ID value without the '*'. The field can be changed. If the role already exists, the other files associated with the role (Role/User, Role/Group and Role/Library List) will be created. |
| Description | The description for the role. The default is based on the group ID value without the '*'. The field can be changed. |
| Library List | The library list value designates whether role/library list (F009264) records are created for a single library list or for all library lists associated with the user. |
After you complete the fields and select the create Roles key (F6), the system calls the Create Role From Group program (P00926C). The Create Role From Group program creates records in the Role (F00926), Role/User (F009261), Role/Group (F009262), and Role/Library List (F009264) files.
Creation of the role records always occurs. Creation of records in the other three files associated with roles is optional, and is based on the DREAM Writer version being used. The version used is based on processing option values set for the User Information Revisions (P0092N) program.
20.4.4 Create Role from Group Window Processing Options
The DREAM Writer version for the Create Role From Group (P00926C) is stored in the processing options of the calling program. Because the Create Role From Group Window calls the batch program interactively, the report is not generated and only certain processing options are used.
-
Effective Date for Role - Enter the effective date value for the role record. If a date prior to the current date is entered, the current date will be used. If no date is entered, then the value in the file will be left blank.
-
Create Role User Record - Create a role/user record (F009261) associated with the role created. Enter a 'Y' or an 'N'. Defaults to 'Y'.
-
Create Role Group Record - Create a role/group record (F009262) associated with the role created. Enter a 'Y' or an 'N'. Defaults to 'Y'.
-
Create Role Library List Record - Create role/library list records (F009264) associated with the role created. Enter a 'Y' or an 'N'. Defaults to 'Y'