7 Implement Import/Export
This chapter contains these topics:
You can use the Import/Export functionality in a variety of JD Edwards World programs.
Although many JD Edwards World programs are similar, there are differences for which you might need to make some adjustments to the actions you perform while implementing Import/Export for a particular program.
JD Edwards World recommends that you refer to the code for a program in which Import/Export is active to become familiar with functionality of the software.
JD Edwards World does not provide customer support for programs you customize, including those in which you implement this functionality.
See Chapter 3, "Set Up Import/Export" and Chapter 4, "Work with Import/Export" for more information about setting up and using Import/Export.
7.1 Implementing Interactive Export
You can implement Interactive Export in many of JD Edwards World interactive subfile programs. Interactive Export is not available in programs that display one record at a time, as this is a very time consuming method of exporting data. From subfile programs, Interactive Export exports the entire subfile and you do not need to page through the entire subfile.
Following is the flow for Interactive Export:
-
Users locate or enter data and then enter T (To PC) in the Action Code field or choose Export (F23) if the program is an inquiry only program.
-
The program executes subroutine C00E1, which:
-
The program:
-
Displays the first page of the subfile.
-
Executes subroutine C00E2, which activates the Subfile Export Parameters program (P00SFDL) to export the data on the screen.
-
Displays the next page of the subfile.
-
Continues to display the subfile and execute C00E2 until it reaches the end of the subfile.
-
Executes subroutine C00IEM that sends a success or failure message to display on the workstation.
-
Executes subroutine C00IET, which ends the export process.
-
When the export is complete, the export process locks the file and it remains in the IFS, because the user can perform multiple exports. When the user exits the program, the system closes the file.
After you implement Interactive Export, you must add the program name to UDC 00/IE, Interactive Export Programs.
7.1.1 Before You Begin
-
For programs without an Action code field, Export (F23) is a standard function exit for Export. You must include this function key in the Function Key Definition (P9220) and Vocabulary Overrides (P9601) programs for the screens in the programs for which you implement Interactive Export.
-
If the export file has multiple record formats (the starting-row-for-column-heading, record format names, and so forth) it can have multiple values and you must adjust the code accordingly.
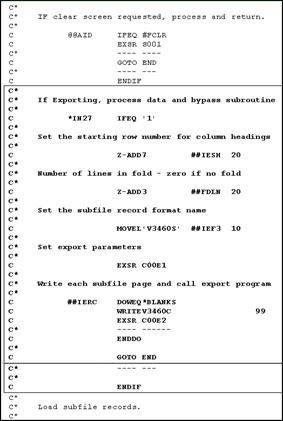
To implement interactive export
-
In the interactive program, include file F00UDP in input mode to section F.
-
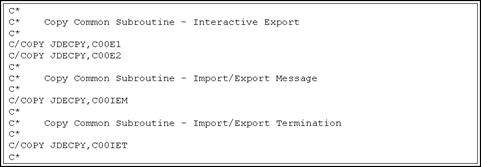
Include copy modules C00IEM, C00IET, C00E1 and C00E2 at the end of the code.
Figure 7-2 Copy Common Subroutine - Interactive Export screen
Description of "Figure 7-2 Copy Common Subroutine - Interactive Export screen"
-
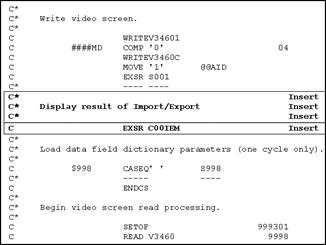
Call subroutine C00IEM after writing the video and just before reading the video in MAINLINE.
Figure 7-3 Display Result of Import/Export screen
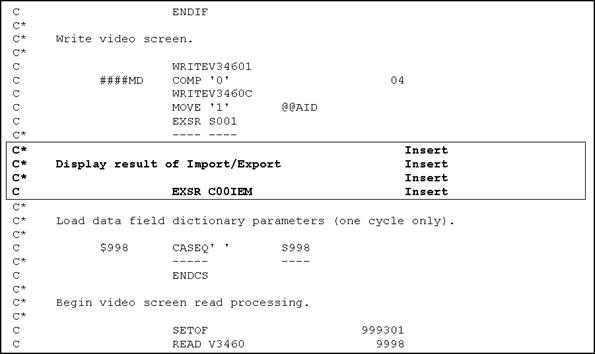
Description of "Figure 7-3 Display Result of Import/Export screen"
-
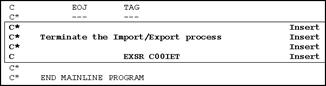
Call subroutine C00IET, just before end of MAINLINE and after EOJ tag.
Figure 7-4 Terminate the Import/Export Process screen
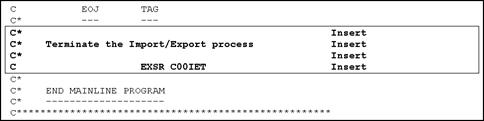
Description of "Figure 7-4 Terminate the Import/Export Process screen"
-
Perform one of the following:
-
If the screen has an Action Code field, add the following code to MAINLINE, prior to S003 and then replace copy module C0001 with C0001T.
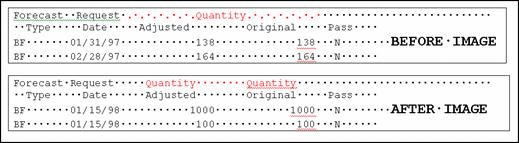
For an example, see Forecast Revisions (P3460) in the JD Edwards World Forecasting Guide.
Figure 7-5 Interactive Export (C0001T) screen
Description of "Figure 7-5 Interactive Export (C0001T) screen"
-
Replace copy module C0001 with C0001T as follows:
Figure 7-6 Copy Common Subroutine - Edit Action Code screen

Description of "Figure 7-6 Copy Common Subroutine - Edit Action Code screen"
-
If the screen does not have an Action Code field, add the following code to Subroutine S00EX.
Figure 7-7 Interactive Export (Subroutine S00EX) screen
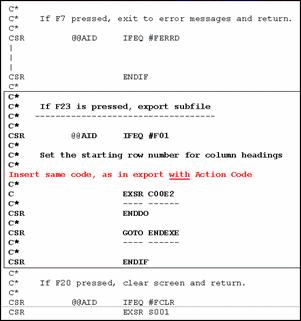
Description of "Figure 7-7 Interactive Export (Subroutine S00EX) screen"
-
If the screen has a preloaded value in the subfile records, replace copy module C00E2 with C00E2P.
Copy module C00E2P passes the ##IESL parameter to the export process. ##IESL informs the export process of the number of records to export on the current subfile page. This avoids the system exporting records on the last page that do not have data. The system sets ##IESL with the number of subfile records to export from the current page prior to executing subroutine C00E2. If every record on the page has data, the number of records on a page must pass in the value. The system can also pass the value of 99, which instructs the export process to export every subfile record on the page.
-
-
Add the program to UDC 00 / IE.
7.2 Implementing Interactive Import
You can implement Interactive Import in subfile maintenance programs and programs that you use to maintain one record at a time. The subfile programs can import the entire subfile automatically and you do not need to page through the entire subfile.
In addition to this task, JD Edwards World recommends that you review the Programming Considerations.
Following is the flow of Interactive Import:
-
In the program, the user enters F (From PC) in the Action Code field.
-
The program executes subroutine C00I1, which:
-
The program:
-
Loads records into one page of the subfile (if present).
-
Continues to import each subfile page, until it reaches the end of the subfile.
-
Displays the import records.
-
Executes subroutine C00IEM, which sends a success or failure message to display on the workstation.
-
Executes subroutine C00IET, which ends the export process.
-
After you implement Interactive Import, you must add the program name to UDC 00/II, Interactive Import Programs.
To implement interactive import
-
Include the Import/Export Parameters file (F00UDP) in input mode to section F.
-
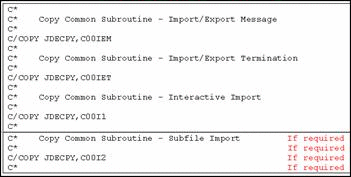
Include copy modules C00I1, C00I2, C00IEM and C00IET at the end.
Figure 7-9 Copy Common Subroutine - Import/Export Message screen
Description of "Figure 7-9 Copy Common Subroutine - Import/Export Message screen"
-
Copy C0001T.
Figure 7-10 Copy Common Subroutine - Edit Action Code (C0001T) screen

Description of "Figure 7-10 Copy Common Subroutine - Edit Action Code (C0001T) screen"
-
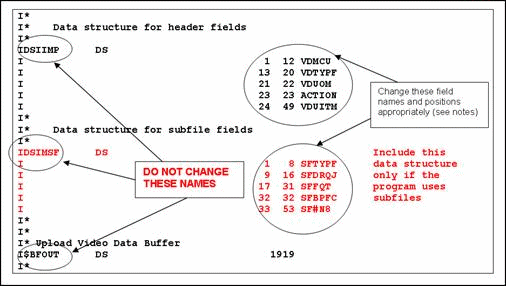
Define a data structure (define two data structures if a subfile exists) with the fields in the exact order as they appear on the video (only include input capable fields). Then define a data structure for $BFOUT
Figure 7-11 Data Structure for Header Fields
Description of "Figure 7-11 Data Structure for Header Fields"
-
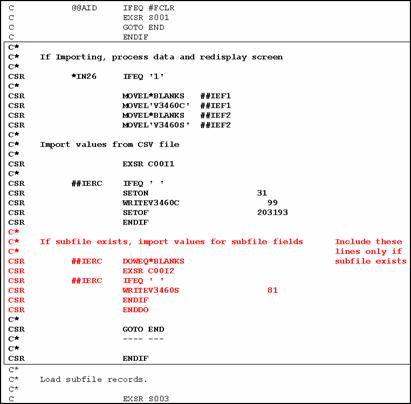
Call subroutine C00IEM after writing the video and just before reading the video in MAINLINE
Figure 7-12 Display Result of Import/Export (Subroutine C00IEM) screen
Description of "Figure 7-12 Display Result of Import/Export (Subroutine C00IEM) screen"
-
Add the following code to MAINLINE, just before S003.
For an example, see Forecast Revisions (P3460) in the JD Edwards World Forecasting Guide.
Figure 7-13 Interactive Import (S003) screen
Description of "Figure 7-13 Interactive Import (S003) screen"
-
Call subroutine C00IET, just before end of MAINLINE and after EOJ tag.
Figure 7-14 Terminate the Import/Export Process screen
Description of "Figure 7-14 Terminate the Import/Export Process screen"
-
Add the program to UDC 00/II.
7.3 Implementing Batch Export
JD Edwards World includes Batch Export in World Writer and certain DREAM Writers. You can implement Batch Export to work with additional DREAM Writers. The export runs when you run the DREAM Writer or World Writer. When the system creates the spool file, the Batch Export process reads the spooled file and exports the contents to the IFS file set up in the parameters. The batch export currently works only if the job generates only one spooled report file. The system cannot accommodate more than one generated report.
You access the Spooled File Export Parameters window from the Additional Parameters screen of the corresponding DREAM Writer or World Writer version by choosing Batch Export Parameters (F6).
Batch Export from a DREAM Writer uses literals, or Export Tags, that you add to the right-hand side of the report. These Export Tags should only print when you use the report for Export. You add six characters to the normal width of the report when you enable Export and run the report. The conditions for this logic to work correctly follow:
-
The Export Tags must exist in the report Data Description Specifications (DDS)
The system compiles the report DDS file with the new report width (the original width plus 6 characters)
-
The system updates the F9805 Printer Overrides file record for the report to the new report width (the original width plus 6 characters)
-
The program name exists for UDC 00/BE Batch Export Programs
If the UDC record 00/BE does not exist, the system bypasses all of the special logic for export capable reports and uses the Form Width in the Printer Override record. If the Form Width is blank or there is no Printer Override record then the system does not override the form width and the width remains as you set it in the printer file.
If the UDC record exists then the report should be capable of export. The system always uses DSPFD as a starting point for the form width because this should be the true length of the printer file including the 6 bytes of export tag characters. If the Enabled export parameter is N, the system calculate form width as the width in the Printer File Creation Parameters file (F9805) record minus six.
If a parameter record in the F00UDP file does not exist, the system also determines that the Enabled export parameter is N.
If a Print Override record exists and has a form width that is greater than the actual report width (the width from DSPFD minus six), the system replaces the Print Override width with the correct width (the width from DSPFD minus six). This prevents you from entering a longer width that would cause the tags to print when you disable the export function. You can enter a width that is shorter than the actual report width and this width remains in effect as long you do not set a processing option for the report to produce an export file. This produces a shortened report.
If you enable the report to produce an export file, the tags must be present so the Print Override width is always set to be the form width from DSPFD.
In addition to this task, JD Edwards World recommends that you review the Programming Considerations.
-
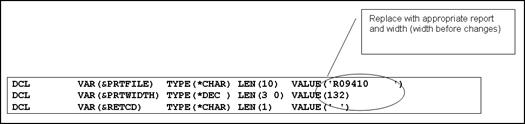
In the CL program, declare the variables as shown.
-
Immediately after the RPG program call, call the Spool File Export program and add error handler for export failure.
Figure 7-16 Spool File Export Program screen

Description of "Figure 7-16 Spool File Export Program screen"
Note:
In standard DREAM Writer CL, the system launches P98315 prior to launching the report program. This program launches P983151 which builds the printer override in the LDA. P983151 assumes that a standard printer file name is in use (the R in the program name replaces the P). If this is not the case, the printer file name in the variable &PRTFILE must pass to P983151 as an optional third parameter. This is an optional seventh parameter in when launching P98315 which in turn passes this to P983151. Do not alter the section of the LDA that specifies the PAGESIZE for the printer override in the CL program after P983151 launches. -
Change the RPG program as necessary.
If you alter any field in the report, you might need to make corresponding changes in the RPG code. You might have to recompile the RPG program over the changes in the report file.
-
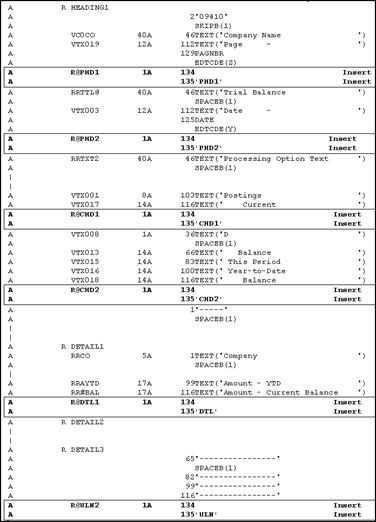
Change the report file by adding a blank 1 byte field at the end and then the 4 byte literal on each line on the DDS. Use the following convention where n can be 1 through 9 and A through Z:
PHDn - On all Page Heading lines
CHDn - On all Column Heading lines
DTLn - On all Detail lines
TOTn - On all Total lines
ULNn - On all Underlines
TXTn - On all Text lines
-
Add a prefix of "R@" for the one-byte field.
-
R@PHDn - On all Page Heading lines
-
R@CHDn - On all Column Heading lines
-
R@DTLn - On all Detail lines
-
R@TOTn - On all Total lines
-
R@ULNn - On all Underlines
-
R@TXTn - On all Text lines
-
-
Assign sequence numbers to the literals and one byte fields in numerical sequence followed by alphabetic sequence.
Corresponding one byte field and associated literal must have the same sequence number or alphabetic character. Sequence numbers can be duplicated for different record formats.
You must code the underline associated with the column headings as a CHD line instead of a ULN line. This allows it to display when the Include Column Headings option = Y and not display when the option is set to N. JD Edwards World recommends that when there is only one row of column headings that you insert a row of column headings above the row. It only requires one VTX column set to blanks to function properly. You must define the PHDs in only one record format and it must be the first record format in the DDS.
-
Add 2 additional literals to print lines that have a level break field to add Level Break Structure to XML output.
Following the 4 byte literal that you added in a previous step, add a 10 byte literal that contains the field name (left justified) on which the level break occurs. Follow this literal with a 2 byte literal that contains the length of the level break data. This must contain a value of 01 through 99. This allows level breaking to occur on 2 or more contiguous fields as well as a single field. These literals add an additional 12 bytes to the 6 extra bytes. The print width extends by a total of 18 bytes when you implement the level breaks.
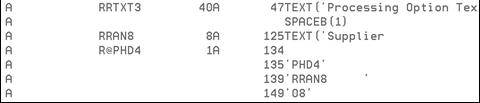
For an example, see the DDS of R43530. Scan for report fields RRAN8 and RRUITM, which are level break fields. RRUITM has a length of 35 because this level break occurs on both RRUITM and RRDRQJ fields.
-
Complete any of the following additional changes to the report as necessary:
-
Break out into separate formats the fields occupying the same or overlapping positions on the same report line (conditioned by indicators).
-
Change a field name to use a different data item if two fields in the same format use the same data item. For example, you can change RRAAP to RRAD. Fields in the same format must have unique data items, even if the prefix makes them unique.
-
Replace the keyword with a new report field and add code to the program to load the field if values on the report brought in through keywords (such as the system date or page number) do not display in the XML.
-
Change a field name to use a different data item, for example RR##01 to RRQD01. Report fields based on data items with a glossary group of U (report and screen display fields) must have an alpha description for the data item in which the first 30 characters of the description are unique for the format. For example, RR##01 and RR##02 cannot be used in the same format.
-
Create a new report field for the non-numeric data if the data item for the report field is not defined as alphanumeric or open. Any non-numeric data does not display in the XML. For example, RRSOQS.
-
-
Add the program name to UDC 00/BE, Batch Export Programs.
If you are implementing Level Break Structure for XML output, then you must also enter Y in the first character of the Special Handling Code field in this UDC. This action informs the export process to enable level break logic. If you are implementing batch export for a non-columnar report, enter an N in the second character of the Special Handling Code. When N is in the second character of the Special Handling Code field, you cannot export to CSV format for this report.
-
Add grouping elements to the XML by the application program.
This only applies to programs that need to implement Level Break Structure. Due to the complexity of the reports that require a program-controlled level break. This feature allows DREAM Writer programs to add hierarchical structure to the XML in addition to the structure already in the Level Breaks or in place of the Level Breaks. Although you can define these anywhere in the XML, you use them primarily for grouping related detail or total lines together and you can nest up to 9 levels. Use these primarily for the XML/BIP template processing.
You might need to group elements if:
The system uses multiple formats print detail or total information that you want to group together and there is not a main format that always prints first.
There is no report field with a unique value to key the Level Break.
Grouping elements is similar to Level Breaks in that you add additional literals to the report line in the DDS in order to signal the beginning or end of a group. Unlike Level Breaks, you do not specify a field name containing a level break value and it is up to the application to control when the grouping starts and ends.
-
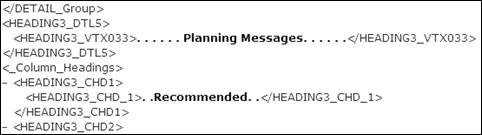
Include an asterisk on the print line in the first byte position where the level break field name begins, following the 4 byte literal.
The asterisk informs the export process that you are defining some type of grouping function for this print line. The next byte after the asterisk, defines a grouping operation. A Blank requests the start of a new group and is followed by a 10 character group name. It automatically results in the termination of an open group of that name, if one exists, as well any subordinate groups. An E followed by a 10 character group name requests the termination of that group and all subordinate groups. A C requests the start of a new group and is followed by a 10 character group name. It automatically results in the termination of all open groups.
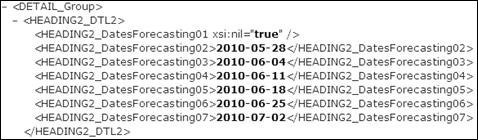
The following examples are from a spooled file that is input to the export process. The first '* DETAIL' tag requests a Grouping element before the DTL2 print line. It creates the XML start tag <DETAIL_Group>. The second '* DETAIL' tag requests a Grouping element before the next DTL2 print line. The export process creates an XML end tag </DETAIL_Group> after the last DTL4 print line to close that group of detail lines before starting a new group. It then creates the new Group element before the next DTL2.
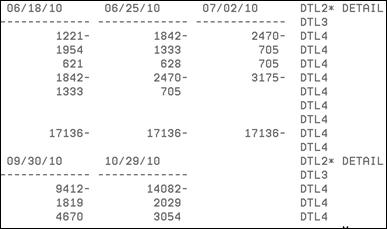
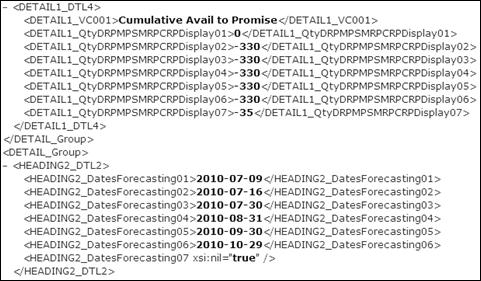
The following examples are from a spooled file that is input to the export process. The *E DETAIL tag requests that the process terminate the DETAIL group. It generates an XML end tag for the group of detail print lines preceding DTL5 print line.
Figure 7-22 Spooled File (*E DETAIL) Example
Description of "Figure 7-22 Spooled File (*E DETAIL) Example"
Figure 7-23 Spooled File (DETAIL Group) Example
Description of "Figure 7-23 Spooled File (DETAIL Group) Example"
The following grouping tags are in the DDS and you can apply conditions at runtime to record or not record them with indicators.


Typically, the system does not open a new group every time the system prints a line with the group tag. You must apply an indicator to condition the tag. This also means you must also modify the program to track whether a new group opens and to activate the indicator as required.
Implementing grouping tags requires a careful analysis of the report and program to determine which formats belong to the group, which formats and lines within the formats might print first in the group, and which formats outside of the group might follow on the report and require that you close the group.
7.4 Programming Considerations
Correct the values in the following generic fields in the copy module:
| Field | Value |
|---|---|
| ##USER | User running the application program. |
| PSKEY | Display file. |
| $PGSZ | Number of subfile records in one page (with subfile folded). |
| $SVI1 | Total records in the subfile. |
| #SFRNO | Number of first subfile record on display. |
| ACTION | Action Code. |
| $CYCLE | Used to indicate fresh screen to display. |
| *IN38 | Used in video to indicate an empty subfile. |
For all interactive programs, you must declare or change @NAC in S999 to allow or prohibit the values of F (From PC) and T (To PC) in the Action Code field. Extend the array from 5 to 7 bytes, with the 6th byte controlling import and 7th byte controlling export. A blank allows the corresponding action and any value prohibits the corresponding action. Leave the first 5 bytes as they are, otherwise you can compromise existing functionality. For example:
1234567
@NAC,6 = ' '. Allows both import and export.
@NAC,6 = 'N '. Prohibits import and allows export.
@NAC,6 = ' N'. Allows import and prohibits export.
Remove copy module D0001 or D0001L from all programs with an Action Code field.
If you implement both Import and Export in a program, enter the call for subroutines C00IEM and C00IET only once.
You must define the Invite keyword on all control record formats in the video to export the fold area correctly. Review the videos for Enter/Change Forecast (V3460) and Trial Balance by Company (V09216) to determine where to define this.
The screen must use *IN38 on the SFLDSP keyword for the export to function correctly. Also, turn this indicator on or off from the program RPG, depending on whether the subfile has records or not. Review the screens in the Enter/Change Forecast (P3460) and Trial Balance by Company (P09216) programs for details. If you do not set this indicator, the user receives an error message that they must perform an inquiry before the export (error message JDE0513), even if the user performs an inquiry.
Before declaring the data structures DSIIMP and DSIMSF for interactive import, run the command DSPFFD with the display file to view the order in which fields appear on the video. Include all fields that are input capable and have a valid value for Row and Column. If these fields contain blanks, the fields are hidden.
You can import data into a video with multiple record formats. However, different record formats might have different fields in a different order and you must declare separate data structures to match each record format. The import process always places data in DSIIMP/DSIMPSF. You must add code to move data from DSIIMP/DSIMPSF to the corresponding data structure.
You must decide whether to implement import in multiple formats. If you allow importing in only one format and you import in another format the system issues the 582O or JDE0520 results errors. For example, see Transfer Order Entry (P4242) in the JD Edwards World Sales Order Management Guide.
RPG programming does not allow a particular field to appear in multiple data structures. If you define a video field in multiple data structures, it must have different names and you must enter separate code to move data into the video field.
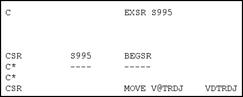
For example, VDTRDJ is currently defined in a data structure in the Transfer Order Entry program (P4242). It is defined as V@TRDJ in DSIIMP.
Figure 7-27 Import Values from CSV File screen
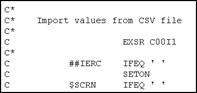
Description of "Figure 7-27 Import Values from CSV File screen"
The import process places data in DSIIMP. V@TRDJ contains the correct value. You must add code to move this to VDTRDJ.
After changing the printer file for batch export, update the form width accordingly before compiling to accommodate the data you add.
Before running the report for batch export, verify the printer overrides as the form width should be the same as the report width, before changes. The export program adds six characters to the width to accommodate the data you add.
If the screen/report contains two header rows and if a heading on one row spans more than one column in the second row, you should split that header field into multiple fields. For example: