I Registration Wizard
This appendix contains these topics:
-
Appendix I, "Setting Up the Registration Wizard for IBM i Server,"
-
Appendix I, "Setting Up the Registration Wizard for Windows Servers."
I.1 Setting Up the Registration Wizard for IBM i Server
For IBM i server, follow the steps from 1 to 10:
-
You can access the Registration Wizard through the LegaSuite Registration Wizard link from
START>ALL PROGRAMS>LEGASUITE>REGISTRATION WIZARD
From the Welcome to SEAGULL Registration Wizard screen, click Next.
Figure I-1 Welcome to SEAGULL Registration Wizard screen

Description of "Figure I-1 Welcome to SEAGULL Registration Wizard screen"
-
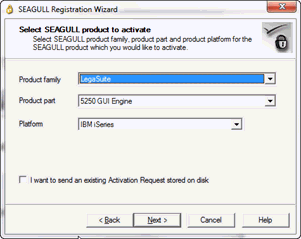
Enter LegaSuite for Product Family, 5250 GUI Engine for Product Part, and IBM iSeries for Platform. Click Next.
Figure I-2 SEAGULL Registration Wizard screen

Description of "Figure I-2 SEAGULL Registration Wizard screen"
-
From the Select installation machine screen, select Host machine (IBM i, zSeries, Solaris, HP-UX, AIX, and Linux). Click Next.
Figure I-3 Select Installation Machine screen

Description of "Figure I-3 Select Installation Machine screen"
-
From the Host system serial number screen, enter your host system serial number and select your LPAR number from the drop down option. Click Next.
Note:
You can identify your serial number and partition (LPAR) from the License Report (LISTLIC). From an IBM i command line type:SEALMS/REPORTLIC
Press Enter.
WRKSPLF
Press Enter.
Figure I-4 Host System Serial Number screen

Description of "Figure I-4 Host System Serial Number screen"
-
From the Registration information screen, complete your information and enter the Installation key E073B1A714FC428DC7EC. Click Next.
Figure I-5 Registration Information screen

Description of "Figure I-5 Registration Information screen"
-
From the Activation Request submit screen, select Via Web (requires direct Internet connection). Click Next.
Figure I-6 Activation Request Submit screen

Description of "Figure I-6 Activation Request Submit screen"
-
From the Submit by Web screen, click Next.
Note:
The registration key legsrv5250as400.saf is stored in the following folder:-
Windows XP or Vista: C:\Documents and Settings\All Users\Application Data\SEAGULL\Registration Wizard
-
Windows 7: C:\ProgramData\SEAGULL\Registration Wizard
-
-
From the Successfully downloaded Activation File screen, click Next.
-
From the Success screen, click Finish.
-
Copy the file legsrv5250as400.saf from the following folder:
-
Windows XP or Vista: C:\Documents and Settings\All Users\Application Data\SEAGULL\Registration Wizard\
-
Windows 7: C:\ProgramData\SEAGULL\Registration Wizard
To the following folder:
-
C:\Program Files\SEAGULL\LegaSuite Server for IBM i V5Rx\4.1xxx.x.xxx\bin\LEGASRV
If JDE componants have been installed, (FTP process has been executed) then copy file to: \LEGASRV folder in the Root IFS.
-
I.2 Setting Up the Registration Wizard for Windows Servers
For windows servers, follow the steps from 1 to 8:
-
Start Registration Wizard by going to Start>All Programs>Legasuite>LegaSuite Registration Wizard. Then click Next.
Figure I-11 SEAGULL Registration Wizard screen

Description of "Figure I-11 SEAGULL Registration Wizard screen"
-
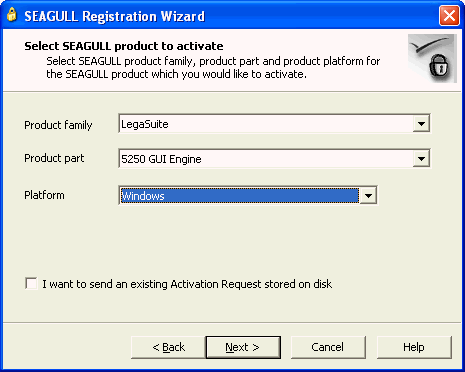
Enter Legasuite for Product Family, 5250 GUI Engine for Product Part, and Windows for Platform. Click Next.
Figure I-12 Select SEAGULL Product to Activate screen

Description of "Figure I-12 Select SEAGULL Product to Activate screen"
-
Select This machine for the activation of Seagull product. Click Next.
Figure I-13 Select Installation Machine screen

Description of "Figure I-13 Select Installation Machine screen"
-
Enter a user's information in Registration information screen. Enter E073B1A714FC428DC7EC for Installation key. Click Next.
Figure I-14 Registration Information screen

Description of "Figure I-14 Registration Information screen"
-
Select Via web (requires direct Internet connection). Click Next.
Figure I-15 Activation Request Submit screen

Description of "Figure I-15 Activation Request Submit screen"
-
If successful, the system displays the following screen. Click Next.
-
The path to which an Activation file is downloaded is displayed in the screen. Click Next.
Figure I-17 Submitted by Web (Activation File) screen

Description of "Figure I-17 Submitted by Web (Activation File) screen"
-
Click Finish to complete the process of activation.


