21 Work with Receipts for Procurement
This chapter contains these topics:
21.1 Working with Receipts for Procurement
You must enter receipt information to verify the receipt of goods or services on a purchase order. You must verify the quantity, cost, and so on, for each order you receive. If you make an error or need to cancel a receipt for any other reason, you can enter reversing receipts.
When you enter receipts for purchase orders, you create the related Brazilian Nota Fiscal document.
You use the Enter Receipts by PO (P4312) program to enter receipts. When you work with Brazilian records, the P4312 program calls the Receive Nota Fiscal Records program (P43125BR) so that you can enter information for notas fiscais. The P43125BR program saves data to these files:
-
F76B4311 (Purchase Order Detail Tag File)
-
F76B0401 (FCI by Item Supplier)
-
F76B432 (Item Location tag File Res 13)
-
F76432 (Purchase Order Detail Tag File)
21.1.1 Import Information in Purchase Order Receipts
When you enter a receipt for items that have imported content, the value in the item origin field for the item determines if item import information is required. If the item origin assigned to the item includes 1 in the first position of the Special Handling Code field, you must provide item import information. This list describes the import information that you enter on the Item/Branch Additional Info screen if import information is required:
-
Import Content Form (FCI)
-
Import Content
-
Value of the Portion from Abroad
-
Total Value of the Interstate Outbound
When you create a purchase order receipt for an item that requires import information, the system retrieves the import information from the F76B4311 file. If the import information does not exist in the F76B4311 table, then you must enter it manually. When you save the purchase order receipt, the system saves the information to the following files:
-
F76B4311
-
F76B432
-
F76B0401
21.1.2 What You Should Know About
21.2 Entering Receipts for Brazilian Procurement
From Localizations - Brazil (G76B), choose Purchase Order Management
From Purchase Order Management - Brazil (G76B43), choose Purchase Order Processing
From Purchase Order Processing - Brazil (G76B4311), choose Enter Receipts by PO or
From Purchase Order Processing (G43A11), choose Enter Receipts by Item
To enter a receipt, you must first locate the open purchase order detail lines that correspond to the receipt. An open detail line contains items that have not yet been received. The system retrieves all open detail lines for the item number, purchase order number, or account number you specify.
If the detail lines on a purchase order differ from the details of the actual receipt, you must adjust the purchase order detail lines to reflect the receipt. For example, if the order quantity on a detail line is 20, but you receive a quantity of 10, you must change the quantity on the detail line to 10. You specify whether to close the remaining balance on the line or to keep it open.
To enter receipts for Brazilian procurement
-
To locate purchase order detail lines that correspond to a receipt, complete one of the following fields, depending on the format that you are using:
-
Order Number
-
Item Number
-
Account Number
The system displays only those detail lines with a next status code equal to that which you specified in processing options.
-
-
Select the Receive option (option 1) for each of the details lines that you want to receive for the purchase order and press Enter.
Alternately, you can select options to close the balance (option7), or cancel the line entirely (option 9).
-
Enter Y to record the receipt.
The system displays the PO Additional Info. - Brazil screen.
Figure 21-1 P.O. Additional Info. - Brazil screen
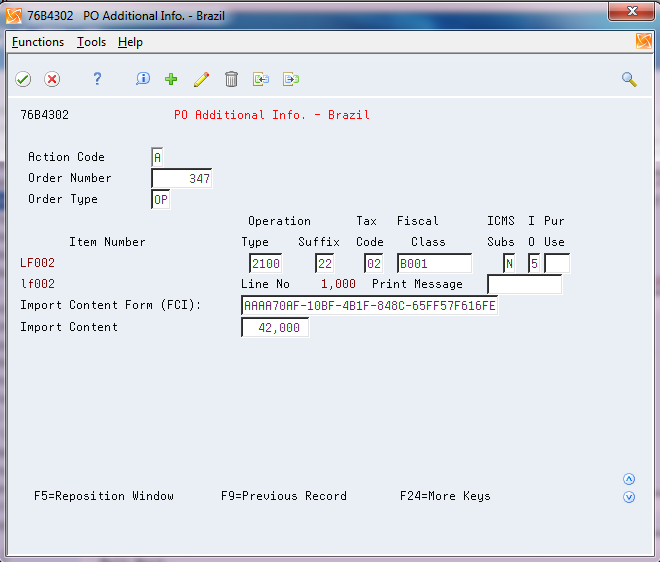
Description of "Figure 21-1 P.O. Additional Info. - Brazil screen"
-
Review the fields and complete those for which you need to add information.
If the Special Handling Code field of the value in the Item Origin field indicates that the item is foreign and requires import information, the fields for imported content become available. The system retrieves the values for the fields from the FCI by Item/Supplier file (F76B0401) if the information exists in the file. If the information does not exist in the F76B0401 file, then you must manually enter it.
-
Fiscal Class
-
Tax Code
-
Item Origin
-
ICMS Substitution
-
Print Message
-
Purchase Use
-
Import Content Form - FCI
-
Import Content
-
Value of the Portion From Abroad
-
Total Value of the Interstate Outbound
See Also: Section 17.3, "Enter Additional Branch/Plant Information for Brazil"
-
-
Click OK.
The system displays the Nota Fiscal Selection screen.
-
Complete the following fields:
-
Document Type
-
Nota Fiscal Number
-
Series
-
Issue Date
-
Legal Access Key (optional)
If the selected document type is for Electronic Nota Fiscal (00/DT SPHD = 355), Legal Access Key information is required.
The Legal Access Key fields 1 to 7 are calculated based on the supplier's setup and supplier's nota fiscal information entered in this screen.
Field 8 needs to be entered by the user based on the information in the Nota Fiscal provided by the Supplier.
Field 9 is a check digit field and is automatically calculated based on the information in all 8 fields.
-
See Section 35.2, "Overview of the Electronic Nota Fiscal (NFe) XML File".
Depending on your processing option selections, the system returns to the Enter Receipts screen.
| Field | Explanation |
|---|---|
| NF Number | In Brazil, Notas fiscais are identified based the combination of a Nota Fiscal number and a Nota Fiscal series number.
Use this numeric, 15-digit field to identify the Nota Fiscal number. The Nota Fiscal Number field is the first key that the system uses to access a specific Nota Fiscal. |
21.2.1 What You Should Know About
21.3 Entering Reversing Receipts for Brazilian Procurement
From Localizations - Brazil (G76B), choose Purchase Order Management
From Purchase Order Management - Brazil (G76B43), choose Purchase Order Processing
From Purchase Order Processing - Brazil (G76B4311), choose Enter Receipts by PO or
From Purchase Order Processing (G43A11), choose Enter Receipts by Item
You can reverse a receipt as long as you have not yet created a voucher for the receipt. You might do this if you recorded a receipt by mistake or you recorded the wrong receipt.
When you reverse a receipt, the system accounts for the order as if it were never received. The system reverses all accounting and inventory transactions.
To enter reversing receipts for Brazilian procurement
-
Complete the following field:
-
Received
-
-
Locate the received detail lines that you want to reverse.
Specify 8 in the following field for the receipts you want to reverse:
-
O (Option Exit)
-
21.3.1 What You Should Know About
| Topic | Description |
|---|---|
| Reversing a receipt in a receipt routing process | If an item goes through a receipt routing process, you must move it back to the first operation in the route before you can reverse the receipt. You must also reverse all dispositions.
For more information, see Working with Items in Receipt Routing in the JD Edwards World Procurement Guide. |
21.3.2 Processing Options
See Section 65.3, "Processing Options for Receipts by PO/Item/Account (P4312)"