2 Phase Two - Planning and Upgrading the Alternate Environment
This chapter contains these topics:
2.1 Overview
For this phase of the upgrade, restore a full set of your A9.3 libraries, download the A9.3 Update 1 software from Oracle's Update Center, or copy the A9.3 Update 1 software files from the DVD+RW media. Next, set up an upgrade plan, which defines which data libraries are converting during the upgrade process and the libraries which contains the new A9.3 Update 1 software. After the upgrade plan is set up and validated, initiate the upgrade command.
2.2 Set Up an Environment
Note:
If your production environment is NOT A9.3, use the A9.3 alternate environment you are currently using for testing A9.3.Note:
If you plan to convert multiple environments, please contact Oracle Support Services, JD Edwards World Technical group.-
The first step in the upgrade process is to use a recent backup tape to restore your A9.3 libraries to another set of libraries. This includes libraries for data, control, and security files. Also, restore a copy of your A9.3 production object, source, and JDFDATA libraries.
Note:
Library names must not be more than 9 characters. -
Change the QJDF Data Area in the alternate object library to reflect the alternate library names.
-
Sign on as a User Who Accesses the Alternate Environment to verify the environment is a complete set of libraries.
Either create a new user profile or change an existing user profile to access the alternate environment.
-
If you were unable to deactivate triggers from the files used to create your alternate environment, you must remove the triggers from the files in your alternate libraries.
Refer to menu G946 option 2 in your production environment for a list of files that have *ACTIVE status.
To remove the triggers from the files in your alternate environment, on a command line, use the IBM command RMVPFTRG for each file in your alternate environment on the list from the prior step.
Next, clear the F98201, F98202, F98203, and F98204 database audit manager files in your alternate library using the CLRPFM command.
Note:
Ensure that you entered the alternate environment library name in the RMVPFTRG and CLRPFM commands.2.3 Check for DDM Files
DDM files cannot exist in the data libraries you restored in the step above for the upgrade to work successfully. Use the WRKDDMF command to check for DDM files. If any exist, delete the files using the DLTF command.
2.4 IBM Journaling
IBM Journaling must be turned off on files that are part of the upgrade plan before you start the A9.3 Update 1 upgrade.
2.5 Delete Files
-
DLTF FILE(dtalib/F74R0430L*) where dtalib is your data library.
-
DLTF FILE(dtalib/F74R0430).
-
DLTF FILE(dtalib/F74R0433).
-
CRTDUPOBJ OBJ(F74R0411) FROMLIB(dtalib) OBJTYPE(*FILE) TOLIB(templib) DATA(*YES)
-
DLTF FILE(dtalib/F74R0411).
2.6 Create and Validate Upgrade Plan
2.6.2 Create Upgrade Plan
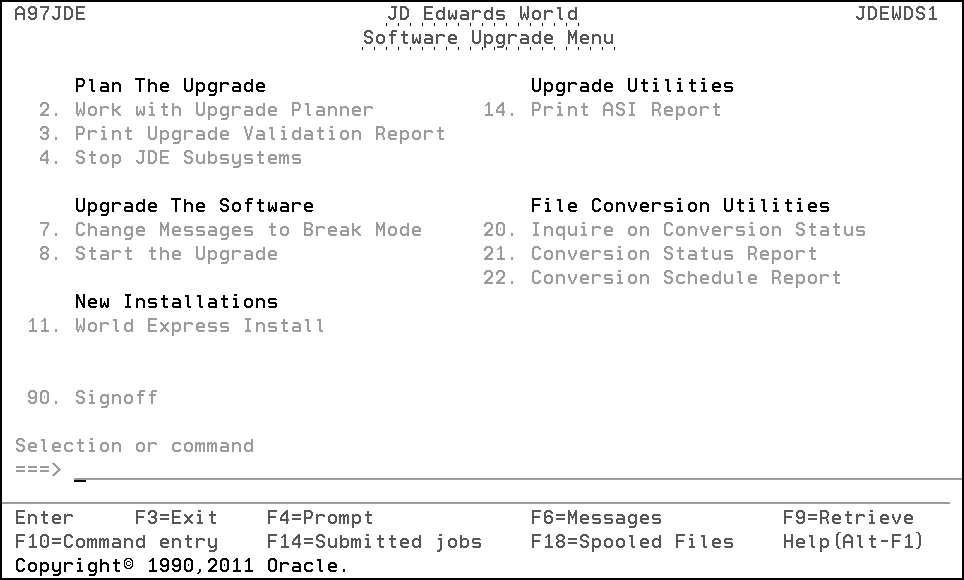
From the Software Upgrade Menu (A97JDE), select Work with Upgrade Planner. The Plan the Upgrade screen appears.
This screen is the first of a series of upgrade planner screens, all of which are described below. For more information on the upgrade planner screens, see Appendix B, "Upgrade Planner Screens."
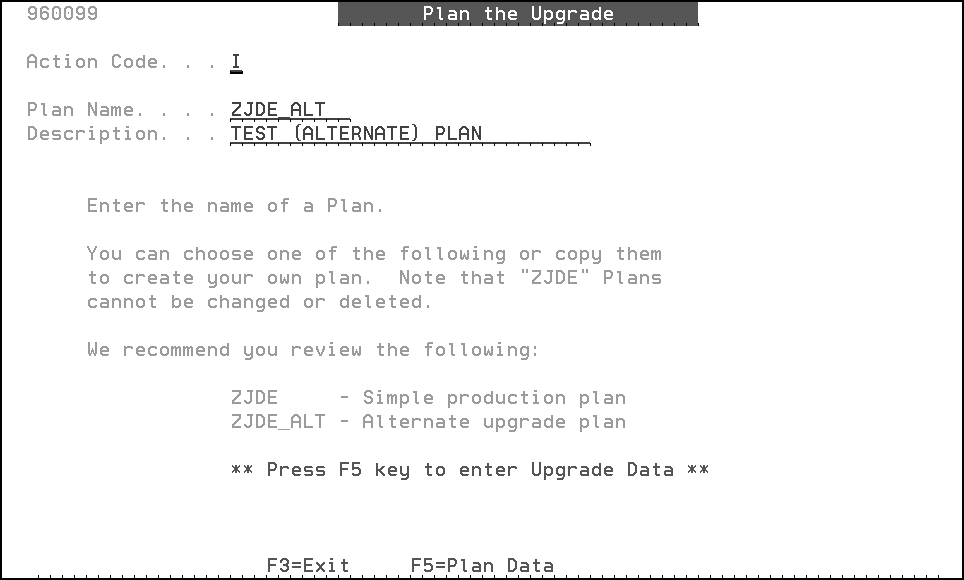
The Plan the Upgrade screen lets you begin to add or change an environment upgrade plan. JD Edwards World recommends that you use the ZJDE_ALT upgrade plan model to create your plan for the alternate environment.
-
From the Plan the Upgrade screen, inquire on ZJDE_ALT (an upgrade plan model supplied by JD Edwards World).
-
In the Action Code field, type A (Add).
-
In the Plan Name field, type a name for the new upgrade plan.
Note:
Do not begin your plan name with ZJDE, numbers, or any special characters except underscore (__). Do not use a name for a plan that already exists as a library on your system. Your plan name cannot exceed nine (9) characters. -
In the Description field, type a description for the new upgrade plan.
-
To add the new upgrade plan, press Enter.
-
Inquire on the new upgrade plan, and then press F5.
The Libraries for This Plan screen appears.
Figure 2-3 Libraries for This Plan screen
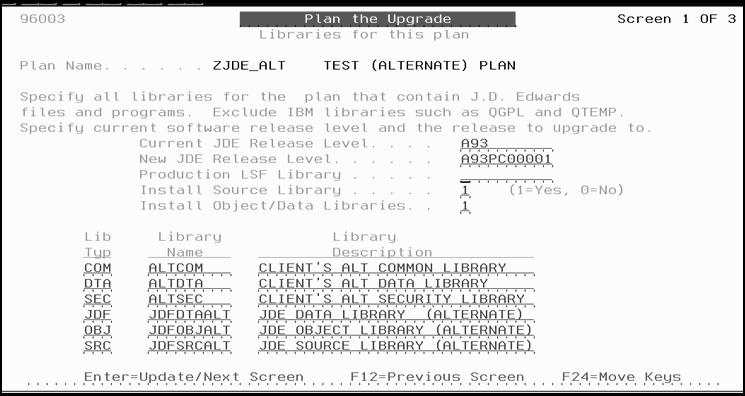
Description of "Figure 2-3 Libraries for This Plan screen"
2.6.3 Indicate the Libraries for this Plan
The Libraries for This Plan screen allows you to specify your current and new JD Edwards World release levels, whether you want to install object and data only or source only, and the libraries that define one complete environment. If you have payroll in a separate data library, it must be included as a second DTA type in the plan. It is recommended that you install source.
-
The Current JDE Release Level for your plan must be A9.3 and the New JDE Release Level must be A93PC00001 for Single Byte or A93PC000X1 for Double Byte.
-
Leave the Production LSF Library line blank.
-
Change the library name fields to reflect the names of your alternate environment libraries.
You can view source only first, set the Install Source Library value to '1' and the Install Object/Data Libraries value to '0'. If you are installing source only, the plan needs to have a JDF and OBJ type library that are populated. You can specify your A7.3, A8.1, A9.1, or A9.2 , or A9.3 libraries.
MULTI-PLANS: All plans must have the same Current and New JD Edwards World Release Level values. They also must have the same object, JD Edwards World data (JDFDATA), and source library names (library types OBJ, JDF, and SRC). If you need assistance setting up Multi-Plans, contact JD Edwards World Technical support for assistance.
Press Enter twice. The Merge Information screen appears.
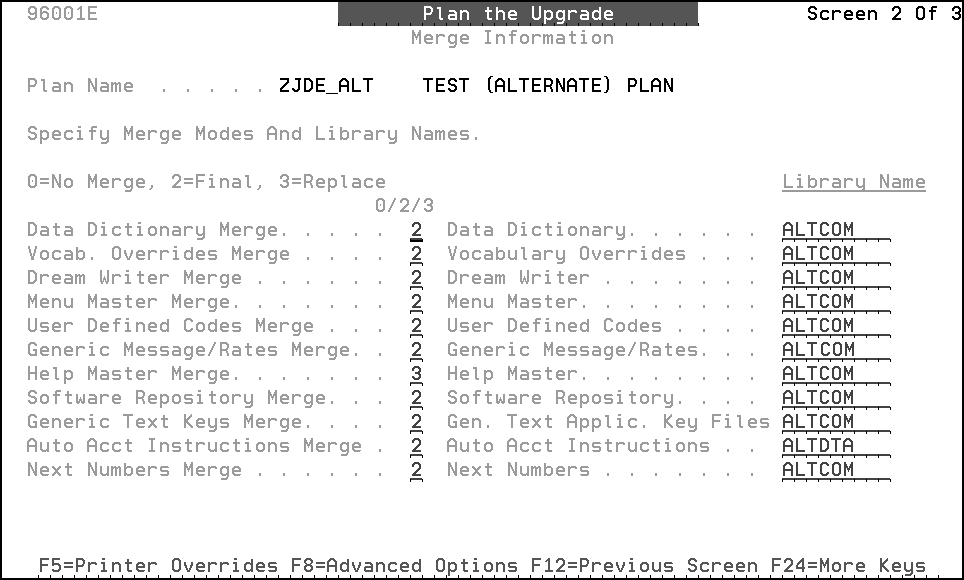
2.6.4 Indicate the Merge Information
The Merge Information screen allows you to specify modes in which you want the merges to run and the library locations of the control files. For more detailed information on the merges, see Appendix B, "Upgrade Planner Screens."
Note:
JD Edwards World recommends that you do not change the merge modes. If the library locations are not correct, blank out the library name fields and press Enter. Your libraries will be searched and the correct locations will be retrieved.MULTI-PLANS: If the plans share the same common files, you do not need to set the merge modes for the shared control files to run for the second and subsequent plans.
From this screen, you can access two screens that allow you to override printer file defaults and select advanced functions for the upgrade process. Review these screens to make sure your plans are correct.
-
To access the Printer Information screen, press F5 (Printer Overrides).
-
To access the Advanced Options screen, press F8 (Advanced Options).
2.6.5 Indicate the Printer Information
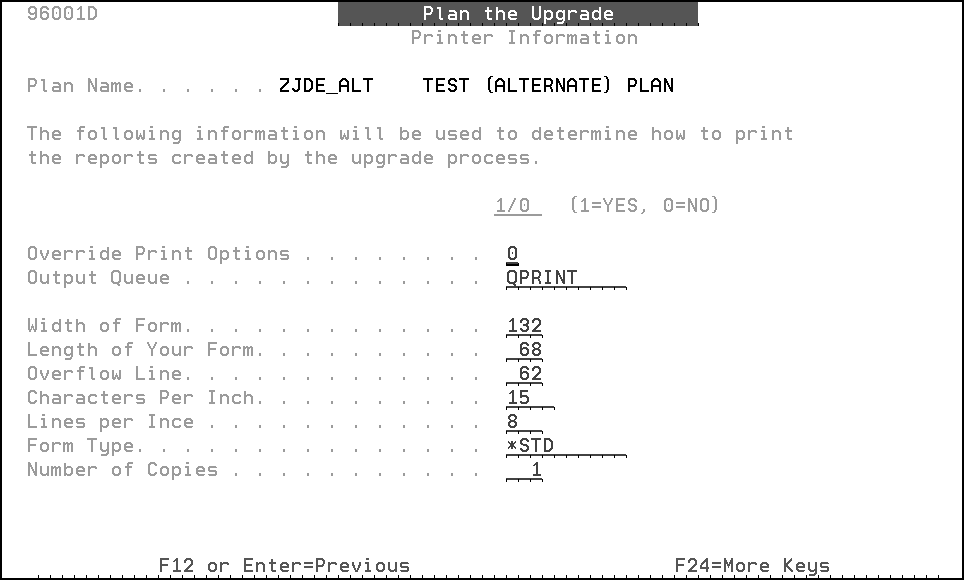
The Printer Information screen allows you to override the default values set for various printer attributes, such as form length, form type, and line spacing.
If you make changes to this screen, press Enter twice. Otherwise, press Enter once. The Merge Information screen reappears.
2.6.6 Select Advanced Options
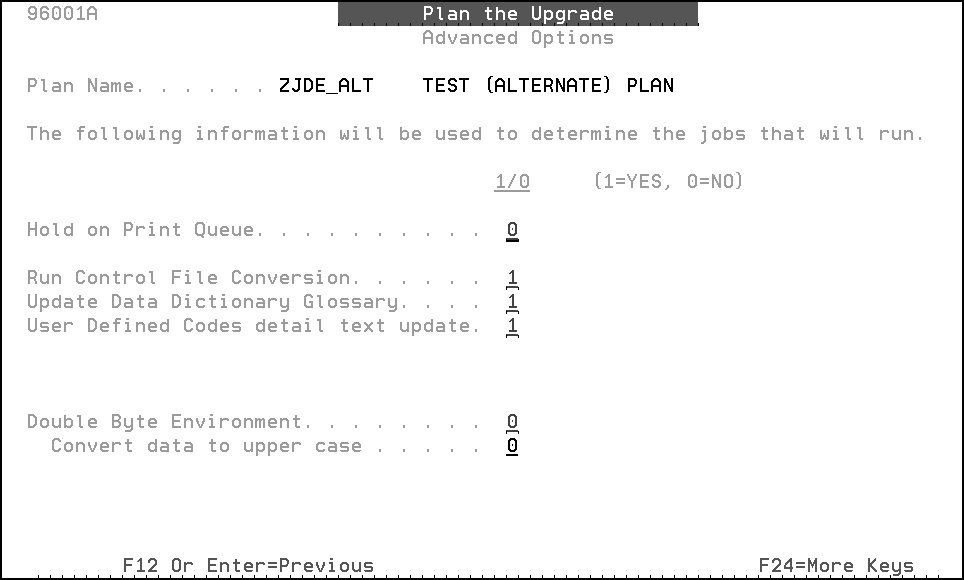
The Advanced Options screen lets you select from several advanced upgrade functions, including enabling or disabling:
-
Hold on print queue option
-
Control file conversion
-
Data dictionary glossary update
-
User defined codes detail text update
You can also indicate whether the environment you are upgrading is double byte, and whether you want to convert all display data to uppercase characters.
If you make changes to the screen, press Enter twice. Otherwise, press Enter once. Press Enter to move to the Data Dictionary Field Ownership screen.
2.6.7 Designate the Data Dictionary Field Ownership Information
The Data Dictionary Field Ownership screen allows you to indicate fields in the Data Dictionary you want to automatically update with the Data Dictionary merge, which runs during the upgrade process. These are fields that customers may have chosen to modify for their business needs. Other fields that are not modified by customers such as system code are also updated by the Data Dictionary merge.
A 'J' in any field, indicates that the upgrade overrides the value in the customer's library for this field with the value from the JDF type library in your plan.
A 'C' in any field indicates that the upgrade does not replace the value for that field in the customer's library.
After the upgrade, you use the Data Dictionary Workbench to view and reconcile differences for fields with a value of 'C'.
Figure 2-7 Data Dictionary Field Ownership screen
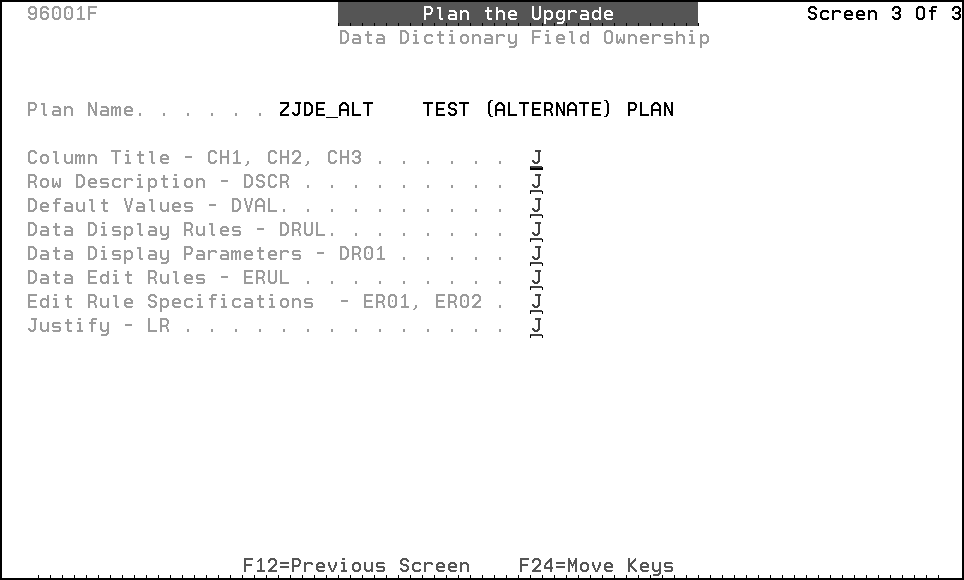
Description of "Figure 2-7 Data Dictionary Field Ownership screen"
If you do not have many custom Data Dictionary items, enter 'J' in all of the fields and later re-enter your custom Data Dictionary changes. The Data Dictionary merge produces reports and the Data Dictionary Workbench allows you to view the before and after value for all of the fields on the Data Dictionary Field Ownership screen.
Press Enter.
2.6.8 Validate Your Upgrade Plan
The upgrade planner creates the Upgrade Planner Validation Report (R96004YR) when you select Print Upgrade Validation Report from the Software Upgrade Menu (A97JDE). The validation process also creates the Duplicate Files Found Report (R97281) if a processing option for the Upgrade Planner Validation Report is set to a '1'. The DD Field Ownership Report (R96004) prints as part of the validation process.
MULTI-PLANS: You must validate each plan.
-
Be sure you are signed on as JDEINSTAL.
-
From the Software Upgrade Menu (A97JDE), select Print Upgrade Validation Report. A Processing Options Revisions screen appears.
Figure 2-8 Processing Options Revisions screen

Description of "Figure 2-8 Processing Options Revisions screen"
-
Enter the appropriate information in the processing option fields. Specify in the first field an upgrade plan name.
Specify 0 in the second field and 1 in the third field, which indicates you want a report created that checks for duplicate files. Specify *UPD in the fourth field.
-
After you verify your information, press Enter.
The report submits to batch.
-
If you receive a message that one or more errors occurred, you have errors listed in the Upgrade Planner Validation Report (R96004YR) and/or duplicate files listed in the Duplicate Files Found Report (R97281).
The Upgrade Planner Validation Report
The report (R96004YR) identifies errors in the information you specified in your upgrade plan. It lists the plan information as you entered it and prints error codes to the right of the incorrect information. A total number of errors are given at the end of the plan information. The error codes that appear on the report are fully described at the end of it, including error descriptions, cause statements, and instructions about resolving the errors. The report must have an error count of zero before you can begin the upgrade process.
Figure 2-9 Upgrade Planner Validation Report, part 1
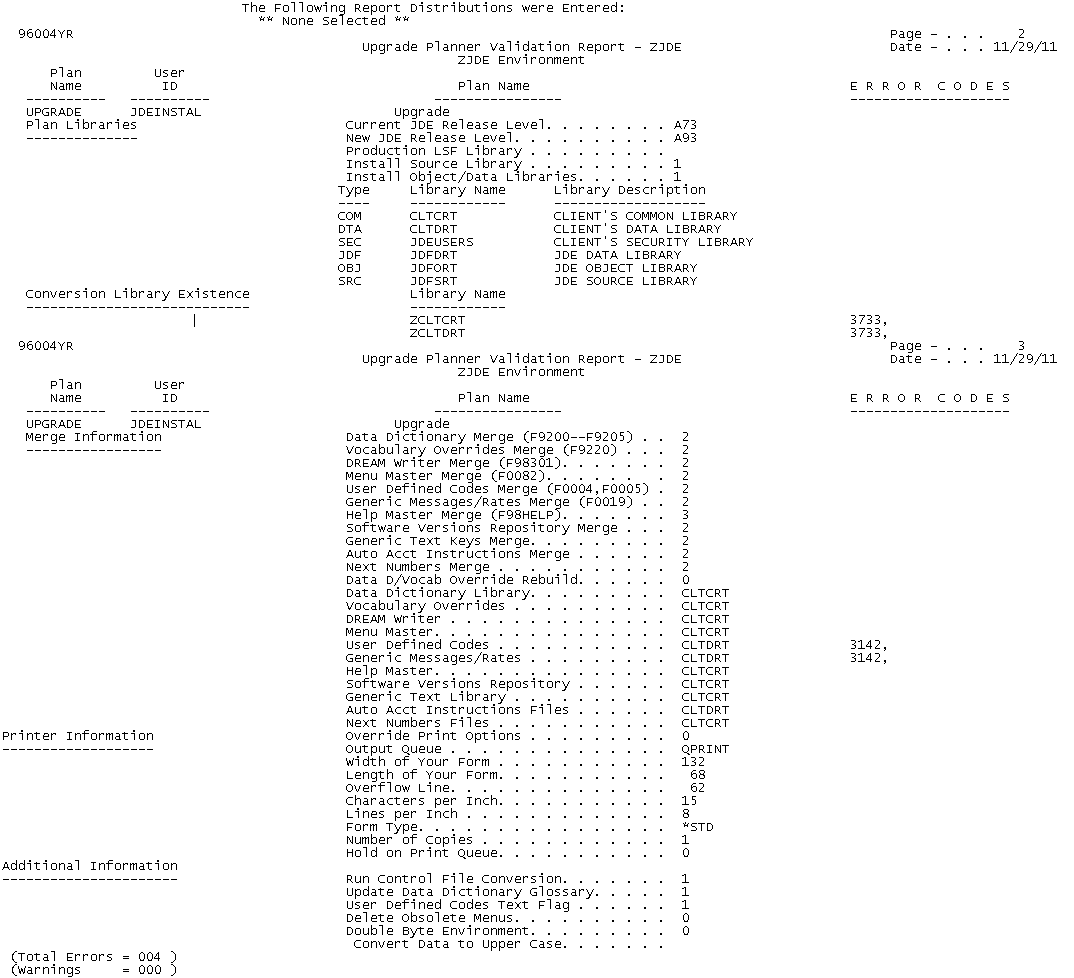
Description of "Figure 2-9 Upgrade Planner Validation Report, part 1"
Figure 2-10 Upgrade Planner Validation Report, part 2
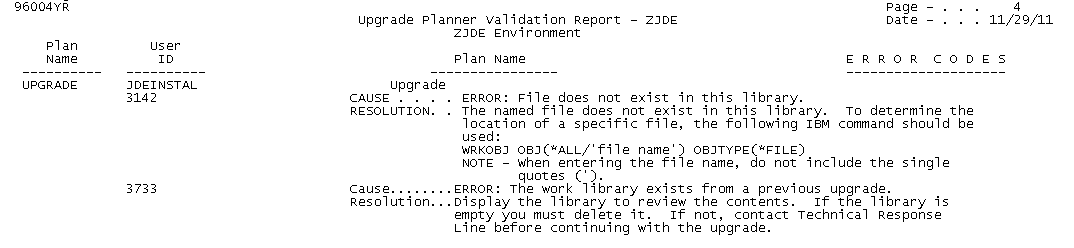
Description of "Figure 2-10 Upgrade Planner Validation Report, part 2"
The Duplicate Files Found Report
The report (R97281) identifies any duplicate files in the environment you ran the report against. This report will be created when you create the Upgrade Planner Validation Report. If you set the processing option for the Upgrade Planner Validation Report to check for duplicate files, the report will list the file and the library in which the duplicate was found for each duplicate file, or it will indicate "NO DUPLICATE FILES FOUND."
You need to clean up any duplicate files on the report before you initiate the upgrade. Evaluate the number of records in each duplicate file and note that the system updates the first file in the library list before removing a duplicate file. When you delete files, you must verify that they do not contain any records needed for processing.

The report (R96004) prints the values you filled in on the DD Field Ownership screen for your plan.
2.7 Start the Upgrade and Track Progress
2.7.1 Change Messages to Break Mode
From the Software Upgrade Menu (A97JDE), select Change Messages to Break Mode. This changes the QSYSOPR message queue to break mode.
2.7.2 Start the Upgrade
-
From the Software Upgrade Menu (A97JDE), select Start the Upgrade.
-
In the Upgrade Type field, enter *UPD.
-
In the Plan Name field, type the name of the upgrade plan that defines the environment you want to upgrade.
MULTI-PLANS: If you are upgrading more than one environment (multiple plans), enter a plus character (+) in the second Plan Name field, press Enter and then enter the additional plans in the fields provided.
-
In the Source Media field, type *SAVF.
-
In the Current JDE Release Level field, type A93.
-
In the New JDE Release Level field, type A93PC00001 for Single Byte or A93PC000X1 for Double Byte and press Enter.
This release level must match the current JD Edwards World release level specified in the upgrade plan.
-
Leave the Run Validator program field set to 1.
-
In the Product Library field, type JDEA9301 for Single Byte or JDXA9301 for Double Byte.
-
In the Update Library field, type A93PC00001 for Single Byte or A93PC000X1 for Double Byte.
-
Leave the Update Step Option field set to 0.
-
Press F10 if you want to change the Hold on job queue option.
-
Press Enter.

2.7.3 Track the Progress of the Upgrade
The first part of the upgrade process (PTF_STEP1) restores the software from the save files in library JDEA9301 for Single Byte or JDEA93X1 for Double Byte and sends you messages as it restores the object, data, and source files to the PTF library (A93PC00001 for Single Byte or A93PC000X1 for Double Byte). The following messages display: PTF objects and data files have been restored and PTF source has been restored.
The second part of the upgrade process (PTF_STEP2) submits merges and converts files. These jobs run in the JDEINSTAL subsystem in separate job queues.
Note:
JDE and JDEPROD job descriptions are changed in Step 2 to the libraries in the Upgrade plan. You should not be using JDE or JDEPROD as the job description for other user profiles.Note:
Step 2 will halt if there are trigger programs attached to files in your alternate environment data libraries. A query report is produced listing the files with triggers attached. Use the RMVPFTRG command to remove the triggers. You may restart the Upgrade by typing *UPD for the Upgrade Type, *DISK for Source Media and '2' for PTF Step Option.After PTF_STEP2 completes, the upgrade process submits the following job automatically:
-
Rebuild field reference files (FRFs) and the JD Edwards World message file (J98FRFGEN)
MULTI-PLANS: PTF_STEP1 builds work files for all plans before it begins the restore process. PTF_STEP2 performs file conversions and merges for the first environment. A PTF_STEP2 job performs file conversions and merges for each subsequent plan.
Note:
The upgrade process produces job logs (QPJOBLOG) for PTF_STEP1 and PTF_STEP2. Keep job log files (QPJOBLOG) in an output queue where they will not be deleted. They are extremely useful for resolving upgrade issues.The PTF_STEP1 joblog shows what happened during the DVD or Save File restore portion of the upgrade process. The PTF_STEP2 job logs show what happened during file conversions and merges.
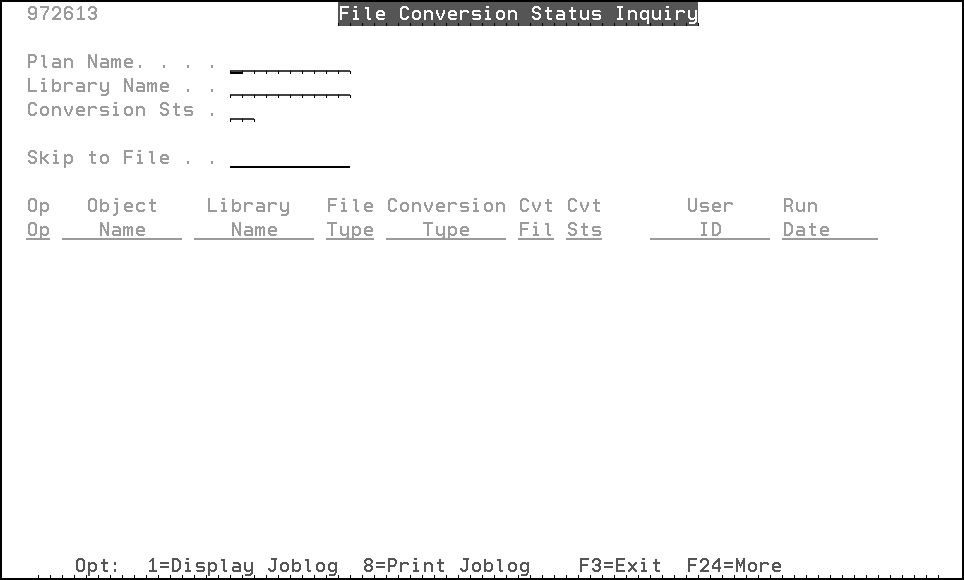
2.7.4 Inquire on File Conversion Status
After PTF_STEP2 completes, check for file conversions that completed abnormally and resolve any problems.
MULTI-PLANS: You must inquire on file conversion status for each plan. Specify each plan name and the associated library name. Do not check file conversion status for an upgrade plan until the associated STEP2 job has finished. The message PTF_STEP2 Completed appears for each plan.
-
From the Software Upgrade Menu (A97JDE), select Inquire on File Conversion Status.
Figure 2-13 File Conversion Status Inquiry screen
Description of "Figure 2-13 File Conversion Status Inquiry screen"
-
In the Plan Name field, type the name of the upgrade plan for which you want to check file conversion status.
-
In the Library Name field, type the name of your common library.
-
In the Conversion Sts field, enter CA (Completed Abnormally).
-
To display the job log for a file conversion listed on this screen, in the OP (Option) field next to a file conversion job, enter 1 (Display the job log).
-
Repeat steps 3 through 5 for your data and security libraries.
-
Note any files that failed conversion and resolve any problems before you continue with the upgrade. For assistance, call JD Edwards World Technical Support.
-
Note:
If for any reason you must start the upgrade process again because file conversion status showed significant errors, call JD Edwards World Technical Support for assistance.