Receiving
Overview of Receiving
Purchasing lets you control the items you order through receiving, inspection, transfer, and internal delivery. You can use these features to control the quantity, quality, and internal delivery of the items you receive.
Purchasing provides you with the features you need to satisfy your receipt, inspection, transfer, and delivery needs. You should be able to:
-
Use routing controls at the organization, supplier, item, or order level to enforce material movement through receiving. For example, you can require inspection for some items and dock-to-stock receipt for others. See: Receiving Controls, Options, and Profiles.
-
Define receiving tolerances at the organization, supplier, item, and order level, with the lowest level overriding previous levels. You can define tolerances for receipt quantity, on-time delivery, and receiving location. You can assign looser tolerances to low-value items that you consume at high volumes. You can set enforcement options to ignore, warn the user, or reject transactions that violate the tolerances. See: Receiving Controls, Options, and Profiles.
-
Use blind receiving to improve accuracy in the receiving process. With this option, the quantity due for each shipment does not show and quantity control tolerances are ignored. Also, the quantity is not visible in view windows or in reports. However, if you choose to have visible receiving, then your receiving staff can see the quantity due. See: Receiving Controls, Options, and Profiles.
-
Use Express Receipt to receive an entire purchase order with a few keystrokes. You can exclude certain lines for express transactions. See: Express Receipts and Receiving Transactions
-
Use Advance Shipment Notices (ASNs) to enter receipts in the Enter Receipts window, reducing data entry time. See: Advance Shipment Notices.
-
Use the Cascade function to distribute a given quantity of an item from a single supplier across multiple shipments and distributions. This function is enabled by a Receiving Options checkbox, Allow Cascade Transactions, and is available only when you have specified a source and an item in the Find Expected Receipts window. See: Cascading Receipts and Receiving Transactions.
-
Specify match approval levels. You can specify two-, three-, and four-way match approval levels on a purchase order line. Purchasing uses your receiving and inspection information to ensure that you only accept and pay for the items you order, receive, or inspect. Choose the three-way match approval level if you want to receive items before you allow payment. Choose the four-way match approval level if you require inspection and acceptance of receipts before authorizing payment. See: Receiving Controls, Options, and Profiles.
-
Print the receiving and inspection documentation you need. For example, you can print Receipt Travelers. Also, you can prepare for incoming receipts by printing the Expected Receipts Report to help you identify items and quantities you expect to receive. You can use this report to plan your work, identify receipts satisfying an urgent demand, and control unexpected receipts. Finally, you can produce summary and detail receiving transaction reports by item, supplier, purchase order number, and/or receiving date range. See: Receiving Reports.
-
Import receipts from other Oracle Applications, other non-Oracle systems, barcoded and other electronic receiving sources, and advanced shipment notices (ASN). See Receiving Open Interface, Oracle Manufacturing APIs and Open Interfaces Manual.
-
Track, update, and record the receipt of intransit and inter-organization shipments.
-
Enter different types of receipt transactions based on your organization's needs. For example, you should be able to record in one transaction a direct receipt of inventory items into inventory.
-
Record receipt of unordered items based on your item, supplier, or organization defaults. For example, if your organization does not allow receipt of unordered items, you should not be able to enter a receipt unless it is matched to an order shipment. See: Unordered Receipts.
-
Record receipt of predefined substitute items if you set your receiving options to allow this feature. You define the acceptable substitutes during setup for the items you purchase. See: Receiving Controls, Options, and Profiles.
-
Automatically update related supply information, inventory balances, WIP operations, requisition details, and purchase order details while entering a single receiving transaction.
-
You can record transfers of inventory items from receiving and inspection to inventory or to the shop floor. You can also record transfers of items to different locations in the receiving and inspection area. For example, you might need to move refrigerated items from the receiving dock into a cold storage area while you are waiting to inspect them. Purchasing lets you record these types of transfers in the same window you use to deliver to stock or expense.
-
Record receipts against services and labor. You can enter either the total value of services received, or the amount of services tied to an invoice. For example, you might receive 40 hours of consulting services.
-
Receive services, inventory, expense, and outside processing items using one screen. You acknowledge receipt of services by receiving amounts of the service, generally related to receipt of an invoice. You receive inventory items to expense or asset subinventories, you receive expense items to the requestor, and you receive outside processing to the shop floor (designated operations in your manufacturing process).
-
Distinguish closed for invoicing from closed for receiving. Purchasing automatically closes your purchase order for receipt when it is fully received. You can manually close partially received purchase orders if you no longer expect any more receipts against them. Close for invoicing and close for receiving are managed using tolerances. You can specify that when you have received a certain percentage of a shipment, Purchasing will close the receipt. This is a soft close, and you can reopen the receipt. Purchasing rolls up closing to the line and header level, and "Closed" information does not show in the Open Purchase Orders Report. Also, if there is a remaining balance, closed quantities are no longer visible as supply scheduled receipts to MRP/ATP.
-
Decide how you accrue un-invoiced receipts. For instance, you can accrue receipts perpetually or at period-end for expense items. Purchasing uses perpetual accrual for your inventory and shop floor item receipts. Purchasing and Inventory together provide you with perpetual visibility and control on your accrued liabilities for inventory items. Inventory lets you maintain the value of your inventories on a perpetual basis. And Purchasing automatically records your accrued liability in your general ledger as you enter receiving transactions. Purchasing also provides you with complete visibility and control of your inventories values, accrued liabilities for inventory and non-inventory items, purchase price variances, and invoice price variances. And Purchasing provides you with the information you need to facilitate your period close and your inventory, purchasing, and payables reconciliation process. See: Overview of Receipt Accounting.
-
Identify and handle hazardous materials. You can use attachments to provide detailed handling instructions. Purchasing displays hazardous material information in the receiving, transfer, and inspection windows as well as on the Receipt Traveler. See: Purchasing Hazardous Materials.
-
Track the quantity and destination of internally delivered items. You know exactly what items you receive and where to deliver them within your organization.
-
Define detailed rules for locator within subinventories for the disposition of inventory receipts. See: .Defining Stock Locators, Oracle Inventory User's Guide
-
Track lot and serially controlled items. See: Control Numbers.
-
Define which of your items require inspection. Purchasing lets you inspect received items before you move the items into stock or deliver them to the requestor. You can accept or reject items and provide detailed information about your inspection results. Purchasing lets you review your inspection results on-line. You can review your inspection results by receipt number, purchase order number, supplier, item, and/or transaction date range. Purchasing also provides summary and detail reports to help you analyze your suppliers' performance. You can produce supplier quality reports by buyer, supplier, and item. You can use the receiving inspection register to review your inspections by receipt. See: Inspections.
-
Record returns to suppliers. You can return items that are damaged on receipt or that fail your inspection process. If you return items that you have already delivered to inventory, Purchasing automatically updates the inventory stock levels. See: Returns.
-
Enable the automatic creation of debit memos for Return to Supplier transactions. See: Debit Memos.
-
Correct receiving transaction errors. Purchasing automatically updates the inventory balances if you correct the quantities of items that have already been moved into inventory. See: Corrections.
-
Use flexible search criteria to choose receipts for review.
-
View receipts details. You should be able to view all the details of your receipt, including matching purchase order and shipment information.
-
Perform transactions with minimal effort. For example, you can record a complete receipt with only a few mouse clicks.
-
Use attachments throughout the receiving process to more completely identify transactions and to inform users of special requirements. See: Attaching Notes to Purchasing Documents.
-
Record drop shipments as receipts once the supplier informs you that the drop shipment has been delivered to the customer. See: Drop Shipments.
-
Receive purchase orders for kanban replenishment requests that were generated from Oracle Inventory. Once you record delivery of a kanban item through the Receipts or Receiving Transactions windows, Inventory automatically receives a status of Full for the order, indicating that the inventory supply has been replenished. See: Demand for Internal Requisitions.
-
Capture exchange rate information on the receipt. See: Entering Receipt Lines.
-
Capture and update an item's country of origin on the receipt. See: Entering Receipt Lines.
-
Capture movement statistics at the time of receipt. See: Movement Statistics.
-
Provide support for electronic signatures for receipts and inspections. See; Inspecting Received Items.
-
Enable inventory items to display shortage messages upon receipt, if a shortage exists, so that the responsible person can make the item available with a high priority. See: Material Shortage Alerts and Shortage Notifications, Oracle Inventory User's Guide.
-
Receive items returned by a customer. See: Return Material Authorizations (RMAs).
-
View inbound shipment details using the waybill number.
Centralized Purchasing for Multiple Receiving Organizations
Purchasing provides complete centralized procurement support. You can leverage your purchasing power by consolidating the requirements from different plants, warehouses, and office sites; yet retain receiving support. You can define separate, autonomous receiving organizations for each of these sites.
Use the Change Organization window (See: Changing Your Organization, Oracle Master Scheduling/MRP and Supply Chain Planning User's Guide) to choose your receiving organization. With the Receipts window, you can receive goods only for your current organization. The current organization code is displayed in the title bar of the Receipts window. (See: Entering Receipt Lines.) For supplier shipments, you specify the receiving organization on the purchase order shipment. For intransit inventory shipments, you specify the receiving organization when you create the intransit shipment. For internal requisitions, you use the destination organization to specify the receiving organization. For customer returns, the sales representative specifies the organization on the return material authorization (RMA) in Order Management.
All other receiving windows can access receiving only in your current organization. You also must deliver to the same organization in which you received the goods.
Use the Manage Shipments window to update intransit information to provide accurate expected delivery date information to better plan your production processes. See: Managing Shipments.
Receiving Locations
Receiving locations are designated areas in which you temporarily store items before you deliver them to their final destinations. Your receiving dock and the area in which items are inspected are receiving locations. See: Defining Locations.
Receiving locations are not required when the routing is Direct Receipt, when you are delivering goods to their final locations. However, when the routing is Standard Receipt, you initially receive the items into a receiving location, and you must specify the receiving location. If the routing is Inspection Required, you could transfer the items to an inspection location before delivering them to their destination. If necessary, you can create additional receiving locations, such as a cold storage area where items can be held pending inspection.
Related Topics
Entering Receipt Header Information
Movement Statistics
You can automate the collection of movement statistics-or information associated with the movement of goods-by following the instructions in: Setting Up Movement Statistics, Oracle Inventory User's Guide. (You can set up this functionality in Purchasing even if Inventory is not fully installed.) Once you set up the automatic collection of movement statistics and start the Movement Statistics Processor, the system records movement statistics automatically from the purchase order, internal requisition, return-to-supplier, and drop shipment receipt transactions.
You can also update movement statistics in the Movement Statistics window, which is accessible through the Receiving menu in Purchasing. For example, if the Movement Statistics Exceptions Report shows missing information, you can query and update the movement statistics record in the Movement Statistics window. For information on this window, see: Entering and Maintaining Movement Statistics, Oracle Inventory User's Guide.
Once you have set up the automatic collection of movement statistics, run the Movement Statistics Processor to compile all of the material transactions for a defined period to automatically create Intrastat and Extrastat records. Then run the movement statistics reports. See: Automatically Generating Movement Statistics, Oracle Inventory User's Guide.
Use e-Commerce Gateway to report the information to government agencies. See: Running the Movement Statistics Extract Program, Oracle e-Commerce Gateway User's Guide.
Related Topics
Overview of Movement Statistics, Oracle Inventory User's Guide
Receiving Controls, Options, and Profiles
Purchasing provides you with all the necessary functionality to set up flexible purchasing and receiving controls, control options, and profile options. The profile options can be set at the site, application, responsibility, or user level. The receiving controls and options can be set at one or more of the following levels: order, item, supplier, organization, and system. Controls at any level override those at a higher level. For example, item level controls override supplier controls but are overridden by order controls.
Use the Profile Options window to set profile options for receiving. Use the Receiving Controls window (See: Entering Purchase Order Receiving Controls.) and the More tabbed region in the PO Shipments window (See: Entering Purchase Order Shipments.) to set receiving options at the order level. Use the Item window (See: .Defining Items, Oracle Inventory User's Guide) to set receiving options at the item level. Use the Supplier window (See: Suppliers, Oracle iSupplier Portal Implementation Guide.) to set receiving options at the supplier level. Use the Receiving Options window (See: Defining Receiving Options.) to set receiving options at the organization level. Use the Purchasing Options window (See: Defining Purchasing Options.) to set receiving options at the system level. You can set the following receiving options:
-
Match approval level, which determines whether the items on a purchase order line must be received and/or inspected before the corresponding invoice can be paid. See: Defining Default Options. You can override this option for specific suppliers, items, and orders.
-
The Invoice Close % tolerance for your shipments. Purchasing automatically closes a shipment for invoicing if it is within the invoicing closing tolerance at billing, when Payables matches invoices to purchase orders or receipts. See: Defining Default Options. You can override this option for specific items and orders.
-
The Receipt Close % tolerance for your shipments. Purchasing automatically closes a shipment for receiving if it is within the receiving closing tolerance at the receiving close point. See: Defining Default Options. Note also that in the Find Expected Receipts form you have the option to include closed purchase orders when you are entering search criteria. You can override this option for specific items and orders. See: Finding Expected Receipts.
-
The Receipt Close Point, when the shipment is closed for receiving: Accepted (passed inspection), Delivered, or Received. See: Defining Control Options.
-
Whether expense accrual is on receipt or at period end. See: Defining Accrual Options.
-
The default expense AP accrual account. See: Defining Accrual Options.
-
Automatic or manual receipt numbering. If you choose Automatic, you can also set the start of the receipt number sequence. This is used with manual receipt numbering for inter-organization direct receipts. See: Defining Numbering Options.
-
Alphanumeric or numeric receipt numbering. See: Defining Numbering Options.
-
Whether you can receive a defined substitute item instead of the originally ordered item. See: Defining Receiving Options. You can override this option for specific suppliers, items, and orders.
-
Whether you can receive unordered items. See: Defining Receiving Options. You can override this option for specific suppliers and items.
-
Whether you allow express transactions. See: Defining Receiving Options.
Express receipt/delivery allows you to receive/deliver the entire quantity of all selected shipments (except those you specifically omit) without entering specific quantities for each shipment and distribution
-
Whether you allow cascade transactions. See: Defining Receiving Options.
The cascade function lets you distribute a quantity of an item from a single supplier across multiple shipments and distributions.
-
Blind receipt. If you choose this option, Purchasing does not enforce quantity tolerances, nor does it display the Quantity Due or the Quantity Ordered for shipments on line or on receiving worksheets. See: Defining Receiving Options.
-
Whether goods can be received only to the receiving location that was defined as the ship-to location on the purchase order and whether Purchasing prohibits the transaction, displays a warning message while permitting the transaction, or permits the transaction without a warning. See: Defining Receiving Options. You can override this option for specific suppliers, items, and orders.
-
The maximum acceptable over-receipt percentage and whether Purchasing prohibits the transaction, displays a warning message while permitting the transaction, or permits the transaction without a warning. See: Defining Receiving Options. You can override this option for specific suppliers, items, and orders.
-
The number of calendar days before and after the purchase order delivery date that you allow receipt and whether Purchasing prohibits the transaction, displays a warning message while permitting the transaction, or permits the transaction without a warning. See: Defining Receiving Options. You can override this option for specific suppliers, items, and orders.
-
The receiving account for your accrual entries. See: Defining Receiving Options.
-
The default receipt routing that you assign goods: Direct Delivery, Standard Receipt, or Inspection Required. See: Defining Receiving Options. You can override this option for specific suppliers, items, and orders.
-
Whether you can override the destination type at receipt time. This is a profile option (RCV: Allow Routing Override) that you can set at the application, responsibility, or user level. See: Profile Options in Purchasing.
-
Whether receipt travelers are automatically printed when you perform a receipt or receiving transaction, and match an unordered receipt. This is a profile option (RCV: Print Receipt Traveler) that you can set at the site, application, responsibility, or user level. See: Profile Options in Purchasing.
-
The processing mode for receiving transactions: Batch, Immediate, or Online. (See Receiving Transaction Processor.) This is a profile option (RCV: Processing Mode) that you can set at the site, application, responsibility, or user level. See: Profile Options in Purchasing.
-
Whether or not you receive an error message-or are prevented by Purchasing-when you attempt to receive against a purchase order shipment for which an Advance Shipment Notice (ASN) already exists. This is done through an option (ASN Control) in the Receiving Options window. See: Defining Receiving Options. See also: Advance Shipment Notices (ASNs).
-
Whether to reject an entire Advance Shipment Notice (ASN) if any ASN line fails validation or processing, or to accept an ASN if at least one ASN line is successful. This is a profile option (RCV: Fail All ASN Lines if One Line Fails). See: Profile Options in Purchasing. See also: Advance Shipment Notices (ASNs).
-
Whether to automatically receive and deliver an ASN for a drop shipment order. This is a profile option (PO: Automatically Deliver Drop Ship ASNs). See: Profile Options in Purchasing. See also: Advance Shipment Notices (ASNs).
Receiving Controls Matrix Control Purchasing Options Window Receiving Options Window Supplier Window Item Window PO Shipments Window * User Profile Window Match Approval Level (2-, 3-, or 4-way) X X X X Invoice Close Tolerance X X X Receipt Close Tolerance X X X Receipt Close Point X Expense Accrual Point X Expense AP Accrual Account X ASN Control - None, Reject, Warning X Receipt Numbering - Auto or manual / alpha or numeric X Allow Substitute Items X X X X Allow Unordered Items X X X Allow Express Transactions X Allow Cascade Transactions X Allow Blind Receiving X Enforce Ship-To Location X X X X Overreceipt Tolerance X X X X Early/Late Receipt Tolerance X X X X Receiving Account X Receipt Routing X X X X Allow Routing Override X Fail All ASN Lines if One Line Fail System Profile Print Receipt Traveler X Processing Mode X
* Note: Controls are entered through the More tabbed region in the PO Shipments window (See: Entering Purchase Order Shipments) or through the Receiving Controls window (See: Entering Purchase Order Receiving Controls), which is accessible only through the PO Shipments window.
Receipt Tolerances
You may want to allow over-receipts on items that you use frequently within your organization, and you can prevent misallocation of shipments to incorrect destinations by setting tolerance levels and the control action. You can over-receive for a particular item if the over-receipt quantity is within tolerance, and you can set the control action to allow all over-receipts, permit over-receipts outside the tolerance but issue a warning message, or reject over-receipts outside the tolerance. See: Receiving Controls, Options, and Profiles.
Example
You order 100 boxes of shelf braces and indicate on the purchase order that this order requires a receipt. You decide to relax the restriction on the receiving tolerance for shelves since shelves are a low cost/high turnover item. You define the receiving tolerance level for shelves to be 10% but choose to allow receipts over this tolerance level after displaying a warning.
At the receiving dock, the receiving agent receives 111 boxes of shelf braces and enters a receipt for all of them. The receiving agent can accept them all because your system setup allows receipt over tolerance for this item.
Later, you determine that you are not using all the shelf braces you had predicted, and you decide to change the tolerance level to 3% and to not allow receipts over tolerance. In the next shipment, you receive another 111 boxes of shelf braces. Again, the purchase order was for 100 boxes. The receiving agent attempts to receive 111, but Purchasing displays an error message stating that the receipt quantity is over tolerance and does not let the receiving agent record the over receipt. So, this time the receiving agent can receive only 103 and must reject the additional 8.
Return Material Authorizations (RMAs)
You can use Purchasing's receiving functionality to receive goods returned by your customers. These are goods for which a sales order in Oracle Order Management was created. If the customer wishes to return the goods, the sales representative creates a return material authorization (RMA) authorizing the return. When the return arrives at your receiving dock, you can create a receipt against the RMA as you would any other receipt, inspect the return, return the repaired goods to the customer, and make receiving corrections. Use the Customer tabbed region of the receiving Find windows to search by customer name, item number, or RMA number. See: Finding Expected Receipts.
If an RMA does not exist for a customer return, you can create an unordered receipt while you find out from the sales representative which RMA to use. See: Unordered Receipts. Use the Receiving Returns window to return the item to the customer if a return is not authorized or after the goods have been repaired.
RMAs use the default receipt routing defined in the Receiving Options window. They use the receipt tolerance that was defined in Order Management when the RMA line was created. The RMA reflects the received, or partially received, quantity while the remaining quantity remains open.
Lot and serial numbers are handled for RMAs as they are for any other item or receipt.
You cannot cascade RMA receipts.
Example
Your company makes computer boards. A sales representative creates sales orders using Order Management and ships the boards to customers. One of your customers receives a shipment of 20 boards, which do not work properly, and calls the sales representative. The sales representative creates an RMA in Order Management authorizing the return of the boards. The RMA line is created with a line type of Return with Receipt of Goods.
When the boards arrive at your receiving dock, you enter the customer name, item number, or RMA number in the Find Expected Receipts window and create a receipt. Purchasing automatically updates the RMA to reflect the quantity received.
You use the Inspection window to record your inspection of the boards. Inspection confirms that all 20 of the returned boards are defective. You use the Receiving Transactions window to deliver the boards to their final destination. Purchasing automatically updates the RMA with the quantity fulfilled.
See: Overview of Returns, Oracle Order Management User's Guide.
Debit Memos
You can automatically generate debit memos for Return To Supplier transactions if an invoice has been created. To enable this functionality, enable the supplier site as a Pay Site (or indicate an Alternate Pay Site) and select Create Debit Memo from RTS Transaction in the Supplier Sites window. See: Entering Supplier Information, Oracle iSupplier Portal Implementation Guide. When you create the return, make sure the Create Debit Memo Option is selected in the Returns window. Once you enable this functionality, a debit memo is created for each return line you enter in the Returns window.
-
The debit memo number contains the original receipt number. Self-Biiling Invoice numbering affects debit memos. See: Self-Billing Invoices.
-
The debit memo is dated with the return transaction date. If this date does not fall within an open period in Oracle Payables, the date defaults to the first open date available in Payables.
-
The payment schedule on the debit memo is based on the purchase order payment terms (in the Terms and Conditions window) and the invoice terms defined in Payables.
-
The debit memo is calculated by multiplying the returned quantity by the purchase order item unit price. If the purchase order is in a foreign currency, and you perform invoice matching to receipts, Purchasing uses the currency conversion rate at the time of receipt to calculate the unit price.
-
The debit memo does not include tax and freight charges.
-
If the unit of measure (UOM) on the return in the Returns window differs from the purchase order UOM, Purchasing restates the return quantity on the debit memo in terms of the purchase order UOM.
-
If an Advance Shipment Notice (ASN) or an ASN with billing information (ASBN) exists for the receipt, the unit price from the ASN or ASBN is used.
-
Purchasing does not automatically include corrections to returns in debit memos; in this case, you need to adjust the debit memo manually. See: Entering Debit/Credit Memos, Oracle Payables User's Guide. Purchasing does not create debit memos for returns against unordered receipts.
-
If an invoice has not yet been created for the receiving transaction or if Payment on Receipt already accounted for the return using the Aging Period functionality, a debit memo will not be created. Whenever a debit memo cannot be created, you will receive a notification in the Notifications Summary window.
-
Similarly, the Aging Period functionality in Payment on Receipt does not include returns for which a debit memo was already created, so that duplicate debits are not made. See: Payment on Receipt.
-
When Auto Create Debit Memo from RTS Transaction is not enabled in the Supplier Site form (Supplier Sites window > Suppliers: Entry), do the following:
From the Sites region, choose Open or New, and a warning message is displayed to the user. A debit memo needs to be created manually against the return to consigned transaction.
However if the user tries to update the status of invoice only consigned purchase orders to Finally Closed or Closed for Invoicing, then the system compares the current billed quantity with net consumed quantity using the Inventory API check_net_consumed_qty which will compare the net consumed quantity (quantity consumed – quantity returned to consigned inventory for that billing period) with the current billed quantity. As long as the net consumed quantity is greater than or equal to quantity billed on the consigned PO, the API returns True and the consigned purchase order status can be updated. If the net consumed quantity is less than quantity billed on the consigned PO, the API returns a value of False, and an error message is displayed.
You can match the debit memo to the purchase order or receipt. See: Matching Credit/Debit Memos in the Invoices chapter/section of the Oracle Payables User's Guide.
Drop Shipment Receipts
Drop shipment orders are always received with a receipt routing of direct delivery, ignoring the routing indicated on the original purchase order. The receipt and delivery are processed immediately for these orders.
You can have drop shipment ASNs received automatically by setting the profile PO: Automatically Deliver Drop Ship ASNs to Yes. See: Profile Options in Purchasing See also: Advance Shipment Notices (ASNs).
Receiving Open Interface
Using the receiving open interface, you can import receipts from other Oracle Applications or from non-Oracle systems. The receiving open interface lets you integrate Oracle Purchasing with new or existing applications such as Oracle Warehouse Management.
Note: Using the Receiving Open Interface, administrators can add new purchase order or return material authorization (RMA) receipt lines to existing purchase orders or return material authorization (RMA) receipts. Administrators can add lines to existing receipt for Advance Shipment Notice (ASN) as well.
To use the receiving open interface, your application must load the receiving information into the interface tables and then the Receiving Transaction Processor is run. See: Receiving Transaction Processor.
Serial Tagging During Picking
The system asks the user for a serial number during material picking for a Sale Order (or Internal Sale Order) if the item is serial tagging enabled.
When serial tagging is enabled for sales order pick, the corresponding Return Material Authorization (RMA) transaction will also be serial controlled. Whether same serial numbers are received as were shipped in the original shipment are dependent on the setting of Validate Serial Numbers at RMA Receipt in the Receiving Parameters window.
When the item is received during an RMA transaction, it does not have the serial association anymore with the received quantity. The on hand balance increases by the received quantity and the serial status is Defined but not Used.
The Receiving Open Interface validates the serial numbers if the item is serial tagging enabled at Sales Order Pick.
Advance Shipment Notices (ASNs)
An Advance Shipment Notice (ASN) is transmitted using Electronic Data Interchange (EDI) or Extensible Markup Language (XML) from a supplier to let the receiving organization know that a shipment is coming. The ASN contains details including shipment date, time, and identification number; packing slip data; freight information; item detail including cumulative received quantities; country of origin; purchase order number; and returnable container information.
Once an ASN is successfully validated, you can use it in the Receipts window to create receipts, reducing data entry time. (A validated ASN is one that contains no errors during data validation in the Receiving Open Interface). If Oracle Yard Management is licensed and installed, the Shipment Information region will display the SCAC and Equipment Number fields in the read-only mode according to the shipment's Equipment id.
Suppliers can also send ASNs with billing information. These contain the same information as ASNs plus invoice and tax information. Once an ASN with billing information (also known as an ASBN) is validated in the receiving open interface and imported into Purchasing, an invoice for the shipment is created automatically.
A supplier creates an ASN based on the demand conveyed by the purchasing organization's Purchase Order, Planning Schedule, or Shipping Schedule. If Purchasing detects errors or discrepancies in the ASN at any time, from the time the ASN is sent to the time it is entered as received, an Application Advice, transmitted via EDI, is sent automatically to the supplier. The supplier can then send a corrected ASN.
Important: ASNs come from external suppliers only. They cannot be used for internal sales orders sourced from your inventory and generated by internal requisitions.
You can view or cancel an accepted ASN as an intransit shipment in the Manage Shipments window.
You can match invoices to receipts created from ASNs. You can also match ASBN invoices to receipts.
ASN Process
The ASN process, shown in the next figure, includes the following:
-
A shipment authorization is made to the supplier in the form of a Purchase Order, Planning Schedule, or Shipping Schedule.
-
The supplier sends the ASN to the receiving organization at the time of shipment.
-
The ASN is verified in the Receiving Open Interface. Intransit and purchasing supplies are updated for ASN lines that are successfully validated. For each accepted line on the ASN, intransit supply is increased and purchasing supply is reduced. If the data isn't accepted or if there is an error or discrepancy in the data, an Application Advice, containing the most likely cause of the error, is sent to the supplier. The supplier can then send a corrected (New) ASN.
-
The goods arrive. You can use the ASN in the Receipts window to create receipts.
-
Shipment-vs.-receipt quantities are compared during the receipt transaction process. (As an optional step, CUM quantities can be compared if Oracle Supplier Scheduling is installed.) If discrepancies are detected in shipment-vs.-receipt or CUM quantity comparisons, an Application Advice is sent to the supplier.
ASN Receiving Options
There are several receiving options related to ASNs:
-
ASN Control option in the Receiving Options window - With this option, you can choose whether or not you receive an error message-or are prevented by Purchasing-when you attempt to receive against a purchase order shipment for which an ASN already exists. See: Defining Receiving Options.
-
RCV: Fail All ASN Lines if One Line Fails - With this profile option, you can choose to reject an entire ASN if any ASN line fails validation or processing, or to accept an ASN if at least one ASN line is successful. See: Profile Options in Purchasing.
-
ASNs for drop shipment orders can be received and delivered automatically with the profile PO: Automatically Deliver Drop Ship ASNs. See: Profile Options in Purchasing.
Application Advices
If an ASN is not accepted or is only partially accepted, errors and discrepancies are electronically conveyed to the supplier in an Application Advice. The Application Advice transmits to the supplier the status (acceptance with errors or rejection) of the ASN, and the severity and description of the errors.
An Application Advice can be sent at several points during the receiving process:
-
When the ASN is first sent and contains header or line errors.
-
When the quantity received does not match the quantity shipped indicated by the ASN.
-
When the receiving organization's newly updated cumulative received quantities do not match the supplier's cumulative shipped quantities.
Note: CUM quantity comparisons can be performed only if Oracle Supplier Scheduling is installed.
The supplier can respond to an Application Advice by sending a Cancellation ASN followed by a corrected (New) ASN. The receiving organization can also cancel an ASN manually in the Manage Shipments window.
The following table indicates the appropriate supplier response to particular Application Advices.
| ASN Header | ASN Lines | Transaction Status | Supplier Action |
|---|---|---|---|
| Fatal Error | Not Validated | Transaction Rejected | Send New ASN before goods arrive. |
| Warning or Valid | All lines Warning or Valid (no fatal errors) | Transaction Accepted | Do not send a New ASN, but correct indicated problems on future ASNs. |
| Warning or Valid | Some Warning Some Valid Some Fatal Error | Transaction Accepted with Some Lines Rejected | Send Cancellation ASN, then send a New (corrected) ASN. |
| Warning or Valid | All lines had a Fatal Error | Transaction Rejected | Send a New (corrected) ASN before goods arrive. |
Types of ASNs
There are three types of ASNs:
-
A New ASN is the initial ASN.
An ASN can also contain substitute item information. To accurately handle substitutions, the supplier must indicate both the buyer's original item number and the buyer's substitute item number on the ASN. With both identifiers available, substitutes can be validated as allowed, and a valid substitute item is referenced against valid purchasing document information.
-
A Cancellation ASN, once validated, cancels the original (New) ASN if the original (New) ASN has not yet had a receipt created against it. The shipment number on the Cancellation ASN is matched to the shipment number on the validated, original (New) ASN.
-
A Test ASN is sent by the supplier usually to make sure the ASN transmission works between you and your supplier. A Test ASN is verified as if it were a New ASN and generates an outbound Application Advice if necessary. A Test ASN is not available for creating a receipt against it and is not visible as inbound supply.
Note: A validated ASN, as described above, is one that contains no errors during data validation in the Receiving Open Interface.
ASNs and CUM Management
You can perform CUM management under the following conditions:
-
Oracle Supplier Scheduling is installed and CUM Accounting is enabled for the ship-to organization.
-
The ASN item or items are defined in the Approved Supplier List.
-
The items are sourced from the supplier using a Supply Agreement Blanket Purchase Order.
The CUM is the total quantity received from a supplier site, for a particular item, within a CUM period. When an ASN is used during receiving and Supplier Scheduling is installed, the updated CUM is compared to the supplier's CUM. Any discrepancy transmits an Application Advice to the supplier..
ASNs and Supply
For each accepted line on the accepted ASN, intransit supply quantity is automatically increased and purchasing supply quantity is automatically reduced by the shipment quantity specified in the ASN.
When an accepted ASN is cancelled or a corrected ASN is sent, corresponding changes are also made to purchasing and intransit supply. (A supplier can send a Cancellation ASN or you can cancel the ASN in the Manage Shipments window.)
The table below shows, for each action you perform with an ASN, the movement of the quantity on the ASN between the various categories of supply.
| ASN Action | Purchasing Supply | Intransit Supply | Inventory |
|---|---|---|---|
| Accept the New ASN | Reduced for accepted lines only | Increased for accepted lines only | |
| Accept the Cancellation ASN | Increased for all accepted lines on New ASN | Reduced for all accepted lines on New ASN | |
| Receive item when the item is indicated on an ASN line | Reduced | Increased | |
| Receive item when the item is not indicated on an ASN line | Reduced | Increased | |
| Increase receipt quantity before the ASN is closed | Reduced | Increased | |
| Increase receipt quantity after the ASN is closed | Reduced | Increased | |
| Decrease receipt quantity before the ASN is closed | Increased | Reduced | |
| Decrease receipt quantity after the ASN is closed | Increased | Reduced | |
| Return item(s) to the supplier before the ASN is closed | Increased | Reduced | |
| Return item(s) to the supplier after the ASN is closed | Increased | Reduced | |
| Close the Purchase Order while an ASN for that purchase order is open | Reduced | Reduced |
Related Topics
Advanced Shipment Notice Discrepant Receipts Report
Receiving Interface Errors Report
Oracle Manufacturing, Distribution, Sales and Service Open Interfaces Manual
Oracle e-Commerce Gateway Implementation Manual
Managing Receipts
Using the Find Expected Receipts Window
When you enter a receipt, you first use the Find Expected Receipts window to locate the source document for the receipt: a shipment from a supplier based on a purchase order, a shipment from inventory backed by an internal sales order generated by an internal requisition, an intransit shipment within your inventory, or a return from a customer based on a return material authorization (RMA).
You can also return material to the organization from where it was shipped by creating a return internal sales order, which in turn generates a return order, and a return ASN document number. For more information, see Return of Items Received Through an Internal Sales Order Shipment, Oracle Inventory User's Guide.
Receiving Shipments
Once you have entered your search criteria, you move to the Receipts window, where all the supplier shipments and inter-organization shipments corresponding to your search criteria are displayed. You can receive goods into a receiving location or to their final destination. When you receive goods into a receiving location, you then use the Receiving Transactions window to optionally inspect and/or transfer receipts between receiving locations before you deliver the receipts to their final destination specified on the source document. You can also receive and deliver to a final destination in one transaction using the Receipts window. You can either use Express Receipt to receive all quantities as shipped, or you can enter specific receipt quantities for shipments. You can modify information, such as the receipt number and packing slip number. When suppliers have consolidated orders onto a single shipment, you can use the Cascade function to allocate the shipment across orders during entry of receipts.
If the RCV: Print Receipt Traveler profile option is set to Yes, receipt travelers are printed automatically when you perform receipts or receiving transactions. See: Profile Options in Purchasing.
You can also record the receipt of substitute and unordered items. Purchasing records the shipment for the unordered items when you enter the receipt. You cannot perform receiving transactions upon the receipt until you match it to an order. See: Matching Unordered Receipts
Related Topics
Express Receipts and Receiving Transactions
Cascading Receipts and Receiving Transactions
Return Material Authorizations (RMAs)
Multiple Distributions
If you're familiar with the previous release of Purchasing, you may remember you had to use a separate screen when entering receipts for purchase orders with multiple distributions. In the current release of Purchasing, you can explode a single shipment into its component distributions in the Receipts window.
When you initially query up a shipment line that has multiple distributions, there will be a + icon to the right of the UOM field for all lines with a Destination Type of Multiple. Shipment lines for which there is only a single distribution will not have the + icon. You can click on the + icon to expand the line into multiple lines, one for each distribution. The original shipment line will appear grey and will not be updatable. The + icon on that line will change to a - icon. Click on the - icon to end the display of the expanded lines.
You can distribute the available quantity across the expanded lines, but you cannot distribute more than the available quantity shown in the parent shipment quantity column. Also, you can enter and maintain line information only in the expanded lines.
If the default routing is direct receipt and routing override is not enabled, you can explode the line and transact the receipt at the distribution level, but you cannot change any of the values on that line. If the default routing is standard receipt and routing override is enabled and there are multiple destinations, Purchasing displays the destination type Receiving and the + icon is not present. If you want to override the routing and send it to final, you must first change the destination type to Multiple. Then the + icon will appear, and you can expand to see all of the distribution lines and change any or all to have a destination type of final.
Cascading Receipts and Receiving Transactions
The Cascade function facilitates the distribution of a given quantity of an item from a single supplier across multiple shipments and distributions. This function is available in the Receipts window if you have specified a Supplier and Item in the Find Expected Receipts window and if Allow Cascade Transactions is enabled in the Receiving Options window. In the Receiving Transactions window, the cascade function is available for deliveries if you have specified an Item in the Find Receiving Transactions window. Performing any manual transaction in a line disables the Cascade button, and it is not enabled until you have again selected the Find button in the appropriate Find window.
When you select the Cascade button, Purchasing displays the Cascade Details window in which you must enter the cascade quantity and the unit of measure. When you select the OK button, the cascade process begins.
The process starts at the first displayed line and allocates the supply available to receive/deliver to that line from the cascade quantity you entered. The process continues to the next line and again allocates the quantity available to receive/deliver, continuing until either the process reaches the last queried line or the cascade quantity is exhausted. Since the lines are displayed in order by promised date/need-by date, the process operates as a First In/First Out procedure. If you entered a cascade quantity larger than the quantity available to receive/deliver, Purchasing displays a dialog window explaining that the process could allocate only so many. If the quantity available to receive/deliver is greater than the cascade quantity, the last receipt/delivery may be partial. To clearly indicate that the cascade quantity has been exhausted, Purchasing displays a transaction quantity of 0 for the remaining lines.
The cascade function does not modify any destination information; it uses the information defined by the routing and defaulted from the shipment.
If a given shipment line has multiple distributions and the default routing for that line is direct receipt, the cascade process explodes the line and allocates the quantity available on the shipment line to the component distributions based on the supply available for the distribution. If you have over distributed a given line, Purchasing allocates all remaining supply for the shipment to the last distribution. If you have over delivered the transactions with prior receipts or transactions, then the process may fill the lines with undesired values, but you can reallocate in this situation once the cascade process is complete.
Record validation is disabled during the cascade process to facilitate the running of the process, but all lines are validated when you save them. Quantities are applied to lines in the expectation that you will transact the line as the default routing intended. However, you can manually override these values.
Express Receipts and Receiving Transactions
The express function is a quick method of entering receipts and receiving transactions. This function is available in the Receipts window if you have specified or inferred a source in the Find Expected Receipts window. (The source would be inferred if you entered, for example, a purchase order number.) In the Receiving Transactions window, the express function is available for deliveries regardless of your search criteria in the Find Receiving Transactions window. Performing any manual action in a line disables the Express button, and it is not enabled until you have again selected the Find button.
When you select the Express button in the Receipts window, Purchasing displays the Express Details window in which you must enter the destination: Final Destination or Receiving location. Note that this action is dependent on the profile RCV: Allow Routing Override. When you select the OK button in the Express Details window, all lines are selected and the Express button changes to Unexpress. When you select the Express button in the Receiving Transactions window, all lines are selected and the Express button changes to Unexpress. In either case, you can select the Unexpress button to return to manual mode. Otherwise, you can deselect lines to omit them from express processing and then save your work to initiate express processing.
-
You cannot perform data collection using Oracle Quality when you select the Express button in the Receiving Transactions window. See: Receiving Transactions.
-
Express receiving does not support entering Descriptive Flexfield segment values.
The express processor performs validation and rejects lines based on the following criteria:
-
the item revision/subinventory/locator is required and not obtainable as a default from the item definition and the destination is Final
-
the early/late receipt date tolerance is exceeded and the exception control is Reject
-
lot/serial information is required
-
ship-to location is not available and the destination is Receiving
-
location is not available for Expense destination type and the destination is Final Destination
-
purchase order supplier and receipt header supplier do not match
-
other receipts are pending for the specified shipment
When validation processing is complete, Purchasing displays a dialog telling you how many lines passed validation and how many failed and are still available to receive manually.
Related Topics
Entering Express Receipts
Use the Receipts window to enter express receipts.
To find source documents:
-
Navigate to the Find Expected Receipts window.
-
Enter search criteria to find the source documents for which you want to enter express receipts. You must include the supplier or organization in the source criteria.
-
Select the Find button to display the Receipts window with line(s) available for receipt displayed in the Lines tabbed region.
To enter express receipts:
-
Select the Express button to open the Express Details window.
-
Select the Destination Type: Final Destination or Receiving location.
-
Select the OK button. This changes the Express button to Unexpress and selects all the lines for express receipt.
-
Optionally deselect individual lines to omit them from the express receipt.
-
Save your work to begin express receipt validation processing.
Related Topics
Express Receipts and Receiving Transactions
Finding Expected Receipts
Use the Find Expected Receipts window to find source documents for which you can enter receipts. Use the Supplier and Internal tabbed region to search for Purchasing documents. If Order Management is installed, use the Customer tabbed region to search for customer return material authorizations (RMAs).
To find expected receipts in the Supplier and Internal tabbed region:
-
Navigate to the Find Expected Receipts window by selecting Receipts from the menu.
-
Select the Supplier and Internal tabbed region.
-
Select the Operating Unit for this search.
-
Specify any of the following, optional search criteria:
-
Select the receipt Source Type for the search:
Internal: An internal order generated from an internal requisition and sourced from your inventory, or an intransit inventory shipment. If you choose this option, the following fields are disabled: PO Number, Release, Line, Shipment, and Include Closed POs.
Supplier: A purchase order sourced from a supplier. If you choose this option, the Requisition Number and requisition Line number fields are disabled.
All: Internal- and supplier-sourced documents.
-
For a Supplier source type, enter the Purchase Order number. To be available, a purchase order must have at least one approved shipment for which the ship-to organization is the same as the current active organization. If you enter a purchase order number, you can also enter a Release number, Line number, and/or Shipment number for the purchase order. The Release field is applicable only when you have entered a purchase order number associated with a planned purchase order or a blanket purchase agreement. The list of values in the Release field includes all releases for the specified purchase order that are not final closed.
-
For an Internal source type, enter the Requisition Number. If you enter a requisition number, you can also enter a Line number. Available lines are those with the same ship-to organization as the current active organization.
-
In the second Shipment field, enter the shipment number of the Advance Shipment Notice (ASN). See: Advanced Shipment Notices (ASNs).
-
Enter the Supplier. For Source Type Internal, this is the organization. For Source Type Supplier, this is the supplier name, and you can also enter the Supplier Site.
-
Select Include Closed POs to include soft closed purchase orders in the search. By not checking Include Closed POs, you exclude purchase orders that have a status of Closed or Closed for Receiving.
-
Enter the Receiving Location.
-
Use the lower tabbed regions to further restrict the search.
-
-
Select the Find button to initiate the search and display the selected source documents in the Receipts window. Purchasing first opens the Receipt Header window.
To find expected returns in the Customer tabbed region:
-
Select the Customer tabbed region in the Find Expected Receipts window.
This region is used for finding items that a customer has returned to your company. When a sales representative creates a sales order in Order Management and ships the item to the customer, you can find and create receipts if the customer returns the item. You create the receipt against a return material authorization (RMA) document, which the sales representative uses to authorize the return.
-
Specify any of the following, optional search criteria:
-
Line type, such as Return with Receipt of Goods, on the RMA. There are different return line types. Search by RMA line type if you want to see all RMA lines with that line type in your receiving organization.
-
RMA Number, which corresponds to the Order Number field on the sales order
-
Line number from the RMA
-
Return ASN document number that is used to return material
-
Customer returning the item
-
Customer Number
-
Customer Item Number that the customer used to order the item
-
The lower tabbed regions. See: To further restrict the search.
-
-
Select the Find button to initiate the search and display the selected source documents in the Receipts window.
To further restrict the search:
-
Specify any of the following, optional search criteria:
-
In the Item region, you can enter the following search criteria: Item number, Revision number, Category, item Description, and Supplier Item Number. Since the supplier item number is generally the best way you can identify purchase order lines when your supplier does not reference your purchase order number on its shipping documents, you should provide a supplier item number on your purchase order lines.
-
In the Date Ranges region, you can select Due Today to limit the search to receipt lines due on the current date. Otherwise, you can enter a Due By date range. These dates correspond to the Promised Date (or Need-by Date if there is no Promised Date) on the Purchasing document or to the Promise Date (or Request Date if there is no Promise Date) on the RMA.
-
In the Shipment region, you can enter the Container, Truck Number, or Bar Code Label indicated on an Advance Shipment Notice (ASN). See: Advance Shipment Notices (ASNs).
-
In the Destination region, you can select the Requestor, Project, Kanban Card, Task, Deliver-to location, or Job. Using these fields will limit your search results at the distribution level of the order.
-
To enter unordered receipts:
-
Select the Unordered button to open the Receipt Header window to enter unordered receipts. See: Entering Unordered Receipts.
To remove existing search criteria:
-
Select the Clear button in any of the source document search windows to remove existing search criteria.
Related Topics
Entering Receipt Header Information
Return Material Authorizations (RMAs)
Entering Receipt Header Information
Use the Receipt Header window to enter header information for all types of receipts.
Note: If you are entering a receipt against an Advance Shipment Notice (ASN), the header information may already be entered for you if the supplier sending the ASN provided that information. See: Advanced Shipment Notices (ASNs).
To enter receipt header information:
-
Navigate to the Receipt Header window. Purchasing opens this window when you select Find or Unordered in the Find Expected Receipts window. You can also get to this window by selecting the Header button in the Receipts window.
-
Enter the Receipt number. If automatic receipt numbering is enabled, this field is not enterable when you are creating a new receipt. Purchasing displays the receipt number if the shipment has been partially received.
-
Enter the Receipt date.
-
Enter the Shipment number.
-
Enter the Shipped Date.
-
Enter the Packing Slip number.
-
Enter the Waybill/Airbill number.
-
Enter the Freight Carrier. See: Defining Freight Carriers, Oracle Shipping Execution Guide
Note: Only the active freight carriers are displayed.
-
Enter the Bill of Lading.
-
Enter the number of Containers.
-
Enter the Received By person.
-
Enter the Supplier or Customer. For supplier-sourced shipments, this is the supplier. For inventory-sourced shipments, this is the organization. If the field says Customer, this is the customer returning an item ordered from your company.
-
Enter Comments.
-
Navigate to the Receipts window.
Note: You can save the header separately from the lines except for ASN receipts.
To add lines to an existing receipt:
-
Select the Add To Receipt button to open a list of values showing the receipts to which you can add lines. When you select the receipt to add to, Purchasing displays values from that receipt in the remaining header fields. You can also change the date when the action is Add To Receipt.
Related Topics
Entering Receipt Lines
Use this window to enter receipt line information.
To enter receipt line information:
-
Purchasing opens the Receipts window and displays all shipments that meet the search criteria when you choose the Find button in the Find Expected Receipts window. See: Finding Expected Receipts.
In the lower part of the screen, Purchasing displays the following detail information for the current shipment line: Order Type, Order number, the Supplier or internal organization shipping the item or the Customer returning the item, Due Date, Item Description, Hazard class, Destination, UN Number, Header Receiver Note (from order document header), Shipment Receiver Note, and Routing.
-
Select the line you want to receive.
If the line you select contains information in the ASN Type field, then an Advance Shipment Notice (ASN) exists for that shipment. (You can set an ASN Control option in the Receiving Options window to prevent you from receiving against a purchase order shipment for which an ASN exists. See: Defining Receiving Options.)
If a material shortage exists for the item, a message appears. Displaying shortage messages for certain items is a setup option. From the message, you can view details of where in your organization the demand exists for the item. You can then make the item available with a high priority. See: Viewing Potential Shortages, Oracle Inventory User's Guide. See: Material Shortage Alerts and Shortage Notifications, Oracle Inventory User's Guide.
-
Purchasing displays the Quantity due for the shipment. If you change the unit of measure, the receipt quantity is adjusted to reflect the new unit of measure. You can override this value if you are recording a partial receipt or an over-receipt. Depending on your receiving options, Purchasing either ignores over-receipts, displays a warning message when you try to receive more items than you ordered, or prevents you from receiving quantities over your receipt tolerance. If you specify blind receiving at the system option level, Purchasing neither performs over-receipt checking nor displays a Quantity To Receive. If you have fully received a shipment, the receipt quantity displayed is zero, but over-receipt checking will reveal whether you have exceeded the over-receipt tolerance on this shipment.
The information described above applies to an ASN line as well as a purchase order shipment line.
The quantity received on the corresponding purchase order or return material authorization (RMA) is updated to reflect the received quantity.
-
Enter the UOM of the item you are receiving.
-
Enter the Destination Type: Receiving, Expense, Inventory, or Shop Floor. This determines the final destination of the received items.
You can change the Destination Type if the profile option RCV: Allow Routing Override is set to Yes.
-
If the item is under revision control, you must enter a Revision.
-
Enter the receiving Location.
-
Enter the Requestor.
-
For the Inventory destination type, enter the Subinventory into which the goods will be delivered.
-
When the destination type is Inventory and when the item and/or the subinventory have locator control enabled, enter the stock Locator.
-
Optionally choose or change the Country of Origin.
The Country of Origin is the country in which an item is manufactured. The Country of Origin defaults from the ASN if there is one. Otherwise, it defaults from the purchase order shipment.
-
If Oracle Process Manufacturing (OPM) has been implemented, you are a process manufacturing user, and the selected receiving organization is a process organization, then the process fields are enabled. The two process fields are Secondary UOM and Secondary Quantity.
Note: If your organization uses Skip Lot controls, the receipt routing may be automatically changed from inspection required to standard.
To enter receipt line detail information:
-
Navigate to the Details tabbed region.
-
Enter the Packing Slip number.
-
Enter the Supplier Lot number.
-
Enter the transaction Reason Code. See: Defining Transaction Reasons, Oracle Inventory User's Guide.
-
Enter any comments.
-
Select Receipt Exception if you want to enter a release exception for this receipt.
To modify exchange rate information:
-
Navigate to the Currency tabbed region.
You can update exchange rate information on the receipt only if you perform invoice-to-receipt matching (an Invoice Match Option of Receipt is chosen for the shipment in the purchase order Shipments window).
These fields are blank and disabled if there is no exchange rate-that is, if the purchase order is not in a foreign currency.
-
Modify the Rate Date.
If the Invoice Match Option on the purchase order shipment is Purchase Order, the default is the purchase order creation date, and you cannot change it. If the Invoice Match Option is Receipt, the default is today's date. You can change the Rate Date to one that better captures the cost of the item at the appropriate exchange rate. For example, if you are creating a receipt for an item that was actually received into inventory a few days earlier, you could enter the earlier date to apply the rate from that day. You can enter a different Rate Date for different receipt lines. For User rate types, changing the Rate Date does not affect the Rate.
Once you complete the receipt transaction, you cannot correct this exchange rate information later.
-
If the Rate Type is User and the profile option PO: Allow Rate Override for User Rate Type is set to Yes, optionally modify the Rate.
The Rate defaults from the purchase order.
Note: The Currency and the Rate Type also default from the purchase order, but cannot be changed.
To view order information:
-
Navigate to the Order Information tabbed region to view the following information for the shipment: Order Type, Number, Release number, order Line number, Shipment number, Project, Task, Kanban Card Number, Charge Account, Supplier, Quantity Ordered, UOM, Due Date, Supplier Item number, Customer Item number, Manufacturer Name, and Source Inspected.
To view outside processing information:
-
Navigate to the Outside Services tabbed region to view the Job or repetitive Schedule number, the repetitive schedule Line number, the Operation Sequence, and the Department number.
To view shipment (ASN) information:
-
Navigate to the Shipment Information tabbed region to view information from the Advance Shipment Notice (ASN), if one exists for the shipment. See: Advance Shipment Notices (ASNs).
To enter control number information:
-
For controlled items, you can select the Lot-Serial button to navigate to the Lot Number and Serial Number windows. See: Lot Control, Oracle Inventory User's Guide. See: Serial Number Control, Oracle Inventory User's Guide.
To cascade quantities across shipments and distributions:
-
If you specified a Supplier and Item in the Find Expected Receipts window, and if Allow Cascade Transactions is selected in the Receiving Options window, choose the Cascade button. See: Cascading Receipts and Receiving Transactions.
To perform an express receipt:
-
Select the Express button to perform an express receipt. See: Entering Express Receipts.
Related Topics
Entering Receipt Header Information
Cascading Receipts and Receiving Transactions
Express Receipts and Receiving Transactions
Defining Conversion Rate Types, Oracle General Ledger User's Guide
Return Material Authorizations (RMAs)
Unordered Receipts
You can receive items from a supplier when you do not have a corresponding purchase order but want to receive the items so you can track them on the system while you wait for a buyer to decide which purchase order to use. You can receive returned items from a customer that were issued on a sales order in Order Management while you find out from the sales representative which return material authorization (RMA) to use.
First receive the items as Unordered Receipts in the Receipts window. You can create a new receipt or add to an existing receipt for the supplier or customer who shipped the unexpected items. Then perform a standard receipt for the unordered item shipment quantity.
Use the Find Unordered Receipts window to find the receipts or RMAs that are available for matching. Then use the Match Unordered Receipts window to specify the purchase order or RMA number, release, line, and shipment schedule to which you want to match the unordered receipt. Purchasing restricts the list of possible matching purchase orders/releases as follows:
-
The purchase order must have the same supplier as the unordered receipt (when matching to RMAs, the RMA must have the same customer as the unordered receipt)
-
The purchase order cannot be final closed or cancelled
-
The purchase order must have at least one approved shipment in the same organization where you performed the unordered receipt (when matching to RMAs, the receiving organization on the RMA must be the same organization where you performed the unordered receipt)
-
Except for receipts for one-time items, the item and the purchasing category on the purchase order (or the item on the RMA) must be the same as the item and purchasing category on the unordered receipt
-
The purchase order must have a receipt routing of Standard Receipt, Inspection Required, or none (blank). If the purchase order shipment has a routing of Direct Delivery, the profile option RCV: Allow Routing Override must be set to Yes. This routing requirement also applies to RMAs, which use the routing specified in the Receiving Options window.
You can match only to approved shipments. If you cannot locate a valid matching document for your unordered receipt, you can modify and approve an existing purchase order/release or you can create and approve a new purchase order. You can then match to this new, approved shipment. For RMAs, you can ask the sales representative to create one in Order Management, and then you can match to the new RMA or RMA line.
When you choose a shipment or RMA line, Purchasing performs receiving control checks of the quantity received tolerance and due date threshold.
If the RCV: Print Receipt Traveler profile option is set to Yes, receipt travelers are printed automatically when you match unordered receipts.
Related Topics
Return Material Authorizations (RMAs)
Entering Unordered Receipts
-
Select Receipts on the menu to open the Find Expected Receipts window. See: Finding Expected Receipts.
-
Choose the appropriate tabbed region.
Choose the Supplier and Internal tabbed region to create an unordered receipt that will later be matched to a purchase order or release. Choose the Customer tabbed region to create an unordered receipt that will later be matched to a return material authorization (RMA). An RMA is created in Order Management to authorize a customer's returning an item to your company.
Important: It is important to choose the correct tabbed region. For example, if the Customer tab is selected, later when you enter the receipt you will see only customer information in the lists of values.
-
Select the Unordered button to open the Receipt Header window.
-
Enter receipt header information. See: Entering Receipt Header Information.
-
Enter receipt line information. See: Entering Receipt Lines.
-
Save your work.
Related Topics
Return Material Authorizations (RMAs)
Matching Unordered Receipts
Use this window to match unordered receipts to purchase order shipments.
To select unordered receipts for matching:
-
Navigate to the Find Unordered Receipts window by selecting Match Unordered Receipts on the menu.
-
Enter any of the following as selection criteria for the receipts you want to match to purchase orders or return material authorizations (RMAs): Receipt Number, Supplier or Customer name, Item, Category, Supplier Item Number, Receiver, Transaction Date, Receiving Location, Item Description.
-
Select the Find button. If your selection criteria produce any receipts for matching, the Item Number, Revision, Category, and Supplier or Customer are displayed in the Unordered Receipts block in the Match Unordered Receipts window. The Receipt Number, Quantity Received, Receiving UOM, Deliver To, Receiver, Item Description, Quantity Ordered, Order UOM, Destination, and Supplier Item Number for the current receipt are displayed in the lower part of the window.
To match unordered receipts:
-
Navigate to the Match Unordered Receipts window by selecting the Find button in the Find Unordered Receipts window.
-
In the Order Information block in the Match Unordered Receipts window, enter a purchase order number in the Order Number field. For customer-returned items (a Customer is displayed rather than a Supplier), enter the return material authorization (RMA) number in the Order Number field. You can also choose List of Values from the tool bar to query the purchase order shipments or RMA lines available to match the current unordered receipt. This displays the Order Number, Release, Line, and Shipment for all shipments appropriate for matching. See: Unordered Receipts.
To display receipt header information:
-
Select the View Receipt Header on the Tools menu to display receipt header information.
To display receipt line information:
-
Select the View Receipt Line on the Tools menu to display receipt line information.
To display purchase order information:
-
If an Order Number is entered, select View Purchase Orders on the Tools menu to display purchase order header information.
Related Topics
Return Material Authorizations (RMAs)
Receiving Transactions
You record inspections, deliveries, and material movements within receiving and inspection by entering receiving transactions. These transactions provide a history that allows you to track an item from its source to its destination.
From the time of receipt, many transactions may be required to record the movement of an item through the receiving and inspection process. For example, after being received, an item can be transferred, inspected, and then delivered. To help you keep track of an item within receiving and inspection, these transactions are linked to each other. You can use the Receiving Transaction Summary (See: Finding Receiving Transactions (Summary)) to view an item's transaction history as if it were a family tree with parent and child transactions. A parent transaction can have one or more child transactions, but a child transaction has only one parent transaction. In the above example, the receipt transaction is the parent of the transfer transaction, while the transfer transaction is the child of the receipt transaction. Purchasing displays parent transaction information to help you determine the status of the item for which you are entering a transaction. For example, if you are about to transfer an item from Receiving Dock 1 to Inspection Area A, you should verify that the parent transaction's location is Receiving Dock 1. Purchasing also displays the parent transaction's unit of measure and available quantity. Available quantity is significant because you cannot enter a quantity for a current transaction that is greater than the parent transaction's available quantity. For example, if you have received 10, you can inspect only up to a quantity of 10. Purchasing also displays the inspection result for a parent transaction if the given material has been accepted or rejected as part of an inspection. For delivery transactions, you must enter lot/serial/locator information for controlled items. See: Lot Control, Oracle Inventory User's Guide. See: Serial Number Control, Oracle Inventory User's Guide. See: Defining Stock Locators, Oracle Inventory User's Guide.
Search Criteria
The first step in entering a new receiving transaction is to choose the receipt involved in this transaction. In the Find Receiving Transactions window (See: Finding Receiving Transactions), you can enter a variety of search criteria such as receipt number, current location, various item details, shipment number, purchase order number, and requisition number. Once you have specified search criteria, Purchasing displays the receipts (and previous transactions) in the Receiving Transactions window for which you can process transactions. Information for receipts is based on information from parent transactions that meet your search criteria.
Express and Cascade Transactions
Purchasing offers two functions to facilitate transaction entry: Express and Cascade. In Express mode, you cannot modify default quantities, but you can record the delivery of many receipts at once. See: Express Receipts and Receiving Transactions. Cascade mode is applicable only for receipts for the same item. In cascade mode, Purchasing starts with the first receipt and enters deliveries for each subsequent receipt for this item until the cascade quantity is met. See: Cascading Receipts and Receiving Transactions.
Receiving Transactions Window
You enter all transfer and delivery transactions in the Receiving Transactions window. If you want to perform an inspection transaction, you can open the Inspections window to specify accepted and rejected quantities. See: Inspections.
Deliveries
Purchasing ensures that you can record deliveries quickly and easily. If you know the purchase order number (or shipment number for internal transactions or RMA number for customer returns to your company), you can simply record the quantity delivered for the appropriate item. If you do not know the purchase order number, you can search using what you know, such as Receipt Number, Supplier, Packing Slip, Category, Item Number or Inspection Required. Purchasing automatically tracks the total quantity delivered to date for a particular receipt.
You can deliver only as many items as you receive. Purchasing lets you easily correct any delivery information.
Example
Both Jane Tims and Juliet Cunningham submit a requisition for 50 chairs each. The buyer places both requisitions on one purchase order line and indicates that the items require receipt. You receive the 100 chairs and record the receipt in the Receipts window. You see that 50 chairs are for Jane Tims in Building 1, and the other 50 chairs are for Juliet Cunningham in Building 2. In the Transactions window, you deliver 50 chairs to each requestor and record the quantity delivered.
Oracle Quality
There are two entry points to Oracle Quality from Purchasing if Oracle Quality is installed. Both entry points are in the Receiving Transactions window: the Enter Quality Results option in the Tools menu (or the Quality button on the menu bar) and the Inspect button. The Enter Quality Results menu option and button are available only if a quality collection plan or plans exist for the receiving transaction. When a mandatory collection plan exists for the receiving transaction, quality results data must be entered and saved before you can save your receiving transaction line information. (You optionally define a collection plan as mandatory when you create the collection plan in Oracle Quality. See also: Using Oracle Quality with Oracle Purchasing, Oracle Quality User's Guide and Purchasing Versus Quality Inspections, Oracle Quality User's Guide.
You cannot perform data collection using Oracle Quality when you select the Express button in the Receiving Transactions window.
For more information on Oracle Quality and the Inspect button, see: Inspections.
See also: Entering Receiving Transactions.
Inspection Electronic Signatures
Oracle E-Records is used to provide FDA CFR 21 Part 11 compliance. If this feature is implemented, you can electronically capture signatures regarding inspection acceptance or rejection. See: 21 CFR Part 11 Compliance
Finding Receiving Transactions (Summary)
Use the Find Receiving Transactions (Summary) window to:
-
Access the Receiving Headers Summary window.
-
Access the Receiving Transaction Summary window.
-
Perform purchase order inquiries at header and line levels.
Use the Supplier and Internal tabbed region to search for Purchasing documents. If Order Management is installed, use the Customer tabbed region to search for customer return material authorizations (RMAs).
To enter search criteria in the Supplier and Internal tabbed region:
-
Navigate to the Receiving Transactions Summary window. The Find Receiving Transactions Summary window appears.
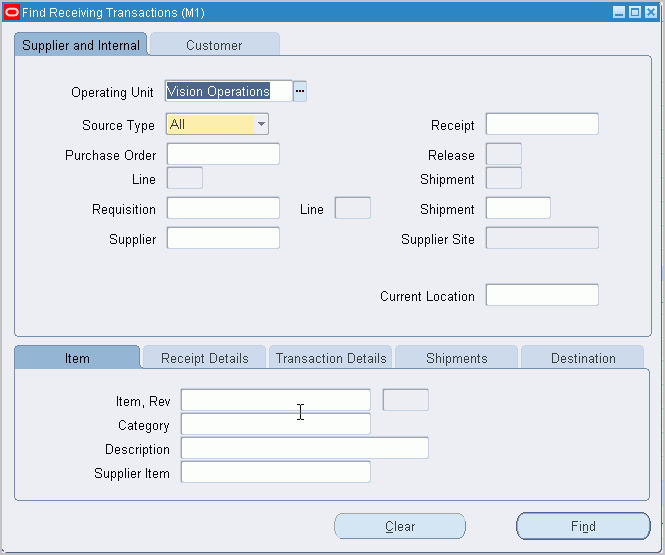
-
Select the Supplier and Internal tabbed region.
-
Select the Operating Unit for this search.
-
Enter the Source Type: Internal, Supplier, or All.
-
Specify any of the following, optional search criteria:
-
Enter the Receipt Number.
-
For source type Supplier, enter the Purchase Order number. If you enter a purchase order number, you can also enter a Release (for blanket purchase agreements), Line, and/or Shipment (for purchase orders) number. For source type Internal, enter the Requisition Number. If you enter a requisition number, you can enter a requisition Line number.
-
In the second Shipment field, enter the shipment number of the Advance Shipment Notice (ASN). See: Advanced Shipment Notices (ASNs).
-
Enter the Supplier. For Source Type Internal, this is the organization. For Source Type Supplier, this is the supplier name, and you can also enter the Supplier Site.
-
Use the lower tabbed regions to further define the search. See: To further restrict the search, below.
-
-
Choose Results Headers (to go to the Receiving Headers Summary window) or Results Transactions (to go to the Receiving Transaction Summary window). Choose Find.
To enter search criteria in the Customer tabbed region:
-
Select the Customer tabbed region in the Find Receiving Transactions summary window.
This region is used for finding items that a customer has returned to your company. When a sales representative creates a sales order in Order Management and ships the item to the customer, you can find, create, and view receipt transactions if the customer returns the item. The receipt is created against a return material authorization (RMA) document, which the sales representative uses to authorize the return.
-
Specify any of the following, optional search criteria:
-
Line type, such as Return with Receipt of Goods, on the RMA. There are different return line types. Search by RMA line type if you want to see all RMA lines with that line type in your receiving organization.
-
Receipt Number
-
RMA Number, which corresponds to the Order Number field on the sales order
-
Line number from the RMA
-
Customer returning the item
-
Customer Number
-
Customer Item Number that the customer used to order the item
-
The lower tabbed regions. See: To further restrict the search, below.
-
Choose Results Headers (to go to the Receiving Headers Summary window) or Results Transactions (to go to the Receiving Transaction Summary window). Choose Find.
To further restrict the search:
-
In the Item region, you can enter the following search criteria: Item, Rev, Category, Description, and Supplier Item.
-
In the Receipt Details region, you can limit the search by Packing Slip, Receiver, Freight Carrier, and Bill of Lading number.
-
In the Transaction Details region, you can limit the search by entering a range of Transaction Dates and Transaction Type.
-
In the Shipments region, you can enter the Container, Truck Number, or Bar Code Label indicated on an Advance Shipment Notice (ASN). See: Advance Shipment Notices (ASNs).
-
In the Destination region, you can select the Requestor, Project, Kanban Card, Task, Deliver-to location, or Job. Using these fields will limit your search results at the distribution level of the order.
Related Topics
Using the Receiving Headers Summary Window
Using the Receiving Transaction Summary Window
Return Material Authorizations (RMAs)
Using the Receiving Headers Summary Window
Use the Receiving Headers Summary folder window to:
-
View receipt header information.
-
Access the Receiving Transaction Summary window to display all receiving transactions for the current header line.
To display receiving headers information:
-
Navigate to the Receipt Header Details window.
-
Enter or choose information from one of the available fields to locate the record from the Find Receiving Transactions window.
-
Choose Results Headers, then choose Find.
-
Optionally choose Transactions to view all the records pertaining to the current search criteria.
Related Topics
Finding Receiving Transactions
Using the Receiving Transaction Summary Window
Customizing the Presentation of Data in a Folder, Oracle Applications User's Guide
Using the Receiving Transaction Summary Window
Use the Receipt Transaction Summary folder window to:
-
View receiving transaction information.
-
View order information backing the receipt.
-
Access the Receipt Header Details window to view receipt header details.
To display receiving transactions navigate to the Receiving Transaction Summary window:
-
In the Receipt Headers Summary window, select the Transactions button to open the Receipt Transaction Summary window and display all receiving transactions for the receipt on the current line. Alternatively, in the Find Receiving Transactions window, you can select Transactions in the Results region and then select the Find button to display all receiving transactions that meet the search criteria.
As installed, Purchasing can display the following information for each receiving transaction: Transaction Type, transaction Amount, Unit (UOM), transaction Date, Item number, item Revision, Destination type, Location, Person, Subinventory, Locator, Receipt number, Source type, Order Number, order Release, order Line number, Order Shipment, Supplier, Country of Origin, Supplier Site, Order Quantity, Order UOM, Supplier Item Number, Supplier Lot Number, Packing Slip, Reason, Hazard class, UN Number, Secondary UOM, Secondary Quantity, Category, Job, Line, Assembly, Operation Sequence Department, and Receipt Exception.
In the lower part of the screen, Purchasing displays the following information for the purchase order, sales order (for internal requisitions), or return material authorization (RMA) behind the receipt: Order Type (Purchase Order, Inventory, or Return Material Authorization), Source, Item Description, Destination, Header Receiver Note, Shipment Receiver Note, Order number, Transaction Date, Hazard class, UN Number, and Routing.
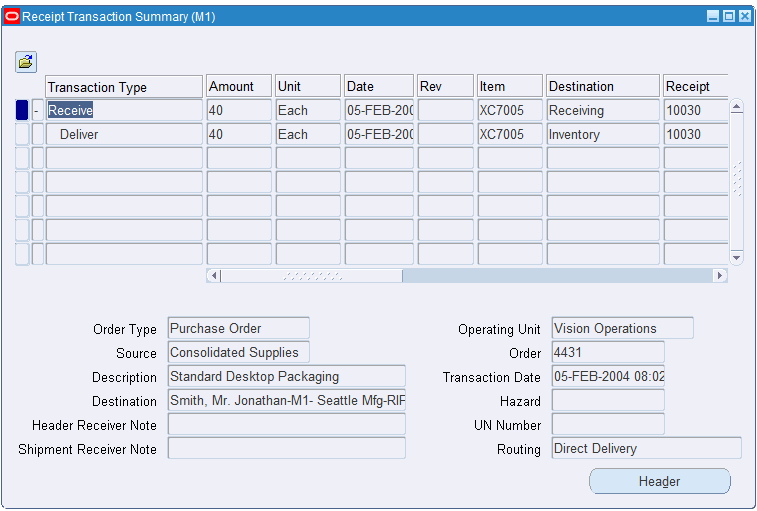
To view transaction detail information:
-
Select the record indicator to the left of the transaction to view the transaction details.
To view receipt header detail information:
-
Select the Header button to open the Receipt Header Details window. See: Using the Receipt Header Details Window.
To view detail accounting lines:
-
Choose View Accounting from the Tools menu to open the View Receiving Accounting window. In this window, you can view the detail accounting lines for the transaction in the form of a balanced accounting entry (where debits equal credits). You can also choose to view the detail accounting as t-accounts. See: Viewing Accounting Lines.
Related Topics
Finding Receiving Transactions
Using the Receiving Headers Summary Window
Customizing the Presentation of Data in a Folder, Oracle Applications User's Guide
Return Material Authorizations (RMAs)
Viewing Accounting Lines
When you query a receiving transaction in Purchasing, you can choose to view the detail accounting lines for the queried transaction in the form of a balanced accounting entry (where debits equal credits). You can also choose to view the detail accounting as t-accounts. Use these features to see how a transaction will affect the account balances in your general ledger.
To view accounting lines:
-
Navigate to the Receipt Transaction Summary window.
-
Select the receiving transaction for which you want to view accounting lines.
You can view accounting lines for the following transaction types:
-
Receive
-
Deliver (to Expense)
-
Return to Receiving (from Expense)
-
Return to Supplier
-
Correct (Receiving Transaction)
-
Correct (Return to Receiving from Expense)
-
Match
For each transaction type above, you can view accounting lines for the expense items (with a Destination Type of Expense) only if you accrue the expense items upon receipt. You can view accounting lines for inventory items (with a Destination Type of Inventory) from within Oracle Inventory only, not Purchasing. You can view accounting lines for shop floor items (with a Destination Type of Shop Floor) from within Oracle Work in Process only.
Note: You cannot view accounting information for receiving transactions created against return material authorizations (RMAs).
-
-
Choose View Accounting from the Tools menu to open the View Receiving Accounting window.
Credit and Debit are the credit and debit entries from your General Ledger journal entries. Entered Credit and Entered Debit are the credits and debits from the purchase order, if the purchase order is in a foreign currency. Entered Currency is also the purchase order currency, if it differs from the functional currency.
-
(Optional) If your organization uses Multiple Reporting Currencies, choose the Alternate Currency button to view the accounting using an alternate currency. For example, if you are viewing the accounting in your primary functional currency (for example, BEF), you can switch to EUR (reporting functional currency).
From the poplist that appears after you choose the Alternate Currency button, choose the primary or reporting ledger whose transactions you want to view. The View Receiving Accounting window will change to reflect amounts in the appropriate currency for the chosen ledger.
-
(Optional) To view the accounting detail as t-accounts, choose the T-Accounts button.
See: Viewing T-Accounts, Oracle General Ledger User's Guide.
View Accounting Windows
The first time you open the View Receiving Accounting window, the following information is displayed for the detailed accounting lines:
| Transaction Type | Entered Credit |
| Account | Currency Conversion Rate |
| Debit | Order Line |
| Credit | Order Shipment |
| Entered Currency | Order Distribution |
| Entered Debit | Accounting Date |
Credit and Debit are the credit and debit entries from your general ledger journal entries, stated in your functional currency. Entered Credit and Entered Debit are the credits and debits in the purchase order currency.
When you select a detailed accounting line, the system displays the following information at the bottom of the View Receiving Accounting window:
| Item | Account Description |
| Revision | Order Type |
| Description | Order Num |
| UOM | Release Num |
| Quantity | Unit Price |
Customizing the View Accounting Window
The View Receiving Accounting window is a folder. You can easily customize the information that is displayed in the window. See: Customizing the Presentation of Data in a Folder, Oracle Applications User's Guide.
When customizing the View Receiving Accounting window, you can hide the columns that normally appear in the window and you can choose to display any additional columns that are available.
Following is a list of all the hidden columns that you can choose to display:
| Account Description | Receipt Num |
| Comments | Release Num |
| Currency Conversion Date | Subinventory |
| Currency Conversion Type | Supplier |
| Item | Supplier Num |
| Item Description | Supplier Site |
| Line Reference | Transaction Date |
| Order Num | Transferred to GL |
| Order Type | UOM |
| Price Override | Unit Price |
| Quantity |
Related Topics
Drilling Down to Purchasing from Oracle General Ledger
Return Material Authorizations (RMAs)
Using the Receipt Header Details Window
Use the Receipt Header Details window to:
-
View detail information for receipt headers
To navigate to the Receipt Header Details window:
-
In the Receiving Transaction Summary window, select the Header button to open the Receipt Header Details window.
The following information is displayed: Receipt Number, Receipt Date, Shipment Number, Shipped Date, Packing Slip, Waybill/Airbill, Freight Carrier, Bill of Lading, Number of Containers, Received By, Supplier, and Comments.
To return to the Receiving Transaction Summary window:
-
Select the Transactions button to return to the Receiving Transaction Summary window.
Related Topics
Using the Receiving Transaction Summary Window
Finding Transaction Status Information
Use the Find Transaction Status window to access the Transaction Status window. You can use this window to review pending transactions before they are processed by the Receiving Transaction Processor. Use the Supplier and Internal tabbed region to search against Purchasing documents. If Order Management is installed, use the Customer tabbed region to search against customer return material authorizations (RMAs).
In addition to searching for receiving transactions created using the application, you can search for Receiving Open Interface (ROI) transactions that are at the pending or error status. After you find such transactions, you can use the Transaction Statuses window to resubmit the selected ROI transactions that are at the pending or error status.
To enter search criteria in the Supplier and Internal tabbed region:
-
Navigate to the Transaction Statuses window. The Find Transaction Statuses window appears.
-
Select the Supplier and Internal tabbed region.
-
Select the Operating Unit for this search.
-
Enter the Source Type: Internal, Supplier, or All.
-
Specify any of the following, search criteria:
-
Enter the Receipt Number.
-
For source type Supplier, enter the Purchase Order number. If you enter a purchase order number, you can also enter a Release (for blanket purchase agreements), Line, and/or Shipment (for purchase orders) number for the purchase order.
-
For source type Internal, enter the Requisition Number. If you enter a requisition number, you can enter a requisition Line number.
-
In the second Shipment field, enter the shipment number of the Advance Shipment Notice (ASN). See: Advanced Shipment Notices (ASNs).
-
Enter the Supplier. For Source Type Internal, this is the organization. For Source Type Supplier, this is the supplier name, and you can also enter the Supplier Site.
Search for receiving transactions using the transaction category. This field is required.
Select from the following options:
-
Desktop: Search for transactions created using the application. The transactions display receiving shipment header information and Receiving Transactions Interface (RTI) line information.
-
Interface: Search for Receiving Open Interface (ROI) transactions. The transactions display Receiving Headers Interface (RHI) header information and Receiving Transactions Interface (RTI) line information.
-
Both: Search for both application and Receiving Open Interface (ROI) transactions.
-
-
Select the group ID of the transaction.
-
Enter the Current Location.
-
Use the lower tabbed regions to further restrict the search. See: To further restrict the search, below.
-
-
Select the Find to initiate the search and open the Transaction Status window.
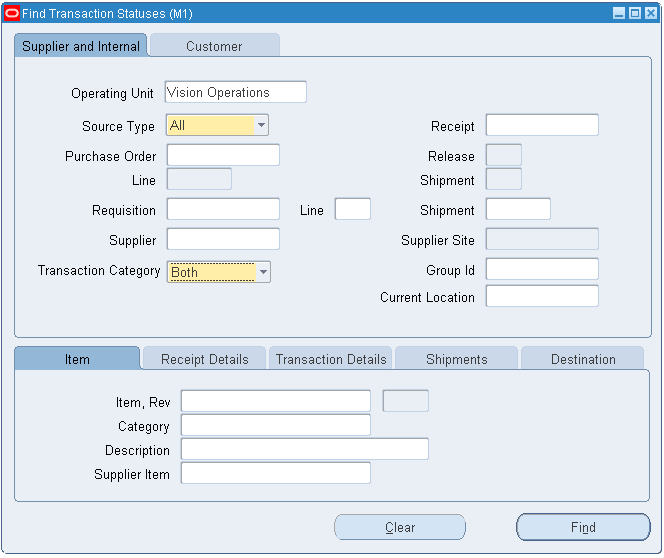
To enter search criteria in the Customer tabbed region:
-
Select the Customer tabbed region in the Find Transaction Statuses window.
This region is used for finding the receipt transaction status for items that a customer has returned to your company. When a sales representative creates a sales order in Order Management and ships the item to the customer, you can find, create, and view receipt transactions if the customer returns the item. The receipts are created against a return material authorization (RMA) document, which the sales representative uses to authorize the return.
-
Specify any of the following, search criteria:
-
Line type, such as Return with Receipt of Goods, on the RMA. There are different return line types. Search by RMA line type if you want to see all RMA lines with that line type in your receiving organization.
-
Receipt Number
-
RMA Number, which corresponds to the Order Number field on the sales order
-
Line number from the RMA
-
Return ASN document number that is used to return material
-
Customer returning the item
-
Customer Number
-
Customer Item Number that the customer used to order the item
-
Select the transaction category to search for specific transactions. See Transaction Category for more information.
-
Select the group ID of the transaction.
-
The lower tabbed regions. See: To further restrict the search, below.
-
-
Select the Find to initiate the search and open the Transaction Status window.
To further restrict the search:
Specify any of the following, optional search criteria:
-
In the Item region, you can enter the following search criteria: Item, Rev, Category, Description, and Supplier Item.
-
In the Receipt Details region, you can limit the search by Packing Slip, Receiver, Freight Carrier, and Bill of Lading number.
-
In the Transaction Details region, you can limit the search by entering a range of Transaction Dates and Transaction Type.
-
Search for transactions using any one of the processing status criteria:
-
Pending
-
Completed
-
Running
-
Error
If you leave this field blank, then you can view all pending, completed, running, or error transactions.
-
-
In the Shipments region, you can enter the Container, Truck Number, or Bar Code Label indicated on an Advance Shipment Notice (ASN). See: Advance Shipment Notices (ASNs).
-
In the Destination region, you can select the Requestor, Project, Kanban Card, Task, Deliver-to location, or Job. Using these fields will limit your search results at the distribution level of the order.
-
To clear existing search criteria:
-
Select the Clear button to clear any existing search criteria.
Related Topics
Viewing Transaction Status Information
Return Material Authorizations (RMAs)
Viewing Transaction Status Information
To view transaction status information:
-
Navigate to the Transaction Statuses window.
-
Based upon the information you entered in the Find Transaction Statuses window, you see the following regions:
-
In the Transactions region you can view: Transaction Type, Processing Mode, Transaction Status, Processing Status, Source Document, Mobile Transaction, Transaction Category, Item, Rev, Item Description, Destination Type, Location, Person, Subinventory, Locator, Secondary UOM, and Secondary Quantity.
-
In the Details region you can view: Transaction Date, Reason, Comments, Packing Slip, Supplier Lot, Hazard, UN Number, and Receipt Exception.
-
In the Order Information region you can view: Order Type, Order Num, Rel, Line, Shipment, Project, Task, Charge Account, Kanban Card Number, Supplier, Qty Ordered, UOM, and Due Date.
-
In the Order Processing region you can view: Job/Schedule, Line, Operation Sequence, and Department.
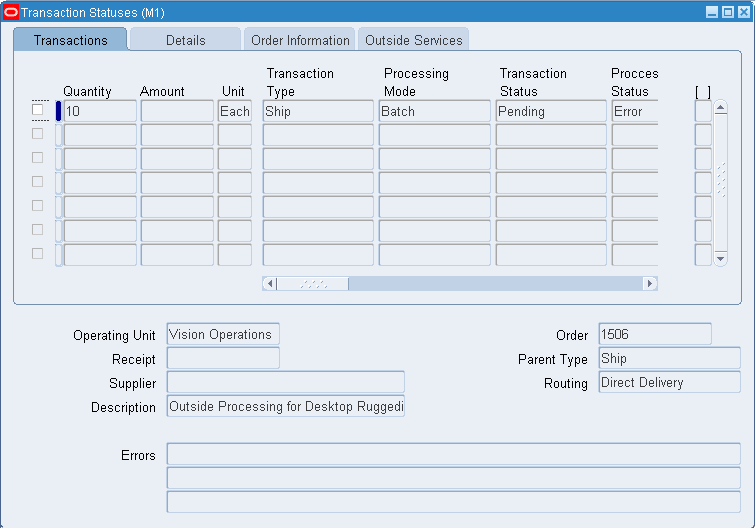
Resubmitting Transactions
Use the Resubmit option from the Tools menu to resubmit the selected Receiving Open Interface (ROI) transactions for Receiving Transaction Processor to process.
Note that you cannot resubmit mobile transactions for processing.
When you use the resubmit transactions feature, the following rules apply:
-
All transactions that belong to the same group will be reprocessed together with the selected records, whether you select the records or not.
-
You cannot resubmit records that have already been resubmitted unless they are stuck in the interface again and you re-query them.
-
When you try to resubmit the selected transactions, a warning message appears. You can submit the transaction or cancel the operation. If you select Yes in the message, then the selected transactions will be submitted for processing.
Cancelling Transactions
For Return to Vendor (RTV) transactions, the application enables check boxes of all the lines. You can select the records and perform cancellation by navigating to the Cancel option in the Tools menu. For return to vendor transaction that you can cancel, the Resubmit option in the Tools menu will not be available.
Note: Cancellation is visible only if the RCV: Track Shipments for Return to Vendors profile option is set to Yes. For more information about this profile option, see: Return to Vendor Transactions
For non-RTV transactions, if you enable the check boxes for all Receiving Transactions Interface (RTI) transaction lines, then:
-
The Cancel option in the Tools menu is not available.
-
The Resubmit option in the Tool menu is enabled for all selected rows.
Deleting Pending or Error ROI Transactions
You can delete the interface error transactions, if you have access to the Transaction Statuses window.
However, you can delete pending or running transactions only if you have the authorization to delete such transactions. Your system administrator must set the P_ALLOW_DELETE form function parameter to Y to enable you to delete the pending or running transactions. If the P_ALLOW_DELETE parameter is set to Y, then the user can delete pending or running ROI transactions. Otherwise, users can delete only error ROI transactions. For more information, See: Function Security in Purchasing
The following rules apply to the delete transactions feature:
You cannot delete:
-
Oracle Time and Labor (OTL) pending transactions.
-
Batch transactions with LPN group ID.
Finding Receiving Transactions
Use the Find Receiving Transactions window to find source documents for which you can enter receiving transactions. Use the Supplier and Internal tabbed region to search for Purchasing documents. If Order Management is installed, use the Customer tabbed region to search for customer return material authorizations (RMAs).
To enter search criteria in the Supplier and Internal tabbed region:
-
Navigate to the Find Receiving Transactions window by selecting Receiving Transactions from the menu. Enter desired search criteria as described in the following steps.
-
Select the Supplier and Internal tabbed region.
-
Select the Operating Unit for this search.
-
Enter the Source Type: Internal, Supplier, or All.
-
Specify any of the following, optional search criteria:
-
Enter the Receipt Number.
-
For source type Supplier, enter the Purchase Order number. If you enter a purchase order number, you can also enter a Release (for blanket purchase agreements), Line, and/or Shipment (for purchase orders) number for the purchase order.
-
For source type Internal, enter the Requisition Number. If you enter a requisition number, you can enter a requisition Line number.
-
In the second Shipment field, enter the shipment number of the Advance Shipment Notice (ASN). See: Advanced Shipment Notices (ASNs).
-
Enter the Supplier. For Source Type Internal, this is the organization. For Source Type Supplier, this is the supplier name, and you can also enter the Supplier Site.
-
Use the lower tabbed regions to further restrict the search. See: To further restrict the search, below.
-
-
Select the Find button to initiate the search and open the Receiving Transactions window.
To enter search criteria in the Customer tabbed region:
-
Select the Customer tabbed region in the Find Receiving Transactions window.
This region is used for finding items that a customer has returned to your company. When a sales representative creates a sales order in Order Management and ships the item to the customer, you can find and create receipts and delivery transactions if the customer returns the item. You create the transaction against a return material authorization (RMA) document, which the sales representative uses to authorize the return.
-
Specify any of the following, optional search criteria:
-
Line type, such as Return with Receipt of Goods, on the RMA. There are different return line types. Search by RMA line type if you want to see all RMA lines with that line type in your receiving organization.
-
Receipt Number
-
RMA Number, which corresponds to the Order Number field on the sales order
-
Line number from the RMA
-
Return ASN document number that is used to return material
-
Customer returning the item
-
Customer Number
-
Customer Item Number that the customer used to order the item
-
The lower tabbed regions. See: To further restrict the search, below.
-
-
Select the Find button to initiate the search and open the Receiving Transactions window.
To further restrict the search:
Specify any of the following, optional search criteria:
-
In the Item region, you can enter the following search criteria: Item number, Revision number, Category, item Description, and Supplier Item Number.
-
In the Receipt Details region, you can limit the search by Packing Slip, Receiver, Freight Carrier, and Bill of Lading number.
-
In the Transaction Detail region, you can limit the search by entering a range of Transaction Dates.
-
In the Shipments region, you can enter the Container, Truck Number, or Bar Code Label indicated on an Advance Shipment Notice (ASN). See: Advance Shipment Notices (ASNs).
-
In the Destination region, you can select the Requestor, Project, Kanban Card, Task, Deliver-to location, or Job. Using these fields will limit your search results at the distribution level of the order.
-
To clear existing search criteria:
-
Select the Clear button to clear any existing search criteria.
Related Topics
Entering Receiving Transactions
Return Material Authorizations (RMAs)
Entering Receiving Transactions
Use the Receiving Transactions window to enter receiving transactions.
Important: If Oracle Quality is installed and at least one qualified collection plan exists, both the Enter Quality Results option on the Tools menu and the Quality button on the button bar are enabled. Only collection plans that have been associated with the Receiving Transaction are qualified. Please note that when mandatory collection plans are used, quality results data must be entered and saved before you can save your receiving transaction line information. Data collection for Inspection Transaction collection plans have no bearing on whether the Enter Quality Results Tools menu option and the Quality button are enabled. See: Using Oracle Quality with Oracle Purchasing, Oracle Quality User's Guide and Purchasing Versus Quality Inspections, Oracle Quality User's Guide.
To enter receiving transaction line information:
-
Purchasing opens the Receiving Transactions window and displays all receipts that meet your search criteria when you select the Find button in the Find Receiving Transactions window. See: Finding Receiving Transactions.
In the lower part of the screen, Purchasing displays the following receipt information for the current line: Receipt Number, Order Number, the Supplier or internal organization shipping the item or the Customer returning the item, Parent Type, Description, Inspection, Destination, Current Location, Receiver Note, and Hazard Class.
-
Select the line for which you want to enter a receiving transaction.
If a material shortage exists for the item, a message appears. Displaying shortage messages for certain items is a setup option. From the message, you can view details of where in your organization the demand exists for the item. You can then make the item available with a high priority. See: Viewing Potential Shortages, Oracle Inventory User's Guide. See: Material Shortage Alerts and Shortage Notifications, Oracle Inventory User's Guide.
-
Purchasing displays the Quantity due for the shipment. If you change the unit of measure, the receipt quantity is adjusted to reflect the new unit of measure.
-
Enter the UOM of the transaction.
-
Enter the Destination Type: Expense, Inventory, Receiving, or Shop Floor. This determines the final destination of the received items.
-
Enter the Location for the transaction.
-
Enter the Person performing the transaction.
-
For Inventory transactions, enter the Subinventory.
-
If the item is under locator control, enter the stock Locator.
-
If you are a process manufacturing user and have implemented Oracle Process Manufacturing (OPM), then the Oracle Purchasing for Process Inventory functionality is enabled. If the selected receiving organization is a process organization, then the two process fields Secondary UOM and Secondary Quantity are enabled. For more information about these fields, see: Entering Receiving Lines.
To enter receiving transaction detail information:
-
Navigate to the Details tabbed region.
-
Enter the Packing Slip number.
-
Enter the Transaction Date.
-
Enter the Supplier Lot number.
-
Enter the transaction Reason Code. See: Defining Transaction Reasons, Oracle Inventory User's Guide.
-
Enter the Hazard class. See: Defining Hazard Classes.
-
Enter the UN Number. See: Defining UN Numbers.
-
Select Receipt Exception if you want to enter a release exception for this receipt.
-
If Oracle Quality is installed and one or more qualified collection plans exist, you can enter quality results by choosing the Quality button from the button bar or Enter Quality Results from the Tools menu. If mandatory collection plans exist, you must enter Quality results in the Enter Quality Results window before you can save the transaction line. See To enter quality results below. See also: Entering Quality Data for Receiving Transactions, Oracle Quality User's Guide.
To view order information:
-
Navigate to the Order Information tabbed region to view the following information for the shipment: Order Type, Number, Release number, order Line number, Shipment number, Supplier, Quantity Ordered, UOM, Due Date, and Supplier Item number.
To view outside processing information:
-
Navigate to the Outside Services tabbed region to view the Job or repetitive Schedule number, the repetitive schedule Line number, the Operation Sequence, and the Department number.
To enter control number information:
-
For controlled items, you can select the Lot-Serial button to navigate to the Lot Number and Serial Number windows. See: Lot Control, Oracle Inventory User's Guide. See: Serial Number Control, Oracle Inventory User's Guide.
To enter inspection information:
-
Select the Inspect button to open the Inspection Details window. See: Inspecting Received Items.
To enter quality results:
Choose the Quality button from the button bar or Enter Quality Results from the Tools menu.
The system selects the first-based on the alphanumeric order of collection plan names-of these collection plans in the Enter Quality Results window that appears.
You can only choose to enter quality results after entering all required receiving transaction line information. If the collection plan you select is mandatory, you must enter quality results data before you can save the transaction line. If the collection plan is a background data collection plan, it is not mandatory to enter data. The plan picks up data you enter in the receiving transaction line, according to the data it is configured to pick up. (A mandatory collection plan is optionally defined as mandatory when it was created in Oracle Quality. If it is mandatory and you don't enter quality results data for it, you'll receive a message when you save the receiving transaction line or move to the next line, telling you which collection plan was mandatory and requires quality results data.) See: Entering Quality Data for Move Transactions, Oracle Quality User's Guide.
To view exchange rate information:
-
Navigate to the Currency tabbed region.
This exchange rate information is based on the receipt. These fields are viewable only. See: Entering Receipt Lines.
Related Topics
Cascading Receipts and Receiving Transactions
Express Receipts and Receiving Transactions
Return Material Authorizations (RMAs)
Drilling Down to Purchasing from Oracle General Ledger
From General Ledger, you can drill down to subledger details from the Account Inquiry, Journal Entry Inquiry, or Enter Journals windows for journals that have specific journal sources assigned to them. For example, if a journal source is Purchasing, you can drill down to the transaction details in Oracle Purchasing.
For instructions on accessing Purchasing subledger details from General Ledger, see: Drilling Down to Subledger Detail, Oracle General Ledger User's Guide.
When you drill down from General Ledger, the Purchasing Receiving Accounting lines window will open. The first time you open this window, the following information will be displayed:
| Transaction Date | Entered Debit |
| Receipt Num | Entered Credit |
| Transaction Type | Currency Conversion Rate |
| Supplier | Order Line |
| Debit | Order Shipment |
| Credit | Order Distribution |
| Entered Currency | Accounting Date |
Credit and Debit are the credit and debit entries from your general ledger journal entries, stated in your functional currency. Entered Credit and Entered Debit are the credits and debits in the purchase order currency.
When you select a detailed accounting line, the system displays the following information at the bottom of the window:
| Item | Order Type |
| Revision | Order Num |
| Description | Release Num |
| UOM | Unit Price |
| Quantity |
When you drill down from General Ledger, the Purchasing Receiving Accounting lines window will open. When you select a detailed accounting line, the system displays additional information at the bottom of the window.
Note: The Credit and Debit fields are the credit and debit entries from your general ledger journal entries, stated in your functional currency. The Entered Credit and Entered Debit fields are the credits and debits in the purchase order currency.
Drilling Down Further
From the Purchasing Receiving Accounting lines window, you can drill down even further to view detail transactions or you can choose to view the underlying transaction accounting.
To drill down to detail transactions or to view transaction accounting:
-
From the Purchasing Receiving Accounting lines window, select a detail accounting line.
-
Choose the Show Transaction button to view detail transactions.
-
Choose the Show Transaction Accounting button to view the transaction accounting.
The View Receiving Accounting window opens. See: Viewing Accounting Lines.
Customizing the Drilldown Window
The drilldown window is a folder. You can easily customize the information that is displayed in the window, as described in the Oracle E-Business Suite User's Guide.
The drilldown window is a folder. You can easily customize the information that is displayed in the window.
See: Customizing the Presentation of Data in a Folder
When customizing the drilldown window, you can hide the columns that normally appear in the window and you can choose to display any additional columns that are available.
Related Topics
T-Accounts, Oracle General Ledger User's Guide
Inspections
Purchasing lets you inspect items you receive from suppliers or customers before internal delivery. You can inspect any item or set up certain items to require inspection.
The buyer can use the Note to Receiver field when preparing the purchase order to indicate where items that require inspection should go. The inspector or requestor can record the inspection results in the Inspections window. See: Inspecting Received Items.
You can review in the Receiving Transactions window what items require inspection, and the quantity accepted after inspection. If items require inspection, but the quantity accepted for the receipt is zero, then you know the items are still in inspection. Requestors can review the status of their requisitions in the Requisitions window. In the Purchase Orders window, you can view whether items require inspection and the quantities received and accepted.
If you choose to let requestors inspect items, they can enter the results of their inspections and then record the quantity delivered in the Receiving Transactions window.
If Oracle Quality is installed, you can inspect items through Quality, if the profile option QA: PO Inspection is set to Oracle Quality. (By default, it is set to Oracle Purchasing.) See: Profile Options (in Oracle Quality), Oracle Quality User's Guide. You cannot use Oracle Quality to inspect customer returns.
You may also use Oracle E-Records to provide electronic signatures for inspections. See 21 CFR Part 11 Compliance.
Example
At the receiving dock, you receive a shipment of 200 glass vials that require inspection. You record receipt and send the items to inspection. As the inspector of the 200 glass vials, you accept 195 and reject 5. You send the 5 rejected glass vials back to the supplier and deliver the 195 glass vials to the requestor.
In the Receiving Transactions window, Purchasing displays 195 in the Quantity Accepted field. This shows you how many items you can deliver to the requestors.
Returns of Rejected Goods
Purchasing lets you identify returns to a supplier or customer. There may be many receipt numbers associated with a particular purchase order or RMA number. If, after inspection, you find damaged goods and reject these, you can send the goods back to Receiving to return to the supplier or customer. The receiving agent records the quantity returned to the supplier using the Receiving Returns window. See: Entering Returns.
Example
After inspecting 15 computer boards, you reject 5 boards and want to return them to the supplier. You can reference the purchase order on the receipt traveler that you attach to the board boxes. This number lets the receiving agent locate the receipt, and enter the quantity returned for this receipt.
Your company has sold items to a customer that the customer has returned. Inspection shows that the items are not damaged as the customer claims. You return the items to the customer. You can reference the RMA on the receipt traveler that you attach to the items. This number lets the receiving agent locate the receipt, and enter the quantity returned for this receipt.
Purchasing keeps an audit trail of returned items, so you can track returns to suppliers and customers and maintain accurate receipt information.
Inspecting Received Items
Use the Inspection Details window to enter inspection information for received items.
Note: If Oracle Quality is installed, you can inspect items through Quality, if the profile option QA: PO Inspection is set to Oracle Quality. (By default, it is set to Oracle Purchasing.) See: Profile Options (in Oracle Quality), Oracle Quality User's Guide.
To enter inspection information:
-
Navigate to the Inspection Details window by selecting the Inspect button in the Receiving Transactions window.
Note: If you use Oracle Quality to inspect the items, when you choose the Inspect button the system selects the first-based on the alphanumeric order of inspection plan names-of the inspection plans to display. See: Entering Quality Results for Receiving Inspections, Oracle Quality User's Guide.
-
Select Accept or Reject to describe the action you are taking in a line.
-
Enter the Quantity accepted or rejected. Purchasing displays the uninspected quantity as the default.
-
Enter the UOM for the inspected item.
-
Enter the Quality Code. See: Defining Quality Inspection Codes
-
Enter a Reason Code for the transaction. See: Defining Transaction Reasons, Oracle Inventory User's Guide.
-
Enter the Supplier Lot number.
-
Enter the inspection Date. The system date is the default.
-
If you are a process manufacturing user and have implemented Oracle Process Manufacturing (OPM), then the Oracle Purchasing for Process Inventory functionality is enabled. If the selected receiving organization is a process organization, then the two process fields Secondary UOM and Secondary Quantity are enabled. For more information about these fields, see: Entering Receiving Lines.
-
Enter a Comment.
-
Save your work.
To cancel inspection entry:
-
Select the Cancel button to cancel inspection entry and return to the Receiving Transactions window.
To save your work:
-
Select OK to save your inspection entries and return to the Receiving Transactions window. You can use Inspection to return to this line for additional inspection entries until you have saved your work. After this time, the receipts will no longer be available for inspection.
If you want to enter more inspection results for a receipt after you've saved your work, requery the receiving transaction line using the Find Receiving Transactions window, and then enter more inspection results.
Returns
Purchasing allows you to perform returns to suppliers and returns to customers in the Receiving Returns window.
Use the Receiving Returns window to return delivered items to receiving and to return received or delivered externally sourced items to the supplier if the purchase order has neither been cancelled nor final closed. For controlled items, you must specify lot numbers, serial numbers or locators, as appropriate. If the Quality module is installed, you can enter quality information.
Use the Receiving Returns window to return items back to a customer. For example, a customer returns to your company a part that does not work properly. You receive and fix the part, then return the part to the customer.
-
You cannot enter returns for internal shipments.
-
RMAs cannot be returned to the customer if the material has been delivered to Inventory.
When you are entering a return, the first step is to identify the purchase order or return material authorization (RMA) number and/or item that you want to return. You can choose among various selection criteria when searching for items in the Find Returns window. Use the Supplier and Internal tabbed region to search for receipts created against external suppliers. Use the Customer tabbed region to search for receipts created for customer returns to your company.
You can return to the supplier or customer unordered receipts that have not been matched.
To return items to receiving, enter the return quantity in the Receiving Returns window. If you originally performed a direct receipt, you must specify a Return To receiving location. Otherwise, Purchasing routes all returned items to the receiving location from which you delivered them. For Inventory (but not Expense or Shop Floor) deliveries, you can update the Return From subinventory. You can also optionally specify additional return information such as Reason Code and RMA number (the number your supplier issues to you to track your return to the supplier).
To return items to the supplier or customer, enter the return quantity in the Receiving Returns window. Purchasing provides the source supplier or customer for the items. For Inventory (but not Expense or Shop Floor) deliveries, you can update the Return From subinventory. You can also optionally specify additional return information such as Reason Code and RMA number (the number your supplier issues to you to track your return to the supplier). When you return items to the supplier or customer, Purchasing creates both a Return To Receiving and a Return To Supplier transaction. Purchasing also reopens the associated purchase order for the return quantity by reducing the original receipt quantity. For customer returns, if you return the item back to the customer, Purchasing updates the RMA to reflect the returned quantity.
You can automatically generate debit memos for Return To Supplier transactions once an invoice has been created. When you create the return make sure the Create Debit Memo option is selected. To enable this functionality, enable the supplier site as a Pay Site (or indicate an Alternate Pay Site) and select Create Debit Memo from RTS Transaction in the Supplier Sites window. See: Debit Memos.
Related Topics
Finding Returns
Use the Find Returns window to find source documents for which you can enter returns. Use the Supplier and Internal tabbed region to search for Purchasing documents. If Order Management is installed, use the Customer tabbed region to search for customer return material authorizations (RMAs).
Note: You cannot enter returns for internal shipments (that is, shipments with a Source Type of Internal).
To find source documents for Supplier and Internal returns:
-
Navigate to the Find Returns window by selecting Returns from the menu. The following steps describe ways in which you can specify search criteria to limit the search for source documents. All of the search criteria are optional.
-
Select the Supplier and Internal tabbed region.
-
Select the Operating Unit for this search.
-
Select a receipt Source Type of Supplier for the search:
The Requisition Number and requisition Line number fields are disabled.
You cannot do returns for documents with a Source Type of Internal.
-
Specify any of the following, optional search criteria:
-
Enter the Receipt Number.
-
Enter the Purchase Order number. To be available, a purchase order must have at least one approved shipment for which the ship-to organization is the same as the current active organization. If you enter a purchase order number, you can also enter a Release number, Line number, and/or Shipment number for the purchase order. The Release field is applicable only when you have entered a purchase order number associated with a planned purchase order or a blanket purchase agreement. The list of values in the Release field includes all releases for the specified purchase order that are not final closed.
-
Enter the Supplier name. You can also enter the Supplier Site.
-
Enter the Current Location.
-
Use the lower tabbed regions to further restrict the search. See: To further restrict the search, below.
-
-
Select the Find button to initiate the search and display the selected source documents in the Receiving Returns window.
To find source documents for Customer returns:
-
Select the Customer tabbed region in the Find Returns window.
This region is used for finding items that a customer has returned to your company. When a sales representative creates a sales order in Order Management and ships the item to the customer, you can find and create receipts if the customer returns the item. The receipts are created against a return material authorization (RMA) document, which the sales representative uses to authorize the return. You can then return the item (for example, after it has been repaired) back to the customer, using the Receiving Returns window.
-
Specify any of the following, optional search criteria:
-
Line type, such as Return with Receipt of Goods, on the RMA. There are different return line types. Search by RMA line type if you want to see all RMA lines with that line type in your receiving organization.
-
Receipt Number
-
RMA Number, which corresponds to the Order Number field on the sales order
-
Line number from the RMA
-
Customer returning the item
-
Customer Number
-
Customer Item Number that the customer used to order the item
-
The lower tabbed regions. See: To further restrict the search, below.
-
-
Select the Find button to initiate the search and display the selected source documents in the Receiving Returns window.
To further restrict the search:
Specify any of the following, optional search criteria:
-
In the Item region, you can enter the following search criteria: Item number, Revision number, Category, item Description, and Supplier Item Number. Since the supplier item number is generally the best way you can identify purchase order lines when your supplier does not reference your purchase order number on its shipping documents, you should provide a supplier item number on your purchase order lines.
-
In the Date Ranges region, you can select Due Today to limit the search to receipt lines due on the current date. Otherwise, you can enter a Due By date range. These dates correspond to the Promised Date (or Need-by Date if there is no Promised Date) on the Purchasing document or to the Promise Date (or Request Date if there is no Promise Date) on the RMA.
-
In the Transaction Detail region, you can enter a Transaction Date range.
-
In the Shipment region, you can enter the Container, Truck Number, or Bar Code Label indicated on an Advance Shipment Notice (ASN) or Advance Shipment and Billing Notice (ASBN). See: Advance Shipment Notices (ASNs).
-
In the Destination region, you can select the Requestor, Project, Kanban Card, Task, Deliver-to location, or Job. Using these fields will limit your search results at the distribution level of the order.
-
To remove existing search criteria:
-
Select the Clear button in any of the source document search windows to remove existing search criteria.
Related Topics
Return Material Authorizations (RMAs)
Entering Returns
Use the Receiving Returns window to enter returns against receipts, deliveries, transfers, acceptances, and rejections.
Note: You cannot enter returns for internal shipments (that is, shipments with a Source Type of Internal).
To enter returns:
-
Navigate to the Find Returns window by selecting Returns on the menu. Enter search criteria and choose Find. See: Finding Returns.
The Receiving Returns window appears. In the Transactions tabbed region of this window, Purchasing displays transactions that meet your search criteria. The Order Information tabbed region displays information about the purchase order against which the receipt was made. The Outside Services tabbed region displays pertinent information for outside processing receipts.
-
Enter the return Quantity. Purchasing selects the line and places a check in the line selector checkbox.
For Return To Supplier transactions, Purchasing reopens the associated purchase order for the return quantity by reducing the original receipt quantity. For customer returns that you return back to the customer, Purchasing updates the RMA to reflect the returned quantity.
-
Enter the Return Unit of Measure. Purchasing displays the unit of measure conversion.
-
Note that Create Debit Memo is selected if Create Debit Memo from RTS Transaction is selected for this supplier site in the Supplier Sites window.
If Create Debit Memos is selected, Purchasing creates a debit memo for the returned quantity once you save the transaction. You can then view or edit the debit memo in Payables. Debit memo creation is enabled for Return to Supplier transactions only. If you do not want a debit memo to be created automatically for this transaction, deselect this option.
If you enter a return and an invoice has not yet been created for the original receipt, or if Payment on Receipt already accounted for the return using the Aging Period functionality, Purchasing does not create a debit memo. (See: Payment on Receipt.)You will receive a notification in the Notifications Summary window for any debit memo that could not be created. Purchasing does not create debit memos for returns against unordered receipts. Tax or freight is not included in the debit memo amount.
-
In the Transactions tabbed region, you can update the RMA Number used by your supplier for returns to that supplier. For Inventory (but not Expense or Shop Floor) deliveries, you can update the Return From subinventory.
Important: The RMA number in the Customer tabbed region of the Find Returns window is the number you and your customer use to track returns to you. The RMA number here is the number you and your supplier use to track your return to the supplier.
-
In the Details tabbed region, you can enter a Reason Code, update the Transaction Date, and view whether a Receipt Exception has been placed. See: Defining Quality Inspection Codes.
To enter control number information:
-
For controlled items, you can select the Lot & Serial button to navigate to the Lot Number and Serial Number windows. See: Lot Control, Oracle Inventory User's Guide. See: Serial Number Control, Oracle Inventory User's Guide.
To move to the Quality module:
-
If the Quality module is installed and if a quality plan applies to the transaction, you can navigate to the Quality module by selecting the Quality button.
Related Topics
Return Material Authorizations (RMAs)
Return to Vendor Transactions
The existing Returns functionality has been extended/enhanced to enable you to return goods/materials to suppliers and ship them back to the supplier location. To integrate the return to vendor functionality with Shipping Execution, Inventory and Export Compliance, the following modules are used:
-
Using the Receiving module (Returns window), you can perform the return of goods/materials.
-
The Shipping Execution module enables you to ship the returned goods to the supplier.
-
Inventory enables you to track the returned goods.
-
The Accounts Payables module enables you to create a debit memo to send to the vendor.
The Return to Vendor process can be executed in one of the following three ways:
-
When you perform returns in the same organization as you received the goods in.
-
When you return goods from an organization that is different from the organization you received the goods in.
-
When you return goods without a reference document.
These return methods are described in detail in the following sections.
Prerequisites
The profile option RCV: Track Shipments for Return to Vendors must be set to Yes to enable the enhanced return to vendor feature. This option can be set at the Site or Responsibility levels in the System Profiles window. Please refer to the appendix Oracle Purchasing Profile Options and Profile Option Categories for more information on this profile.
Performing Returns in the Receipt Organization
To return goods/material using the same organization that you created the original receipt in, follow the steps below:
Receiving
-
Using the Receiving module, search for your original receipt using the Find Returns window. Use the Change Organization window to specify the inventory organization. The tinventory organization specified should be the same as the organization you created the original receipt in.
-
Enter your search criteria such as the Receipt Number or Supplier or Purchase Order, then click Find. The search results display in the Receiving Returns window.
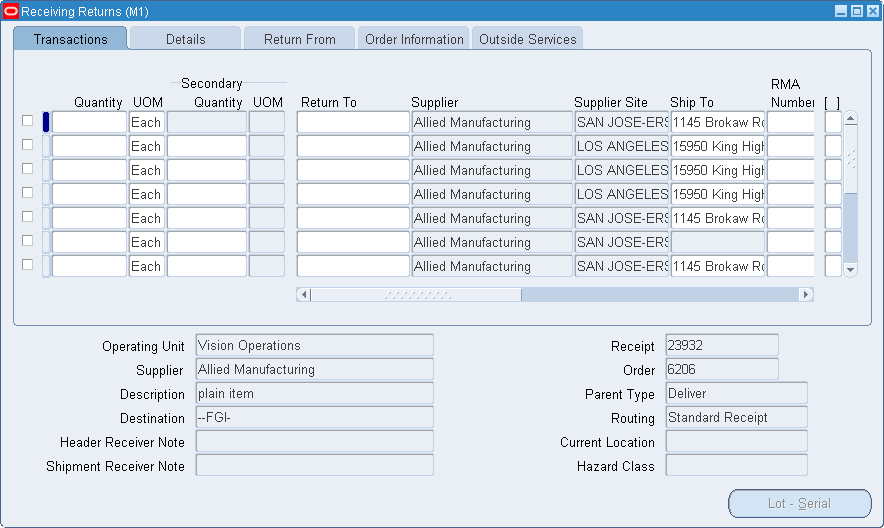
-
Create a Return Order: In the Receiving Returns window, enter the following required criteria for the return lines such as quantity to be returned, supplier details, etc.
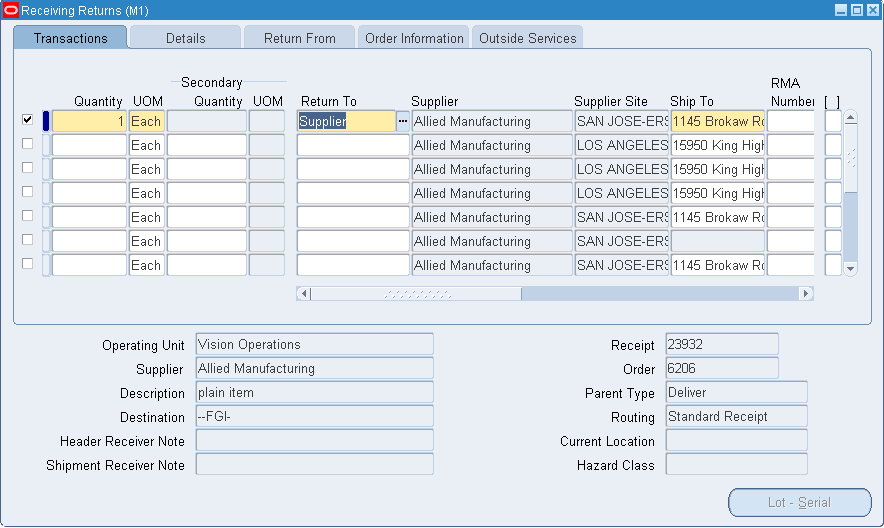
-
After you complete the entries, click Save. The system generates a new unique return order number for this return transaction and displays the return order number. This return order number is trackable in Inventory and Shipping Execution. Make a note of the return order number so that you can perform a return shipment.
Note: Once the return order is created, you cannot update/modify it.
When return to vendor happens, and if Oracle Warehouse Management (WMS) is installed in your enterprise, you can track return orders through license plate number (LPN). For return orders, you can view LPN details available in the From LPN and To LPN columns in the Return From tab. For information about LPN, refer to the Oracle Warehouse Management User's Guide.
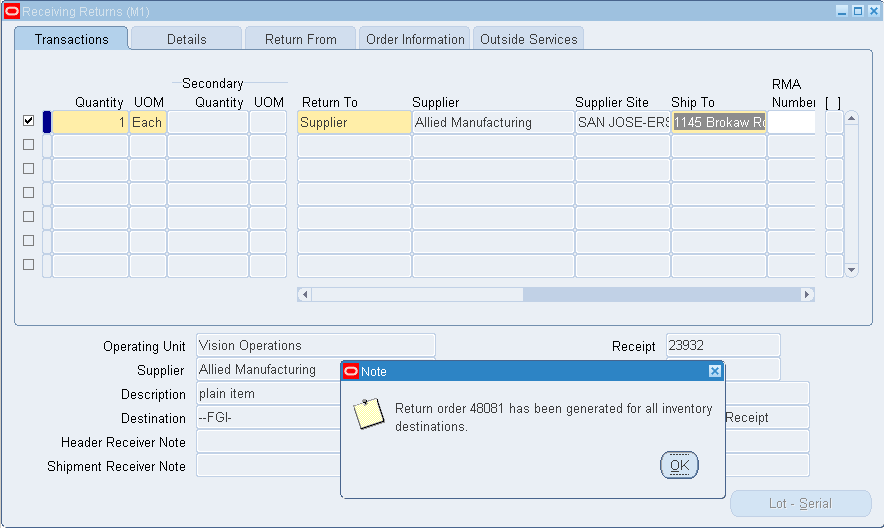
Shipping Execution
-
Using the appropriate Shipping Execution responsibility, navigate to the Shipping Transaction window. The Shipping Transactions window enables you to ship confirm the returned goods using a Type Return.
Alternatively, from the Tools menu, select Transact Shipment (after the order is saved) to open the return order lines in Shipping Transactions window and ship the returned goods/materials.
-
Navigate to the Query Manager window (Shipping Transactions window) to query the return details and perform the return shipment.
Note: If you transacted the shipment from the Receiving Returns window by selecting Tools > Transact Shipment then the Shipping Transactions window already appears.
-
In the Source System field, select Returns to search by related returns criteria such as the return order number. Click Find to display the search results.
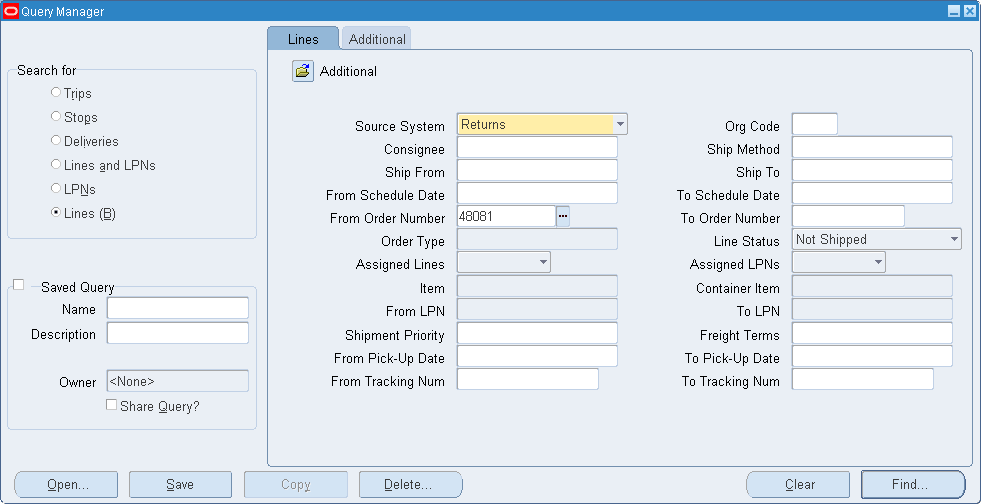
-
From the Actions list, select Auto-create Deliveries. The default grouping rules for deliveries are defined in Oracle Shipping Execution. Click Go to create the deliveries. The delivery number appears in the Delivery field.
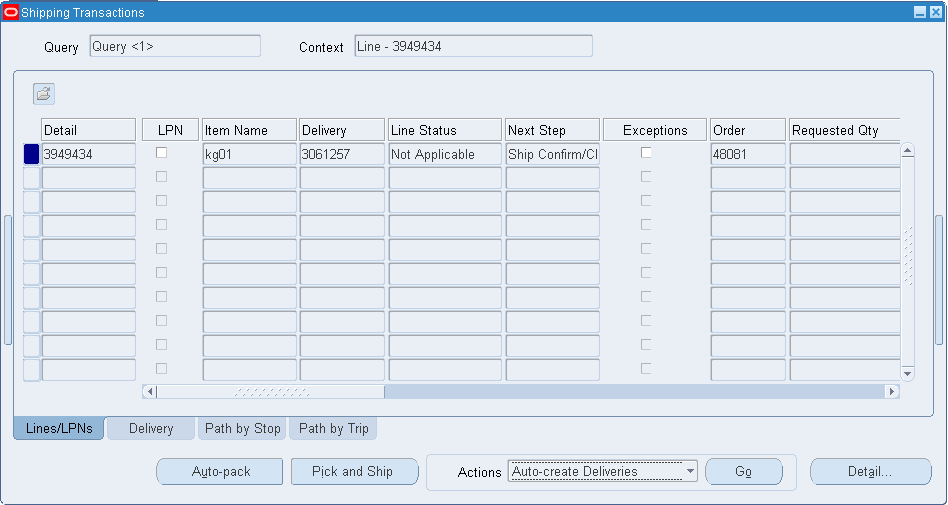
-
Perform a search from the Shipping Transactions window to display the delivery.
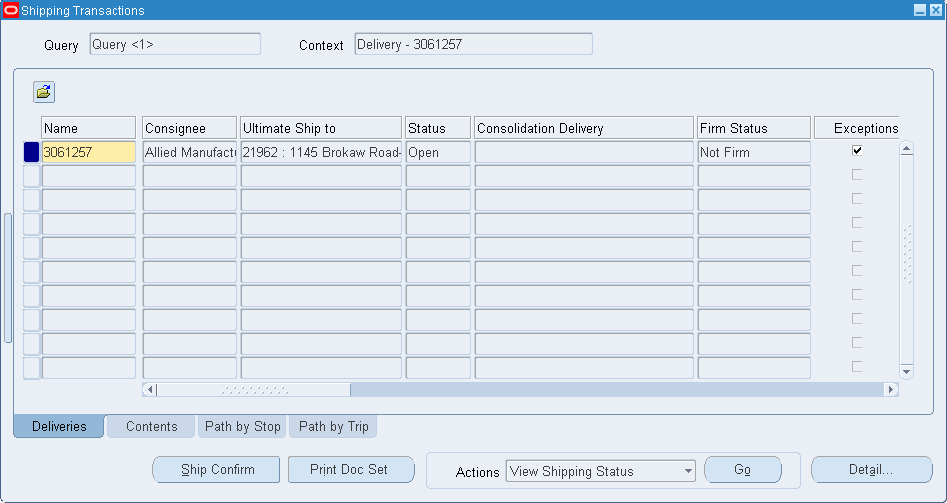
-
Print Documents, Export Compliance, and Shipping: You can print documents when creating deliveries, manually during any time during shipping, or even during the ship confirm process. For export compliance requirements, Oracle Shipping Execution already provides a standard shipping integration with Oracle's Global Trade Management (GTM) module. After you have selected and printed the document set, then you can ship-confirm the delivery. For more information on setting up GTM for Return to Vendor transactions, please refer to the Oracle Order Management Implementation Manual, International Trade Management Partner Integration section.
To manually print the document set associated with the delivery, click the Print Doc Set button.
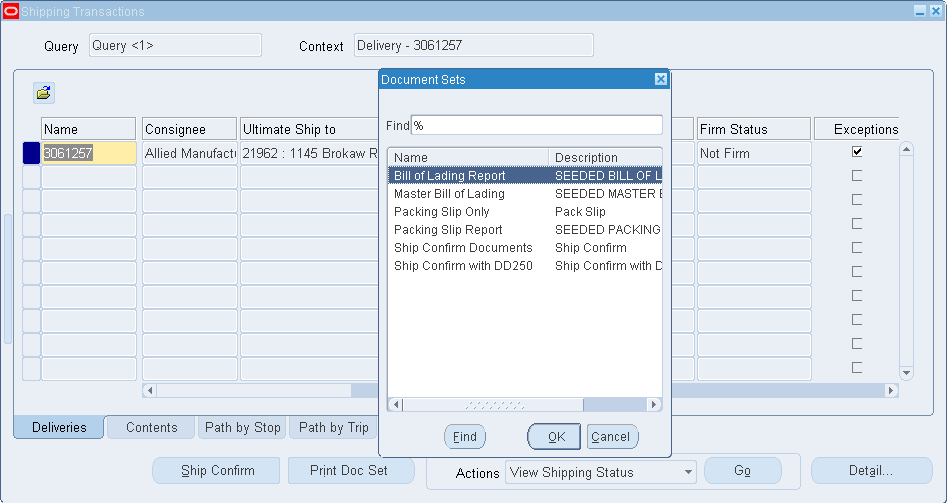
-
Finally, from the Actions field, select Ship Confirm then click Go to ship confirm the delivery.
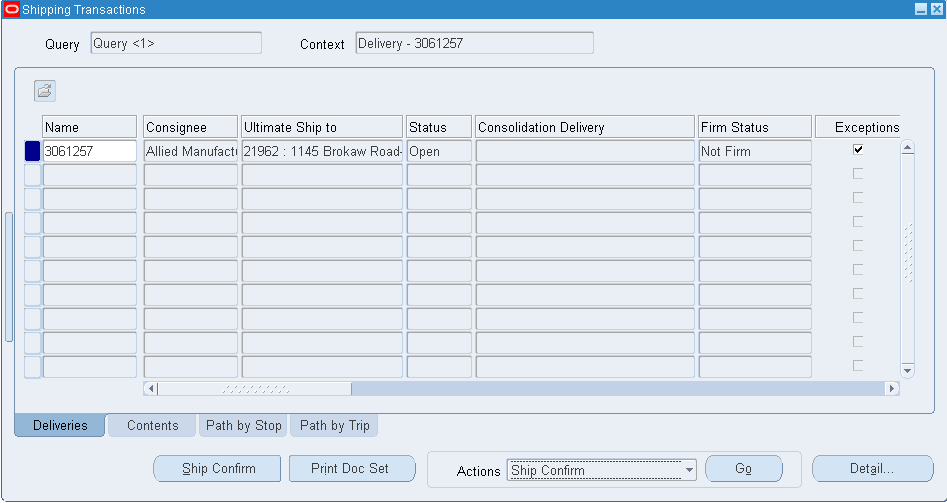
-
Confirm the ship confirm criteria in the Confirm Delivery window. After completing your entries, click OK. A message confirms the success of your delivery.
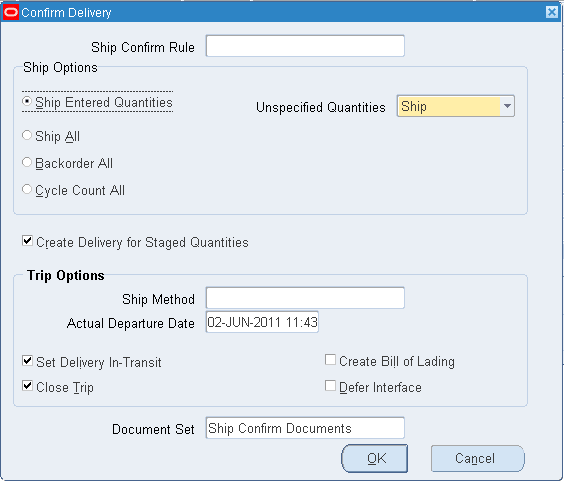
-
After ship confirming, run the Interface Trip Stop to interface with Inventory.
Note: When interfacing, the system uses the transaction type called Return to Vendor so that an issue transaction is performed.
To cancel return shipment lines
-
You can cancel an open quantity for a shipment from the Transaction Statuses window. Cancelling lines is only applicable to the open quantity on the delivery details.
-
Navigate to the Transaction Statuses window, using the appropriate Oracle Inventory responsibility.
-
Perform a query by return order number to find the return shipment to be cancelled.
-
From the Tools menu, select Cancel return shipment lines to cancel the shipment/ lines.
The status of these delivery details will be marked as Cancelled.
Performing Returns From an Organization Different from the Receipt Organization
Using e-Business Suite's multiple organization access capabilities, you can query for a receipt that belongs to an organization different from your current organization, provided your given responsibility has the relevant organization access.
You can also return goods/materials from an organization that is different from the one the goods/material were received in. Such a situation, where the goods are returned from a different organization from the original one (where the goods were received), occurs frequently in most businesses.
When you perform a return in an organization that is different from the organization the goods were received in, some points to be noted are:
-
When you ship confirm the return delivery, the system internally performs an inter-direct organization transfer.
-
When returning from a different organization, the return organization and the receipt organization should belong to the same operating unit.
Example of Performing Returns From an Organization Different from the Receipt Organization
Suppose you have two inventory organizations: M1 and M2. A purchase order is raised with a supplier and the goods are received in M1. Now, the customer who bought these goods wants to return the goods to organization M2.
To perform the return, navigate to the Receiving Returns window, using the appropriate Purchasing responsibility:
-
Navigate to the Change Organizations window to change to the M2 organization.
-
2. The returned on-hand material exists in M2. The goods can come in from any receipt generated for which return items are available in the on-hand quantity. Alternatively, the customer can create a Returns Material Authorization (RMA) using the Oracle Order Management module, so that the returned goods are in inventory and the on-hand quantity is greater than zero. For more information on RMAs, see the Oracle Order Management User's Guide. These goods have to be returned to the supplier from M2.
-
In the Find Returns window, select M1 as the Receipt Org and enter the original receipt number (that was issued in M1).
-
The receipt details display from M1, but you can perform returns from M2 (where the actual on-hand quantity lies).
Performing Returns Without a Reference Document
Sometimes you may need to return a specific component to a supplier but you do not have a backing document for the receipt of the item [such as a tracking purchase order (PO) number]. This situation may arise, for example, if:
-
the PO was cancelled.
-
the Item received was a final assembly, however only part of the assembly was returned.
In these situations, you can create a new return shipment without a reference document.
-
Navigate to the Find Returns window (log into the organization where the original receipt was made).
-
Perform a search to confirm that there is no existing receipt.
-
If no receipts exist, click New on the Find Returns window to display the Receiving Returns window.
-
Define your return criteria in the Receiving Returns window such as Quantity, Return To, Supplier, Supplier Site, Ship To and Item.
-
For additional information on creating the return order, see Performing Returns in the Receipt Organization.
-
After you have created the return order, refer to the steps on selecting export compliance and shipping documents, and shipping the return order.
Some considerations while performing Return to Vendor Transactions
-
The supplier site needs to be active in order for the return to vendor transactions to work. For more information on activating supplier sites, see the Oracle Payables User's Guide.
-
Return to receiving is not possible from the Receiving Returns window when value of the profile option RCV: Track Shipments for Return to Vendors is set to Yes.
-
A return order will be created only for the return lines with an Inventory destination. Returns saved with Receiving, Expense, and Shop floor destinations will follow the regular return to vendor flow.
-
Debit memos can be created using Accounts Payables or Receiving after the return to vendor transaction has been completed.
-
To issue stock/goods out of inventory using return to vendor without a reference document feature, a new transaction type – Return to Vendor without Receipt has been introduced in inventory.
Corrections
Use the Receiving Corrections window to modify receiving transactions to correct errors. You can correct receiving transactions other than another Correction transaction or an internal shipment delivered to inventory. For controlled items, you must specify lot and/or serial numbers, as appropriate. For corrections to customer return transactions, the return material authorization (RMA) in Order Management is updated to reflect the new quantity.
Note: You cannot perform a correction to a drop shipment purchase order receipt.
When you are entering a correction, the first step is using the Find Corrections window to identify the transaction that you want to correct. See: Finding Corrections.
You can enter positive or negative corrections to any receiving transaction. Purchasing allows you to enter correction quantities greater than the outstanding receiving supply quantity.
You can also make corrections to quantities that you return to a supplier. For example, you receive 100 items, and you use a Return To Supplier transaction to return 10 items to the supplier because they were damaged. Then you realize that only 9 items were damaged. This means that, in the Corrections window, you must enter a correction of -1 for the Return to Supplier transaction. Purchasing moves the item from the supplier to your receiving supply. If you additionally want to move the item from your receiving supply to your on-hand supply, you must additionally enter a correction of +1 for the Return to Receiving transaction.
The table below illustrates this process, using a correction of -1 and +1 as examples.
| In the Corrections window, in the Quantity field, when you enter ... | Purchasing ... |
| -1 for the Return to Supplier transaction | Returns the item to receiving supply: Supplier --> Receiving |
| -1 for the Return to Receiving transaction | Returns the item to on-hand supply: Supplier Receiving --> Supply |
| +1 for the Return to Receiving transaction | Returns the item to receiving supply: Receiving <-- Supply |
| +1 for the Return to Supplier transaction | Returns the item to the supplier: Supplier <-- Receiving Supply |
When you make corrections to a receipt created against an Advance Shipment Notice (ASN), your purchasing, in-transit, and inventory supplies are automatically updated. See: ASNs and Supply.
Related Topics
Return Material Authorizations (RMAs)
Finding Corrections
Use the Find Corrections window to find source documents for which you can enter corrections. Use the Supplier and Internal tabbed region to search for Purchasing documents. If Order Management is installed, use the Customer tabbed region to search for customer return material authorizations (RMAs).
Note: You can also make corrections to quantities that you return to a supplier. For instructions, see: Corrections.
To find Supplier and Internal source documents for corrections:
-
Navigate to the Find Corrections window by selecting Corrections from the menu. The following steps describe ways in which you can specify search criteria to limit the search for source documents. All of the search criteria are optional.

-
Select the Supplier and Internal tabbed region.
-
Select the Operating Unit for this search.
-
Select the receipt Source Type for the search:
-
Internal: An internal order generated from an internal requisition and sourced from your inventory, or an intransit inventory shipment. If you choose this option, the following fields are disabled: PO Number, Release, Line, Shipment, and Include Closed POs.
-
Supplier: A purchase order sourced from a supplier. If you choose this option, the following fields are disabled: Requisition Number, requisition Line number, and Shipment Number.
-
All: Internal- and supplier-sourced documents.
-
-
Specify any of the following, optional search criteria:
-
Enter the Receipt Number.
-
For source type Supplier, enter the Purchase Order number. To be available, a purchase order must have at least one approved shipment for which the ship-to organization is the same as the current active organization. If you enter a PO Number, you can also enter a Release number, Line number, and/or Shipment number for the purchase order. The Release field is applicable only when you have entered a purchase order number associated with a planned purchase order or a blanket purchase agreement. The list of values in the Release field includes all releases for the specified PO that are not final closed.
-
For source type Internal, enter the Requisition Number. If you enter a requisition number, you can also enter a Line number. Available lines are those with the same ship-to organization as the current active organization.
-
In the second Shipment field, enter the shipment number of the Advance Shipment Notice (ASN). See: Advanced Shipment Notices (ASNs).
-
Enter the Supplier. For Source Type Internal, this is the organization. For Source Type Supplier, this is the supplier name, and you can also enter the Supplier Site.
-
Enter the Current Location.
-
Use the lower tabbed regions to further restrict the search. See: To further restrict the search, below.
-
-
Select the Find button to initiate the search and display the selected source documents in the Receiving Corrections window.
To find Customer returns for corrections:
-
Select the Customer tabbed region in the Find Corrections window.
This region is used for finding items that a customer has returned to your company. When a sales representative creates a sales order in Order Management and ships the item to the customer, you can find and create receipts and corrections if the customer returns the item. The receipt is created against a return material authorization (RMA) document, which the sales representative uses to authorize the return.
-
Specify any of the following, optional search criteria:
-
Line type, such as Return with Receipt of Goods, on the RMA. There are different return line types. Search by RMA line type if you want to see all RMA lines with that line type in your receiving organization.
-
Receipt Number
-
RMA Number, which corresponds to the Order Number field on the sales order
-
Line number from the RMA
-
Return ASN document number that is used to return material
-
Customer returning the item
-
Customer Number
-
Customer Item Number that the customer used to order the item
-
The lower tabbed regions. See: To further restrict the search, below.
-
-
Select the Find button to initiate the search and display the selected source documents in the Receiving Corrections window.
To further restrict the search:
Specify any of the following, optional search criteria:
-
In the Item region, you can enter the following search criteria: Item number, Revision number, Category, item Description, and Supplier Item number. Since the supplier item number is generally the best way you can identify purchase order lines when your supplier does not reference your purchase order number on its shipping documents, you should provide a supplier item number on your purchase order lines.
-
In the Receipt Details region, you can restrict the search by Packing Slip number, Receiver, Freight Carrier, or Bill of Lading.
-
In the Transaction Detail region, you can enter a Transaction Date range.
-
In the Shipment region, you can enter the Container, Truck Number, or Bar Code Label indicated on an Advance Shipment Notice (ASN). See: Advance Shipment Notices (ASNs).
-
In the Destination region, you can select the Requestor, Project, Kanban Card, Task, Deliver-to location, or Job. Using these fields will limit your search results at the distribution level of the order.
-
To remove existing search criteria:
-
Select the Clear button in any of the source document search windows to remove existing search criteria.
Related Topics
Return Material Authorizations (RMAs)
Entering Corrections
Use the Receiving Corrections window to record correction transactions against prior receiving transactions.
To enter corrections:
-
Navigate to the Receiving Corrections window by selecting the Find button in the Find Corrections window. See: Finding Corrections.
If your selection criteria produce any transactions, the Transaction Type (Expense, Inventory, Shop Floor, or Receiving), Quantity, Destination, Item, Revision, and Item Description are displayed in the Transactions tabbed region. The Order Type, Order number, the Supplier or internal organization shipping the item or the Customer returning the item, and the Due Date are displayed in the Order Information region. The Item Description, Hazard Class, Destination, UN Number, Receiver Note, and Routing for the current line are displayed in the lower part of the window.
-
Use the remaining tabbed regions to display additional information about the transactions:
-
In the Transactions tabbed region, you can view the following: Destination Type, Item number, Revision number, Item Description, Location, Person, Subinventory, and stock Locator.
-
In the Details tabbed region, you can view the following: Packing Slip number, Supplier Lot number, Reason code, Hazard class, and UN Number.
-
In the Currency tabbed region, you can view exchange rate information if the purchase order was created in a foreign currency.
-
In the Order Information tabbed region, you can view the following: Order Type, Order number, Release number, Line number, Shipment number, Supplier or Customer, Quantity Ordered, UOM, and Due Date.
-
In the Outside Services tabbed region, you can view the Job/Schedule, Line, Operation Sequence, and Department.
-
-
If you are a process manufacturing user and the Oracle Process Manufacturing (OPM) application is installed, then the Oracle Purchasing for Process Inventory functionality is enabled. If the selected receiving organization is a process organization, then the two process fields Secondary UOM and Secondary Quantity are enabled. For more information about these fields, see: Entering Receiving Lines.
-
In the Quantity field, enter the positive or negative correction quantity for the current line. Making any entry on the line automatically selects the line. You can also use the line selector to select and deselect lines.
You can also make corrections to quantities that you return to a supplier. For instructions, see: Corrections.
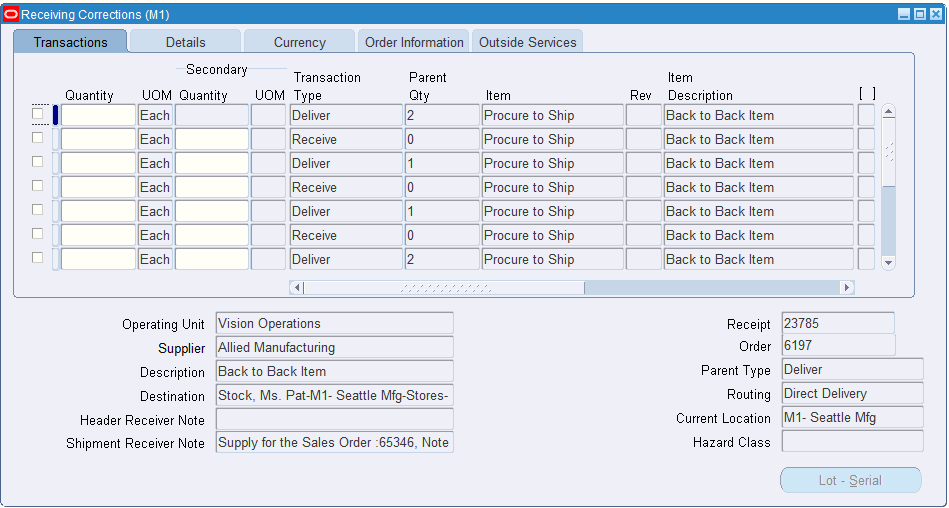
To enter control number information:
-
For controlled items, you can select the Lot & Serial button to navigate to the Lot Number and Serial Number windows. See: Lot Control, Oracle Inventory User's Guide. See: Serial Number Control, Oracle Inventory User's Guide.
To view exchange rate information:
-
Navigate to the Currency tabbed region.
This exchange rate information is based on the receipt. See: Entering Receipt Lines. These fields are viewable only. Any correction you make is made using the exchange rate information you see here.
To move to the Quality module:
-
If the Quality module is installed and if a quality plan applies to the transaction, you can navigate to the Quality module by selecting the Quality button. See: Using Oracle Quality with Oracle Purchasing, Oracle Quality User's Guide
Related Topics
Return Material Authorizations (RMAs)
Finding Intransit Shipments
Use the Find Intransit Shipments window to find source documents for which you can enter shipment information. You can also use the Find Intransit Shipments window to view validated Advance Shipment Notices (ASNs).
To find source documents for intransit shipments:
-
Navigate to the Find Intransit Shipments window.
-
Select the Operating Unit for this search.
-
Specify any of the following, optional search criteria:
-
Select a Source Type of Internal, Supplier, or All. 'Internal' searches for inventory intransit shipment information. 'Supplier' searches for external suppliers' shipment information, such as ASNs. 'All' searches for both internal and external shipment information.
-
For a Supplier source type, enter the Purchase Order Number. If you enter a purchase order number, you can also enter a Release number, Line number, and/or Shipment number for the purchase order.
-
For an Internal source type, enter the Requisition Number. If you enter a requisition number, you can also enter a Line number.
-
In the second Shipment field, enter the shipment number of the Advance Shipment Notice (ASN). See: Advanced Shipment Notices (ASNs).
-
Enter the Supplier. For Source Type Internal, this is the organization. For Source Type Supplier, this is the supplier name, and you can also enter the Supplier Site.
-
Enter the Receiving Location.
-
Use the tabbed regions to further restrict the search.
-
In the Item region, you can enter the following search criteria: Item number, Revision number, Category, and item Description.
-
In the Date Ranges region, you can select Due Today to limit the search to receipt lines due on the current date. Otherwise, you can enter a Due By date range.
-
In the Receipt Details region, you can restrict the search by Packing Slip number, Receiver, Freight Carrier, or Bill of Lading.
-
In the Shipment region, you can enter the Container, Truck Number, or Bar Code Label indicated on an ASN.
-
-
-
Select the Find button to initiate the search and display the selected source documents in the Manage Shipments window.
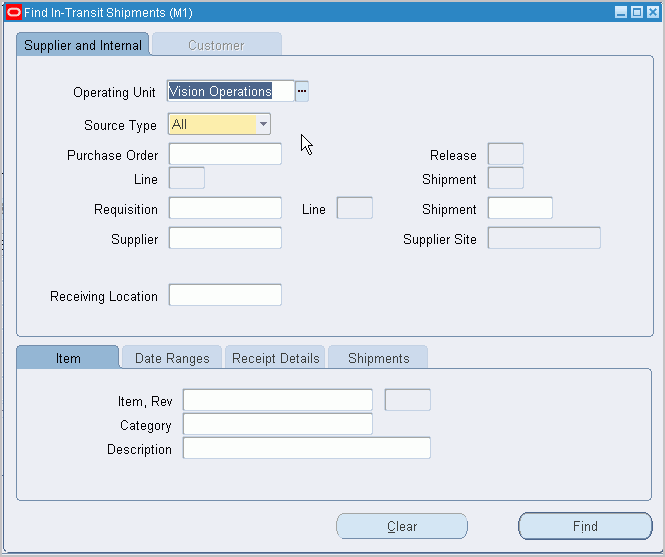
To remove existing search criteria:
-
Select the Clear button in any of the source document search windows to remove existing search criteria.
Related Topics
Advanced Shipment Notices (ASNs)
Managing Shipments
Use the Manage Shipments window to view and update inventory intransit shipment information. Also use the Manage Shipments window to view or cancel Advance Shipment Notices (ASNs), ISO shipments, and return ASNs.
You can view a wide variety of information about an inventory intransit shipment, including internal requisition information backing the intransit shipment. You can enter or change selected header information including packing slip and bill of lading numbers, the expected receipt date, the freight carrier, the ship-to location, and the number of containers. You can also enter or change some information at the shipment line level: the packing slip number, receipt routing, and reason code.
For an ASN, you can also view a wide variety of information, including truck and container numbers. You can also cancel an ASN by choosing Cancel from the Tools menu. (The supplier can also send a Cancellation ASN.) See: Advanced Shipment Notices (ASNs).
Note: Before you can use this window to view and update inventory intransit shipment information, you must transfer material between organizations that use intransit inventory. See: Transferring Between Organizations, Oracle Inventory User's Guide.
To select shipments:
-
Navigate to the Find Intransit Shipments window. See: Finding Intransit Shipments.
-
Enter any of the following as selection criteria: Purchase Order or Requisition number, requisition Line number, ASN Shipment number, Supplier, Supplier Site and Receiving Location. In the tabbed regions in the lower part of the screen, you can specify additional selection criteria for the item, and date ranges.
-
Select the Find button to move to the Manage Shipments window.
To manage shipments:
-
Navigate to the Manage Shipments window. In this window Purchasing displays Shipment Header information for the first shipment that meets the criteria. Use the down arrow on your keyboard to display information for subsequent shipments that meet your search criteria.
Note: For inventory intransit shipments, you will see Shipment Lines information only when you view the shipments from within the receiving organization.
-
You can maintain data only in the following Shipment Header fields: Expected Receipt Date, Bill of Lading, Freight Carrier, Packing Slip, Ship-to Location, Number of Containers, and Comments.
-
If Oracle Yard Management System (YMS) is licensed and installed, the Equipment Status field indicates whether the ASN is In Yard, At Dock Door or other status. The status is only for Yard Management System associated organizations. When the ASN is not associated with any equipment, the status column is blank. If the ASN has single equipment related, the value displayed is that of the specific equipment's status. Otherwise, the value Multiple is displayed.
-
In the Shipment Lines region, only the item Revision, stock Locator, Packing Slip, Comments, Transaction Reason Code, and Receipt Routing are maintainable.
-
You can cancel the entire shipment only when no item is received at the destination organization.
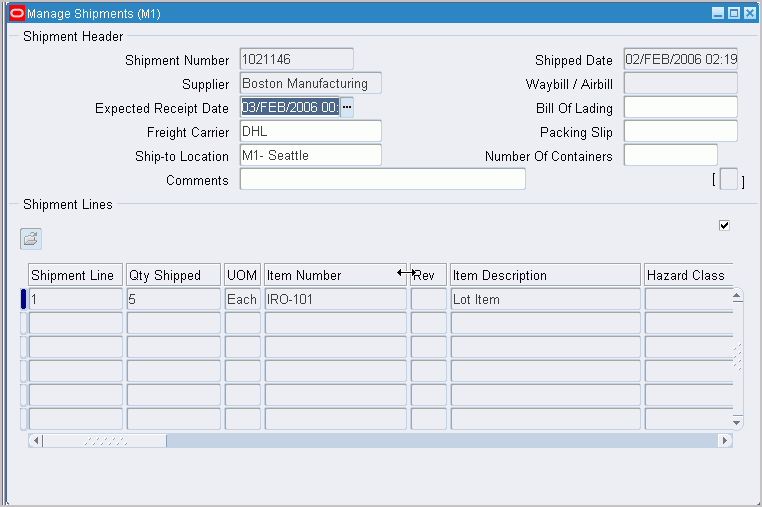
To cancel an Advanced Shipment Notice:
-
Select the shipment line and choose Cancel from the Tools menu.
To cancel an ISO Shipment:
-
You can cancel an ISO shipment and shipment lines from the Manage Shipments window.
Prerequisite
-
Use the Application Developer responsibility to set the parameter ALLOW_CANCEL to Y in the Manage Shipments window (Function Name is RCV_RCVSHESH).
-
To cancel an ISO shipment:
-
In the destination organization, select the shipment that you want to cancel.
-
Ensure that the Destination Type column has the value Inventory.
-
Place your cursor in the shipment header or line.
-
From the Tools menu, select Cancel. If you cancel a shipment at the header level, then all the individual lines are automatically canceled. You can cancel shipment lines with status Expected or Partially Received. For a partially received shipment line, deliver the received quantity before initiating cancellation.
In WMS-enabled organizations, if you cancel a shipment line, then the application unpacks the line quantity from the corresponding LPN.
-
Click OK. This action initiates the Order Import concurrent program to import the internal RMA.
-
You can add the columns Internal RMA and Return ASN to check them at the shipment line level.
Important: Internal RMA and Return ASN are folder fields. With the cursor in the shipment lines region, you can show or hide them from the Folder menu.
-
Verify that the Status column for the same shipment displays Canceled or Partially Canceled.
For more information about the cancellation process, see Canceling an ISO Shipment, Oracle Inventory User's Guide.
Using the Split Line Window
If Oracle Yard Management System (YMS) is licensed and installed and the form function parameter P_ALLOW_YMS_UPDATE is set to Y, then in the Split Line window, you can:
-
Split ASN lines to accommodate more than one trailer on the same ASN.
-
Update existing ASN trailer SCAC and Equipment Number to allow correct ASL lines to be attached to the correct equipment in case ASN spans multiple trailers.
To navigate to the Split Line window, select Split Line from the Tools menu. For information on how to set the form function parameter P_ALLOW_YMS_UPDATE to Y, see: Enable Users to Split Lines and Update Equipment Details, Function Security for Purchasing.
In the Split Line window, you can update the equipment number and SCAC, only if:
-
The destination organization is YMS associated organization.
-
The form function parameter is 'Y'.
-
The shipment line status is 'Expected'.
In the Split Line window, you can split the ASN line, only if:
-
The destination organization is YMS associated organization.
-
The form parameter value is 'Y'.
-
The line is an ASN shipment line.
-
The shipment line status is 'Expected' Or 'Partially Received'.
-
The shipment does not have LPN and lot/serial information.
Control Numbers
Purchasing uses three types of control numbers: lot numbers, serial numbers, and stock locators.
Purchasing provides you the ability to assign lot and serial numbers to items as they are transacted to their destinations by direct receipt or delivery and to track these items by lot and serial number.
You assign lot and serial numbers to items as you are entering individual deliveries or performing direct receipts. You can access the Lot and Serial Numbers window directly from each transaction that you enter, and assign lot and/or serial numbers to each unit of the item in the transaction.
Stock Locators are used for deliveries to inventory destinations. Purchasing uses the locator controls defined in Inventory.
Entering Lot Numbers
In the Lot Numbers window, there may or may not be existing lot number information corresponding to your transaction. If such information exists, you can pick the lot number that you want to assign to your receiving transaction. If you are entering a supplier receipt, you have to enter a lot number that has not been previously assigned to an item. If you are entering any other type of receiving transaction, you have to pick a lot number from the list of lot numbers that are valid for the given item. For example, if you enter an intransit receipt or a transfer, you cannot assign a completely new lot number, but rather you must choose the appropriate lot number that has been previously assigned to the item.
Based on the lot number you enter, Purchasing automatically enters the expiration date if you defined shelf life control for the item and specified a number of shelf life days. If you defined the item by specifying lot control with shelf life control that is user definable, then you can enter an expiration date that is the same as or later than the current date. Purchasing displays the quantity of each lot number that is available for assignment, and you cannot assign more units to a lot number than are available.
Entering Serial Numbers
For deliveries, you must enter serial number information if the item is under serial number control. Purchasing displays a running total of the number of units that have been assigned to serial numbers.
There may be existing serial number information corresponding to the item in this transaction. For example, if you were receiving an item from intransit and the sending organization had assigned serial numbers to the item at the time of shipment, these numbers would be available in a list of values. On the other hand, if you were entering a supplier receipt, you would have to assign new serial numbers.
You enter serial numbers by assigning a range of numbers for each item or lot quantity. Purchasing then assigns each unit of the item or lot quantity to a serial number within your selected range. When you enter a beginning serial number, Purchasing automatically defaults the ending serial number to the same value. You can override this default if you want to specify a range of serial numbers rather than just one serial number.
Lot and Serial Numbers in Inter-organization Transfers
When you perform an inter-organization transfer, the source and destination organization may have different lot/serial controls. Purchasing handles this situation as follows:
-
When the source organization uses controls and the destination organization does not, the control numbers are recorded as being issued from the source organization. Lot/serial transactions are recorded for the destination organization.
-
When the source organization does not use controls and the destination organization does, the transaction is processed normally.
-
When both source and destination organizations use controls, the control numbers are recorded as being issued from the source organization. These control numbers are tracked to insure that the same control numbers that were shipped are the ones that are received. When items are returned from inventory to receiving or to the supplier, only the control numbers originally recorded for the delivery transaction can be used.
Entering Stock Locators
When you enter a receiving transaction that will result in a delivery to an inventory destination, and when locator control is required for the organization/item/subinventory, Purchasing displays the Stock Locator flexfield during entry of the destination information in the Receipts, Receiving Transactions, Returns, and Corrections windows.
Lot Control, Oracle Inventory User's Guide
Serial Number Control, Oracle Inventory User's Guide
Defining Stock Locators, Oracle Inventory User's Guide
Receiving Reports
Purchasing provides summary and detail reports on your receipts. You can produce receiving transaction reports by item, supplier, purchase order number, receipt number and/or receiving date range.
Purchasing also provides summary and detail reports to help you analyze your suppliers' performance. You can produce supplier quality reports by buyer, supplier, and item. You can use the receiving inspection register to review your inspections by receipt.
Use the Submit Requests window to run Receiving reports. See: Concurrent Processing, Oracle E-Business Suite Setup Guide.
Printing an Expected Receipts Report
Purchasing helps you organize your work by generating an Expected Receipts Report using the setup options you specify. You can use setup options such as Ship-To Location, Promised Dates, Category, and Item Number. For example, you can review all expected computer equipment receipts, or you can review all receipts for the next two days.
You want to print an Expected Receipts Report for the current week. You are primarily interested in the furniture receipts for the week, so you specify a date range for the current week and the purchasing category Furniture in the Category field. See: Expected Receipts Report.
Using Receipt Travelers
Purchasing makes it easy to route goods in your organization by letting you print a receipt traveler that you can place on the goods. You can use the Submit Requests window to print as many travelers as you need. See: Concurrent Processing, Oracle E-Business Suite Setup Guide.
You receive 5 personal computers and you want to show the final destination for each. In the Submit Requests window, you can generate a Receipt Traveler for each box. See: Receipt Traveler.
Important: If the RCV: Print Receipt Traveler profile option is set to Yes, Purchasing automatically prints the Receipt Traveler when you perform a standard or direct receipt and when you match unordered receipts.
Related Topics
Submitting a Request, Oracle Applications System Administrator's Guide
Overview of Receipt Accounting
Inventory Accruals
Inventory and Purchasing provide you with visibility and control of your accrued liabilities for inventory items. Purchasing automatically records the accrued liability for your inventory items at the time of receipt as perpetual accruals. This transaction is automatically recorded in your general ledger at the time of receipt (unless you specified otherwise when setting up periodic costing). The inventory expense is recorded at delivery if you use Standard Delivery and at receipt if you use Direct Delivery. You have options to determine whether Purchasing and Inventory reverse encumbrances. The option used is dependent on how you compare encumbrance to budget balances in inventory for your organization.
Expense Period-End Accruals
Purchasing optionally accrues uninvoiced receipts of non-inventory items when you close a period. You can choose which uninvoiced receipts are accrued. At period end, Purchasing automatically creates a balanced journal entry for each uninvoiced receipt. Purchasing creates a reversing entry for the encumbered amount corresponding to the expense while creating an accrual entry for the receipt in the general ledger if you are using encumbrance at your site.
Important: When using Cash Basis Accounting, you will not normally run the Receipt Accrual - Period End process. However, you must use the Purchasing Options window and set the Accrue Expense Items flag to Period End. See: Receipt Accruals - Period End Process.
Expense Perpetual Accruals
Purchasing optionally provides you with the ability to accrue non-inventory liabilities at the time of receipt. If you choose at time of receipt, Purchasing records an accrued liability and charges your receiving inspection account for each non-inventory receipt. This transaction is automatically recorded in your general ledger at the time of receipt. Purchasing creates a reversing entry for the encumbered amount at the time you deliver the goods to the final inventory or expense destination. When an invoice is matched to a purchase order and approved in Payables, it is not necessary for Payables to record an encumbrance for the expense. However, Payables will record an encumbrance for invoice price variance or exchange rate variance, if the variance exists.
Purchase Price Variance
Purchasing and Inventory provide you with visibility and control of your purchase price variances. When you use standard costing, Purchasing and Inventory automatically calculate and record purchase price variances as you receive your inventory items into inventory. If desired, Purchasing and Inventory automatically calculate and record purchase price variances for your outside processing receipts into work in process. You can use the Purchase Price Variance Report to review the accuracy of the standard costs for your purchased items and services. See: Purchase Price Variance Report.
Invoice Price Variance (IPV) and Exchange Rate Variance
Purchasing and Inventory provide you with visibility and control of your invoice price and exchange rate variances. When Payables accounts for invoices, it automatically creates accounting entries for price and exchange rate variances. You can use the Invoice Price Variance Report to review the accuracy of your purchase order prices. See: Invoice Price Variance Report.
Foreign Currencies
If the purchase order uses a foreign currency, Purchasing converts the purchase order price to the inventory functional currency. Inventory uses this converted value for receiving accounting purposes. Payables allows you to record exchange rate invoice variance to separate accounts.
Nonrecoverable Tax
If you use nonrecoverable or partially recoverable tax, the nonrecoverable tax amount is included in your period-end or perpetual accrual accounting. Nonrecoverable tax is also included in the invoice and exchange rate variances. Changing the exchange rate on the receipt may affect the nonrecoverable tax amount. See: Tax Inofrmation in Purchasing. See: Entering Receipt Lines.
Accrual Reconciliation and Write-Off
Purchasing and Inventory provide you with a complete reconciliation report of all of your accounts payable accrual transactions. You can quickly identify any mismatched items and write-off accrual transactions from your receiving, accounts payable, inventory, and work in process subledgers. See: Reconciling A/P Accrual Accounts Balance.
Expense Accrual Reporting
You can use the Uninvoiced Receipts Report to analyze your uninvoiced receipt liabilities for non-inventory purchases when you create accrual entries for them in your general ledger. You can control the amount of expenses you accrue by supplier and purchasing category. You can obtain detailed information about the purchase order receipts you accrued during your accounting period. See: Uninvoiced Receipts Report.
Period-End Accruals and Encumbrance
For period-end accruals when using encumbrances, Purchasing creates a reversing entry for the encumbered amount corresponding to an expense while creating an accrual entry for the receipt in the general ledger. When you accrue your receipts, Purchasing ensures that you do not duplicate entries for the period. At the beginning of the following period, you reverse the accrual entry for the expense and recreate the encumbrance entry you reversed in the previous period using General Ledger. See: Receipt Accruals - Period End Process.
If you use nonrecoverable or partially recoverable tax, the nonrecoverable tax amount is included in your encumbrances.
Inventory and Perpetual Expense Accruals and Encumbrance
For perpetual expense and inventory accruals, Purchasing and Inventory create a reversing entry for the encumbered amount at the time you deliver the goods to the final inventory or expense destination. When an invoice is matched to a purchase order and approved in Payables, it is not necessary for Payables to record an encumbrance for the expense. However, Payables will record an encumbrance for invoice price variance or exchange rate variance, if the variance exists.
If you use nonrecoverable or partially recoverable tax, the nonrecoverable tax amount is included in your encumbrances.
Related Topics
Accrual Process for Perpetual Accruals
Reconciling A/P Accrual Accounts Balance
Accrual Process for Period End Accruals
Identifying Journal Entry Batches in General Ledger
Setting Up Inventory Accruals
If you use Purchasing and Inventory together, use the following steps to implement perpetual accruals for inventory item purchases:
Defining Expense Accrual Option
You need to specify whether you want to use period-end or perpetual accruals for your expense destination receipts. Set the Accrue Expense Items option in the Purchasing Options window to At Receipt if you want to accrue your expense receipts perpetually. Specify Period End if you want to accrue your receipts at period end. See: Defining Accrual Options.
Defining Default Accounts
You need to define the following accounts before entering transactions in Purchasing and Inventory.
Receiving Account
Enter the general ledger account to record the current balance of material in receiving and inspection.
Use the Define Organization or Receiving Options window to set up this account. See: Defining Receiving Options.
Inventory A/P Accrual Account
Enter a general ledger account to accumulate the inventory accounts payable accrual for this organization. This is the account used by Purchasing to accrue your payable liability when you receive your items. This account represents your uninvoiced receipts and is usually part of your accounts payable liabilities in the balance sheet. Payables relieves this account when the invoice is matched and approved. See: Defining Other Account Parameters, Oracle Inventory User's Guide.
Expense A/P Accrual Account
Enter a general ledger account to accumulate the expense accounts payable accrual for your purchasing installation. This is the account used by Purchasing to accrue your accounts payable liability for expense items at time of receipt when your Expense Accrual Option is At Receipt, or at period-end when your Expense Accrual Option is Period End. This account represents your uninvoiced receipts and is usually part of your accounts payable liabilities in the balance sheet.
Use the Purchasing Options window to set up this account. See: Defining Accrual Options.
Purchase Price Variance Account
Enter a general ledger account to accumulate purchase price variance for this organization. The purchase price variance account is usually an expense account. This is the variance that you record at the time you receive an item in inventory, and is the difference between the purchase order cost and an item's standard cost. Purchasing calculates purchase price variance as:
| PPV = (PO unit price - standard unit cost) quantity received |
Note: Cost Management includes nonrecoverable tax with the PO unit price if tax and a recovery rate are set up for the item. If the purchase order is in a foreign currency, the purchase price variance is calculated using the exchange rate from the receipt if the Invoice Match Option in the purchase order Shipments window is Receipt and from the purchase order if the Invoice Match Option is Purchase Order.
Purchase price variance is not used for average costing.
Use the Organization Parameters window to set this account. See: Inter-Organization Transfer Accounts, Oracle Inventory User's Guide.
Invoice Price Variance Account
Enter a general ledger account to accumulate invoice price variance for this organization. This is usually an expense account.
Invoice price variance is the difference between the purchase order price for an inventory item and the actual invoice price multiplied by the quantity invoiced: Invoice Quantity x (Invoice Price - PO Price) x Invoice Exchange Rate. Purchasing uses this account on the PO distribution when the requisition or purchase order is created. When Payables creates accounting entries for the invoice, it uses the invoice price variance account from the purchase order to record invoice price variance entries.
Use the Organization Parameters window to set this account. See: Inter-Organization Transfer Accounts, Oracle Inventory User's Guide.
Exchange Rate Gain or Loss Accounts
Enter general ledger accounts to accumulate exchange rate gains or losses for this organization. These are usually expense accounts.
Exchange rate gain or loss accounts are used to record the difference between the exchange rate used for the purchase order and the exchange rate used for the invoice. The exchange rate is taken from the purchase order only if the Invoice Match Option in the purchase order Shipments window is Purchase Order. If the Invoice Match Option is Receipt, the exchange rate is taken from the receipt.
These accounts can also be used in Payables to record gains and losses at payment time and clearing time.
Use the Accounting region of the Financials Options window to set up these accounts. See: Defining Financials Options, Oracle Payables User's Guide.
Using the Account Generator to build accounts
In addition to the standard default accounts listed above, you can use the Account Generator to predefine a set of rules that allow Purchasing to build the following accounts for each purchase order distribution automatically:
-
Charge Account
-
Budget Account
-
Accrual Account
-
Invoice Variance Account
See: Using the Account Generator in Oracle Purchasing.
Setting Up Your Period End Date
For the accrual report to balance to the general ledger, the last transaction (or accounting) date of each fiscal period has to be the same in Inventory, Purchasing, and Payables.
Creating Purchase Orders for Inventory Items
Some of the purchase orders you create are for items you want to move directly into your inventories. Some other purchase orders are for items you simply want to expense.
Purchasing ensures that you charge all inventory items you purchase to the Inventory A/P accrual account for the receiving organization. Each time you enter an item on a purchase order, Purchasing defaults the Inventory A/P accrual account corresponding to the organization you are ordering this item for on your distributions. You cannot override the distribution accrual account.
Purchasing also ensures that you use the correct invoice price variance account for the receiving organization. Each time you enter an item on a purchase order, Purchasing defaults the invoice price variance account corresponding to the organization you are ordering this item for on your distributions. You cannot override the distribution invoice variance account.
Inventory Funds Checking Methods
One way in which you can budget and funds check the inventory purchases you make for a given subinventory is by setting up an encumbrance (i.e. budget) account for the subinventory, and not reversing the encumbrance on receipt/delivery. This way, the encumbrance will accumulate as an actual and can be compared with the account budget for actual purchases to budget analysis. You cannot use the subinventory asset account in the funds available calculation (FA = Budget - Enc - Actuals), because this account will only contain the current value of the subinventory or the net of received and delivered items currently in the subinventory, and will not track to the accumulated purchases for the subinventory. To use this method of funds checking, you must set the Reverse Encumbrance flag in the Organization Parameters window to No. See: Inter-Organization Transfer Accounts, Oracle Inventory User's Guide.
An alternative method of funds checking inventory purchases is by setting up a summary account and performing a funds check against that summary account. To provide an accurate picture of the funds available, you need to take into account:
-
The outstanding commitments/obligations for inventory and expense purchases
-
The current value of inventory
-
The amounts purchased for inventory, but already issued out of the subinventory to either expense accounts within the "department" (summary account) or to other "departments" (other summary accounts)
Funds available = Budget
less amount on open commitments/obligations (either for inventory, or for expense accounts within the department)
less current inventory value
less value of material 'expensed' to accounts with the department
The following example illustrates some of the transactions and their impact on the funds available:
| Summary (Department X) | |||||
| Subinventory Asset Account 'x1' | Subinventory Encumbrance Account 'x2' | Budget Account 'xbud' | Department Expense 'xA' | Department Expense 'xB' | Department Expense 'xC' |
| Summary (Department Y) | |||||
| Subinventory Asset Account 'y1' | Subinventory Encumbrance Account 'y2' | Budget Account 'ybud' | Department Expense 'yA' | Department Expense 'yB' | Department Expense 'yC' |
-
Requisitions and purchase orders for expense purchases will create commitments/obligations against expense accounts (xA, xB, xC), decreasing the funds available for Department X
-
Receipt and Delivery of expense purchase orders (or invoicing for period end accruals) will create the actuals to the department expense accounts (xA, xB, xC), and reverse the encumbrance in those same accounts
-
Requisitions and purchase orders for inventory purchases will create commitments/obligations against the encumbrance account (x2, y2). We use a different account than the asset account to ensure that we do not distort the value in the asset account (which should only contain the value of the material in the given subinventory). The requisitions and purchase orders will decrease funds available for the department.
-
Receipt and Delivery of inventory purchase orders will reverse the encumbrance against x2/y2 and create actuals to the subinventory asset account, having no net impact against funds available
-
Inventory issues from x1 to xA, xB, or xC will not be funds checked and will have no net impact on funds available
-
Inventory issues from x1 to Department Y expense accounts (yA, yB, or yC) will increase Department X's funds available and decrease Department Y's funds available
-
Inventory transfers from x1 to y1 will also increase Department X's funds available, and decrease Department Y's funds available.
Note: If you want to use encumbrances and budgetary control for inventory transfers or issues to expense accounts, you can use internal requisitions.
If you are using Period End Accruals, the encumbrance reversals are created with the accrual entries for the month end. You should reverse these journal entries in the beginning of the next period.
If you are accruing At Receipt, the delivery transaction reverses the encumbrances (and creates the debit to the charge account and the credit to the receiving/inspection account).
Note: A direct receipt in purchasing performs both the debit and credit transactions.
Accrual Process for Perpetual Accruals
Use perpetual accruals for expense purchases when you want to record uninvoiced receipt liabilities immediately upon receipt of goods. Receipts for inventory purchases are always accrued upon receipt. Other key points of perpetual accruals include:
-
Actual journal entries are created for the amount of the receipt liabilities, debiting the receiving inspection account and crediting the expense accrual liability account.
-
Accrual journal entries are created when you enter receiving transactions. Purchasing creates adjusting journal entries if you correct your receiving transactions.
-
Perpetual accrual entries do not need to be reversed at the start of a new accounting period.
-
If you are using encumbrance accounting, purchase order encumbrance is relieved when the goods are delivered to their final destination, either by a delivery or a direct receipt.
Important: If you accrue expense purchases at the time of receipt, you must reconcile the entries in the A/P accrual accounts. In addition, if you also receive inventory, you need to use the Receiving Value By Destination Account Report to break out your receiving/inspection value by asset and expense.
Purchase Order Receipt to Receiving Inspection
When you receive material from a supplier into receiving inspection, Purchasing uses the quantity received; the purchase order price; nonrecoverable tax if any; and, if the purchase order is in a foreign currency, exchange rate, to update the accrual and the receiving inspection account. (If the purchase order is in a foreign currency, the exchange rate comes from the receipt if the Invoice Match Option in the purchase order Shipments window is Receipt and from the purchase order if the Invoice Match Option is Purchase Order.) The accounting entries for inventory receipts are:
| Account | Debit | Credit |
|---|---|---|
| Receiving Inspection account at PO price | XX | |
| Inventory A/P Accrual account at PO price | XX |
The accounting entries for expense destination receipts are:
| Account | Debit | Credit |
|---|---|---|
| Receiving Inspection account at PO price | XX | |
| Expense A/P Accrual account at PO price | XX |
Important: For clarity, the accounting entries in this section refer to the Inventory A/P Accrual Account and the Expense A/P Accrual Account. These are the accounts you typically use as your purchase order distribution accrual accounts for inventory and expense destinations. You can use the Account Generator to define the business rules you want Purchasing to use to determine the actual purchase order distribution accrual account. Purchasing uses the accrual account on the purchase order distribution for all receipt accrual entries.
For expense destinations, the PO distribution accrual account is the Expense A/P Accrual Account set in the Purchasing Options window. For inventory destinations, the purchase order distribution accrual account is the Inventory A/P accrual account for the receiving organization. The accrual accounts are the liability accounts that offset the material and expense charge accounts. They represent all inventory and expense receipts not matched in Payables.
Delivery From Receiving Inspection to Inventory
With the Receiving Transactions window, you can move material from receiving inspection to inventory. See: Receiving Transactions.
For standard costing, when you enter a delivery transaction in Purchasing and move the items to inventory, Inventory generates a purchase price variance transaction. Inventory books this transaction as a period expense for the current accounting period. If the standard cost is greater than the purchase order price, then the purchase price variance is favorable. Inventory records the expense as a credit (negative expense). If the standard cost is less than the purchase order price, then the variance is unfavorable. Inventory records the expense as a debit (positive expense).
For average costing, when you enter a delivery transaction in Purchasing, the system recalculates the average cost for the inventory organization with the incoming purchase order value. You do not have any purchase price variance for average costing.
For periodic costing, when you enter a delivery transaction in Purchasing, the system recalculates the periodic average cost for the period based on the periodic acquisition cost. See: Processing Periodic Acquisition Costs, Oracle Cost Management User's Guide.
Inventory uses the quantity; the purchase order price; nonrecoverable tax if any; and, if the purchase order is in a foreign currency, exchange rate, of the delivered item to update the receiving inspection account and the quantity. Inventory uses the standard cost of the delivered item to update the subinventory balances. The standard cost is in the functional currency. The accounting entries are:
| Account | Debit | Credit |
|---|---|---|
| Subinventory accounts at standard cost | XX | |
| Receiving Inspection account at PO price | XX | |
| Debit/Credit Purchase Price Variance |
Delivery From Receiving Inspection to Expense Destinations
With the Receiving Transactions window, you can also move material from receiving inspection to expense destinations. See: Receiving Transactions.
When you enter a delivery transaction in Purchasing and move the items to an expense location, Purchasing uses the transaction quantity; the purchase order price; nonrecoverable tax if any; and, if the purchase order is in a foreign currency, exchange rate, of the delivered item to update the receiving inspection and expense charge account. (If the purchase order is in a foreign currency, the exchange rate comes from the receipt if the Invoice Match Option in the purchase order Shipments window is Receipt and from the purchase order if the Invoice Match Option is Purchase Order.) The accounting entries are:
| Account | Debit | Credit |
|---|---|---|
| PO distribution charge accounts at PO price | XX | |
| Receiving Inspection account at PO price | XX | |
| Encumbrance at PO price | XX | |
| Reserve for Encumbrance at PO price | XX |
Purchase Order Receipt to Inventory
You can use the Receipts window to receive material directly from a supplier to inventory. See: Managing Receipts. Please note that this section addresses inventory destinations only.
When you receive material from a supplier directly to inventory, Purchasing and Inventory perform the receipt and delivery transactions in one step.
Purchasing uses the quantity received; the purchase order price; nonrecoverable tax if any; and, if the purchase order is in a foreign currency, exchange rate, to update the accrual and the receiving inspection account. (If the purchase order is in a foreign currency, the exchange rate comes from the receipt if the Invoice Match Option in the purchase order Shipments window is Receipt and from the purchase order if the Invoice Match Option is Purchase Order.) The accounting entries are:
| Account | Debit | Credit |
|---|---|---|
| Receiving Inspection account at PO price | XX | |
| Inventory A/P Accrual account at PO price | XX |
Inventory uses the quantity and standard cost of the received item to update the receiving inspection and subinventory balances. The accounting entries are:
| Account | Debit | Credit |
|---|---|---|
| Subinventory accounts at standard cost | XX | |
| Receiving Inspection account at PO price | XX | |
| Debit/Credit Purchase Price Variance |
If you use average costing, the system recalculates the average cost at receipt, and you do not have any purchase price variance.
The Inventory A/P Accrual account is the liability account that offsets the material accounts, and represents all inventory receipts not matched in Payables.
Purchase Order Receipt to Expense Destinations
You can use the Receipts window to receive material directly from a supplier to the expense destination. See: Managing Receipts. Please note this section addresses expense destinations only.
When you receive material from a supplier directly to expense destinations, Purchasing performs the receipt and delivery transactions in one step.
Purchasing uses the quantity received; the purchase order price; nonrecoverable tax if any; and, if the purchase order is in a foreign currency, exchange rate, to update the accrual and the receiving inspection account. (If the purchase order is in a foreign currency, the exchange rate comes from the receipt if the Invoice Match Option in the purchase order Shipments window is Receipt and from the purchase order if the Invoice Match Option is Purchase Order.) The accounting entries are:
| Account | Debit | Credit |
|---|---|---|
| Receiving Inspection account at PO price | XX | |
| Expense A/P Accrual account at PO price | XX |
Purchasing uses the quantity received; the purchase order price; nonrecoverable tax if any; and, if the purchase order is in a foreign currency, exchange rate, to update the receiving inspection and expense accounts. (If the purchase order is in a foreign currency, the exchange rate comes from the receipt if the Invoice Match Option in the purchase order Shipments window is Receipt and from the purchase order if the Invoice Match Option is Purchase Order.) The accounting entries are:
| Account | Debit | Credit |
|---|---|---|
| PO distribution charge accounts at PO price | XX | |
| Receiving Inspection account at PO price | XX | |
| Reserve for Encumbrance at PO price | XX | |
| Encumbrance at PO price | XX |
Match, Approve, and Create Accounting Entries for an Invoice
In Payables, when you are matching an invoice to a purchasing document, if the Invoice Match Option in the purchase order Shipments window is Purchase Order, then you match each invoice distribution to a purchase order distribution. If the Invoice Match Option is Receipt, then you match each invoice distribution to a purchase order distribution for the received transaction. You can set up Payables to ensure that you pay only for the quantity you received.
If you accrue at receipt, and if you use encumbrance, then during the Payables Approval process, Payables makes any encumbrance adjustments for price and exchange rate variances, including nonrecoverable tax, between the invoice and the purchase order (or receipt, if the invoice is matched to a receipt). Also, if your encumbrance types are different for purchase orders and invoices, then Payables creates appropriate entries. For details on how Payables calculates variance amounts, see: Invoice Variances, Oracle Payables User's Guide. To see the accounts that Payables uses to record the variances, see: Variance Accounts, Oracle Payables User's Guide
When Payables records the accounting entries for the invoice, any variances are recorded as actuals and the encumbrances are reversed. Payables then credits the Liability account for the full amount of the invoice, and debits the accrual account for the remaining amount (invoice price - invoice price variance - exchange rate variance).
Important: Normally, you charge the original expense account for any invoice price variances. Purchasing uses the Account Generator to set your purchase order distribution variance account to be the same as your purchase order charge account. If you want to record your invoice price variances to a separate account, use the Account Generator to define the business rules you use to determine the correct invoice price variance account.
Invoice Exchange Rate Variances
Note that Purchasing uses the functional currency for your ledger in all receiving accounting entries. Purchasing converts foreign currency purchase order prices to the functional currency using the currency conversion rate from the purchase order. Payables uses the currency and the conversion rate of the invoice when it creates accounting entries for the invoice. If the conversion rate differs between the purchase order (or the receipt, if the Invoice Match Option in the purchase order Shipments window is Receipt) and the invoice, then the conversion difference is recorded as an Exchange Rate Variance. Separate accounts are defined for exchange rate gains and losses, which record currency gains and losses within Payables, for example, between invoice time and payment time.
Return to Supplier From Receiving
You use the Returns window to return material from receiving inspection or from inventory to a supplier. If you use receiving inspection and you have delivered the material into inventory, you must first return the goods to receiving before you can return to your supplier. For a return from inspection, Purchasing decreases the receiving inspection balance, and reverses the accounting entry created for the original receipt. See: Returns.
Return To Supplier From Inventory or Expense Destinations
When you do not use receiving inspection, the return to supplier transaction updates the same accounts as the direct receipt to the inventory or expense destination, with reverse transaction amounts.
Period-End Reconciliation Tasks
When you use perpetual inventories, you should balance your inventory accounts to your inventory value report. You should also review the general ledger journal transactions for inventory Purchase Price Variance and A/P Accrual Accounts. You should look for potential problems or errors such as transactions charged to the wrong account and duplicate transactions. This process is called the Inventory Reconciliation and Period Close Review. Purchasing and Inventory provide you with a set of reports you can use to reconcile your transactions with your general ledger account balances quickly and easily.
Period-End Checklist
Before reconciling your transactions with your general ledger account balances, you should perform the following steps:
-
Identify the period you want to reconcile and close.
-
Enter all receiving transactions for goods and services you received during the period.
-
Enter and match all invoices you received during the period for your receipt accrual entries.
-
Perform the GL Transfer in Inventory and reconcile your Inventory Purchase Price Variance and A/P Accrual entries.
-
Identify the period-end balances of the following accounts in your general ledger:
-
Purchase Price Variance
-
A/P Accrual Account
-
Inventory Accounts
-
Reconcile the balance of the Purchase Price Variance account using the Purchase Price Variance Report (detailed below).
-
Identify the Invoice Price Variances amount and Accrued Receipts amounts in the A/P Accrual Account (detailed below).
-
Manually remove the Invoice Price Variance amount from the A/P Accrual Account using your general ledger (prior release IPV only).
-
Close your accounts payable period corresponding to the purchasing period for your receipts accrual entries. See: Controlling the Status of AP Accounting Periods, Oracle Payables User's Guide.
-
Perform period-end accruals steps for purchasing and one-time items as described in the following section.
-
Close the period in Purchasing, (You do not need to reverse any journal entry batch in the following period). See: Controlling Purchasing Periods.
-
Close your Inventory period after review. See: Maintaining Accounting Periods, Oracle Inventory User's Guide.
-
Close your General Ledger period after review.
Monitoring Price Variances
Purchasing provides you with reports you can use to review the purchase and invoice price variances. You should run the Purchase Price Variance Report weekly to review the accuracy of standard costs and purchase price variance. The Purchase Price Variance Report is also a good indicator of buyer's performance. However, you should make sure to include in your analysis any fluctuation of market prices beyond buyer control or changes in standard costs. At the end of a period, you should run the Purchase Price Variance Report for the entire period. See: Purchase Price Variance Report.
You should run the Invoice Price Variance Report monthly to review the accuracy of standard costs and purchase order prices. The Invoice Price Variance Report is also a good indicator of buyers' performance. However, you should make sure to include in your analysis any pricing fluctuations beyond buyer control.
You can sort the Invoice Price Variance Report by Category or Supplier, and you can restrict your report to invoice price variances for a specific Category, Supplier, or Period Name.
At the end of a period, you should run the Invoice Price Variance Report for this period. Identify the invoice price variance for all purchase orders charged to the Inventory A/P Accrual Account and compare it with the balance of the Invoice Price Variance account in your general ledger. See: Invoice Price Variance Report.
Reconciling AP Accrual Accounts Balance
At any given time, the balance of the AP (Accounts Payable) accrual accounts can account for the following transactions:
-
Uninvoiced Receipts
-
Over-invoiced Receipts
-
Errors (Invoices or inventory transactions charged to this Account by mistake)
You need to analyze the balance of the AP accrual accounts, distinguish accrued receipts from invoice price variances, and identify errors.
Analyzing the AP Accrual Account Balance
You need to monitor potential problems with purchasing and receiving activities that can affect the accuracy of your AP accrual accounts. You can use the Accrual Reconciliation Report to identify the following problems in receiving, purchasing, inventory, work in process, or accounts payable transactions:
-
Quantities differ between receipts and invoices
-
Incorrect purchase order or invoice unit prices (previous releases only)
-
Discrepancies in supplier billing
-
Invoice matched to the wrong purchase order distribution (or for receipt-matched invoices, the wrong purchase order distribution for the receipt transaction)
-
Received against the wrong purchase order or order line
-
Miscellaneous inventory or work in process transactions that do not belong to the accrual accounts
-
Payables entries for tax and freight that do not belong to the accrual accounts
Using the Accrual Reconciliation Reports
Use the accrual reconciliation reports to analyze the balance of the AP accrual accounts. To submit this report, you must have Oracle Purchasing and Payables installed. You can accrue both expense and inventory purchases as you receive them. When this happens, you temporarily record an accounts payable liability to your Expense or Inventory AP accrual accounts. When Oracle Payables creates accounting entries for the invoice, Payables clears the AP accrual accounts and records the liability from the supplier site. There are three accrual reconciliation reports:
Typically, you run the accrual reconciliation reports at month end. After you have entered your receipt transactions and matched your invoices, you can run the accrual reconciliation reports for any transaction date range and identify any differences between your PO Receipts and AP Invoices. The reports display any miscellaneous transactions recorded in error to your accrual accounts. These miscellaneous transactions or transactions unrelated to purchase order receipts may be from Payables, Inventory, or Work in Process (depending on your installation). After you have researched the reported accrual balances, you can use the Accrual Write-Off form to indicate which entries you wish to remove and write off from this report. And, after you have written off these entries, you can use the Accrual Write-Off Report as supporting detail for your manual journal entry.
Resolving Quantity Differences
The accrual reconciliation reports let you easily identify quantity differences (i.e., when the quantity received for a purchase order shipment is smaller than the quantity invoiced). Such differences leave residual balances that never clear from the AP accrual accounts. You should investigate the cause of these differences and take corrective actions before closing your period.
Common causes of quantity differences include late inventory receipts, incorrect receipt quantities, and supplier overbilling. To correct late receipts, ensure that receivers enter all receipts into inventory. To correct receipt quantities, enter receipt corrections. To correct overbilling errors, follow your standard procedure for supplier debit memos to clear the difference.
Resolving Price Differences
The accrual reconciliation reports lets you determine how much you should have paid and whether the PO or invoice is correct. Such differences leave residual balances that never clear from the AP accrual accounts. You should investigate the cause of these differences and take corrective actions before closing your period.
Accrual Process for Period-End Accruals
Key points for accruing expense purchases at period-end include:
-
You record the total uninvoiced receipt liabilities accrued during the accounting period.
-
Actual journal entries are created for the amount of the receipt liabilities, debiting the charge account and crediting the PO distribution accrual account (normally the Expense A/P Accrual Account defined in the Define Purchasing Options form).
-
You reverse accrual journal entries manually at the start of the new accounting period. The accrual entries are reversed through complete multi-period accounting request on the first day of the next period.
-
If you are using encumbrance accounting, purchase order encumbrance is relieved when the invoice(s) matched to the purchase order are posted to the general ledger.
Receiving Transactions
Purchasing does not record any accounting entries for expense during a receiving transaction if you use period-end accruals. You record all of your uninvoiced liabilities at month end using the Receipt Accruals - Period-End process. See: Receipt Accruals - Period End Process.
Receipts Accruals-Period End
Use the Receipt Accruals - Period End process to create period-end accruals for your uninvoiced receipts for expense distributions. Purchasing creates an accrual journal entry in your general ledger for each expense distribution having uninvoiced receipt you choose using this form. If you use encumbrance or budgetary control, Purchasing reverses your encumbrance entry when creating the corresponding accrual entry.
Purchasing never accrues an uninvoiced receipt twice. Each time you create accrual entries for a specific purchase order distribution, Purchasing marks this purchase order distribution as accrued and ignores it the next time you run the Receipt Accrual - Period-End process. Purchasing creates accrual entries only up to the quantity the supplier did not invoice for partially invoiced receipts.
Purchasing creates the following accounting entries for each distribution you accrue using the Receipt Accruals - Period-End process:
| Account | Debit | Credit |
|---|---|---|
| PO charge account at Uninvoiced Quantity x PO unit Price | XX | |
| Expense A/P accrual account at Uninvoiced Quantity x PO price | XX |
As soon as you open the next period, Purchasing reverses the accrual entries using the following accounting entries. The Complete Multiperiod Accounting program reverses the actual entries on the first day of the next period.
| Account | Debit | Credit |
|---|---|---|
| Expense A/P accrual account at Uninvoiced Quantity x PO unit price | XX | |
| PO charge account at Uninvoiced Quantity x PO Price | XX |
Note: Purchasing adds nonrecoverable tax, if any, to the unit price and includes the exchange rate if the purchase order is in a foreign currency. The exchange rate comes from the receipt if the Invoice Match Option in the purchase order Shipments window is Receipt, from the purchase order if the Invoice Match Option is Purchase Order.
Match, Approve, and Create Accounting Entries for an Invoice
When you enter an invoice in Payables, you match each invoice distribution to a specific purchase order distribution or to a purchase order distribution for a receipt transaction in Purchasing. You can set up Payables to ensure that you pay only for the quantity you received. If you accrue your uninvoiced receipts at period-end, Payables records the expense transactions part of the accounting transactions.
Important: Normally, you charge the original expense account for any invoice price variances, so your PO distribution variance account is the same as the PO distribution charge account. You do not record invoice price variances for expense purchases. Purchasing uses the Account Generator to set your purchase order distribution variance account to be the same as your purchase order charge account. If you want to record your invoice price variances to a separate account, use the Account Generator to define the business rules you use to determine the correct invoice price variance account.
Complete Period Transactions
If you use encumbrance or budgetary control, Purchasing creates encumbrance journal entries in your general ledger each time you approve a purchase order. Similar to accrual journal entries, encumbrance journal entries recognize a liability towards your supplier before any invoicing transactions occur. Unlike accrual journal entries, encumbrance journal entries are not actual transactions. General Ledger tracks actual and encumbrance journal entries and balances separately.
Period-End Checklist
Purchasing provides you with complete flexibility and control for your period-end accruals. You can use the Uninvoiced Receipts Report to analyze your uninvoiced non-inventory receipts before you accrue these receipts. You can then use the Receipt Accruals - Period-End process as many times as you want to generate accrual entries for the vendor or category you choose.
For your period-end reconciliation, you should perform the following steps:
-
.Identify the purchasing period you want to reconcile and close.
-
Enter all receiving transactions for goods and services you received during the period. Purchasing automatically creates receipt accruals for all receipts you entered up to the end of this period. To prevent any period-end disruption, Purchasing lets you provide a receipt date that is different from the date you enter the receipts. You never have to enter all the receipts for a period before the end of this period. You can enter these receipts later. You simply need to back date the receipt date.
-
Enter and match all invoices you received during the period for your receipt accrual entries. You should make sure that you solve all posting holds problems in Payables before accruing receipts. Purchasing creates accrual journal entries for all purchase orders you received and did not match to an invoice. If you matched a purchase order or receipt to an invoice, Purchasing does not accrue the corresponding receipts. Purchasing does not accrue any purchase order that you closed on or before the end of the accrual period you choose. If the invoice is on posting hold, Payables has not yet accounted for the liability corresponding to the invoice. Under these conditions, the liability corresponding to this invoice would not appear in your books for the period. Payables lets you recognize this liability in the following period.
-
Close your accounts payable period corresponding to the purchasing period for your receipt accrual entries.
Note: The List of Values for period end accruals does not require the Accounts Payable period to be closed, however it's strongly recommended that closed periods are used, as the receipt accruals process will not pick up invoices entered after the accruals process is run for the period.
-
For period-end accruals of expense purchases, run the Uninvoiced Receipts Report. Use this report to analyze your uninvoiced receipts. The Uninvoiced Receipts Report lets you use the same selection criteria for your uninvoiced receipts as the Receipt Accruals - Period-End process. You always know exactly what you accrue and for what amount.
-
For period-end accruals of expense purchases, use the Receipt Accruals - Period-End process as many times as you need. You can use the search criteria to choose what you want to accrue and accrue your receipts step by step. You create accruals for a specific purchasing period. Purchasing automatically accrues all uninvoiced receipts your entered up to the end of the accrual period you specify. See: Receipt Accruals - Period End Process.
Each time you use the Receipt Accruals - Period-End process, Purchasing creates a batch in Receiving Subledger for your receipt accruals. It also creates accounting events in SLA.If you are using encumbrance, Purchasing creates another set of accounting events in SLA in your general ledger corresponding to the encumbrance reversal entries for the uninvoiced receipts you accrued.
Purchasing never accrues your uninvoiced receipt twice. Each time you create accrual entries for a specific uninvoiced receipt, Purchasing marks this receipt as accrued and ignores it the next time you use the Receipt Accruals - Period-End process. Purchasing creates accrual entries only up to the quantity your supplier did not invoice for your partially invoiced receipts.
-
Post Accrual and Encumbrance Reversal journal entry batches in your general ledger. (See the following section to identify Accrual and Encumbrance Reversal journal entry batches.) Run Create Accounting - Cost Management for process category receiving to create accounting in SLA.
Note: If you are using encumbrance then you don't need to run the Create Accounting – Cost Management as Receipt Accruals – Period-End creates the accounting in SLA automatically.
-
Transfer to general ledger from SLA using Transfer Journal Entries to GL - Cost Management for Process Category Receiving. You can provide the general ledger batch name while transferring to general ledger so that you can identify the batch in general ledger.
-
Post Accrual and Encumbrance Reversal journal entry batches in your general ledger.
-
Perform all the steps you need to close your accounting period and generate your period-end reports and financial statements in your general ledger.
Use your general ledger system to reverse all the receipt accrual and encumbrance reversal batches you created for your period-end accruals.
-
Close the purchasing period for your receipt accruals. When you close a purchasing period, Purchasing automatically un-marks all the receipts you previously accrued to make sure you can accrue these receipts again if they are still uninvoiced in the next period. See: Uninvoiced Receipts Report.
-
Run Complete Multiperiod accounting which automatically reverses the accrual entries on the first day of next period
Identifying Journal Entry Batches in General Ledger
Purchasing creates accrual journal entries in your general ledger when you accrue receipts. If you use encumbrance, Purchasing also creates encumbrance reversal journal entries corresponding to the receipts you accrued. Purchasing automatically names journal entry batches, headers, and lines for you. The names Purchasing uses to create batches are the following:
Period-End Accruals
Purchasing creates one batch each time you run the Receipt Accruals - Period-End process. Purchasing creates one header for each purchase order you accrue. See: Receipt Accruals - Period End Process.
Journal Entry Batches
-
Batch Name: PO/Accruals/[current date and time]/Batch: [JE_BATCH_ID of the Accruals Batch]
-
Batch Type: Actual
-
Batch Status: Unposted
-
Period: [Accrual Period]
-
Debits: [Sum of all debits for all headers]
-
Credits: [Sum of all credits for all headers]
Journal Entry Headers
-
Header Name: Accrue/PO [PO Number-Release Number]
-
Category: Accrual
-
Source: Purchasing
-
Currency: [PO Currency]
-
Reverse: Yes
-
Reverse to Period: [Next Period]
-
Debits: [Sum of all debits for all lines]
-
Credits: [Sum of all credits for all lines]
Purchasing creates two types of journal entry lines for each accrued receipt:
-
Distribution Lines (one for each distribution of an accrued purchase order line)
-
Accrued Receipt Lines (one for each accrued purchase order line)
Purchasing creates one line for each purchase order distribution you accrued on the purchase order. Purchasing charges each line to the charge account on the purchase order distribution. Purchasing computes the accrual amount by prorating the quantity accrued for the purchase order shipment of the distribution to the quantity ordered on the distribution.
Purchasing creates one journal entry line charged to the PO distribution accrual account (normally the expense A/P accrual account). This line corresponds to the amount accrued for a purchase order. The amount accrued for a purchase order equals the sum of all uninvoiced receipts for this purchase order multiplied by the price for the corresponding purchase order shipments. The accrued receipt journal entry line balances all the distribution journal entry lines.
Distribution Journal Entry Lines
-
Account: [Charge Account for PO Distribution]
-
Amount: [Shipment Price x Quantity Received for Shipment x Quantity Ordered on Distribution/Quantity Ordered on Shipment]
-
Dr/Cr: Dr
-
Description: Purchase Order Line Description
Accrued Receipt Journal Entry Lines
-
Account: [Accrual Account for PO Distribution]
-
Amount: [Sum of all amounts for Distributions Journal Entry Lines for the same Header]
-
Dr/Cr: Dr
-
Description: Accrued Liability Account
Encumbrance Reversal
Purchasing creates one batch each time you use the Receipt Accruals - Period-End process if you use encumbrance.
Note that Encumbrance Journal Entry Batches are unbalanced in General Ledger. General Ledger automatically offsets the Reserve for Encumbrance account with the balance of your encumbrance batch. You set up your Reserve for Encumbrance account when defining your ledgers. See: Defining Ledgers, Oracle General Ledger User's Guide.
Purchasing creates one header for each purchase order you accrue.
Journal Entry Batches
-
Batch Name: PO/Accruals/[current date and time]/Batch: [JE_BATCH_ID of the Encumbrance Batch]
-
Batch Type: Encumbrance
-
Batch Status: Unposted
-
Period: [Accrual Period]
-
Debits: 0.00
-
Credits: [Sum of all credits for all headers]
Journal Entry Headers
-
Header Name: Rev Enc/PO [PO Number-Release Number]
-
Category: Purchases
-
Source: Purchasing
-
Encumbrance Type: Obligation
-
Currency: [PO Currency]
-
Reverse: Yes
-
Reverse to Period: [Next Period]
-
Debits: 0.00
-
Credits: [Sum of all credits for all lines]
Purchasing creates one line for each purchase order distribution you accrued on the purchase order. Purchasing charges each line to the account on the purchase order distribution. Purchasing computes the line amount by prorating the quantity accrued for the purchase order shipment of the distribution to the quantity ordered on the distribution.
Distribution Journal Entry Lines
-
Account: [Charge Account for PO Distribution]
-
Amount: [Shipment Price x Quantity Received for Shipment x Quantity Ordered on Distribution/Quantity Ordered on Shipment]
-
Dr/Cr: Cr
-
Description: Purchase Order Line Description
Accrual Write Off
If you choose the Perpetual Accrual Method within Purchasing, Purchasing records an accounts payable liability to an AP accrual account for goods received but not invoiced. When Payables matches and approves the invoice for the received goods, Payables clears the accounts payable accrual account and records the actual liability amount to the invoice accounts payable liability account.
You might want to reconcile those transactions that leave some balance (liability) in accrual accounts. This can be done with accrual reconciliation process. The following flow diagram illustrates the flow for the accrual reconciliation and the accrual write off process.
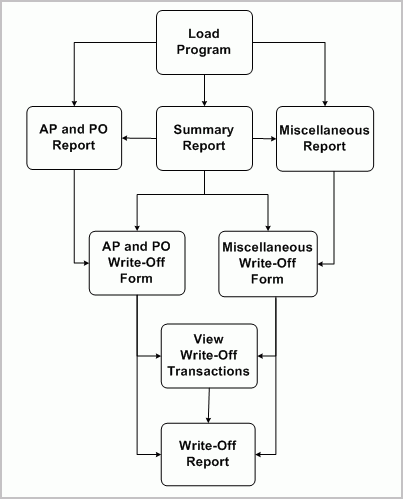
After you have entered your receipt transactions, matched and approved your accounts payable (AP) invoices, you will need to run the accounting process that creates the accounting for these transactions in the final mode and subsequently transfer these transactions to the general ledger. You can then begin the accrual reconciliation process by running the Accrual Reconciliation Load program. This program is used to populate the accrual reconciliation table with all the necessary transaction data for you to perform the reconciliation process. The load program can be run for an operating unit incrementally. The program requires the two parameters from date and to date. These two dates represent the transaction dates that are used to fetch the transaction information from the transaction tables. All the affected purchase order (PO) distributions (in the case of AP/PO transactions and individual transactions in the case of miscellaneous transactions) will be deleted first and the transaction information for these distributions are loaded into the accrual reconciliation tables. See: Accrual Reconciliation Load
Next you would run the Summary Accrual Reconciliation report to identify any differences between your Oracle Purchasing (PO) receipts and Oracle Payables (AP) invoices. This report shows which accounts have balances in them provides a partial breakdown of the balance source. You can see whether related AP and PO transactions and/or miscellaneous AP and Oracle Inventory transactions are contributing to the balance. Furthermore, the report shows the amount of write-offs already performed against the accrual account. See: Summary Accrual Reconciliation Report.
In addition, to aid in your analysis you can run the AP and PO Accrual Reconciliation Report and Miscellaneous Accrual Reconciliation Report. Each of the three reports can be run independently of each other as well as independent of the load program once the load program has been run and the data in the accrual reconciliation load tables is current.
The AP and PO Accrual Reconciliation Report provides a transactional breakdown of each accrual account with a net balance greater than zero in a summarized or full transaction details version. In summarized mode, for each accrual account, only the distribution information and PO, AP, WO (Write-Off) and Total Balances are displayed. For detailed mode, the individual transaction details for each distribution are also shown. You can also see the age of the distribution on this report. The report is first grouped by accrual account, then by aging bucket and then by purchase order distribution ID. Aging bucket is calculated depending on user specified value of “Aging period days” while submitting the report. Transactions are grouped according to their age into aging buckets. See: AP and PO Accrual Reconciliation Report.
The Miscellaneous Accrual Reconciliation Report provides reporting of all the miscellaneous AP (not matched to PO or PO receipts) and Oracle Inventory transactions hitting accrual accounts. The report is first grouped by accrual account, then by each accrual code that hits the specific accrual account and then by purchase order distribution id. See: Miscellaneous Accrual Reconciliation Report
After you have researched the reported accrual balances, you can use the AP and PO Accrual Write-Offs window to indicate which AP and PO transactions you wish to write off and remove from the AP and PO Accrual Reconciliation Report. You can use the Miscellaneous Accrual Write-Offs window to indicate which miscellaneous AP (not matched to PO) and Oracle Inventory transactions you wish to write off and remove from the Miscellaneous Accrual Reconciliation Report. See: Miscellaneous Accrual Write-Offs windowand AP and PO Accrual Write-Offs window.
To complete the procedure you would review your write-offs using the View Write-Off Transactions window and then submit the Accrual Write Off Report. Accrual Write Off Report.
Writing Off Accrual Transactions
-
Oracle Payables and Purchasing are installed.
-
Define your transactions reasons in Oracle Inventory's Transaction Reasons window. This gives you a means of classifying your write-offs so you can record them in separate accounts when you record a manual journal entry to write off these transactions. The Accrual Write Off Report provides a summary by transaction reason. See: Defining Transaction Reasons, Oracle Inventory User's Guide.
-
If you use Oracle Inventory and Work in Process, transfer to your general ledger transactions from these two sources.
-
Transfer your Oracle Payables invoices to your general ledger. See: Payables Transfer to General Ledger Program, Oracle Payables User's Guide.
To write off a transaction from an accrual account:
-
Use the Select Accrual Accounts window to verify or define all the accrual accounts to be used when loading accrual data. See: Select Accrual Accounts.
-
Run the Accrual Reconciliation Load Run program. See: Accrual Reconciliation Load.
-
Run the Summary Accrual Reconciliation Report for the desired operating unit to find out which accounts have balances and the amount of those balances. See: Summary Accrual Reconciliation Report.
-
If a balance is in AP and PO transactions where AP is matched to PO or a PO receipt, run the AP and PO Accrual Reconciliation Report. See: AP and PO Accrual Reconciliation Report.
-
If a balance is in other types of transactions, run the Miscellaneous Accrual Reconciliation Report. See: Miscellaneous Accrual Reconciliation Report
-
-
Examine the transactions.
-
If AP and PO transactions where AP matched to PO or a PO receipt, use the AP and PO Accrual Write-Offs window to view transactions by PO distribution. See: AP and PO Accrual Write-Offs.
-
Otherwise, use the Miscellaneous Accrual Write-Offs window to view the transactions. See: Miscellaneous Accrual Write-Offs
-
-
Choose those transactions that are candidates for write-off and perform the write off.
-
Use the View Write-Off Transactions window to see the write-off transactions. You may also reverse the write-off transactions from this window. See: View Write-Off Transactions
-
[Optional] Run the Accrual Write-Off Report to see the history of write-off transactions See: Accrual Write-Off Report.
-
[Optional] Run the Summary Accrual Reconciliation Report to make sure that the balanced accounts do not appear in the report
Select Accrual Accounts
Use this window to select the accounts to be evaluated by the Accrual Load program to select transactions for possible write off.
-
Navigate to the Select Accrual Accounts window.
-
Select the operating unit for the accrual accounts you are working on.
-
Click Get Default Accounts.
Clicking this button fetches the accrual accounts that were setup as accrual accounts in the prior releases in addition to the accrual accounts setup for each organization and the default accrual accounts from the Purchasing Options window for that operating unit.
-
Add or delete any accounts to be included in this write off analysis.
-
If you made any changes, click Save.
AP and PO Accrual Write-Offs
Use this window to "write off" the selected AP matched to PO transactions, which will automatically generate an accounting event.
-
Navigate to the AP and PO Accrual Write-Offs window.
-
Use the Find window to narrow the number of transactions displayed in the write-off window.
Enter the operating unit for write offs. You can optionally enter the following search criteria: Account number, Balancing Segment range, Item number, item Description, PO Number, PO Release, PO Line, PO Shipment, PO Distribution, Destination Type, Age range, and a Balance range.
If you are confident of your search results, check Auto-Select Results for Write-Off to have all your results selected for write off.
-
Click Find.
-
Select the transactions you wish to write off.
-
Select the transactions that you want to write off.
-
Save your work. A pop-up window will appear for you to enter:
Caution: When the form is saved/committed, all write-off transactions selected will be written off and are cleared from this window.
-
Enter a Write Off Date that is in the same accounting period as the journal entry you would prepare to write off selected transactions.
-
[Optional] Enter a Reason why the selected transactions are being written off.
-
[Optional] Enter a comment to provide more clarity to the reason for the write off.
AP and PO Accrual Reconciliation Report. They will appear on the Accrual Write Off Report.
AP/PO transactions are reconciled at purchase order distribution accrual account level. Hence write offs for these transactions are also performed at purchase order distribution accrual account level. The offset account for these transactions is defaulted from the distribution. The following set of rules determines the default offset account that is used to write the transaction off:
-
If the destination type on the PO distribution that is being written off is expense, the default offset account used is the charge account on the PO distribution.
-
If the destination type on the PO distribution is inventory or shopfloor, the default offset account used is the variance account on the PO distribution.
-
Miscellaneous Accrual Write-Offs
Use this window to "write off" the selected miscellaneous transactions, which will automatically generate an accounting event.
-
Navigate to the Miscellaneous Accrual Write-Offs window.
-
Use the Find window to narrow the number of transactions displayed in the write-off window.
Enter the operating unit for write offs. You can optionally enter the following search criteria: Account number, Balancing Segment range, Item number, item Description, Invoice Number, Invoice Line, PO Number, PO Release, PO Shipment, PO Distribution, Inventory Transaction Id, Date range, Amount range, and a Transaction Type. If the transaction type selected for filtering data is “Consignment”, then you can also specify an age range for these transactions.
If you are confident of your search results, check Auto-Select Results for Write-Off to have all your results selected for write off.
-
Click Find.
-
Select the transactions you wish to write off.
-
Save your work. A pop-up window will appear for you to enter:
Caution: When the form is saved/committed, all write-off transactions selected will be written off and the transactions are cleared from this window.
-
Enter a Write Off Date that is in the same accounting period as the journal entry you would prepare to write off selected transactions.
-
Enter an Offset account. This account will be used as an offset account to write off the transaction balance.
-
[Optional] Enter a Reason why the selected transactions are being written off.
-
[Optional] Enter a comment to provide more clarity to the reason for the write off.
Transactions that you selected to write off in this window will no longer appear on the Miscellaneous Accrual Reconciliation Report. They will appear on the Accrual Write Off Report.
In addition to the inventory transactions and non-matched AP invoices, Invoice Price Variance Distributions (IPV), Exchange Rate Variance distributions (ERV), Tax Invoice Price Variance (TIPV), Tax Exchange rate Variances (TERV), Tax Rate Variance distributions (TRV) are treated as miscellaneous transactions and need to be written off like any other miscellaneous transaction.
The accrual reconciliation also attempts to group the consigned transfer transactions in inventory with the accounts payable invoice that may have been matched to the consumption advice. If there is no balance in the accrual account as a result of the AP invoice clearing the accrual created by the consigned ownership transfer, these transactions are automatically deleted and they will not appear in the reconciliation tables, forms and reports.
-
View Write-Off Transactions
Use this window to view the selected write-off transactions.
-
Navigate to the View Write-Off Transactions window.
-
Use the Find window to narrow the number of transactions displayed in the window.
Select the operating unit for write offs. You can also enter Account number, Balancing Segment range, Date range and Reason.
Optionally if you check AP-PO Write-Offs Only check box you can also enter PO Number, PO Release, PO Shipment and PO Distribution. If you check Miscellaneous Write-Offs Only check box, you can also enter Inventory Transaction Id, Invoice Number and Invoice Line.
AP-PO Write-Offs Only and Miscellaneous Write-Offs Only check boxes restrict data queried for to AP-PO write offs or Miscellaneous write offs respectively.
-
Click Find.
-
Review your write-off transaction and optionally select the transactions you wish to reverse.
A reverse write-off transaction reverses the accounts used by the write-off transaction that is being reversed. If you have customized any of the accounts that are being used on the write off transaction, the same account needs to be customized on the reverse write off transaction as well to make sure that the accounts stay cleared after the write off.
-
Save your work.
Caution: When the form is saved/committed, all write-off transactions selected will be reversed. A write off transaction can be reversed only once. If you want to write these transactions off again, you will need to create a new write-off transaction.
To view the accounting:
-
From the Tools menu select View Accounting to view sub-ledger journal entry lines associated with the write-off transaction. This option is disabled if accounting has not been created for write-off transactions using the Create Accounting program in SLA .
To view the accounting events:
-
From the Tools menu select View Accounting Events to view accounting entry lines associated with a write-off transaction.
Accounting for the Write Off transactions
Accounting for the write off transactions includes journal entries for the accrual account and offset account. When the invoice is matched to receipt, the write off variance may be generated due to the exchange rate difference between the write-off date and various receipt dates. In some cases, there might be a balance left over in the accrual account due to rounding inconsistencies. If the Write off is performed in such a case, the accrual account is cleared by the write off transaction and the write off variance is generated against the write off variance account.
The following rules determine the default write off variance account that is used:
-
If the invoice is matched to purchase order, the write off variance account used is the variance account on the purchase order distribution.
-
If the invoice is matched to receipt and the destination type on the purchase order distribution is expense, the write off variance account used is the charge account on the distribution. If the destination type is non-expense, the write off variance account used is the exchange rate gain or loss account that has been setup for that operating unit.
Related Topics
Defining Purchase Order Receipt Accruals
Overview of Receipt Accounting
Reconciling A/P Accrual Accounts Balance
Accrual Process for Perpetual Accruals
Automatic Offsets in Oracle Purchasing
Receipt Accruals
The default Account Generator configuration in Oracle Purchasing builds a charge, budget, accrual, and variance account for each purchase order, release, and requisition distribution based on the distribution's Expense, or Inventory, destination type. Oracle Purchasing always builds these accounts using the Account Generator; you cannot disable this feature.
To populate the Accrual account for distributions with an Expense destination type, the Account Generator locates the Expense AP Accrual Account that you specify in Define Purchasing Options as part of your application setup and copies it into the Accrual Account in your document. The Account Generator then overlays the balancing segment of the AP Accrual Account with the balancing segment of the charge account so that your transactions always balance by fund.
Defining Purchase Order Receipt Accruals
You can create balanced offsets for receipt accrual accounts in Oracle Purchasing by customizing the default configuration of the Account Generator to overlay the balancing segment of the AP Accrual Account with the balancing segment of the charge account so that your transactions always balance by balancing segment.
Prerequisites:
-
Establish your Chart of Accounts. See: Defining Your Chart of Accounts, Oracle General Ledger User's Guide.
-
See Prerequisites to Using the Account Generator in: Decide How To Use the Account Generator.
To build Purchase Order Receipt Accrual Accounts:
-
Use the same Chart of Accounts you used to build the purchase order charge accounts by balancing segment, substituting the receipt accrual liability account for the expense account.
The Account Generator function is called from the Purchase Orders window to automatically create the receipt accrual liability accounts by balancing segment on each purchase order distribution.
Important: Use the same balancing segment for the charge account and the receipt accrual account so the receipt transactions will balance by balancing segment.
-
Customize your Account Generator process. See: Customizing the Account Generator for Oracle Purchasing.
Related Topics
Automatic Offsets in Oracle Purchasing
Defining Purchase Order Receipt Accruals
Defining Transaction Reasons, Oracle Inventory User's Guide
Overview of Receipt Accounting
Integration with Landed Cost Management
Landed Cost Management (LCM) helps you capture all the costs related to a purchase such as freight, insurance, taxes (country, state, local etc). Landed Cost Management enables you to calculate landed cost of the item, which is taken into consideration for costing and accounting purposes. This helps customers to valuate goods at actual cost and also helps in complying with the country's fiscal/legal requirements.
There are two distinct types of Landed Cost Management practices followed by customers:
-
All fiscal & commercial documents (e.g.: invoices) are received together with the goods. It is a legal requirement that all documents must be carried by the truck driver and delivered to the addressee along with the goods/products. In case of electronic documentation (e-invoices), the driver carriers a report print-out referencing the e-invoice number that can be tracked by any tax authority in case of in-transit audits.
-
In other situations you can define charge templates (freight, duty, insurance, etc) by vendor/item. When goods are received in the Receiving module, Landed cost is calculated based on the receipt quantity, charges in the template and item price, and then costing is carried out using the landed cost. In this scenario, charges are captured and landed cost is calculated in the background, without user intervention.
For information on Landed Cost Management with Purchasing, please refer to the Integration with Other Applications chapter, Landed Cost Management section.
Integration with Receiving
You can calculate landed costs in either of the following two methods:
-
You can configure Oracle Inventory/WMS with LCM as a pre-receiving application, to allow receipts of goods only after the landed cost is calculated in the Landed Cost Management module.
-
You can configure Landed Cost Management not as a pre-receiving application, allowing the user to receive the goods without cost knowledge;this triggers Landed Cost Management in the background to capture costs from pre-defined templates and to calculate landed costs.
In both the cases Receiving captures unit landed cost from LCM for the corresponding receipt line and passes the information to Costing / Accounting modules based on the landed cost instead of purchase price. Landed Cost Management supports PO receipts with Destination type Inventory. For PO receipts with destination type OSP and Expense, RMA and internal requisition receipts are made without landed cost even in the LCM enabled organizations.
In Inventory > Setup > Organization > Organization Parameters, you can define Landed Cost integrations and in Receiving Parameters optionally define Landed cost as a pre-receiving application. LCM enabled flag indicates that PO receipts with destination type Inventory (PO shipments will be marked as LCM) in this organization are made with landed cost and all other receipts with PO price. The Find Expected Receipts window enables you to query an expected receipt with reference to its landed cost records in LCM by shipment ID or Supplier and create receipts in Oracle Inventory. Oracle Inventory takes the landed cost and uses it for the inventory cost calculations instead of purchase price. You can also use Mobile receiving to receive the goods vis-a-vis landed cost records in Landed Cost Management.
Alternatively, if Landed Cost Management is not pre-receiving, then you can receive the goods without landed cost; landed cost is calculated in the background before creating receipt transactions. Receipt transactions with Landed cost are indentified with Landed cost Shipment Line ID in Oracle Inventory for cross reference at a later point of time.
If the Inventory Organization is integrated with Landed Cost Management and Landed Cost Management is a pre-receiving application: You cannot receive goods directly using Desktop/Mobile Receiving without referring to its landed cost records in Landed Cost Management. YOu can query expected shipments by PO, Line, Shipment, Supplier and LCMshipment to receive these receipts with reference to LCM shipments.
If the Inventory Organization is integrated with Landed Cost Management and Landed Cost Management is not a pre-receiving application then landed cost is calculated in the background and receiving transactions are created with LCM shipment ID reference.
You can perform standard inventory functions like Inspections, corrections, RTV etc using existing desktop and mobile functionality. If the original receipt is made with reference to landed cost records (Receipt transaction will have LCM Shipment line stamped) then Landed cost is used for costing these transactions otherwise regular purchase price is used.
Receiving HTML UI
Receiving HTML UI enables users to perform common receiving functions such as creating receipts, entering deliveries, viewing receiving transactions, etc., with a simplified UI that is easy to navigate and use. In addition, available data such as Overdue Receipts and Deliveries ensure that users know the count of their receiving documents, whether in progress or complete or overdue.
Using an appropriate Inventory responsibility, navigate to Inbound, and then to Receiving to use the Receiving HTML UI. The Context Settings page that opens has four tabs: Receive, Deliver, Return, and Receipts. The Receive tab is selected by default. In the Context Settings page, enter your organization (operating unit). This is similar to the Change Organization popup that appears when you open the Receiving forms for the first time in a session. Click Apply to open the Receive page.
Receive Page
The following infotiles are available at the top of the page and you can view information such as overdue receipts, internal external and unordered receipts, and so on. You can view receipt information without querying by specific document number.
Expected Today infotiles displays those documents whose expected receipt date is today, Overdue displays documents whose expected receipt date is a past date; Internal infotile, when clicked, shows expected receipts for inter-organization and Internal Requisition shipments; External infotile shows the expected receipts for purchase orders, and external requisitions; ASNs displays the expected receipts for Advance Shipment Notices.
Click an infotile to see the details appear in the table below the infotiles. In the Receive tab, the following columns are displayed:
-
Document – document number
-
Class – source for the document such as PO, Shipment, RMA (Return Material Authorization)
-
Type – such as Standard Purchase Order, Blanket Agreement, Internal Shipment, RMA
-
Source – such as Supplier Name, Customer Name, Source Org Name
-
Requester – name of the person who created the document
-
Order Date is the date when the document was created
-
Progress displays what percent of the document has been processed: it is a average percentage of each purchase order line receipt quantity divided by shipment quantity. For example:
Two shipment lines in a purchase order have the following quantities:
-
Order quantity: 100; Received Quantity: 30; 30% received
-
Order quantity: 100; Received quantity : 20; 20% received
Progress is calculated at: (30%+20%) / 2 = 25%
-
The Actions column enables you to select whether you wish to create a Quick Receipt or a Directed Receipt. Quick Receipts provide you with pre-filled data and enable you to complete the receipt details entry in a single page, even for multiple lines. Directed Receipts enable you to enter receipt details for individual lines only, along with lot/serial information, and extensive details.
Important: Both Quick Receipt and Directed Receipt options allow LPN based Receiving for WMS enabled organizations.
To search for a document on the Search page, use criteria such as Operating Unit, Class, Type, Source, Document, and so on. To save your search criteria, click Save Search, and then enter the required information on the Create Saved Search page. To perform the unordered receipts, from the Class LOV select Purchase Order or RMA, and then click Unordered Receipts.
Note: From the Class LOV, select Purchase Order for suppliers and RMA for customers.
See Unordered Receipts.
Quick Receipts
The Quick Receipts page enables you to receive items/services for multiple lines using a single page.
Enter a Receipt Number or click the plus (+) icon next to the Receipt Number field to enable the system to generate the receipt number from an internal sequence.
Enter the remaining details such as Shipment Number, Waybill/Airbill, Packing Slip, etc., to complete the receiving information. You could add attachments to the newly created receipt by clicking Add and entering the attachment information.
At the line level, you can enter additional receipt details for the line by clicking the pencil icon. Or you can remove the line from the receipt by clicking the X icon.
If you click the pencil icon, the receipt details popup opens, where you can enter the following information:
-
Secondary Quantity and Secondary UOM
-
Revision
-
Destination (for example, Inventory, Expense)
-
Location
-
Subinventory (such as Finished Goods Inventory)
When you have completed entering the receipt details in the popup, click Apply.
When you have completed entering receipt information in the Quick Receipts page, click Receive. You get a confirmation message with the receipt number, stating that the receipt is confirmed. Or you may see error messages (you need to correct errors before proceeding) or warning messages (For example: Purchase order receipt date tolerance exceeded Cause: The receipt you are trying to transact exceeds the days early or late tolerance. Action: Return the shipment to the supplier if you think it is necessary. Action: Modify the receiving controls setup at the purchase order shipment, item, or organization level so that you allow receipts exceed days early or late tolerance).
Directed Receipts
Directed receipts enables you to enter all receipt information on all the lines, however the page contains information from only one shipment line. If you wish to receive all the lines, you need to enter details for each line by clicking Next Item; Click Cancel if you do not want to receive a specific line. If the item is lot controlled, the lot section is shown. The lot popup displays the fields that are applicable to lot controlled items. If you wish to enter additional lot attributes, click the additional details button. You can add serial number and serial number details for the lot. The lot section is hidden for non-lot controlled items.
Enter the receipt details and click Confirm or Next Item. When you have completed entering details for the next items, click Confirm. You will see the Directed Receipts page, where you can enter the remaining details such as Shipment Number, Waybill/Airbill, Packing Slip, etc., to complete the receiving information. You could add attachments to the newly created receipt by clicking Add and entering the attachment information.
When you have completed entering receipt information in the Directed Receipts page, click Receive. You get a confirmation message with the receipt number, stating that the receipt is confirmed. Or you may see error messages (you need to correct errors before proceeding) or warning messages (For example: Purchase order receipt date tolerance exceeded Cause: The receipt you are trying to transact exceeds the days early or late tolerance. Action: Return the shipment to the supplier if you think it is necessary. Action: Modify the receiving controls setup at the purchase order shipment, item, or organization level so that you allow receipts exceed days early or late tolerance).
LPN Receipts for Multi-Distribution Purchase Orders with Projects
You can perform standard LPN receipt via WMS mobile. However, WMS does not provide the flexibility to receive against a specific project and distribution for a multi-distribution purchase order.
With the Receiving HTML UI, you can receive packed material for specific distributions in separate LPNs and this enables you to accurately track the transaction flow of items on the Receiving floor at the Project level and at the LPN level.
You can use LPN receipts with Standard Receipt routing as well as Inspection Required Routing, and you can put-away these LPN receipts using the WMS UI.
For more information, see: Oracle Warehouse Management User's Guide.
Use the Expected Today infotile (in the Receive tab) to receive for a multi-distribution purchase order, with LPN receipts against both project and task.
Alternatively, click Searchfor the receipt you require.
-
Use the Directed action in the Actions column to view the receipt details. The Directed Receipt page displays, with Project and Task information. The shipment quantity is displayed in the Quantity field.
-
If multiple distributions have multiple projects and tasks, the Multiple link appears next to the Project field. Click the plus icon near the LPN field to generate the LPN automatically.
-
When the LPN is generated, the first distribution is defaulted, along with the corresponding project or task. Select Next Item to receive the next distribution.
-
When you are done, click Confirm to review the receipt details. Finally, click Receive to complete the receipt process. A confirmation message displays, telling you that the receipt is successful.
To view the completed receipt transactions, click the Receipts icon in the home page, and query for the receipt number or document number.
Unordered Receipts
The Unordered Receipts page enables you to receive items from a supplier when there is no corresponding purchase order. You receive the items, track them, and wait for a buyer to decide which purchase order to use for receiving. You can receive returned items from a customer that were issued on a sales order in Oracle Order Management, while you find out from the sales representative which return material authorization (RMA) to use for receiving.
To perform unordered receipts:
-
Navigate to the Receive page.
-
Click Search.
-
On the Search page, from the Class LOV, select Purchase Order for suppliers or RMA for customers.
-
Click Unordered Receipts. The Unordered Receipt page appears.
Note: For suppliers, the Unordered Receipt: Purchase Order page appears. For customers, the Unordered Receipt: RMA page appears.
-
Enter a receipt number in the Receipt Number field.
-
Enter a source of the receipt in the Source field.
-
Click the + (plus) icon to add lines to the table.
-
For the unordered receipt lines enter information such as Item, Quantity, Location, and Item Category.
-
Optionally, enter the information such as Revision, UOM, DFF, and so on.
-
Click Receive.
-
Click OK for the confirmation message.
Note: To perform further transactions such as inspect or deliver, you must match the receipt.
For information about matching the unordered receipts, see Match Page.
Inspect Page
The Inspect page enables users to perform an inspection of the received goods.
The Inspect tab has the following info tiles:
-
Pending Inspection - lists all receipts that require inspection
-
Internal - lists internal receipts that require inspection
-
External - lists external receipts that require inspection
-
ASNs - lists Advanced Shipment Notices (ASN) that require inspection
Click the Pending Inspection infotile and the search results table displays the receipts that need to be inspected.
Or click the Search button on the right most top corner of the page to open the Inspect Search page. When the profile option RCV: Allow Routing Override is set to Yes, you can view standard receipts in the search results table, otherwise standard receipts are not displayed. You can search for a receipt by receipt number, class, document, or item, and so on. Click Go after entering your search criteria, and then click the Receipt Number link to open the Inspect Receipt Header and Transaction page.
To inspect received goods with Oracle Purchasing, set the profile option QA: PO Inspection to Oracle Purchasing at the user level. Select one or more items, and then click the Edit icon to view, update, or enter inspection details. In the Transaction Details page that opens, you can update the quantity, UOM, and other fields. Ensure that you enter the Inspection Date and then click OK to save your changes. You get a confirmation message that for the Receipt, the Inspection Transaction is complete. Click OK to continue.
Inspecting Received Goods with Oracle Quality
Use the Inspect page to enter inspection information for received goods. You can update, duplicate, delete, or view quality results of the received goods.
Prerequisite: Set the profile option QA: PO Inspection to Oracle Quality at the user level.
The Receiving HTML UI integrates with Oracle Quality to support the following features: Sampling, Skip Lot inspections, and E-records and E-signatures (ERES).
Sampling Inspections
To perform sampling inspections, a percentage of the total received quantity is available. Use the Sampling Plan Setup window to determine the size of the samples to be inspected. Inspect a few quantities from the received quantity at random to decide the pass or fail status of the received quantity. The inspection results of the entire received quantity is based on the results of the sample.
For more information, see Performing Inspection Sampling, Oracle Quality User’s Guide.
Skip Lot Inspections
During skip lot inspection, the skip lot schedule defines the frequency or ratio of the inspected and the skipped received quantity. Oracle Quality inspects the goods in the following manner:
-
Qualification: The lots received by a supplier are inspected. This number of lots received is the minimum number of consecutive lots, which need to be accepted.
-
Skipping: The predefined parameters determine the inspection frequency of the inspected and skipped lots.
Use the Interruption Parameters tab to define the conditions based on which you can reset the skip lot process to the qualification step.
For more information, see Performing Skip Lot Inspections, Oracle Quality User’s Guide.
E-records and E-signatures (ERES)
To capture an e-record when you perform a receiving inspection, Oracle Quality must be installed. You can capture an e-record when you enter receiving inspection results. After entering the receiving inspection results, capture the required e-signatures. You can perform group inspection for multiple lines and enter your signature online or defer to a later time. An online signature enables you to sign while the transaction is happening in the window. A deferred signature can be entered at any time after the transaction is saved.
To perform group inspection transaction ERES with online or deferred signature, set the URL parameter ENABLE_DEFER_ERES for the function RCV_INSPECT_PG. If the parameter ENABLE_DEFER_ERES is set to Y, then you can defer the signature. If the parameter ENABLE_DEFER_ERES is set to N, then you must enter the signature online.
To capture the ERES, you must set the following profile options:
-
QA: PO Inspection to Oracle Quality.
-
EDR: E-records and E-signatures to Yes at the site, application, or responsibility level.
To enter inspection information:
-
Navigate to the Inspect page.
-
Click Pending Inspection.
-
Click a receipt number to open the Receiving Transactions page.
Note: You could use the Receipt, Source search to retrieve a receipt by receipt number.
-
The Receiving Transaction page appears.
-
Identify an item with the Inspection Status as Not Inspected.
-
Click the Actions icon.
Note: If skip lot is enabled, and multiple skip lot plans exist, then the Receiving Transaction Details page appears to select the skip lot plan and enter the details of the results. Additionally, you can view the Sample Size for the applicable sampling plans in the applicable plan region.
-
Enter the results on the Add Data: Enter Results page.
-
Click Apply.
-
Click OK on the Receiving Transaction Details page.
-
Repeat steps 3-9 to add item inspections.
-
Click Save.
-
Click OK.
Note: Note: For more information about quality results data entry, see Oracle Quality User's Guide.
Deliver Page
The Deliver page enables you to view and create deliveries. The following infotiles are available at the top of the page and you can view information such as overdue receipts, internal and external receipts, etc., using the infotiles. You can view receipt information using the table below the infotiles without querying by specific document number. Click an infotile, and the relevant information displays in the table below the infotile.
The Pending Deliver infotile shows you information on the pending deliveries for the items/services. Internal infotile, when clicked, shows expected deliveries for inter-organization and Internal Requisition shipments; External infotile shows the expected deliveries for purchase orders, and external requisitions; ASNs displays the expected deliveries for Advance Shipment Notices.
-
Receipt – Receipt Number
-
Class – source for the document such as PO, Shipment, RMA (Return Material Authorization)
-
Type – such as Standard Purchase Order, Blanket Agreement, Internal Shipment, RMA
-
Source – such as Supplier Name, Customer Name, Source Org Name
-
Received By – the name of the user who received the items/services
-
Order Date – date of the source document
-
Progress displays what percent of the document has been processed: it is a average percentage of each purchase order line receipt quantity divided by shipment quantity. For example:
Two shipment lines in purchase order have the following quantities:
-
Order quantity: 100; Received Quantity: 30; 30% received
-
Order quantity: 100; Received quantity : 20; 20% received
Progress is calculated at: (30%+20%) / 2 = 25%
-
The Actions column enables you to select whether you wish to create a quick delivery or a directed delivery. Quick Deliver provide you with pre-filled data and enable you to complete the delivery details entry in a single page, even for multiple lines. Directed Deliver enable you to enter delivery details for individual lines only, along with lot/serial information, and extensive details.
You could use the Search field above the Document column to search for a specific document by receipt number. Or you could use the Search button at the top right of the page to open the Search page. Enter search criteria to find your documents. You could save your searches if you use frequently-used criteria, for example, a purchase order belonging to an operating unit, or an order date or receipt number and a due date.
Quick Deliver
The Quick Deliver page enables you to capture delivery information for items/services for multiple lines in a single page.
The Receipt Number and Receipt Date are defaulted in the respective fields.
Enter the remaining details such as Shipment Number, Waybill/Airbill, Packing Slip, etc., to complete the delivery information. You could add attachments to the newly created delivery by clicking Add and entering the attachment information.
At the line level, you can enter more receipt details for the line by clicking the pencil icon. Or you can remove the line from the delivery by clicking the X icon.
If you click the pencil icon, the receipt details popup opens with the ability to enter the following information:
-
Secondary Quantity and Secondary UOM
-
Revision
-
Destination (for example, Inventory, Expense)
-
Location
-
Subinventory (such as Finished Goods Inventory)
When you have completed entering the receipt details in the popup, click Apply.
When you have completed entering delivery information in the Quick Deliver page, click Deliver. You get a confirmation message with the delivery number, stating that the delivery is confirmed. Or you may see error messages (you need to correct errors before proceeding) or warning messages. You can opt to ignore the warnings and proceed with the delivery creation, or you could correct the causes of the warning messages and then proceed with the delivery creation.
Directed Deliver
Directed deliveries enable the user to enter the delivery information for the first item based on the line number. If the item is lot controlled, the lot section is shown. The lot popup displays the fields that are applicable to lot controlled items. If you wish to enter additional lot attributes, click the additional details button. You can add serial number and serial number details for the lot. The lot section is hidden for non-lot controlled items.
Enter the delivery details and click Confirm or Next Item. When you have completed entering details for the next items, click Confirm. You will see the Directed Deliver page. You could add attachments to the newly created delivery by clicking Add and entering the attachment information.
At the line level, you can enter more receipt details for the line by clicking the pencil icon. Or you can remove the line from the receipt by clicking the x icon. Clicking the pencil icon takes you back to the page where you entered the delivery details for that line and you can edit the delivery details for that line.
When you have completed entering delivery information in the Directed Deliver page, click Deliver. You get a confirmation message with the Delivery number, stating that the delivery is confirmed. Or you may see error messages (you need to correct errors before proceeding) or warning messages. You can opt to ignore the warnings and proceed with the delivery creation, or you could correct the causes of the warning messages and then proceed with the delivery creation.
Return Page
The Return page displays infotiles that you can click to view Rejected receipts, Returned to Receiving, and Today's Receipts. You could also search for a receipt by clicking Search or by using frequently used search criteria, such as Operating Unit, Class, Type, Receipt Number, Receipt Org, etc.
The Rejected infotile shows the rejected receipts. Click a rejected receipt number to open the Receiving Returns page. Use the Receiving Returns page to perform returns for the rejected items.
Use the Returned to Receiving infotile to perform a regular return. Select a receipt by clicking the receipt number in the search results table or the infotiles results table. The Receiving Returns page appears, enabling you to perform returns for the receipt you selected.
The receipt lines details are displayed on the Receiving Returns page. Select the line for which you wish to return quantity, and then enter the Quantity and UOM (Unit of Measure) that you wish to return. You can return the entire (full) quantity, or a partial quantity. Specify that you wish to return to the supplier or vendor.
Click the pencil icon in the Actions column to view and update return details in the popup. The Return Details popup enables you to enter additional details for the return such as Subinventory, Locator, Secondary Quantity, and Secondary UOM.
Click the Missing Receipt button on the Returns page to perform returns when you don't have a receipt or receipt number. The Receiving Returns: Missing Receipt Transactions page appears. There are no receipt details on this page. Enter the Item, Quantity, UOM, and Return To (Supplier) information. Use the Return Details popup to enter additional details for the return such as Subinventory, Locator, Secondary Quantity, and Secondary UOM. Click Return to perform the return without a receipt, and return to the main Return page.
Receipts Page
The Receipts page displays infotiles that you can click to view more details in the table below. The Today's Receipts infotile shows you the receipts that were created on the current date. Weekly Late and Weekly Early infotiles display the early and late receipts for the current week. Weekly External and Weekly Internal show the external receipts (created for documents such as purchase orders and external requisitions) and internal receipts (created for documents such as inter-organization and internal requisition shipments) for the current week.
When you click an infotile, the table below the infotiles shows the following information:
-
Receipt – Receipt Number
-
Class – source for the document such as PO, Shipment, RMA (Return Material Authorization)
-
Type – such as Standard Purchase Order, Blanket Agreement, Internal Shipment, RMA
-
Source – such as Supplier Name, Customer Name, Source Org Name
-
Received By – the name of the user who received the items/services
-
Receipt Date – date of the receipt document
You could use the Search filter above the Receipt column to retrieve a specific receipt by receipt number. Or you could use the Search button at the top right of the page to open the Search page. Enter search criteria to find your documents. You could save your searches if you use frequently-used criteria, for example, a purchase order belonging to an operating unit, or an order date or due date.
For more information on the Correct Receipts action, where you can correct receipt quantities, refer to the Oracle Inventory User's Guide.
Click a Receipt Number link to open the Receiving Transactions page. The Receiving Transactions page shows you the receipt details, along with the routing information. You can close the page by clicking Done and you will navigate back to the Receipts page.
Match Page
The Match page enables you to match the unordered receipts with the corresponding PO or RMA.
The Match page has the following infotiles:
-
Supplier: Displays the pending unordered receipts to match with the document corresponding to a supplier
-
Customer: Displays the pending unordered receipts to match with the document corresponding to a customer
-
Weekly: Displays the pending unordered receipts for the previous week
The Match page displays the following columns in the Result table:
-
Receipt - Receipt Number
-
Class - Source of the document such as PO or RMA (Return Material Authorization)
-
Source - Such as Supplier Name, Customer Name, Source Org Name
-
Received By - Name of the person who received the items or services
-
Receipt Date - Date of the receipt document
To match unordered receipts:
-
Navigate to the Match page.
-
Search for a receipt.
-
From the Result table, click the receipt link. The Unrecorded Receipt Matching page appears.
-
Enter order numbers for items in the Order Number field.
-
Click Match.
-
Click OK for the confirmation message.
Status Page
The Status page displays the status of transaction that could be pending or error.
The Status page has the following infotiles:
-
Today's Errors: Displays interface transaction records in error status for the current date
-
Today's Pending: Displays interface transaction records in pending status for the current date
-
Monthly Errors: Displays interface transaction records in error status for the previous month
-
Monthly Pending: Displays interface transaction records in pending status for the previous month
-
Return Orders: Displays interface transaction records with pending or error status for return orders
The Status page displays the following columns in the Result table:
-
Receipt - Receipt Number
-
Document - Document Number
-
Class - Source of the document such as PO, Shipment, RMA (Return Material Authorization)
-
Transaction Type: Type of the transaction such as Standard Purchase Order, Blanket Agreement, Internal Shipment, RMA
-
Transaction Date: Date of the transaction
-
Processing Status: Status of the transaction such as Pending or Error
-
Actions: Two action items for the transaction are additional information and delete
Note: The delete option is unavailable for return orders.
To resubmit the pending transactions:
-
Select the receipts that you want to resubmit.
-
From the Actions LOV select Resubmit.
-
A confirmation message to resubmit the selected receipts appears. Click Yes to resubmit.
To cancel the return orders:
-
Select the receipts that you want to cancel.
-
From the Actions LOV select Cancel Return Shipment Lines.
-
A confirmation message to cancel the selected shipment lines appears. Click Yes to cancel the return orders.