Customer Merge
This chapter covers the following topics:
- Merging Customers
- Merging Sites for the Same Customer
- Merging Different Customers
- Submitting the Merge Process
- Customer Merge Execution Report
- Reviewing Merged Customers
Merging Customers
Use Customer Merge to consolidate any duplicate customers or transfer site use activity from a customer or site that is no longer active.
After the merge completes successfully, all activity that was previously associated with the old customer or site is now associated with the new customer or site. Activity includes invoices, debit memos, commitments, credits, receipts, adjustments, and chargebacks. The merge process also checks for records in the AutoInvoice interface tables.
You can also retain links to external systems, such as legacy and third party systems, by using the Oracle Trading Community Architecture Source System Management (SSM) feature. You can use SSM to map external systems to the entities in the TCA registry. After you map Source names and codes to TCA entities, the merge-to customer retains the cross references to the external systems of both the merge-from and the merge-to customers. See: Source Systems Overview, Oracle Trading Community Architecture Administration Guide.
Important: You can only merge sites that pass tax validation. See: Tax Validation for Merge.
Merge Customers or Sites
You can either merge site uses for the same customer or all of the site uses for two different customers.
Important: You can merge site uses only in the operating units that are on your access list.
Predefined site uses include Bill-to, Ship-to, Statements, Marketing, Legal, and Dunning. You can only merge a bill-to site with a bill-to site, a ship-to site with a ship-to site and so on whether you are merging different customers or two sites for the same customer.
You can also choose to either inactivate or delete your old customer and sites use information. If you choose to delete the customer or site use information, then it is removed from the database and the application does not maintain an audit trail of this data. Note that you cannot directly delete a customer. You must use the Customer Merge process with the Delete after Merge check box selected to merge your customer (called the From Customer) to a dummy customer (called the To Customer). This process deletes the merged (From) customer. If you are merging sites for the same customer, then you cannot choose to delete the old customer information (since the customers are the same).
Whether you can inactivate or delete the merge-from customer depends on the account sites. If the merge-from customer has:
-
Sites only in the operating units that are on your access list - you can delete or inactivate the merge-from customer.
-
Inactive sites in other operating units - you can inactivate but not delete the merge-from customer.
-
Active sites in operating units to which you don't have access - you can neither inactivate nor delete the merge-from customer.
Old customers and site uses that are merged are assigned a status of 'Inactive' after the merge process is complete. Inactive customers cannot generate new transactions, but you can view their information or reactivate them at any time in the Customers window.
Merge Individuals or Organizations
Customer Merge distinguishes individual customers (consumers) from organizations and can merge both of these entities. However, the customer parties being merged must be of the same party type. Thus, you can merge only individual customers (consumers) with individual customers (consumers). You can merge only organization customers with organization customers. The same is true for merging customer accounts for parties of different party types.
All of the requirements described in Merging Sites for the Same Customer and Merging Different Customers are true whether you are merging individuals or organizations.
Identify Duplicate Customers
Use the Duplicate Customer Report to see a list of all duplicate customers before you initiate the customer merge program. This report tries to match duplicate customer names based on the search criteria that you specify. See: Duplicate Customer Report, Oracle Receivables User Guide.
Review Customer Details
To see active or inactive customer information, use the Customer Listing Detail and Summary reports, Oracle Receivables User Guide. The Detail report displays contacts, addresses, and relationships for each customer you choose in your search criteria. The Summary report displays a list of your customers and their addresses.
Merge Transactions in Other Applications
If you have any of the following applications installed and you run customer merge, the system automatically merges all transactions associated with the merge candidates in those applications as well:
-
Customer Service
-
Federal Financials
-
Grants Accounting
-
Inventory
-
Master Scheduling /MRP Planning
-
Order Management
-
Payables
-
Pricing
-
Projects
-
Property Manager
-
Public sector financials
-
Purchasing
-
Quality
-
Shipping
-
Training Administration
Update Transaction Information
When you merge customers, Customer Merge updates the customer information for all of the old customers transactions. For example, if you merge ACME with Customer XYZ, the program updates all of ACME's transactions with Customer XYZ's ship-to and bill-to information.
Maintain Custom Data Integrity
If you have custom tables in your AR account that have foreign keys to the HZ_CUST_ACCOUNTS, HZ_CUST_ACCTS_SITES, or HZ_CUST_SITE_USES_ALL table, you can use the package ARP_GENERIC_CMERGE to ensure that the foreign keys remain valid. This package needs to be modified to include your custom table names and foreign keys. Use the $AR_TOP/install/sql/arplbtrx.sql file as a guideline on how to modify this package.
Related Topics
Merging Sites for the Same Customer
Tax Validation for Merge
For tax purposes, you can only merge addresses within the same tax jurisdiction:
-
If the addresses are set up for tax validation in Geography Hierarchy then the address elements with a tax validation usage must match. See: Managing Validations, Oracle Trading Community Architecture Administration Guide.
For example, Address 1 is created in a country that is set up with City, County, and State selected for tax validation. Address 2 is created in the same country. To merge these two addresses, the city, county, and state for both addresses must be exactly the same, as validated against geographies set up in Geography Hierarchy.
-
If the addresses are not set up for tax validation in Geography Hierarchy, then you can merge the addresses as long as the country is the same.
-
If you have both types of addresses, with and without addresses set up for tax validation in Geography Hierarchy, then you cannot merge the addresses.
Merging Sites for the Same Customer
If a customer is closing one of its sites and there is activity assigned to this site, you can use Customer Merge to transfer all activity from the old site to one of this customer's existing sites. For example, ACME currently has two bill-to sites, but they are planning to close one of these locations. Customer Merge lets you transfer all of their activity from the site that will be closed to their remaining open site.
Any predefined site uses or site uses that you defined in the Receivables Lookups window must be merged with similar site uses. For example, you are merging two of Customer ABC's sites. This customer has defined the following sites as described in this table:
| Address | Site Usage |
|---|---|
| Address1 | Bill-to |
| Address1 | Ship-to |
| Address2 | Ship-to |
In this example, you can only merge the ship-to site of Address1 with Address2 because they are both ship-to sites of different addresses.
The diagrams below illustrate what happens when ACME closes one of its locations. Customer Merge transfers all of ACME's activity from the site that is closed to the remaining open site.
Before the Merge
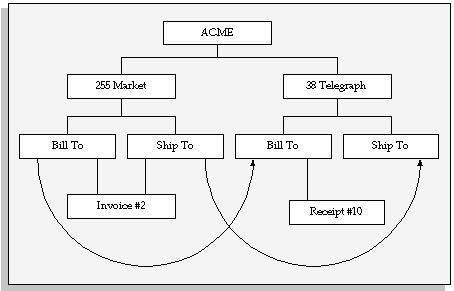
This illustration shows ACME before the company closes a site and transfers all activity from the old site to an existing site. Before the merge, ACME has two addresses: 255 Market and 38 Telegraph. The 255 Market address is both a bill-to and ship-to site and has one invoice against both sites. The 38 Telegraph address is also a bill-to and ship-to site with one receipt against the bill-to site.
The illustration shows how the merge program combines the two ship-to sites and the two bill-to sites of the 255 Market and 38 Telegraph addresses, and transfers all activity from the site that is closing (255 Market) to the existing site (38 Telegraph).
After the Merge
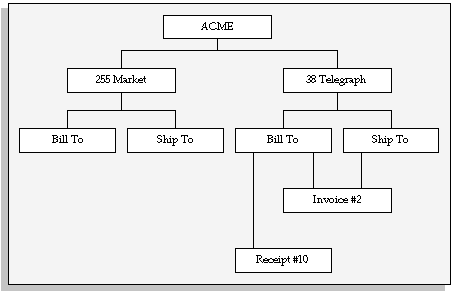
This illustration shows that there is no activity against ACME's 255 Market address after the merge. Instead, the invoice that was previously against the 255 Market bill-to and ship-to sites is now attached to the 38 Telegraph bill-to and ship-to sites. The receipt remains against the 38 Telegraph bill-to site.
Important: When merging two sites for the same customer, you cannot submit the merge if Delete After Merge is set to Yes.
Prerequisites
-
Complete Auto Invoice processing (optional). This minimizes the number of rows to be merged in the interface tables. The merge process can then run more efficiently.
-
Generate the Customer Listing report to see detailed information about the customer and site uses (optional). See: Customer Listing Detail and Summary Reports, Oracle Receivables User Guide.
-
Create a map that shows the site uses you want to merge and the sites you want to maintain. Check that you are merging like site uses (for example, Bill-To's merged with Bill-To's).
-
Determine whether to inactivate or delete old site use information.
To merge site usages for the same customer:
-
Navigate to the Customers Merge window.
-
In the From region, select the Type of customer you are merging, then select or enter the name or number of the customer.
Tip: If merging an individual, you can use the list of values to search for the person's first or last name.
Important: The customer names and number LOVs include names and numbers of only those customers that have at least one account site in the operating units that are on your access list.
-
In the From region, select the operating unit in which you want to merge the account sites. Alternatively, you may select All to merge the account sites in all the operating units that are on your access list and in which the customer has account sites.
In the Account Site area of the From region, the Operating Unit, Site Number, Addresses, and Usage are auto populated.
Important: If your responsibility allows access to only one operating unit, then that operating unit and related customer account details, such as Site Number, Addresses, and Usage, are defaulted in the Account Site area.
-
In the From region, select a Merge Reason: De-duplication or Merger.
-
In the To region, enter the same customer name or number or select it from the list of values.
-
In the From region, select each site you want to merge.
-
In the To region, enter the new Address for the site or select it from the list of values.
The Site Number is auto populated in the To region.
Note: Site usage is defaulted in the To region based on the usage in the From region. For example, a bill-to site use is defaulted in the To region for each site with a bill-to site use in the From region.
Important: You cannot merge sites with different account site usage or across operating units.
-
Assign a processing priority, P1-High, P2-Medium, or P3-Low, to the merge process.
Note: Use the processing priority when creating merge batches. For example, you can create a batch for merges having the priority P1 to process all the high priority merges first.
-
To save your merge details without submitting the merge, save your work. This lets you review your mapping for accuracy before actually merging your customer and site information.
Note: At any time before you choose the Merge button, you can use the Cancel button to cancel the merge
To submit the merge process immediately, choose Merge. Because batch processing is more efficient, you can decide to save the merge for later batch processing or to immediately continue with processing. To immediately process the merge, choose Continue. To save the proposed merge for later batch processing, choose Save. See: Submitting the Merge Process.
Important: If required, repeat these steps for the other operating units, if any, for the customer account.
If you wish to merge account sites in another operating unit for the same customer account or if you wish to perform an account merge for an entirely different customer account, press the Down Arrow key. This action clears the Customer Merge window and readies it for the next account merge.
Related Topics
Merging Different Customers
When merging two different customers, you must merge all site uses associated with the customer being merged. For example, ACME purchases Pacific Express and each has one bill-to site and one ship-to site. You can transfer activity from Pacific Express to ACME by merging like site uses assigned to Pacific Express (for example, Bill-to's merged with Bill-to's). The application automatically associates all transaction activity and customer relationships with the new customer.
Customer Merge ensures that you inactivate or delete all site uses for the old customer; you cannot inactivate some site uses and delete others. In addition, you must assign all of the old customer site uses to one or more of the new customer's site uses. For example, you want to merge the following customers that have sites as described in this table:
| Customer ABC | Customer XYZ |
|---|---|
| Address1 (bill-to) | Address1 (bill-to) |
| Address2 (ship-to) | Address1 (ship-to) |
| Address3 (statements) |
You can merge the two addresses having Bill-to site use (Address 1's) and the two addressed having Ship-to site use (Address 2's). However, you cannot merge Address 3 of Customer ABC, which has a Statements site use, to Customer XYZ because Customer XYZ has no address with the same site use. The only way you can merge these two customers is to copy Address 3 and assign its site use to the merge-to customer (Customer XYZ) by selecting the Create Same Site check box.
The diagrams below illustrate what happens when ACME purchases Pacific Express. Customer Merge transfers activity from Pacific Express to ACME by merging like site uses assigned to Pacific Express.
Before the Merge
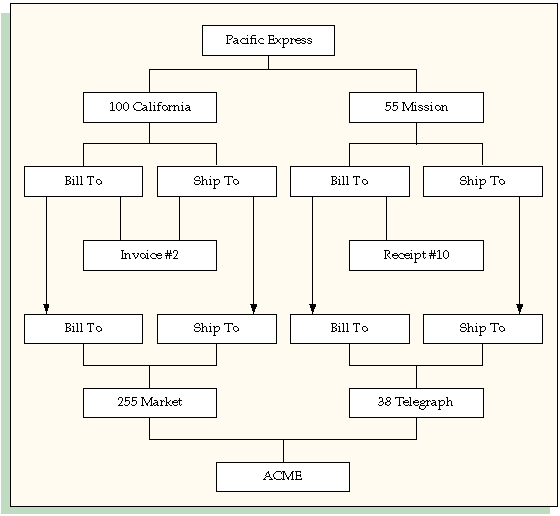
This illustration shows the sites and activity for Pacific Express and ACME, before you transfer all activity from Pacific Express to ACME.
Before the merge, Pacific Express has two sites: 100 California and 55 Mission. The 100 California address is both a bill-to and ship-to site and has one invoice against both sites. The 55 Mission site is also a bill-to and ship-to site with one receipt against the bill-to site. ACME has two sites: 255 Market and 28 Telegraph. Both of these sites are bill-to and ship-to sites.
The illustration shows how the merge program transfers activity from Pacific Express to ACME by merging like site uses assigned to Pacific Express.
After the Merge
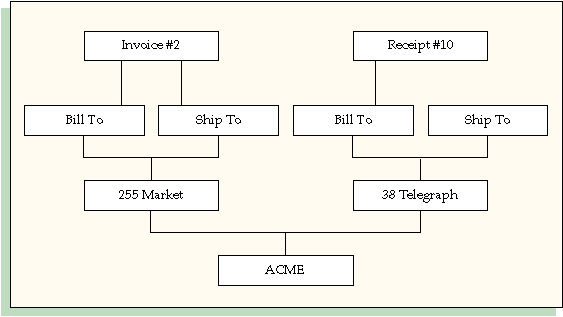
This illustration shows that there is no activity against Pacific Express after the merge. Instead, the Pacific Express invoice against the 100 California bill-to and ship-to sites is now attached to both the bill-to and ship-to sites of ACME's 255 Market address. The Pacific Express receipt against the 55 Mission bill-to site is now attached to ACME's 38 Telegraph bill-to site.
Prerequisites
-
Generate the Duplicate Customers Report to see a list of potential duplicated customers (optional). See: Duplicate Customer Report, Oracle Receivables User Guide.
-
Create a map that shows the site uses for the old customer that you want to merge with the To customer. Check that you are merging like site uses (for example, Bill-to's merged with Bill-to's).
-
Create new site uses for the To customer (if the old customer has any site uses which does not exist for the To customer).
-
Determine whether to inactivate or delete the old customer.
To merge two different customers:
-
Navigate to the Customers Merge window.
-
In the From region, select the Type of customer you are merging, then select or enter the name or number of the customer to merge.
Note: If merging an individual, you can use the list of values to search for the person's first or last name.
Important: The customer names and number LOVs include names and numbers of only those customers that have at least one account site in the operating units that are on your access list.
-
In the From region, select the operating unit in which the customer you want to merge has account sites. In case the customer you want to merge has account sites in more than one operating unit, select All to merge the account sites in all the operating units that are on your access list.
In the Account Site area of the From region, the Operating Unit, Site Number, Addresses, and Usage are auto populated.
Important: If your responsibility allows access to only one operating unit, then that operating unit and related customer account details, such as Site Number, Addresses, and Usage, are defaulted in the Account Site area.
-
In the From region, select a Merge Reason: De-duplication or Merger.
-
In the To region, select the customer Type, then enter the name or number of the customer to merge or select it from the list of values.
-
For each site in the From region, enter an address in the To region or select it from the list of values.
The Site Number is auto populated in the To region.
Note: Site usage is defaulted in the To region based on the usage in the From region. For example, a bill-to site use is defaulted in the To region for each site with a bill-to site use in the From region.
Important: You cannot merge sites with different account site usage or across operating units.
To copy an address and site usage from the From region to the merge-to customer, check the Create Same Site box. The merge-from value in the Location field is also transferred to the merge-to customer location.
In any operating unit, the location must be unique for each combination of customer account and site use type, or business purpose. If the location transfer violates this validation for the merge-to customer, you can choose to either transfer the location with "-C" appended or manually enter the merge-to customer location.
Note: You can update the Location field only if the HZ: Location Updatable profile option is set to Yes. If you cannot update the field, a unique, sequential value is automatically assigned as the merge-to customer location.
-
Choose to delete or inactivate the old customer information.
To keep an audit trail of the old customer information, do not check the Delete After Merge check box. The application assigns a status of 'Inactive' to the old customer after you complete the merge.
To delete the old customer information, check the Delete After Merge check box.
-
Assign a processing priority, P1-High, P2-Medium, or P3-Low, to the merge process.
Note: Use the processing priority when creating merge batches. For example, you can create a batch for merges having the priority P1 to process all the high priority merges first.
-
To save your merge details without submitting the merge, save your work. This lets you review your mapping for accuracy before actually merging your customer and site information.
Note: At any time before you choose the Merge button, you can use the Cancel button to cancel the merge
To submit the merge process, choose Merge. Because batch processing is more efficient, you can decide to save the merge for later batch processing or to immediately continue with processing. To immediately process the merge, choose Continue. To save the proposed merge for later batch processing, choose Save. See: Submitting the Merge Process.
Important: If required, repeat these steps for the other operating units, if any, for the customer account.
If you wish to merge account sites in another operating unit for the same customer account or if you wish to perform an account merge for an entirely different customer account, press the Down Arrow key. This action clears the Customer Merge window and readies it for the next account merge.
Related Topics
Merging Sites for the Same Customer
Submitting the Merge Process
You can submit the customer merge process immediately after entering your merge details, or you can save your work and submit the merge later. You may not want to submit the merge immediately if, for example, you want to review the merge candidates before transferring the customer and/or site information.
You can run the Customer Merge program from the Customers Merge window for individual merges or the Standard Request Submission windows for batch merges. View detail results of the Customer Merge program in the Customer Merge Execution Report.
Merging Individually
Use the Customer Merge window to submit the Customers Merge program for one merge at a time.
Prerequisites
-
Enter merge details. See: Merging Different Customers or Merging Sites for the Same Customer.
To submit an individual merge:
-
Navigate to the Customers Merge window.
-
When you are certain that all of the information in the Merge Customers window is correct, choose Merge. Because batch processing is more efficient, you can decide to save the merge for later batch processing or to immediately continue with processing. To immediately process the merge, choose Continue. To save the proposed merge for later batch processing, choose Save. If you choose Continue, the application submits the Customer Merge program as a concurrent process and assigns a Request ID.
The Process Flag field displays the current status of a merge as Processing, In Progress, Rejected, Completed, Failed, or Saved. The Process Flag field displays the status as Processing if a merge request is waiting for a Concurrent Manager. If the merge is in progress, the status changes to In Progress. If the merge request is rejected, the Process Flag field displays the status of the merge as Rejected. After merge processing ends, the Process Flag field displays either Completed or Failed. If the merge failed, then the Error Message field displays a detailed error message. Using the information provided in the error message, you can correct the information in the Customers Merge window and then choose Merge again or choose Save to include the merge in a batch for future processing.
Merging in Batch Process
Use the Customer Merge program to run customer merges in a batch process. When you submit merges from the Customers Merge window, you run the Customer Merge program for only one merge at a time. From the Standard Request Submission window or the Request Submission page, however, you can:
-
Specify the number of merges you want the Customer Merge program to execute in a batch.
-
Select the processing priority — P1-High, P2-Medium, or P3-Low — to specify the merges that you want to include in a batch. For example, you can select the processing priority P1-High to process all the high priority merges in a batch.
The Customer Merge program groups the merge processes into merge sets and sequentially runs and saves each set. The setting for the AR: Customer Merge Commit Size profile option determines the size of the merge sets. For more information, see: Customer Merge Deployment Category, Oracle Trading Community Architecture Administration Guide.
The operating unit parameter is displayed when the Customer Merge process is submitted as a concurrent program. If there is more than one operating unit, then the first five operating units are displayed and, if there are more than five operating units, then “…” is appended after the fifth operating unit.
Use the Standard Request Submission windows or the Request Submission page to run the Customer Merge program. See: Running Reports and Programs, Oracle E-Business Suite User Guide.
The Customer Merge Execution report for a batch identifies any unsuccessful merge processes and provides the appropriate error messages. You can view and correct the information about the unsuccessful merge in the Customers Merge window. Viewing the unsuccessful merge in the Customers Merge window displays FAILED in the Process Flag field and a detailed error message in the Error Message field. After correcting the merge information, you must change the Process Flag to SAVED and then either choose Save to include the merge in another batch for future processing or choose Merge to immediately process the merge.
Prerequisites
Before you run the Customer Merge program, you must create merge batches to merge sites for the same customer or to merge different customers.
Related Topics
Customer Merge Execution Report
Customer Merge Execution Report
Use the Customer Merge Execution report to review the customers and site uses involved in the merge process. The application automatically generates this report when you initiate the Customer Merge program. See: Submitting the Merge Process.
The report heading displays the request ID for your concurrent process. The report body displays Inactive or Delete in the Status column to indicate the status of your old customer or site use. It displays an error message if the Customer Merge program failed.
You can also review details of past merges online using the Customers Merge window. See: Reviewing Merged Customers.
Report Headings
Request ID: The request ID for your concurrent process.
Column Headings
Address: The address associated to the business purpose of the old and new customers that you merged.
Location: The location for the business purposes of the old and new customers that you merged.
Name [Number]: The name and number of the old and new customers that you merged.
Primary: Yes or No to indicate whether this is the primary Site Use.
Site Use: The business purpose of the old and new customers that you merged.
Status: Inactive or Delete to indicate the status of your old customer, address, and business purpose. If you choose to delete old customer information, the system removes this information from the customer tables.
Related Topics
Reviewing Merged Customers
You can review details of your merged customer online using the Customers Merge window.
Prerequisites
-
Enter merge details. See: Merging Different Customers or Merging Sites for the Same Customer.
To review previously merged customers:
-
Navigate to the Customers Merge window.
-
Query a specific customer or query all Processed customers.
-
Execute the query. The application will display the concurrent request ID of the customer merge.
Related Topics