Oracle Depot Repair-Specific Setup Steps
This chapter describes implementation tasks that are specific to Oracle Depot Repair.
This chapter covers the following topics:
- Completing the Prerequisite Setups
- Setting Up Charges for Oracle Depot Repair
- Defining Billing Type Codes
- Mapping Billing Type Codes to Billing Categories
- Defining Service Activities and Billing Types
- Defining Service Business Processes
- Defining Installed Base Transaction Sub Types
- Setting Up Time and Material Labor Schedules
- Setting Up Service Types
- Setting Up Defaulting Rules
- Setting Up Service Bulletins
- Setting Up Statuses, Status Transitions, and Service Type Transitions
- Setting Up Service Request Types for Depot Repair
- Setting Up Depot Repair Reason Codes
- Setting Up Customer Profiles
- Setting Up Diagnostic Codes in Oracle Depot Repair
- Setting Up Service Codes in Oracle Depot Repair
- Setting Up Service Code Recommendations
- Defining Oracle Depot Repair Lookup Codes
- Setting Up Oracle Depot Repair Profile Options
- Setting Up Message Action Codes
- Setting Up Serial Reservations
- Setting Up Aging Threshold
- Setting Up Quality Threshold
- Setting Up Defect Codes
- Setting Up Recall Status
- Setting Up Recalls
- Setting Up Eco-Impact Threshold
- Setting Up Region Geographies
- Setting Up Return Stream Reasons
- Setting Up Material Disposition Reasons
- Setting Up Internal Requisitions and Internal Sales Orders
- Setting Up Supplier Warranty
- Setting Up Returns Portal Parameters
- Using the Return Portal for eClaims
- Setting Up Return Types
- Setting Up Activity Rules
- Managing Users
- Login Interfaces
- Roles, Responsibilities, and Permissions
- Creating Oracle Depot Repair Users
- Charges and Service Types Setup Example
- Setting Up Transfer Install Base Ownership
- Integrating with Advanced Pricing
- Using Time Clock Bin
- Using Complete Work Button
- Using Request Parts Button
Completing the Prerequisite Setups
With reference to the Implementation Checklist, make sure that all the implementation steps prior to the Oracle Depot Repair specific tasks are completed and reviewed before proceeding with the tasks detailed here.
Setting Up Charges for Oracle Depot Repair
Note: Every item to be processed using Charges must be set up in Inventory as a Material, Labor, or Expense (MLE) item. This means every item in Oracle Applications that may need service must be set up as a Charges MLE item.
Charges is a module of Oracle TeleService. Setting up Charges for all service-related processing consists of steps that serve a variety of Oracle applications, including Oracle Depot Repair. This section describes the Charges setup steps, with a particular orientation to Oracle Depot Repair processes and operations.
For detailed information on setting up Charges, see the Oracle TeleService Implementation Guide.
Setting up Oracle Charges for Depot Repair processing includes the following setup steps:
Billing Categories classify Billing Types into Material, Labor, and Expense. Each serviceable item in Inventory is classified using Billing Type Codes associated to a Billing Category.
A Service Activity Code is a type of action to be performed, for example, replace, return, install, drain, fill. The combination of Billing Type and Service Activity defines the Order Type for a given operating unit. It also provides the basis upon which discounts for a Service Contract can be applied.
Defining Billing Type Codes
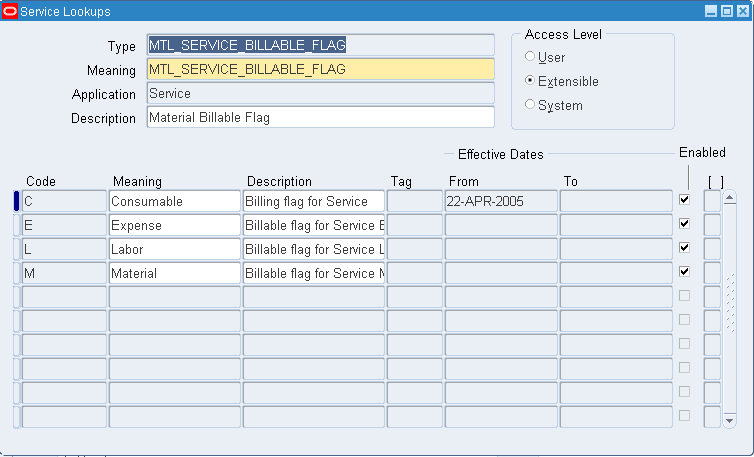
To define the Billing Type Codes, use the Oracle Service Lookups window.
To define Transaction Billing Type Codes:
-
From the Navigator, use the following path to open the Oracle Service Lookups window:
Service Request > Setup > Customer Support Lookups.
-
Query up the Lookup Type MTL_SERVICE_BILLABLE_FLAG.
-
Add the new required Billing Type Codes. You can use the online help for more information.
The seeded Billing Type Codes are M, L, and E.
Mapping Billing Type Codes to Billing Categories
To associate Billing Type Codes to Billing Categories, use the Billing Type Attributes window. The seeded Billing Categories include Material, Labor, and Expense.
Use the following path to navigate to the Billing Type Attributes window:
Switch responsibilities to Customer Support, Vision Operations and navigate to Setup > Charges > Billing Type Attributes.
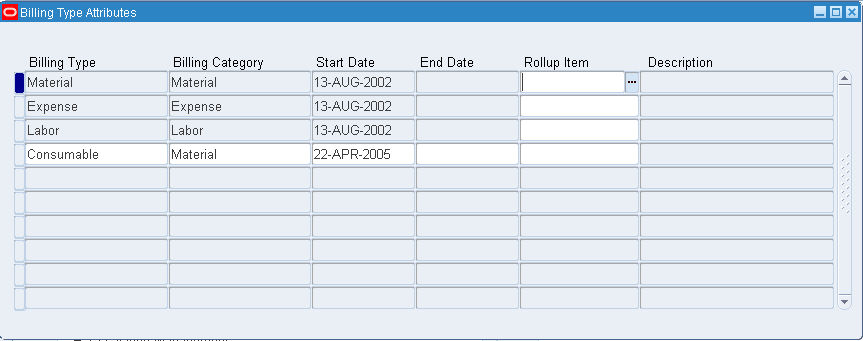
Only the Billing Types associated with a Billing Category in this window appear in the Billing Type Name List of Values in the Service Activities and Billing Types form. Similarly only the Billing Type Names associated here appear in the List of Values for Billing Type: Material, Labor, and Expense in the Service Types form.
Note: You cannot associate the Billing Category Labor to a new Billing Type. The seeded Labor Billing Type is mapped to the Labor Billing Category.
Defining Service Activities and Billing Types
A Service Activity is a business operation, such as Replacement or Return for Repair. Each Service Activity is classified as either an Order or a Return - this is specified by its Line Category.
A Service Activity has a one to many relationship with Service Activity Billing Type. A Service Activity Billing Type, for example, Advanced Exchange: Material, is an intersection between Service Activity Advanced Exchange and Billing Type Material.
The Service Activity Billing Type is linked to an Oracle Order Management Order Type and Line Type for each operating unit.
Oracle Order Management Order and Line Types are associated with Service Activities that are assigned to Service Types in Oracle Depot Repair. When a user chooses a Service Type, these Order and Line Types determine the processing of charge lines (RMA, Ship, Estimate) for a Service Order. Please refer to the Oracle TeleService Implementation Guide and the Oracle Order Management User's Guide for more details.
Oracle Order Management provides seeded Workflow process definitions for both orders and lines. It enables you to define both order header and order line Service Activities. The seeded Service Activities that Order Management provides are, however, not mapped by default.
A Service Activity is operating unit-specific. The Line Category is set at transaction level to prevent the use of a single Service Activity as an order in one operating unit and a return in another.
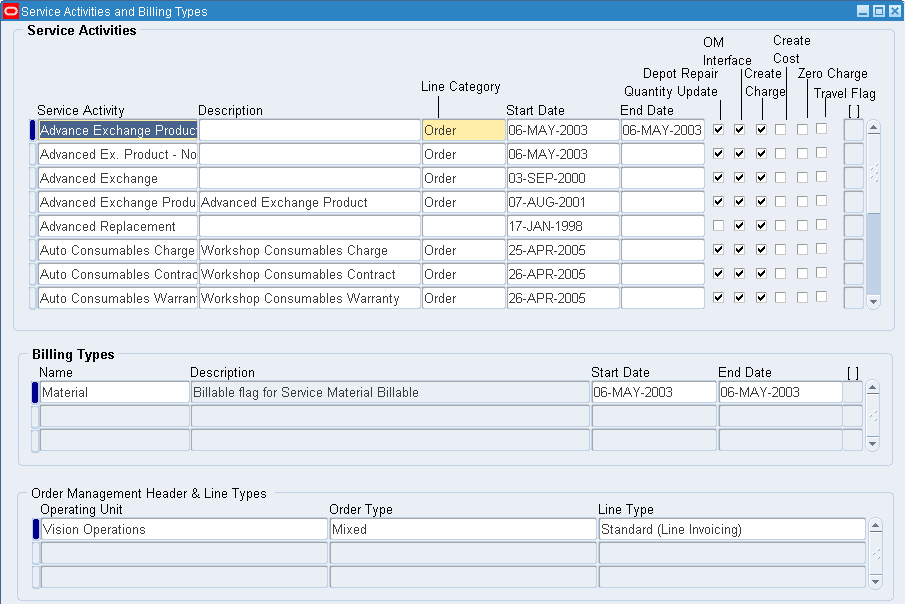
Use the Service Activities and Billing Types window to confirm or define Service Activities and associated Billing Types, Order Management header types, and line types as detailed below.
The Order Management Header & Line Types region is used to specify the organization, header type, and line type - in the Operating Unit, Order Type, and Line Type fields respectively - to be used when a charge line is submitted to Order Management. These values are used to retrieve an Order Management header type and line type from the setup while submitting the order.
Note: You can associate multiple Billing Types to a Service Activity.
To Define Service Activities and Billing Types:
-
Open the Service Activities and Billing Types window using the following navigation path:
Service Request > Setup > Charges > Service Activities and Billing Types.
-
Select the New toolbar icon to create an empty row for your Service Activity Billing Type.
-
Enter the appropriate values in the Service Activity and Line Category Code fields.
-
In the Related Billing Types region, select the appropriate Billing Type to be associated with the Service Activity you are creating.
-
Select the Depot Repair Quantity Update checkbox to update the depot inventory.
Only Service Activities with Depot Repair Quantity Update check box selected will be displayed in the Service Activity list of values in the Logistics tab in the Service Types window.
-
Leave the OM Interface check box selected (the default value).
This setting means the customer can be billed for charges for this activity.
-
Select the No Charge flag checkbox if you do not want to charge the customer for this Service Activity.
Please note that an estimate or actuals line is discounted based on the contract associated with the Service Order only if the Service Activity Billing Type of the estimate or actuals line is also set up for the contract. The Service Activity Billing Type of the estimate or actuals line is determined based on the Service Type for the Service Order, and the Billing Type for the estimate or actuals line item.
For more information on the contract associated with a Service Order, see Determine Contract and Price List Defaults at Service Order Creation in the Oracle Depot Repair User Guide.
-
Save the Service Activity and exit the Service Activities and Billing Types window.
Defining Service Business Processes
A Business Process is a group of Service Activities created with a view to restricting Service Activity availability. A Business Process supports the charge lines that the line of business in your organization can utilize, such as, Depot Repair.
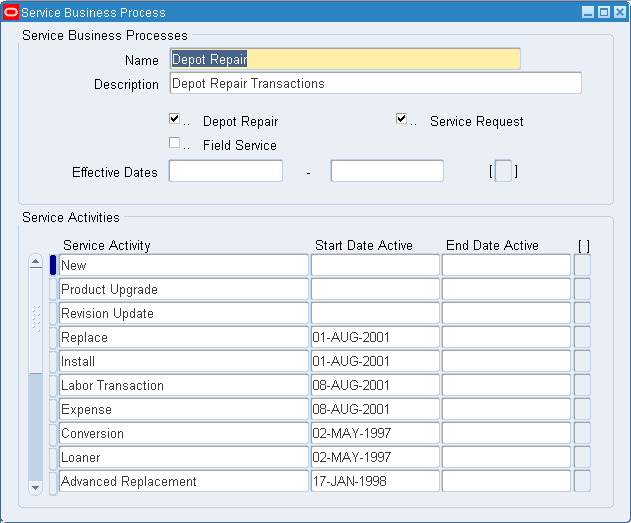
Use the Service Business Process window to define your Business Process and associate Service Activities with it. Ensure that the Depot Repair check box is selected when setting up the Business Process. For a particular Business Process, the selected flag check boxes indicate the modules (Service Request, Field Service, Depot Repair) in which this Business Process can be used.
To Define Service Business Processes:
-
Open the Service Business Process window using the following navigation path:
Service Request > Setup > Charges > Service Business Process.
-
Enter the appropriate value in the Name and Description fields.
-
Select the Depot Repair check box.
You can also optionally select any of the other check boxes for the applications (Service Request, Field Service) where you want this Business Process to be visible.
-
Enter the Effective Dates for the Business Process if you want the Business Process to be used only for a limited time.
-
In the Service Activities region, select the Service Activity you want to associate with the Business Process.
-
Save your work, and exit the Service Business Process window.
Defining Installed Base Transaction Sub Types
Each Service Activity that is required to process an Installed Base trackable item must have an Installed Base Transaction Sub Type with the same name as the Service Activity. For example, for the Service Activity named Return for Repair, we define the corresponding Transaction Sub Type with the name Return for Repair.
Note: For items that are not Installed Base trackable, the Service Activities associated with the Service Type should not have Installed Base Transaction Sub Types defined. Hence you need to have separate Service Types and Service Activities defined for Installed Base trackable items and for non-trackable items.
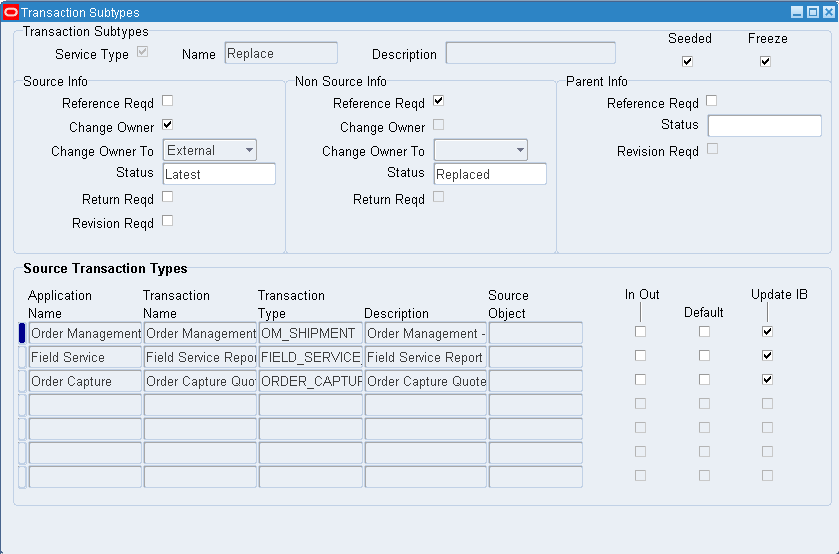
Transaction Sub Types Window
Use the Transaction Sub Types window to specify the type of update that can be performed in an Installed Base instance by transactions originating from Depot Repair that are interfaced with Installed Base.
Transaction Sub Types Area
For Depot Repair, the Service Type checkbox should be selected. When the Service Type checkbox is selected, the Name field List of Values displays the Service Activities for which you can create an Installed Base Transaction subtype.
Source Info and Non Source Info Areas
You can define the transactions and the kind of actions they can perform on the Source, Non Source, and Parent instances.
-
Source Info area: Specify details of the instance being transacted, such as in a sales order, as a shipped or a returned item.
Note: Transaction sub types defined as shipments, that is, which have OM_SHIPMENT as their source transaction type, should not have Reference Reqd checked in the Source Info area. This is because Shipping does not understand and does not need Installed Base reference numbers.
Also, for non-serialized Installed Base trackable items, when an item is shipped back to the customer, a new instance with a new Installed Base reference number is created in Installed Base for the shipped instance. For a serialized Installed Base trackable item, the shipped item instance is identified in Installed Base by the shipped item and the serial number.
-
Non Source Info area: Specify information on a related instance, such as one that is being replaced by the source instance.
Non Source information is required for the Service Activities associated with the Service Types Exchange, Advance Exchange, and Replacement. In these cases, to transfer the warranty, the Non Source Info region should have Reference Reqd check box selected. This ensures that at the time of shipping the new item, the warranty information is transferred.
Note: For the Replacement Service Type, the damaged item status is changed to EXPIRED by setting this value in the Status field in the Non Source Info area.
-
Parent Info area: This area is reserved for future use.
The Change Owner check box and Change Owner To fields determine whether the instance ownership has to be changed.
In the case of Service Type Return and Repair, for example, the Transaction Sub Type for Return and Ship in the Source Info area has neither the Change Owner check box selected nor the Change Owner To field populated.
But in the case of Service Type Exchange, the item is changed, and hence the Source Info area for the Transaction Sub Types for Return and Ship has the Change Owner check box and Change Owner To field selected.
Source Transaction Types Area
In the Source Transaction Types area, for Oracle Depot Repair, only Oracle Order Management needs to be set up as a source application. Ensure also that the Update IB check box is selected here.
Detailed information on Installed Base Transaction Sub Types is available in the Oracle Installed Base Implementation Guide.
To Define Installed Base Transaction Sub Types:
-
Open the Transaction Sub Types window using the following navigation path:
Service Request > Setup > Charges > Install Base Transaction Types
-
Enter the appropriate values in the fields as explained above.
-
Save your work, and exit the Transaction Sub Types window.
Setting Up Time and Material Labor Schedules
Use the Time & Material Labor Schedule window to set up schedules for the Depot Repair Business Process. This is required to process any labor transaction in the Debrief form accessed from the Tasks tab in the Service Orders form.
From the Navigator, use the following path to access the Time & Material Labor Schedule window:
Service Request > Setup > Charges > T&M Labor Schedule.
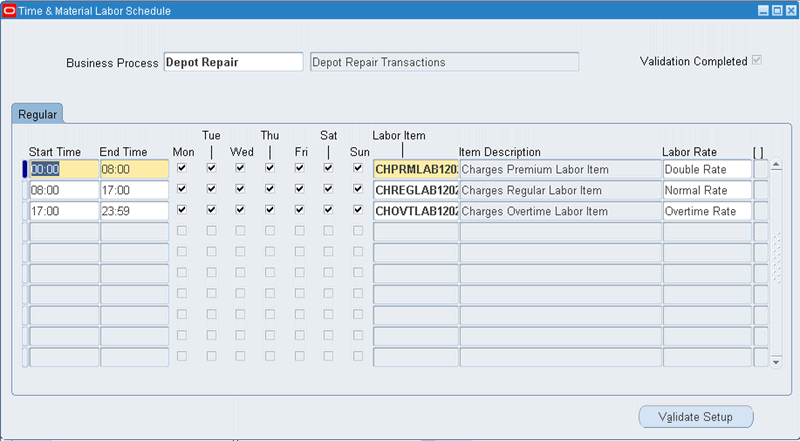
For more information, please refer to the Oracle TeleService Implementation Guide.
Setting Up Service Types
Oracle Depot Repair supports the following Service Types:
-
Advance Exchange
The depot sends a replacement item to the customer before receiving the damaged item for core credit.
-
Exchange
The depot sends a replacement item to the customer after a broken item is received from the customer for core credit.
-
Loaner
The depot sends a loaner item to the customer.
-
Loaner, Repair and Return
This is the same as Repair and Return with an item loaned to the customer before receiving the broken item, so as to bridge the gap while the damaged item is being serviced.
-
Repair and Return
A broken item is serviced by the depot, and then returned to the customer.
-
Replacement
The depot sends a new replacement item to the customer without having to receive a damaged item from the customer.
-
Standard
The depot agent is uncertain about a customer need, and is unable to take a decision before further inspection of the damaged item. RMAs and Sales Orders are created manually. The depot agent has the option to carry out all functions in a manual mode.
-
Refurbishment
A Service Order and its associated Service Request is created in the Spares Management of Oracle Field Service as a result of a demand for refurbishment or replenishment. The Service Order has a Service Type of Refurbishment, and has two transaction lines, Move In and Move Out.
The Move In line tracks the shipment of the defective item from Spares Management, and its reception into the depot. The Move Out line processes the shipment of the serviced item back to Spares Management.
-
Third Party Repair
For a third party service execution, an Outside Processing (OSP) operation is created in the Technician Portal. Essentially, completing the OSP operation triggers the creation of a purchase order with a request to procure service from a third party.
-
Return Only Repair
The return only repair functionality is used when a service type is setup to have an RMA line. In this case, there is no corresponding ship line.
-
Service Campaign or Recall
A service campaign is a coordinated set of service actions focused on a specific set of customers or products in a business's install base. A recall is an action taken to address a problem with an item that makes it likely to fail, cause injury, or violate safety laws.
-
Supplier Warranty
Supplier warranty provides the ability to manage supplier warranty claims resulting from maintenance and service work.
-
Customer Take-back Request
This functionality enables you to process the take-back request of items from the customers.
-
Trade-in or Upgrade
This function enables you to process a trade-in or upgrade using the Returns Portal.
The Service Types Screen
Service Types setup determines the proper processing and management of Service Orders by the application and service organization. The Service Types Setup screen determines which, and how each of the seeded Service Types are used in the service organization, whether the Oracle WIP or the Task Manager module of Oracle Common Application Components is used in services management, and how charge lines are identified as they are passed to Oracle Order Management.
A service organization can also make a copy of the selected Service Type, and customize as necessary. Though the value of the Service Type Ref field drives application process automation, this capability enables service organizations to better distinguish their Service Types if necessary.
Use the Service Types Setup window to perform the following tasks:
-
Customize the Service Types.
-
Select Service Modes for Service Types. A Service Order is created with the service mode defined for the chosen Service Type.
-
Select Service Type Ref for custom Service Types.
-
Select Business Process for Service Types.
-
Select default Service Activity Codes for RMA order (Return) and Sales order (Ship) lines for the Service Type. The default item transactions are created with the order and line types associated with the Service Activity Billing Type for the Service Type and service item. This classifies the created RMA order and Sales order lines for respective Service Types.
-
Select a Pricelist for the Service Type. This is optional.
The default price list for a Service Order is the Pricelist for the Service Type if either of the following cases is true:
-
There is no default contract and the profile option CSD: Default Price List is not set.
-
There is a default contract, but the contract does not specify a price list, and the profile option CSD: Default Price List is not set.
-
-
Select Billing Types and enter Service Activity Code for Material, Labor, and Expense charge lines. You can enter more than one Billing Type and Service Activity Code for Material and Expense charge lines. This classifies the Material, Labor, and Expense charge lines for Order Management processing. This is needed only if using Estimates functionality.
-
Select to Calculate Resolve By Date based on the RMA receipt date or the service order creation date.
Alternatively, select to Calculate Resolve By Date based on a specific service order status by setting the profile option CSD: Calculate Resolve By Date from Entitlement to Yes. See: Setting up Oracle Depot Repair Profile Options.
-
Select preferences to process Product Transaction lines for Service Types by selecting Automatically Enter and Book RMA.
Note: Only the Service Activities associated with the selected Business Process for the Service Type will be displayed in the Service Activity Code List of Values in the Service Types window. The same is true for the Service Activity Code List of Values in the Logistics tab in the Service Orders window.
Service Types Setup Fields Control Description Editable Seeded Values Service Type A short description of the Service Type. This description appears in the application during Service Type selection Yes Same name as Service Type Ref, but editable Description A more detailed explanation of the Service Type Yes -- Active (check box) This read-only field indicates if the Service Type is active, based on the Start Date and End Date No -- Business Process The combination of Service Type Ref and Business Process identifies the applicable Transaction Billing Types Yes Depot Repair Service Mode Determines whether Oracle WIP or the Task Manager module of Oracle Common Application Components is used for Job management No Task
WIPService Type Ref Identifies the type of application logic that applies to the Service Type No Advanced Exchange
Exchange
Loaner
Loaner, Repair and Return
Refurbishment
Repair and Return
Replacement
StandardPre-Service RMA Classifies the created RMA order (Return) line for respective Service Type reference. If Service Type reference does not require this RMA line, this entry is disregarded. Yes -- Pre-Service Ship Classifies the created Sales order (Ship) line for respective Service Type reference. If Service Type does not require this Sales order line, this entry is disregarded. Yes -- Post-Service RMA Classifies the created RMA order (Return) line for respective Service Type reference. If Service Type reference does not require this RMA line, this entry is disregarded. Yes -- Post-Service Ship Classifies the created Sales order (Ship) line for respective Service Type reference. If Service Type reference does not require this Sales order line, this entry is disregarded. Yes -- Third Party Ship Classifies the Service Activity Billing Types. These values must be associated with a third party Ship line to indicate what OM line types to use, what operating unit to associate them with, and what contract entitlements apply. Yes -- Third Party RMA Classifies the Service Activity Billing Types. These values must be associated with a third party RMA line to indicate what OM line types to use, what operating unit to associate them with, and what contract entitlements apply. Yes -- Pricelist Identifies the default price list for the Service Type. Yes -- Start Date The effective start date of the Service Type Yes -- End Date The effective end date of the Service Type Yes -- Internal Order (check box) For Internal Order Refurbishments Yes -- Third Party (check box) For creating a third party ship and RMA line if a Service Activity Billing Type is selected in the Third Party column. Yes -- Calculate Resolve By Date Specifies whether the date by which a service order should be resolved based on repair order creation date or RMA receipt date. No At Service OrderCreation
At RMA receiptAutomatically enter and book RMA Decides whether to default Auto RMA check box as checked or unchecked for Service Orders. When a Service Order is created with this check box selected, an RMA (Return) line is entered and booked automatically. You can still manually override the default for individual Service Orders. Yes -- Automatically ship through:
Radio buttons:
-- Enter Order
-- Book OrderThis is available only for service types whose Service Type Ref is Advance Exchanged Exchange, Loaner, or Loaner, Repair and Return.
When a Service Order is created with this check box and one of the radio button options selected, a Ship line is created and processed according to the option chosen:
-- Enter Order results in ship line Status of Submitted.
-- Book Order results in ship line Status of Booked.Yes -- Material Enables the classification of Material charge lines for Order Management processing Yes Material Labor Enables the classification of Labor charge lines for Order Management processing Yes Labor Expense Enables the classification of Expense charge lines for Order Management processing Yes Expense
For details on seeded Service Types setup, see Charges and Service Types Setup Example.
To Set Up Service Types
-
From the Depot Repair Navigator, use the following path to open the Service Types window:
Depot Repair > Setup > Service Types
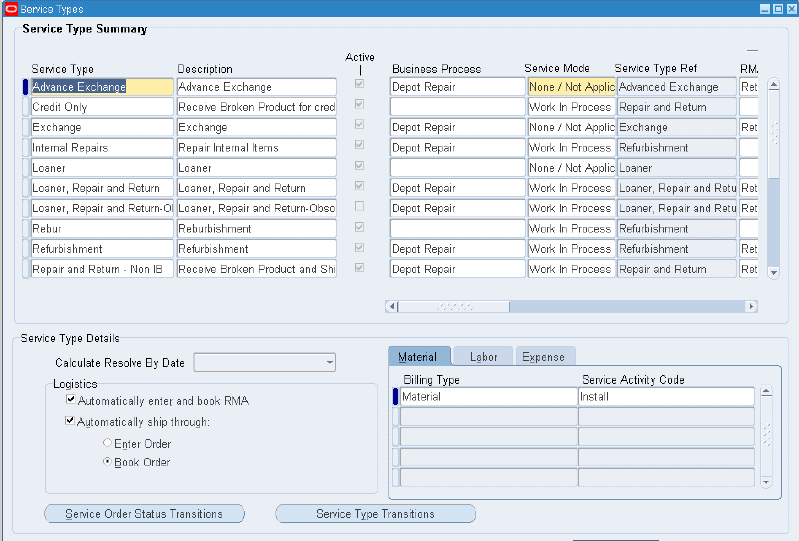
-
To define a new service type, click the New icon on the menu option.
-
Enter the fields in the Service Types window making necessary selections for defining your Service Types as explained above.
-
To set up Third Party Service Type, select Third Party Ship and RMA.
The list of values displays the Service Activity Billing Types, which are setup in the Charges setup windows. These values must be associated with a third party RMA line and third party Ship line to indicate what OM line types to use, what operating unit to associate them with, what contract entitlements apply, and so on.
-
Select the Third Party check box to create a third party ship and RMA line if a Service Activity Billing Type is selected in the Third Party column.
You can select the third party check box and only set up an RMA line. It defaults the RMA line at SO creation. If the third party flag is not checked, no Third party lines will be auto-created, even if service activities are entered in the Third Party Ship and RMA fields.
Note: A service type having third party lines can also have regular lines, provided the Service Activity Billing Types are set up for them in their respective columns.
-
Save your work.
After a Service Type is set up, it should have default values for the following fields:
-
Service Mode
-
Service Type Ref
-
Business Process
-
Default Service Activity Codes (Pre-Service RMA, Pre-Service Ship, Post-Service RMA, Post-Service Ship). Default values are required only for the applicable transaction for the Service Type.
-
-
Billing Types and associated Service Activity Codes (Material, Labor, Expense). Default values are needed only if Estimates functionality is used.
Setting Up Defaulting Rules
Service types, service owner, priority and other service order values default at the time of service order creation based on customer defined rules. The fields that default are, Inventory Organization, RMA Receiving Organization, RMA Receiving, Subinventory, Service Organization, Service Owner, Service Priority, Service Type, Ship from Organization, Ship from Subinventory, and Vendor Account. Rules are based on service item, service location, customer, contract, and the like.Defaulting rules can also be set up for Processor, Carrier, and Disposition based on Service Type.
To Set Up Defaulting Rules
-
Navigate to the Defaulting Rules page. This page displays the summary of existing defaulting rules.
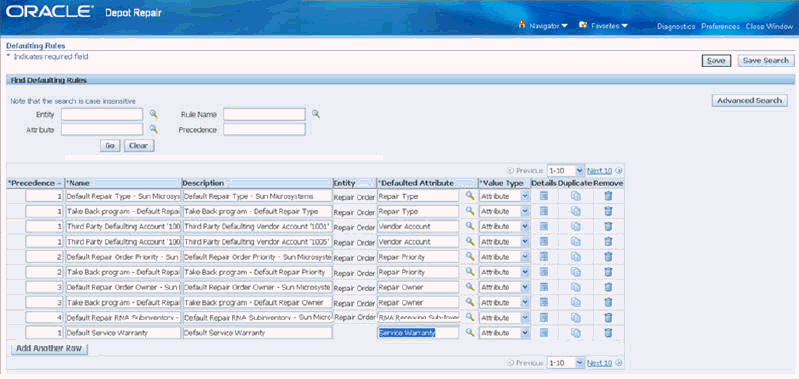
-
To set up a new defaulting rule, click Add Another Row button.
-
Enter the values in the following fields:
-
Precedence: Each rule is assigned a Precedence. Rules are evaluated in the order of precedence - the smaller the number, the higher is the precedence. The Precedence field accepts both positive and negative values.
-
Name: Name to the defaulting rule
-
Description: Description of the defaulting rule
-
Entity: Defaults from the system
-
Defaulted Attribute: The value of this field defaults when a defaulting rule is applied to a service order.
-
Create SO Flag
-
Inventory Organization
-
Job Accounting Class
-
Job Inventory Organization
-
Job Status
-
Material Issue Sub-Inventory
-
Material Transaction Reason Code
-
Pick Release Rule
-
Price List
-
RMA Receiving Organization
-
RMA Receiving Sub-Inventory
-
Service Organization
-
Service Owner
-
Service Priority
-
Service Type
-
Service Warranty
-
Ship From Organization
-
Ship From Sub-Inventory
-
Vendor Account
-
-
Value Type: Valid list of values for Value Type are:
-
Attribute: This indicates the type of value, and not the value itself. It can be either PL/SQL, profile or a constant as specified in the setup.
-
PL/SQL API: This defaults the value returned from a call to the specified PL/SQL API to the Depot Workbench when this rule is evaluated to be true.
Note: PL/SQL API field for defaulting rules is limited to 30 characters or less.
-
Profile: This defaults the value stored in the specified profile option to the Depot Workbench when this rule is evaluated to be true. When you select Profile as the value type, and there are multiple levels of profile setting, the system behaves in the same way it does for other profile option selections.
-
-
-
Click the Details icon to navigate to the Update Defaulting Rule page.
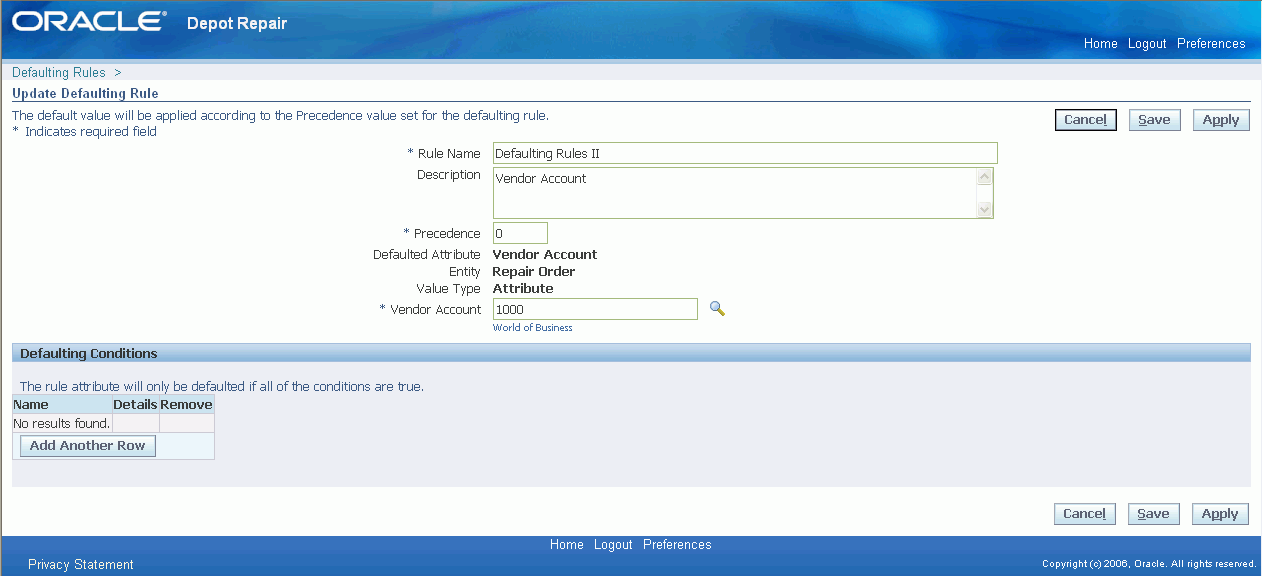
This page displays the details of the defaulting rule you entered. Use this page to specify a value for the defaulted attribute and the conditions to trigger the rule.
-
Select the Service Type to default.
-
In the Defaulting Conditions region, click Add Another Row to enter a self-explanatory name for the condition.
Defaulting Conditions region enable you to define one or more conditions for a defaulting rule. All the conditions must evaluate to true to execute the defaulting rule.
-
Click Apply to save your work and navigate back to the Defaulting Rules page.
-
Click Save to save the Defaulting Rule.
-
Duplicate icon duplicates the condition.
-
To delete a defaulting rule, click the corresponding Remove icon in the Defaulting Rules page.
Setting Up Service Bulletins
Depot Repair provides an interface to the service manager enabling him to trigger notifications, escalations, and/or workflows based on key business events in the service shop. The service manager can drill down to the details of critical activities to speed up the resolution of issues, thereby increasing customer satisfaction.
To Set Up Service Bulletin
-
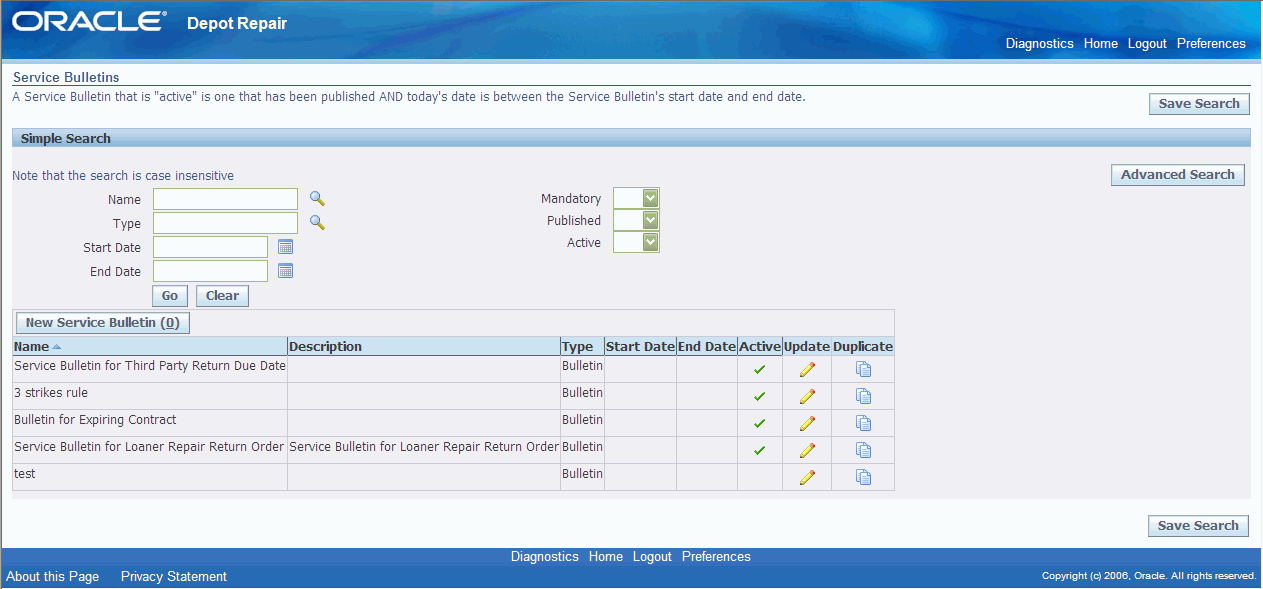
Navigate to the Service Bulletins page.
This page displays the existing service bulletins in a summary table. The Simple and Advanced Search options enable you to look for a particular service bulletin.
-
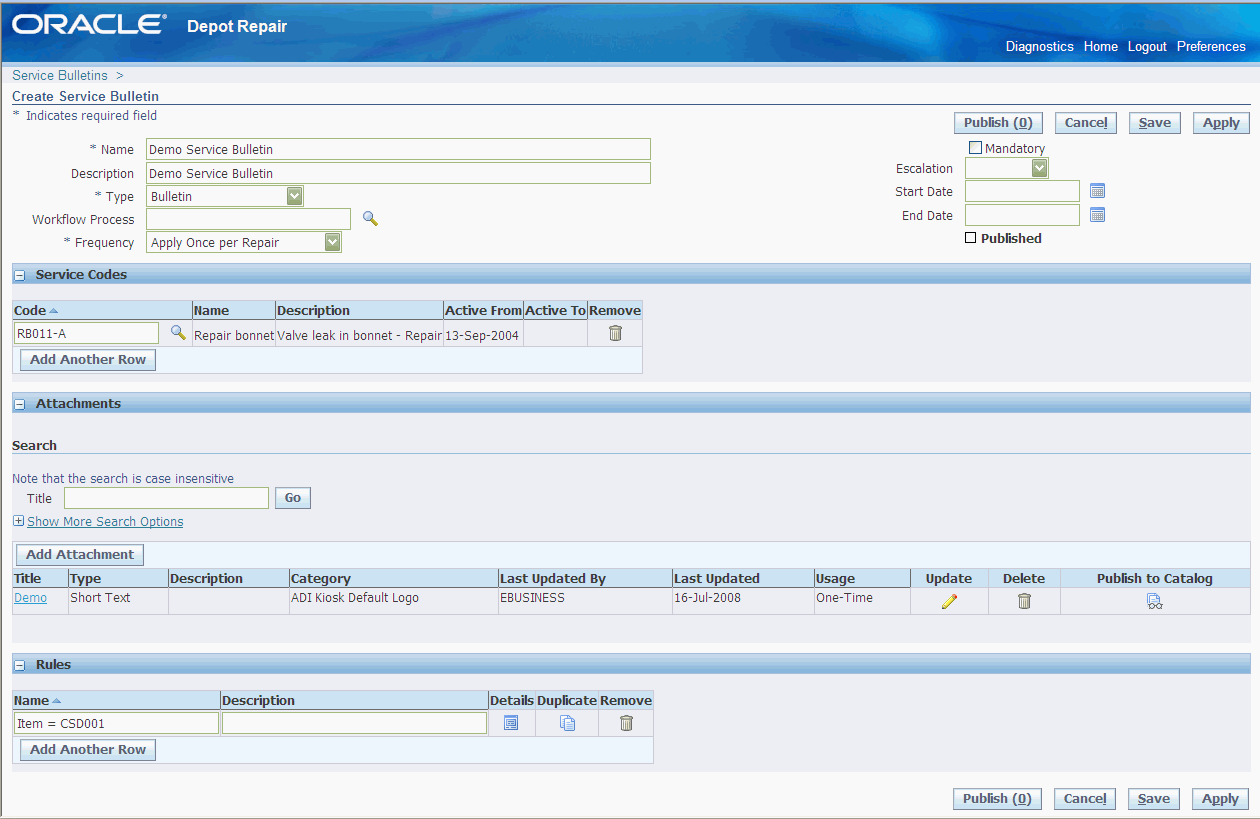
Click the New Service Bulletin button to navigate to the Create Service Bulletins page.
-
Enter the information in the following fields. The fields marked with an asterisk (*) are mandatory:
-
Name: Name of the service bulletin
-
Description: Description of the service bulletin
-
Type: Select the type of the service bulletin
-
Workflow Process: Associate a workflow process to the service bulletin
-
Frequency: Select how frequently the service bulletin is applied
Apply Once per Item Instance implies that the service bulletin is applied only once for a particular instance. For example, you can set this frequency when an engineering change order is applied only once and for which the same bulletin does not need to be applied repeatedly. A bulletin with this frequency never gets attached to Service Orders with Non-Installed Base items.
Apply Once Per Repair implies that the service bulletin is applied every time there is a new service order.
-
Mandatory: Select this checkbox to mark the service bulletin as mandatory on the service order
-
Escalation: You can define your own statuses.
-
Start Date: The activation date of the service bulletin.
-
End Date: The expiration date of the service bulletin.
Note: If the dates field is left blank, it implies that the service bulletin is always active.
-
-
In the Service Codes region, click Add Another Row to define the service codes for the service bulletin.
-
You can add one or more attachments to a service bulletin using the Attachments region. Click Add Attachment to navigate to the Add Attachment page.
Note: You can add a File, URL, or Text as an attachment.
-
The Rules region enables you to define multiple rules to associate to the service bulletin. Click Add Another Row to define rules.
-
Click the Details link in the Rules region to navigate to the Update Service Bulletin Rule page.
-
Use the Conditions region to define conditions for the rule. Click Add Another Row to enter the condition.
A rule can have multiple conditions and all the conditions are evaluated to hold true for the rule to apply.
-
Click the Details link to navigate to the Update Rule Condition page.
-
Enter the required rule conditions and click Apply.
-
Navigate back to the Create Service Bulletin page and click Publish.
Note: Once you publish the service bulletins, it becomes read only. You can only modify the start and end dates.
Setting Up Statuses, Status Transitions, and Service Type Transitions
In Oracle Depot Repair, you can monitor and record the progress of a service order through states and statuses. You associate statuses to service types through record status transitions, where a transition is defined with a Current and a Next status. The status change of service orders is then controlled by these status transitions.
Statuses in Earlier Releases of Oracle Depot Repair
In earlier releases of Oracle Depot Repair, only SO statuses existed to categorize service order progress. There were four seeded SO statuses - Draft, Open, Hold, Closed - and they were not extensible.
This concept has been extended to allow statuses to be defined within states. The current states correspond to the earlier statuses. What you can now do is to define many lower-level statuses within the new states.
Terminology
State
A state describes the high level condition of a service order. There are four seeded states in Oracle Depot Repair: Draft, Open, Hold, Closed, and they are not extensible.
Status
A status describes the more detailed mode or condition of a service order. Each status is associated with one and only one state. Each state can be associated with many statuses.
Each status associated with a state inherits the limitations that are associated with that state. Statuses associated with Hold or Closed states restrict users as to what operations they can perform in Oracle Depot Repair. For more information, see Constraints on User Operations.
You can create as many statuses as you want.
Note: The Draft state is a special case, and has one status, Draft. Both the Draft status and the Draft state are used by the system only. For example, you cannot associate any of your own statuses to the Draft state.
Service Order Status Transitions
A Service Order Status Transition is the definition of two service order statuses, the Current Status and the Next Status. For each service type, you must define a start status and one or more service status transitions: these transitions determine the only allowable status transitions for the given service type.
You associate a service status to a service type only through the status transitions; that is, by specifying it either as a Start status, or a Current or Next status of a status transition pair.
Service Type Transitions
The same status can be defined for several different service types.
In this situation, when a service order status has been defined as associated to other service types, and your service order has the appropriate common status, you can update the service type of the service order to any of the other service types.
For example, you can define a status of In Repair for the service type Repair and Return and also Loaner, Repair and Return. The service type of a service order, whose service type is currently Repair and Return and whose status is In Repair, can be updated to Loaner, Repair and Return.
Note: Service Type Transitions do not add, delete, nor default any logistic lines. After a service type transition is performed on a service order, you must perform manual adjustments to your logistic lines, if your organization processes require this.
Constraints on User Operations
If a status is associated with the Open state, setting that status for a service order imposes no constraints for users performing Oracle Depot Repair operations.
If the status is associated with the Hold state, the following are the actions that you cannot perform for a service order in that status:
-
Update a Service Order, other than change the Status
-
Select or change the Default Contract field on the Coverage window launched through the menu path Tools > Coverage
-
Create, update, submit, or book logistics lines
-
Create a job
-
Perform Material or Complete Job Transactions
-
Create or update tasks
-
Split a service order
-
Update counters
If the status is associated with the Closed state, the following are the only actions that you can perform for a service order in that status:
-
Update the Service Order Status
-
View and update Notes
-
View Configuration, from the Details tab
-
Send and view messages, from the Data menu option
-
View Coverage and Contracts
-
Enter Task Debrief
-
View and Refresh Jobs
-
Print estimates
-
View the current workflow
Overview of Status and Transition Setup Processes
This section consists of the following topics:
Creating the Status Lookup
You must first create a service status lookup.
Steps
-
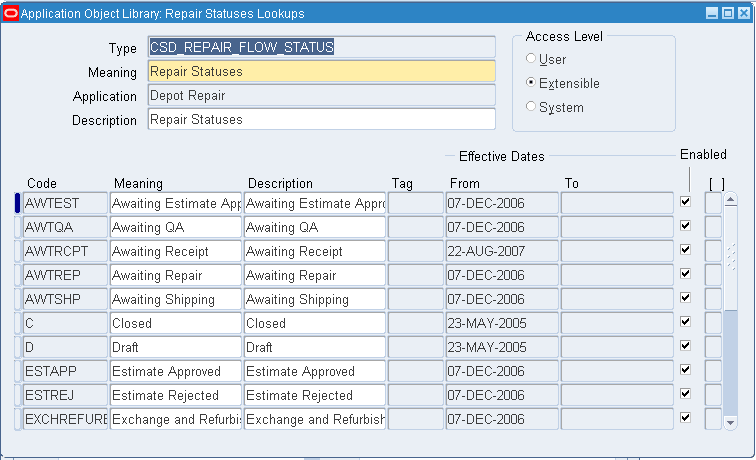
From the Depot Repair Navigator, use the following path to open the Service Statuses Lookup window:
Depot Repair > Setup > Service Statuses
-
Add a new record, with values for Code and Meaning.
-
You can also add values for Description, Tag, and Effective From and To dates.
-
To allow activation of the status, ensure that the Enabled check box is set
-
Save your work.
Associating the Status to a State
You must associate each status that you create with a State of Open. Hold, or Closed.
There are limitations on the operations that can be performed on a service order set to a Status associated with either the Hold or the Closed State. For details, see Constraints on User Operations.
Important: After you have associated a Status with a State, you cannot update that association.
Important: You can delete non-seeded Status-State associations, but you should do so with great care. Service orders whose latest status resulted from a deleted Status-State association may be corrupted.
Steps
-
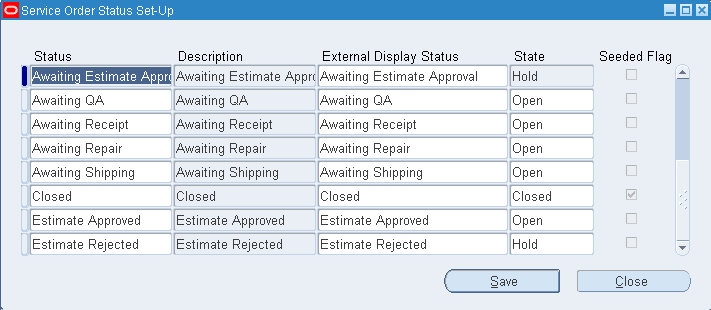
From the Depot Repair Navigator, use the following path to open the Service Order Status Set-Up window:
Depot Repair > Setup > Service Order Status Set-Up
-
Select the Status and State.
-
Optionally enter a Description.
-
Save your work.
Adding a Status Transition to a Service Type
In order to make use of statuses in service orders, you must associate your statuses with at least one service type - through a status transition. For each service type, you must also specify a start status.
You can associate a service status to several service types, by including it in the status transitions of each service type.
A status transition defines the Current and Next statuses that are to be allowed for the service orders of a given service type.
Steps
-
If you are not already in the Service Types window, then, from the Depot Repair Navigator, use the following path:
Depot Repair > Setup > Service Types
-
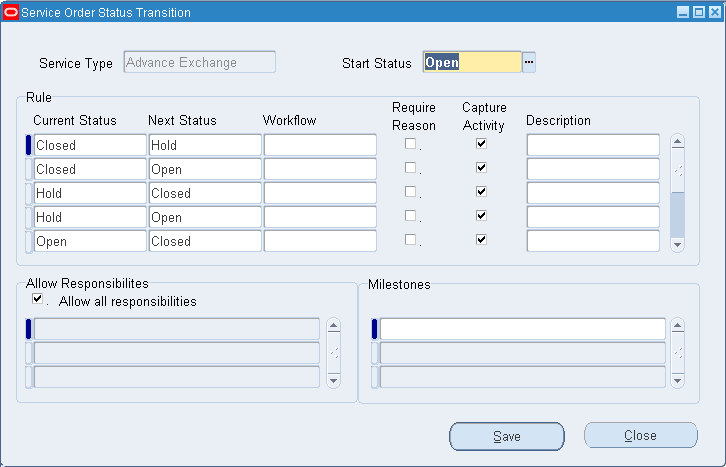
Select a Service Type and click Service Order Status Transitions.
-
Select a Start Status.
-
For each status transition, perform the following in the Rule area:
-
Select a Current Status and a Next Status.
-
Optionally select a Workflow that is to initiated when the service order status changes from the Current to the Next status.
-
Optionally check Require Reason, if you want to make it mandatory for a status changer to enter a reason at the time of status change.
-
Optionally check Capture Activity, if you want changing to the Next status to result in the creation of a viewable Activity.
-
Optionally enter a Description.
-
-
For each status transition, select the transition and, in the Allow Responsibilities area, either select the check box "Allow all responsibilities" or select individual responsibilities for which the status transitions are allowed.
-
For each status transition, select the transition and optionally select one or more milestones.
Service Start or Service End are seeded milestones provided by Oracle Depot Repair to help businesses indicate for any given Service Type as to which statuses in that flow mark the beginning and end points for that metric. These milestones help to measure and report how long it takes for a business to complete a repair.
Select Service Start or Service End as milestones for any transition to display the metrics for a service order in the Technician Portal. The earliest Service Start time and the latest Service End time, taken at the times of the status transitions, are recorded for the service order, and appear as Key Performance Indicators in the Debrief Report tab of the Technician Portal. Users can create and add other milestones for tracking and reporting.
-
Save your work.
Creating a Service Type Transition
Service type transitions are possible only when a service order status is associated with more than one service type. Defining a service type transition allows users to switch the service type of a service order, when the service order status is a status common to the service types.
Important: Service type transitions do not add, delete, nor default any logistic lines. After a service type transition is performed on a service order, you must perform manual adjustments to your logistic lines, if your organization processes require this
Steps
-
If you are not already in the Service Types window, then, from the Depot Repair Navigator, use the following path:
Depot Repair > Setup > Service Types
-
Select a Service Type and click Service Type Transitions.
The From Service Type field shows the current service type.
-
For each service type transition, perform the following in the Rule area:
-
Select a Common Status and a To Service Type.
-
Optionally check Require Reason, if you want to make it mandatory for a service type changer to enter a reason at the time of service type change.
-
Optionally check Capture Activity, if you want changing to the new service type to result in the creation of a viewable Activity.
-
-
For each service type transition, select the transition and, in the Allow Responsibilities area, either select the check box "Allow all responsibilities" or select individual responsibilities for which the service type changes are allowed.
-
For each service type transition, select the transition and optionally enter a Description.
-
Save your work.
Setting Up Service Request Types for Depot Repair
Service request types help categorize your service requests. For each service request type, you can set up service request statuses.
Each service request type can be linked to an existing Oracle Workflow process. The workflow can be automatically launched when the service request is created (not when it is updated) or manually launched depending on the settings you enter while defining service request types.
You must define at least one service request type for Oracle Depot Repair use. Typically you define one service request type called Depot Repair. However, you can use any name for the service request type, so long as it is associated with a Business Process that can be used in Oracle Depot Repair. See Defining Business Processes.
The new service request types set up for Oracle Depot Repair use and their related statuses register as entries in the lists of values for their fields in the Service Orders window. See the Oracle TeleService Implementation Guide for more information.
The Service Request Type window is used to link a Service Request Type to a Business Process. The Service Request Type Depot Repair needs to be associated with the applicable Business Process for your organization.
To Set Up Service Request Types
-
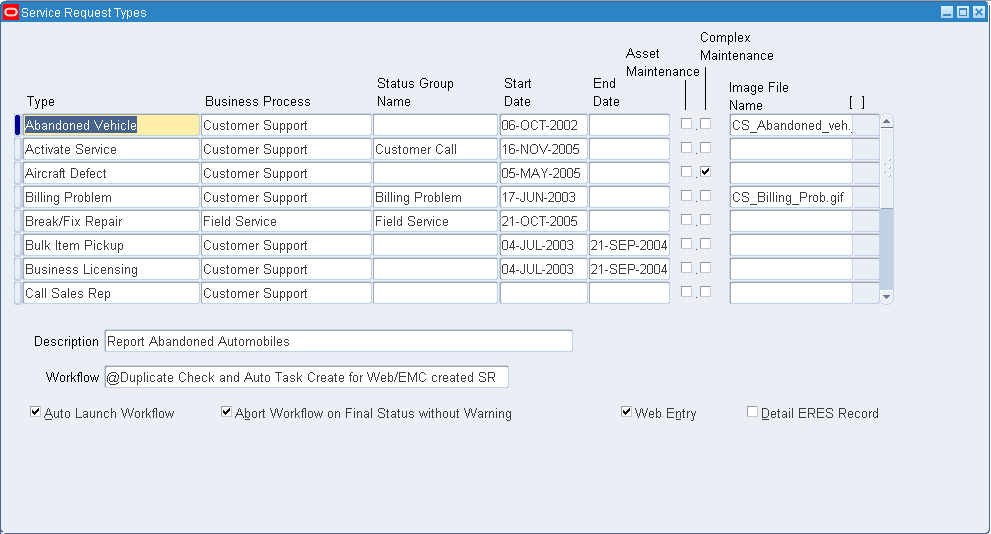
Navigate to Service Request Types window using the following path:
Service Request > Setup > Definitions >Service Requests Types
The window lists all the existing service request types.
-
Click the New toolbar button to create a blank row for defining your service request type.
-
In the Type field, enter the name Depot Repair for the service request type.
Typically, you have one service request type called Depot Repair, but it is not essential to have that exact name. You must have at least one service request type that is mapped to the Depot Repair Business Process.
-
In the Business Process field, select the Business Process for which this service request type is being created. In this case, the Business Process is Depot Repair.
-
Enter the Status Group Name, which in this case is Depot Repair.
-
Enter the effective dates for the service request type in the Start Date and End Date fields.
-
Enter a brief description of the request type in the Description field.
-
In the Workflow field, select the Generic workflow. Do not select the Auto Launch Workflow check box, if this workflow is selected.
-
Optionally, select from the available check boxes. Refer to the following table for details of the actions initiated when the check boxes are selected.
Checkbox Action Auto Launch Workflow Launches workflow automatically when the service request is saved. Not to be used with Oracle Depot Repair Generic Workflow. Abort Workflow on Close Aborts workflow when service request status is set to closed Web Entry Makes this service request type accessible to web entry through iSupport. Currently not used with Oracle Depot Repair. -
Save your work.
Setting Up Depot Repair Reason Codes
Reason Codes are values defined for the different reasons that affect the return of an item for service.
Oracle Depot Repair provides the following seeded Reason Codes:
| Code | Description |
|---|---|
| ADV_EXCH | Advanced Exchange |
| APPRV | Customer Approves the RMA |
| EST | Estimate Approved |
| HOLD | Repair On-Hold |
| LOANER | Loaner |
| PRCD RPAIR | Proceed with Repair |
| REJECT_1 | Product Unrepairable |
| REJECT_2 | Declined Repair |
| REV_EST | Revised Estimate Approved |
| WAIT_1 | Customer Contacted |
| WAIT_2 | Awaiting Approval |
You can set up the reason codes for use in your organization using the Application Object Library: Reason Lookups window.
Note: You can define additional reason Lookup Codes using the Lookups window. For detailed instructions, see Defining Oracle Depot Repair Lookup Codes.
To Set Up Depot Repair Reason Codes
-
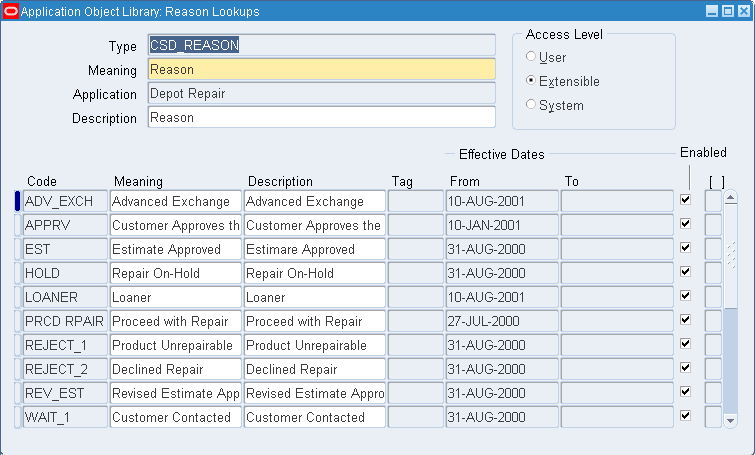
From the Depot Repair Navigator, use the following path to navigate to the Application Object Library: Reason Lookups window:
Depot Repair > Setup > Reason
-
The Reason Lookups window consists of the following fields:
-
Type: refers to the Lookup Type and is seeded value that the user cannot modify
-
User Name: refers to a user definable value for this Lookup Type
-
Application: refers to the application that owns the reason types being defined
-
Description: refers to the description of the Lookup Type
-
Code: is the unique code assigned to a reason type
-
Meaning: represents the meaning of the Code
-
Description: refers to the description for the Code
-
Tag: refers to an optional additional category hard code, and is not used by Depot Repair
-
Effective Date From: represents the first date that the Reason Code was available and valid
-
Effective Date To: represents the last date the Reason Code was available and valid
-
Enable check box: when selected, enables the use of the Reason Code while using Oracle Depot Repair
-
-
Enter, or modify the values in the fields as required for use in your depot.
-
Click the Save icon on the toolbar to save your setup.
Setting Up Customer Profiles
A Customer Profile displays summarized information about the customer that is appropriate for the service representative to know. It may contain information such as the number of open service requests. These profile checks are flagged by appropriate ratings and colors that provide instant visual clues to the service representative to assist in appropriate engagement with the customer. Customer Profiles also furnish the ability to drill down from a profile check to a detailed list, and then to the original transaction.
You can define profile checks, and combine multiple checks with complex criteria. It is also possible to define critical customer criteria by using profile checks.
The profile engine (a concurrent program) runs periodically to check and store changes to profile checks.
Use the Customer Profile Setup window to define the profiles based on critical customer information that needs to be readily accessible by the service representative. You may already have set up Customer Profile if other Oracle Service application modules are in use at your organization.
To navigate to the Customer Profile Setup window, use the following path:
Service Requests > Setup > Customer Management > Customer Profiles
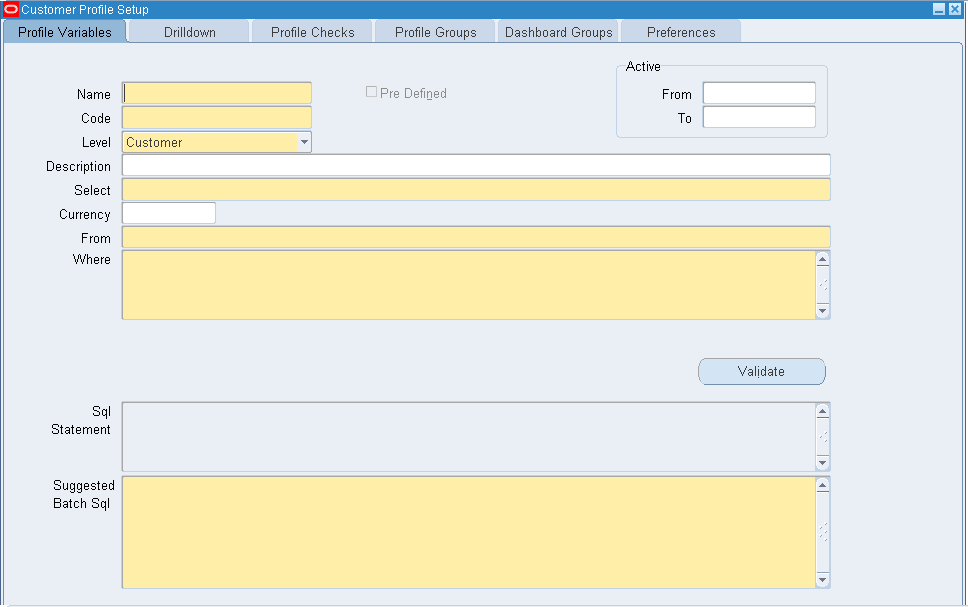
Follow these steps to setup Customer Profiles:
-
Define Profile Rating Lookup Codes
-
Define Profile Variables
-
Define Drilldowns
-
Define Profile Checks
-
Define Profile Groups
-
Define Dashboard Groups
-
Associate Profiles with Modules
-
Define Preferences
-
Define Rating Labels
-
Define Categories
-
Run the Customer Profile Engine
For detailed instructions, refer to the Oracle TeleService Implementation Guide.
Setting Up Diagnostic Codes in Oracle Depot Repair
Oracle Depot Repair provides the ability to associate service problems with a Diagnostic Code, and to associate the potential resolutions with a Service Code. By utilizing Diagnostic Codes and Service Codes, users can quickly document service efforts for customer charges and depot service history.
You make use of Diagnostic Codes and Service Codes when you process a Service Order. If you have recorded one or more Solutions in Oracle Knowledge Management to previous problems similar to the one in the current Service Order, then you can examine these previous cases, and if appropriate, apply one or more of the previous Solutions to the current Service Order.
The full setup of Diagnostic Codes and Service Codes includes setup steps in both Oracle Depot Repair and Oracle Knowledge Management.
This section deals with the setting up of Diagnostic Codes in Oracle Depot Repair.
For details of setting up Service Codes in Oracle Depot Repair, see Setting Up Service Codes in Oracle Depot Repair.
For details of setting up Diagnostic Codes and Service Codes in Oracle Knowledge Management, see Setting Up Knowledge Management.
In Oracle Depot Repair, when you create a Diagnostic Code, you associate it with one or more domains. There are two domain types, Item and Category. Each associated domain is either an item or an item category, as defined in Oracle Inventory.
The list of values for the Category field will be a list of all item categories for the category set selected for the profile option CSD: Default Category Set for Diagnostic Codes and Service Codes.
Use the Diagnostic Codes window to define the Diagnostic Codes, and their associated items or categories or both.
To Set Up Diagnostic Codes in Oracle Depot Repair
-
Navigate to Diagnostic Codes window using the following path:
Depot Repair > Setup > Diagnostic Codes
The window lists all the existing Diagnostic Codes.
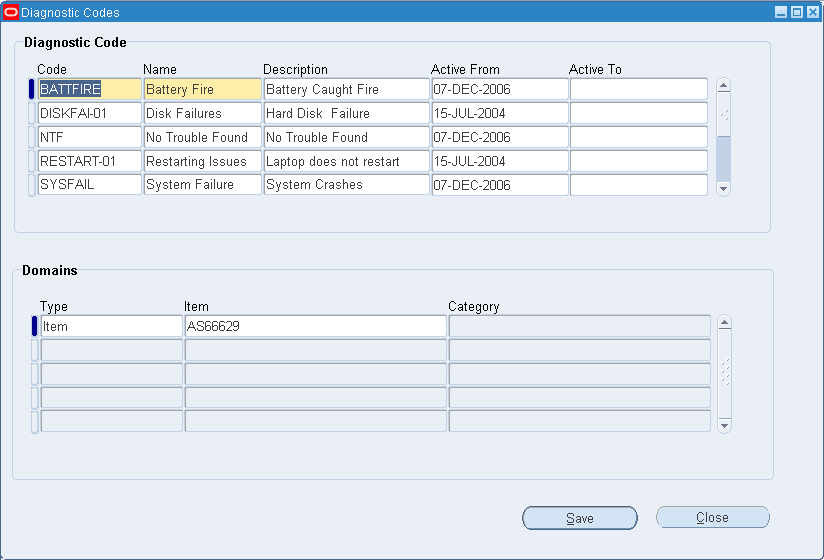
-
Click the New toolbar button to create a blank row for defining your Diagnostic Code.
-
Enter a Code and a Name for the Diagnostic Code.
-
Optionally, enter a Description for the Diagnostic Code.
-
In the Active From field, enter the date on which the Diagnostic Code is activated.
The date defaults to the current date. You can change it to any later date, but not to a prior date.
-
Optionally, set the Active To date field.
-
Click the Depot Repair Diagnostic Codes DFF field to open the Depot Repair Diagnostic Codes window. Add a DFF value to the diagnostic code and click the Save.
-
Click any field in the Domains area, and if necessary, click the New toolbar button to create a blank row for defining a domain.
-
In the Type field, select either Item or Category. from the list of values.
-
Depending on the Type, select either an Item or a Category from the list of values in the Item or Category field respectively.
-
Click the Depot Repair Diagnostic Codes DFF field to open the Depot Repair Diagnostic Codes window. Add DFF value to the diagnostic code and click the Save.
-
Repeat steps 7 to 11 for as many domains as you want to associate with the Diagnostic Code.
-
Click the Save Button to save your setup.
Setting Up Service Codes in Oracle Depot Repair
Oracle Depot Repair provides the ability to associate service resolutions with a Service Code.
You make use of Service Codes when you process a Service Order. If you have recorded one or more Solutions in Oracle Knowledge Management to previous problems similar to the one in the current Service Order, then you can examine these previous cases, and if appropriate, apply one or more of the previous Solutions to the current Service Order.
You can use Service Codes with or without Diagnostic Codes.
The full setup of Diagnostic Codes and Service Codes includes setup steps in both Oracle Depot Repair and Oracle Knowledge Management.
This section deals with the setting up of Service Codes in Oracle Depot Repair.
For details of setting up Diagnostic Codes in Oracle Depot Repair, see Setting Up Diagnostic Codes in Oracle Depot Repair.
For details of setting up Diagnostic Codes and Service Codes in Oracle Knowledge Management, see Setting Up Knowledge Management.
In Oracle Depot Repair, when you create a Service Code, you can associate it with the following:
-
One or more items
-
One or more item categories
The item categories belong to the category set selected for the profile option CSD: Default Category Set for Diagnostic Codes and Service Codes.
-
One or more reference bills
-
One or more alternate bills
-
One or more reference routings
-
One or more alternate routings
-
One or more task template groups
Use the Service Codes window to define the Service Codes, and their associated elements.
To Set Up Service Codes in Oracle Depot Repair
-
Navigate to the Service Codes window using the following path:
Depot Repair > Setup > Service Codes
The window lists all the existing Service Codes.
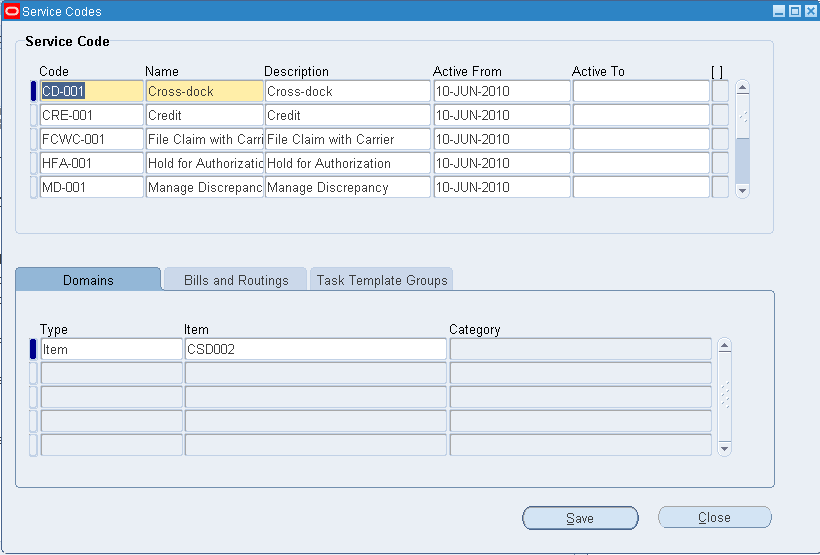
-
Click the New toolbar button to create a blank row for defining your Service Code.
-
Enter a Code and a Name for the Service Code.
-
Optionally, enter a Description for the Service Code.
-
In the Active From field, enter the date on which the Service Code is activated.
The date defaults to the current date. You can change it to any later date, but not to a prior date.
-
Optionally, set the Active To date field.
-
In the DFF field, enter flexfield information associated with the Service Code. The DFF name is Depot Repair Service Codes.
-
If you want to associate the Service Code with a domain:
-
Click the Domain tab, if it is not visible
-
Select either Item or Category from the Type list of values
-
Depending on your choice of Type, select either an Item or a Category from the appropriate list of values.
Repeat this step for as many domains as you want to associate with the Service Code.
-
-
If you want to associate a bill or routing or both to the Service Code:
-
Click the Bills and Routings tab.
-
Select the organization from the Org list of values.
-
To associate a bill, select from the Bill Reference list of values, and if you require an alternate bill, select also from the Bill Alternate list of values.
-
To associate a routing, select from the Routing Reference list of values, and if you require an alternate routing, select also from the Routing Alternate list of values.
Repeat this step for as many bills and routings as you want to associate with the Service Code.
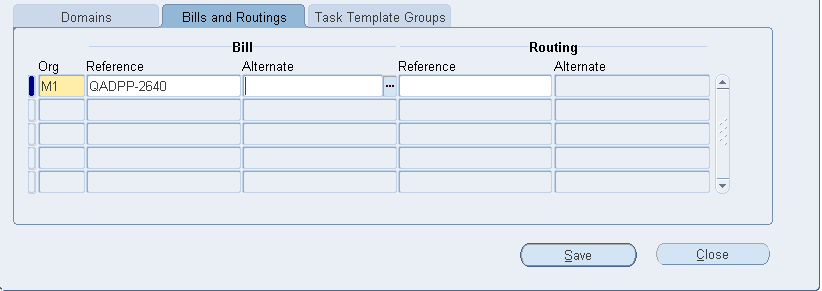
-
-
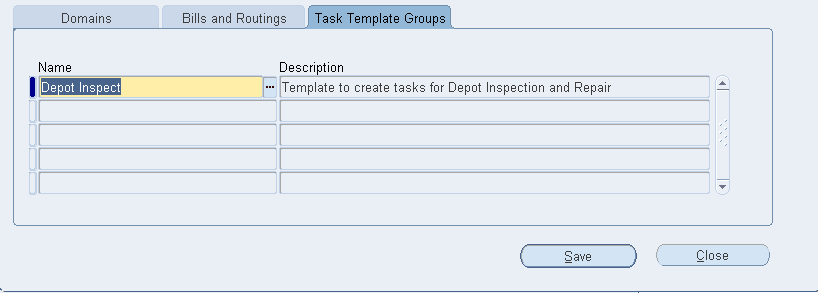
If you want to associate one or more task template groups to the Service Code:
-
Click the Task Template Groups tab.
-
Select the task template group from the Name list of values.
This also populates the Description field.
Repeat this step for as many task template groups as you want to associate with the Service Code.
-
-
Click the Save icon on the toolbar to save your setup.
Setting Up Service Code Recommendations
When you are processing high volume repairs, in the Evaluation tab of the Service Order page, two of the screen areas are the Diagnostic Codes region and the Service Codes region.
Any diagnostic codes and service codes defined for the same item or item category as the service item automatically appear in their respective screen areas.
You can also get service codes added to the page if you have set up service code recommendations in advance.
The main elements of a service code recommendation are the following:
-
A name
-
A service code and one of its domains
-
A recommendation type of Sometimes or Always
-
One or more requirements involving diagnostic codes and their domains; each requirement mandates either the existence or the absence of a diagnostic code and one of its domains
For example, if an examination of past services leads you to the conclusion that the service code S7 will always be useful when diagnostic code D1 is present and diagnostic code D99 is absent, you could set up a service code recommendation whose main elements are as follows (assume that all domains are the same as the service item):
-
Recommendation Name: S7_D1Y_D99N
-
Recommendation Type: Always
-
Service Code: S7
-
Diagnostic Requirement 1: Must Have D1
-
Diagnostic Requirement 2: Must Not Have D99
Service code recommendations are used in the Service Order page, as follows:
-
You click the Recommend Services button.
-
The system checks all the diagnostic codes in the Diagnostic Codes region against all the requirements of the service code recommendations.
-
If all the requirements of one or more recommendations are fulfilled, the corresponding service code or codes are added to the Service Codes region.
Any service code added from a recommendation whose Type is Always will be marked as Applicable and disabled, so that any jobs generated from the Service Codes region will include the bills and routings associated with that service code.
For details, select from the following:
Querying Service Code Recommendations
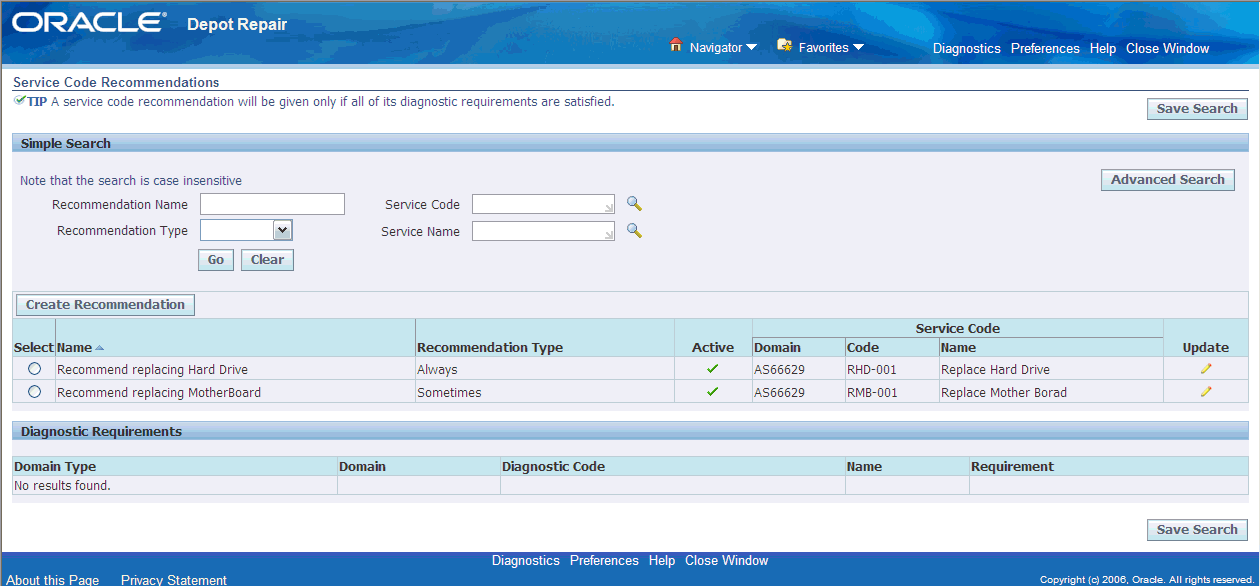
-
Open the Service Code Recommendations window using the following navigation path: Depot Repair > Setup > Service Code Recommendations
The window shows the existing service code recommendations.
-
Select a recommendation to see its diagnostic code requirements at the foot of the screen:
-
Optionally, click the Update icon for a recommendation to update it.
-
For a new recommendation, click Add Recommendation.
Adding Service Code Recommendations
-
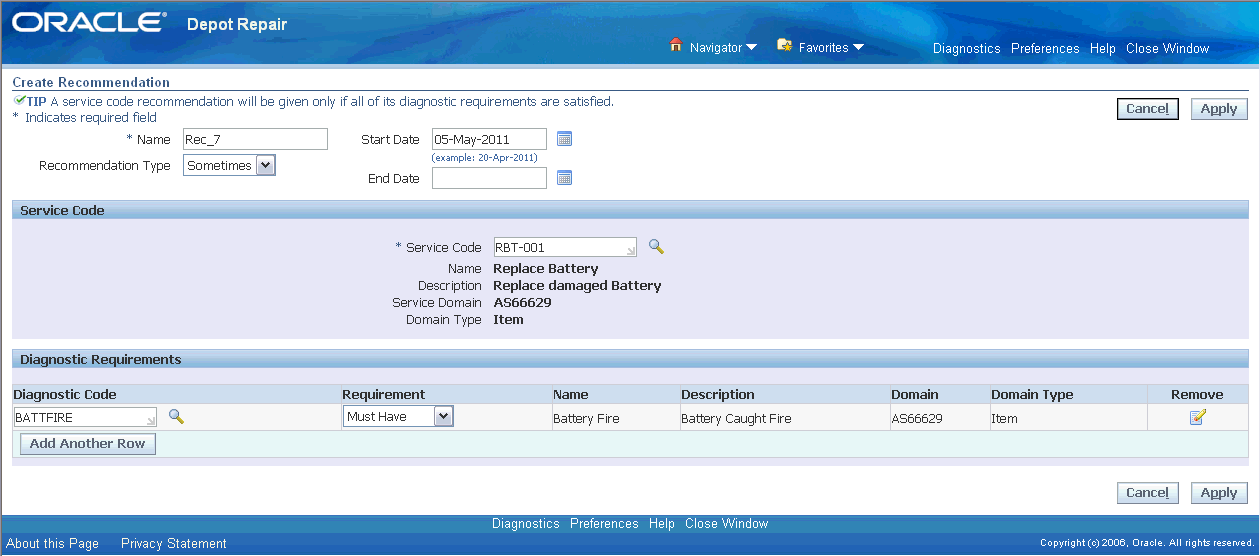
Enter a Name for the recommendation.
-
Select a Recommendation Type, of Sometimes or Always.
-
Optionally, select a Start and End Date.
-
Select a Service Code.
From the list of values, select the entry with the item or category domain that you want to associate with the recommendation. This is the domain that will be compared with the service order item domain, to try to find a match when you click Recommend Services in the Service Order page.
-
You can create one or more entries in the Diagnostic Requirements area.
For each diagnostic requirement, select the following
-
Diagnostic Code
Selecting from the list of values populates the Name, Description, Domain, and Domain Type fields.
From the list of values, select the entry with the item or category domain that you want to associate with the recommendation. This is the domain that will be compared with the service order item domain, to try to find a match when you click Recommend Services in the Service Order page.
-
Requirement - either Must Have or Must Not Have
-
-
In the process of entering the requirements, you can Remove an entry.
-
Save your work.
Defining Oracle Depot Repair Lookup Codes
You can maintain existing Lookups as well as define additional Lookups for your shared Lookup Types.
Each Lookup has a Code, a Meaning, and a Description. Lookup Codes are not editable, but Meanings and Descriptions are. If you make changes to a Lookup, you must log out and then log back on before your changes take effect.
The following Lookup Types are pre-seeded in Oracle Depot Repair. For more information, refer to Appendix B.
| Lookup Type | Description |
|---|---|
| CSD_APPROVAL_STATUS | Repair Approval Status (Approved, Rejected) |
| CSD_ESTIMATE_STATUS | Estimate Status (Accepted, Bid, Closed, Draft, Hold, Rejected) |
| CSD_EST_BILLING_TYPE | Estimate Billing Type (Expense, Labor, Material) |
| CSD_EVENT | Repair Event (Customer Approved, Charges Recorded, Repair Diagnosed, Repair Job Completed) |
| CSD_PRODUCT_ACTION_CODE | Product Transaction Action Code for Service Orders (Customer Item, Exchange, Loaner, Replacement, Defective, Usable) |
| CSD_PROD_ACTION_TYPE | Depot Service Order Product Transaction Action Types (Return, Ship, Move In, Move Out) |
| CSD_PRODUCT_TXN_STATUS | Product Transaction Status (Booked, Entered, Received etc.) |
| CSD_REASON | Reason for current status of repair process (Customer Approves the Estimate, Estimate Approved, Repair On Hold) |
| CSD_REJECT_REASON | Estimate Reject Reasons (Customer Reject, Machine Unavailable, Resource shortage) |
| CSD_REPAIR_MODE | Service Mode for the depot repair processes (WIP, Tasks, None, All) |
| CSD_REPAIR_STATUS | Service Status (Closed, Open, On Hold) |
| CSD_REPAIR_TYPES | Depot Service Types (Advance Exchange, Walk-In with Return and Repair etc.) |
| CSD_RO_TXN_STATUS | Service Order Transaction Status (OM Booked, OM Received, OM Released etc.) |
| CSD_UNIT_OF_MEASURE | Lead Time Unit of Measure (Hour, Week, Day) |
| CSD_WIP_JOB_STATUS | Job Status (Released, Unreleased) |
| CSD_WARRANTY_STATUS | Supplier Warranty Status (Rejected, Submitted, Approved) |
| CSD_SOURCE_TYPE | Repair BOM |
| CSD_DEF_ENTITY_ATTR_RO | Service Owner, Ship From Sub-Inventory, RMA Receiving Sub-Inventory, Service Organization, Ship From Organization, Inventory Organization, RMA Receiving, Organization, Service Priority, Service Type, Vendor Account |
| CSD_BULLETIN_TYPES | Notification, Recall, Regulatory Compliance, Soft Entitlement, ECO, Bulletin |
| CSD_BULLETIN_SOURCE_TYPE | Rule, Manual |
| CSD_DEFAULTING_ENTITIES | Service Order |
| CSD_DEFAULTING_VALUE_TYPES | Attribute, PL/SQL API, Profile |
| CSD_RULE_TYPES | Service Bulletin Rule, Defaulting Rule |
| CSD_RULE_OPERATORS | <>, <, >, = |
| CSD_BULLETIN_FREQUENCY | Apply Once Per Repair, Apply Once Per Item Instance |
| CSD_ESCALATION_CODES | New, Reopened |
| CSD_BULLETIN_ACTION | Mark as Viewed, Mark as Unviewed |
| CSD_WARRANTY_VIOLATION | Yes, No |
| CSD_REWORK | Yes, No |
| CSD_RECALL_FLOW_STATUS | Recall Flow Status (Closed, Draft, Open) |
To Define Oracle Depot Repair Specific Lookup Codes
Switch to the Application Developer responsibility.
-
From the Application Developer Navigator window, use the following path to navigate to the Applications Object Library Lookups window:
Functions (tab) > Application > Lookups > Application Object Library
-
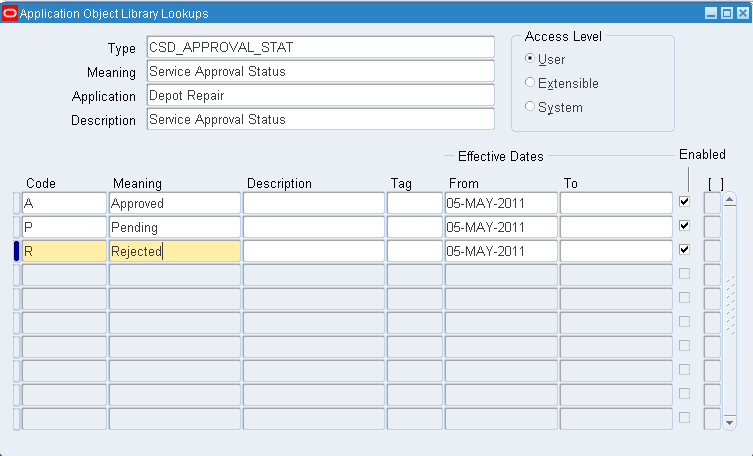
Run a query to display the details of the Lookup Type under which you want to define the lookup code. Several lookup types (listed above) are pre-seeded in Oracle Depot Repair.
-
Click anywhere in the spread table. Now click the New tool bar button to open a blank row.
-
Enter a name for the Lookup Code in the Code field. The code name is internal to the system.
-
Enter a User Name for the Lookup Code in the meaning field. This value is displayed in the LOV.
-
Optionally enter a description in the Description field.
-
If you want the Lookup Code to be effective only for a specific period, set the period by selecting the Effective Dates From and To fields.
-
Verify that the Enabled check box is selected. Only enabled Lookup Codes will appear in the List of Values.
-
Save your work.
Setting Up Oracle Depot Repair Profile Options
Profile options are changeable parameters that affect the way your application looks and behaves. As System Administrator, you control how Oracle Depot Repair operates by setting profile options to the values you want. You can set profile options at four different levels: site, application, responsibility, and user. For a detailed discussion of User Profile options, refer to the Oracle E-Business Suite Setup Guide.
When a profile option may be set at more than one level, site has the lowest priority, superseded by application, then responsibility, with user having the highest priority. For example, a value entered at the site level may be overridden by values entered at any other level. A value entered at the user level has the highest priority, and overrides values entered at any other level.
Use the System Profile Values window to set up the profile values. The following profile options may be modified to customize Oracle Depot Repair to suit your specific requirements.
| Profile Name | Default Value (Site Level) | Possible Values | Description |
|---|---|---|---|
| CSD: Add to Order Num Within Service Order Default | No | Yes or No | When the new item transaction is created, the Add to Order Number is derived based on this profile and CSD: Add to Order Num Within Service Request Default. The Bulk Receiving program honors this profile. |
| CSD: Add to Order Num Within Service Request Default | No | Yes or No | When the new item transaction is created, the Add to Order Number is derived based on this profile and CSD: Add to Order Num Within Service Order Default. This profile takes the precedence over CSD: Add to Order Num Within Service Order Default. Setting this profile will cause it to use the order number of the Service Request. The Bulk Receiving program honors this profile. |
| CSD: Allow Charge Override for Actuals | No | Yes or No | Determines whether to allow overriding of the Charge field for Actuals lines. |
| CSD: Allow Charge Override for Estimates | No | Yes or No | Determines whether to allow overriding of the Estimated Charge field for Estimate lines. |
| CSD: Allow Creating WIP Job Without RMA | No | Yes or No | Determines whether the creation of a WIP Job without an RMA is allowed. |
| CSD: Allow Price Override for Logistics Lines | No | Yes or No | Determines whether to allow overriding of the Price field in the Logistics Tab. Cannot be updated by a User, only by Sysadmin. If not set, the value is taken as No. |
| CSD: Automatically Clock In to Time Clock | Yes and No | When set to Yes, this profile option automatically clocks you in to the first available operation on the first available job when you log into the Technician Portal or access the Technician Portal from the Execute Job button in the Depot Repair Workbench or from the Work Details button in the Returns Portal.
Note: Ensure you personalize and enable the Work Details button in Returns Portal Service Order Details page and the Returns Portal Confirmation page. If you select No for this profile, you will not be automatically clocked in when you access the Technician Portal. |
|
| CSD: Automatically Receive Items | Prompt Before Auto-Receive | Never Automatically Receive Always Automatically Receive Prompt Before Auto-Receive |
Determines whether or not you will be prompted to automatically receive items in the Logistics tab of the Depot Repair workbench. If you select:
|
| CSD: Automatic Service Bulletin Retrieval after Service Order Creation | No | Yes or No | This will specify the default sub-inventory to use when issuing materials in the Technician Portal. |
| CSD: Automatic Serial Number Reservation | None | Yes or No | If this profile is set to yes, the serial number is automatically reserved before pick release, sparing the user from having to manually reserve it using the Data->Reserve Serial Number menu option. |
| CSD: Bulk Receiving Logistics | Process through Receiving Orders | Process through Booking Orders Process through Receiving Orders |
This profile option gives you the option to create a service order with or without automatic receiving transactions in the Bulk Receive module. You can select from the following values:
|
| CSD: Calculate Resolve By Date from Entitlement | No | Yes or No | If set to Yes, this profile calculates the Resolve by Date starting from a specific service order status rather than only from service order creation.
Note: In addition to setting the profile option to Yes, the Entitlement milestone needs to be set under RO Status Transitions Setups in order for this calculation to be kicked off during a status change. |
| CSD: Close SR When All Service orders are Closed | None | Yes or No | When set to Yes, automatically closes the Service Request when the last Service Order is closed. |
| CSD: Create IB Instance at Service Order Creation | No | Yes or No | If this profile set to Yes, it creates IB instance at service order creation. It will not ask you whether you want to create IB instance or not. If this profile set to NO, it will ask you whether you want to create IB instance during creation of service order. |
| CSD: Create Logistics Lines for OSP | No | Yes or No | Setting this profile to Yes enables a technician to automatically create a third party ship and RMA line on the Logistics tab whenever an OSP operation is completed. |
| CSD: Complete Work Service Order Status | No | Yes or No | This profile option specifies the flow status that the service order will be changed to when the complete work button is clicked. |
| CSD: Currency Conversion Type | None | Daily conversion types available in GL (gl_daily_conversion_types) | Conversion type to use when converting a cost to the currency of an estimate charge line. |
| CSD: Customer Approval Required | Yes | Yes or No | Determines whether customer approval of the estimate is required for creating a Job. |
| CSD: Custom Estimate Report Concurrent Name | None | Name of the concurrent program to launch for custom estimate reports | |
| CSD: Custom Traveler Concurrent Name | None | Name of the concurrent program to launch for custom travelers | |
| CSD: Debug Level | This profile is no longer in use. Use the FND debug profile options to enable debugging. | ||
| CSD: Default Actuals Account from Customer Account | Null | Yes or No | This profile defaults the customer account information in the service request header to the Default Bill To Account field in the Actuals tab on the Depot Repair Workbench. Use the following values:
If the profile value is null, then the default behavior will be the same as when the profile is set to No. |
| CSD: Default BOM Resource | No | Yes or No | This profile option specifies the BOM resource to transact when clocking out. Before you set profile CSD: Default BOM Resource, you must set the profile CSD: Default Repair Inventory Org first. |
| CSD: Default Completion Sub-Inventory | None | The default subinventory to use when completing a job in the Technician Portal | |
| CSD: Default Current Item Revision for Job Completions | Yes | Yes or No | Whether or not to default the latest item revision when completing a job in the Technician Portal |
| CSD: Default Current Item Revision for Material Transactions | Yes | Yes or No | Whether or not to default the latest item revision for materials in the Technician Portal |
| CSD: Default Category Set for Diagnostic Codes and Service Codes | Inv.Items | <Category Set> | Determines the default Category Set for setting up Diagnostic Code and Service Code domains. |
| CSD: Default Country Code (Phone) | None | < free text > | Specifies the Default Country Code for phone number fields. |
| CSD: Default Department for Operations | None | The department to default for a new operation on a job in the Technician Portal if the job does not have a routing reference. | |
| CSD: Default HR Resource | None | The default employee for a resource on a job in the Technician Portal | |
| CSD: Default Instance-Party Association Type | None | Any value defined in Install Base > Instance Party Account | Relationship Types Form Automatically creates instance party association to support rental flow. If the profile is set to a value, it will automatically create an association between two parties and process repair orders and charge lines.
Note: If the instance is not owned by the service request customer (the instance may be internally owned or it may be owned by another external customer), then the code automatically creates the relationship between the SR customer and the item instance. The relationship value comes from the profile. |
| CSD: Default Job Name Prefix | No | <Any user entered value is allowed> | Specifies the Default Job Name Prefix used while submitting a Job for creation. This profile is applicable only when the profile CSD: Use CSD as Job Name Prefix is set to No. |
| CSD: Default Job Status | None | Released or Unreleased | Determines the default Job status. |
| CSD: Default Labor Item for Estimate Line From Tasks | None | Eligible labor items from Inventory | Labor item to use when auto-creating estimate labor lines from tasks. |
| CSD: Default Logistics Addresses to Primary Customer Account Sites | None | Yes or No | If set to yes: Depot Repair workbench will to default the Bill To and Ship To on the Logistics lines from the Primary Customer Account Sites for the users Operating Unit. If no primary account site can be found, then the logistics addresses will be defaulted from the SR bill-to and ship-to fields. If set to no: The logistics bill to and ship to addresses defaulted from the bill-to and ship-to fields in the SR. |
| CSD: Default Logistics Warehouse | Yes | Yes or No | If this profile set to Yes, it will default the warehouse on the logistics line. If the value set to NO, it will not default the warehouse on the logistics line. |
| CSD: Default Material Sub-Inventory | None | 1 Any valid subinventory | This will specify the default sub-inventory to use when issuing materials in the Technician Portal. |
| 2. Null | If set to Null, users will not be required to enter supply subinventory information in the Technician Portal when creating the material requirements if the supply type of operation is push. .
Note: If the Null value is selected, users will be required to enter supply subinventory information during issue transactions in the Technician Portal if the supply type of operation is pull and assembly pull and not push. Note: This profile needs to have a value if the WIP supply type is operation pull or assembly pull and can be left as null otherwise. |
||
| CSD: Default Material Sub-Inventory Locator | None | All valid subinventories in a particular inventory organization and subinventory. | This profile option is the default profile used for transacting materials from Technician Portal if the item is locator controlled or the subinventory is locator controlled. Use this profile option to specify from where to source material when issuing materials to jobs. |
| CSD: Default Material WIP Supply Type | Null | Null, Push, Assembly Pull, Operation Pull | This profile allows a repair organization to specify a single supply type, generally Push, for all materials used in repairs. This overrides setups done in the Item Master. This is applicable for organizations that use only a single supply type in the repair business and do not want to have distinct setups for manufacturing versus repair when the repair supply type is always the same. If set, this default supply type will be used for material requirements manually created in the Technician Portal or created from Estimate lines.
Note: If the value is null, the WIP supply type defaults from the setup in the Item Master. |
| CSD: Default Pick Release Rule for Usable SubInventory | None | All valid and active pick release rules. | This is the default pick release rule when performing a move out action from depot in the spares to depot flow. The usables are picked up from this subinventory and are staged. |
| CSD: Defective Pick Release Rule for Defective Sub Inventory. | None | All valid and active pick release rules. | This is the default pick release rule when performing a move in action to depot in the spares to depot flow. The defectives are picked up from this subinventory and are staged. |
| CSD: Default Pick Release Rule for Sales Orders | None | Standard, etc. | Determines default Pick Release Rule for Service Order related sales orders. |
| CSD: Default Price List | None | < Price List > | Sets the default price list for the Depot Repair application. |
| CSD: Default Program Created Service Request Severity | None | <List of Incident Severities> | When creating Service Requests from RMA lines via concurrent manager, this severity will be used for the Service Request. |
| CSD: Default Program Created Service Request Status | None | <List of Incident Statuses> | 1. When creating new Service Requests for internal order refurbishments, this status will be used for the Service Request. 2. When creating Service Requests from RMA lines via concurrent manager, this status will be used for the Service Request. |
| CSD: Default Program Created Service Request Type | None | <List of Service Request Types for Depot Repair> | When creating Service Requests from RMA lines via concurrent manager, this type will be used for the Service Request. |
| CSD: Default Program Created Service Request Urgency | None | <List of Incident Urgencies> | 1. When creating new Service Requests for internal order refurbishments, this urgency will be used for the Service Request. 2. When creating Service Requests from RMA lines via concurrent manager, this urgency will be used for the Service Request. |
| CSD: Default RMA Subinventory | None | List of subinventories | The default Subinventory to RMA an item into from the depot workbench |
| CSD: Default Return Reason Code for RMAs | Damaged Product | Damaged Product, etc. | Determines default Return Reason Code for item transaction: RMAs. |
| CSD: Default Service Order for New Lines | Yesor | Yes or No | Determines whether to default line values into the new line when you arrow down from last service order line in the Depot Repair Workbench. |
| CSD: Default Service Type | Standard | <Service Types> | Determines default Service Type for new Service Orders. |
| CSD: Default Service Request Severity for Internal Service Order | None | <Service Request Severity> | When creating new Service Requests for internal order refurbishments, this severity will be used for the Service Request. List of values displays all active Service Request severities. |
| CSD: Default Service Request Type for Internal Service Order | None | <Service Request Types> | When creating new Service Requests for internal order refurbishments, this type will be used for the Service Request. List of values displays all active Service Request types. |
| CSD: Default Service Order Item as Material on Job | Yes | Yes/No or Non-Serialized Only | Setting this profile to Yes automatically defaults the Item value that is captured on the service order as a material demand for jobs. The service order item can be seen in the Materials table on the Execution tab of the Technician Portal as soon as a job is created.
Note: When the profile CSD: Default Service Item as Material on Job is set to Yes, the Service Order item defaults when:
Setting this profile to Non-Serialized Only when repairing non-serialized items, defaults the repair item as material demand to more than one job. Businesses repairing non-serialized items may require more than one job, and this value defaults to all jobs instead of only the first job. Note: The Non-Serialized Only option is only valid for businesses always repairing only non-serialized items and not for business repairs for serialized items. |
| CSD: Default Service Order Inventory Org | Possible values of any of the valid defined Inventory Organizations. | Each service order is associated with an Inventory Org. This is used as the default value to create new logistics lines and for reporting. The profile is that value from which the default is derived. | |
| CSD: Default Service Type for Bulk Receiving | None | Service Type of service orders created through Bulk Receiving module | |
| CSD: Default Service Request Owner for Bulk Receiving | None | Owner for Service Requests created through Bulk Receiving module | |
| CSD: Default Service Request Severity for Bulk Receiving | None | Severity for Service Requests created through Bulk Receiving module | |
| CSD: Default Service Request Status for Bulk Receiving | None | Status for Service Requests created through Bulk Receiving module | |
| CSD: Default Service Request Summary for Bulk Receiving | None | Summary statement for Service Requests created through Bulk Receiving module | |
| CSD: Default Service Request Type for Bulk Receiving | None | Service Request Type for Service Requests created through Bulk Receiving module | |
| CSD: Default Service Request Urgency for Bulk Receiving | None | Urgency for Service Requests created through Bulk Receiving module | |
| CSD: Default Service Order Status After Receiving | All service order flow statuses. | The default service order status after the item is received. | |
| CSD: Default Service Order Status After Final Shipping | Null (none) | List of the all the service order status on the service order status set-up UI page. | It is the default service order status after the final shipping on the logistics line. |
| CSD: Default Service Request Status for Bulk Receiving | None | All valid service request statues. | This profile is referred when creating service request from bulk receiving screens. If this profile is not set, the bulk receiving concurrent program would fail to create the service request. |
| CSD: Default Service Order Organization | None | All active service order organizations | Default service owning organization. |
| CSD: Default Subinventory for Bulk Receiving | None | Subinventory to receive items into when using the Bulk Receiving module | |
| CSD: Default Work Summary for Service Request | None | < free text > | When creating Service Requests from RMA lines via concurrent manager, this work summary will be used for the Service Request. |
| CSD: Default WIP MRP Net Qty to Zero | None | Yes or No | Determines if the net quantity for a WIP job should be defaulted to zero.If it is set to null or No, then the net quantity will be set to job quantity. |
| CSD: Default WIP Accounting Class | None | All defined accounting classes for non-standard discrete jobs | Default accounting class used in the create job functionality. Used when the jobs get created from all channels except Submit Jobs form. |
| CSD: Descriptive Flexfield Context for Technician Portal Operations | Sets the descriptive flexfield context in the operations table of the Repair Execution tab in the Repair Technician Portal. | ||
| CSD: Descriptive Flexfield Context for Technician Portal Materials | Sets the descriptive flexfield context in the materials table of the Repair Execution tab in the Repair Technician Portal. | ||
| CSD: Descriptive Flexfield Context for Technician Portal Resources | Sets the descriptive flexfield context in the resources table of the Repair Execution tab in the Repair Technician Portal. | ||
| CSD: Directory for Depot Log Files | This profile is no longer in use. Use the FND debug profile options to enable debugging. | ||
| CSD: Enable Advanced Pricing | No | Yes or No | Setting this profile to YES enables the use of Advanced Pricing modifiers, qualifiers, static and dynamic pricing formulas, secondary price lists and price breaks on Estimates and Actuals. |
| CSD: Enable Auto Update of Service Order Status upon Receiving | No | Yes or No | Set this option to Yes to enable automatic update of service order status when the item is received. |
| CSD: Enable Costing | Yes | Yes or No | Enables/disables cost fields and buttons for estimates. |
| CSD: Enable Estimates | Yes | Yes or No | This determines whether the Estimate tab will be enabled or disabled. |
| CSD: Enable Expected Receipts for Bulk Receiving | No | Yes or No | Setting this profile to Yes enables the Bulk Receiving module to allow for expected receipts as well as unexpected receipts. |
| CSD: Enable Flexfield Defaulting for Service Orders Flexfield | No | Yes or No | Enables defaulting of values in the service orders flexfield. When set to yes, the create service order API will try to default values for the flexfield segments if anything is defined. |
| CSD: Enable Knowledge Management | None | Yes or No | If the user sets this option to No, the applicable Knowledge Management area in the Diagnostics tab will be grayed out. If this profile option is not set, Knowledge Management will be enabled. |
| CSD: Enable Project and Task for Actuals | None | Yes or No | Set this profile to Yes to transfer the project and task number to sales orders from depot repair actuals.
Note: Remove OM constraints to allow project and task updates on booked sales order lines. |
| CSD: Estimate Report Print Mode | None | Oracle Report, HTML, PDF, RTF, TXT, XLS | Format for estimate reports |
| CSD: Enable Sales Order Drill-down | No | Yes or No | This profile enables the Sales Order hyperlink on the logistics tab and Actuals window. |
| CSD: Enable Service Request Drill-down | No | Yes or No | Set this profile to Yes to launch the Update Service Request page from the Request Num link. |
| CSD: Enable Service Order Drill-down | No | Yes or No | Set this profile to Yes to allow users to double-click on the Repair Number in the Depot Workbench to drill down to the Service Order Details OA page. |
| CSD: Environmental Impact Dashboard Visibility Level | Operating Unit | Enterprise, Operating Unit | This profile restricts your ability to query environmental impact dashboard at an enterprise or operating unit level. |
| CSD: Environmental Impact Dashboard Default Weight UOM | None | Any active UOM defined with UOM Class = Weight | This profile option defaults the Weight UOM field in the environmental impact dashboard header. |
| CSD: Extend Resolve By Date for Hold Time | None | Yes or No | Set this profile to Yes to automatically extend the Resolve by Date based on the amount of time service orders are in the hold status. |
| CSD: Generate Estimate Overwrite Policy | None | NULL Overwrite Draft and New Estimates Only Always Overwrite Existing Estimates |
This profile option determines how to regenerate and overwrite existing estimates in the Technician Portal. To only regenerate an existing estimate with the status New, select the value NULL or Overwrite New Estimates Only To only regenerate an existing estimate with the status New or Draft, select the value Overwrite Draft and New Estimates Only. To regenerate an existing estimate regardless of the status, select the value Always Overwrite Existing Estimates. |
| CSD: Import WIP to Actuals - Net Quantity | Yes | Yes or No | If the profile set to Yes, the import actuals from WIP feature will only import the Net Quantity to Actuals line. If the profile set to No, it will import the issued quantity to actuals line. |
| CSD: Import WIP Job to Actuals Only If All Lines Are Successful | Null | Yes | When the profile is set to Yes, if any of the lines in a WIP job that cannot be imported due to warnings or errors, none of the lines in the WIP job are imported. You must correct the issues and attempt to import the WIP job again. When the profile is set to No, all lines in a WIP job that can be imported are imported even if one or more lines fails to import. |
| CSD: Import WIP Resources to Estimates | Untransacted Resources only | Transacted Resources only Untransacted Resources only Transacted and Untransacted Resources Do not import Resources |
This profile determine which resources are added to the estimate when Generate Estimate button is used in the Technician Portal. |
| CSD: Import WIP Materials to Estimates | Untransacted Materials only | Transacted Materials only Untransacted Materials only Transacted and Untransacted Materials Do not import Materials |
This profile determine which materials are added to the estimate when Generate Estimate button is used in the Technician Portal. |
| CSD: Job Name Generation Method | None | 1. Auto-generate job name using standard prefix (CSD) | If set to 'Auto-generate job name using standard prefix (CSD)', the job name is auto-generated using the standard prefix (CSD). The Job Name Prefix field defaults to 'CSD', is not editable, and the job name will have a number appended after 'CSD'. |
| 2. Auto-generate job name using prefix from profile option | If set to 'Auto-generate job name using prefix from profile option', the job name is auto-generated using prefix from profile option. The Job Name Prefix field defaults to the value from the profile CSD: Default Job Name Prefix, is not editable, and the job name will be appended by a number after the prefix. | ||
| 3. Manually enter job name | If set to 'Manually enter job name', the job name is manually entered. The Job Name Prefix field defaults to the value from the profile CSD: Default Job Name Prefix, is editable, and the job name is generated exactly as entered, with no number appended. | ||
| CSD: Launch Change Organization Form | No | Yes or No | If this profile set to Yes, the Change Organizations Form auto launches once the Service Order form is open. If the profile set to No, the Change Organizations form does not auto launch once the service order form is open. |
| CSD: Mandate Service Code Recommendations | None | Yes or None | When a user clicks the Recommend Service Codes button in the Technician Portal, the service codes that are recommended as Always will be automatically checked and disabled so that the user must apply the service code when generating jobs. |
| CSD: Mode for Sales Orders | Order Details Form | 1. Order Details Form | This profile option determines which Order Management user interface will be shown when the user attempts to apply or release a hold from Depair Repair's Service Order Details page. Select the default value Order Details Form to launch the Order Management Sales Order Form |
| 2. HTML UI View Order Details | Select HTML UI View Order Details to launch the Sales Order Details read-only HTML page | ||
| 3. HTML UI Update Order Details | Select HTML UI Update Order Details to launch the Sales Order Details updateable HTML page | ||
| CSD: Number of Days to Rollback Currency Conversion | 300 | <Integer value> | Number of Days to rollback currency conversion when converting a cost from GL currency to currency of estimate charge line. |
| CSD: Number of Days in Quality Check Period | <Null> | <Null> or <Any positive integer> | A service bulletin can be created for Number of Services During Quality Check Period that checks to see whether an item instance has been returned multiple times within a defined time period. This is used to ensure that neither the item instance nor the service performed is of low quality. Setting the Number of Days in Quality Check Period to <null> will treat the check period as infinite and will check for repeat returns from the very first service record in the database. Any positive integer value will restrict the search to the number of days specified. |
| CSD: Number of days from the current date to default Return By Date | None | Any number | The Return By Date on a logistics line in the Depot Repair Workbench to the current date + the number of days specified in this profile option, if that logistic line's IB transaction type requires a source or non-source return. |
| CSD: Predictive Analytics Model | Best Model | Decision Tree Naïve Bayes Support Vector Machines Best Model |
This profile option allows you to select the prediction model from the following available models:
The default value for this profile option is Best Model. If set to the default value, the application chooses from the three available models on the basis of whichever model performs better and returns the highest probabilty predictions. |
| CSD: Predictive Analytics Probability Threshold | 50% | The value should be a percentage between 0% and 100% | This profile specifies the threshold for which recommendations will be shown in the Technician Portal. Only recommendations with a confidence level above the threshold will be shown. |
| CSD: Print Bulk Receipt Travelers | Yes | Yes or No | Enables the generation of bulk receipt traveler reports if the value is set to Yes.
Note: Set CSD: Print Bulk Receipt Travelers as Y, in addition to setting RCV: Print Receipt Traveler profile option as Y or X. |
| CSD: Printer Name | None | <Printer Name> | Determines printer for printing estimate report. |
| CSD: Printer Required | None | Yes or No | Determines whether a printer is required. |
| CSD: Price List Derivation Excludes Contract Header | No | Yes or No | The service order price list derivation excludes the contract header if this profile set to Yes. |
| CSD: Process Auto Pick Release | All ship lines in an order | Selected ship line only / All ship lines in an order | This profile allows user to pick release all ship lines in an order or selected ship line only on the Depot logistics tab |
| CSD: Restrict Service Order Search by Manufacturing Organization | None | Yes or No | This profile option enables filtering by organization in the Find Service Order form if the value is set to Yes. When the profile option is set to Yes, and the user selects the Org from the Change Organization form, the Find Service Orders forms will filter by the organization that was selected. |
| CSD: Require Item For Service Request | Yes | Yes or No | Makes the item and related fields required/not required in the Service Request header. |
| CSD: Read Only Workbench | No | Yes or No | Set this option to Yes to view the Depot Workbench in read-only mode. |
| CSD: Returns Portal Mode | None | Consumer Returns | If the profile value is set as Consumer Returns, the user can register and login to the Returns Portal and can view/request only assigned returns. |
| Store Returns | If the profile value is set as Store Returns, users can select customer information while requesting the returns and create new customer records. The Store Returns user can see all the return orders irrespective of the which depot they might be assigned to. | ||
| CSD: Requisition Lead Time (Days) | None | Any number | The need by date for an internal requisition is defaulted to the current date + the number of days specified in this profile option. |
| CSD: Service Mode for Depot Orders | Work In Process | Work In Process, Task, None/ Not Applicable, All | Determines Service Mode for Depot Repair Processes - site level. |
| CSD: Service Type Internal Service Order | None | List of values displays all Service Types where Service Type Ref is Refurbishment and Internal Order flag is checked. | List of values will display at least one value, as Oracle Depot Repair seeds one Refurbishment Service Type. Customer can add more Service Types with Refurbishment set for the Service Type Ref and Internal Order flag checked, for example, one each for Task and WIP mode. A value for this profile is required to create internal Service Orders from Spares Management. |
| CSD: Service Execution Mode | Technician Portal | Technician Portal or WIP Forms | Decides whether to use Technical Portal or traditional WIP forms for performing different actions like material transaction, resource transaction, move job, complete job etc. When this profile is set to Depot Execute Job button is rendered in jobs tab. When its WIP, we will get a Dropdown in the same tab with links to WIP forms. |
| CSD: Show Depot WIP Transaction Descriptive Flexfield for Estimates | No | Yes or No | When the value is Yes, another DFF field appears in the Estimate Line Details window. When viewing the generated estimate lines after an estimate is generated from a WIP job, users can then see the DFF values from the material/resource line of the source WIP job that have been entered for materials and resources in the Technician Portal. DFF values are read-only and only viewable depending on the value of this profile option. The DFF will only have values if the user imports the estimate line from WIP and only if the user has entered DFF information in the Technician Portal. |
| CSD: Show Service Request Descriptive Flexfield | No | Yes or No | If set to Yes, a descriptive flexfield appears in the Service Request block of the Depot Repair Workbench.
Note: If you set up the application to have context sensitive service request descriptive flexfields, then this profile must be set to No. |
| CSD: Transfer of Ownership for Bulk Receiving | None | Yes or No | Whether or not to automatically transfer ownership of an item being received through Bulk Receiving to the Service Request customer |
| CSD: Time Clock Next Button Transactions | None | Transact Time Clock Resource Only | Automatically populates the accrued time since clocking in to that operation on the Resources table. No other materials or resources are auto-transacted. Users will be clocked out of the current operation and clocked into the next operation. |
| Transact Time Clock Resource and Complete Operation | Completes the operation before clocking into the next operation ( in addition to the properties of Transact Time Clock Resource Only profile value) | ||
| CSD: Update Instance Number on Shipped Lines for Non-Serialized Installed Base Item | No | Yes or No | The update logistics and Shipment Update concurrent program does update the source instance number for the non serialized IB service item on the logistics ship line if this profile set to Yes |
| CSD: Update Logistics Program Error Handling | Stop On Error | Stop On Error or Process All | If the profile set to Stop On Error, the update logistics concurrent program will stop if there is any error. If the profile set to Process All, the update logistics concurrent program will skill bad record and continue process the rest of the record. |
| CSD: Use Tasks from Knowledge Management Solutions | Yes | Yes or No | When set to Yes, auto-creates estimate lines from tasks that are linked to applicable solutions (even if they are not linked via a service code), when you click Add Lines from Diagnostics in the Estimate tab. |
| CSD: Use Global Variables For Advanced Pricing | None | Yes or No | This profile option supports global variables for Oracle Advanced Pricing. Set this profile option to Yes to use global variables for Advanced Pricing, or else select No. |
| CSD: Validate bill-to and ship-to before opening Service Request | None | Yes or No | This will enable/disable the validation of bill-to and ship-to address before opening the service request in Depot Repair. |
| CSD: View Warning or Confirmation Messages in Logistics | None | Yes or No (A null value evaluates to No) | The pick release or ship confirmation shows a series of messages. When this profile is set to No, only one message will be shown. |
| RCV: Print Receipt Traveler | None | Y or N or X | This profile option runs the Receipt Traveler Concurrent program automatically during Auto-Receiving and prints the receipt traveler report. When set to Y, the receipt traveler report is printed in the RDF format. When set to X, the receipt traveler report is printed in the XML format. When set to No, the receipt traveler report is not printed. Note: When you set RCV: Print Receipt Traveler profile as Y or X, ensure you that you set the profile option CSD: Print Bulk Receipt Travelers as Y. |
The following profile options, though not owned by Oracle Depot Repair, provide certain application functionality:
| Profile Name | Possible Values | Description |
|---|---|---|
| Service: Default Group Owner for Service Requests | Profile options Service: Default Group Owner for Service Requests and Service: Default Group Owner Type for Service Request both have to be either defined or NULL | Restricts the Service Request Owner List of Values depending on the selected profile value. |
| Service: Default Group Owner Type for Service Request | Profile options Service: Default Group Owner for Service Requests and Service: Default Group Owner Type for Service Request both have to be either defined or NULL | Restricts the Service Request Owner List of Values depending on the selected profile value. |
| Service: Default Service Request Owner | No predefined set of values. The value has to be specified during implementation. | This defaults the Service Request Owner in the Service Order form. |
| Service: Default Service Request Owner Type | No predefined set of values. The value has to be specified during implementation. | This defaults the Service Request Owner Type. This field is not displayed in the Service Orders form. |
| Service: Inventory Validation Organization | No predefined set of values. The value has to be specified during implementation. | Items are validated against the Organization specified by this profile. This is mandatory and can usually be set to the Master Inventory Organization. |
| Service: Restrict Installed Base for location validation | Yes or No | If set to Yes, the Installed Base Reference Number List of Values will be restricted to HZ_PARTY_SITES or HZ_LOCATIONS. |
| Task Manager: Default Task Status | The value has to be specified during implementation. | If a status transition rule is defined, and is mapped to the Oracle Depot Repair responsibility being used, then this profile is mandatory. This profile specifies the default starting status for a Task in the Tasks tab in the Service Order form. If this profile is not set, then when creating a task, the status LOV will have no values. If no status transition rule is mapped to the Depot Repair Responsibility, then this profile is not mandatory, and the task status LOV in this case will list all the task statuses. It is recommended to setup status transition rules. |
| Task Manager: Default Task Owner | The value has to be specified during implementation. | Determines the default value for the Task Owner field on the Tasks tab in the Service Orders window |
| Task Manager: Default Priority | The value has to be specified during implementation. | Determines the default Task Priority value on the Tasks tab. |
| Task Manager: Default Task Type | The value has to be specified during implementation. | Determines the default Task Type on the Tasks tab in the Service Orders window |
| Task Manager: Owner Type for a Task | The value has to be specified during implementation. | Determines the default Owner Type for a task selected on the Tasks tab in the Service Orders window. |
| Server Timezone | The value has to be specified during implementation. | Determines the server time zone, and is mandatory. This is used in the Product Coverage tab in the Service Orders window to sort the contracts by response resolution time. |
| Start Menu in Quickmenu | Depot Repair Quick Menu | Quick Menu under the Tools Menu in the Service Orders window points to the menu specified by this profile. This profile has to be set at the responsibility level, and must be set to the seeded menu: Depot Repair Quick Menu. |
| JTFAM: Activate Auto Selection of Resources | Yes or No or Null | If the profile is set to Yes, the Assignment Manager limits the resources to the number of required resources for a particular Task Type. If the profile option is set to No or Null, the Assignment Manager shows all available resources regardless of resource requirements. |
Setting Up Message Action Codes
Please refer to Oracle TeleService Implementation Guide for instructions on setting up Message Action Codes. Message Action Codes are used to specify the type of action you want a message recipient to take.
Setting Up Serial Reservations
Serial Reservation is done for items serialized at receipt or predefined to avoid opening Transact Move Order screen. Depot uses group API to create batch and pick release.
Note: The Transact Move Order screen is not required to ship items that are serialized at Sales Order Issue.
Auto-reservation takes place when the user pick releases the item, thus the serial number is not reserved immediately after booking in Depot.
The following criteria must be satisfied for the serial reservation capability to work:
-
The subinventory is specified.
-
The source serial number is specified.
-
The line is of type Ship or Ship Third Party.
-
The item on the ship line is defined in Item Master as Reservable.
-
The item on the ship line is defined in Item Master as serialized At Receipt or Predefined.
Serial reservation is triggered when you process the pick release from the Depot Workbench. Items are not reserved after booking.
To activate auto reservation in Depot, please check the following setups:
-
Set profile: CSD: Automatic Serial Number Reservation to Yes
-
Navigate to the Release Rules page.
-
Click the Inventory tab and set the Auto Allocate to Yes.
-
Save and close the form.
-
Navigate to the Organization Parameters page.
-
Select the Revision, Lot, Serial And LPN tab.
-
In the Serial Control region, set Allocate Serial Numbers to No.
-
Save and Close the form.
-
Navigate to the Depot Repair Workbench and open a service order with a ship line on it.
-
In the Logistics tab, enter a Subinventory on the ship line. The selected subinventory from which you are shipping out must be reservable. The item you are shipping must be reservable (in the organization you are shipping out from).
For information on how to make a subinventory reservable, see: Inventory Attribute Group, Oracle Inventory User's Guide
Setting Up Aging Threshold
Aging is defined as the amount of time from service orders creation or the amount of time that a service order is in a specific status. Aging is related to elapsed calendar time and not to actual service time. The unit of measure (UOM) for aging is time-bound, for example, days, hours, minutes, and so on.
To set up aging threshold
-
Navigate to the Aging Thresholds Setup page from the Depot Repair Setup menu.
-
Select an organization. To search for an existing aging threshold go to step 3 or continue to step 4 to set up a new aging threshold.
-
Click Go to search for an existing aging threshold in the selected organization.
-
Click the Add Another Row button to enter aging threshold details.
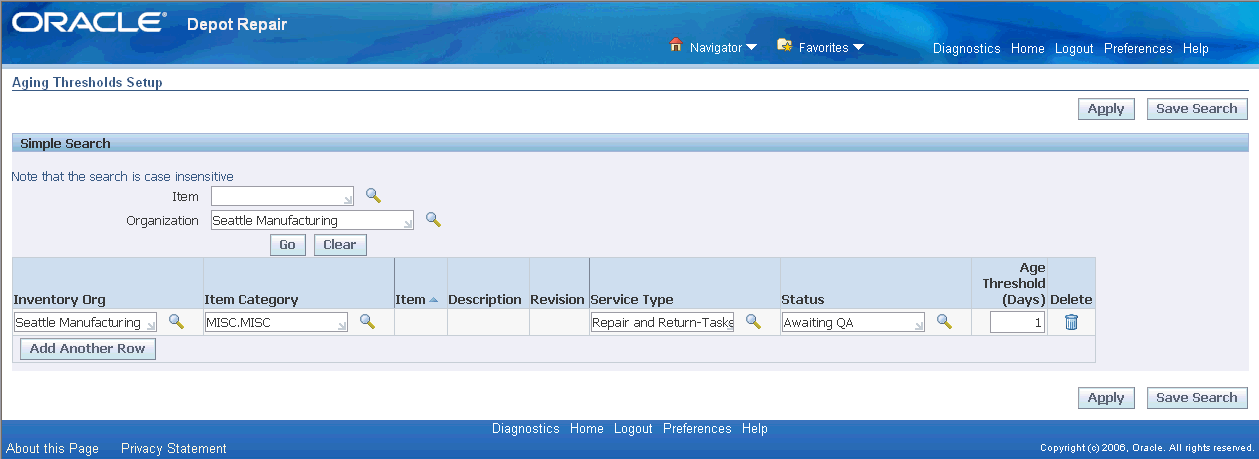
-
Enter the following information:
-
Inventory Org: Displays the default organization to which you belong based on your user profile organization.
-
Item Category: Select the item category. If you choose an Item Category, the Item field is disabled.
-
Item: Select the item. If you select an Item, the Item Category field is disabled.
-
Description: Describes the item.
-
Revision: For revision-controlled items, you can optionally specify thresholds to specific revision number.
-
Service Type: Specifies the service type for which age threshold applies.
-
Status: Specifies the status to which age threshold applies.
-
Age Threshold (Days) : Specifies the number of days at which a service is considered aging. It must be a positive value (>0).
-
Delete: This icon deletes an aging threshold entry.
-
-
Click Apply to record the new aging threshold.
A confirmation message appears on the top of the page.
Setting Up Quality Threshold
Quality thresholds setup page enables you to create item record and corresponding quantity per day. Use quality thresholds to set how many items can be returned per day.
To set up quality threshold
-
Navigate to the Quality Thresholds Setup page from the Depot Repair Setup menu.
-
Select an organization. To search for an existing quality threshold go to step 3 or continue to step 4 to set up a new quality threshold.
-
Click Go to search for an existing aging threshold in the selected organization.
-
Click the Add Another Row button to enter aging threshold details.

-
Enter the following information:
-
Inventory Org: Displays the default organization to which you belong based on your user profile organization.
-
Category: Select the item category. If you choose a Category, the Item field is disabled.
-
Item: Select the item. If you select an Item, the Category field is disabled.
-
Description: Describes the item.
-
Revision: Active only for revision-controlled item.
-
Threshold Quantity/Day: Represents the number of returns per day at which a service is considered a quality event. It must be a positive value (>0).
-
UOM: Describes the item's unit of measurement.
-
Delete: This icon deletes a quality threshold entry.
-
-
Click Apply to record the new quality threshold.
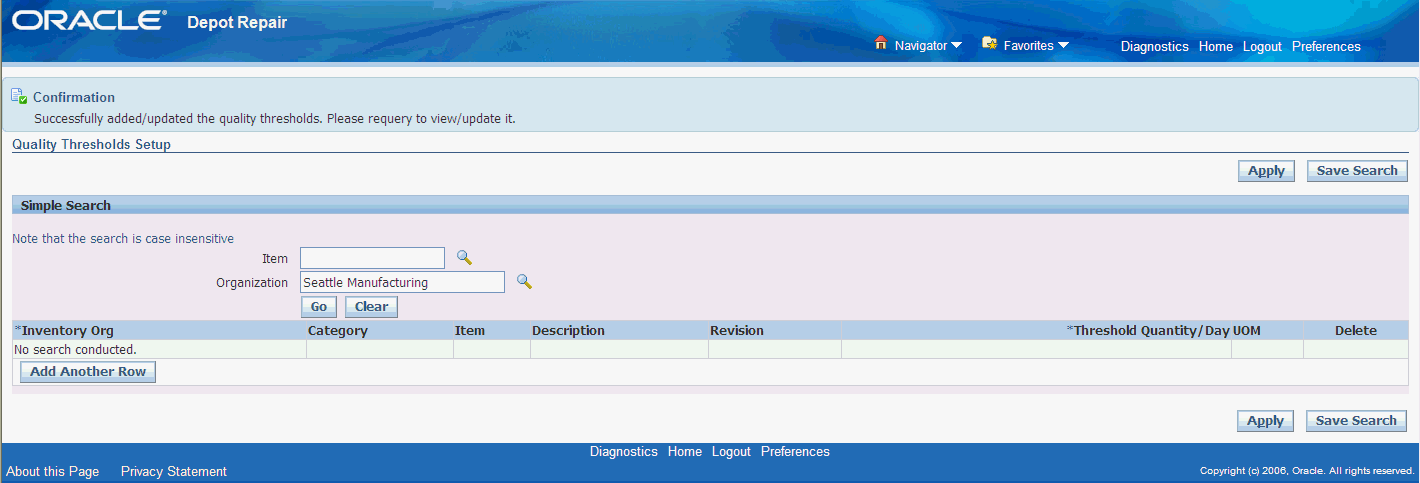
A confirmation message appears on the top of the page.
Setting Up Defect Codes
Defect codes capture the root cause of why an item required service. Though the system allows multiple root cause codes to be captured, most businesses will generally capture a single main cause for reporting and analysis purposes. You can set up defect codes to apply to all items universally or can be mapped to specific items or item categories.
Oracle Depot Repair provides a setup interface where each root cause code is linked to specific items or item categories. On the basis of this setup, the Technician Portal displays only the root cause codes that match the item or category of the required item.
To set up Defects Codes Lookup
-
To populate the Defect Codes List of Values, set up the Defects Codes lookup. Use the Application Developer responsibility and navigate to Lookups > Application Object Library lookups.
-
Run the query type: CSD_DEFECT_CODES.
To set up defect code domains
-
Navigate to Defect Code Domains page using the following path:
Depot Repair > Setup > Defect Code Domains
The page lists all the existing Defect Codes.
-
Click Add Another Row to create a blank row to define the new defect codes.
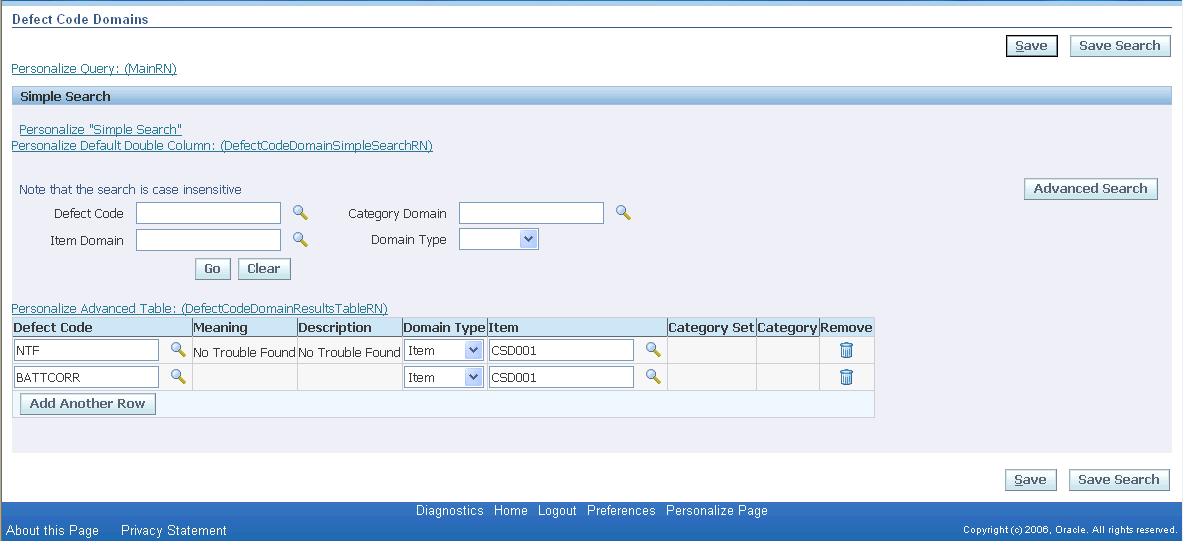
-
Select the new Defect Code from the list of values.
-
Select the Domain Type and the Item.
-
Repeat steps 2 to 4 for as many domains as you want to associate with the Defect Code.
-
Click Save to save the new setup.
-
A confirmation page appears displaying that the new setup is saved.
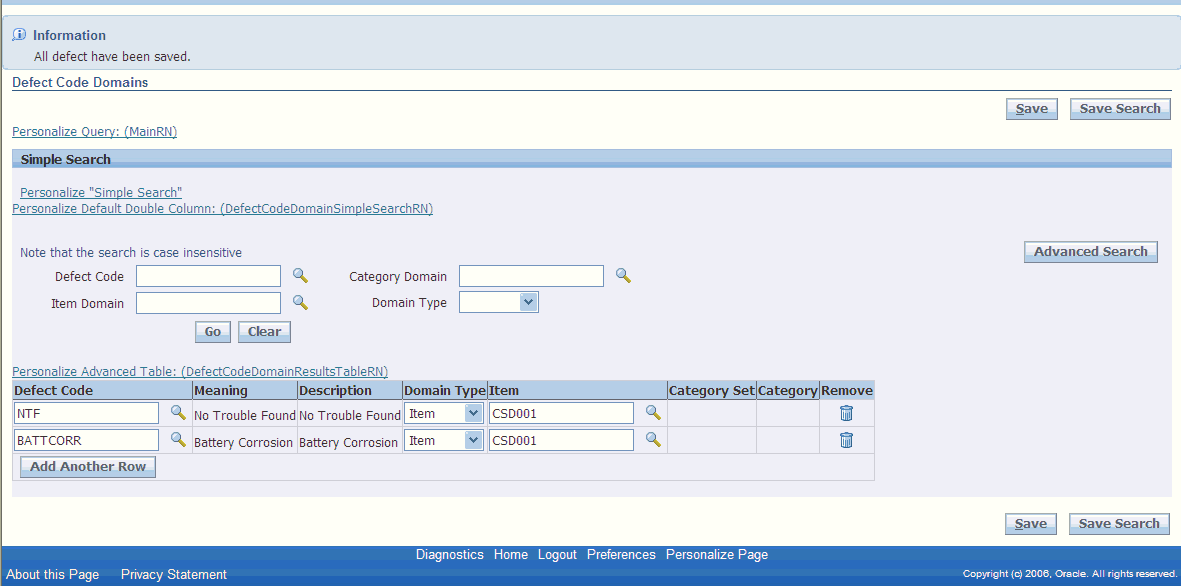
Setting Up Recall Status
The recall statuses indicate the stage of the recall lifecycle and critical milestones. Each status is associated with one and only one state. Each business defines its own status and transitions.
To set up recall status
-
Navigate to the Recall Status Setup page. The page defaults to the existing statuses.

-
The Recall Status Transitions Setup region allows you to enter various recall statuses. Click the Add Another Row button to define new status.
-
Click the Apply button to save the new status.
Setting Up Recalls
The Recalls Setup page enables you to set up various recall options.
The Recall Options region displays the following information:
-
The Service Request Defaults region contains the mandatory fields required for the creation of Service request from the Recalls page.
-
The Service Order Default region specifies the default service type to be used for the Service Orders created via Recalls page.
-
The Job Defaults region specifies the default job attributes to be used for the WIP jobs created via Recalls.
Recall Status Transitions region enables you to perform the following actions:
-
Specify the Default Start Status for the recall.
-
Setup status transitions if any. For example, you can set up a transition from Draft to Open. In this case, you can change the status of recall to Open only from draft. Any other status transition is disallowed.

Additional Information: A new concurrent program named Update Recall Metrics is created. This program is initiated from the Concurrent Program Manager, set to perform periodic updates, or is called real-time from the Update Recall Metrics button on the Recall page.
Setting Up Eco-Impact Threshold
The Eco-Impact Threshold Setup page enables you to setup the thresholds for:
-
Percentage of Returned Units
-
Percentage of Returned Weight
-
Number of Units
-
Weight
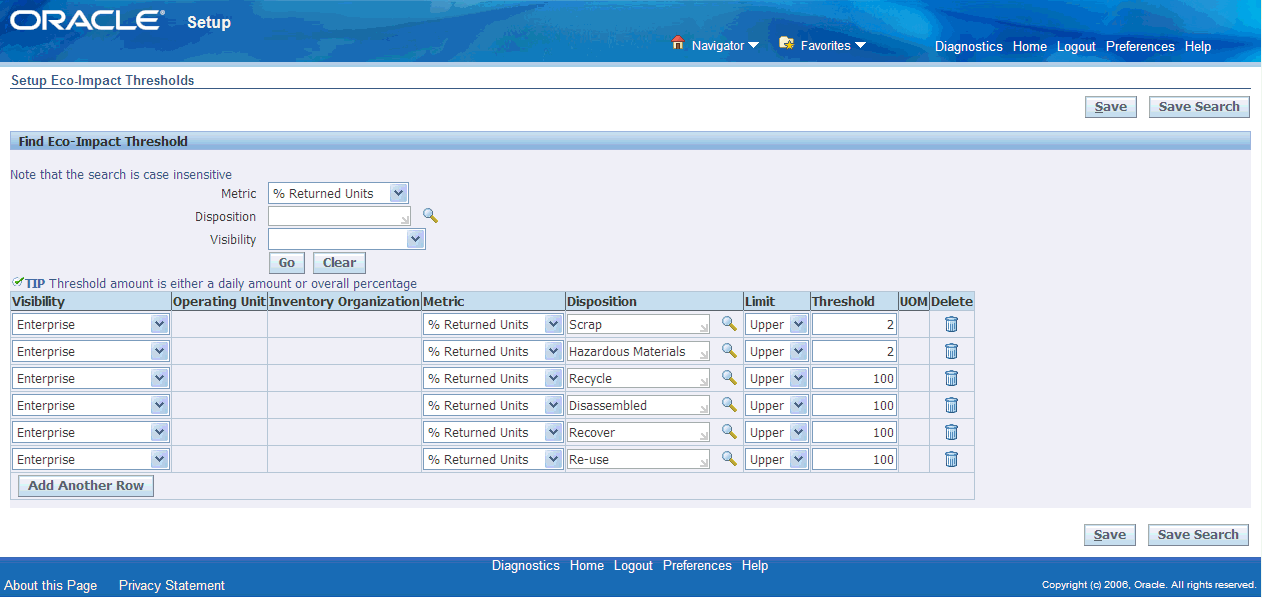
To facilitate the availability of data within a specific inventory organization for an entire operating unit or for the enterprise, the system allows setting up thresholds for each of these levels.
To define an eco-impact threshold
-
Navigate to the Setup Eco-Impact Thresholds page. The Find Eco-Impact Threshold region enables you to search for existing thresholds. Enter any one of the following search criteria:
-
Metric
-
Disposition
-
Visibility
-
-
Click the Go button. The thresholds matching the search criteria are displayed.
-
Click Add Another Row to define a new threshold.
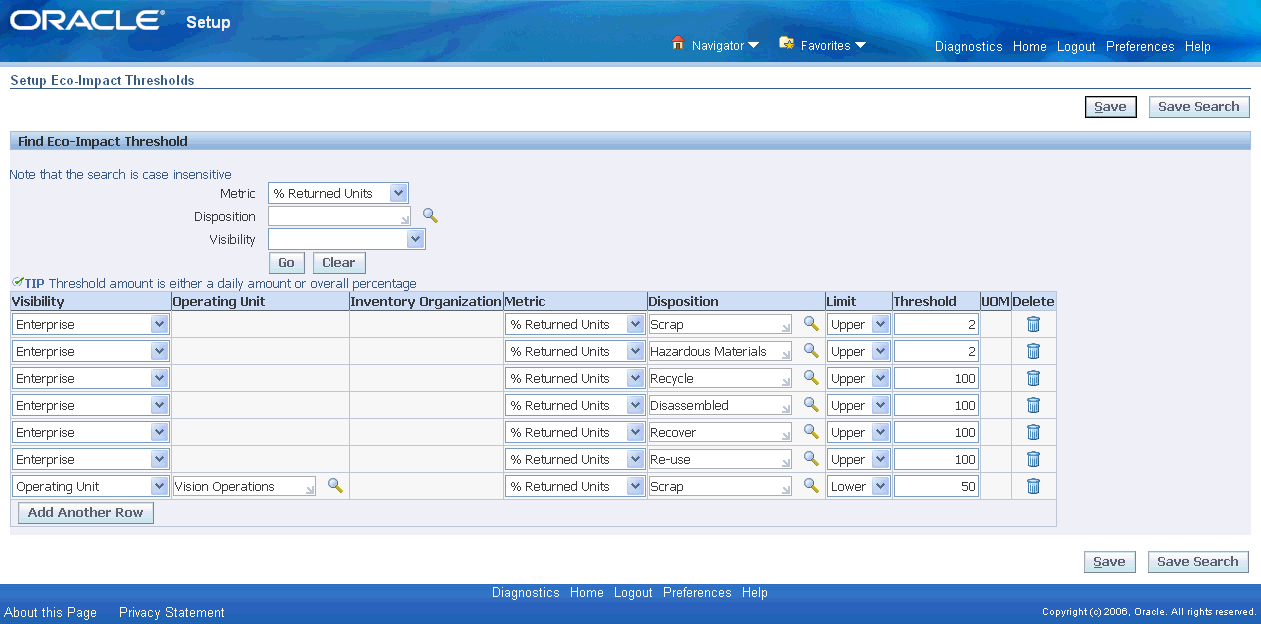
-
Select a Visibility from the list.
-
If you select Enterprise, both the Operating Unit and Inventory Organization fields are not visible.
-
If you select Operating Unit, the Operating Unit field is visible. You can enter the required operating unit.
-
If you select Inventory Organization, the Inventory Organization field is visible. You can enter the required Inventory Organization.
-
-
Choose the appropriate Metric from the list.
-
If you choose % Returned Units, the UOM field is disabled.
-
If you choose % Returned Weight, the UOM field is disabled.
Note: The percentage (%) thresholds are an overall percentage for the period queried in the returns dashboard.
-
If you choose Number of Units, the UOM field is enabled.
-
If you choose Weight, the UOM field is enabled.
Note: The thresholds for Number of Units and Weight are a daily threshold.
-
-
Enter a Disposition. See: Setting Up Material Disposition Reasons
-
Enter the Limit. You can enter either Lower or Upper.
-
Enter the required Threshold value.
-
Click the Save button. A confirmation message appears stating that all eco-impact thresholds have been saved.
Setting Up Region Geographies
Geography Hierarchy is a data model that lets you establish conceptual parent-child relationships between geographies. A geography describes a boundary on the surface of the earth. Applications extrapolate information based on this network of hierarchical geographical relationships.
Oracle Trading Community Architecture (TCA) and other Oracle E-Business Suite applications leverage Geography Hierarchy for various location related use such as real-time address validation and tax calculation. The geography information is centrally located in TCA and shared among all the applications.
Use the Geography Name Referencing process to validate and map address elements of existing location table records against master reference geographies.
For details on how to set up Geography Hierarchy, see: Administering Geography Hierarchy, Oracle Trading Community Architecture Administration Guide.
In addition to the TCA Geography Hierarchy setup, you can setup Regions as lookups and map them to Geographies via Depot Repair's new Region Geography setup page.
To set up region geographies
-
Navigate to the Region Geographies page. The Find Region Geographies region enables you to search for existing regions and geographies.
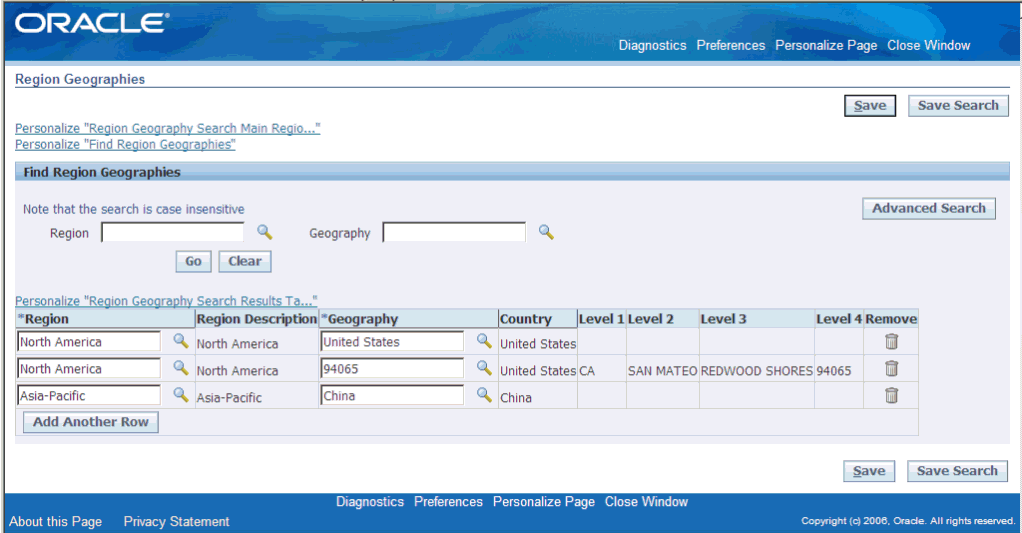
-
Enter any one of the following search criteria:
-
Region
-
Geography
-
-
Click the Go button. The region geographies matching the search criteria are displayed.
-
Click Add Another Row to define a new region.
-
Select a Region from the list.
-
Choose the appropriate Geography from the list to map the region.
-
Click Save to add the new region to the list.
Setting Up Return Stream Reasons
The Setup Return Stream Reasons page enables you to define which RMAs are grouped together into each return stream. Each RMA Return Reason Code is linked with only one single Return Stream. However, a Return Stream can be composed of many RMA Return Reason Codes.
To set up a new Return Stream for Return Reason
-
Navigate to the Setup Return Stream Reasons page.
-
Search for a return reason that does not have a return stream associated with it.
-
Enter the Return Stream for the searched Return Reason.
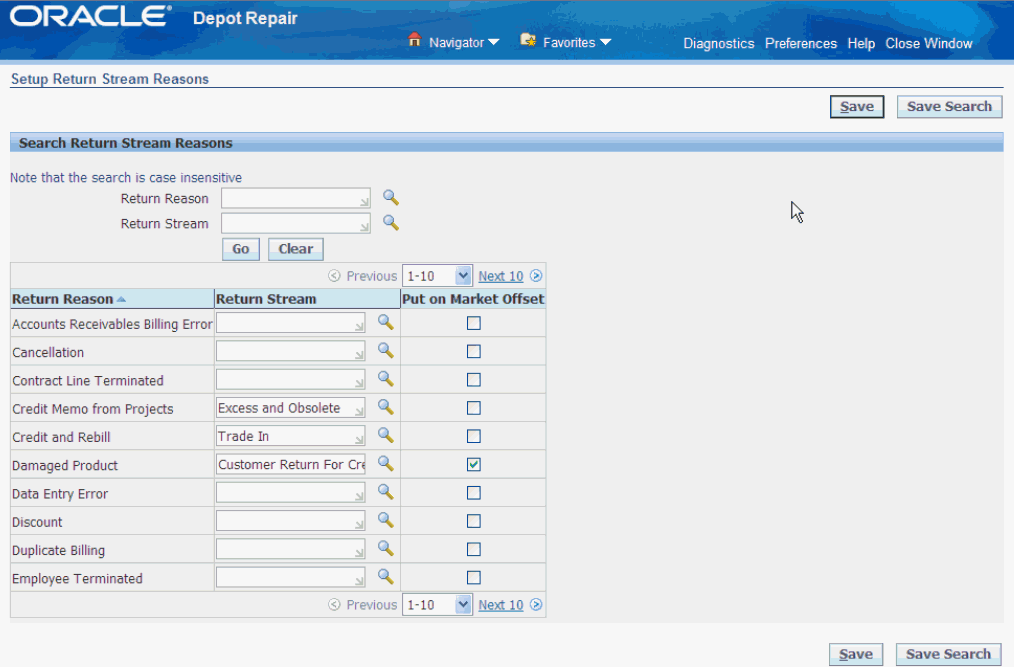
-
If you select the Put on Market Offset check box, any returns for that return reason code is subtracted from the put on market total. If you leave the check box blank, the returns for that return reason code will not affect put on market data.
-
Click the Save button. A confirmation message appears stating that all return stream reasons have been saved.
Setting Up Material Disposition Reasons
The Setup Material Disposition Reasons page enables you to define which WIP Material Transactions are grouped together into each Material Disposition. Each WIP material transaction reason is linked with only one single Disposition. However, a Disposition can be composed of many Material transaction reason. Currently, only WIP returns and negative issues are counted in the disposition metrics for the Returns Dashboard.
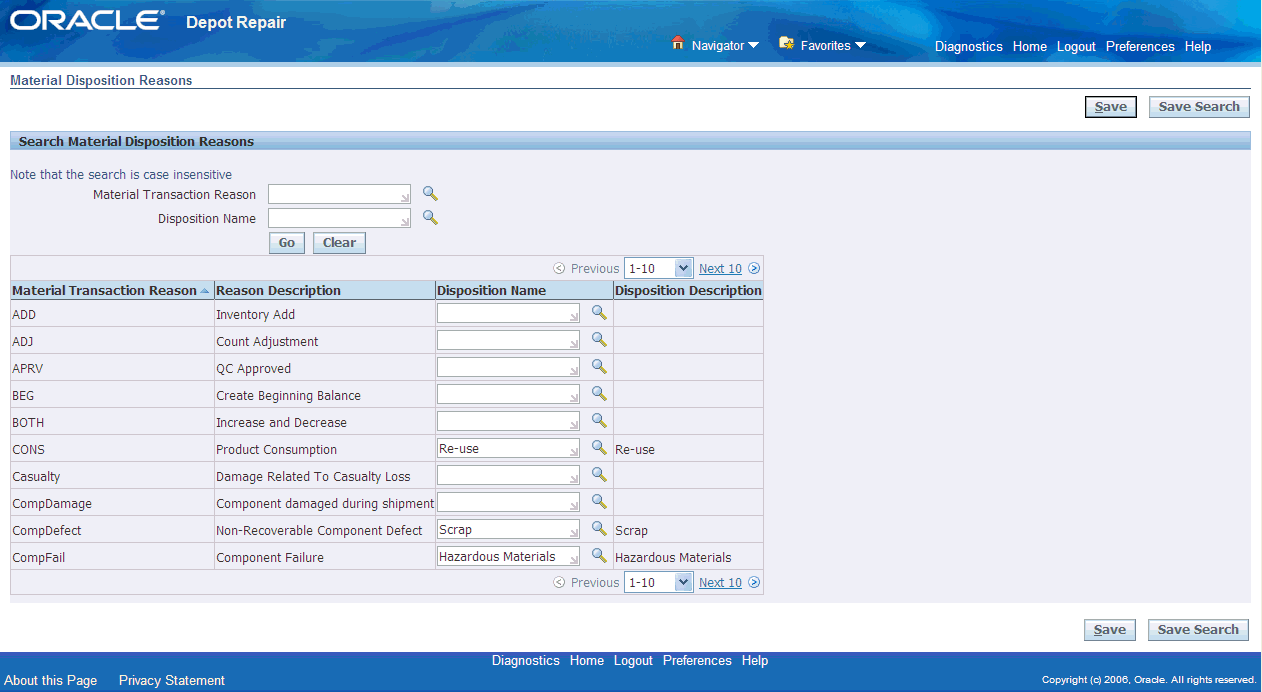
To set up a new disposition
-
Navigate to the Material Disposition Reasons page.
-
In the Search Material Disposition Reasons region, query the Material Transaction Reason that does not have an associated Disposition.
-
Click the Go button.
-
Enter the Disposition Name to associate.

-
Click the Save button. A confirmation message appears stating that all material disposition reasons have been saved.
Setting Up Internal Requisitions and Internal Sales Orders
Two key features within the Depot application automatically create internal requisitions and internal sales orders. The first is the Request Parts button on the Technician Portal and the second is the Internal Moves screen.
The Request Parts button will automatically create an internal requisition and internal sales order for the parts selected on the Materials table. This enables a technician to request the parts they need without ever leaving the Technician Portal.
The Internal Move capability allows you to move items or parts from one location to another from a single window. The Internal Move window wraps the capabilities provided by the Internal Requisition and Internal Sales Order modules provided by Purchasing and Order Management. This new capability enables a single service order to track both internal and external logistical operations. You can perform logistical transactions without leaving the Depot Repair interface.
Prerequisites to create Internal Orders
The following steps outline the setups required to use the Internal Requisition functionality.
Use the responsibility: Inventory, Vision Operations (USA)
-
Navigate to Inventory > Items > Master Items to ensure that the item for which you wish to create an internal requisition is defined in the Inventory Item Master. See: Defining Items, Oracle Inventory User's Guide.
-
The item must be assigned to both the Source and Destination Inventory Organizations. See: Assigning Items to Organizations, Oracle Inventory User's Guide.
-
Ensure the item is stockable (under Inventory tab in master items), Internal Ordered (under OM tab) and has a default subinventory defined (under Receiving tab).
-
Navigate to Inventory > Setup > Organizations > Shipping Networks to create the shipping network using the Shipping Networks window. You must select the Internal Order Required check box for Internal Orders. See: Defining Shipping Methods, Oracle Inventory User's Guide.
-
Navigate to Inventory > Setup > Organizations > Locations to create the location using the Location window. The location that you create is tied to the Destination Location in the requisition form to the Internal Customer to be used on the Sales Order window.
Note: Internal Sales Orders will only ship if there is quantity of the item to be shipped on hand. Ensure that there is available inventory on hand in the source inventory organization before attempting to ship an internal order.
See: Oracle Inventory User's Guide
Switch to responsibility: Order Management Super User, Vision Operations (USA)
-
Navigate to Customers > Standard. Create an internal customer. You can also query for an existing internal customer.
-
Assign the location you created in Inventory setup. This association ties the customer to the location.
-
Create a Bill To Usage record for the new internal customer.
Note: You must create the customer in the Operating Unit of the Source Inventory Organization that is used on the Internal Requisition.
See: Adding Customers using the Add Customer Window, Oracle Order Management User's Guide
Switch to responsibility: Purchasing, Vision Operations (USA)
-
(Optional) Navigate to the Item Costs Summary window and query for the item for which you wish to create an internal requisition.
-
The Item Costs Summary window shows the cost of the item to be requisitioned. Purchasing uses this cost as the price of the item on the Internal Requisition. Note that the item cost can be different in each inventory organization, and that the Internal Requisition will display the item cost as defined in the source (ship from) inventory organization.
-
Navigate to Supply Base > Sourcing Rules to setup a new sourcing rule. Select the All Orgs radio button option.
-
In the Shipping Organization table, add a row with Type of Transfer From. For the Org column, specify the source (ship from) inventory organization.
-
For the Shipping Method column, capture the desired shipping method.
-
Assign the newly created Source rule to the Assignment set identified by MRP: Default Sourcing Assignment Set profile. The assignment set mentioned in this profile is used by the PO system by default. Assign this sourcing rule at the organization level. See: Defining Sourcing Rules, Oracle Purchasing User's Guide.
Create internal orders automatically from the Create Service Orders HTML page
-
The Internal Moves screen will automatically create an internal requisition. To also automatically convert the internal requisition to an internal sales order, set the profile CSD: Automatically Create Internal Order to Yes.
-
The RMA Receiving Into organization parameter of the defaulting rules engine must be set up to derive the destination organization for the internal move orders.
-
The defaulting rules will default the value for destination organization only when the profile CSD: Automatically Create Internal Order to Yes.
Note: Defaulting rules created for the RMA Receiving Inventory attribute can be used in the Depot application wherever RMAs are created. When creating defaulting rules ensure that they do not unintentionally impact standard RMA receiving flows.
Setting Up Supplier Warranty
Oracle Depot Repair provides a setup interface to perform the following actions using the Supplier Warranty functionality:
-
Create and Edit Supplier Warranty Templates.
-
Create and Edit Supplier Warranty Contracts.
-
Link Supplier Warranty Contracts to Item Instances.
To create and edit supplier warranty templates
-
Navigate to the Search Warranty Template page. This page enables you to search, view and edit an existing warranty template as well as to view its associated contracts. You can also use this page to create a new template or copy an existing template.
-
To search for an existing template, enter any of the following search criteria:
-
Template Name
-
Vendor Name
-
Template Status
-
Warranty Type
-
Item Number
-
Item Description
-
Item Status
-
-
Click Go to return all supplier warranty templates defined, according to the search criteria. You can edit or view the template or navigate to the contracts if they are available.
-
Click the Edit icon to navigate to the Update Warranty Template page for the template that you select.
-
Click the Copy Template icon to navigate to the Create Warranty Template page. This page defaults the information of the original template information. All fields, counters and Items are copied.
-
Click the Contracts icon to navigate to the Search Warranty Contract page with the template in context. This action queries all contracts based on the template. The Contracts icon is disabled if no contracts exist for the template.
-
Click the Create button to navigate to the Create Warranty Template page. Use this page to create a new template record.
-
Enter the following information on the header:
-
Template Name: Enter a unique name for the warranty template.
-
Vendor: Select the appropriate vendor from the list.
-
Contract Date Calculation: Select from the following two options:
-
Date: This option renders Start Date and End Date fields. During Warranty Contract creation you are automatically presented with a predefined Start Date for the Contract and the End Date as well.
-
Period: This option renders the Period and UOM fields. During the Warranty Contract creation, you select options that determine the start date. This Start Date is used with the Period and UOM values to calculate the End Date of the Contract. The Start Date value is based on either a user defined date or it is calculated based on a historical counter value.
-
-
Enabled: Template status. Enabled templates can be used as a basis to create new contracts, where Non-enabled templates cannot.
-
Type: Customer defined attribute during system setup that can be used to differentiate templates.
-
-
Click the Details tab.
-
Enter the following information on the Details tab:
-
Template Description: Add a description of the template.
-
Terms and Conditions: Enter the terms and conditions of the warranty template.
-
Reaction and Resolution Time: Further description relating to the terms and conditions.
-
Service Level Agreement: Further description relating to the terms and conditions.
-
Template Start Date: Defaults to system date during Template creation. It is used for reference and in conjunction with Template End date in order to change the template status to Not Enabled.
-
Template End Date: Does not defaults during Template creation and is not a required attribute. It is used for reference and in conjunction with Template Start date in order to change the template status to Not Enabled.
-
Claim Labor Hours: Add a standard number of hours that can be claimed for contracts created from this template. This will reflect in the contract and can be used for reporting.
-
Remarks: Open field for the user to document miscellaneous information.
-
Attachments: Standard Oracle attachments can be added or deleted here. These attachments can be viewed on each Contract as well when they are created.
-
-
Click Apply to save the information.
-
Click the Items tab. This tab allows you to define the items to which the template can be associated and a warranty contract to be instantiated. This tab displays all the Items that have been associated to a template. Items can be associated to one or many templates.
-
Click the Add Warranty Items button to launch the Add Warranty Items page that allows you to search and select multiple items.
-
To associate more items to the template, click the Add Rows button. Enter the following item details:
-
Item: Select the item you want to associate from the list values.
-
Item Description: Defaults from the item you select.
-
Enabled: Click the Enabled check box to allow additional Item instances to be instantiated by generating a Warranty Contract. Leave the Enabled check box blank to restrict the use of the Warranty Template to instantiate a contract for this item.
-
Auto Assign: Used by a concurrent program to automatically generate new contracts, in pending status, for all enabled items as their corresponding item instances are introduced into install base. This function automates the search and creation of contracts for newly introduced item instances.
-
-
Click Apply to associate the item to the warranty.
To create and edit supplier warranties
-
Navigate to the Search Warranty Contract page. This page enables you to search, view and edit an existing warranty contracts.
-
To search for an existing warranty contract, enter any of the following search criteria:
-
Warranty Contract Number
-
Item
-
Warranty Type
-
Expiration Date
-
Serial Number
-
Unit Configuration
-
Contract Status
-
-
Click the Show More Search Options to display additional search criteria:
-
Template Name
-
Claim Number
-
OSP Order Number
-
Vendor Name
-
Claim Status
-
-
Click Go. The Results region displays all the contracts defined in the warranty contracts, according to the search criteria.
-
Select a warranty contract and click the Calculate Expiration button to recalculate the expiration due date for a selected warranty contract.
-
Click the Warranty Contract Number link to navigate to the View Warranty Contract page.
-
From the Results region select a warranty contract and click the Edit button to navigate to the Update Warranty Contract page.
-
Make the required changes to the contract and click Apply to update the warranty contract.
To link supplier warranties to item instances
-
Navigate to the Search Warranty Instance page. This page enables you to search for the item instance to view or define a warranty contract from a warranty template.
-
Enter any one of the following search criteria:
-
Unit Configuration
-
Item
-
Instance Number
-
Serial Number
-
Lot Number
-
Template Name
-
Template Assigned
-
No Active Contract
-
Show Only Enabled Templates
-
Show Only Enabled Items
-
-
Click Go. The Results region displays all item instances defined in install base, according to the search criteria.
-
Click the Template Name link to navigate to the View Warranty Template page.
-
The Warranty Template for which both the Template Enabled and Item Enabled fields are checked, the Define Warranty icon displays. Click Define Warranty icon to navigate to the Create Warranty Contract page. All the predefined definitions are copied to the contract instance.
Setting Up Returns Portal Parameters
The Returns Portal provides an effective and efficient way to enable customers to return products. Customers may exchange or return products for service, testing, calibration or trade-in credit. The Returns Portal allows customers, business partners, and retail associates and distributors to request returns directly via a web portal.
The following table lists the Return Portal parameters and default values:
| Parameter Code | Name | Description | Default Values |
| CREDIT_CARD_AUTH_REQUIRED | Authorize Credit Card | Credit card authorization required | N |
| CHANGE_IB_OWNERSHIP | Change IB Ownership | Change IB ownership | N |
| CREATE_IB_FOR_RET | Create IB | Create IB for return | N |
| DISPLAY_CHARGES | Display Charges | Display Charges | N |
| IB_REQ_FOR_RET | IB required for return | Install base record required for return | N |
| REQ_RETURN_REASON | Return reason required | Return reason required | N |
| REQ_SERIAL_NUM | Serial Number Required | Serial Number Required | N |
The system does not default Return Portal parameters and requires users to enter a parameter code and a value for it. While you can change the parameter names and descriptions, enter the parameter code as shown in the table. This is the internal code and cannot be changed. The value for a parameter code must be either Y or N. To enable a Returns Portal parameter, set the value as Y. Any other value will be treated as N.
Note: You can use the Return Parameters page to create specific conditions for Returns Portal parameters under which the parameter is either Y or N. For example, you can choose to define rules for Return Parameters and create a condition where in the parameter Display Charges is enabled to Y only for a specific return type.
To set up returns portal parameters
-
Navigate to the Returns Portal Parameters Page. This page displays the summary of existing returns portal parameters.
-
Click Add Another Row to set up a new parameter.
-
Enter the values in the following fields:
-
Parameter Name: Enter a unique name for the parameter. Parameter name determines system behaviors for the entire business or only conditionally when specific conditions are true.
-
Description: Enter a description of the parameter.
-
Value: Enter a value of the parameter. Parameters are created with values that are enumerated list (Yes or No), integers, decimals, date times or LOVs.
-
-
Click Save to save the parameter.
Note: The application will only use seeded parameters. Customer-defined parameters can be used in custom code.
-
Click the Rules icon to navigate to the Parameter Effectivity Rules page. This page enables you to specify a set of rules that drive different parameter values based on business conditions.
-
Enter the values in the following fields:
-
Precedence: Each rule is assigned Precedence. Rules are evaluated in the order of precedence - the smaller the number, the higher is the precedence. The Precedence field accepts both positive and negative values.
-
Name: Enter a unique name of the rule.
-
Description: Add a description of the rule.
-
Parameter Value: Parameter values are defined as enumerated lists [Yes, No], LOVs, database table values, integers, decimals or date times.
-
-
Click Save to save the new parameter effectivity rule.
-
Click the Details icon to navigate to the Parameters Effectivity Rule Definition page. This page lets you define a specific rule to determine the effectivity of a parameter value. The rule is defined by a rule name, description, precedence and set of conditions that determine whether the rule is true or not.
-
Enter the values in the following fields:
-
Rule Name: Enter a unique name for the rule.
-
Description: Enter the description of the rule.
-
Precedence: Enter precedence. Multiple rules can have the same precedence. However, the system stops evaluating rules as soon as it finds the first one that is true. As a result it is recommended that you give unique precedence to each rule.
-
-
Use the Effectivity Conditions region to define conditions. Click the Details icon to navigate to the Update Effectivity Condition page. This page allows you to define a specific rule condition that can be verified as true or false. A rule can consist of many conditions. If any one of the conditions of a rule is false, the entire rule is false.
-
Enter the values in the following fields:
-
Operand: Conditions are created from a predefined list of possible operands. These operands are system values that are queried and evaluated against truth conditions. Operands include Return Type, Customer, Item, Item Category, Contract, Warranty Status, Ship From Location and Return To Location.
-
Operator: Choose an Operator from the available values.
-
Criterion: Determine the best suitable criterion for the specific rule condition.
-
-
Click Apply to save the information and return to the Parameter Effectivity Rule Definition page.
-
Click Apply on the Parameter Effectivity Rule Definition page to save the data and return to the Returns Portal Parameters page.
Using the Return Portal for eClaims
Users can deploy the Returns Portal as an eClaims Portal for third party service providers to log into via the Web. They can log reimbursement requests for performing repair work on behalf of the seller. The Returns Portal can be modified using OAF Personalization to:
-
Display labels as Claim instead of Return.
-
Restrict searches so partners can only view assigned orders.
-
Hide data fields with any information partners should not have access to view.
The eClaims Portal uses the same DMZ architecture that allows customers and storefronts to securely use the Returns Portal outside the seller's firewall.
Using the eClaims Portal, an authorized service partner can log in and enter a claim to be reimbursed for repairing a customer's product by:
-
Entering the customer and product information.
-
Checking the customer entitlements.
-
Capturing any additional information required by the seller.
-
Submitting the claim.
Sellers can setup the Portal to require partners request approval before performing repairs. After repair, the partner can capture the parts and labor required for the work, as well as failure codes, root cause codes and any other information required by the seller.
As the eClaims Portal uses the same schema as the Returns Portal, the claim itself is in effect just a specific type of service order. This means that both the seller and partner have visibility to the claim status and details, and can add notes or additional information to facilitate collaboration and adjudication. After reviewing and approving the claim, the parts and labor from the claim can be imported to the Actuals schema to submit to Accounts Payable to reimburse the partner.
An eClaims system is useful for a seller relying on a network of authorized service providers or as a dealer management system for a manufacturer relying on dealerships to sell and service their products.
Setting Up Return Types
The Return Type Setup Page allows you to set up the Return Types that are supported in the Returns Portal.
To set up return types
-
Navigate to the Return Type Setup page.
-
Use the Find Return Types region to search for existing records of return types.
-
Click Add Another Row to define new return types.
-
Enter the values in the following fields:
-
Return Type: Enter a new return type.
-
Description: Enter the description of the return type.
-
Service Type: Select the appropriate service type from the LOV. You can map return types to service types.
-
Context: You can link a return type to a specific Return Type DFF context that displays a specific set of DFF attributes on the Enter Returns page. It also drives the capture of additional information.
-
Terms and Conditions: You can define Terms and Conditions that are displayed on the Review and Submit page for that return type. This field is not mandatory.
-
-
Click the Effectivity Rules icon to navigate to the Return Type Effectivity Rules page. Use this page to set up the rules for when a return type can be used.
-
Select the Always Applies option to always display the Return Type in the Return Type LOV on the Enter Returns page. Or, select the Applies Conditionally option to display the Return Type in the Return Type LOV only when one or more of the rules on this page are true.
-
Enter the values in the following fields:
-
Precedence: Each rule is assigned Precedence. Rules are evaluated in the order of precedence - the smaller the number, the higher is the precedence. The Precedence field accepts both positive and negative values.
-
Name: Enter a unique name for the rule.
-
Description: Enter the description of the rule.
-
-
Click the Details icon to navigate to the Return Type Effectivity Rule Definition page. Use this page to define a specific rule to determine the effectivity of a Return Type.
-
Enter the values in the following fields:
-
Rule Name: Enter a unique rule name.
-
Description: Enter the description of the rule.
-
Precedence: Multiple rules can have the same precedence. However, the system stops evaluating rules as soon as it finds the first one that is true. It is recommended that you give unique precedence to each rule.
-
-
Click the Details icon of the Effectivity Conditions region to navigate to the Update Effectivity Condition page. Use this page to define conditions that can be verified as true or false.
-
Enter the values on the following fields:
-
Operand: Conditions are created from a predefined list of possible operands. These operands are system values that are queried and evaluated against truth conditions. Operands include Return Type, Customer, Item, Item Category, Contract, Warranty Status, Ship From Location and Return To Location.
-
Operator: Choose an Operator from the available values.
-
Criterion: Determine the best suitable criterion for the specific rule condition.
-
-
Click Apply to save the data and return to the Return Type Effectivity Rule Definition page.
-
Click Apply on the Return Type Effectivity Rule Definition page to save the information and navigate back to the Return Type Setup page.
-
Click the Return Reasons icon on the Return Type Setup page to navigate to the Return Type to Return Reasons Mapping page. Use this page to choose a specific set of RMA Return Reasons to be applicable to the return type.
-
Select a Reason Code to display the same on the Return Reason LOV on the Enter Returns page. The Reason Codes that are not selected are not displayed on the Return Reason LOV.
-
Click Apply to save the data and return to the Return Type Setup page.
Setting Up Activity Rules
Activity rules allow a business trigger changes to the service order status or kick off a PL/SQL API based on user activities within the Depot application. These events can occur not just in the Depot Workbench but also the Technician Portal, Bulk Receiving Module, and Service Manager Portal.
The Activity Rules page allows users to enter new activity rules and specify the new service order status and PL/SQL API to call. Users can set up rules to change service order status or run a PL/SQL API based on events that are logged in the activity log in Depot Repair Workbench. Note however, that activity rules are driven by user action and not activity log. The string $ROLINEID$ is to be used in repair_line_id for the PL/SQL API. You can set up activity rules that work in conjunction with the estimate status updated event and the estimate status generated event associated with the Generate Estimate button in the Technician Portal.
Note: The following rule conditions can be used in addition to the already existing conditions:
-
Pre-Update Estimate Status
-
Post-Update Estimate Status
To find activity rules
You can use the Simple Search or Advanced Search capabilities in the Find Rules region in the Activity Rules page to find an activity rule.
-
Use the following criteria to run a query on rules:
-
Activity Event Type: Use this field to select from the following supported events:
-
Estimate Status Updated
-
Estimate Status Generated
Note: The activities that trigger Activity Manager rules are currently limited Estimate Status Updated, and Estimate Generated (when the user clicks the Generate Estimate button in the Technician Portal).
-
-
New SO Status: Select a service order status from the list of values given in this field.
-
Rule Name: Select an existing activity rule name.
-
Precedence: Select a rule name by the precedence it has been assigned.
-
-
Click Go. The details of the rule display in the table.
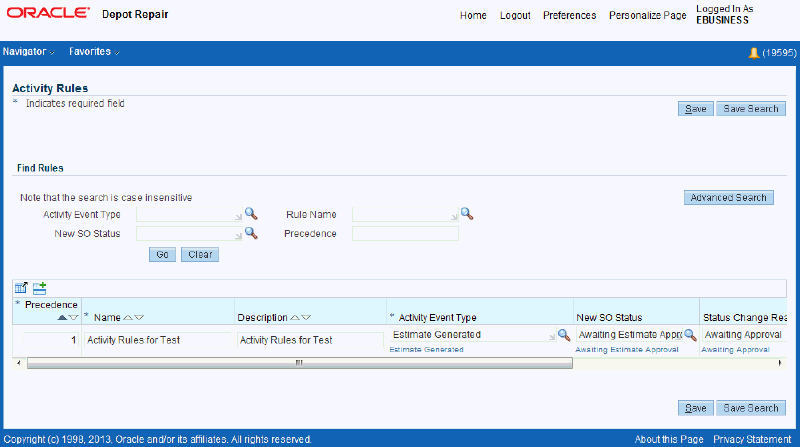
-
Click Details to update the activity rule in the Update Activity page.
-
Click Duplicate to copy and duplicate the activity rule.
-
Click Remove to remove the activity rule.
To set up activity rules
You can use the Add Another Row functionality to enter details of a new activity rule.
-
Click the Add Another Row icon in the Rules table in the Activity Rules page.
-
Optionally, click to detach the table using the Detach Table icon.

-
Enter the following details to set up a new activity rule:
-
Precedence: Enter a number to specify the precedence you would like to assign the rule you are setting up. The lower the number , the higher precedence a rule has compared to other rules.
-
Name: Enter a name for the activity rule.
-
Activity Event Type: Use this field to select from the following supported events:
-
Estimate Status Updated
-
Estimate Status Generated
-
-
New SO Status: Select a service order status from the list of values given in this field.
-
Status Change Reason: Select the reason for the status change from the list of values.
-
PL/SQL API: Enter the PL/SQL API.
-
-
Click Details to open the Update Activity page.
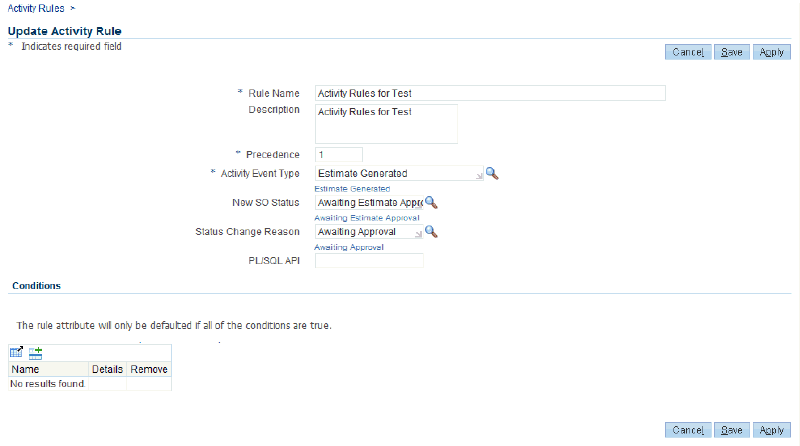
-
Click Save and Apply to create and enable the activity rule.
Managing Users
This section discusses how to handle user management issues when setting up Oracle Depot Repair.
Login Interfaces
The menus that appear after login depend upon the roles and responsibilities assigned to the log in parameters assigned to a user. Users will not be able to access Oracle Depot Repair functionality until they have been assigned both roles and responsibilities.
Roles, Responsibilities, and Permissions
During the implementation process and throughout the life span of Oracle Depot Repair, it will be necessary for an administrator to assign roles, responsibilities, and permissions to users.
A role is a collection of page and function level permissions that are granted to maintain application security. A permission is the smallest unit making up a role.
There are two types of permissions: Functional and Data Access Control (DAC). Permissions dictate the actions that a user can perform.
Responsibilities control the presentation of menus, tabs, and screens. For example, the responsibility Depot Repair Super User gives users a different set of menus than the responsibility given to a technician.
Oracle Depot Repair provides Depot Repair Super User as the seeded responsibility.
Creating Oracle Depot Repair Users
A user refers to any person who needs access to Oracle Depot Repair. This includes employees ranging from call center agents to depot planners, technicians, accountants etc.
While you can create a number of user types, the basic procedures for defining them remain identical. The roles and responsibilities assigned to each user type may be different.
Creating users involves the following tasks:
-
Defining responsibilities
-
Defining users
-
Assigning responsibilities to users
To perform these tasks, switch to the System Administrator Responsibility and navigate to Security > Responsibility, or Security > User as the case may be, then select Define to open the Responsibilities or Users window.
For detailed instructions on creating users, refer to the online help available from the two windows.
Charges and Service Types Setup Example
The following examples illustrate Charges and Service Types setup for Installed Base and Non-Installed Base trackable items. Separate Service Activities and Service Types are required for Installed Base trackable items and non-Installed Base trackable items. Refer to the relevant sections within this document for navigation paths and other details.
Service Activities and Billing Types
Perform the following steps to set up Service Activities and Billing Types.
Service Activity: Return for Repair, Installed Base Trackable Item
Consider the Service Activity Return for Repair for an Installed Base trackable item. This Service Activity will be used for returns for repair, and requires a corresponding Installed Base Transaction Sub Type.
Perform the following set up.
Service Activity
-
Service Activity: Return for Repair
-
Line Category: Return
-
Depot Repair Quantity Update check box: Selected
Billing Type
-
Billing Type: Material
Order Management Header and Line Types
-
Operating Unit: Vision Operations
-
Order Type: Mixed
-
Line Type: Return (Receipt)
Service Activity: Return for Repair, Non-Installed Base Trackable Item
Consider the Service Activity Return for Repair for a non-Installed Base item. This Service Activity will be used to process returns for repair, and does not have a corresponding Installed Base Transaction Sub Type set up.
Enter Service Activity value as Return for Repair, non-Installed Base. Set Billing Type and Order Management Header and Line Types as detailed above for the Installed Base item.
Service Activity: Replacement, Installed Base Trackable Item
Consider the Service Activity Replacement for an Installed Base item. This Service Activity will be used for shipping replacements, and requires a corresponding Installed Base Transaction Sub Type. Perform the following set up.
-
Service Activity: Replacement
-
Line Category: Order
-
Depot Repair Quantity Update: Selected
Set up Billing Type and Order Management Header and Line Types as explained in the first example.
Service Activity: Replacement, Non-Installed Base Trackable Item
A separate Service Activity has to be set up for Replacement of non-Installed Base items. Set up the Replacement Service Activity for a non-Installed Base item as you did for the Return for Repair example. This Service Activity setup does not have a corresponding Installed Base Transaction Sub Type set up.
Service Business Processes
After defining required Service Activities and Billing Types as illustrated in the above example, define a Service Business Process and include the required Service Activities.
Installed Base Transaction Sub Types
After defining Service Activities and Billing Types and Service Business Processes, set up the Installed Base Transaction Sub Types as follows:
-
Transaction Sub Type: Return for Repair. This Transaction Sub Type is seeded.
-
Transaction Sub Type: Replacement. The Change Owner checkbox in the Source Info region of the Transaction Sub Types window is selected when the Service Activity is Replacement. Also select the Reference Reqd checkbox in the Non Source Info region. The Change Owner To Status and Status fields in the Source Info region must be populated with the values External and Replaced respectively. The Status field in the Non Source Info region has the value EXPIRED.
Other seeded Transaction Sub Types include Ship Loaner, Return Loaner, Material Transaction, and Ship Repaired Item. For Return for Repair, Ship Repaired Item, Ship Loaner, and Return Loaner, the Change Owner checkbox in the Source Info region is not selected. This is because, in these transactions, the owner does not change.
Service Types Setup
After you set up all the required Installed Base Transaction Sub Types, set up the Service Types as follows:
You have to set up separate Service Types for Installed Base trackable items and non-Installed Base trackable items.
Service Type: Repair and Return, Installed Base Trackable Product
Enter the following values:
-
Service Type: Repair and Return
-
Business Process: Depot Repair
-
Service Mode: Work in Process
-
Service Type Reference: Repair and Return
-
Pre-Service RMA: Return for Repair
-
Pre-Service Ship: (Not Applicable)
-
Post-Service RMA: (Not Applicable)
-
Post-Service Ship: Ship Serviced Item
-
Automatically Enter and Book RMA check box: Select
If you are using the Estimates functionality, you need to set up the Billing Type and Service Activity Codes for Material, Labor, and Expense.
-
Material: Material Transaction
-
Labor: Labor Transaction
-
Expense: Expense Transaction
Service Type: Repair and Return, Non-Installed Base Trackable Product
Enter the following values:
-
Service Type: Repair and Return, non-Installed Base
-
Business Process: Depot Repair
-
Service Mode: Work in Process
-
Service Type Reference: Repair and Return
-
Pre-Service RMA: Return for Repair, non-Installed Base
-
Pre-Service Ship: (Not Applicable)
-
Post-Service RMA: (Not Applicable)
-
Post-Service Ship: Ship Serviced Item, non-Installed Base
-
Automatically Enter and Book RMA check box: Select
If you are using Estimates functionality, you need to set up the Billing Type and Service Activity Codes for Material, Labor, and Expense.
Note: Since estimate lines are created as Bill Only lines in Order Management, Transaction Sub Types for the associated Service Activity Codes are not relevant. This implies that even if a Transaction Sub Type exists for the Service Activity Code set up for the estimate line, it is ignored.
-
Material: Material Transaction
-
Labor: Labor Transaction
-
Expense: Expense Transaction
Service Type: Replacement, Installed Base Trackable Product
Enter the following values:
-
Service Type: Replacement
-
Business Process: Depot Repair
-
Service Mode: None/Not Applicable
-
Service Type Reference: Replacement
-
Pre-Service RMA: (Not Applicable)
-
Pre-Service Ship: (Not Applicable)
-
Post-Service RMA: (Not Applicable)
-
Post-Service Ship: Replacement
-
Automatically Enter and Book RMA checkbox: Do not select (leave unchecked)
Since Estimates may not be needed in case of Replacements, you do not have to set up the Billing Type and Service Activity Codes for Material, Labor and Expense.
Service Type: Replacement, Non-Installed Base Trackable Product
You will need to set up a separate Service Type for Replacement of non-Installed Base trackable items, just as you did for the Repair and Return example.
Seeded Service Types Setup
This section describes the Service Type setup summary for all the seeded Service Types. The Service Type details can be set up as explained in the examples in the section Service Types Setup.
The following table, Seeded Service Types Setup, applies to Installed Base trackable items.
Note: For Non-Installed Base trackable items, you will need to define separate Service Types, as illustrated in the above examples.
In the following Seeded Service Types Setup table, the Service Activities Return Exchange, Ship Exchange, and Replacement need to be defined before they can be set up in the Service Type form. The other Service Activities are available as seeded.
For Service Types Exchange, Advance Exchange, and Replacement, the owner of the item is changed when the item is returned or shipped. This is specified in the Source Info region for Transaction Sub Types Return Exchange, Ship Exchange, and Replacement. For Transaction Sub Types Ship Exchange and Replacement, the Reference Reqd checkbox in the Non Source Info region should be selected, so that the warranty information is transferred to the shipped item.
| Service Type | Business Process | Service Mode | Service Type Reference | Pre Service RMA | Pre Service Ship | Post Service RMA | Post Service Ship |
|---|---|---|---|---|---|---|---|
| Repair and Return | Depot Repair | Work In Process | Repair and Return | Return for Repair | - | - | Ship Repaired Item |
| Replacement | Depot Repair | None/Not Applicable | Replacement | - | - | - | Replacement |
| Advance Exchange | Depot Repair | None/Not Applicable | Advance Exchange | Return Exchange | - | - | Ship Exchange |
| Exchange | Depot Repair | None/Not Applicable | Exchange | Return Exchange | - | - | Ship Exchange |
| Loaner | Depot Repair | None/Not Applicable | Loaner | - | Ship Loaner | Return Loaner | - |
| Loaner, Repair and Return | Depot Repair | Work In Process | Loaner, Repair and Return | Return for Repair | Ship Loaner | Return Loaner | Ship Repaired Item |
| Refurbishment* | Depot Repair | Work In Process | Refurbishment | - | - | - | - |
| Standard | Depot Repair | Work In Process | Standard | - | - | - | - |
Note: * - For the Refurbishment Service Type, the Internal Order flag must be set. For all the other Service Types, leave it unset.
Setting Up Transfer Install Base Ownership
The following steps facilitate setting up transfer Install Base ownership function.
To set up transfer Install Base ownership:
-
Login with the System Administrator responsibility.
-
Navigate to the Menus page.
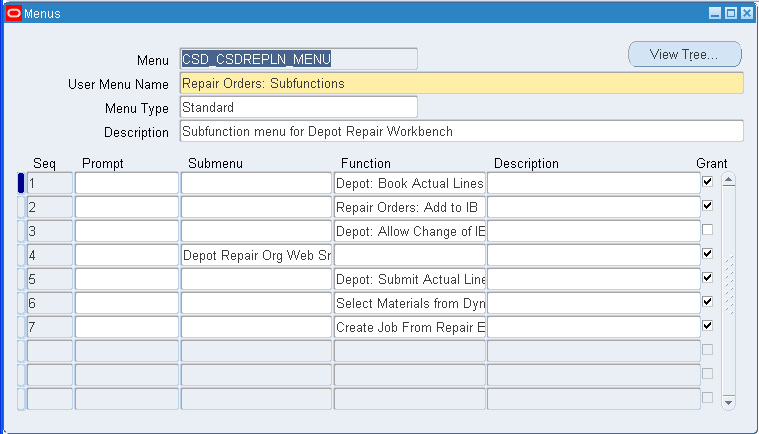
-
Query for the CSD_CSDREPLN_MENU in the menu field.
-
In the sub menus listed, locate the menu Depot: Allow Change of IB Ownership.
-
Select the Grant check box.
-
Click Save.
-
Click OK on the message window. This notifies you about the request being submitted to recompile the menu.
Integrating with Advanced Pricing
The Advanced Pricing integration enables various pricing features for Logistics lines, Estimate lines, and Actual lines in the application. It enables the following Advanced Pricing features:
-
Support for Pricing Qualifiers Context: Customer, Attribute: Customer Name and Context: Modifier List, Attribute: Pricelist
-
Pricing Modifiers
-
Static and Dynamic Formulae
-
Secondary Pricelists
-
Price Breaks
Note: Multi Currency Price List is not supported.
This integration is based on the certain assumptions:
-
The Pricing Transaction Entity (PTE) for the depot repair process is ASO.
-
Only automatic pricing modifiers are supported.
-
Service Contracts discounts are applied after the pricing engine determines a list price based on modifiers and/or qualifiers, as applicable.
-
The current release supports line level pricing calculations only and does not apply any header-level based pricing calculations.
-
Freight and Special Charges and Sales Tax calculations are not enabled in the new integration.
To enable the Advanced Pricing integration, follow the steps:
-
Set the value for the profile CSD: Enable Advanced Pricing to Yes. By default, the value is set to No.
-
Set up Advanced Pricing (e.g. qualifiers, modifiers etc.) for the PTE ASO.
Note: If you do not wish to enable the additional Advanced Pricing features, do not change any setup. By default the price calculations behaves same as is.
Using Time Clock Bin
The Time Clock functionality enables technicians to clock in and clock out the time for a service. The system tracks the amount of time a technician spends clocked in on a service and automatically capture that time as a resource transaction. The Time Clock Bin displays by default in the Technician Portal and can be personalized using the profile option CSD: Time Clock Next Button Transactions.
You can also use the profile option CSD: Automatically Clock In to Time Clock to automatically clock in technicians to the first available operation on the first available job when they log into the Technician Portal or access the Technician Portal from the Execute Job button in the Depot Repair Workbench or from the Work Details button in the Returns Portal.
See: Setting Up Oracle Depot Repair Profile Options
Note: In case of prior releases that require personalization of the Time Clock Bin, complete the following steps:
-
Turn on Self Service Personalization. Set the profile options, Personalize Self-Service Defn and FND: Personalization Region Link Enabled, to Yes.
-
Query any existing service order.
-
Look for Stack Layout: (MainRN) in the personalization hierarchy.
-
Look for RoTimeClockCntRN.
-
Click on personalization pencil icon.
-
Look for Content Container: Time Clock and set the Rendered property to true at the required hierarchy scope.
-
Save the changes and return to the application.
This makes the Time Clock bin visible in the Service Order page.
Using Complete Work Button
When a service is finished, technicians perform many actions like: complete operations, complete jobs, log labor hours, transact resources, issue materials, change service order status, or kick off a workflow. The Complete Work button enables technicians to stop the clock and trigger these actions automatically. The Complete Work button displays by default in the Technician Portal.
Note: In case of prior releases that require personalization of the Complete Work Button, complete the following steps:
-
Turn on Self Service Personalization. Set profile option, Personalize Self-Service Defn, to Yes.
-
Query any existing service order.
-
Click on Personalize Page.
-
Click on the first personalization pencil icon on the page.
-
Look for Submit Button: Complete Work and set the Rendered property to true at the required hierarchy scope.
-
Save the changes and return to the application.
This makes the Complete Work button visible in the Service Order page.
Using Request Parts Button
The Request Parts button enables technicians to create a purchase requisition for one or more items on the Materials table. See: Setting Up Internal Requisitions and Internal Sales Orders
Note: In case of prior releases that require personalization of the Request Parts Button, complete the following steps:
-
Turn on Self Service Personalization. Set profile options, Personalize Self-Service Defn and FND: Personalization Region Link Enabled, to Yes.
-
Query any existing service order and navigate to Service Execution tab.
-
Go to Material region personalization page.
-
Look for Flow Layout: (SelectMtlsRN) in the personalization hierarchy.
-
Look for Submit Button: Request Parts.
-
Click on personalization pencil icon and set the Rendered property to true at the required hierarchy scope.
-
Save the changes.
-
Scroll down the personalization hierarchy and look for Column: (mtlPurReqCol).
-
Click the personalization icon. Set the Rendered Property to yes at the required level.
-
Save the changes and go back to the application.
This enables Request Parts button and the Requisition column on the Materials table.