| Skip Navigation Links | |
| Exit Print View | |

|
Booting and Shutting Down Oracle Solaris 11.1 Systems Oracle Solaris 11.1 Information Library |
| Skip Navigation Links | |
| Exit Print View | |

|
Booting and Shutting Down Oracle Solaris 11.1 Systems Oracle Solaris 11.1 Information Library |
1. Booting and Shutting Down a System (Overview)
2. x86: Administering the GRand Unified Bootloader (Tasks)
x86: Upgrading Your GRUB Legacy System to a Release That Supports GRUB 2
x86: How to Upgrade Your GRUB Legacy System to a Release That Supports GRUB 2
x86: How GRUB Legacy Menu Entries Are Migrated to GRUB 2
x86: Maintaining GRUB 2 and GRUB Legacy Boot Environments on the Same System
x86: Administering the GRUB Configuration by Using the bootadm Command
x86: How to List GRUB Menu Entries
x86: How to Manually Regenerate the GRUB Menu
x86: How to Maintain the GRUB Menu
x86: How to Set Attributes for a Specified Boot Entry in the GRUB Menu
x86: How to Add a Boot Entry to the GRUB Menu
x86: How to Remove a Boot Entry From the GRUB Menu
x86: Adding Kernel Arguments by Editing the GRUB Menu at Boot Time
x86: Adding -B prop=val Kernel Arguments at Boot Time by Editing the GRUB Menu
Redirecting the Oracle Solaris Console at Boot Time
x86: Customizing the GRUB Configuration
x86: Advanced GRUB Administration and Troubleshooting
x86: Installing GRUB 2 by Using the bootadm install-bootloader Command
x86: How to Install the Boot Loader
x86: How to Install the Boot Loader After Restoring a Root Pool
x86: How to Install GRUB in a Location Other Than the Default Location
x86: Installing GRUB Legacy on a System That Has GRUB 2 Installed
x86: How to Install GRUB Legacy on a System That Has GRUB 2 Installed
3. Shutting Down a System (Tasks)
5. Booting a System From the Network (Tasks)
The following information is provided in this section:
GRUB 2 is a powerful and more modular boot loader that supports a wider range of platforms and firmware types, including booting from Unified Extensible Firmware Interface (UEFI) firmware, and booting from GUID Partition Table (GPT) partitioned disks of any size, on systems with BIOS or UEFI firmware. GRUB 2 also supports the UEFI-specified, GPT partitioning scheme.
Like GRUB Legacy, GRUB 2 uses a two-stage boot process. The key difference between GRUB 2 and GRUB Legacy is that GRUB 2 places many facilities in dynamically loaded modules, which enables the core GRUB 2 (second-stage boot loader) image to be smaller and therefore load faster and be more flexible. As a result, GRUB functionality is loaded on demand at boot time.
GRUB 2 introduces the following key changes:
Configuration changes
The GRUB 2 configuration differs syntactically from the GRUB Legacy configuration. The menu.lst file that is used by GRUB Legacy has been replaced by a new configuration file, grub.cfg. Unlike the menu.lst file, the grub.cfg file is automatically regenerated by boot management commands. Therefore, this file should never be directly edited. as any edits are immediately destroyed when the grub.cfg file is regenerated. See x86: Description of the GRUB 2 Configuration.
Partition and device naming changes
Instead of 0-based indexes, GRUB 2 uses 1-based indexes for partitions and a changed device naming scheme. See x86: GRUB 2 Partition and Device Naming Scheme.
Boot loader and GRUB menu administration changes
You administer the grub.cfg file through the bootadm command. Modified subcommands and new subcommands enable you to perform most of the administrative tasks that were previously accomplished by editing the menu.lst file. Two examples include setting boot attributes (such as kernel arguments) for an Oracle Solaris boot instance and managing boot loader settings. See x86: Administering the GRUB Configuration by Using the bootadm Command.
GRUB menu and screen changes
The various GRUB menus and some tasks, for example, adding kernel arguments by editing the GRUB menu at boot time, work somewhat differently now. These differences are documented in the various tasks within this document, where appropriate.
Other boot loader related command changes
The installgrub command is deprecated in this release. Do not use this command to install the boot loader on systems that support GRUB 2, as doing so can prevent the system from booting. Instead, if you are running a release that supports GRUB 2, use the bootadm install-bootloader command. This command supersedes the functionality of the installgrub command on x86 platforms and the installboot command on SPARC platforms. See x86: Installing GRUB 2 by Using the bootadm install-bootloader Command.
You can use the installgrub command to install GRUB Legacy on a system, but only after you have verified that the version of GRUB Legacy you are installing supports the ZFS pool version of your root pool, and that there are no remaining GRUB 2 boot environments on the system. For instructions, see x86: How to Install GRUB Legacy on a System That Has GRUB 2 Installed.
GRUB 2 uses an entirely different configuration than GRUB Legacy. The GRUB Legacy configuration is managed through the menu.lst file, but GRUB 2 does not use a menu.lst file. Instead, GRUB 2 uses a configuration file, grub.cfg, to store the same type of information. Similar to the menu.lst file, the grub.cfg file is located at the top-level of the ZFS dataset for the root pool, /pool-name/boot/grub, for example, /rpool/boot/grub/grub.cfg.
The syntax of the grub.cfg file is based on a subset of bash scripting, which is more complex and powerful than the directive-like language that is used in the menu.lst file that is shown in the following example:
title title
             bootfs pool-name/ROOT/bootenvironment-name
             kernel$ /platform/i86pc/kernel/$ISADIR/unix -B $ZFS-BOOTFS
             module$ /platform/i86pc/$ISADIR/boot_archive
By comparison, the same configuration is stored in the grub.cfg file, as follows:
menuentry "<title>" {
        insmod part_msdos
        insmod part_sunpc
        insmod part_gpt
        insmod zfs
        search --no-floppy --fs-uuid --set=root f3d8ef099730bafa
        zfs-bootfs /ROOT/<BE name>/@/ zfs_bootfs
        set kern=/platform/i86pc/kernel/amd64/unix
        echo -n "Loading ${root}/ROOT/<BE name>/@$kern: "
        $multiboot /ROOT/<BE name>/@/$kern $kern -B $zfs_bootfs
        set gfxpayload="1024x768x32;1024x768x16;800x600x16;640x480x16;640x480x15;640x480x32"
        insmod gzio
        echo -n "Loading ${root}/ROOT/<BE name>/@/platform/i86pc/amd64/boot_archive: "
        $module /ROOT/<BE name>/@/platform/i86pc/amd64/boot_archive
}
Another significant difference between the grub.cfg file and the menu.lst file is that you do not edit the grub.cfg file. The menu.lst file supports user-created menu entries and manual changes to global GRUB configuration file settings and variables, in addition to menu entries that are automatically generated by the system. In contrast, the grub.cfg file is administered by using various bootadm subcommands, many of which are new in this release. The various bootadm subcommands enable you to administer most boot loader administration tasks. See x86: Administering the GRUB Configuration by Using the bootadm Command.
Another feature of the grub.cfg file is that it is autogenerated whenever you make changes to the boot loader configuration. The file is also autogenerated during some operations and when certain boot administration commands are used. If necessary, you can manually generate a new grub.cfg file by running the bootadm command with the new generate-menu subcommand. Use this subcommand to create a new grub.cfg file only if the boot configuration becomes corrupted. See x86: How to Manually Regenerate the GRUB Menu.
Note - The autogeneration mechanism for the grub.cfg file is intended for installed systems only.
For reference, the GRUB 2 configuration is stored in the following files:
grub.cfg – Is the main configuration file that is used by GRUB 2.
/pool-name/boot/grub/menu.conf – Is a file that is used by Oracle Solaris to generate the final grub.cfg configuration file.
The menu.conf file is a separate GRUB meta configuration file that stores the machine-parseable representation of the GRUB 2 configuration.
Note - Do not attempt to edit this file.
/pool-name/boot/grub/custom.cfg – Is an editable file that resides in the same location as the grub.cfg and menu.conf files. The custom.cfg file is created by the administrator (and not on the system by default). This file is reserved for the purpose of adding more complex constructs (menu entries or other scripting information) to the basic GRUB configuration.
The custom.cfg file is referenced in the grub.cfg file. If a custom.cfg file exists on the system, the commands or directives that are in that file are then processed by the grub.cfg file. For more information, see x86: Customizing the GRUB Configuration.
If you are familiar with how device naming for GRUB Legacy works, you need to be aware of the differences between the GRUB Legacy naming scheme and the GRUB 2 naming scheme. While GRUB Legacy implements a 0-based naming scheme for partition indexes, GRUB 2 uses a 1-based naming scheme for partition indexes.
The GRUB 2 device naming scheme uses the following format:
(hdX, part-typeY, part-typeZ, ...)
Because partition schemes can be nested, GRUB's device naming scheme has been changed to support arbitrary nesting levels. GRUB accepts either the old-style device naming (“(hd0,1)”) or the new-style device naming that includes the partition scheme name. For example:
(hd0, gpt1)
The previous example refers to the first GPT partition on the first disk.
Note - Only the GRUB partition numbering has changed, not disk numbering. Disk numbers remain 0-based.
Because GRUB 2 relies on file system UUIDs (or labels) and a built-in search command for automatically locating the proper device or partition name, you are not required to manually specify device names. The following table provides examples of the partition indexes and device names that GRUB uses.
Table 2-1 GRUB 2 Partition and Device Naming Scheme
|
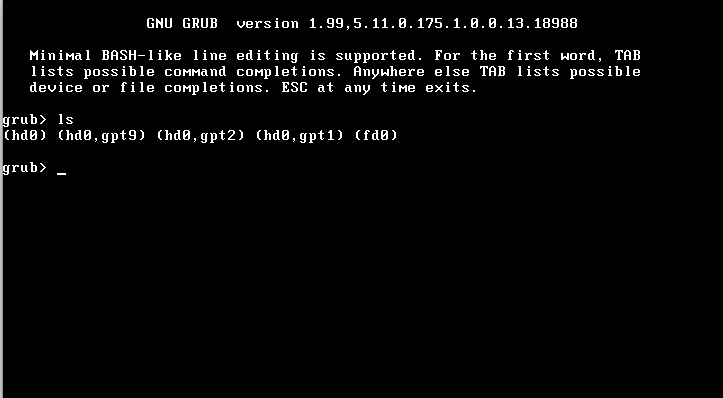
If you need to determine which partition number refers to a partition that interests you, access the GRUB command-line interpreter by pressing the C key (or Control-C, if you are editing a menu entry). Then, run the ls command to list all of the partitions that GRUB can identify, which is similar to the following figure.

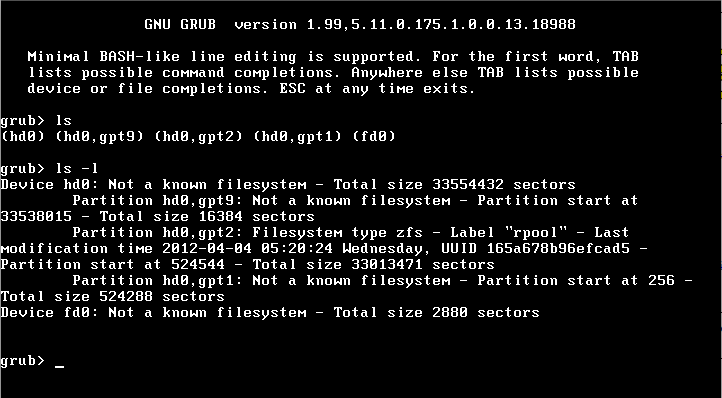
The -l option to the ls command displays more detailed information about each partition, including file system and file system UUID information, which is similar to the following figure.

Note - GRUB counts the drive numbers from zero, regardless of their type and does not distinguish between Integrated Drive Electronics (IDE) and Small Computer Systems Interface (SCSI) devices.
Although GRUB 2 shares several characteristics with GRUB Legacy, because GRUB 2 does not use a menu.lst file, many boot administration tasks are performed differently on systems that support GRUB 2. For example, you manage the GRUB menu and perform various boot loader administrative tasks by using new subcommands of the bootadm command.
A new -P pool argument is available for most of the bootadm subcommands. This option enables you to view or make changes to the GRUB menu and boot entries for a particular root pool. If you are running an operating system that supports GRUB Legacy, the -P option might not be available for these bootadm subcommands.
For example, you would list the GRUB menu for a specific root pool, as follows:
# bootadm list-menu -P pool-name
The following table compares some common GRUB 2 tasks and commands to the GRUB Legacy equivalent. For detailed instructions, see the bootadm(1M) man page and x86: Administering the GRUB Configuration by Using the bootadm Command.
Table 2-2 GRUB 2 Tasks Compared to GRUB Legacy Tasks
|