7 Integrating Oracle Access Manager
This chapter provides instructions for integrating Oracle Access Manager (OAM) in the Oracle GlassFish Server environment via the OAM Security Provider.
This chapter assumes that you are familiar with security features such as authentication, authorization, and certificates. If you are not, see Administering System Security.
The chapter additionally assumes that you are familiar with Oracle Access Manager features, concepts, and components, and it summarizes the Oracle Access Manager configuration steps that you must perform. See Oracle Access Manager Installation Guide for detailed instructions on Access Manager tasks.
The following topics are addressed here:
-
Integrating OAM Security Provider with Oracle Access Manager 10g
-
Integrating OAM Security Provider with Oracle Access Manager 11g
-
Integrating OAM Security Provider with Oracle Access Manager 11g and WebGate
Instructions for accomplishing the tasks specific toGlassFish Server by using the Administration Console are contained in the Administration Console online help.
About OAM Security Provider for Glassfish
The OAM Security Provider for GlassFish Server is a JSR 196 Server Authentication Module (SAM) that provides authentication, authorization (optional), and single sign-on across JavaEE Web applications that are deployed on GlassFish Server. (See JSR 196: JavaTM Authentication Service Provider Interface for Containers for the specification and the related Javadocs.)
The OAM Security Provider enables GlassFish Server administrators to use Oracle Access Manager to control user access to business applications. The OAM Security Provider enables the following Oracle Access Manager functions forGlassFish Server users:
-
Authenticator- This security provider uses Oracle Access Manager authentication services to authenticate users who access JavaEE applications deployed on GlassFish Server. Users are authenticated based on their credentials, such as user name and password, or client certificate.
Authentication occurs when GlassFish Server directly receives unauthenticated requests from end-user clients for applications deployed on GlassFish Server. The OAM Security Provider challenges the user, collects the credentials and sends them to Oracle Access Manager via the configured AccessGate. The form of challenge issued (BASIC, FORM, Client-Certificate) and the security characteristics of the transport (SSL or PlainText) depend on the policies configured at Oracle Access Manager for the resource being accessed.
Oracle Access Manager authenticates the credentials and, upon successful authentication, create an OBSSOSession. The OAM Security Provider receives this session and sets its identifier as an ORA_GF_ObSSOCookie in the response. This allows subsequent requests from the client for other resources protected by the same policy-domain to not require authentication, thereby achieving single sign-on (SSO) access to resources.
-
Identity Asserter- The security provider uses Oracle Access Manager authentication services to validate already-authenticated Oracle Access Manager users using the OAM_REMOTE_USER header and creates an authenticated session.
Identity assertion occurs when GlassFish Server is behind a proxy Oracle HTTP Server (OHS) that has an installed WebGate. The WebGate is responsible for challenging the user requests for resources. OHS then passes the OAM_REMOTE_USER header to the GlassFish Server.
The OAM Security Provider tries to assert the identity of the user that was sent in the OAM_REMOTE_USER header.
-
Authorizer - In this mode the OAM Security Provider additionally uses Oracle Access Manager authorization services to authorize users who are accessing a protected resource. The authorization is based on Oracle Access Manager policies.
Obtaining Oracle Access Manager Group Information
In the authentication function, the OAM Security Provider also tries to obtain group membership information for the authenticated user from the Oracle Access Manager backend. This information is set in a SecurityContext, which is then passed to the GlassFish Server authorization system to determine if access to the resource should be allowed.
The backend query is integrated into the JSR-196 CallerPrincipal Callback handling in the container and is transparent to the OAM Security Provider.
To obtain the group information, you configure an LDAPRealm in GlassFish Server to point to the OAM backend where the group information is stored. For example, you can use the Administration Console or the create-auth-realm command to add the following entry to the domain-specific domain.xml file:
<auth-realm classname="com.sun.enterprise.security.auth.realm.ldap.LDAPRealm
 name="ldaprealm">
<property name="jaas-context" value="ldapRealm" />
<property name="base-dn" value="o=company,c=us" />
<property name="directory" value="ldap://140.87.134.98:1389" />
<property name="search-bind-dn" value="cn=Directory Manager" />
<property name="search-bind-password" value="welcome1" />
</auth-realm>
About Oracle Access Manager
Oracle Access Manager allows users of your applications to log in once and gain access to a broad range of resources. Oracle Access Manager provides an identity management and access control system that is shared by all of your applications. The result is a centralized and automated single sign-on (SSO) solution for managing who has access to what information across your entire IT infrastructure.
To integrate the OAM Security Provider with Oracle Access Manager, you need to understand the Oracle Access Manager component concepts shown in Table 7-1.
Note:
The OAM Security Provider integrates with versions 10g and 11g of Oracle Access Manager. Between these two versions of Oracle Access Manager, many component names remain the same. However, there are several important changes that you should know about, as described in Product and Component Name Changes in Oracle Fusion Middleware Administrator's Guide for Oracle Access Manager.
Table 7-1 Oracle Access Manager Concepts
| Oracle Access Manager 10g | Oracle Access Manager 11g | Description |
|---|---|---|
|
Access System |
Access System |
The Access System is the access-control system that provides single sign-on across any Web application. It supports a variety of access policies, and is fully integrated with the Identity System so that changes in user profiles are instantly reflected in the Access System's policy enforcement. The Access System consists of the Policy Manager, Access Server, and WebGate. |
|
Access Server |
OAM Server |
Access Server receives requests and then queries authentication, authorization, and auditing rules in the directory server. Based on the information in the directory server, the Access Server sends the authentication scheme, validates user credentials, authorizes the user, audits, and manages the session. |
|
Policy Manager |
OAM Administration Console |
The Policy Manager provides a Web-based interface where administrators can create and manage access policies. The Policy Manager also communicates with the directory server to write policy data, and communicates with the Access Server when certain policy modifications are made. |
|
WebGate |
OAM Agent |
WebGate is a server plug-in Oracle Access Manager access client that intercepts HTTP requests for Web resources and forwards them to the Access Server for authentication and authorization. A WebGate is shipped out-of-the-box with Oracle Access Manager. |
|
AccessGate |
OAM Agent |
An AccessGate is a custom access client that is specifically developed using the Software Development Kit (SDK) and Oracle Access Manager APIs, either by the customer or by Oracle. An AccessGate processes requests for Web and non-Web resources (that is, non-HTTP) from users or applications. |
The component names described in this section reflect the 10g version of Oracle Access Manager.
Understanding OAM Security Provider Use Cases
With the OAM Security Provider, you can use Oracle Access Manager to protect JavaEE Web Application resources. You can configure single sign-on for Web applications, such that a user who has authenticated to GlassFish Server can access Oracle Access Manager-protected resources without re-authentication. You can also configure single sign-on such that a user who has authenticated to Oracle Access Manager can access GlassFish Server Web resources without re-authentication. The OAM Security Provider can also be optionally configured to perform resource authorization using policies configured at the Oracle Access Manager PolicyManager.
You can use the provider in the following ways:
-
To provide authentication for Web resources via an AccessGate.
-
To provide authentication (Identity Assertion) for Web resources using a proxy server with a WebGate installed.
-
To indicate that authorization checks are based on Policy Manager.
Uses cases for each scenario are described next.
Use Case: Authentication for Web Resources Via Access Gate
The OAM Security Provider uses Oracle Access Manager authentication services to authenticate users who access JavaEE applications deployed on GlassFish Server. This method can be used to protect HTTP resources deployed on GlassFish Server. Users are authenticated based on their credentials, such as user name and password (BASIC/Form) and client certificate.
The OAM Security Provider uses an AccessGate to consult an AccessServer configured at the Oracle Access Manager instance to do authentication. Upon successful authentication, the OAM Security Provider sets a cookie (ORA_GF_ObSSOCookie) to represent the single sign-on (SSO) session created by Oracle Access Manager.
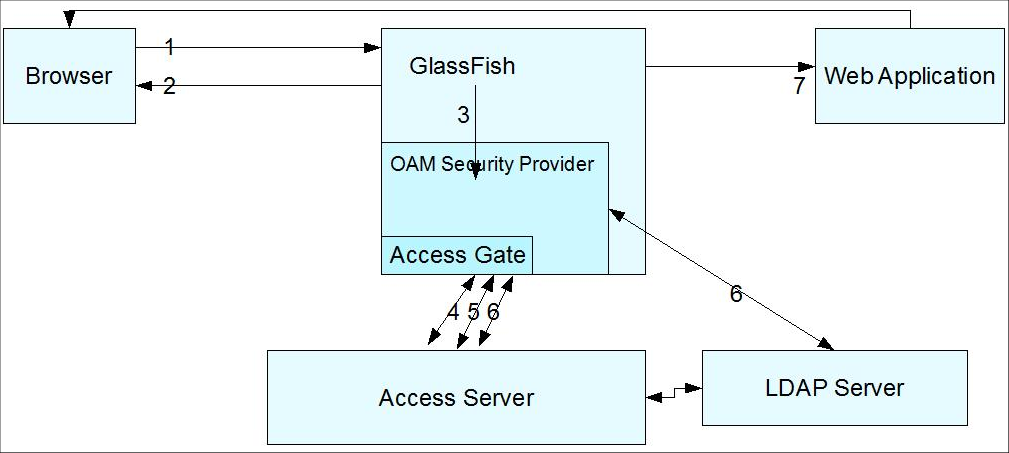
Consider the flow of control shown in Figure 7-1.
Figure 7-1 Authentication (FORM/BASIC) for Web resources Via AccessGate
Description of "Figure 7-1 Authentication (FORM/BASIC) for Web resources Via AccessGate"
The flow of control shown in Figure 7-1 is as follows:
-
A user attempts to access an Oracle Access Manager-protected GlassFish Server resource.
-
The GlassFish Server challenges the user for a username and password using a predefined login form in the case of FORM authentication (or a challenge in the case of BASIC authentication) because the application's deployment descriptor requires authentication from the container. You can use your own login form, which can be specified as an option to the OAM Security Provider.
-
The GlassFish Server forwards the username and password to the OAM Security Provider for authentication and authorization.
-
The OAM Security Provider uses the AccessGate to communicate with the Access Server to verify the user's identity. If authentication is successful, the Access Server generates a session token with a URL that contains the ORA_GF_ObSSOCookie.
-
If authentication is successful, the OAM Security Provider creates a Subject with the authenticated principal and also sets the cookie in the response.
The ORA_GF_ObSSOCookie is set so that when the user attempts to access additional Oracle Access Manager-protected non-GlassFish Server resources, authentication is not performed. That is, if the ORA_GF_ObSSOCookie is already set and the user has logged in using form-based authentication, the user is logged in without being challenged.
-
The control returns to the GlassFish Server authorization mechanism, which checks if the user has permission to access the requested resource. The policies that protect resources are specified in the Policy Manager application in Oracle Access Manager. Policies that are defined in
web.xmlandglassfish-web.xmlare honored by default and authorization based on policies at the Policy Manager can be configured as an option. When the OAM Security Provider is configured to do additional authorization checks based on policies at the Policy Manager, the resource access is disallowed if the policies defined in web.xml are not also satisfied. -
If authorization is successful, the GlassFish Server allows the user to access the requested resource.
Use Case: Identity Assertion for Web Resources via WebGate
This use case occurs when GlassFish Server is behind an Oracle HTTP Server proxy that has an installed WebGate, and there is a connector to the GlassFish Server Web container from the proxy.
The WebGate is responsible for challenging the user requests for resources, and it is assumed that all requests to the Web container have to come through the configured proxy. The Web resources are protected using authentication schemes such as FORM, BASIC, or CLIENT-CERT supported by the WebGate. The WebGate protects only Web resources (HTTP).
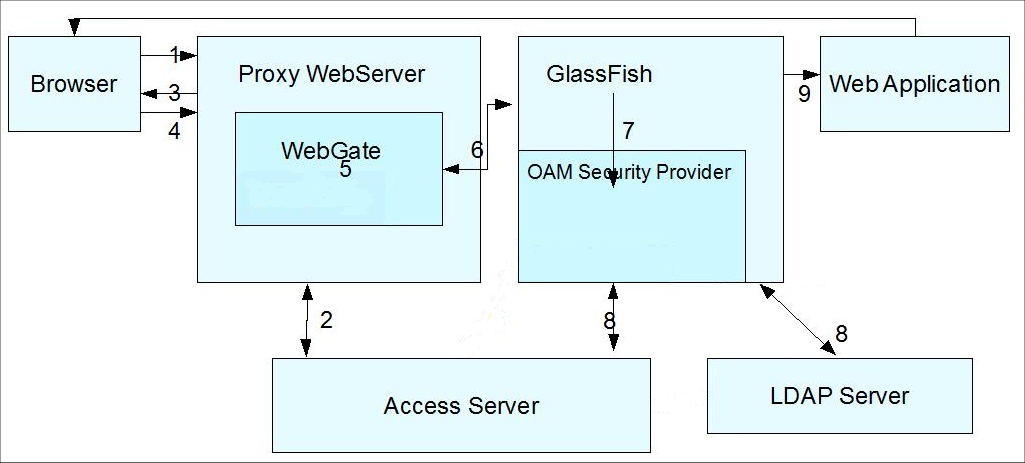
Consider the flow of control shown in Figure 7-2.
Figure 7-2 Identity Assertion via WebGate
Description of "Figure 7-2 Identity Assertion via WebGate"
The flow of control shown in Figure 7-2 is as follows:
-
A user attempts to access an Oracle Access Manager-protected Web application that is deployed on the GlassFish Server. (The WebGate protects only Web resources (HTTP). )
-
The WebGate intercepts the request and queries the Access Server to check if the resource is protected.
-
If the resource is protected, the WebGate challenges the user for credentials based on the type of Oracle Access Manager authentication scheme configured for the resource, which is CLIENT CERT in this use case.
-
The user presents a certificate.
-
If the user authenticates successfully, the Oracle Access Manager sets the OAM_REMOTE_USER header in the request. Note the following cookie and header use:
For a 10g WebGate:
-
The ObSSOCookie is always propagated.
-
The OAM_REMOTE_USER header is always set by an OAM 11g server.
For an 11g Webgate:
-
A cookie is not propagated.
-
The OAM_REMOTE_USER header is always set by an OAM 11g server
-
-
The request is redirected to the GlassFish Server via the Oracle HTTP Server (OHS) redirect directive.
-
The OAM Security Provider looks at the OAM_REMOTE_USER header and gets the authenticated user identity.
-
The OAM Security Provider creates a Subject with the authenticated principal.
-
Authorization based on policies at the Policy Manager in Oracle Access Manager can be configured as an option.
-
(Not shown.) If authorization is successful, the GlassFish Server enables the user to access the requested resource.
Use Case: Authorization Checks Based on Policy Manager
The oam.check.resource.access parameter to the OAM Security Provider (see Table 7-2) indicates whether Oracle Access Manager should perform authorization checks for the resource.
This authorizer function is optional.
By default, GlassFish Server uses its container authorization mechanisms to make the final resource access decision. GlassFish Server uses the Subject set by the OAM Security Provider (after successful authentication) to perform the authorization step.
If you set the oam.check.resource.access parameter for the OAM Security Provider to true, the Oracle Access Manager policies that protect the resources are invoked. (You specify these policies in the Policy Manager application in Oracle Access Manager.)
Note:
Even when the OAM Security Provider is configured to do additional authorization checks based on policies at the Policy Manager, resource access is still disallowed if the policies defined in web.xml are not also satisfied.
The authorization flow of control is as follows:
-
A user attempts to access an Oracle Access Manager-protected GlassFish Server resource.
-
The GlassFish Server challenges the user for a username and password using a predefined login form in the case of FORM authentication (or a challenge in the case of BASIC authentication) because the application's deployment descriptor requires authentication from the container. You can use your own login form, which can be specified as an option to the OAM Security Provider.
-
The GlassFish Server forwards the username and password to the OAM Security Provider for authentication and authorization.
-
The OAM Security Provider uses the AccessGate to communicate with the Access Server to verify the user's identity and to see if the user has access to the protected resource, as determined by a policy in the Policy Manager. (The policies that protect resources are specified in the Policy Manager application in Oracle Access Manager. ) If authentication is successful and the user has access to the resource, the Access Server generates a session token with a URL that contains the ORA_GF_ObSSOCookie.
-
If authentication is successful, the OAM Security Provider creates a Subject with the authenticated principal and also sets the cookie in the response.
The ORA_GF_ObSSOCookie is set so that when the user attempts to access additional Oracle Access Manager-protected resources, authentication is not performed. That is, if the ORA_GF_ObSSOCookie is already set and the user has logged in using form-based authentication, the user is logged in without being challenged.
-
The control returns to the GlassFish Server authorization mechanism, which checks whether the user has permission to access the requested resource. When the OAM Security Provider is configured to do additional authorization checks based on policies at the Policy Manager, final access to a resource is allowed only when Policy Manager policies and
web.xmlpolicies are both satisfied. -
If authorization is successful, the GlassFish Server allows the user to access the requested resource.
Configuring the OAM Security Provider
The OAM Security Provider is implemented via the OAMAuthenticatorSAM class.
You configure the OAM Security Provider as a message-security-provider (HttpServlet layer interception point), either through the Administration Console or the create-message-security-provider command.
The following message-security-provider syntax configures an OAM Security provider:
<message-security-config auth-layer="HttpServlet">
<provider-config provider-type="server" provider-id="mysam"
class-name="com.sun.glassfish.oamsam.OAMAuthenticatorSAM">
<property name="oam.resource.hostid.variation"
value="your-host-system.com" />
<!--property name="form.login.page" value="" /-->
</provider-config>
</message-security-config>
You must set the provider id to a unique value. The class name must be com.sun.glassfish.oamsam.OAMAuthenticatorSAM.
You can optionally set the properties shown in Table 7-2 for the OAM Security Provider.
Table 7-2 OAM Security Provider Properties
| Property | Description |
|---|---|
|
APPSERVER_SSL_MUTUAL_AUTH_PORT |
Option to the SAM indicating the SSL Mutual Authentication port for the Application Server. |
|
APPSERVER_SSL_PORT |
Option to the SAM indicating the SSL port for the Application Server. |
|
cookie.httponly |
Option to the SAM indicating if the httponly flag of the ORA_GF_ObSSOCookie should be set. |
|
cookie.path |
Option to the SAM indicating the value of the path parameter of the ORA_GF_ObSSOCookie. By default the path parameter is not set. |
|
cookie.secure |
Option to the SAM indicating if the isSecure() bit of the Cookie should be set to true/false when the ORA_GF_ObSSOCookie is created after successful authentication. |
|
error.page |
Option to the SAM indicating the custom Error Page to use for Authentication/Authorization failures. Should be a path relative to current context root, and must begin with a "/". |
|
form.login.page |
Option to the SAM indicating the custom FORM Login Page to use for FORM based login. Must be a path relative to the domain's docroot. A default login FORM is used when this option is absent, or when its value is set to "" (empty string) or to the value "default". |
|
oam.auth.cert.param |
Option to the SAM indicating the parameter name for certificate credential passed to create ObUserSession. |
|
oam.auth.hdr.external |
Option to the SAM whose value indicates the name of Request Header that contains the UserId/Cookie corresponding to the ObUserSession. |
|
oam.auth.password.param |
Option to the SAM indicating the parameter name for password credential passed to create ObUserSession |
|
oam.auth.userid.param |
Option to the SAM indicating the parameter name for username credential passed to create ObUserSession. |
|
oam.check.resource.access |
Option to the SAM indicating if OAM should also perform the authorization check for the resource. The value is a flag that indicates if OAM should check (authenticate and authorize) the resource access. By default OAM would only be consulted for authentication of any credentials and establishing the SSO token. Note: The GlassFish Serverauthorization has the final say as to whether the access to the resource is finally allowed, primarily based on the group and principal of the user being in the correct JavaEE-defined Role to access the resource. |
|
oam.header.type |
Option to the SAM indicating if the External Header in the Request is to be interpreted as a Cookie or as the User Principal of an Authenticated user when the module is acting as an Identity Asserter. |
|
oam.include.port.in.resource |
Option to the SAM indicating whether the port number of a request should be used while constructing the request URI for the protected resource whose access is protected by OAM. |
|
oam.include.query.params.in.resource |
Option to the SAM indicating whether the query-parameters of a request should be used while constructing the request URI for the protected resource whose access is protected by OAM. |
|
oam.obsso.cookie.name |
Option to the SAM indicating the name of the ORA_GF_ObSSOCookie to use. |
|
oam.res.access.protocol |
Option to the SAM indicating the protocol to be used when creating the resource representation for the protected resource whose access is protected by OAM. |
|
oam.resource.hostid.variation |
Option to the SAM indicating the host-id variation to use when constructing the request URI for the protected resource whose access is protected by OAM. |
|
oam.ext.header |
Option to the SAM indicating the name of the header to use for identity assertion. This is used by the SAM to find the configured header and to extract the principals. The allowed value is OAM_REMOTE_USER. |
|
IdentityAsserterMode |
Option to the SAM that determines whether the SAM acts as an Identity Asserter. IdentityAsserterMode is used when set to true. |
Determining Which Authentication Method is Used
The JavaEE Web applications you want to protect should be configured with deployment descriptors containing required <security-constraint> and associated <auth-constraint> specifying the roles. The descriptors should not contain <login-config> elements that specify the JavaEE supported authentication methods.
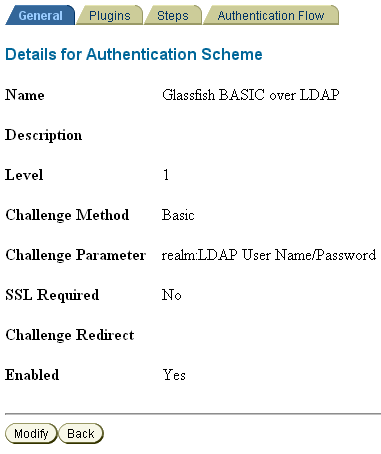
Instead, the OAM Security Provider determines the authentication mechanism to used based on the challenge method of the Authentication Scheme you configure for the resource in Oracle Access Manager. For example consider the Authentication Scheme shown in Figure 7-3, which uses the BASIC challenge method.
The authentication mechanisms supported by the OAM Security Provider are BASIC, FORM or Client-Cert. The default is BASIC. The Authentication Schemes supported at Oracle Access Manager include BASIC, FORM and Client-Cert. The use of the SSL transport is optional for BASIC and FORM.
Integrating OAM Security Provider with Oracle Access Manager 10g
This section describes how to integrate the OAM Security Provider with Oracle Access Manager 10g.
Integrating OAM Security Provider with Oracle Access Manager 10g
This procedure explains how to integrate the OAM Security Provider with Oracle Access Manager 10g.
See the Oracle Access Manager Installation Guide for detailed instructions on Access Manager tasks.
The procedure was tested on Microsoft Windows and the file names are those of the Windows version.
-
Install and configure Oracle Access Manager.
To do this, install Oracle Identity Server, the Policy Manager, and the Oracle Access Server component. You need to obtain all of the required Oracle Access Manager components before you begin the installation procedures.
-
Log in to Administration Console.
After the successful installation, access the Administration Console from http://host:port/access/oblix and log in.
The administrative interface for managing core access server components, policy manager, and identity console is displayed.
-
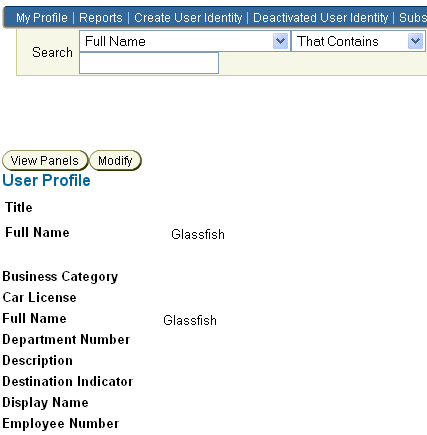
From the User Manager tab of the Identity System Console, create the users who will have access to the protected resource. For example, you might create the user Glassfish, as shown in Figure 7-4.
-
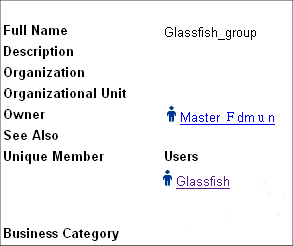
From the Group Manager tab of the Identity System Console, create the group to which you will grant access and add users to the group. For example, you might create the group Glassfish_group, and add the user Glassfish to this group, as shown in Figure 7-5.
-
Create Access Server configuration.
From the Access System Configuration tab of the Access System Console, create an Access Server Configuration.
Provide the required parameters including Name and Hostname, and enable it.
When you configure an Access Server, you specify the transport security mode to use between an Access Gate/WebGate and this Access Server, from the following choices:
-
Open mode means no encryption.
-
Simple mode means encryption through SSL and a public key certificate provided by Oracle.
-
Cert mode means encryption through SSL and a public key certificate provided by an external CA.
For example, a sample Access Server configuration, GlassfishAS, is shown in Figure 7-6.
Figure 7-6 Sample Access Server Configuration (Partial Screen)
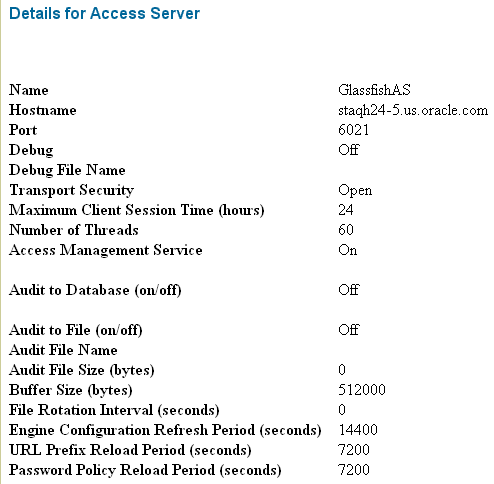
Description of "Figure 7-6 Sample Access Server Configuration (Partial Screen)"
-
-
Create Access Gate configuration.
From the Access System Configuration tab of the Access System Console, create an Access Gate configuration.
Provide the required parameters including Name, Hostname (name of the system that will host the AccessGate), and enable it. For example, a sample AccessGate configuration, GlassfishAG, is shown in Figure 7-7.
Figure 7-7 Sample AccessGate Configuration (Partial Screen)
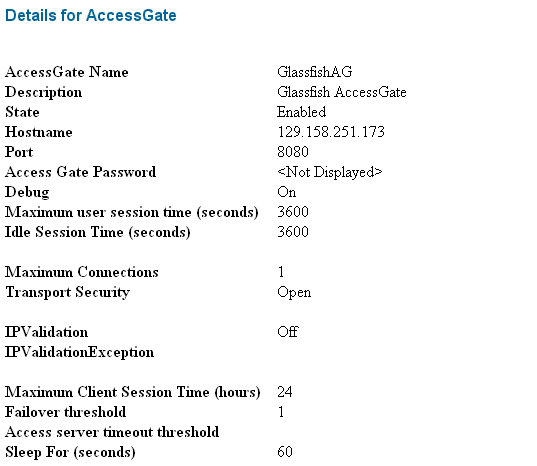
Description of "Figure 7-7 Sample AccessGate Configuration (Partial Screen)"
-
Associate Access Gate and Access Server.
From the Access System Configuration tab of the Access System Console, associate the Access Gate and the Access Server.
To do this, from the AccessGate configuration page, click List Access Servers and then add the Access Server you previously created.
Figure 7-8 Associating Access Server with Access Gate
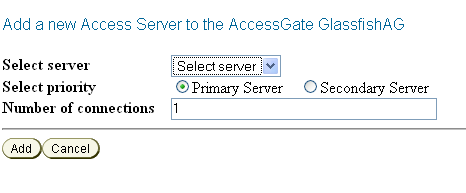
Description of "Figure 7-8 Associating Access Server with Access Gate"
-
Add Host Identifiers.
From the Access System Configuration tab of the Access System Console, add one or more host identifiers.
You use Host identifiers to simplify the identification of a Web server that hosts resources you want to protect with Access Manager.
For example, when you added the configuration for the AccessGate, assume that you used the hostname of the system hosting the AccessGate. You might want to add a host identifier for the IP address or the fully-qualified domain name of the system hosting the AccessGate.
Figure 7-9 Adding a Hostname Identifier for the AccessGate System
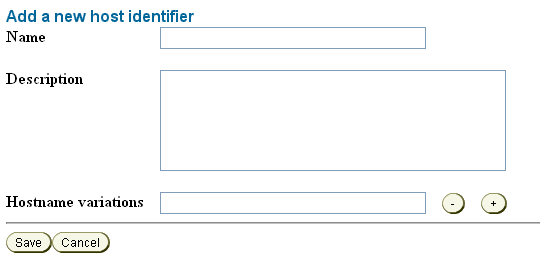
Description of "Figure 7-9 Adding a Hostname Identifier for the AccessGate System"
-
Create an Authentication Scheme.
From the Access System Configuration tab of the Access System Console, create an authentication scheme for each login mechanism.
Create an authentication scheme for each login mechanism (BASIC, Form, client cert) that you want to use to protect the resource, save it, and then add a credential mapping plug-in (from the Plugins tab) for the authentication scheme.
For BASIC authentication, the credential mapping plug-in maps the LDAP attributes of the user (shown in the figure as genuserid=%userid% and obCredentialPassword) with the challenge parameters (shown in the figure as realm:LDAP User Name/Password) of the authentication scheme, and they must match.
Figure 7-10 and Figure 7-11 show a sample BASIC over LDAP authentication scheme, and the respective plug-ins.
Figure 7-11 Plug-Ins for BASIC Authentication Scheme

Description of "Figure 7-11 Plug-Ins for BASIC Authentication Scheme"
For client cert authentication, a sample authentication scheme is shown in Figure 7-12.
In this mapping, the LDAP attribute employeetype is mapped to the certificate subject certSubject.CN.
Figure 7-12 Client Cert Authentication Scheme
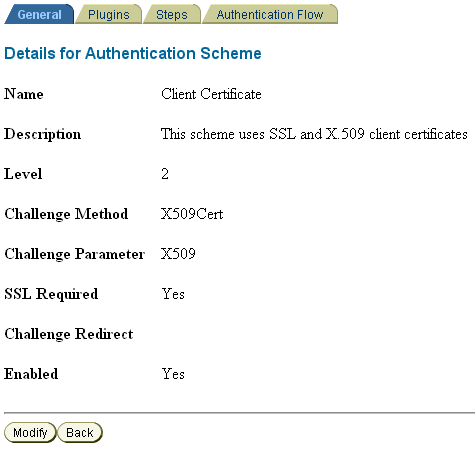
Description of "Figure 7-12 Client Cert Authentication Scheme"
For client cert authentication, the associated plug-in configuration is shown in Figure 7-13.
Figure 7-13 Plug-Ins for Client Cert Authentication Scheme

Description of "Figure 7-13 Plug-Ins for Client Cert Authentication Scheme"
-
Create a Policy Domain.
From the Policy Manager, create a policy domain.
The Policy Manager application allows you to create, remove and manage policies and resources and test policy enforcement.
Before a policy domain can control access to your resources, you must:
-
Add a resource to be protected.
From the Resources tab, click Add. Select the host identifier for the system that hosts the AccessGate and the resource to be protected.
The URL prefixes provide the pathway to your Web resources. A policy domain can contain one or more URL prefixes. The available URL prefixes depend on the resource type you selected. You can also specify a unique URL prefix in the associated text field; for example, glassfish-default.
If you want to use the Policy Manager authorization function to protect resources, you can configure the resources individually. If you want to use GlassFish Server for authorization, and use Oracle Access Manager only for authentication
-
Add an authentication rule.
From the Default Rules tab, select the Authentication Rule tab and add enter an authentication rule. Choose the authentication scheme you configured in Step 9. For example, Basic Over LDAP.
-
Create one or more authorization rules.
From the Authorization Rules tab, click Add and enter an authorization rule. Save the change. Then, from the Allow Access tab, add the user or group you created in Step 3 and Step 4.
-
Create an authorization expression.
From the Default Rules tab, select the Authorization Expression tab. Click Add to add an authorization expression.
-
Optionally, create one or more policies to fine-tune access control for the resource.
Provide a name, choose the operations for the policy, and choose the configured resource (Host Identifier and URL Prefix).
-
-
Download and unzip the Oracle Access Server SDK.
You can download the SDK from Oracle Identity Management 10g (10.1.4.x) Downloads.
Select Oracle Access Manager Core Components (10.1.4.3.0) (Disk1).
The Access Server SDK allows Java, C++, and C applications to use the services of the Oracle Access Manager , including user authentication and authorization of user requests to access resources protected by Oracle Access Manager.
The following components are installed from the zip file:
-
oamcfgtool_10_1_4_3_0.zip
-
Oracle_Access_Manager10_1_4_3_0_Win32-dotnet20_AccessServerSDK.exe
-
Oracle_Access_Manager10_1_4_3_0_Win32_AccessServerSDK.exe
-
Oracle_Access_Manager10_1_4_3_0_Win32_Access_Server.exe
-
Oracle_Access_Manager10_1_4_3_0_Win32_Identity_Server.exe
-
Oracle_Access_Manager10_1_4_3_0_Win32_OHS11g_Policy_Manager.exe
-
Oracle_Access_Manager10_1_4_3_0_Win32_OHS11g_WebPass.exe
-
Oracle_Access_Manager10_1_4_3_0_Win32_Snmp_Agent.exe
-
-
Run the installation wizard.
Run Oracle_Access_Manager10_1_4_3_0_Win32_AccessServerSDK.exe on the system from which you intend to run the GlassFish Server hosted application and follow the installation wizard.
Note:
Depending on the platform, additional steps may be required to configure the AccessServerSDK, such as setting LD_LIBRARY_PATH and so forth. Please consult the
ASDK_README.htmfile under installdirectory\AccessServerSDK for more details. -
Configure the AccessServer SDK.
Configure the AccessServer SDK to facilitate the handshake between the AccessGate you created and Oracle Access Manager.
To do this, run the utility configureAccessGate.exe, located in installdirectory\AccessServerSDK\oblix\tools\configureAccessGate, where installdirectory is the root folder for your Access Manager SDK installation.
configureAccessGate -i <AccessServerSDK-install-dir>
-t AccessGate -w GlassfishAG -m open -h access-server-host-name -p 6021 -a GlassfishAS

Please enter the Password for this AccessGate :

Preparing to connect to Access Server.  Please wait.

AccessGate installed Successfully.
The command line parameters shown are as follows:
Parameter Description -i
Installation directory for AccessServerSDK.
-t
AccessGate keyword. Enter as shown.
-w
AccessGate name you specified when you created the AccessGate entry in Oracle Access Manager.
-m
Oracle Access Manager intercomponent mode. This is the security mode you specified between the WebGate/Access client and the Access Server. The valid values are open, simple, or cert.
Open mode means no encryption. Simple mode means encryption through SSL and a public key certificate provided by Oracle. Cert mode means encryption through SSL and a public key certificate provided by an external CA.
-h
Fully-qualified name of the host on which you installed the Access Server.
-p
Port on which the Access Server is running.
-a
The Access Server name you created in Oracle Access Manager.
You may also need to enter an Access Server password (-r AccessServerpassphrase) and an AccessGate password (-P AccessGatePwd) if you created them in Oracle Access Manager.
-
Add JVM Options.
In the GlassFish Server JVM options, add the following entry:
<jvm-options>-DOBACCESS_INSTALL_DIR=<AccessServerSDK-install-dir></jvm-options>
You can use the
create-jvm-optionscommand to do this. Consider the following example:asadmin --port 4848 --host localhost create-jvm-options -DOBACCESS_INSTALL_DIR=D\:\\\\"program files"\\NetPoint\\AccessServerSDK
-
Copy jobaccess.jar.
Copy jobacces.jar from from installdirectory\AccessServerSDK\oblix\lib into <Glassfish>\lib.
-
Verify the location of the OAM Security Provider.
Ensure that the OAM Security Provider, oam-integration.jar, is in <Glassfish>\lib.
-
Configure the OAM Security Provider.
-
Define your SAM as a message-security-provider.
You can use either the Administration Console or the
create-message-security-providercommand to do this. Consider the following example:<message-security-config auth-layer="HttpServlet"> <provider-config provider-type="server" provider-id="mysam" class-name="com.sun.glassfish.oamsam.OAMAuthenticatorSAM"> <property name="oam.resource.hostid.variation" value="your-system.com" /> <!--property name="form.login.page" value="" /--> </provider-config> </message-security-config>
-
Bind the OAM Security Provider.
Bind the OAM Security Provider for use with your application. You do this by defining the httpservlet-security-provider attribute in the
glassfish-web.xmlfile corresponding to your application.Set the value of the attribute to the name you assigned to the OAM Security Provider in Step a. For example, MySAM.
The group name you specify must match the group name you specified in Oracle Access Manager.
<?xml version="1.0" encoding="UTF-8"?>
<!DOCTYPE sun-web-app PUBLIC "-//Sun Microsystems, Inc.//DTD Application
Server 9.0
Servlet 2.5//EN" "http://www.sun.com/software/appserver/dtds/
sun-web-app_2_5-0.dtd">
<sun-web-app error-url="" httpservlet-security-provider="MySAM">
<context-root>/BasicAuthen</context-root>
<security-role-mapping>
<role-name>glassfish</role-name>
<group-name>Glassfish_group</group-name>
<group-name>cn=Glassfish_group,ou=groups,ou=myrealm,dc=oam_domain</group-name>
</security-role-mapping>
<class-loader delegate="true"/>
<jsp-config>
<property name="keepgenerated" value="true">
<description>Keep a copy of the generated servlet class' java code.</description>
</property>
</jsp-config>
</sun-web-app>
-
-
Deploy the application.
Deploy the application you want to protect in GlassFish Server.
-
Add SDK_install_dir\oblix\lib to the Path.
-
Configure LDAPRealm.
Configure the LDAPRealm in GlassFish Server to point to Oracle Access Manager backend, as described in Obtaining Oracle Access Manager Group Information. For example, you can use the Administration Console or the
create-auth-realmcommand to add the following entry:<auth-realm classname="com.sun.enterprise.security.auth.realm.ldap.LDAPRealm" name="ldaprealm"> <property name="jaas-context" value="ldapRealm" /> <property name="base-dn" value="o=company,c=us" /> <property name="directory" value="ldap://140.87.134.98:1389" /> <property name="search-bind-dn" value="cn=Directory Manager" /> <property name="search-bind-password" value="welcome1" /> </auth-realm> -
Make the LDAPRealm the default realm in GlassFish Server.
<security-service default-realm="ldaprealm">
-
Restart GlassFish Server.
Restart GlassFish Server and access the protected resource from a browser, such as http://hostname.domainname:8080/BasicAuthen/SecureServlet.
Integrating OAM Security Provider with Oracle Access Manager 11g
This section describes how to integrate the OAM Security Provider with Oracle Access Manager 11g.
Integrating OAM Security Provider with Oracle Access Manager 11g
This procedure explains how to integrate the OAM Security Provider with Oracle Access Manager 11g.
See the Oracle Fusion Middleware Administrator's Guide for Oracle Access Manager with Oracle Security Token Service for detailed instructions on Access Manager tasks.
The procedure was tested on Microsoft Windows and the file names are those of the Windows version.
This procedure focuses on LDAP authentication. See Addtional Considerations for Certificate Authentication for information on X509 authentication.
-
Install and configure Oracle Identity and Access Management 11g.
-
Create OAM Server instance.
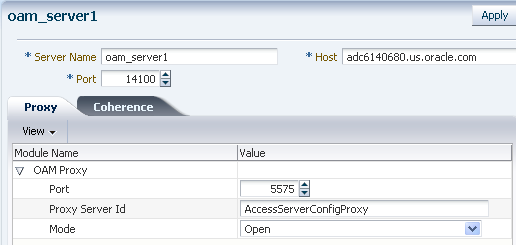
If you have not already done so, create an OAM Server instance.
Under System Configuration, from the left navigation pane select Server Instances and then click the Create command button in the tool bar. The Create: OAM Server page appears.
When you create an OAM Server instance, you specify the transport security mode to use between an OAM Agent and this OAM Server instance, from the following choices. See "Securing Communication Between OAM 11g Servers and WebGates" in the Access Manager online help for a description of these modes and how to use them.
-
Open
-
Simple
-
Cert
For example, consider the OAM Server instance shown in Figure 7-25.
-
-
Create a 10g Webgate.
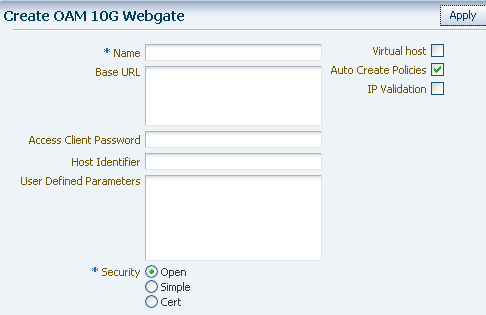
Under System Configuration, from the left navigation pane select SSO Agents and then OAM Agents. Click Create 10g Webgate. The Create OAM 10g Webgate screen appears.
The security mode you choose must match that of the OAM Server instance.
The Create OAM 10g Webgate screen is shown in Figure 7-15.
-
Create one or more Host Identifiers.
You use Host identifiers to simplify the identification of a Web server that hosts resources you want to protect with Access Manager.
From the Policy Configuration tab, expand the Shared Components node, and then select Host Identifiers. Click the Create command button in the tool bar.
Figure 7-16 shows an example host identifier GlassfishTestClient to be used for systems that require BASIC and FORM authentication.
Figure 7-16 GlassfishTestClient Host Identifier
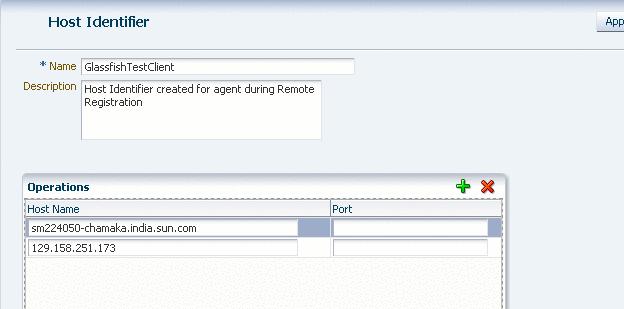
Description of "Figure 7-16 GlassfishTestClient Host Identifier"
-
Create a User Identity Store
From the System Configuration tab, select Data Sources. Expand Data Sources and click User Identity Stores. Click the Create command button in the tool bar.
The User Identity Store specifies the LDAP provider it is associated with, as shown in Figure 7-17. This LDAP provider can be the Oracle WebLogic embedded LDAP provider, or another supported provider from the drop-down menu that you have previously configured.
Figure 7-17 LDAP Provider of Identity Store
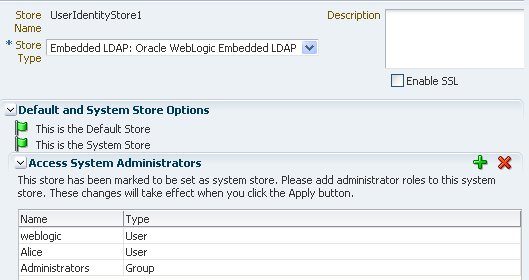
Description of "Figure 7-17 LDAP Provider of Identity Store"
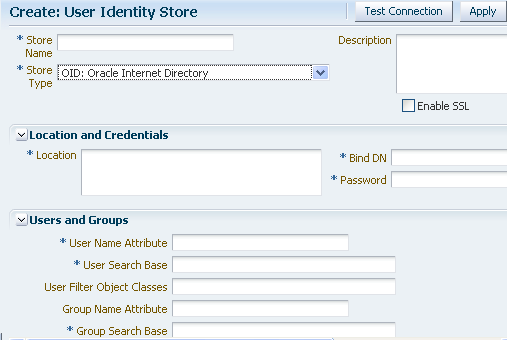
For LDAP providers other than the embedded LDAP provider, when you create a User Identify Store based on one of these LDAP providers, you specify identifying properties, such as the User Search Base and the User Name Attribute that you will need later in this procedure to configure the GlassFish Server LDAPRealm. For example, Figure 7-18 shows the User Identity Store screen for the Oracle Internet Directory LDAP Provider.
For the embedded LDAP provider, the identifying properties are not available from the Access Manager user interface. You therefore need to use some other LDAP tool to configure these properties when you create a user in the next step.
-
Create a group and user in the LDAP provider.
Create a group and user in the LDAP provider who will have access to the protected resource.
Later in this procedure you need to configure the GlassFish Server LDAPRealm, and to do this you will need identifying LDAP properties that are not available for the embedded LDAP provider from the Access Manager user interface.
If you want to use the embedded LDAP provider, you will therefore need to use some other LDAP tool to configure these properties. For example, you might use LDAP commands to add the user and group, and to search the LDAP database for them:
ldapadd -x -h cieqalnx01.us.oracle.com -p 7001 -D"cn=Admin"
-w welcome1 -f gadd.ldif
ldapadd -x -h cieqalnx01.us.oracle.com -p 7001 -D"cn=Admin" -w welcome1 -f uadd.ldif
ldapsearch -x -h   cieqalnx01.us.oracle.com -p 7001 -D"cn=Admin" -w welcome1 -s sub
-b "ou=people,ou=myrealm,dc=oam_domain"
ldapsearch -x -h   cieqalnx01.us.oracle.com -p 7001 -D"cn=Admin" -w welcome1 -s sub
-b "ou=groups,ou=myrealm,dc=oam_domain"
In this example, the contents of the "user add" file
uadd.ldifthat adds the user Glassfish might be as follows:# GlassFish, people, myrealm, oam_domain dn: uid=GlassFish,ou=people,ou=myrealm,dc=oam_domain objectclass: top objectclass: person objectclass: organizationalPerson objectclass: inetOrgPerson objectclass: wlsUser cn: GlassFish sn: GlassFish uid: GlassFish description: GlassFish User wlsMemberOf: cn=GlassFish_Group,ou=groups,ou=myrealm,dc=oam_domain userpassword: GlassFishThe contents of the "group add" file
gadd.ldifthat adds a GlassFish_Group might be as follows:dn: cn=GlassFish_Group,ou=groups,ou=myrealm,dc=oam_domain objectclass: top objectclass: groupOfURLs objectclass: groupOfUniqueNames cn: GlassFish_Group description: OAM GlassFish Group memberURL: ldap:///ou=people,ou=myrealm,dc=oam_domain?? sub?(&(objectclass=person)(wlsMemberOf=cn=GlassFish_Group,ou=groups,ou=myrealm, dc=oam_domain))
Make a note of sufficient properties to uniquely identity the user, such as wlsMemberOf, as you will need them later in this procedure when you configure the LDAPRealm.
-
Create an Authentication Module.
From the System Configuration tab, select Authentication Modules. Expand Authentication Modules and select LDAP Authentication Modules. Click the Create command button in the tool bar.
Specify a name for this Authentication Module, and select the User Identity Store you previously created, as shown in Figure 7-19
-
Create an Authentication Scheme.
Create an authentication scheme for each challenge method (BASIC, Form, and X.509) that you want to use to protect the resource.
From the Policy Configuration tab, expand the Shared Components node, and then select Authentication Schemes. Click the Create command button in the tool bar.
The Authentication Module must already exist.
Figure 7-20 shows an example BASIC over LDAP authentication scheme.
Figure 7-20 BASIC Over LDAP Authentication Scheme
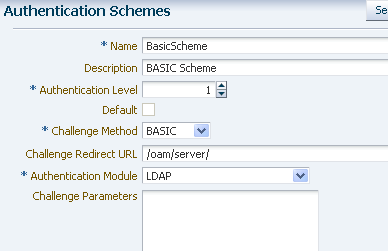
Description of "Figure 7-20 BASIC Over LDAP Authentication Scheme"
-
Create one or more Application Domains.
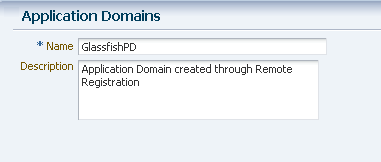
From the Policy Configuration tab, select Application Domains. Click the Create command button in the tool bar to create an Application Domain. An example Application Domain is shown in Figure 7-21.
Before an application domain can control access to your resources, you must now identify those resources and specify how you want to protect them:
-
Add a resource to be protected.
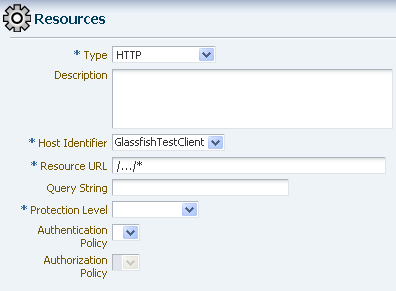
From the Policy Configuration tab, expand Application Domains and select the domain you just created. Select Resources, and click the Create command button in the tool bar. On the Create resource page:
Select HTTP as the resource type.
Select the host identifier (described in Step 4) for the system that hosts the resource to be protected.
Specify the resource URL for the Web resource. The URL value of a resource must begin with a forward slash (/), for example /BasicAuthen/SecureServlet, and must match a resource value for the chosen host identifier. To protect all of the resource URLs, append "/.../*". For example, /BasicAuthen/SecureServlet/.../*.
Figure 7-22 shows an example of creating a resource that uses a host identifier named GlassfishTestClient.
-
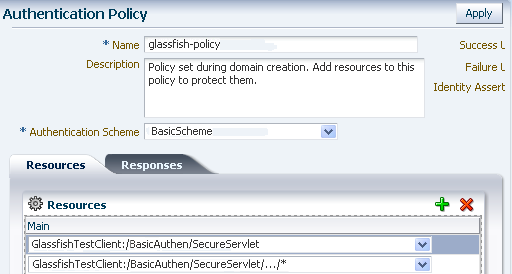
Add an Authentication Policy.
From the Policy Configuration tab, expand Application Domains and select the domain you just created. Select Authentication Policies, and click the Create command button in the tool bar. On the Create Authentication Policies page:
Name this Authentication Policy.
Select a named authentication scheme you previously configured.
Select the resources you want to protect with this Authentication Policy.
Figure 7-23 shows an example of creating an Authentication Policy that uses the BasicScheme authentication scheme.
-
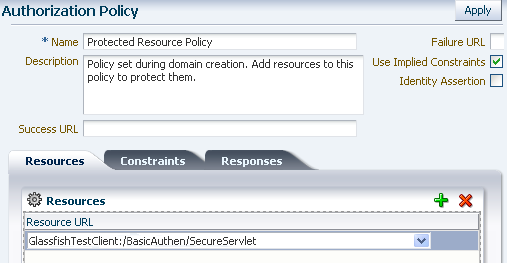
Optionally, create one or more Authorization Policies.
Note:
The OAM 11g default behavior is to deny access when a resource is not protected by a policy that explicitly allows access. In contrast, the OAM 10g default behavior allowed access when a resource was not protected by a rule or policy that explicitly denied access to limit the number of WebGate queries to the Access Server.
From the Policy Configuration tab, expand Application Domains and select the domain you just created. Select Authorization Policies, and click the Create command button in the tool bar. On the Create Authorization Policies page:
Name this Authorization Policy.
Select the resource to be protected by this Authorization Policy.
Set the Use Implied Restraints control, or explicitly set constraints on the Constraints tab.
Figure 7-24 shows an example Authorization Policy with two protected resources.
-
-
Download and unzip the Oracle Access Server SDK.
You can download the SDK from Oracle Identity Management 10g (10.1.4.x) Downloads.
Select Oracle Access Manager Core Components (10.1.4.3.0) (Disk1).
The Access Server SDK allows Java, C++, and C applications to use the services of the Oracle Access Manager , including user authentication and authorization of user requests to access resources protected by Oracle Access Manager.
The following components are available from the zip file:
-
oamcfgtool_10_1_4_3_0.zip
-
Oracle_Access_Manager10_1_4_3_0_Win32-dotnet20_AccessServerSDK.exe
-
Oracle_Access_Manager10_1_4_3_0_Win32_AccessServerSDK.exe
-
Oracle_Access_Manager10_1_4_3_0_Win32_Access_Server.exe
-
Oracle_Access_Manager10_1_4_3_0_Win32_Identity_Server.exe
-
Oracle_Access_Manager10_1_4_3_0_Win32_OHS11g_Policy_Manager.exe
-
Oracle_Access_Manager10_1_4_3_0_Win32_OHS11g_WebPass.exe
-
Oracle_Access_Manager10_1_4_3_0_Win32_Snmp_Agent.exe
-
-
Run the installation wizard.
Oracle_Access_Manager10_1_4_3_0_Win32_AccessServerSDK.exe on the system from which you intend to run the GlassFish Server hosted application and follow the installation wizard.
Note:
Depending on the platform, additional steps may be required to configure the AccessServerSDK, such as setting LD_LIBRARY_PATH and so forth. Please consult the
ASDK_README.htmfile under installdirectory\AccessServerSDK for more details. -
Configure the AccessServer SDK.
Configure the AccessServer SDK to facilitate the handshake between the WebGate you created and Oracle Access Manager.
To do this, run the utility configureAccessGate.exe, located in installdirectory\AccessServerSDK\oblix\tools\configureAccessGate, where installdirectory is the root folder for your Access Manager SDK installation.
configureAccessGate -i <AccessServerSDK-install-dir>
-t AccessGate -w GlassfishAG -m open -h access-server-host-name -p 5575 -a oam_server1

Please enter the Password for this AccessGate :

Preparing to connect to Access Server.  Please wait.

AccessGate installed Successfully.
The command line parameters shown are as follows:
Parameter Description -i
Installation directory for AccessServerSDK.
-t
AccessGate keyword. Enter as shown.
-w
Name you specified when you created the WebGate entry in Oracle Access Manager.
-m
Oracle Access Manager intercomponent mode. This is the security mode you specified between the WebGate/Access client and the OAM Server instance. The valid values are open, simple, or cert.
Open mode means no encryption. Simple mode means encryption through SSL and a public key certificate provided by Oracle. Cert mode means encryption through SSL and a public key certificate provided by an external CA.
-h
Fully-qualified name of the host on which you installed the OAM Server instance.
-p
Port on which the OAM Server instance is running.
-a
The OAM Server instance name you created in Oracle Access Manager.
You may also need to enter an OAM Server password (-r AccessServerpassphrase) and an AccessGate password (-P AccessGatePwd) if you created them in Oracle Access Manager.
-
Update JVM options
In the GlassFish Server JVM options, add the following entry:
<jvm-options>-DOBACCESS_INSTALL_DIR=<AccessServerSDK-install-dir></jvm-options>
You can use the
create-jvm-optionscommand to do this. Consider the following example:asadmin --port 4848 --host localhost create-jvm-options -DOBACCESS_INSTALL_DIR=D\:\\\\"program files"\\NetPoint\\AccessServerSDK
-
Copy jobacces.jar.
Copy
jobaccess.jarfrom from installdirectory\AccessServerSDK\oblix\lib into <Glassfish>\lib. -
Verify the location of the OAM Security Provider.
Ensure that
oam-integration.jaris in <Glassfish>\lib. -
Configure the OAM Security Provider.
-
Define your SAM as a message-security-provider.
You can use either the Administration Console or the
create-message-security-providercommand to do this. Consider the following examples:For BASIC authentication
<message-security-config auth-layer="HttpServlet">
          <provider-config provider-type="server" provider-id="mysam"
class-name="com.sun.glassfish.oamsam.OAMAuthenticatorSAM">
            <property name="oam.resource.hostid.variation"
value="your-host-name" />
          </provider-config>
        </message-security-config>
For Form authentication, you might want to set the
form.login.property.message-security-config auth-layer="HttpServlet"> <provider-config provider-type="server" provider-id="mysam" class-name="com.sun.glassfish.oamsam.OAMAuthenticatorSAM"> <property name="oam.resource.hostid.variation" value="your-host-name" /> <property name="form.login.page" value="" /> </provider-config> </message-security-config> -
Bind the OAM Security Provider for use with your application.
You do this by defining the httpservlet-security-provider attribute in the
glassfish-web.xmlfile corresponding to your application.Set the value of the attribute to the name you assigned to the OAM Security Provider in Step a. For example, MySAM.
The group name you specify must match the group name you specified in the LDAP provider. For example, GlassFish_Group.
<?xml version="1.0" encoding="UTF-8"?>
<!DOCTYPE sun-web-app PUBLIC "-//Sun Microsystems, Inc.//DTD Application
Server 9.0
Servlet 2.5//EN" "http://www.sun.com/software/appserver/dtds/
sun-web-app_2_5-0.dtd">
<sun-web-app error-url="" httpservlet-security-provider="MySAM">
<context-root>/BasicAuthen</context-root>
<security-role-mapping>
<role-name>glassfish</role-name>
<group-name>GlassFish_Group</group-name>
<group-name>cn=GlassFish_Group,ou=groups,ou=myrealm,dc=oam_domain</group-name>
</security-role-mapping>
<class-loader delegate="true"/>
<jsp-config>
<property name="keepgenerated" value="true">
<description>Keep a copy of the generated servlet class' java code.</description>
</property>
</jsp-config>
</sun-web-app>
-
-
Deploy the application you want to protect in GlassFish Server.
-
Add SDK_install_dir\oblix\lib to the Path.
-
Configure the LDAPRealm.
Configure the LDAPRealm in GlassFish Server to point to the Access Manager LDAP provider and group you specified to authenticate the user.
The properties you enter here must match that of the LDAP provider.
For example, you can use the Administration Console or the
create-auth-realmcommand to add the following entry:<auth-realm classname="com.sun.enterprise.security.auth.realm.ldap.LDAPRealm" name="ldaprealm"> <property name="jaas-context" value="ldapRealm"></property> <property name="base-dn" value="ou=people,ou=myrealm,dc=oam_domain"></property> <property name="directory" value="ldap://cieqalnx01.us.oracle.com:7001"></property> <property name="group-search-filter" value="cn=%s"></property> <property name="group-target" value="wlsMemberOf"></property> <property name="search-bind-dn" value="cn=Admin"></property> <property name="search-bind-password" value="welcome1"></property> </auth-realm> -
Make the LDAPRealm the default realm in GlassFish Server.
<security-service default-realm="ldaprealm">
-
Restart GlassFish Server.
Restart GlassFish Server and access the protected resource, such as http://hostname.domainname:8080/BasicAuthen/SecureServlet.
Addtional Considerations for Certificate Authentication
In addition to the procedure described in Integrating OAM Security Provider with Oracle Access Manager 11g, there are additional steps required if you want to use certificate authentication to protect your resource.
-
The X.509 root certificate and the CA certificate you plan to use for Authentication to the OAM Server must be in the GlassFish Server trust store for the domain.
-
The X.509 root certificate and the CA certificate you plan to use for Authentication to the OAM Server must also be in the OAM Server keystore. See Importing CA-Signed Certificates Into the Keystore for instructions on how to do this.
-
The X.509 certificate you use for authentication must map to a valid user. To do this, create a user in the Access Manager LDAP provider whose CN attribute matches that of the subject.CN from the certificate.
Consider the following example, which adds the user Alice. The subject.CN from the certificate must therefore be Alice.
#ldapadd -x -h cieqalnx01.us.oracle.com -p 7001
-D"cn=Admin" -w welcome1 -f uadd.ldif
In this example, the contents of uadd.ldif are as follows:
#contents of uaddalice.ldif
# GlassFish, people, myrealm, oam_domain
dn: uid=Alice,ou=people,ou=myrealm,dc=oam_domain
objectclass: top
objectclass: person
objectclass: organizationalPerson
objectclass: inetOrgPerson
objectclass: wlsUser
cn: Alice
sn: Alice
uid: Alice
description: GlassFish End User
wlsMemberOf: cn=GlassFish_Group,ou=groups,ou=myrealm,dc=oam_domain
userpassword: Alice
-
Create an X509 Authentication Module. Make sure that the Match LDAP Attribute is set to cn, and that the X509 Cert Attribute is Subject.CN. Set CertValidationEnabled to true. Consider the following example.
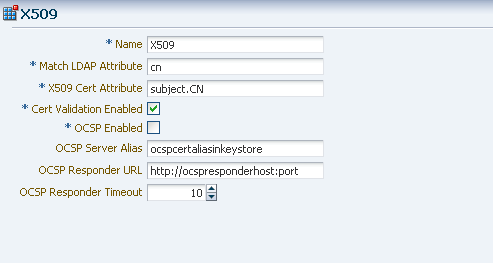
Description of the illustration x509-auth-module.png
-
Create an Authentication Scheme that uses the X509 Challenge Method, and the X509 Authentication Module you just created.
Remember that the WebGate challenges the user for credentials based on the type of OAM Server authentication scheme configured for the resource, which is X509 in this case.
Set the Challenge URL to the SSL port of OAM server. For example, https://<oam_server>:<ssl_port>/oam/CredCollectServlet/X509.
Note:
To work around a known problem, the name of the Authentication Scheme must contain either or both of the (case sensitive) words "X509" and "Certificate".
Consider the following example.
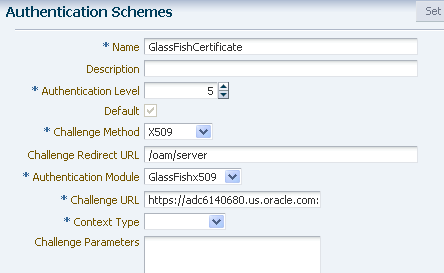
Description of the illustration authentication-scheme-certif.png
-
Configure the OAM Security Provider. To do this, define your SAM as a message-security-provider. You can use either the Administration Console or the
create-message-security-providercommand to do this. Consider the following example:For Ceritificate Auth : <message-security-config auth-layer="HttpServlet"> <provider-config provider-type="server" provider-id="mysam" class-name="com.sun.glassfish.oamsam.OAMAuthenticatorSAM"> <property description="" name="oam.resource.hostid.variation" value="129.158.239.142"></property> </provider-config> </message-security-config> -
Modify the http-listener-2 configuration in domain.xml as follows:
<ssl classname="com.sun.enterprise.security.ssl.GlassfishSSLImpl"
ssl3-enabled="false" cert-nickname="s1as" client-auth-enabled="true"></ssl>
Integrating OAM Security Provider with Oracle Access Manager 11g and WebGate
This section describes how to integrate the OAM Security Provider with Oracle Access Manager 11g and a WebGate.
For your convenience, this self-contained section includes the steps required to configure Oracle Access Manager for use with the OAM Security Provider and a WebGate. If you have already followed the steps described in Integrating OAM Security Provider with Oracle Access Manager 11g to configure Oracle Access Manager, you need only tailor your configuration as described in this section.
In addition to having to configure the Oracle HTTP Server and the Oracle HTTP Server WebGate, the most significant differences in the procedure are the changes to the OAM Security Provider properties.
Note:
You are not required to install the Oracle Access Server SDK or configure the Access Gate (on the system hosting GlassFish Server) in this use.
Integrating OAM Security Provider with Oracle Access Manager 11g and WebGate
This procedure explains how to integrate the OAM Security Provider with Oracle Access Manager 11g and a WebGate.
See the Oracle Fusion Middleware Administrator's Guide for Oracle Access Manager with Oracle Security Token Service for detailed instructions on Access Manager tasks.
The procedure was tested on Microsoft Windows and the file names are those of the Windows version.
-
Install and configure Oracle Identity and Access Management 11g.
-
Install Oracle HTTP Server.
If you have not already done so, install a version of Oracle HTTP Server (OHS) that is compatible with your Oracle Identity and Access Management installation.
OHS is available from the Oracle Middleware Downloads page. Look for "Web Tier Utilities" under "Required Additional Software." Note that you need to install the complete Web Tier Utilities bundle because OHS is not available separately.
-
Create an OAM Server instance.
If you have not already done so, create an OAM Server instance.
Under System Configuration, from the left navigation pane select Server Instances and then click the Create command button in the tool bar. The Create: OAM Server page appears.
When you create an OAM Server instance, you specify the transport security mode to use between an OAM Agent and this OAM Server instance, from the following choices. See "Securing Communication Between OAM 11g Servers and WebGates" in the Access Manager online help for a description of these modes and how to use them.
-
Open
-
Simple
-
Cert
For example, consider the OAM Server instance shown in Figure 7-25.
-
-
Create a User Identity Store
From the System Configuration tab, select Data Sources. Expand Data Sources and click User Identity Stores. Click the Create command button in the tool bar.
The User Identity Store specifies the LDAP provider it is associated with, as shown in Figure 7-26. This LDAP provider can be the Oracle WebLogic embedded LDAP provider, or another supported provider from the drop-down menu that you have previously configured.
Figure 7-26 LDAP Provider of Identity Store

Description of "Figure 7-26 LDAP Provider of Identity Store"
For LDAP providers other than the embedded LDAP provider, when you create a User Identify Store based on one of these LDAP providers, you specify identifying properties, such as the User Search Base and the User Name Attribute that you will need later in this procedure to configure the GlassFish Server LDAPRealm. For example, Figure 7-27 shows the User Identity Store screen for the Oracle Internet Directory LDAP Provider.
For the embedded LDAP provider, the identifying properties are not available from the Access Manager user interface. You therefore need to use some other LDAP tool to configure these properties when you create a user in the next step.
-
Create groups and users in the LDAP provider.
Create a group and user in the LDAP provider who will have access to the protected resource.
Later in this procedure you need to configure the GlassFish Server LDAPRealm, and to do this you will need identifying LDAP properties that are not available for the embedded LDAP provider from the Access Manager user interface.
If you want to use the embedded LDAP provider, you will therefore need to use some other LDAP tool to configure these properties. For example, you might use LDAP commands to add the user and group, and to search the LDAP database for them:
ldapadd -x -h cieqalnx01.us.oracle.com -p 7001 -D"cn=Admin"
-w welcome1 -f gadd.ldif
ldapadd -x -h cieqalnx01.us.oracle.com -p 7001 -D"cn=Admin" -w welcome1 -f uadd.ldif
ldapsearch -x -h   cieqalnx01.us.oracle.com -p 7001 -D"cn=Admin" -w welcome1 -s sub
-b "ou=people,ou=myrealm,dc=oam_domain"
ldapsearch -x -h   cieqalnx01.us.oracle.com -p 7001 -D"cn=Admin" -w welcome1 -s sub
-b "ou=groups,ou=myrealm,dc=oam_domain"
In this example, the contents of the "user add" file
uadd.ldifthat adds the user Glassfish might be as follows:# GlassFish, people, myrealm, oam_domain dn: uid=GlassFish,ou=people,ou=myrealm,dc=oam_domain objectclass: top objectclass: person objectclass: organizationalPerson objectclass: inetOrgPerson objectclass: wlsUser cn: GlassFish sn: GlassFish uid: GlassFish description: GlassFish User wlsMemberOf: cn=GlassFish_Group,ou=groups,ou=myrealm,dc=oam_domain userpassword: GlassFishThe contents of the "group add" file
gadd.ldifthat adds a GlassFish_Group might be as follows:dn: cn=GlassFish_Group,ou=groups,ou=myrealm,dc=oam_domain objectclass: top objectclass: groupOfURLs objectclass: groupOfUniqueNames cn: GlassFish_Group description: OAM GlassFish Group memberURL: ldap:///ou=people,ou=myrealm,dc=oam_domain?? sub?(&(objectclass=person)(wlsMemberOf=cn=GlassFish_Group,ou=groups,ou=myrealm, dc=oam_domain))
Make a note of sufficient properties to uniquely identity the user, such as wlsMemberOf, as you will need them later in this procedure when you configure the LDAPRealm.
-
Create an Authentication Module.
From the System Configuration tab, select Authentication Modules. Expand Authentication Modules and select LDAP Authentication Modules. Click the Create command button in the tool bar.
Specify a name for this Authentication Module, and select the User Identity Store you previously created, as shown in Figure 7-28
-
Create an Authentication Scheme.
Create an authentication scheme for each challenge method (BASIC, Form, and X.509) that you want to use to protect the resource.
From the Policy Configuration tab, expand the Shared Components node, and then select Authentication Schemes. Click the Create command button in the tool bar.
The Authentication Module must already exist.
Figure 7-29 shows an example BASIC over LDAP authentication scheme.
Figure 7-29 BASIC Over LDAP Authentication Scheme

Description of "Figure 7-29 BASIC Over LDAP Authentication Scheme"
-
Create one or more Application Domains.
From the Policy Configuration tab, select Application Domains. Click the Create command button in the tool bar to create an Application Domain. An example Application Domain is shown in Figure 7-30.
Before an application domain can control access to your resources, you must now identify those resources and specify how you want to protect them:
-
Add a resource to be protected.
From the Policy Configuration tab, expand Application Domains and select the domain you just created. Select Resources, and click the Create command button in the tool bar. On the Create resource page:
Select HTTP as the resource type.
Select the host identifier (described in Step 5) for the system that hosts the resource to be protected.
Specify the resource URL for the Web resource. The URL value of a resource must begin with a forward slash (/), for example /BasicAuthen/SecureServlet, and must match a resource value for the chosen host identifier. To protect all of the resource URLs, append "/.../*". For example, /BasicAuthen/SecureServlet/.../*.
Figure 7-31 shows an example of creating a resource that uses a host identifier named GlassfishTestClient.
-
Add an Authentication Policy.
From the Policy Configuration tab, expand Application Domains and select the domain you just created. Select Authentication Policies, and click the Create command button in the tool bar. On the Create Authentication Policies page:
Name this Authentication Policy.
Select a named authentication scheme you previously configured.
Select the resources you want to protect with this Authentication Policy.
Figure 7-32 shows an example of creating an Authentication Policy that uses the BasicScheme authentication scheme.
-
Optionally, create one or more Authorization Policies.
-
-
Configure the Oracle HTTP Server WebGate and Register the WebGate Agent.
You configure the Oracle HTTP Server WebGate on the system where the Oracle HTTP Server is installed.
Oracle HTTP Server WebGate is a Web server plug-in that is shipped out-of-the-box with Oracle Access Manager. The Oracle HTTP Server WebGate intercepts HTTP requests from users for Web resources and forwards them to the Access Server for authentication and authorization. Oracle HTTP Server WebGate installation packages are found on media and virtual media that are separate from the core components.
For complete instructions, see Installing and Configuring Oracle HTTP Server 11g Webgate for OAM.
-
Configure Oracle HTTP Server and Restart
Edit
mod_wl_ohs.confto configure the redirect host and port (WebLogicHostandWebLogicPort, respectively) to point to the GlassFish Server instance in which the secured application will run. Consider the following example:<Location /BasicAuthen/SecureServlet> SetHandler weblogic-handler WebLogicHost host-name-where-GlassFish-running WebLogicPort 8080 DebugConfigInfo on </Location>After you have edited the file, restart Oracle HTTP server.
-
Verify the location of the OAM Security Provider.
Ensure that
oam-integration.jaris in <Glassfish>\lib. -
Configure the OAM Security Provider.
-
Define your SAM as a message-security-provider.
You can use either the Administration Console or the
create-message-security-providersubcommand to do this. Consider the following example:<message-security-config auth-layer="HttpServlet"> <provider-config provider-type="server" provider-id="mysam" class-name="com.sun.glassfish.oamsam.OAMAuthenticatorSAM"> <property name="oam.base.dn" value="ou=people,ou=myrealm,dc=oam_domain"></property> <property name="oam.ext.header" value="OAM_REMOTE_USER"></property> <property name="IdentityAsserterMode" value="true"></property> </provider-config> </message-security-config>The OAM Security Provider acts as an Identity Asserter only when
IdentityAsserterModeis set to true. This example also shows the (OAM_REMOTE_USER) header. The value of the base-dn must point to the user's base-dn you configured in Step 5. -
Bind the OAM Security Provider for use with your application.
You do this by defining the httpservlet-security-provider attribute in the
glassfish-web.xmlfile corresponding to your application.Set the value of the attribute to the name you assigned to the OAM Security Provider in Step a. For example, MySAM.
The group name you specify must match the group name you specified in the LDAP provider. For example, GlassfFish_Group.
<?xml version="1.0" encoding="UTF-8"?>
<!DOCTYPE sun-web-app PUBLIC "-//Sun Microsystems, Inc.//DTD Application
Server 9.0
Servlet 2.5//EN" "http://www.sun.com/software/appserver/dtds/
sun-web-app_2_5-0.dtd">
<sun-web-app error-url="" httpservlet-security-provider="MySAM">
<context-root>/BasicAuthen</context-root>
<security-role-mapping>
<role-name>glassfish</role-name>
<group-name>GlassFish_Group</group-name>
<group-name>cn=GlassFish_Group,ou=groups,ou=myrealm,dc=oam_domain</group-name>
</security-role-mapping>
<class-loader delegate="true"/>
<jsp-config>
<property name="keepgenerated" value="true">
<description>Keep a copy of the generated servlet class' java code.</description>
</property>
</jsp-config>
</sun-web-app>
-
-
Deploy the application you want to protect in GlassFish Server.
-
Configure the LDAPRealm.
Configure the LDAPRealm in GlassFish Server to point to the Access Manager LDAP provider and group you specified to authenticate the user.
GlassFish Server directly contacts this LDAP provider for group information.
The properties you enter here must match that of the LDAP provider.
For example, you can use the Administration Console or the
create-auth-realmcommand to add the following entry:<auth-realm classname="com.sun.enterprise.security.auth.realm.ldap.LDAPRealm" name="ldaprealm"> <property name="jaas-context" value="ldapRealm"></property> <property name="base-dn" value="ou=people,ou=myrealm,dc=oam_domain"></property> <property name="directory" value="ldap://cieqalnx01.us.oracle.com:7001"></property> <property name="group-search-filter" value="cn=%s"></property> <property name="group-target" value="wlsMemberOf"></property> <property name="search-bind-dn" value="cn=Admin"></property> <property name="search-bind-password" value="welcome1"></property> </auth-realm> -
Make the LDAPRealm the default realm in GlassFish Server.
<security-service default-realm="ldaprealm">
-
Restart GlassFish Server.
Restart GlassFish Server and access the protected resource, such as http://hostname.domainname:8080/BasicAuthen/SecureServlet.
Additional Considerations for Certificate Authentication With a WebGate
In addition to the procedure described in Integrating OAM Security Provider with Oracle Access Manager 11g and WebGate, there are additional steps required if you want to use certificate authentication to protect your resource.
As described in Use Case: Identity Assertion for Web Resources via WebGate, the WebGate challenges the user for credentials based on the type of Oracle Access Manager authentication scheme configured for the resource, which is client-cert in this use case. In response, the client application needs to send its own certificate.
The underlying WebLogic Server implementation is the Web container and must trust the application's certificate. WebLogic Server can trust this certificate either because the certificate is explicitly in the truststore, or because the certificate has a valid cert path to a trusted certificate.
You must therefore perform the following actions or satisfy their requirements by some other method:
-
Select the certificate you want the client to use. If you do not already have a private certificate, you can use a tool such as OpenSSL to generate a self-signed one for development and testing purposes.
-
Import your certificate into your browser. For Firefox, choose the 'Ask me every time' option in the browser (for choosing a Personal Certificate). Also make sure that SSL 3.0 is checked in the browser. Choose analogous options for other browser types.
-
The X.509 certificate you use for authentication must map to a valid user. To do this, create a user in the Access Manager LDAP provider whose CN attribute matches that of the subject.CN from the certificate.
Consider the following example, which adds the user Alice. The subject.CN from the certificate must therefore be Alice.
#ldapadd -x -h cieqalnx01.us.oracle.com -p 7001
-D"cn=Admin" -w welcome1 -f uadd.ldif
In this example, the contents of uadd.ldif are as follows:
#contents of uaddalice.ldif
# GlassFish, people, myrealm, oam_domain
dn: uid=Alice,ou=people,ou=myrealm,dc=oam_domain
objectclass: top
objectclass: person
objectclass: organizationalPerson
objectclass: inetOrgPerson
objectclass: wlsUser
cn: Alice
sn: Alice
uid: Alice
description: GlassFish End User
wlsMemberOf: cn=GlassFish_Group,ou=groups,ou=myrealm,dc=oam_domain
userpassword: Alice
-
Create an X509 Authentication Module. Make sure that the Match LDAP Attribute is set to cn, and that the X509 Cert Attribute is Subject.CN. Set CertValidationEnabled to true. Consider the following example.

Description of the illustration x509-auth-module.png
-
Create an Authentication Scheme that uses the X509 Challenge Method, and the X509 Authentication Module you just created.
Remember that the WebGate challenges the user for credentials based on the type of OAM Server authentication scheme configured for the resource.
Set the Challenge URL to the SSL port of OAM server. For example, https://<oam_server>:<ssl_port>/oam/CredCollectServlet/X509.
Note:
To work around a known problem, the name of the Authentication Scheme must contain either or both of the (case sensitive) words "X509" and "Certificate".
Consider the following example.

Description of the illustration authentication-scheme-certif.png
-
Configure WebLogic Server for Custom Identity and Custom Trust, as described in Configure Identity and Trust.
-
Import the root and intermediate certificates for your generated certificate into a custom keystore and truststore.
keytool -import -keystore  /scratch/mytruststore -storepass (...)
-file root.cer -alias alice_root

keytool -import -keystore  /scratch/mykeystore -storepass (...)
 -file root.cer -alias alice_root

keytool -import -keystore  /scratch/mytruststore -storepass (...)
-file ca.cer -alias alice_root_1

keytool -import -keystore  /scratch/aime1/mykeystore -storepass (...)
-file ca.cer -alias alice_root_1
-
Copy the custom keystore and truststore to the WebLogic Server system.
-
Configure WebLogic Server to use this custom keystore and truststore, as described in Configure Identity and Trust.
-
Restart the Oracle Access Manager and the Oracle HTTP Server.
Session Synchronization
When the same application is used by different user identities, GlassFish Server ensures that the same session is not used by the new user.
Specifically, when a user logs in using the BASIC, FORM or CLIENT-CERT authentication schemes after authentication from Oracle Access Manager, both an Oracle Access Manager session and a GlassFish Server HTTP session are established. When the Oracle Access Manager session is then cleared, the GlassFish Server HTTP session is not automatically cleared.
Therefore, after clearing the Oracle Access Manager session:
-
If a user logs in through the OAM Security Provider, and
-
The user principal differs from the principal in the previous HTTP session, then
-
The previous HTTP session is cleared and a new session is created.
