Table of Contents Previous Next PDF


Using the Jolt Repository Editor

Using the Jolt Repository Editor
Use the Jolt Repository Editor to add, modify, test, export, and delete Oracle Tuxedo service definitions from the Repository based on the information available from the Oracle Tuxedo configuration file. The Jolt Repository Editor accepts Oracle Tuxedo service definitions, including the names of the packages, services, and parameters.
This topic includes the following sections:
Introduction to the Repository Editor
The Jolt Repository is used internally by Jolt to translate Java parameters to an Oracle Tuxedo type buffer. The Repository Editor is available as a downloadable Java applet. When an Oracle Tuxedo service is added to the repository, it must be exported to the Jolt server to ensure that the client requests can be made from a Jolt client.
Repository Editor Window
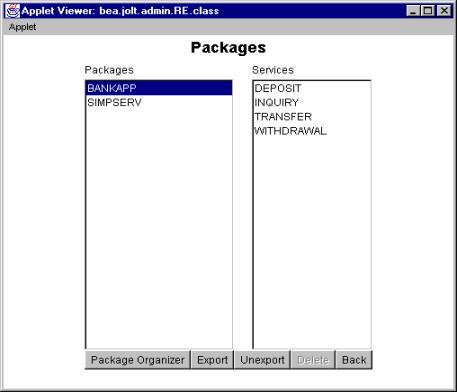
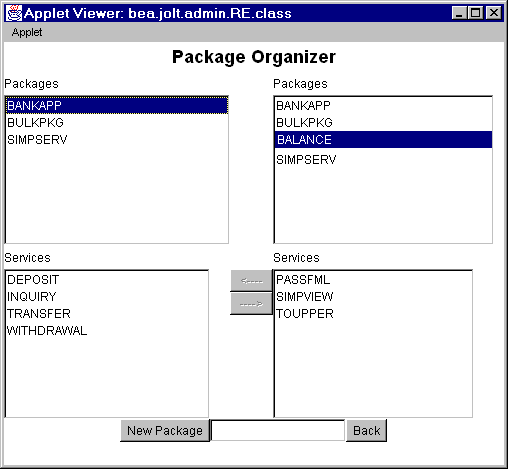
Repository Editor windows contain entry fields, scrollable displays, command buttons, status, and radio buttons. The figure “Sample Repository Editor Window” on page 4‑3 illustrates the parts of the window. The table “Repository Editor Window Parts” on page 4‑4 contains details about each part.
Figure 4‑1 Sample Repository Editor Window
 
Repository Editor Window Description
Table 4‑1 details the parts of the Repository Editor window shown in the previous figure.
1 Text boxes
2 Drop-down arrow
3 Display list
4 Command buttons
5 Radio buttons
Getting Started
Before starting the Repository Editor, make sure that you install the minimally required components, the Jolt Server and the Jolt Client.
To use the Repository Editor:
1.
You can start the Repository Editor from either the JavaSoft appletviewer or from your Web browser. Both of these methods are detailed in the following sections.
2.
Note:
Starting the Repository Editor Using the Java Applet Viewer
1.
Set the CLASSPATH to include the Jolt class directory.
2.
appletviewer <full-pathname>/RE.html
If loading the applet from the Web server, type the following at the URL location:
appletviewer http://<www.server>/<URL path>/RE.html
3.
Press Enter.
The window is displayed as shown in the figure “Oracle Jolt Repository Editor Logon Window” on page 4‑7.
Starting the Repository Editor from Your Web Browser
Use one of the following procedures to start the Repository Editor from your Web Browser.
To Start from a Local File
1.
Set the CLASSPATH to include the Jolt class directory.
2.
file:<full-pathname>/RE.html
3.
Press Enter.
The editor is displayed as shown in “Oracle Jolt Repository Editor Logon Window” on page 4‑7.
To Start from a Web Server
1.
Ensure that the CLASSPATH does not include the Jolt class directory.
2.
Unset the CLASSPATH.
3.
http://<www.server>/<URL path>/RE.html
Note:
Before opening the file, modify the applet codebase parameter in RE.html to match your Jolt Java classes directory.
4.
Press Enter.
The editor is displayed as shown in the “Oracle Jolt Repository Editor Logon Window” on page 4‑7.
Logging On to the Repository Editor
Note:
1.
The “Oracle Jolt Repository Editor Logon Window” on page 4‑7 must be displayed before you continue with step 2. Refer to this figure as you perform the following procedure.
2.
3.
The system validates the server and port information.
Note:
4.
Depending upon the authentication level, complete steps 5 and 6 as required.
5.
6.
The Packages and Services command buttons are enabled.
Note:
See the JoltSessionClass for additional information.
Figure 4‑2 Oracle Jolt Repository Editor Logon Window
The following table, “Repository Editor Logon Window Description,” describes Repository Editor logon window elements.
Repository Editor Logon Window Description


Exiting the Repository Editor
Exit the Repository Editor when you finish adding, editing, testing, or deleting packages, services, and parameters. Prior to exit, the window is displayed as shown in the figure “Oracle Jolt Repository Editor Logon Window Prior to Exit” on page 4‑9.
Figure 4‑3 Oracle Jolt Repository Editor Logon Window Prior to Exit
Note that only the Packages, Services, and Log Off command buttons are enabled. All of the text entry fields are disabled.
Follow the steps below to exit the Repository Editor:
1.
Click Back to return to the Repository Editor Logon window.
2.
Click Log Off to terminate the connection with the server.
The Repository Editor Logon window continues to be displayed with disabled fields.
3.
Select Close from your browser menu to close the window.
Main Components of the Repository Editor
The Repository Editor allows you to add, modify, or delete any of the following components:
You can also test and group services.
Repository Editor Flow
After you log on to the Repository Editor, two buttons are enabled, Packages and Services.
Figure 4‑4 illustrates the Repository Editor flow to help you determine which of these two buttons to select.
Figure 4‑4 Repository Editor Flow Diagram
Select Packages to open the Packages window and perform the following functions:
Refer to “What Is a Package?” on page 4‑12 for complete details.
Select Services to open the Services window and perform the following functions:
Refer to “What Is a Service?” on page 4‑15 for complete details.
What Is a Package?
Packages provide a convenient method for grouping services for Jolt administration. (A service consists of parameters, such as pin number, account number, payment, rate, term, age, or Social Security number.)
You use the Packages window to perform the following:
Click the Packages button in the Jolt Repository Editor logon window to display the available packages. When you select a specific package from the display list, its services within that package are displayed.
Figure 4‑5 contains a sample Packages window. The BANKAPP package is selected, and the services within the BANKAPP package is displayed.
Figure 4‑5 Sample Packages Window
Packages Window Description
Table 4‑3 shows the packages window description.
 
Instructions for Viewing a Package
1.
Click Packages in the Repository Editor Logon window.
The Packages window opens and displays the list of available packages.
In the figure “Sample Packages Window” on page 4‑13, BANKAPP, BULKPKG, and SIMPSERV are the available packages.
2.
What Is a Service?
A service is a definition of an available Oracle Tuxedo service. Services include parameters such as pin number, account number, payment, and rate. Adding or editing a Jolt service does not affect an existing Oracle Tuxedo service.
You use the Services Window to add, edit, or delete services.
Figure 4‑6 is an example of a Services window with the BANKAPP package selected, and the display list of services and parameters available for this package (parameters are detailed later).
Figure 4‑6 Sample Services Window
Services Window Description
Table 4‑4 shows the services window description.
 
Instructions for Viewing a Service
1.
Select Services from the Repository Editor Logon window.
The Services window opens and displays the list of available packages.
2.
The list of available services for the selected package is displayed.
In the figure “Sample Services Window” on page 4‑15, BANKAPP is the selected package. DEPOSIT, INQUIRY, TRANSFER, and WITHDRAWAL are the available services for BANKAPP.
3.
Working with Parameters
A service contains parameters, which may be a pin number, account number, payment, rate, term, age, or Social Security number. Figure 4‑7 shows a Services window displaying a selected service and its parameters.
Note:
Figure 4‑7 Sample Services Window with Parameters List
Instructions for Viewing a Parameter
1.
Select Services from the Repository Editor Logon window.
The Services window opens and displays the list of available packages.
2.
The list of available services for the selected package is displayed.
In the preceding figure, BANKAPP is the selected package.
3.
The list of available parameters for the selected service is displayed.
In the preceding figure, INQUIRY is the selected service.
4.
In the preceding figure, ACCOUNT_ID, FORMNAM, SBALANCE, and STATLIN are the available parameters for the INQUIRY service.
5.
Setting Up Packages and Services
This section includes the necessary steps for setting up a package and its services:
Saving Your Work
As you create and edit services and parameters, it is important to regularly save information to avoid losing input. Clicking Save Service in the Edit Services window can prevent the need to re-enter information in the event of a system failure.
Caution:
When you add or edit the parameters of a service, you must select Add before choosing Back from the Edit Parameters window and returning to the Edit Services window.
If adding a new service or modifying an existing service in the Edit Services window, be sure to select Save Service before choosing Back. If you select Back before you save the modified information, a warning is briefly displayed on the status line at the bottom of the window.
Adding a Package
When you need to add a new group of services, you create a new package before adding the services. The “Package Organizer Window” on page 4‑19 and the following procedure show how to add a new package, BALANCE, to the Packages listing.
Figure 4‑8 Package Organizer Window
Instructions for Adding a Package
1.
Click Packages in the Repository Editor Logon window to display the Packages window.
2.
Select Package Organizer to display the Package Organizer window, similar to that shown in the figure “Package Organizer Window” on page 4‑19.
For a description of contents of this window, see “Package Organizer Window Description” on page 4‑30.
3.
Click the New Package button in the Package Organizer window.
The text field is activated.
4.
The new name (shown in the preceding figure as BALANCE) is displayed on the Packages list in random order.
Adding a Service
Services are definitions of available Oracle Tuxedo services and can only be a part of a Jolt package.You must create the service as a part of a new or existing package.
The Repository Editor accepts the new service name exactly as it is typed (that is, all uppercase letters, abbreviations, misspellings are accepted). Service names must not exceed 30 characters.
Figure 4‑9 shows the Edit New Services window for adding a service.
Figure 4‑9 Edit Services Window: Add a New Service to a Package
 
Adding a Service Window Description
Table 4‑5 describes the options for adding services to a package in a package window.
 
Instructions for Adding a Service
1.
Select Services from the Repository Editor Logon window.
The Services window opens, similar to the figure shown in “Sample Services Window” on page 4‑15.
2.
If you later decide that another package should contain the new service, use the Package Organizer to move the service to a different package. (See “Grouping Services Using the Package Organizer” on page 4‑29 for additional information.)
3.
4.
Select the Service Name text field to activate it.
5.
6.
Although the same buffer type selected for the Input Buffer is automatically selected for the Output Buffer, you can select a different Output Buffer type.
If VIEW or VIEW32 is selected, you must type the Input View Name and Output View Name in the associated text fields.
If CARRAY or STRING is selected, refer to “Selecting CARRAY or STRING as a Service Buffer Type” on page 4‑24 for additional instructions.
7.
Select Save Service to save the newly created service.
Selecting CARRAY or STRING as a Service Buffer Type
If CARRAY or STRING is selected as the buffer type for a new service, only CARRAY or STRING can be added as the data type for the accompanying parameters. See also “Adding a Parameter” on page 4‑24 and “Selecting CARRAY or STRING as a Parameter Data Type” on page 4‑27. For additional information, refer to Chapter 5, “Using the Jolt Class Library.”.
Figure 4‑10 shows an example Edit Services window with STRING selected as the buffer type for the service SIMPAPP.
Figure 4‑10 Edit Services Window: Select STRING Buffer Type
Adding a Parameter
Clicking New under the label Parameter level actions in the Edit Services window is displayed in the Edit Parameters window. Review the features in Figure 4‑11. Use this window to enter the parameter and screen information for a service.
Figure 4‑11 Edit Parameters Window: Add a Parameter
Adding a Parameter Window Description
 
Instructions for Adding a Parameter
1.
Select Field Name to activate the field, and type the field name.
Note:
2.
3.
Specify a direction by selecting the input, output, or both radio buttons.
4.
Select the Occurrences text field to activate it, and then enter the number of occurrences.
5.
Select Add to append the information. Add does not save the parameter.
6.
In the Edit Services window, click Save Service to save the parameter as a part of the service.
WARNING:
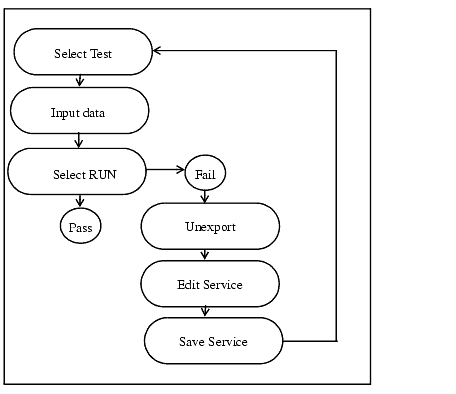
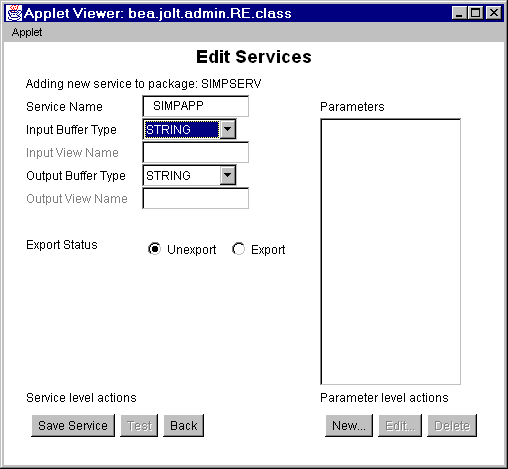
If you do not click Save Service before you click Back, the parameters are not saved as part of the service.
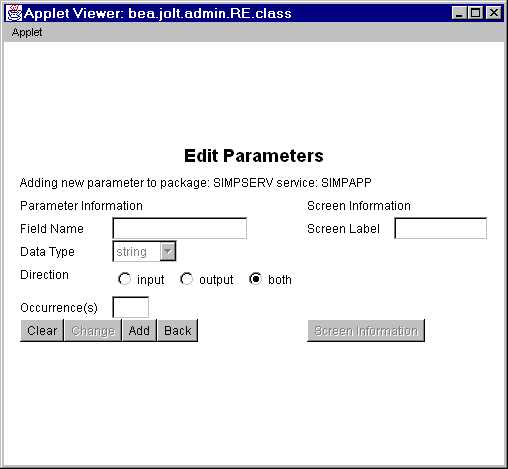
7.
Click Back to return to the Edit Services window.
Selecting CARRAY or STRING as a Parameter Data Type
If CARRAY or STRING is the selected buffer type for a new service, only CARRAY or string can be added as the data type for the accompanying parameters.
In this case, only one parameter can be added. It is recommended that you use the parameter name “CARRAY” for a CARRAY buffer type, and the parameter name “STRING” for a STRING buffer type.
See also “Instructions for Adding a Service” on page 4‑23 and “Selecting CARRAY or STRING as a Service Buffer Type” on page 4‑24. For additional information, refer to Chapter 5, “Using the Jolt Class Library.”.
Figure 4‑12 is an example of the Edit Parameters window with string as the selected data type for the parameter. The Data Type defaults to string and does not allow you to modify that particular data type. The Field Name can be any name.
Figure 4‑12 Edit Parameters Window: string Data Type
Grouping Services Using the Package Organizer
The Package Organizer moves services between packages. You may want to group related services in a package (for example, WITHDRAWAL services that are exported only at a certain time of the day can be grouped together in a package).
Use the Package Organizer arrow buttons to move a service from one package to another. These buttons are useful if you have several services to move between packages. The packages and services display listings to help track a service within a particular package.
Figure 4‑13 is an example of a Package Organizer window with a service selected for transfer to another package.
Figure 4‑13 Package Organizer Window
Package Organizer Window Description
 
Instructions for Grouping Services with the Package Organizer
1.
2.
3.
In the previous figure, INQUIRY is the selected service in the BANKAPP package.
4.
The previous figure shows the selected service, INQUIRY, and the selected package, BANK, to which the INQUIRY service will be moved.
Figure 4‑14 Example of a Moved Service
5.
These keys are activated only when both packages (left and right are displayed) and a service are selected. The keys are only active in the direction of the package where the service is to be moved. The previous figure, “Example of a Moved Service,” shows that the INQUIRY service has been moved to the BANK package on the right.
Note:
Modifying Packages, Services, and Parameters
You can make the following changes to packages, services, and parameters:
Editing a Service
You can edit an existing service name or service information, or access the window to add new parameters to an existing service. For a description of the Edit Services window, see “Adding a Service Window Description” on page 4‑21. Figure 4‑15 is an example of the Edit Services window.
Figure 4‑15 Edit Services Window
Instructions for Editing a Service
Follow these steps to edit a service:
1.
The services available for the selected package are displayed.
2.
The parameters available for the selected service are displayed.
3.
Click Edit to display the Edit Services window, as shown in the previous figure.
4.
Editing a Parameter
All parameter elements can be changed, including the name of the parameter.
WARNING:
Figure 4‑16 is an example of the Edit Parameters window.
Figure 4‑16 Edit Parameters Window
.
Instructions for Editing a Parameter
Follow these steps to change a parameter:
1.
In the Services window (see “Sample Services Window with Parameters List”), select the package and service that contain the parameter you want to change.
2.
3.
The Edit Parameters Window is displayed as shown in the previous figure.
4.
5.
Click Back to return to the previous window.
Deleting Parameters, Services, and Packages
This section describe how to delete a package. Before deleting a package, all the services must be deleted from the package. The Delete option is not enabled until all components of the package or service are deleted.
WARNING:
Deleting a Parameter
Determine which parameters to delete and follow these steps:
1.
2.
3.
Click Edit to display the Edit Services window.
4.
5.
Deleting a Service
Determine which services to delete and follow these steps:
Note:
1.
2.
Delete is enabled.
3.
Click Delete. The service is deleted.
Deleting a Package
Determine which packages to delete and follow these instructions. Make sure all services contained in this package are deleted or moved to another package before selecting this option.
1.
In the Repository Editor Logon window, click Packages to display the Packages window.
2.
3.
Click Delete.
The package is deleted.
Making a Service Available to the Jolt Client
To make a service available to a Jolt client, you export it. All services in a package must be exported or unexported as a group. A service is made available by using the Export and Unexport radio buttons.
This topic includes the following sections:
Exporting and Unexporting Services
Determine which services are being made available or unavailable to the Jolt client. Services are exported to ensure that the Jolt client can access the most current service definitions from the Jolt server.
Figure 4‑17 shows the Packages window, where you can export and unexport services.
Figure 4‑17 Packages Window: Export and Unexport Buttons
Follow these steps to export or unexport a service:
1.
From the Repository Editor Logon window, select Packages to display the Packages window.
2.
The Export and Unexport buttons are enabled.
3.
To make the services in the selected package unavailable, select Unexport.
Caution:
Reviewing the Exported and Unexported Status
When a service is exported or unexported, you can review its status from the Edit Services window.
Figure 4‑18 displays the Export radio button as active, for Export Status; therefore, the current status for the service TRANSFER is exported.
Figure 4‑18 Export Status
To review the current exported or unexported status of a service, follow these steps:
1.
2.
The Services display list of available services for the selected package is displayed.
3.
4.
Click Edit.
The Edit Services window is displayed as shown in the figure “Edit Services Window” on page 4‑33.
One of the radio buttons (Unexport or Export) next to the Export Status label will be active, indicating the current status of the service.
Testing a Service
Test a service and its parameters before you make them available to Jolt clients. You can test currently available services without making changes to the services and parameters.
Note:
An exported or unexported service can be tested; if you need to change a service and its parameters, unexport the service prior to editing.
This topic includes the following sections:
Jolt Repository Editor Service Test Window
Use the Run button to test the service to ensure that the parameter information is accurate. A service can only be tested when the corresponding Oracle Tuxedo server is running for the service being tested.
Although the Test button in the Edit Services window is enabled when parameters are not added to the service, the Service Test window displays unused in the parameter fields, and they are disabled. Refer to “Sample Service Test Window” on page 4‑40 for an example of unused parameter fields.
Note:
Figure 4‑19 is an example of a Service Test window with both writable and read-only text fields.
Figure 4‑19 Sample Service Test Window
Service Test Window Description
The following table describes the Service Test window options.
Note:
 
Testing a Service
You can test a service without making changes to the service or its parameters. You can also test a service after editing the service or its parameters.
Test Service Process Flow
Figure 4‑20 shows a typical Repository Editor service flow test.
Figure 4‑20 Test Service Flow
Instructions for Testing a Service
Follow these steps to test a service. For troubleshooting information, see the first two entries in the Repository Editor Troubleshooting table.
1.
Select Services from the Repository Editor Logon window.
The Services window is displayed.
2.
3.
Click Edit to access the Edit Services window.
4.
Click Test to access the Service Test window.
5.
6.
Click RUN.
The status line displays the outcome as follows:
If the test passed: “Run Completed OK
See “Repository Editor Troubleshooting” on page 4‑43 for additional Repository Editor troubleshooting information.
If Edits are Required After Testing
Follow these steps if editing is required to pass the test:
1.
2.
3.
Click Unexport.
4.
Click Back to return to the Repository Editor Logon window.
5.
Click Services to display the Services window.
6.
7.
8.
Repository Editor Troubleshooting
Consult Table 4‑6 if you encounter problems while using the Repository Editor.
 
For Netscape browsers, make sure that Enable Java and Enable JavaScript are checked under EditPreferencesAdvanced. Then select CommunicatorToolsJava Console. If the Java Console does not exist on the menu, the browser probably does not support Java.
If running appletviewer, check the system console (or the window where you started the appletviewer).
The RE.html file is available to the Web server.
The RE.html file contains the correct <codebase> parameter. Codebase identifies where the Jolt class files are located.
If running the editor in a browser (or appletviewer) and loading the applet from disk, make sure that:
The RE.html file exists and is readable.
The RE.html file is Java-enabled.
The RE.html file contains the correct <codebase> parameter (this is where the Jolt class files are installed on the local disk).
You cannot display Packages or Services even though you are sure they exist
Make sure that the configuration of JREPSVR: verify CLOPT parameters and verify that jrep.f16 (FML definition file) is installed and accessible (follow installation documentation).
 

Copyright © 1994, 2017, Oracle and/or its affiliates. All rights reserved.