| Oracle® Fusion Middleware Tutorials for Oracle WebLogic Portal 10g Release 3 (10.3.4) Part Number E14252-02 |
|
|
View PDF |
| Oracle® Fusion Middleware Tutorials for Oracle WebLogic Portal 10g Release 3 (10.3.4) Part Number E14252-02 |
|
|
View PDF |
This tutorial helps you learn how to use the WebLogic Portal Administration Console for some basic portal configuration tasks.
For more information about each page of the wizards used in this chapter, see the Oracle Fusion Middleware Portal Development Guide for Oracle WebLogic Portal.
The tasks described in this chapter are based on those described in Chapter 2 and Chapter 3; so it is important that you complete those tutorials before starting the tasks described here.
The WebLogic Portal Administration Console is the tool that portal administrators use to not only control the behavior, content, and appearance of portals, but also to perform many traditional system administration activities such as user and security management. This tutorial focuses on basic tasks that assemble portals into desktops.
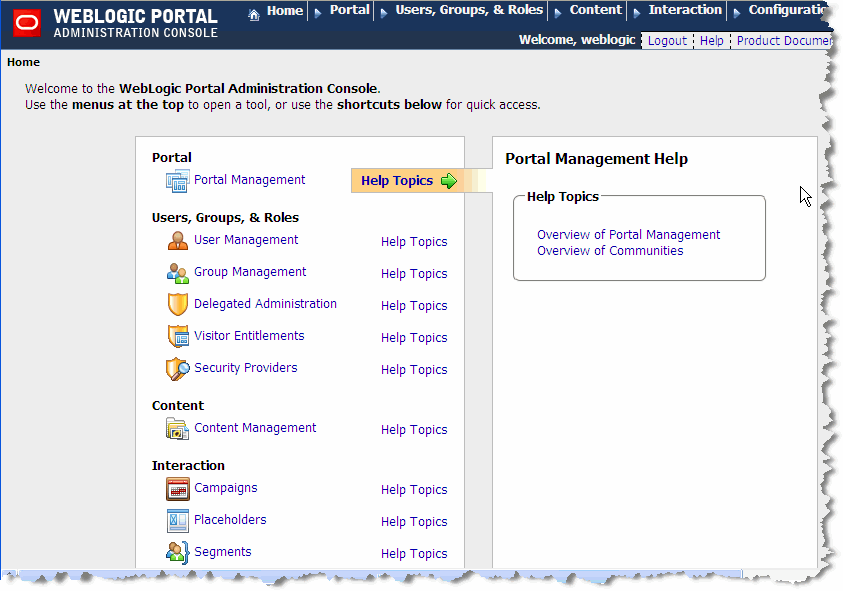
The WebLogic Portal Administration Console is organized according to the following categories of tasks (Figure 4-2):
Portal – Provides tools for managing portals, desktops, books, pages, portlets, and other portal resources.
This tutorial describes some of the basic Portal Management tasks. For detailed information about Portal Management tasks, see the Oracle Fusion Middleware Portal Development Guide for Oracle WebLogic Portal.
User, Groups, & Roles – Provides tools for user and group management, security provider configuration, delegated administration, and visitor entitlements.
For detailed information about the tasks in this category, see the Oracle Fusion Middleware User Management Guide for Oracle WebLogic Portal and the Oracle Fusion Middleware Security Guide for Oracle WebLogic Portal.
Content – Provides tools for managing content and repositories.
For detailed information about the tasks in this category, see the Oracle Fusion Middleware Content Management SPI Development Guide for Oracle WebLogic Portal.
Interaction – Provides tools for managing campaigns, placeholders, user segments, and content selectors.
For detailed information about the tasks in this category, see the Oracle Fusion Middleware Interaction Management Guide for Oracle WebLogic Portal.
Configuration & Monitoring – Provides tools for managing server settings for cache, server maintenance mode, personalization, security, unified user profiles, and WSRP.
For detailed information about the tasks in this category, see the:
Oracle Fusion Middleware Security Guide for Oracle WebLogic Portal
Oracle Fusion Middleware Portal Development Guide for Oracle WebLogic Portal
Oracle Fusion Middleware Federated Portals Guide for Oracle WebLogic Portal
Oracle Fusion Middleware Interaction Management Guide for Oracle WebLogic Portal
Oracle Fusion Middleware User Management Guide for Oracle WebLogic Portal
Using the tutorial, you will create a portal desktop based on the portal and portlets created previously, make some modifications to your desktop, and then view your results.
The tutorial includes instructions on how to perform these tasks:
Before you can begin using the WebLogic Portal Administration Console, the server must be running. Depending on the state of your Oracle Enterprise Pack for Eclipse workbench, you might need to start the server before opening the Administration Console.
If you are continuing from Chapter 3 and you have not closed/opened Oracle Enterprise Pack for Eclipse, you can skip to Step 4.
If you closed Oracle Enterprise Pack for Eclipse after finishing the tutorial in Chapter 3, follow these steps:
Start Oracle Enterprise Pack for Eclipse and return to the workspace that you used for the previous tutorials. You can run the executable file <MW_HOME>/oepe_11gR1PS1/eclipse/eclipse.exe. On Windows, you can also start the IDE from the Start menu by selecting Start > My Programs > Oracle WebLogic > Eclipse for WebLogic 10.3.4.
In the Servers view, click the server to select it.
On the Servers view toolbar, click the Start the server icon.
Wait while Oracle Enterprise Pack for Eclipse starts the server. This process might take some time, depending on the speed of your system. When the process completes, the Status column in the Servers view displays Started and the Stop the server square icon becomes active.
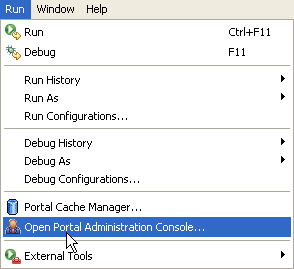
From the menu bar, select Run > Open Portal Administration Console, as shown in Figure 4-1.
Figure 4-1 Menu Selection for Run > Open Portal Administration Console
The Administration Console login dialog appears.
The Administration Console login dialog requires a WebLogic Server system administrator or a WebLogic Portal administrator user name and password. WebLogic Server system administrators have full security privileges for the entire domain and can log in to and use the WebLogic Server Administration Console tools. WebLogic Portal administrators have full security privileges for a Portal web project, which can include multiple portals.
Table 4-1 shows the default system administrator user names and passwords.
Table 4-1 Default User Names and Passwords for the WebLogic Portal Administration Console
| User Name | Password | Description |
|---|---|---|
|
weblogic |
webl0gic |
WebLogic Server system administrator with full privileges in the domain. Note: This username and password must match the values you provided when you created the domain in Section 2.2.1, "Create a Portal Domain." In this case, remember that the "0" in the password is a zero. |
For purposes of this tutorial, you will use the default WebLogic Server login so that you have full privileges.
To log in to the WebLogic Portal Administration Console:
In the Administration Console login dialog, enter the user name weblogic and password webl0gic, and then click Sign In. This username and password must match the values you provided when you created the domain in Section 2.2.1, "Create a Portal Domain."
The main menu of the Administration Console displays.
Figure 4-2 Administration Console Main Page
To create a desktop, you first create a portal to contain it.
To create a portal and desktop, follow these steps:
Click the Portal Management menu shortcut on the Administration Console home page.
The Portal Management page displays; the Portal Resources tree displays on the left on the page, as shown in Figure 4-3.
Figure 4-3 Portal Resources Tree in the Administration Console

Notice that the display is based on the Portal Web Project you created in Chapter 3. If you expand the Library > Portlets portion of the tree, you can see the portlets that you created earlier.
Click Portals in the tree.
In the Browse Portals tab on the Portals page, click Create New Portal.
Because no portals exist yet, the table containing portals is empty.
In the Create a New Portal dialog, enter values for the portal, using Table 4-2 as a guide.
Click Create New Portal.
When the Portals page displays again, the Browse Portals table includes the portal you created, and the Portal Resources tree lists the new portal.
Click myPortal in the Browse Portals table to view the details for this portal.
In the Browse Desktops tab of the portal page, click Create New Desktop.
In the Create Desktop wizard, enter values for the desktop in the appropriate wizard pages, using Table 4-3 as your guide:
Table 4-3 Create Desktop Wizard Page Values
| Wizard Page | Value/Selection |
|---|---|
|
Step 1: Select Create Method |
|
|
Step 2: Select Source |
|
|
Step 3: Enter Desktop Properties |
|
On the Enter Desktop Properties page, click Review Properties to review the desktop properties.
On the Review Properties page, click Create Desktop to create the desktop.
A confirmation dialog confirms that the desktop has been created and displays related information.
Click Finish to return to the main Administration Console page.
The newly created desktop is listed in the Browse Desktops table and the Portal Resources tree. Figure 4-4 shows the expanded tree.
Figure 4-4 New Desktop in Portal Resources Tree
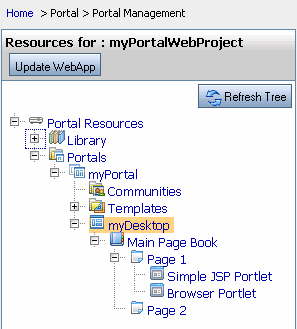
Notice that the portlets that you created for this portal (which was used as the template for this desktop) appear automatically in the new desktop.
In this task, you view the portlets for a desktop page—the portlets that you created using Oracle Enterprise Pack for Eclipse—and rearrange them on the page. Then you will view your work.
To update your desktop page:
In the Portal Resources tree for myPortalWebProject, expand the tree to display the pages for the desktop, as shown in Figure 4-4.
Click Page 1 to select it.
In the Page 1 page on the right, select the Edit Contents tab.
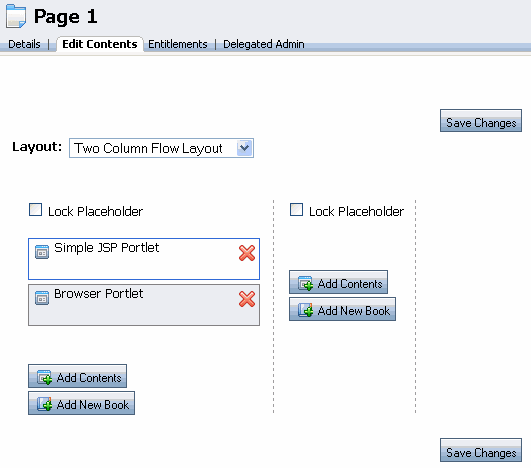
The Edit Contents tab of Page 1 displays the JSP portlet and the browser portlet. (Figure 4-5)
Drag the browser portlet onto the same placeholder as the Simple JSP Portlet, as shown in Figure 4-6.
Figure 4-6 Moving the Browser Portlet by Dragging
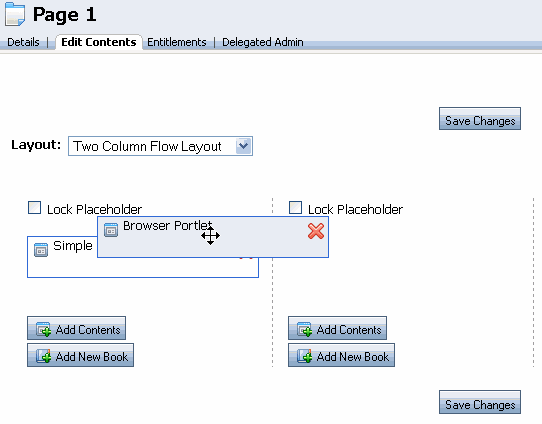
When you release the mouse button, the browser portlet appears below the Simple JSP Portlet, as shown in Figure 4-7.
Figure 4-7 Result After Moving the Browser Portlet in the Administration Console
Click Save Changes.
In the Portal Resources tree, click myDesktop.
In the Details tab, click View Desktop.
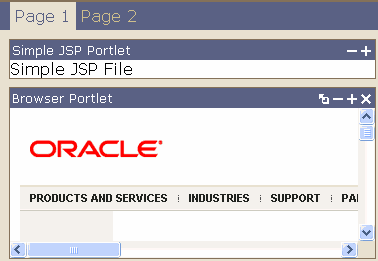
The desktop displays in a browser, with the portlets in their new positions, as shown in Figure 4-8.
Figure 4-8 Desktop in Browser Showing Portlets Rearranged
In this task, you will create a new page for your desktop.
To create a page on a desktop:
In the Portal Resources tree for myPortalWebProject, expand the Library node.
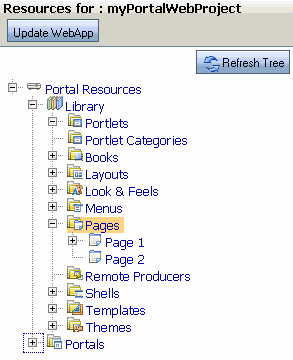
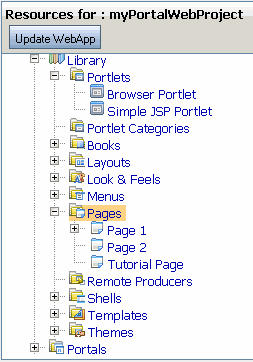
Click Pages, as shown in Figure 4-9.
Figure 4-9 Expanded Portal Resources Tree Showing Desktop Pages
In the Browse Pages tab of the Pages page, click Create New Page.
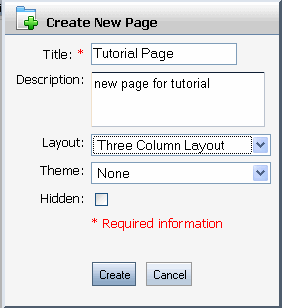
In the Create New Page dialog (Figure 4-10), enter values for the new page, using Table 4-4 as a guide.
Table 4-4 Create New Page – Field Descriptions
| Field | Value/Description |
|---|---|
|
Title |
Tutorial Page |
|
Description |
new page for tutorial |
|
Layout |
Three Column Flow Layout |
|
Theme |
(leave as is - None) |
|
Hidden |
(leave as is - unchecked) |
Figure 4-10 Create New Page Dialog in Administration Console
Click Create.
The new page is added, and is displayed in the Details page for the desktop; the Portal Resources tree updates to include the new page, as shown in Figure 4-11.
Figure 4-11 New Page Added to the Portal Resources Tree
With the completion of this tutorial, you have created a basic desktop and performed some additional tasks to become familiar with the staging environment and the WebLogic Portal Administration Console.
To get started with actual portal development and desktop staging, see the Oracle Fusion Middleware Portal Development Guide for Oracle WebLogic Portal.