The third and final phase of this section discusses the update options available after a storage array has been registered through Oracle VM Manager.
To change the registered storage array configuration:
If you need to modify a storage array, select it in the tree structure in the navigation pane, right-click it and choose one of these options:
Edit Storage Array: change storage array settings such as name, description, access host and port; change admin server settings in the second section of the wizard
Refresh Storage Array: request an update of the storage array configuration in case changes have been made to the available physical disk configuration
Add/Remove Admin Server: determine which Oracle VM Servers are responsible for information exchange with this storage array
Delete Storage Array: remove the selected storage array from your Oracle VM environment
If you need to modify a physical disk on a storage array, expand the storage array and volume group, select the item in the tree structure in the navigation pane, right-click it and choose one of these options:
Edit Physical Disk: change the name, description and extra information of the physical disk or make it shareable
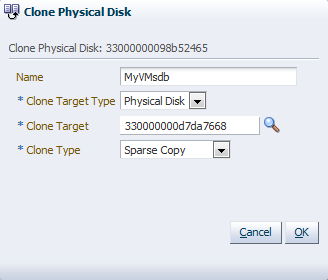
Clone Physical Disk: create a thin clone, sparse copy or non-sparse copy of the physical disk on the selected target. The options are explained in the table below:
Clone Target
Thin Clone
Sparse Copy
Non-sparse Copy
Physical Disk
Yes
Storage Array
Yes
Storage Repository
Yes
Yes
This applies specifically to a physical disk; for more information about VM cloning, see Section 7.8, “Cloning a Virtual Machine or Template”.
For a definition of these clone target types, see Appendix D, Glossary.
Delete: stop using the selected physical disk in your Oracle VM environment
WarningIf you effectively delete a LUN from a registered storage array, make sure that you delete it in Oracle VM Manager first, before you physically delete it from the storage server. If you do not respect this order of operations, the system will go into an unknown state, which can only be resolved by rebooting the Oracle VM Servers the deleted LUN is connected to.
If you need to modify the way Oracle VM Servers access the physical disks in your storage array, select the storage array in the tree structure in the navigation pane, go to the Access Groups tab in the management pane, and select the access group you wish to modify. Using the toolbar buttons near the top of the tab, choose one of these options:
Edit Access Group: change access group settings such as name, description, selected storage initiators and physical disks
Present/Unpresent Physical Disk: change the selection of physical disks to which this access group has access
Delete Access Group: remove the selected access group configuration
NoteFor generic iSCSI storage arrays, only the selected storage initiators can be modified. Other properties cannot be changed.