3 Installing Oracle Exalytics In-Memory Machine Into a Rack
This chapter describes how to optionally place your Oracle Exalytics In-Memory Machine into a rack using the rail assembly in the rackmount kit. The rail assembly is included in your Oracle Exalytics In-Memory Machine package.
Note:
A rack is not shipped with the Oracle Exalytics In-Memory Machine. You should use an existing four-post rack that meets the standards listed in Table 3-1.
This chapter contains the following topics:
-
Section 3.5, "Installing the Mounting Brackets Onto Oracle Exalytics In-Memory Machine"
-
Section 3.6, "Attaching the Slide-Rail Assemblies to the Rack"
-
Section 3.7, "Installing Oracle Exalytics In-Memory Machine into the Slide-Rail Assemblies"
-
Section 3.9, "Verifying the Operation of the Slide Rails and CMA"
3.1 Task Roadmap
Installing your Oracle Exalytics In-Memory Machine into a four-post rack using the slide-rail and cable management arm options involves the following steps:
3.2 Reviewing Rack Compatibility
Verify that your rack is compatible with the slide-rail and cable management arm (CMA) options. The optional slide-rails are compatible with a wide range of equipment racks that meet the standards listed in.
Table 3-1 Rack Compatibility for Oracle Exalytics In-Memory Machine
| Item | Requirement |
|---|---|
|
Structure |
Four-post rack (mounting at both front and rear). Two-post racks are not compatible. |
|
Rack horizontal opening and unit vertical pitch |
Conforms to ANSI/EIA 310-D-1992 or IEC 60927 standards. Only M6 tapped or 9.5 mm square are supported. |
|
Distance between front and rear mounting planes |
Minimum 610 mm and maximum 915 mm (24 inches to 36 inches). |
|
Clearance depth in front of front mounting plane |
Distance to front cabinet door is at least 25.4 mm (1 inch). |
|
Clearance depth behind front mounting plane |
Distance to rear cabinet door is at least 900 mm (35.5 inches) with the cable management arm, or 770 mm (30.4 inches) without the cable management arm. |
|
Clearance width between front and rear mounting planes |
Distance between structural supports and cable troughs is at least 456 mm (18 inches). |
|
Machine dimensions |
Depth: (not including PSU handle): 732 mm (28.82 inches) Width: (not including ears): 436.5 mm (17.19 inches) Height: 129.85 mm (5.11 inches) |
3.3 Before You Begin
Before installing Oracle Exalytics In-Memory Machine into a rack, read the following cautions and important notes:
-
Always load equipment into a rack from the bottom up, so that the rack will not become top-heavy and tip over. Deploy your rack's anti-tip bar to prevent the rack from tipping during equipment installation.
-
If the Oracle Exalytics In-Memory Machine is installed in a closed or multi-unit rack assembly, the operating ambient temperature of the rack environment might be greater than room ambient temperature. Therefore, consideration should be given to installing the equipment in an environment compatible with the maximum ambient temperature (Tma) specified for the Oracle Exalytics In-Memory Machine.
-
Installation of the equipment in a rack should be such that the amount of air flow required for safe operation of the equipment is not compromised.
-
Mounting of the equipment in the rack should be such that a hazardous condition is not achieved due to uneven mechanical loading.
-
Consideration should be given to the connection of the equipment to the supply circuit and the effect that overloading of the circuits might have on over-current protection and supply wiring. Appropriate consideration of equipment nameplate power ratings should be used when addressing this concern.
-
Reliable earthing of rackmounted equipment should be maintained. Particular attention should be given to supply connections other than direct connections to the branch circuit (for example, use of power strips).
-
Slide-rail mounted equipment must not be used as a shelf or a work space.
3.4 Disassembling the Slide-Rails
To disassemble the slide-rails before the installation, complete the following steps:
-
Unpack the slide-rails.
-
Locate the slide-rail lock at the front of the slide-rail assembly, as shown in Figure 3-1.
-
Press and hold the slide-rail lock toward the direction of the arrow, while you pull the mounting bracket out of the slide-rail assembly until it reaches the stop, as shown in Figure 3-1.
-
Push the mounting bracket release button toward the front of the mounting bracket (Figure 3-1), and simultaneously withdraw the mounting bracket from the slide-rail assembly.
Figure 3-1 Disassembling the Slide-Rails Before Installation
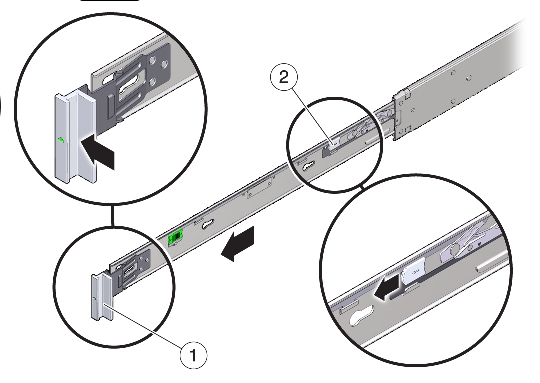
Description of "Figure 3-1 Disassembling the Slide-Rails Before Installation"
3.5 Installing the Mounting Brackets Onto Oracle Exalytics In-Memory Machine
You must install the mounting brackets onto the Oracle Exalytics In-Memory Machine before you can rackmount it.
To install the mounting brackets, complete the following steps:
-
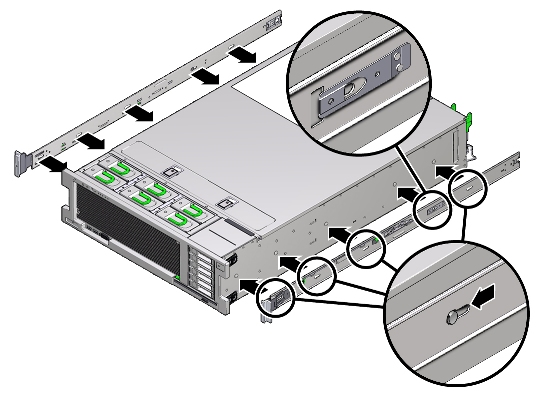
Position a mounting bracket against the chassis so that the slide-rail lock is at the Oracle Exalytics In-Memory Machine front, and the five keyhole openings on the mounting bracket are aligned with the five locating pins on the side of the chassis, as shown in Figure 3-2.
Note:
The mounting brackets are identical and can be installed on either side of the chassis.
Figure 3-2 Installing the Mounting Brackets
Description of "Figure 3-2 Installing the Mounting Brackets"
-
With the heads of the five chassis locating pins protruding though the five keyhole openings in the mounting bracket, pull the mounting bracket toward the front of the chassis until the mounting bracket clip locks into place with an audible click, as shown in Figure 3-2.
-
Verify that the rear locating pin has engaged the mounting bracket clip.
-
Repeat to install the remaining mounting bracket on the other side of the Oracle Exalytics In-Memory Machine.
3.6 Attaching the Slide-Rail Assemblies to the Rack
The slide rail assemblies support only racks with 9.5-mm square holes and M6 round holes. All other racks, including those racks with 7.2-mm, M5, or 10-32 mounting holes, are not supported. See your rack documentation for information about the size of its rail holes.
To attach the slide-rail assemblies to the rack, complete the following steps:
-
(Optional) If you need to move the rack with the Oracle Exalytics In-Memory Machine installed, it is recommended that you attach the slide-rail assembly with mounting screws and cage nuts.
Note:
Insert the cage nuts prior to performing the next step. See the Rail Rackmount Kit Overview and Information card for instructions on inserting these cage nuts. This card is included with the rack kit.
-
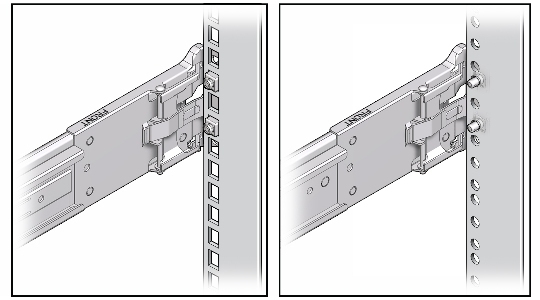
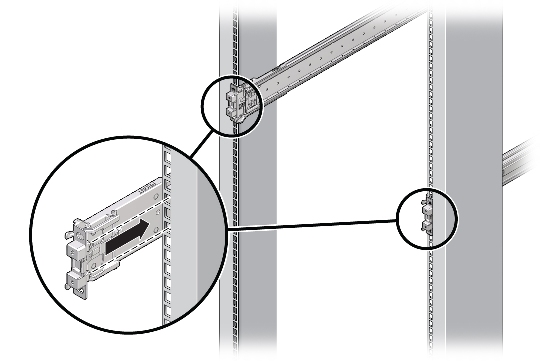
Position a slide-rail assembly in your rack, so that the slide-rail assembly front bracket is on the outside of the front rack post and the slide-rail assembly rear bracket is on the inside of the rear rack post, as shown in Figure 3-3.
-
Align the slide-rail assembly mounting pins with the front and rear rack post mounting holes. Then lock the assembly into place by pushing the assembly toward the rear of the rack until the mounting pins engage the rack, as shown in Figure 3-4.
You will hear an audible click when the mounting pins engage the rack.
Note:
The slide assembly mounting pins accommodate either 9.5 mm square mounting holes or M6 round mounting holes. No other mounting hole sizes are supported.
Figure 3-3 Installing Slide-Rail Assemblies Onto the Rack
Description of "Figure 3-3 Installing Slide-Rail Assemblies Onto the Rack"
-
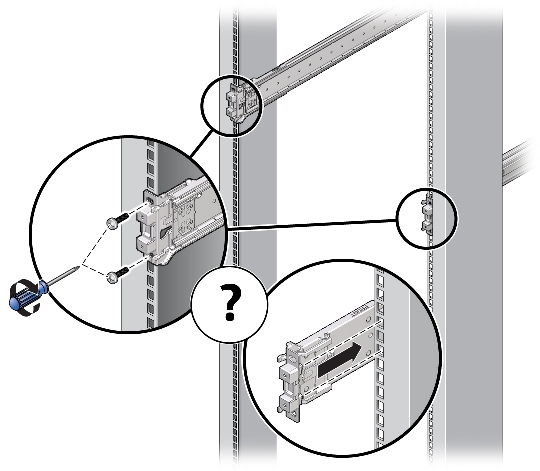
(Optional) If you choose to attach the slide-rail assembly with mounting screws and cage nuts, insert the M6 mounting screws through both front and rear slide-rail brackets and rack posts, then secure them with the caged nuts. See Figure 3-5.
Figure 3-5 Attach Slide-Rail Assembly to a Rack
Description of "Figure 3-5 Attach Slide-Rail Assembly to a Rack"
-
Repeat Step 2 through Step 4 for the remaining slide-rail assembly.
-
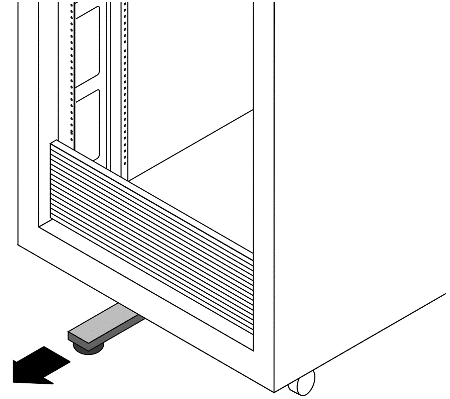
If available, extend the anti-tip bar at the bottom of the rack, as shown in Figure 3-6. Refer to your rack documentation for instructions.
Caution:
If your rack does not have an anti-tip bar, the rack could tip over.
3.7 Installing Oracle Exalytics In-Memory Machine into the Slide-Rail Assemblies
Use this procedure to install the Oracle Exalytics In-Memory Machine chassis, with mounting brackets, into the slide-rail assemblies that are mounted to the rack.
Caution:
This procedure requires a minimum of two persons because of the weight of the Oracle Exalytics In-Memory Machine. Attempting this procedure alone could result in equipment damage or personal injury.
Always load equipment into a rack from the bottom up so that the rack will not become top-heavy and tip over. Extend your rack's anti-tip bar to prevent the rack from tipping during equipment installation.
To install Oracle Exalytics In-Memory Machine into the slide-rail assemblies, complete the following steps:
-
Push the slide-rails into the slide-rail assemblies in the rack as far as possible.
-
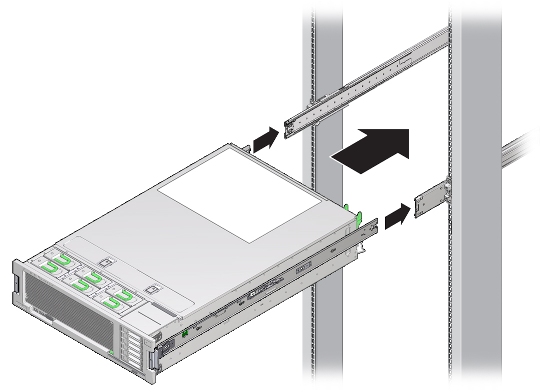
Raise the Oracle Exalytics In-Memory Machine so that the rear ends of the mounting brackets are aligned with the slide-rail assemblies that are mounted in the rack, as shown in Figure 3-7.
-
Insert the mounting brackets into the slide-rails, then push the server into the rack until the mounting brackets encounter the slide-rail stops (approximately 12 inches, or 30 cm).
Caution:
When inserting the Oracle Exalytics In-Memory Machine into the slide-rail, ensure that both the top and bottom mounting lips of the mounting brackets are inserted into the slide-rail. The Oracle Exalytics In-Memory Machine should slide forward and backward easily if correctly installed. If the unit does not slide easily, ensure that each mounting lip is inserted properly. If the mounting brackets are not inserted properly, the unit may fall when removing it from the rack.
Figure 3-7 Inserting the Oracle Exalytics In-Memory Machine with Mounting Brackets into the Slide-Rails
Description of "Figure 3-7 Inserting the Oracle Exalytics In-Memory Machine with Mounting Brackets into the Slide-Rails"
-
Simultaneously push and hold the green slide-rail release buttons (Figure 3-1) on each mounting bracket while you push the Oracle Exalytics In-Memory Machine into the rack (Figure 3-8). Continue pushing until the slide-rail locks (on the front of the mounting brackets) engage the slide-rail assemblies. You will hear an audible click.
Figure 3-8 Sliding the Oracle Exalytics In-Memory Machine Into the Rack
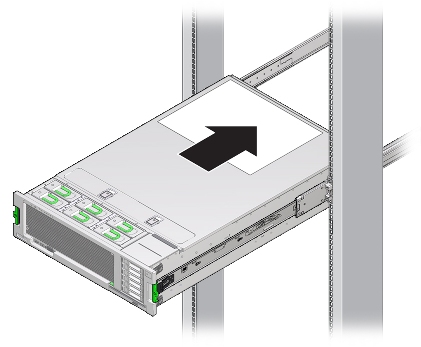
Description of "Figure 3-8 Sliding the Oracle Exalytics In-Memory Machine Into the Rack"
Caution:
Verify that the Oracle Exalytics In-Memory Machine is securely mounted in the rack and that the slide-rail locks are engaged with the mounting brackets before continuing.
3.8 Installing the Cable Management Arm
The cable management arm (CMA) is an optional assembly that you can use to route the server cables in the rack.
To install the optional CMA, complete the following steps:
-
Unpack the CMA parts.
-
Take the CMA to the back of the equipment rack and ensure that you have adequate room to work around the back of the Oracle Exalytics In-Memory Machine.
Note:
References to left or right in this procedure assume that you are facing the back of the equipment rack.
-
Remove tape to separate the parts of the CMA.
-
Insert the CMA's mounting bracket connector into the right slide-rail until the connector locks into place with an audible click, as shown in Figure 3-9.
Figure 3-9 Inserting the CMA Mounting Bracket Into the Back of the Right Slide-Rail
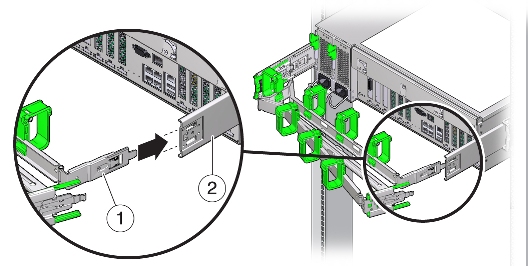
Description of "Figure 3-9 Inserting the CMA Mounting Bracket Into the Back of the Right Slide-Rail"
-
Insert the right CMA slide-rail connector into the right slide-rail assembly until the connector locks into place with an audible click, as shown in Figure 3-10.
Figure 3-10 Inserting CMA Slide-Rail Connector Into the Back of the Right Slide-Rail
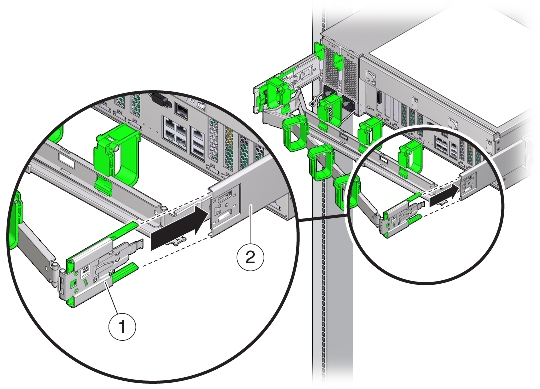
Description of "Figure 3-10 Inserting CMA Slide-Rail Connector Into the Back of the Right Slide-Rail"
-
Insert the left CMA slide-rail connector into the left slide-rail assembly until the connector locks into place with an audible click, as shown in Figure 3-11.
Figure 3-11 Inserting CMA Slide-Rail Connector Into the Back of the Left Slide-Rail
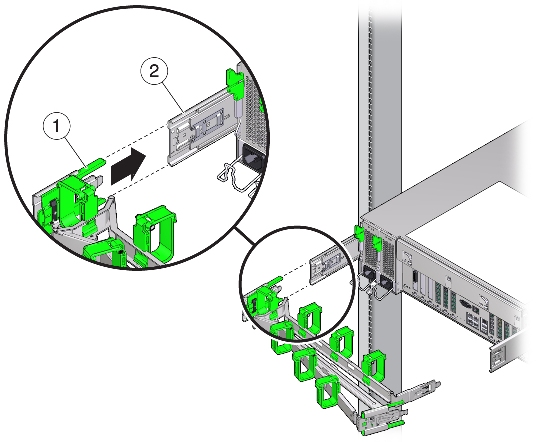
Description of "Figure 3-11 Inserting CMA Slide-Rail Connector Into the Back of the Left Slide-Rail"
-
Install and route cables to your Oracle Exalytics In-Memory Machine, as required.
-
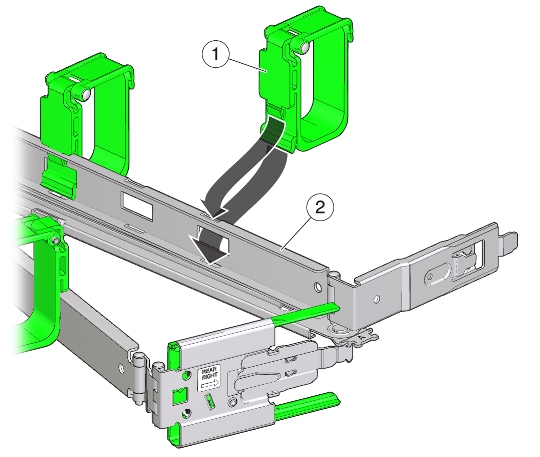
If required, attach the cable hook and loop straps to the CMA, and press them into place to secure the cables, as shown in Figure 3-12.
Note:
Cable hooks and loop straps are preinstalled on the CMA. Perform the procedure in this step if you need to reinstall cable hooks and straps on the CMA.
3.9 Verifying the Operation of the Slide Rails and CMA
Use the following procedure to ensure that the slide-rails and CMA are operating correctly.
Note:
Two persons are recommended for this procedure: one to move the Oracle Exalytics In-Memory Machine in and out of the rack, and one to observe the cables and CMA.
-
Slowly pull the Oracle Exalytics In-Memory Machine out of the rack until the slide-rails reach their stops.
-
Inspect the attached cables for any binding or kinks.
-
Verify that the CMA extends fully from the slide-rails.
-
Push the Oracle Exalytics In-Memory Machine back into the rack, as described in the following sub-steps.
When the Oracle Exalytics In-Memory Machine is fully extended, you must release two sets of slide-rail stops to return the Oracle Exalytics In-Memory Machine to the rack:
-
The first set of stops are levers, located on the inside of each slide-rail, just behind the back panel of the Oracle Exalytics In-Memory Machine. Push in both green levers simultaneously and slide the Oracle Exalytics In-Memory Machine toward the rack. The Oracle Exalytics In-Memory Machine will slide in approximately 18 inches (46 cm) and stop. Verify that the cables and the CMA retract without binding before you continue.
-
The second set of stops are the slide-rail release buttons, located near the front of each mounting bracket (Figure 3-1). Simultaneously push both of the green slide-rail release buttons, and push the Oracle Exalytics In-Memory Machine completely into the rack until both slide-rail locks engage.
-
-
Adjust the cable straps and CMA, as required.
