The purpose of this section is to describe any security configuration changes that must be made after installation. However, the installers for Oracle VM components have been designed to mimimize security risks by default, so potential issues are addressed automatically during the installation procedure. Some general security considerations are listed here:
It is good practice to remove or disable components that are not needed in a given type of deployment. However, Oracle VM is based on a lightweight, optimized version of Oracle Linux: obsolete packages and components are simply not included in the installation media.
Installation requires the creation and assignment of superusers and root passwords so that software can be installed and configured. As soon as the installation and configuration tasks have been completed, it is recommended that you create individual user accounts for each Oracle VM administrator. Consider disabling root access where possible.
Weak or plain-text protocols, such as FTP or standard HTTP, must be disabled by default. For demo and testing purposes it would be acceptable to use them, but you must always be aware that this is insecure. Communications between Oracle VM components are properly secured by default. Oracle VM Manager and the Oracle VM Servers communicate via the Oracle VM Agents, and all agent communication is SSL-encrypted. Access to the Oracle VM Manager is configured to use HTTPS by default. To add a trusted CA certificate, follow the detailed instructions in Section 2.5.1, “Adding a Trusted CA Certificate and Keystore for SSL Encryption”. Additional instructions for the configuration of certificates are also included in this section.
Any files that may contain sensitive information should have restrictive file permissions by default. These files include audit logs, password files and configuration. Oracle VM is configured in such a way that no sensitive data, for example clear text passwords, can be disclosed in any logs or temporary files. File permissions are kept strict by default to prevent unauthorized access, and encryption is applied where required.
Access to the physical servers is tightly restricted by default, which implies that the risk of information being compromised is very small. Therefore, sensitive data such as log files, password files and configuration data are generally well protected in an Oracle VM environment. After successful installation or upgrade of Oracle VM Manager, be sure to remove the log files from
/tmp, as instructed by the installer.
To create a secure production environment you need to obtain and install a trusted certificate from a Certificate Authority (CA). Oracle VM Manager runs on Oracle WebLogic Server, and Oracle WebLogic provides the interface for updating the digital certificate and keystore. To add a trusted CA certificate and keystore, see the procedure set out in the Oracle WebLogic documentation:
Two variables are mentioned in this procedure that you need to know when installing the certificate. The values for these variables in Oracle VM Manager are:
$JAVA_HOME\jre\lib\security   /u01/app/oracle/java/jre/lib/security
$WL_HOME\server\lib           /u01/app/oracle/Middleware/wlserver_10.3/server/lib
Oracle VM has SSL enabled by default, and installs with a self-signed CA certificate. If you connect to Oracle VM Manager over HTTPS at TCP port 7002, you will receive a warning because your browser cannot verify the identity of Oracle VM Manager and considers the connection untrusted. It is recommended that you obtain a certificate from an official Certificate Authority, as described in this section and in the Oracle WebLogic documentation.
To access the Oracle WebLogic Server console, enter:
https://-or-hostname:7002/consolehttp://(HTTP is disabled by default in Release 3.2.1)hostname:7001/console
Log in with the user weblogic and the password you set during the Oracle VM Manager installation.
Communications between Oracle VM Agents and Oracle VM Manager are
SSL-encrypted using an RSA algorithm and 1024-bit private key.
The relevant files are located in
/etc/ovs-agent/cert:
certificate.pemkey.pemrequest.pem
To replace the default self-signed certificate with your own trusted certificate, replace the certificate file.
To generate a new certificate and key files, log on to an
Oracle VM Server and execute the command
ovs-agent-keygen. The command is used as
follows:
# ovs-agent-keygen -h
Usage: ovs-agent-keygen [OPTION]
Generate SSL certificate and key files for Oracle VM Agent XMLRPC Server.
Options:
-f, --force      override existing files
-v, --version    show version number and exit
-h, --help       show this help message and exit
The generated files are placed in the directory mentioned above.
If you use the "-f" option, the existing
files are overwritten.
The Oracle VM Agent password, which you set during the installation of the Oracle VM Servers, can be modified by an administrator via Oracle VM Manager. For details, see Changing Oracle VM Agent Passwords on Oracle VM Servers.
In a default Oracle VM installation, VNC and Live Migration
traffic are secured with the same certificate as the one used
for Oracle VM Agent communications. If required by your security
policy, you can use a different certificate by specifying the
appropriate location in the configuration file
/etc/xen/xend-config.sxp. More
specifically, you must look up the section below in the
configuration file and change the location parameters of the
certificate and key files:
# SSL key and certificate to use for the ssl relocation interface, if # xend-relocation-ssl-server is set. (xend-relocation-server-ssl-key-file/etc/ovs-agent/cert/key.pem) (xend-relocation-server-ssl-cert-file/etc/ovs-agent/cert/certificate.pem)
By default, an instance of the Oracle VM Manager UI can only log into its own core (the API layer). In some situations you may want to log in from a remote location to Oracle VM Manager's core; for example: when using Oracle Enterprise Manager to mange the Oracle VM environment. To enable this, you must perform some set up on the Oracle VM Manager host to allow remote log ins.
Once secure TCP connectivity has been configured, it cannot be disabled again. There are no remote (regular) TCP connections allowed.
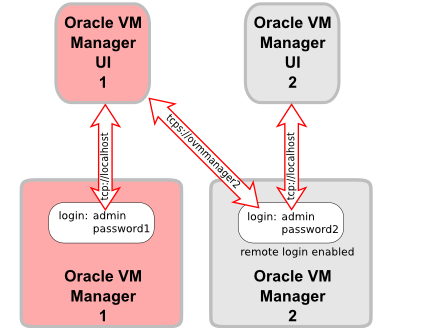
If remote logins are configured, a remote instance of Oracle VM Manager can log into the local instance and interact with all the objects the local instance owns and manages. If you want to enable remote management of your Oracle VM environment, you set up remote TCPS authentication. To do this you must first generate a keystore, then use it to enable remote TCPS connections.
To enable TCPS connections from a remote Oracle VM Manager:
Enter the following commands on the Oracle VM Manager host to create the keystore:
# cd /u01/app/oracle/ovm-manager-3/bin
# ./secureOvmmTcpGenKeyStore.sh
You are prompted to enter the following information:
Generate OVMM TCP over SSH key store by following steps: Enter keystore password:
passwordRe-enter new password:passwordWhat is your first and last name? [Unknown]:nameWhat is the name of your organizational unit? [Unknown]:unitWhat is the name of your organization? [Unknown]:organizationWhat is the name of your City or Locality? [Unknown]:CityWhat is the name of your State or Province? [Unknown]:StateWhat is the two-letter country code for this unit? [Unknown]:country_codeIs CN=name, OU=unit, O=organization, L=City, ST=State, C=country_codecorrect? [no]:yesEnter key password for <ovmm> (RETURN if same as keystore password):passwordRe-enter new password:passwordUse the keystore to enable the TCPS service using the
secureOvmmTcp.shscript, which is in the same directory as the keystore script above. On the Oracle VM Manager host, enter:# ./secureOvmmTcp.sh
You are prompted to enter the following information:
Enabling OVMM TCP over SSH service Please enter the OVM manager user name:
usernameThe local Oracle VM Manager username to use Please enter the OVM manager user password:passwordThe local Oracle VM Manager password to use Please enter the password for TCPS key store :passwordThe keystore password created in the previous script The job of enabling OVMM TCPS service is committed, please restart OVMM to take effect.The username and password entered here are the local Oracle VM Manager authentication credentials to use when logging in from the remote Oracle VM Manager instance.
Restart the local Oracle VM Manager instance:
# /sbin/service ovmm stop
# /sbin/service ovmm start
In the (remote) Oracle VM Manager UI, enable the Management Server URI field as follows: in the Tools and Resources tab, go to Preferences, select Show Management Server URI, and click Apply.
Log out of the current Oracle VM Manager UI session. You can now connect to a remotely running Oracle VM Manager. In the Oracle VM Manager UI login screen, enter the Management Server URI in the top right corner:
tcps://
hostnameUsing the username and password you enabled with the
secureOvmmTcp.shscript.
If you preform an upgrade from Oracle VM Manager 3.0.x to Oracle VM Manager 3.1.1, the scripts above are not included. You should download the scripts by searching the patch 14067211 from the My Oracle Support website at: https://updates.oracle.com/ARULink/PatchDetails/process_form? patch_num=14067211.
Alternatively you can use Java keytool and Oracle VM Utilities which provide more configuration options. For information on configuring secure TCP (TCPS) for Oracle VM Manager, see the My Oracle Support website at: https://support.oracle.com/oip/faces/secure/km/DocumentDisplay.jspx?id=1456338.1.
Oracle VM Manager uses a secure tunnel to protect virtual machine console data traffic across the network. Oracle VM Manager does not make a direct connection but rather uses a VNC proxy and SSL-encrypted tunneling. The virtual machine console is accessed via a client instance of a VNC viewer. The preferred location to install a VNC viewer is on the Oracle VM Manager host server.
Oracle recommends that you install the latest TightVNC package from http://oss.oracle.com/oraclevm/manager/RPMS/
Install TightVNC with this command:
# rpm -ivh tightvnc-java-version.noarch.rpmAny firewall between Oracle VM Manager and the client accessing a virtual machine needs TCP port 15901 to be open for access to the secure VNC proxy. Any firewall between Oracle VM Manager and the Oracle VM Servers needs TCP ports 6900 and above to be open; one port for each virtual machine. For example, if you have 50 virtual machines, you should allow traffic over TCP ports 6900-6949.
For non-encrypted local VNC connections to virtual machines, TCP ports 5900 and above can be used. SSL encryption is preferred from a security standpoint.
For more details about the installation and use of VNC, see Installing and Configuring a VNC Viewer in the Oracle VM Installation and Upgrade Guide.