11 Managing Connector Lifecycle
Oracle Identity Manager offers various solutions for integration with different kinds of IT-based resources in an organization. Oracle Identity Manager connectors are the recommended solution for integration between Oracle Identity Manager and resources that store and use user data. A connector enables exchange of user data between Oracle Identity Manager and a specific resource or target system.
Oracle Identity Manager server uses connectors to perform operations on target systems. Oracle provides connectors for common enterprise resources. You can develop custom connectors for your own resources.
A connector consists of the following artifacts:
-
Binaries (JAR and DLL files) that contain the connector code
-
XML file(s) consisting of data of Objects defined in Oracle Identity Manager, such as an IT resource, resource object, provisioning process and process tasks, process form and child forms, adapters and adapter tasks, lookup definitions, reconciliation rules, and scheduled tasks
-
Integration libraries that enable adapters to perform actions on the target system
For some target systems, third-party integration libraries might be required to enable communication or specific functionality with the target systems.
See Also:
Oracle Identity Manager Connector Concepts for detailed conceptual information about connectors and connector objectsThis chapter provides information about Connector Lifecycle Management (LCM) features. It is divided into the following sections:
11.1 Lifecycle of a Connector
The following are stages in the lifecycle of a connector:
A connector can be installed by clicking the Manage Connector menu on the Advanced Administration section of the Oracle Identity System Administration.
To complete the deployment procedure, you might also need to copy connector files and external code files to destination directories on Oracle Identity Manager and target system host computers. Some connectors require a Remote Manager, which is usually installed on the target system host computer. Some other connectors, specifically the identity connectors, require the local and remote connector server.
Oracle Identity Manager 11.1.1.5.x provide Connector LCM as a new feature to manage connectors and uses Connector Installer (CI) for installing connector.
Installing a connector using Connector Installer is not the same as doing it using Deployment Manager. Although the Deployment Manager offers an alternative approach to import definitions of the objects that constitute a connector, the connector imported using Connector LCM can be managed better as Connector LCM offers a more broader and richer feature than Deployment Manager. Therefore, the Install Connectors feature is the recommended approach for Oracle Identity Manager 11g based connector installation and/or management.
See Also:
-
Oracle Identity Manager Connector documentation for information about copying connector files and external code files to destination directories on Oracle Identity Manager and target system host computers. Connector documentation is available on the Oracle Web site at the following URL:
-
"Identity Connector Framework" in the Oracle Fusion Middleware Developer's Guide for Oracle Identity Manager for information about the Identity Connector Framework and how to use it to create an identity connector.
After deployment, you might customize a connector to meet business requirements that are not addressed by the default configuration of the connector. For example, you might add new attributes for reconciliation and provisioning with the target system. An enhancement of this type requires changes to be made in multiple connector objects, such as Resource Object, Process Definition, and Process Form. See Connector Documentation for detailed information about changes required in connector objects.
You might have more than one installation of a target system. If you have a target system with multiple instances, and data is either same or shared or replicated, such as in Microsoft Exchange or Active Directory connectors, then you do not need to clone the connector. You need to create multiple IT resources for the instances. The target works as a single resource object.
If you have a target system with different installations or schema or data, such as a LDAP server for internal users and another LDAP server for external, contractors, and consumers, then you need to clone the connector. The connectors will work as two separate targets.
There might be a scenario where the connector attributes are different. Then instead of creating a new connector, the existing connector can be cloned by using the XML of the original connector. The Clone Connectors feature of the Advanced Administration enables you to automatically generate copies of a set of connector objects.
To make use of new features introduced in later releases of a connector, you might upgrade a connector by applying patch sets released by Oracle. Typically, upgrading to a new release of a connector involves processes that range from simple changes (such as a JAR file upgrade) to changes that affect most of the adapter tasks that were shipped as part of the connector. You can use the Upgrade Connectors feature to upgrade a connector.
Note:
Upgrading connectors preserve the existing customizations in a connector.Note:
Uninstalling a connector is performed in the development environment and not in production environment.If you stop using a connector, then this action is also provided to additional environments, such as System Integration Testing, User Acceptance Testing, and Staging, where that connector is also stopped.
The need to keep a clean development environment that does not have any unnecessary Oracle Identity Manager objects, you would like to uninstall a particular connector version that you no longer need to use. The Uninstall Connectors utility enables you to uninstall connectors as well as individual connector objects.
Note:
You must have the System Administrator role to perform connector lifecycle management tasks, such as installing connectors including importing connector XML files by using the Deployment Manager, and cloning, defining, upgrading, and uninstalling connectors.Figure 11-1 depicts the connector lifecycle:
11.2 Connector Lifecycle and Change Management Terminology
The following terms have been introduced in this chapter:
-
Oracle-released connector refers to a connector released by Oracle.
-
Custom release or custom connector refers to connectors that you develop as well as Oracle-released connectors that you customize or reconfigure in any way.
-
Source release or source connector refers to the existing release of the connector that you want to upgrade to a different (that is, new) release. For example, if you want to upgrade the SAP User Management connector from release 9.1.2 to release 9.1.2.1, then release 9.1.2 is the source release.
-
Target release or target connector is the release to which you want to upgrade the source release. In the preceding example, SAP User Management release 9.1.2.1 is the target release.
Note:
Some of the preceding terms can be combined to provide a shortened description of the type of connector that is under discussion. For example, a custom source release is a connector that you had created, customized, or reconfigured and now want to upgrade to a target release. -
A configuration XML file contains information that is used during connector installation by the Install Connectors feature. For a connector released by Oracle, the configuration XML file is included in the deployment package. For a custom-developed connector, you might want to develop the individual connector objects on the staging (test) server and then deploy the connector on the production server. In this case, you can create a configuration XML file for the connector if you want to install the connector on the production server by using the Install Connectors feature.
See Also:
"Installing Connectors" for information about the Install Connectors feature. -
A connector XML file contains definitions of the individual objects that constitute a connector. When the XML file is imported into Oracle Identity Manager through the Deployment Manager, these objects definitions are used to create the connector objects in the Oracle Identity Manager database. The manner in which the XML file is imported into Oracle Identity Manager depends on the type of connector:
-
For an Oracle-released connector that is compatible with the Install Connectors feature, the connector XML file is automatically imported when you use the Install Connectors feature. This feature implicitly calls the Deployment Manager to import the connector XML file.
-
For an Oracle-released connector that is not compatible with the Install Connectors feature, you use the Deployment Manager to import the XML file.
-
For a custom connector, you can use the Deployment Manager to first export definitions of objects that you had created on the staging server. The output of this process is the connector XML file. You can then import the file into the production server. Alternatively, if you create a complete deployment package (including the configuration XML file) for the connector, then you can use the Install Connectors feature to install the connector. This feature implicitly calls the Deployment Manager to import the file.
See Also:
"Exporting Connector Object Definitions in Connector XML Format" for information about exporting connector object definitions by using the Deployment Manager
-
11.3 Viewing Connector Details
To view the details of a connector:
Note:
In this release of Oracle Identity Manager, the connector lifecycle management functionality have been introduced such as defining, cloning, upgrading, and uninstalling connectors. For all these features, complete connector DM-XML is required in the database, and this is the source for all the connector lifecycle management activities.When Oracle Identity Manager is upgraded from earlier releases, such as Release 9.1.x or 11g Release 1 (11.1.1.5), to 11g Release 2 (11.1.2), you must define the connector so that all the lifecycle management operations on the connector are possible to perform. Without defining the connector, it is not possible to search for the installed connector, upgrade the installed connector, clone the connector, and uninstall the connector. See "Defining Connectors" for information about defining connectors.
-
Login to Oracle Identity System Administration.
-
In the left pane, under System Management, click Manage Connector.
-
In the Connector Name field, enter the name of the connector and then click Search.
-
The search results show the details of the connector.
If you do not know the full name of the connector, then you can perform a wildcard search for a connector. For example, if you want to display details of the Microsoft Active Directory connector installed in your operating environment, then you can use "Direct" as the search string.
If you want to display details of all installed connectors, then leave the Connector Name field blank and click Search.
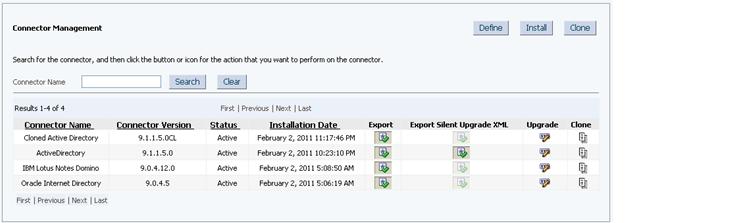
Figure 11-2 shows the search results table.
Figure 11-2 Search Results Table Showing Details of Connectors
Description of "Figure 11-2 Search Results Table Showing Details of Connectors"
The search results table displays the connector name, release number, status, and the date and time at which the connector was installed. The remaining columns of the table provide icons that you can use to begin any of the lifecycle management operations on a connector.
11.4 Installing Connectors
In the Advanced Administration section, you can click System Management, Deployment Manager, Manage Connector, and then click Install to install a connector. The following sections describe this feature and the procedure to use it:
Note:
To determine whether you can install an Oracle-released connector by using the Install Connectors feature, see the connector guide.11.4.1 Overview of the Connector Deployment Process
To install a connector, you perform some or all of the following tasks:
-
Verify the installation requirements.
-
Configure the target system.
-
Copy the connector files and external code files to directories on the Oracle Identity Manager server.
-
Configure Oracle Identity Manager.
-
Import the connector XML files.
-
Configure reconciliation.
-
Configure provisioning.
-
Configure Secure Sockets Layer (SSL).
Of these tasks, the Install Connectors feature automatically performs the following:
Note:
You manually perform the remaining tasks. Connector documentation provides instructions.-
Copying the connector files and external code files to directories on the Oracle Identity Manager server
-
Importing the connector XML files
-
Compiling adapters (which is part of the procedure to configure provisioning)
At the end of a successful installation, an entry is created in a table in the Oracle Identity Manager database that stores data about installed connectors. "Defining Connectors" describes the data that is stored in the database.
11.4.2 Creating the User Account for Installing Connectors
Users belonging to the SYSTEM ADMINISTRATORS group of Oracle Identity Manager can install connectors. Alternatively, members of a group to which you assign the required menu items and permissions can install connectors.
See Also:
The "Creating and Managing User Groups" section in the connector guide for information about creating groups and assigning menu items and permissions to them.The required permissions are the following:
-
Form Designer (Allow Insert, Write Access, Delete Access)
-
Structure Utility.Additional Column (Allow Insert, Write Access, Delete Access)
-
Meta-Table Hierarchy (Allow Insert, Write Access, Delete Access)
-
User Should belong to SYSTEM ADMINISTRATORS group.
The required menu item is Deployment Management Install Connector.
To install a connector, if you want to use a user account that does not belong to the SYSTEM ADMINISTRATORS group, then you must apply these permissions and menu item to one of the groups to which the user account belongs.
11.4.3 Installing a Connector
Note:
From this release onward, re-installing a connector is not supported. You cannot install a connector version which had already been installed in Oracle Identity Manager. However, if the installation process is not successful, Oracle Identity Manager allows you to reinstall the connector.To install a connector:
-
Log in to Oracle Identity System Administration by using the user account described in "Creating the User Account for Installing Connectors".
-
In the left pane, under System Management, click Manage Connector.
-
Click Install in the top-right corner of the page.
-
From the Connector List list, select the connector that you want to install. This list displays the names and release numbers of connectors whose installation files you copy into the default connector installation directory:
OIM_HOME/server/ConnectorDefaultDirectoryIf you have copied the installation files into a different directory, then:
-
In the Alternative Directory field, enter the full path and name of that directory.
-
To repopulate the list of connectors in the Connector List list, click Refresh.
-
From the Connector List list, select the connector that you want to install.
Figure 11-3 shows the Select Connector to Install page of the Install Connector wizard:
Figure 11-3 The Select Connector to Install Page
Description of "Figure 11-3 The Select Connector to Install Page"
-
-
Click Load.
The following information is displayed:
-
Connector installation history
The connector installation history is information about previously installed releases of the same connector.
-
Connector dependency details
There are some connectors that require the installation of some other connectors before you can start using them. For example, before you use the Novell GroupWise connector, you must install the Novell eDirectory connector. Novell eDirectory is called the dependency connector for Novell GroupWise.
The connector dependency details include the list of connectors that must be installed before you can install and use the selected connector. These details also include information about any dependency connectors that are already installed, and whether or not any of the installed dependency connectors must be upgraded. However, after showing the dependency information, the Install Connector wizard allows you to install the connector.
You must ensure that the correct versions of dependency connectors are installed after you complete the current installation.
Figure 11-4 shows the page with connector history details and connector dependency details:
Figure 11-4 Connector History and Dependency
Description of "Figure 11-4 Connector History and Dependency"
-
-
To start the installation process, click Continue.
The following tasks are performed in sequence:
-
Configuration of connector libraries
-
Import of the connector XML files (by using the Deployment Manager)
-
Compilation of adapters
Figure 11-5 shows the Connector Installation page of the Install Connector wizard:
Figure 11-5 The Connector Installation Page
Description of "Figure 11-5 The Connector Installation Page"
On successful completion of a task, a check mark is displayed for the task. If a task fails, then an X mark and a message stating the reason for failure are displayed. Depending on the reason for the failure, make the required correction and then perform one of the following steps:
-
Fix the cause of the error, and then retry installation by clicking Retry.
-
Cancel the installation and begin again from step 1 of the installation procedure.
One of the reasons for installation failure could be a mismatch between information about files and directory paths in the configuration XML file and the actual files and directory paths. If this happens, then an error message is displayed.
For example, suppose the actual name of the JAR file for reconciliation is
recon.jar. If the name is provided asrecon1.jarin the configuration XML file, then an error message is displayed.If such an error message is displayed, then perform one of the following steps:
-
Make the change in the configuration XML file, and then retry installation from the Step 1: Select Connector to Install page onward.
In the example described earlier, change the name of the JAR file to
recon.jarin the configuration XML file, and then retry installation from the Step 1: Select Connector to Install page onward. -
Make the change in the actual name or path of the file or directory, and then use the Retry option.
In the example described earlier, change the name of the JAR file to
recon1.jarand then click the Retry button.
-
-
If all three tasks of the connector installation process are successful, then a message indicating successful installation is displayed. In addition, a list of the steps that you must perform after the installation is displayed. These steps are as follows:
-
Ensuring that the prerequisites for using the connector are addressed
Note:
There are no prerequisites for some connectors. -
Creating an IT resource for the connector
The IT resource type is displayed. You must create an IT resource of the specified type. To do this, go to Advanced Administration, Configuration, Resource Management, Create IT Resource. See the "Creating IT Resources" section in the connector guide for more information.
-
Configuring the scheduled tasks that are created when you installed the connector.
The names of the scheduled tasks that are created during the XML file import process are displayed. You must configure these scheduled tasks. To do this, go to Advanced Administration, System Management, Scheduler. Alternatively, in the System Management page, you can search Scheduled Jobs. See the "Managing Scheduled Tasks" section in the connector guide for more information.
-
11.5 Defining Connectors
Connector LCM operations such as Upgrade, Clone, and Uninstall needs a source for each connector where all the connector objects reside. The Connector Install stores the Deployment Manager (DM) XML in Oracle Identity Manager database.
Typically, you will install the shipped connector and then perform one or both of the following operations:
-
Customize the connector by, for example, add/ modify existing object definitions, add additional adapters
-
(Re) Configure the connector by, for example, changing attribute names and key fields
The DM XML in Oracle Identity Manager database, which will be the reference for all Connector LCM operations need to be updated for customization changes. Oracle Identity Manager provides Define feature to update the DM XML stored in Oracle Identity Manager database with customization changes. Define feature is similar to Export where user need to add all the connector objects related to a specific connector. The end result of defining a connector is an XML file, which will be updated in Oracle Identity Manager database.
At this point, the customized or re-configured connector is not the same as the Oracle-released connector. The connector XML file for the Oracle-released connector might not be valid for the customized or re-configured connector.
In the Advanced Administration page of the Oracle Identity System Administration, you can define a customized or re-configured connector. Defining a connector is equivalent to registering the connector with Oracle Identity Manager.
Note:
You must add only those Oracle Identity Manager artifacts that are specific to the connector and do not add default objects or any other connector objects that are shared across connectors. The defined XML is the source for life cycle operations such as upgrade, clone, and uninstall. If an object is used in define and is shared across connectors or a default Oracle Identity Manager object, then there will be un-intended behavior. For example, a Lookup Definition which is there by default in Oracle Identity Manager is added as a part of define, then clone operation will create another copy of the object, which is not required. The uninstall will delete this default object from Oracle Identity Manager as it is defined specific to a connector. Such incorrect definition will have impact on Oracle Identity Manager functionality. Therefore, you must be careful while adding an object while defining a connector.When you define a connector, a record representing the connector is created in the Oracle Identity Manager database. If this record already exists, then it updates:
-
The name of the connector. For example,
Microsoft Active Directory. -
The release number of the connector. For example,
9.1.1. -
The connector XML definitions.
Note:
-
You can define the connector XML definitions in the form of an XML file. See the "Exporting Connector Object Definitions in Connector XML Format" section of the connector guide for more information. You can then use this connector XML file to build the installation package for installing the connector on a different Oracle Identity Manager installation.
-
Oracle recommends defining a connector immediately after customizing the connector or updating the DM XML file with the customization changes.
A connector is automatically defined when you install it using the Install Connectors feature or when you upgrade it using the Upgrade Connectors feature. Therefore, if you install a connector and want to clone it without customizing the connector, then there is no need to define the connector.
You must manually define a connector, otherwise newer version (which basically pertains to entry in CIH table) of connector may not be reflected even though import of new XML was successfully completed. Perform this procedure only if:
-
You import the connector by using the Deployment Manager.
-
You customize or reconfigure the connector.
Note:
You can continue to use a connector without defining it after you customize or reconfigure a connector or after you upgrade Oracle Identity Manager. However, if you want to upgrade, clone, or uninstall the connector, then you must first define it. -
You upgrade Oracle Identity Manager.
-
It is a custom connector that you develop.
Note:
To determine whether you can define a particular release of a connector by using the Oracle Identity System Administration, see the documentation for that release of the connector.-
Log in to Oracle Identity System Administration.
-
In the left pane, under System Management, click Manage Connector.
-
On the Connector Management window, click Define. The Connector Management Wizard is displayed, as shown in Figure 11-6:
Figure 11-6 Connector Management Wizard for Defining Connectors
Description of "Figure 11-6 Connector Management Wizard for Defining Connectors"
-
On the first page of the wizard, select either Resource or Process from the Search list. In the adjoining field, you can enter a search string and the asterisk (*) as a wildcard character to refine your search for resource objects or process definitions belonging to the connector. Then, click Search.
Most of the objects that constitute a connector are linked to the resource objects and process definition of the connector. By selecting the resource objects or process definition, you automatically select the objects linked with them. Some of the connector objects, for example, scheduled task, do not have dependency with the resource object. Ensure that you search all the attributes and add them while defining.
When you click Search, the list of resource objects or process definitions that meet the specified search criteria are displayed.
-
Select the check boxes for the resource objects or process definitions that are part of the connector.
Figure 11-7 shows step 1 of the Connector Management Wizard with search results for connector objects:
Figure 11-7 Step 1 of the Connector Management Wizard
Description of "Figure 11-7 Step 1 of the Connector Management Wizard"
-
Click Select Children.
-
From the list of connector objects displayed, ensure that all the objects belonging to the connector are selected. Then, click Select Dependencies.
Note:
For an Oracle-released connector, the adapters that are part of the connector are listed in the connector guide. Select the check boxes for those adapters.Figure 11-8 shows step 2 of the Connector Management Wizard:
Figure 11-8 Step 2 of the Connector Management Wizard
Description of "Figure 11-8 Step 2 of the Connector Management Wizard"
-
After you review the list of objects that you have selected, click Confirmation.
Figure 11-9 shows step 3 of the Connector Management Wizard with the list of selected connector objects:
Figure 11-9 Step 3 of the Connector Management Wizard

Description of "Figure 11-9 Step 3 of the Connector Management Wizard"
-
Click Add For Define.
Figure 11-10 shows step 4 of the Connector Management Wizard:
Figure 11-10 Step 4 of the Connector Management Wizard
Description of "Figure 11-10 Step 4 of the Connector Management Wizard"
-
To proceed, select any one of the following options, and click OK:
-
Add more (Go to Step 1): Select this option if you want to go to step 1 of the Connector Management Wizard and select more connector objects.
-
Exit wizard and show full selection: Select this option if you want to exit the Connector Management Wizard and display the complete list of selected connector objects.
Figure 11-11 shows the page with the options to add more connector objects or to exit the wizard:
Figure 11-11 Options to Select More Objects or Exit
Description of "Figure 11-11 Options to Select More Objects or Exit"
-
-
On the page that is displayed, only objects shown in the Current Selections list are included in the connector definition. You can drag objects across lists. For example, you can drag an adapter from the Current Selections list to the Unselected Children list. After you make the required changes, click Define.
Note:
Make sure that you have added all the Oracle Identity Manager connector objects specific to defining connector. If you do not have a specific connector object while defining the connector, then upgrade, clone, or uninstall may not handle the undefined object.The following are Oracle Identity Manager artifacts that are generally associated with almost all the connectors:
-
Resource objects
-
Event handlers
-
Process forms
-
IT resources
-
Data object definitions
-
Prepopulate adapters
-
Processes
-
IT resource type definitions
-
Task adapters
-
Lookups
-
Scheduled tasks
Figure 11-12 shows the page with the complete list of selected connector objects that are to be included in the connector definition and the unselected connector dependencies:
-
-
In the dialog box that is displayed, select one of the following options:
-
Select the name of the connector, and then enter a release number for it: Select this option if an earlier release of this connector already exists on this Oracle Identity Manager installation. In addition, select a connector name and enter a release number.
-
Enter a name and release number of the connector: Select this option if an earlier release of this connector does not exist on this Oracle Identity Manager installation. In addition, enter a connector name and release number.
Figure 11-13 shows the dialog box to specify the connector name and release number:
Figure 11-13 Connector Name and Release Number
Description of "Figure 11-13 Connector Name and Release Number"
-
-
Click Define.
-
At the end of the process, a message stating that the operation was successful is displayed. Click Close.
11.6 Cloning Connectors
Note:
In this guide, the term Clone Connectors feature refers to the set of Oracle Identity Self Service pages that you can use to clone connectors.This section describes the procedure to create a copy of a connector by setting new names for some of the objects that comprise the connector. The outcome of the process is a new connector XML file. Most of the connector objects, such as Resource Object, Process Definition, Process Form, IT Resource Type Definition, IT Resource Instances, Lookup Definitions, Adapters, Reconciliation Rules and so on in the new connector XML file have new names.
Note:
Oracle Identity Manager offers a different feature for using a single connector to integrate:-
Multiple installations of a particular target system with Oracle Identity Manager
-
A target system that stores data about multiple user types (for example, employee and contractor) and requires Oracle Identity Manager to provide a different resource object for each user type
See the connector guide for information about how to use access policies to create resource objects for different user types on a particular target system.
This section contains the following topics:
11.6.1 Guidelines for Cloning a Connector
Apply the following guidelines while using the Clone Connectors feature:
-
The Clone Connectors feature does not support request dataset cloning. This is because request dataset definitions are not usually included in the connector XML file. Cloned copy of the connector is needed when there is a change in attributes of the same target but for different instances. If attributes are different, then the same request dataset cannot be used.
-
A connector must be compatible with the Clone Connectors feature before you can use the utility to create a clone of the connector. For an Oracle-released connector, see the connector guide for information about whether or not the connector is supported by the Clone Connectors feature.
-
Validation performed on the names of connector objects does not cover the names of objects that belong to other connectors. However, when you import the connector XML file that is created by the Clone Connectors feature, the Deployment Manager throws an error when it encounters duplicate object names. This is illustrated by the following example:
AD USER is the name of a resource object belonging to the Microsoft Active Directory connector. Suppose My_RO is the name of an existing resource object defined in the Oracle Identity Manager database. If the new name that you specify for the AD_USER resource object is My_RO, then the Clone Connectors feature does not display an error message stating that a resource object with the specified name already exists.
11.6.2 Cloning a Connector
Cloning a connector involves performing a two-step procedure:
Step 1: Create the connector XML file for the cloned connector
To create the connector XML file for the cloned connector:
-
Log in to Oracle Identity System Administration.
-
In the left pane, under System Management, click Manage Connector.
-
The next step depends on the source XML that you want to use to create the clone:
-
If you want to use a connector XML file as the source, then:
-
Click Clone in the upper-right corner.
-
On the Step 1: XML Selection from File System page, use the Browse option to navigate to and select the connector XML file.
Figure 11-14 shows the XML Selection from File System page of the Connector Management - Cloning wizard:
Figure 11-14 The XML Selection from File System Page
Description of "Figure 11-14 The XML Selection from File System Page"
-
Click Continue.
-
-
If you want to use the connector XML that was stored in the database when the connector was defined, then:
-
Use the Search feature to search for the connector. Figure 11-15 shows the page to search for the connector:
-
In the search results that are displayed, click the Clone icon in the row for the connector that you want to clone.
-
-
-
On the Step 2: Provide New Names for ROs page, enter new names for the resource objects of the clone.
If the connector has multiple resource objects, then the new name that you specify for each resource object must be different from the names of all the existing resource objects of that connector.
Click Continue after you specify new names for all the resource objects.
Figure 11-16 shows the Provide New Names for Resource Objects page of the Connector Management - Cloning wizard:
Figure 11-16 The Provide New Names for Resource Objects Page
Description of "Figure 11-16 The Provide New Names for Resource Objects Page"
-
On the Step 3: Provide New Names for Process Definitions page, enter new names for the process definitions of the clone.
If the connector has multiple process definitions, then the new name that you specify for each process definition must be different from the names of all the existing process definitions of that connector.
Click Continue after you specify new names for all the process definitions.
Figure 11-17 shows the Provide New Names for Process Definitions page of the Connector Management - Cloning wizard:
Figure 11-17 The Provide New Names for Process Definitions Page
Description of "Figure 11-17 The Provide New Names for Process Definitions Page"
-
On the Step 4: Provide New Names for Process Forms page, enter new names for the process forms of the clone.
If the connector has multiple process forms, then the new name that you specify for each process form must be different from the names of all the existing process forms of that connector.
Click Continue after you specify new names for all the process forms.
Figure 11-18 shows the Provide New Names for Process Forms page of the Connector Management - Cloning wizard:
Figure 11-18 The Provide New Names for Process Forms Page
Description of "Figure 11-18 The Provide New Names for Process Forms Page"
-
On the Step 5: Provide New Names for IT Resource Type Definitions page, enter new names for the IT resource type definitions of the clone.
If the connector has multiple IT resource type definitions, then the new name that you specify for each IT resource type definition must be different from the names of all the existing IT resource type definitions of that connector.
Click Continue after you specify new names for all the IT resource type definitions.
Figure 11-19 shows the Provide New Names for IT Resource Type Definitions page of the Connector Management - Cloning wizard:
Figure 11-19 The Provide New Names for IT Resource Type Definitions Page
Description of "Figure 11-19 The Provide New Names for IT Resource Type Definitions Page"
-
On the Step 6: Provide New Names for IT Resources page, enter new names for the IT resources of the clone.
If the connector has multiple IT resources, then the new name that you specify for each IT resource must be different from the names of all the existing IT resources of that connector.
Click Continue after you specify new names for all the IT resources.
Figure 11-20 shows the Provide New Names for IT Resource Type Definitions page of the Connector Management - Cloning wizard:
Figure 11-20 The Provide New Names for IT Resources Page
Description of "Figure 11-20 The Provide New Names for IT Resources Page"
-
On the Step 7: Provide New Names for Scheduled Tasks page, enter new names for the scheduled tasks of the clone.
Enter new names for the scheduled tasks. However, you cannot use the same set of scheduled tasks for the clone and the original connector.
Click Continue.
Figure 11-21 shows the Provide New Names for Scheduled Tasks page of the Connector Management - Cloning wizard:
Figure 11-21 The Provide New Names for Scheduled Tasks Page
Description of "Figure 11-21 The Provide New Names for Scheduled Tasks Page"
-
On the Step 8: Provide New Names for Lookup Type Definitions page, enter new names for the lookup definitions of the clone.
Click Continue.
Figure 11-22 shows the Provide New Names for Lookup Type Definitions page of the Connector Management - Cloning wizard:
Figure 11-22 The Provide New Names for Lookup Type Definitions Page
Description of "Figure 11-22 The Provide New Names for Lookup Type Definitions Page"
-
On the Step 9: Provide a Prefix for Adapters page, enter the string that will be set as the prefix for the copies of the adapters. Then, click Continue.
You must ensure that the prefix that you specify does not cause the full name of any adapter to exceed 80 characters. The Clone Connectors feature cannot check if this limit is exceeded. However, when you import the connector XML file created for the clone, the Deployment Manager throws an error. Remember that the Deployment Manager is called even when you build a deployment package for the clone and use the Install Connectors feature to install the clone.
You can use the Design Console to determine the character length of the longest adapter name.
Figure 11-23 shows the Provide a Prefix for Adapters page of the Connector Management - Cloning wizard:
Figure 11-23 The Provide a Prefix for Adapters Page
Description of "Figure 11-23 The Provide a Prefix for Adapters Page"
-
On the Step 10: Provide New Names for Reconciliation Rules page, enter new names for the reconciliation rules of the clone.
Figure 11-24 shows the Provide New Names for Reconciliation Rules page of the Connector Management - Cloning wizard:
Figure 11-24 The Provide New Names for Reconciliation Rules Page
Description of "Figure 11-24 The Provide New Names for Reconciliation Rules Page"
-
On the Step 11: Object Names Summary page, review the names that you have set for the connector objects of the clone and then click Continue.
Figure 11-25 shows the Object Names Summary page of the Connector Management - Cloning wizard:
Figure 11-25 The Object Names Summary Page
Description of "Figure 11-25 The Object Names Summary Page"
-
On the Step 12: Object Clone Generation page, click Generate XML.
Figure 11-26 shows the Object Clone Generation page of the Connector Management - Cloning wizard:
Figure 11-26 The Object Clone Generation Page
Description of "Figure 11-26 The Object Clone Generation Page"
-
In the File Download dialog box, use the Save option to save the connector XML file of the clone to a location of your choice.
Figure 11-27 shows the File Download dialog box:
Figure 11-27 The File Download Dialog Box
Description of "Figure 11-27 The File Download Dialog Box"
Step 2: Install the clone connector
You can install the clone connector by using one of the following approaches:
Note:
You can install the clone connector on either the same or a different Oracle Identity Manager installation.-
Use the Deployment Manager to import the connector XML file. If you use Deployment Manager import to install the connector, then you need to define the cloned connector. This will enlist the cloned connector in the list of connectors in Connector Management Search. If the connector is imported in different Oracle Identity Manager environment where the original connector does not exist, then you need to upload the related Jar files of the connector using JarUpload utility and adapters need to be compiled after all connector jars have been uploaded.
-
Create a deployment package for the cloned connector, and then install it using the Install Connectors feature. For a sample, see the contents of the deployment package for any Oracle-released connector.
11.6.3 Postcloning Steps
After a copy of the connector is created by setting new names for connector objects, some objects might contain the details of the old connector objects. Therefore, you must modify the following Oracle Identity Manager objects to replace the base connector artifacts or attribute references with the corresponding cloned artifacts or attributes:
-
Lookup Definition: If the lookup definition contains the old lookup definition details, then it must be modified to provide the new cloned lookup definition names. If the encode and decode values are referring the base connector attribute references, then these must be replaced with new cloned attributes.
-
Scheduled Task: The base connector resource object name in the scheduled task must be replaced with the cloned resource object name. If the scheduled task parameter has any data referring to the base connector artifacts or attributes, then these must be replaced with the new cloned connector artifacts or attributes.
11.7 Exporting Connector Object Definitions in Connector XML Format
As mentioned earlier, the Oracle Identity Manager database stores the definitions of all connector objects. You can export these definitions to create a connector XML file for a particular connector. By using the Deployment Manager, you can import the connector XML file to create the connector object definitions in another Oracle Identity Manager installation.
Alternatively, you can use the connector XML file as one of the components of a deployment package that you create for the connector. This deployment package can then be installed using the Install Connectors feature. For a sample, see the contents of the deployment package for any Oracle-released connector. Another important component of a deployment package is the configuration XML file, which is used by the Install Connectors feature. You must manually create the configuration XML file.
See Also :
Connector guide for information about the contents of the configuration XML fileTo export connector object definitions in connector XML format:
-
Log in to Oracle Identity System Administration.
-
In the left pane, under System Management, click Manage Connector.
-
You can use one of the following options to export the connector XML file:
-
If you want the XML file to include definitions of only specific connector objects, then use the Export button to open the Deployment Manager. See the "Using the Deployment Manager" chapter in the connector guide for detailed information about using this feature to select connector objects whose definitions you want to include in the connector XML file.
-
If you want to create the connector XML file out of the connector XML stored in the database when the connector was defined, then:
-
In the Connector Management page, use the Search feature to display the connector for which you want to create the connector XML file.
-
Use the Export icon displayed in the connector row to export the connector XML file from the entry created in the database when defining the connector.
Figure 11-28 shows the Connector Management page:
Figure 11-28 The Connector Management Page
Description of "Figure 11-28 The Connector Management Page"
-
-
11.8 Upgrading Connectors
Connector Upgrade utility is responsible for upgrading the OIM artifacts from source version to the target version, by retaining the customer customization done on the source connector. Connector upgrade does not handle connector library upgrade/update. User need to manually upgrade the libraries involved in connector.
The following are sample scenarios that describe a need for upgrading a connector:
-
Reconfiguring or customizing an existing connector
After you install a connector, you might customize or reconfigure it according to your requirements. For example, you might add new attributes for reconciliation and provisioning and modify the scheduled tasks for reconciliation or lookup field synchronization. Ideally, you would make these changes to the connector on a staging server. You would then want to upgrade the connector deployed on your production server to the version that you create by making changes on the staging server.
-
Upgrading a customer-developed connector
You might have developed your own connector. When an Oracle-released upgrade is available for your connector, you might want to upgrade from your connector to the Oracle-released connector. For example, suppose you have developed and are using a connector for IBM Lotus Notes and Domino. When Oracle ships a new release of Oracle Identity Manager Connector for IBM Lotus Notes and Domino, you might want to use some of the features included in the new release. You can use the Upgrade Connectors feature to upgrade from your connector to the Oracle-released connector.
-
Upgrading an Oracle-released connector
Oracle ships connector upgrades. An upgrade includes enhancements and fixes that you might need. For example, if you are currently using SAP User Management release 9.1.2, then you might want to upgrade to release 9.1.2.3 of the same connector when that release is available.
In scenarios such as these, you can use the Upgrade Connectors feature to upgrade the connector.
Upgrading connectors can be done by two ways:
-
Silent mode upgrade: Used in staging and production environments
-
Wizard mode upgrade: Used in development environment
In this guide, Wizard upgrade, which is performed using Oracle Identity System Administration pages is described.
This section is divided into the following topics:
11.8.1 Upgrade Use Cases Supported by the Connector Upgrade Feature
The following types of source connectors are supported by the Upgrade Connectors feature:
-
Customer-developed connectors
-
Oracle-released connectors that are not supported by the Install Connectors feature
-
Oracle-released connectors that are supported by the Install Connectors feature
-
Oracle-released connectors that are supported by the Install Connectors feature and have been customized
-
Cloned connectors
The upgrade process does not cover the following objects:
-
E-mail definitions
-
Password policies
-
Error message definitions
-
Business rule definitions
-
Object forms
-
Access policies
Note:
-
Connector lifecycle management does not support the upgrade of a trusted connector if the source connector uses the Xellerate User resource object for trusted source configuration. Therefore, you must manually upgrade the connector. Contact Oracle Support for more information.
-
Connector lifecycle management does not support the upgrade of a connector from the target mode (source version) to the trusted mode (target version). Similarly, upgrading from trusted mode to the target mode is also not supported.
Use Case 1: Custom-Developed Source Connector
A custom-developed source connector must meet the following requirements so that it is compatible with the Upgrade Connectors feature:
-
The connector must be defined in Oracle Identity Manager. See "Defining Connectors" if you want to manually define the connector.
-
The connector must have a configuration XML file. See the connector guide for information about configuration XML files.
The following are sample events that can take place before you upgrade a custom-developed source connector:
-
You develop the connector and its configuration XML file.
-
Create a deployment package that is compatible with the Connector Installation feature. When you use this feature to deploy the connector on the production server, the connector is automatically defined at the end of the installation process.
-
You use the connector for reconciliation and provisioning. Target system resources are allocated (through reconciliation and provisioning) for OIM Users.
-
You modify the connector on the staging server, redefine it, and then regenerate the connector XML file.
Use Case 2: Oracle-released connector that is not supported by the Install Connectors feature
A connector that is not supported by the Install Connectors feature connector must meet the following requirements so that it is compatible with the Upgrade Connectors feature:
-
The connector must be defined in Oracle Identity Manager. See "Defining Connectors" if you want to manually define the connector.
-
The connector must have a configuration XML file. See the connector guide for information about configuration XML files.
Sample events and the upgrade procedure for this use case are the same as those for Use Case 1.
Use Case 3: Oracle-released connector that is installed using the Install Connectors feature
A connector that is installed using the Install Connectors feature meets the requirements specified for Use Cases 1 and 2.
Use Case 4: Oracle-released connector that has been installed and then customized
A connector that is supported by the Install Connectors feature meets the requirements specified for Use Cases 1 and 2. However, customizations are overwritten during the upgrade process. For example, if you have added an attribute in a scheduled task and also modified the JAR file for reconciliation, then this customization would be lost after the upgrade. To work around this issue:
-
Keep a record of customizations that you implement on a connector.
-
After you upgrade the connector, reapply the customizations.
A connector that is installed using the Clone Connectors feature meets the requirements specified for Use Cases 1 and 2.
After the upgrade operation, you can use each clone to manage resource data that was collected through the clone before the upgrade.
11.8.2 Connector Object Changes Supported by the Upgrade Connectors Feature
Before you upgrade a connector, you might have reconfigured or customized the connector by making changes in individual connector objects. The upgrade process itself changes individual connector objects. The following sections list connector object changes supported by the Upgrade Connectors feature. These changes may have been performed manually (that is, at any time before the Upgrade Connectors feature is used) or may be performed by the Upgrade Connectors feature itself.
11.8.2.1 Resource Object Changes
The Upgrade Connectors feature can run on a resource object on which any combination of the following changes have been made. In addition, an upgrade operation might involve any combination of the following changes to a resource object.
-
Status definitions can be added or deleted.
-
Administrators can be assigned or deleted.
-
Password policies can be added or deleted.
-
User-defined fields (UDFs) can be added or deleted.
-
Dependencies with other resource objects can be assigned or deleted.
-
Object authorizers can be assigned or deleted. In addition, the priority number assigned to the authorizers can be modified.
-
Process determination rules can be assigned or deleted.
-
Event-handler adapters can be assigned or deleted.
-
Resource object fields that are not present in the connector XML of the target connector are marked as obsolete.
-
Customizations performed on the resource object are not retained.
After the upgrade, the new name of the resource object is the one specified in the connector XML of the target connector.
11.8.2.2 Process Definition Changes
The Upgrade Connectors feature can run on a process definition on which any combination of the following changes have been made. In addition, an upgrade operation might involve any combination of the following changes to a process definition.
-
The existing process definition can be replaced by a new process definition.
-
The existing provisioning definition can be renamed.
-
Existing reconciliation field mappings can be retained without change or modified.
-
New process tasks can be added.
-
Custom process tasks can be retained without a change.
-
Default process tasks can be retained, but you need to confirm that there are no changes in the default process task in the new version. Refer to the connector guide for more information.
-
Any combination of the following changes can be made to an existing process task:
-
The name and properties of the task can be modified.
-
An attached event handler-adapter can be modified.
-
Preceding and dependent tasks can be added, modified, or deleted.
-
New response codes can be added.
-
Existing response codes can be modified or deleted.
-
New tasks can be generated.
-
Undo tasks and recovery tasks can be modified.
-
Task-to-object status mapping can be modified.
-
Assignment rules can be modified.
-
-
Existing process tasks can be deleted.
After the upgrade, the new name of the process definition is the one specified in the connector XML of the target connector.
11.8.2.3 Resource Object Changes
To update the resource bundles:
-
If there are any customization on the resource bundles such as adding new entries to the connector resource bundles, the changes need to be applied on the resource bundles present in the "resources" folder of the connector distribution bundle. The existing resource bundles present in Oracle Identity Manager database can be downloaded using the DownloadResourceBundles utility available under OIM_HOME/server/bin.
-
Use DownloadResourceBundles utility (available under OIM_HOME/server/bin) to delete all the resource bundles specific to the connector from Oracle Identity Manager database.
-
Use UploadResourceBundles utility (available under OIM_HOME/server/bin) to upload all the resource bundles specific to the connector to Oracle Identity Manager database.
11.8.2.4 Process Form Changes
The Upgrade Connectors feature can run on a process form on which any combination of the following changes have been performed. In addition, an upgrade operation might involve any combination of the following changes to a process form.
Note:
-
An upgrade operation works on only the active version of the process form. No changes are made to earlier versions.
-
The existing process form cannot be renamed.
-
Columns can be added, modified, or deleted.
-
Child forms can be added, modified, or deleted.
-
Pre-populate adapters can be added.
-
The name, mappings, order, and rule of existing pre-populate adapters can be modified.
-
The user can manually add the customizations to the active version if they wish to add certain fields to the new version that were present in the existing form.
-
If the form attribute is retained and the corresponding connector objects, for example Lookup Definition and IT Resource Type Definition are removed to which this attribute has references, then you need to modify the form attribute properties by pointing it to the correct connector object.
After the upgrade, the name of the process form is the version number of the upgraded connector.
11.8.2.5 Lookup Definition Changes
The Upgrade Connectors feature can run on a lookup definition on which any combination of the following changes have been made. In addition, an upgrade operation might involve any combination of the following changes to a lookup definition.
-
Lookup definitions can be added.
Note:
Existing lookup definitions are not deleted during an upgrade operation. -
Existing lookup definitions can be retained or modified. During an upgrade operation, new entries in an existing lookup definition are appended after the existing entries.
11.8.2.6 Adapter Changes
The Upgrade Connectors feature can run on an adapter on which any combination of the following changes have been made. In addition, an upgrade operation might involve any combination of the following changes to an adapter.
Note:
Existing adapters are not deleted during an upgrade operation.-
New adapters can be added.
-
The custom adapters are retained as part of upgrade. If there are any customization on the default adapters, these changes need to be applied after upgrade as all the default adapters will be overwritten.
-
After applying the customization on the default adapters (if there are any), the corresponding mapping for these adapters in Process Task, form field, and data object manager need to be verified for mapping.
11.8.2.7 Rule Changes
The Upgrade Connectors feature can run on a rule on which any combination of the following changes have been made. In addition, an upgrade operation might involve any combination of the following changes to a rule.
-
New rules can be added.
-
If there are any customizations in default Rules, these customizations need to be applied after the upgrade as all default Rules will be overwritten.
11.8.2.8 IT Resource Type Changes
The Upgrade Connectors feature can run on an IT resource type on which any combination of the following changes have been made. In addition, an upgrade operation might involve any combination of the following changes to an IT resource type.
-
The existing IT resource type can be replaced by a new IT resource type.
-
In an existing IT resource type, new parameters can be added and existing parameters can have their default values and types modified or deleted.
-
All custom parameters are displayed while mapping IT Resource Type definitions. You can retain the custom parameters.
11.8.2.9 IT Resource Changes
The Upgrade Connectors feature can run on an IT resource on which any combination of the following changes have been made. In addition, an upgrade operation might involve any combination of the following changes to an IT resource.
-
The parameter retained for IT Resource Type definition will be available for all the IT Resource instances of this type. If an existing parameter in IT Resource Type definition is not retained, then this parameter will not available in all the IT Resource instances of this type.
-
In an existing IT resource, new parameters can be added and existing parameters can have their default values and types modified or deleted.
After the upgrade, the new name of the IT Resource Type definition is the one specified in the connector XML of the target connector.
11.8.2.10 Scheduled Task Changes
The Upgrade Connectors feature can run on a scheduled task that has been retained or existing scheduled tasks have been replaced by new scheduled tasks.
11.8.3 What Happens When You Upgrade a Connector
See Upgrade Use Cases Supported by the Connector Upgrade Feature for information about the changes that can be put into effect when you upgrade a connector.
In addition, the following events are part of the outcome of an upgrade operation:
-
While performing the upgrade procedure, you are prompted to map new connector objects with existing objects. For example, you are prompted to map each resource object in the target connector with a resource object in the source connector. If the object names are same in both source and target, then for the new object, the corresponding old object need to be mapped. If there are changes in the object names in source and target, then you need to map the object properly by referring the source and target connector release documents. It is your responsibility map the source and target objects properly. If the objects are not mapped properly, then the source object will be corrupted by the upgrade process. Therefore, it is mandatory that you must know about all the source and the target connector objects.
11.8.4 Summary of the Upgrade Procedure
The following is a summary of the procedure to upgrade a connector:
Note:
The procedure explained in this chapter is based on the best practice in which you first perform the upgrade in a test development environment. All functional use cases need to be tested before applying the upgrade in production server. Wizard mode upgrade should not be used in production, only silent mode need to be used in production server.-
Read through the upgrade procedure.
This will let you make an estimate of the time for which the connector and, therefore, the target system might be unavailable to Oracle Identity Manager users. You can also determine if you have the Oracle Identity Manager expertise required to complete all the upgrade and post-upgrade steps.
-
Make a note of associations between objects of the source connector and other Oracle Identity Manager objects. For example, make a note of associations between resource objects and access policies.
-
If required, create the connector XML file for a clone of the source connector.
If the object names in the target connector are different from object names in the source connector, then it is recommended that you first create the connector XML file for the clone connector. "Step 1: Create the connector XML file for the cloned connector" describes the procedure. While performing the procedure, specify object names that are the same as object names in the target connector. This will help avoid the need for renaming connector objects after you upgrade the connector.
-
Upgrading the source connector to target connector on staging server.
The XML file contains details of changes to be made to the connector objects of the source connector so that they are converted into the connector objects of the target connector. These changes are applied automatically during the upgrade process.
To upgrade the source connector:
-
Back up the Oracle Identity Manager database on the production server.
-
Perform the steps described in "Preupgrade Procedure"
-
Perform the steps described in "Silent Mode Upgrade in Staging and Production Environment" The resulting transformed XML can be generated and used in production server.
-
-
Use the silent delta XML for connector upgrade.
To use the delta XML file:
-
Restore the production database on the staging server.
-
Perform the steps described in "Preupgrade Procedure"
-
Perform the steps described in "Silent Mode Upgrade in Staging and Production Environment"
-
Perform the steps described in "Postupgrade Procedure"
-
-
Verify that the source connector on the production server is the same as the source connector on the staging server. If there are differences in the source connector on the staging server and the production server, then the delta XML file is not correctly imported on the production server.
-
Import the delta XML file on the production server.
After you verify that the upgraded target connector is working as expected on the staging server, perform the following steps:
-
Perform the steps described in "Preupgrade Procedure"
-
Perform the steps described in "Silent Mode Upgrade in Staging and Production Environment"
-
Perform the steps described in "Postupgrade Procedure"
-
11.8.5 Procedure to Upgrade a Connector
The following sections discuss the procedure to upgrade a connector:
11.8.5.1 Preupgrade Procedure
Before you begin the upgrade procedure, ensure that the following prerequisites are addressed:
-
Read through the upgrade procedure documented in this chapter.
-
Note down customizations made in the connector objects on source connector.
-
Call a Java API to handle workflows that are in progress. See Step 3 of Section 11.8.5.2, "Upgrade Procedure" for information about pending workflows. You need to make sure that there are no requests in pending state for the resource objects that are part of this connector. You also need to complete all the requests before going for connector upgrade. Requests can be closed if they are in a closable state. All the requests associated with the connector resource objects should in one of the following states before starting the upgrade process.
-
Request Completed
-
Request Closed
-
Request Withdrawn
-
Request Failed
-
Template Approval Rejected
-
Request Approval Rejected
-
Operation Approval Rejected
-
-
If required, create the connector XML file for a clone of the source connector.
-
Disable all the scheduled tasks.
11.8.5.2 Upgrade Procedure
Upgrading connectors is a two-stage procedure:
Wizard Mode Upgrade in Staging Environment
Note:
You need to perform preupgrade and post upgrade steps while performing wizard mode upgrade.To perform the wizard mode upgrade on the staging server:
-
Create a backup of the Oracle Identity Manager database.
-
Create Oracle Identity Manager metadata (MDS) backup. See "Migrating User Modifiable Metadata Files" in the Oracle Fusion Middleware Developer's Guide for Oracle Identity Manager for information about exporting and importing Oracle Identity Manager metadata to and from MDS.
-
Run the connector preupgrade utility.
A validation script is provided with Oracle Identity Manager. This script performs the following functions:
-
Determines whether the connector that you want to upgrade has been defined in Oracle Identity Manager
In other words, the script checks whether the connector XML stored in the database when the connector was installed/defined is consistent with the connector object definitions in the database. Apart from checking the consistency of the connector XML, it also checks whether the Connector XML is present in Oracle Identity Manager Database or not. If it is not present, then it displays the corresponding message to define the connector before proceeding with upgrade. Refer the "Defining Connectors" to perform the procedure to define a connector.
-
Identifies the Oracle Identity Manager scheduled tasks that are currently running.
You must disable all scheduled tasks that belong to the source connector before you proceed with the upgrade procedure. In addition, it is recommended to disable all other scheduled tasks before proceeding with the upgrade procedure.
-
Identifies the Attestation tasks associated with the resource object of the connector.
You must complete all the attestation tasks that belong to the source connector before you proceed with the upgrade procedure.
-
Identifies all the pending requests associated with the resource objects of the connectors.
You must either close or complete all the pending requests that belong to the source connector before you proceed with the upgrade procedure.
To run the validation script:
-
Ensure that Oracle Identity Manager is running.
-
In a command window, change to the OIM_HOME/server/bin directory.
-
Run the script as follows:
Note:
Set APP_SERVER, OIM_ORACLE_HOME, JAVA_HOME, MW_HOME, WL_HOME, and DOMAIN_HOME before running the scripts.For Unix:
sh ConnectorPreUpgradeUtil.sh
For Windows:
ConnectorPreUpgradeUtil.bat
You will be prompted to provide the following details:
-
Enter Oracle Identity Manager administrator's username: Enter the Oracle Identity Manger administrator's username.
-
Enter Oracle Identity Manager administrator's password: Enter the Oracle Identity Manger administrator's password.
-
Enter t3 Oracle Identity Manager Server URL: Enter the Oracle Identity Manger server URL. For example, t3://hostname:hostport.
-
Enter OIM Database username: Enter the Oracle Identity Manager Database's username.
-
Enter OIM Database Password: Enter the password of the Oracle Identity Manager Database.
-
Enter the JDBC URL for the OIM Database: Enter the JDBC URL of the Oracle Identity Manager Database. For Example:
jdbc:oracle:thin:@HOST_NAME:DB_PORT:iam/ORACLE_SID
After the successful login, you will be prompted to provide the following details:
-
Enter the connector name: Enter the connector name to be validated before upgrade.
-
Enter the connector version: Enter the connector version to be validated before upgrade.
On successfully connecting to the Oracle Identity Manager database, a message is displayed.
-
The output generated by the script is displayed in the command window and is also recorded in the OIM_HOME/server/bin/validateUtil.log file.
The action that you must take depends on the message generated by the script:
-
If the message states that the connector XML in the database is not consistent with the connector objects defined in the database, then perform the procedure described in the "Defining Connectors" of the connector guide.
-
If the message states that the "connector XML does not exists in Oracle Identity Manager database. Define a connector before upgrade.", then perform the procedure described in the "Defining Connectors" section of the connector guide before proceeding with upgrade
-
If the message contains the names of the scheduled tasks that are currently running, then you must disable all scheduled tasks. To disable a scheduled task, in the Advanced Administration, click System Management, search for scheduled jobs, and click the specific scheduled job, and then click Stop.
-
If the message contains the names of the Attestation Processes of which some attestation tasks associated with the resource object of the connector is pending, then you must complete all the attestation tasks belonging to the connector that you are upgrading before proceeding with the upgrade process.
-
If the message contains the names of the pending requests associated with the resource object of the connector, then you must either close or complete all the pending requests belonging to the connector that you are upgrading before proceeding with the upgrade process.
-
-
Copy the JARs and the resource bundles to the specified directories.
If the target release also contains new or updated JARs and resource bundles, then download the version of the jar to Oracle Identity Manager, check the version of the jar which is shipped with Oracle Identity Manager, compare these files and copy the JARs manually to their destination directories. For an Oracle-shipped connector, details of the destination directories are given in the connector guide. See the Connector Code Files Changes section for more information.
-
Use the Upgrade Connectors feature.
-
Log in to the Oracle Identity System Administration.
-
In the left pane, under System Management, click Manage Connector.
-
Use the Search feature to search for the source connector that you want to upgrade. In the table of search results, click the Upgrade icon for the source connector.
-
On the Step 1: On the Upgrade page, select Connector XML for the Wizard Mode XML File field. Use the Browse option to navigate to the target version of the connector XML to which you want to upgrade. You can also enter the full path of the target connector XML file. Make sure that you select the correct target connector XML. Upgrade feature does not validate the XML for target version or for any other connector object details. Leave Silent Mode XML File field empty.
For example, if a user is upgrading the Active Directory connector from source version 9.1.1.7 to target version 11.1.1.5.0, user needs to select Active Directory 11.1.1.5.0 connector config XML (which is under xml folder) for Wizard mode upgrade XML field.
Note:
There will be only one XML file for both trusted source reconciliation and target resource reconciliation for all the ICF based connectors. If you have more than one XML file, that is one for trusted source reconciliation and another for target resource reconciliation, you need to select the XML file for target resource reconciliation. Refer the connector guide (CI-XML) for the XML file name.Figure 11-29 shows the Select Connector XML to Upgrade page of the Connector Management - Upgrading wizard:
Figure 11-29 The Select Connector XML to Upgrade Page
Description of "Figure 11-29 The Select Connector XML to Upgrade Page"
-
Click Continue.
-
On the Step 2: Resource Object Mapping page, apply the following guidelines to map each new resource object with an existing resource object. Click Continue after you create each mapping.
-
The New Resource Object field shows the name of a resource object in the target release. From the Existing Resource Object list, select the resource object in the source release to which you want to map the resource object in the target release. There might be a change in resource object names. It is your responsibility to map the resource object properly.
-
If there are new resource objects that do not have a corresponding resource object in the source release, then select None from the Existing Resource Object list. This will happen only when the target connector versions add new resource objects that are not there in the source version.
Note:
If you are upgrading from an Oracle-released source connector to an Oracle-released target connector, then see the connector guide for information about the mappings that you must create.Figure 11-30 shows the Resource Object Mapping page of the Connector Management - Upgrading wizard:
Figure 11-30 The Resource Object Mapping Page
Description of "Figure 11-30 The Resource Object Mapping Page"
-
-
On the Step 3: Define Resource Scope page, a summary of the resource object mappings that you create is displayed. If there are resource objects in the source release that do not have corresponding resource objects in the target release, then they are displayed in the second table on this page. If you want to delete these resource objects, then select their check boxes. If a resource object is selected for deletion, then the resource will not be deleted from Oracle Identity Manager database. It just updates the OBJ_IS_SOFT_DELETE flag for the corresponding Resource Object to "1". The resource will be still available for all provisioning and reconciliation. This flag will be used in future.
Figure 11-31 shows the Define Resource Scope page of the Connector Management - Upgrading wizard:
Figure 11-31 The Define Resource Scope Page
Description of "Figure 11-31 The Define Resource Scope Page"
-
Click Continue.
-
On the Step 4: Define Process Definition Mapping page, map each new process definition with an existing process definition. Follow the guidelines given in Step f for mapping resource objects. Click Continue after you create each process definition mapping. If there are changes in the process definition names in source and target, it is your responsibility to map them properly. After selecting the corresponding source process definition for a specified target process definition, the page displays the list of process tasks available in the source process definition. You can retain the process tasks from the Source process definition. If there are any custom process tasks added to the source process definition, they can be retained. If there are any customization on the default process task, then before retaining such tasks you need to make sure there are no changes for this process task in the new connector release version by refereeing the connector guide. If a specific default process task is selected to retain, you might lose the changes (if there are any) for this process task in the new connector release. If the process tasks are part of the source connector and are not required in the target connector, then such process tasks must not be retained. It is recommended only to retain tasks that are added by user as part of customization of the source connector.
Figure 11-32 shows the Define Process Definition Mapping page of the Connector Management - Upgrading wizard:
Figure 11-32 The Define Process Definition Mapping Page
Description of "Figure 11-32 The Define Process Definition Mapping Page"
-
On the Step 5: Process Definition Mapping Summary page, a summary of the process definition mappings that you create is displayed. Click Continue to proceed.
Figure 11-33 shows the Process Definition Mapping Summary page of the Connector Management - Upgrading wizard:
Figure 11-33 The Process Definition Mapping Summary Page
Description of "Figure 11-33 The Process Definition Mapping Summary Page"
-
On the Step 6: Define Form Mappings page, map each new form with an existing form. Follow the guidelines given in Step f for mappings resource objects. In addition, apply the following guideline and then click Continue after you create a mapping for each form. When a source process form is selected for each target, the page displays list of process form fields from the source process form attributes, which are not available in the target process form. These attributes either added to the source process as a part of customization or these were default attributes part of the source process form which may not be required for the target. You can select the attributes which are added as a part of customization, but need to verify if a default attribute is required in the target before retaining it.
Figure 11-34 shows the Define Form Mappings page of the Connector Management - Upgrading wizard:
Figure 11-34 The Define Form Mappings Page
Description of "Figure 11-34 The Define Form Mappings Page"
-
On the Step 7: Form Mapping Summary page, a summary of the form mappings that you create is displayed. Click Continue to proceed.
Figure 11-35 shows the Form Mapping Summary page of the Connector Management - Upgrading wizard:
Figure 11-35 The Form Mapping Summary Page
Description of "Figure 11-35 The Form Mapping Summary Page"
-
On the Step 8: Define IT Resource Type Definition Mappings page, map each new IT resource definition with an existing IT resource definition. Follow the guidelines given in Step f for mappings resource objects. Click Continue after you create a mapping for each IT resource definition. If there are changes in the names of the IT resource type definition, then it is your responsibility to map them properly. Refer the connector guide to check the change in default IT resource type definition names. When a target IT resource type definition is mapped with corresponding source IT resource type definition, the page displays list of IT resource type definition parameters, which are part of source definition but not available in target definition. These are either added as a part of customization or they were part of source definition. If these parameters are added as part of customization, then you need to retain them.
Figure 11-36 shows the Define IT Resource Type Definition Mappings page of the Connector Management - Upgrading wizard:
Figure 11-36 The Define IT Resource Type Definition Mappings Page
Description of "Figure 11-36 The Define IT Resource Type Definition Mappings Page"
-
On the Step 9: IT Resource Type Definition Mapping Summary page, a summary of the IT resource type definition mappings that you create is displayed. Click Continue to proceed.
Figure 11-37 shows the IT Resource Type Definition Mapping Summary page of the Connector Management - Upgrading wizard:
Figure 11-37 The IT Resource Type Definition Mapping Summary Page
Description of "Figure 11-37 The IT Resource Type Definition Mapping Summary Page"
-
On the Step 12: Preupgrade Steps page, enter a new release number for the connector in the Connector Version field. Click Continue to proceed. The upgrade process does not validate the version provided with the connector release version. You need to provide correct version here by referring the connector guide.
Figure 11-38 shows the Preupgrade Steps page of the Connector Management - Upgrading wizard:
-
On the Step 13: Select Connector Objects to Be Upgraded page.
Figure 11-39 shows the Select Connector Objects to Be Upgraded page of the Connector Management - Upgrading wizard:
Figure 11-39 The Select Connector Objects to Be Upgraded Page
Description of "Figure 11-39 The Select Connector Objects to Be Upgraded Page"
Note:
If the Connector Management - Upgrading wizard is opened by using Microsoft Internet Explorer, then all the fields and buttons on the Step 13: Select Connector Objects to Be Upgraded page might not be visible. There is no scroll bar available in the page. Therefore, maximize the window to display all the controls in the page. -
After you review the information on the Connector Upgrade Status page, click Upgrade to start the upgrade process.
Figure 11-40 shows the Connector Upgrade Status page of the Connector Management - Upgrading wizard:
Figure 11-40 The Connector Upgrade Status Page
Description of "Figure 11-40 The Connector Upgrade Status Page"
Note down the process definition names and the corresponding process task names. These process tasks are not going to be used by Oracle Identity Manager anymore. Therefore, all their pending and rejected instances need to be canceled.Use cancelProcessTask utility available in OIM_HOME/server/bin. The utility takes the process definition name and the process task name as input. You need to run the utility for each process task.The Upgrade Connectors feature processes connector object mappings in the following manner:
-
If a new connector object is mapped to None, then the new connector object is inserted in the database.
-
A new resource object, process definition, or form replaces the old resource object, process definition, or form to which it is mapped.
-
The new names of the process form are converted into the old process form names.
-
If an old and a new lookup definition have the same name, then their contents are merged.
-
When the Upgrade Connectors feature tries to delete an object, which is not going to be used by upgraded version of connector, an exception is thrown if the instances of the object exists in Oracle Identity Manager database. Such an object is renamed and soft deleted so that it will not be used anymore by Oracle Identity Manager.
-
-
Perform the following steps:
-
Change form names and form field column name references in the following objects:
Note:
For an Oracle-released connector, see the connector guide for information about the changes to be made.-
Lookup definitions
-
Process task literals
-
Adapter literals
-
-
All the default adapters are overwritten. Therefore, if customer has done any customization, the changes need to be applied after connector upgrade.
-
After the upgrade, contents of existing and new lookup definitions are merged. In these lookup definitions, you must manually delete entries that are not required.
-
-
Use the FVC Utility to update existing user data created through the connector.
See "Using the Form Version Control Utility" in the Oracle Fusion Middleware Administrator's Guide for Oracle Identity Manager for information about using the FVC Utility.
-
Verify that all use cases specific to the target are working fine including provisioning and reconciliation.
-
Generate the XML file. This XML file contains details of the object definition changes from the source release to the target release.
To generate this file:
-
Log in to the Oracle Identity System Administration.
-
In the left pane, under System Management, click Manage Connector.
-
Use the Search feature to search for the connector.
-
In the search results table, click the Export Silent Upgrade XML icon for the connector.
-
Specify the location where you want the file to be saved.
Note:
If the upgrade fails, then perform the following steps:-
Look at the exception and take suitable action.
-
Restore the Oracle Identity Manager database and MDS.
-
Proceed for the upgrade.
-
Silent Mode Upgrade in Staging and Production Environment
Note:
You need to perform preupgrade and post upgrade steps while performing wizard mode upgrade.Caution:
Before you import the XML file, verify that the source connector on the production server is the same as the source connector on the staging server. If there are differences in the source connector on the staging server and the production server, then the XML file is not correctly imported on the production server.To perform the silent mode upgrade on the production server:
-
Copy the XML file to the host computer of the Oracle Identity Manager installation on which you want to import the file. Alternatively, copy the XML file to a shared folder on another computer that can be accessed from the Oracle Identity Manager host computer.
-
Log in to the Oracle Identity System Administration.
-
In the left pane, under System Management, click Manage Connector.
-
Use the Search feature to search for the source connector that you want to upgrade.
-
In the table of search results, click the Upgrade icon for the source connector.
-
On the Step 1: Select Connector XML to Upgrade page of the utility, enter the full path and name of the connector XML file for the source release in the Silent mode upgrade XML field. You can use the Browse option to navigate to the XML file.
Note:
There will be only one XML file for both trusted source reconciliation and target resource reconciliation for all the ICF based connectors. If you have more than one XML file, that is one for trusted source reconciliation and another for target resource reconciliation, you need to select the XML file for target resource reconciliation. Refer the connector guide (CI-XML) for the XML file name.Figure 11-41 shows the Select Connector XML to Upgrade page of the Connector Management - Upgrading wizard:
Figure 11-41 The Select Connector XML to Upgrade Page
Description of "Figure 11-41 The Select Connector XML to Upgrade Page"
-
Click Continue.
-
On the Step 12: Preupgrade Steps page, click Continue to proceed.
Figure 11-42 shows the Preupgrade Steps page of the Connector Management - Upgrading wizard:
-
On the Step 13: Select the Connector Objects to be Upgraded page, review the summary of the connector objects that you selected for upgrade.
Figure 11-43 shows the Select the Connector Objects to be Upgraded page of the Connector Management - Upgrading wizard:
Figure 11-43 The Select the Connector Objects to be Upgraded Page
Description of "Figure 11-43 The Select the Connector Objects to be Upgraded Page"
-
After you review the information on the page, click Upgrade to start the upgrade process.
The Connector Upgrade Status page shows the status at the end of a successful upgrade, as shown in Figure 11-44:
Figure 11-44 The Connector Upgrade Status Page
Description of "Figure 11-44 The Connector Upgrade Status Page"
11.8.5.3 Postupgrade Procedure
The following sections describe procedures that you must perform after the upgrade operation:
During an upgrade operation, you need copy connector code files, which include JAR files and scripts to the specified directories. To do so:
-
Manually upload all the connector specific jars (excluding common library files Common.jar, FAMILYCommon.jar, and icf-Common.jar) present in the "lib" folder of the connector distribution bundle using UpdateJars utility (available under OIM_HOME/server/bin) to Oracle Identity Manager database. Before running the UpdateJars utility, set APP_SERVER, OIM_ORACLE_HOME, JAVA_HOME, MW_HOME, WL_HOME, and DOMAIN_HOME.
-
Download common library (Common.jar, FAMILYCommon.jar and icf-Common.jar) from Oracle Identity Manager database using DownloadJar utility (available under OIM_HOME/server/bin).
-
Extract MANIFEST.MF from the downloaded libraries. Compare this version of MANIFEST.MF with the version in MANIFEST.MF of the common libraries that is available as part of ICF based distribution bundle. If the distributed library version is higher than the one downloaded from Oracle Identity Manager database, then use the UploadJar utility (available under OIM_HOME/server/bin) to upload the common libraries to Oracle Identity Manager database.
Running the PurgeCache Utility
When the upgrade is performed, there might be stale data in the cache, which is required to be purged. The PurgeCache utility purges the cache. See Oracle Fusion Middleware Performance and Tuning Guide for information about purging the cache.
Note:
Before running this utility, set APP_SERVER, OIM_ORACLE_HOME, JAVA_HOME, MW_HOME, WL_HOME, and DOMAIN_HOME.Running cancelProcessTask Utility
This utility is used for canceling the pending and rejected instances of a process task. If a process task of a process definition, which is there in the source connector and is not required in the target, then the process task will be soft deleted in the upgrade process. Oracle Identity Manager will not use such soft deleted task as part of provisioning work flow after upgrade. All the instances of such deleted process task, which are in pending and rejected status need to be canceled.
The utility is available in OIM_HOME/server/bin. This utility will take the process task name and the corresponding process definition name as input.
Note:
Before running this utility, set APP_SERVER, OIM_ORACLE_HOME, JAVA_HOME, MW_HOME, WL_HOME, and DOMAIN_HOME.Connector upgrade process creates the new process form versions. The account data created using the source connector will have an association with the source connector process form version. Therefore, after the upgrade, you need to run the FVC utility to update the new process form version which is created in upgrade process. Apart from this, FVC provides the feature to copy the old form field data to the new form fields. You can use the FVC Utility to copy process form data from the source release to the process form of the target release. You can also specify changes to be made to the resource data so that it is consistent with changes made in the process form of the target release. See Oracle Identity Manager Tools Reference for information about using this utility.
In Oracle Identity Manager, an access policy is associated with a resource object. While creating an access policy, user would have provided the data for the process form attributes. As the part of connector upgrade, if there are changes in the form attributes, then you need to edit the access policy to check the data for the existing and the new fields. For example, if the connector upgrade adds a new process form attribute, you can provide the data for the new attribute by editing the access policy.
In Oracle Identity Manager, an approval policy is associated with a resource object. While creating a policy, user would have provided the data for the process form attributes. As the part of connector upgrade, If there are any change in the resource object names, then the user need to verify all the Approval Policies associated with the resources to modify the resource name to the new resource name.
Verify that the IT resource instances have proper values after upgrade.
Configuring the Scheduled Tasks
Set values for attributes of the scheduled tasks of the target release. For an Oracle-released target connector, see the connector guide for information about the scheduled task attributes.
Update Adapters for Changes in IT Resource Type Definition Parameter
If there are changes in the IT Resource Type Definition Parameter names, you need to update the custom adapters for the parameter changes. To do so:
-
Log in to Design Console.
-
Open the custom adapter using the adapter factory.
-
Go to the variable list and check if there are any variables of type IT Resource, as shown in Figure 11-45:
Figure 11-45 The Variable List Tab of the Adapter Factory Form
Description of "Figure 11-45 The Variable List Tab of the Adapter Factory Form"
-
If there is a variable of IT Resource, then go to the task details and change the mapping of the IT Resource parameter mapping to the new target field (if the parameter is changed/deleted).
Figure 11-46 shows the Edit Adapter Factory Task Parameters dialog box that enables you to change the mapping of the IT Resource parameter mapping to the new target field:
Figure 11-46 The Edit Adapter Factory Task Parameters Dialog Box
Description of "Figure 11-46 The Edit Adapter Factory Task Parameters Dialog Box"
-
If the adapter is mapped to the IT Resource Type Definition parameter, then you need to verify if the mapped parameter is not deleted. If the parameter is deleted, then you need to remap it to the correct parameter.
To verify the adapter mappings:
-
Verify the mapping for process task adapter as follows:
i) Log in to Design Console.
ii) Go to Process Definition.
iii) Click the task, and then click the Integration tab, as shown in Figure 11-47:
Figure 11-47 The Integration Tab of the Editing Task Dialog Box
Description of "Figure 11-47 The Integration Tab of the Editing Task Dialog Box"
iv) Check if the adapter variable is mapped to the deleted/modified form attribute. If yes, remap such attributes to adapter variables. Repeat this step for all process tasks of all process definitions of the connector.
Figure 11-48 shows the Editing Data Mapping for Variable dialog box that enables you to view and edit the adapter variable mapping to the form attribute:
Figure 11-48 The Editing Data Mapping for Variable Dialog Box
Description of "Figure 11-48 The Editing Data Mapping for Variable Dialog Box"
-
Prepopulate adapter mappings as follows:
i) Log in to Design Console.
ii) Go to Form Designer, Pre-Populate Adapters, as shown in Figure 11-49:
Figure 11-49 The Pre-Populate Adapters Dialog Box
Description of "Figure 11-49 The Pre-Populate Adapters Dialog Box"
iii) Click Map to map adapter variable and check if any of the fields are mapped to the process data attributes. If it is mapped, then verify the process form attribute is not deleted as part of upgrade. If the process form attributes are deleted, then remap them to the correct form attribute data.
Figure 11-50 shows the Map Adapter Variable dialog box:
Figure 11-50 The Map Adapter Variable Dialog Box
Description of "Figure 11-50 The Map Adapter Variable Dialog Box"
Note:
Repeat the procedure for all the prepopulated fields of all the process forms of the connector. If there are any entity adapter, then check the adapter variables mapping for these adapters in Data Object Manager.
-
Perform the following postupgrade steps:
-
Change form names and form field column name references in the following objects:
Note:
For an Oracle-released connector, see the connector guide for information about the changes to be made.-
Lookup definitions
-
Process task literals
-
Adapter literals
-
-
Verify all the reconciliation fields on the resource object and corresponding reconciliation form field mapping on the process definition. Delete old default reconciliation fields, if there are any, which have mapping to the process form fields that are not retained as part of upgrade.
-
Verify that upgrade process has retained all customizations, for example, customizations on Resource Object, Process definition, and Process Form.
-
After the upgrade, contents of existing and new lookup definitions are merged. In these lookup definitions, you must manually delete entries that are not required.
-
Run the Lookup reconciliation again. The old lookup reconciliation data will be available in the Lookups after upgrade. Re-running the Lookups is required if there is a change in the format for the lookup values. Refer the specific connector guide for more details about lookup reconciliation.
-
Recalculate statistics and re-create indexes and other database objects that are removed or made invalid by the upgrade process. For more information, see Oracle Identity Manager Database guide.
-
Check adapters status related to the connectors. If the adapters are not compiled, then you must compile them.
-
Verify that the custom parameters are available after upgrade. Custom Scheduled Task parameters are retained as part of upgrade process. Modify the scheduled task to add the parameter if it is not available after upgrade.
-
If there are any change in Resource object names the user need to verify all the Approval Policies associated with the Resources to modify the Resource name to the new Resource name.
-
Verify if there are any changes in the new request dataset shipped with the connector. If yes, then delete the existing request dataset for the resource from MDS. Modify the new request dataset for any customization and import the new dataset to MDS. See "Migrating User Modifiable Metadata Files" in the Oracle Fusion Middleware Developer's Guide for Oracle Identity Manager for information about importing and exporting data to and from MDS.
11.8.6 Procedure to Upgrade a 9.x Connector Version to an ICF Based Connector
ICF based Connector provides LCM as a new feature that uses Connector Installer to import the connector, where as 9.x connector uses Deployment Manager to import definitions of the objects that constitute a connector. Since LCM offers a more broader and richer feature in installing and/or managing a connector than Deployment Manager, it is recommended to use only Connector installer for Oracle Identity Manager 11g connectors installation and/or management.
To upgrade a 9x connector version to a ICF based connector:
-
Delete all the existing jar files such as Javatasks, ScheduleTask, and ThirdParty jars related to the 9x connector except for the Common.jar file.
-
Download Common.jar and extract its MANIFEST.MF. Compare this version of MANIFEST.MF with the version in MANIFEST.MF of the Common.jar that is available as part of ICF based connectors distribution bundle. Retain/Upload (using UploadJars utility) Common.jar in Oracle Identity Manager database that has higher version.
-
Manually upload all the jars present in the "lib" folder of the ICF based connector distribution bundle using the UploadJars utility in Oracle Identity Manager database (available under OIM_HOME/server/bin).
-
Explode the connector bundle (with naming convention "org.identityconnectors.*") in some temporary folder. Make a folder named "lib" in the same temporary folder and copy all the third party libraries to that folder.
-
Retain MANIFEST.MF from the above exploded bundle.
-
Repackage the connector with the same name and with the same MANIFEST.MF that was being retained. Now, the repackaged connector bundle will also be having third party libraries.
-
Upload the repackaged connector in Oracle Identity Manager database with jar type as "ICFBundle".
-
Delete the temporary folder created in Step 4.
-
Upgrade the connector by following the upgrade process
-
Purge cache or restart the server.
11.9 Uninstalling Connectors
WARNING:
This utility is specifically created for use in development environments. It should not be used in a production environment, because the utility deletes data from the Oracle Identity Manager database directly and is therefore meant to be used only in development/staging environments.Connector uninstall utility deletes the data related to the connector chosen for uninstall from Oracle Identity Manager Database. It deletes all the account related data associated with resource objects of the connector.
This utility does not delete:
-
The actual user account from the target system
-
Identities from Oracle Identity Manager although the users are brought from trusted source to Oracle Identity Manager through trusted reconciliation
-
Audit data
-
Archival data
Connector uninstall utility does not validate and notify the user if there is any object dependency present. For example, while uninstalling a Microsoft Active Directory (AD) connector, it does not validate if a dependent connector, such as Microsoft Exchange connector, already exists or not. Before uninstalling a connector, you must check if there are any other connectors dependent on the connector. If there are any, then the connector must not be uninstalled because this will affect the functionality of the dependent connectors. You must uninstall all the dependent connectors before uninstalling the base connector.
This section discusses the following topics:
11.9.1 Use Cases Supported by the Uninstall Connectors Utility
The following use cases are supported by the Uninstall Connectors utility:
-
A target system that has been decommissioned, and you want to uninstall the connector that was used to link that target system with Oracle Identity Manager.
-
Instead of directly upgrading to the latest release of a connector, you want to uninstall the earlier release and then perform a fresh installation of the latest release.
-
You want to remove an individual connector object from the Oracle Identity Manager database. For example, you had created a resource object in Oracle Identity Manager to represent the Intern user type defined in your target system. This user type has been removed from the target system, and you now want to remove the resource object from Oracle Identity Manager.
The Uninstall Connectors utility supports independent deletion of following connector artifacts:
-
Adapters
-
Lookup definitions
-
Resource objects
-
Scheduled tasks
-
11.9.2 Overview of the Connector Uninstall Process
When you run the Uninstall Connectors utility, the utility performs the following steps before deleting the resource objects of the connector:
-
Checks if there are any access policies associated with the resource objects of the connector. If there are any access policies present, then the utility displays the list of access policies associated with the resource object and prompts you to modify the access policy and terminates with no data deletion. The access policy should be modified to remove the resource object from it. If the access policy is associated with only one resource object, then you need to create a dummy resource object, assign it to the access policy and then proceed with the removal of resource object from the access policy.
-
Closes all requests associated with the resource objects.
-
Displays list of request templates that are used while creating requests that are associated with the resource objects. The request templates are generic in nature, therefore the utility does not delete request templates. It prompts a message recommending you to delete/modify these templates as the resource objects would be deleted from Oracle Identity Manager. If the request template is associated with the resource object, then the request template needs to be modified to remove the resource name. If the request template is created for this resource object only, then you can delete the request template.
-
Displays the list of attestation processes which are associated with the resource objects. Attestation processes are generic in nature, therefore the utility does not delete attestation processes from Oracle Identity Manager. It prompts you to modify these processes as the resource objects would be deleted from Oracle Identity Manager.
-
Deletes only the operational level approval policies, which are associated with the resource object. The utility does not delete or modify request level approval policies and other operational level approval policies that are not associated with the resource object.
The following objects that constitute the connector are dropped from the Oracle Identity Manager database.
-
Resource object and objects related to the resource object.
-
Entitlement assignment, entitlement assignment history, and entitlement data
-
Tasks and task history associated with any provisioning process linked to the resource object
-
Process forms associated with the resource object
-
Process instance and object instances associated with the resource object
-
Reconciliation events and data associated with the resource object
-
Attestation event data for the resource object
-
Requests and request data associated with the resource object
-
E-mail definitions for the resource object
-
Entitlements associated with the resource object
-
Regular rules associated with the resource object
-
Reconciliation owner matching rules for the resource object
-
Reconciliation action rules for the resource object
-
Status codes corresponding to this resource object
-
Reconciliation process mappings for the resource object
-
Reconciliation object fields for the resource object
-
Request dataset to process form mappings for the resource object.
-
Object dependency tables for parent and child forms for the resource object
-
Resource object for organization
-
Process determination rules associated with the resource object
-
Password policy rules associated with the resource object
-
IT resource instances that are associated with IT resource types defined on forms that are linked to provisioning processes. If there is any default IT resource instance, they will not be deleted, for example, IT resource instance of Remote Manager
-
Process instances and resource object instances
-
Tasks associated with the provisioning processes
-
The actual object and process, parent and child tables associated with the resource object.
-
-
Scheduled tasks and scheduled jobs
-
Adapters/Event Handlers
-
Lookup definitions
11.9.3 Setting Up the Uninstall Connector Utility
To set up the Uninstall Connector utility:
-
Files that constitute the Uninstall Connector utility are viable in OIM_HOME/server/bin directory. These files are as follows:
-
ConnectorUninstall.properties
-
uninstallConnector.bat
-
uninstallConnector.sh
-
11.9.4 Uninstalling Connectors and Removing Connector Objects
Depending on your requirements, you can use the Uninstall Connectors utility to perform any of the following tasks:
The following section provides detailed instructions on using the ConnectorUninstall script to delete connector objects from the Oracle Identity Manager database. Each of the earlier sections provides a link to this section.
11.9.4.1 Uninstalling a Connector
Caution:
It is strongly recommended that Oracle Identity Manager is idle and it is not available for any operations. You must ensure that:-
There are no operations on Oracle Identity Manager while using uninstalling connector or connector objects
-
All scheduled tasks are disabled and there are no asynchronous messages pending for processing such as audit messages, offline provisioning messages, offline task messages, requests scheduled for future and so on.
You can use the ConnectorUninstall script to uninstall a connector. When you run the script, all objects that form part of the connector and all the resource data that was collected through the connector are deleted from the database.
Note:
Before running the uninstall utility:-
You cannot use uninstall utility on production database.
-
You cannot delete data that are already archived.
-
You must ensure that you have the latest Oracle Identity Manager schema and MDS backup, which will help to restore if uninstall utility does not complete successfully.
-
You must ensure that your UNDO tablespace is sized properly. This is required if your development/test environment has significant amount of data to be deleted.
As mentioned earlier in this guide, when a connector is defined, an entry is created for the connector in the Oracle Identity Manager database. This entry also includes the contents of the connector XML. When you choose to uninstall a connector, the utility identifies the connectors objects to be dropped by parsing the connector XML contents.
Warning:
-
Connector uninstall collects all the objects information from the connector XML, which is created while installing or defining a connector. If an additional object, which is not related to this connector is added while defining the connector, uninstall would delete that too. For example, while defining AD connector, if user adds a system lookup or lookup related to other connector, uninstall would delete that lookup.
-
Ensure that only the connector specific objects are added while defining a connector.
See "Running the Script to Uninstall Connectors and Connector Objects" for the procedure.
11.9.4.2 Removing Adapters, Lookup Definitions, Resource Objects, and Scheduled Tasks
Caution:
It is strongly recommended that Oracle Identity Manager is idle and it is not available for any operations. You must ensure that:-
there are no operations on Oracle Identity Manager while using uninstalling connector or connector objects
-
all scheduled tasks are disabled and there are no asynchronous messages pending for processing such as audit messages, offline provisioning messages, offline task messages, requests scheduled for future and so on.
You can use the ConnectorUninstall script to remove an adapter, lookup definition, resource object, or scheduled task. Only the object that you specify is removed from Oracle Identity Manager.
11.9.4.3 Running the Script to Uninstall Connectors and Connector Objects
Running the script to uninstall connectors and connector objects includes the following procedures:
11.9.4.3.1 Preuninstall
Note:
Before executing the uninstall, you must ensure that all scheduled tasks are disabled.Before Uninstalling the connector, you must:
-
Create a backup of Oracle Identity Manager database so that if something goes wrong during uninstalling, then the data can be restored. See Oracle Identity Manager Database documentation for details about creating database backup.
-
Create Oracle Identity Manager metadata (MDS) backup.
-
Ensure that there are no operations on Oracle Identity Manager until the Uninstall utility is completed. Oracle Identity Manager and SOA servers should be up and running.
-
Ensure that all the JMS messages are processed.
11.9.4.3.2 Uninstall
To run the ConnectorUninstall script for uninstalling the connector:
-
Set values in the properties file used by the script.
Note:
If you provide ConnectorName and Release along with ObjectType and ObjectValues, then deletion of ObjectValues will be performed by the utility and the Connector information will be skipped.The ConnectorUninstall.properties file is a viable in OIM_HOME/server/bin. This file contains information that is used by the script for deleting connector objects.
Open the properties file in a text editor, and then set values for the following properties:
-
DatabaseURL: Enter the JDBC URL for the Oracle Identity Manager database in the following format:
jdbc:oracle:thin:@HOST_NAME:DATABASE_PORT:DATABASE_NAME/ORACLE_SID

For example: jdbc:oracle:thin:@localhost:1521:orcl
-
DBUserName: Enter the user name of an Oracle Identity Manager database.
-
DBType: Specifies the type of database.
-
LogLevel: Enter one of the following as the log level: DEBUG, WARN, INFO, or ERROR.
-
Location: Enter the directory location where you want to have all the log files generated by the Uninstall utility.
If the Uninstall utility completes successfully, then the ConnectorUninstall.log file, along with <ResourceObject>.log files are generated.
If the Uninstall utility fails, then the ConnectorUninstall.log file along with the ConnectorUninstall_Error.log file are generated.
Note:
If the uninstall utility fails with errors, then check the ConnectorUninstall.log and ConnectorUninstall_Error.log and take suitable action. Then, run the uninstall utility again.For example, if the Uninstall utility of ActiveDirectory Connector succeeds, then the following logs will be generated:
-
ConnectorUninstall.log
-
AD User.log
-
AD Group.log
-
AD Oraganization Unit.log
-
AD User Trusted.log
If the Uninstall utility of ActiveDirectory Connector Fails, then the following logs will be generated:
-
ConnectorUninstall.log
-
ConnectorUninstall_Error.log
-
-
ConnectorName: The value that you set for this property depends on your requirement. If you want to delete a specific connector, then enter the name of the connector. The name that you enter must be the same as the name shown in the search results displayed through the Manage Connector feature. For example, enter
Active Directoryif you want to delete the Microsoft Active Directory connector. -
Release: The value that you set for this property depends on your requirement. If you want to delete a specific connector, then enter the release number of the connector. The release number that you enter must be the same as the release number shown in the search results displayed through the Manage Connector feature. For example, enter
9.1.0.1if you want to delete the Microsoft Active Directory 9.1.0.1 connector. -
ObjectType: The value that you set for this property depends on your requirement:
-
If you want to uninstall a connector, then ensure that the ObjectType property is not assigned a value.
-
If you want to delete adapters, lookup definitions, resource objects, or scheduled task, then enter
Adapter, Lookup, ResourceObject,or ScheduledTaskrespectively.Example: ResourceObject
-
-
ObjectValues: Enter a semicolon-separated list of object values.
Example: AD User; AD Group
-
-
In a command window, change to the OIM_HOME/server/bin directory and then run the script, sh uninstallConnector.sh (or bat file).
Note:
Before running this utility, set APP_SERVER, OIM_ORACLE_HOME, JAVA_HOME, MW_HOME, WL_HOME, and DOMAIN_HOME.While the script runs, logs will be generated at the location provided.
After you run the utility, you will be prompted to enter following information:
-
Oracle Identity Manager Database Password
-
Oracle Identity Manager Administrator Name
-
Oracle Identity Manager Administrator Password
-
Oracle Identity Manager Server t3 URL
-
Confirmation for the deletion of the connector/object(s)
-
11.9.4.3.3 Postuninstall
After uninstalling the connector, you must perform the following steps:
-
Use DeleteJars utility for deleting the jars associated with the connector from Oracle Identity Manager database.
-
Use DeleteResourceBundles utility for deleting all resources that are associated with the connector from Oracle Identity Manager database.
-
Revisit the log, look for the following information and perform the steps mentioned for each of it:
-
The list of request templates: Delete/modify these templates as the resource objects, which used these templates are now deleted.
-
The list of attestation processes: Delete/modify these attestation process as the resource objects, which used these attestation processes are now deleted.
-
Modify request and approval policies manually to delete the resource object names that are cleaned by the uninstall utility.
-
As the part of connector uninstall, the approval processes (Approval workflow/SOA composites) are not deleted. If the approval processes are generic, then you need to modify them if they have association with the deleted resource objects.
-
-
Recalculate statistics and re-create indexes and other database objects that are removed by the connector uninstall utility. For more information, see "Performance Tuning and Best Practices".
-
Restart Oracle Identity Manager, or use PurgeCache utility to purge the Cache.
See
Oracle Fusion Middleware Performance and Tuning Guidefor information about purging the cache.
11.10 Troubleshooting Connector Management Issues
Using Oracle Identity Manager 11g Release 2 (11.1.2), you can configure a cloned Active Directory (AD) Release 9.x connector for target AD and run an AD trusted source reconciliation to create users in Oracle Identity Manager. After the user is created in Oracle Identity Manager, when you run the target resource reconciliation for AD, the user details are linked in the Accounts tab. However the Detail Information tab displays a blank page. When you check the Application Instances section in Oracle Identity System Administration and search and open the relevant application instance, no form is found associated with the application instance.
Create a new set of forms for each application instance.