3 Managing Common Services and Certificate Validation
This chapter explains how to configure properties that are used in common by the services integrated into Oracle Access Management. This chapter includes
3.1 Prerequisites
Chapter 2, "Getting Started with Oracle Access Management Administration and Navigation"
3.2 Introduction to Common Configuration Elements
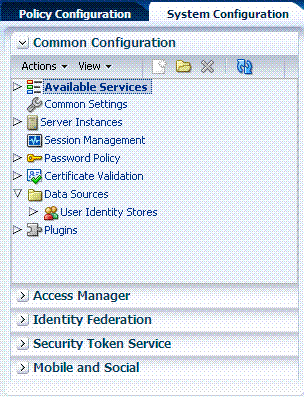
This section introduces the common System Configuration elements. Unless explicitly stated, Common Configuration elements are shared by all OAM Servers and services in the domain. Figure 3-1 shows the Common Configuration section of the System Configuration tab.
Figure 3-1 Common Configuration Nodes in the System Configuration

Description of "Figure 3-1 Common Configuration Nodes in the System Configuration"
Table 3-1 introduces the common configuration section of the System Configuration tab. Items here apply to all services in the suite, and where you can find more information on each one.
Table 3-1 System Configuration: Common Configuration Section
| Node | Description |
|---|---|
|
Available Services |
Provides access to all services. |
|
Common Settings |
Provides properties and settings that apply to all Oracle Access Management services, including Session properties, Oracle Coherence, Auditing configuration, and Default and System Identity Stores. |
|
Server Instances |
Provides access to all registered OAM Server instances. |
|
Session Management |
Provides access to Active session management operations. |
|
Password Policy |
Provides access to global password policy management operations for Access Manager. See: Chapter 16. |
|
Certificate Validation |
Provides access to the certificate revocation list and OCSP/CDP settings. See: "Managing Global Certificate Validation and Revocation". |
|
Data Sources |
Provides access to registered user identity stores for Oracle Access Management. |
|
Plugins |
Provides a mechanism to import, distribute, activate (or de-activate), and remove plug-ins that extend authentication functionality for Oracle Access Management services.
|
3.3 Enabling or Disabling Available Services
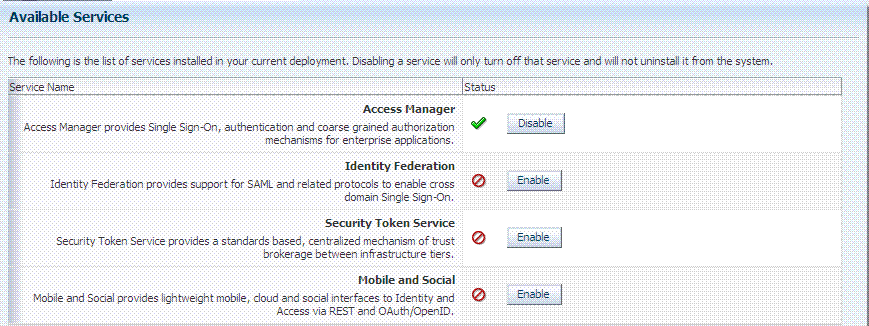
Figure 3-2 shows the Available Services page of the Common Configuration section, which provides the status of services, and controls to enable or disable a service. Initially, only Access Manager services are enabled. Oracle Access Management Administrators must enable a service in the Oracle Access Management Console to use the related functionality. The exception to this is Identity Context, which is enabled by default and does not have any controls to disable it.
Figure 3-2 System Configuration, Available Services Page (right)

Description of "Figure 3-2 System Configuration, Available Services Page (right)"
A green check mark in the Status field beside the service name indicates the service is enabled. A red circle with a line through it indicates that the corresponding service is disabled.
| Service | Description |
|---|---|
|
Access Manager |
Access Manager functionality is enabled by default. Access Manager Service is required to set SSO policies, configure Access Manager, as well as Common Configuration, and when REST Services are enabled. Default: Enabled No other services are required for Access Manager and Common Configuration. |
|
Identity Federation |
Must be enabled to manage the federation partners. Default: Disabled Note: The Access Manager service must also be enabled because Identity Federation is another authentication module. See Also: Part VII, "Managing Oracle Access Management Identity Federation". |
|
Security Token Service |
Enable this service to use Security Token Service functionality. Default: Disabled Access Manager service is not required. See Also: Part VIII, "Managing Oracle Access Management Security Token Service". |
|
Mobile and Social |
Mobile and Social Services can be deployed in either of two ways:
See Also: Part IX, "Managing Oracle Access Management Mobile and Social" |
WebLogic AdminServer must be running.
Logging In to and Signing Out of Oracle Access Management Console
To enable or disable a service
-
From the Oracle Access Management Console, open the:
System Configuration tab
Common Configuration section
Available Services node -
Enable Service: Click Enable beside the desired service name (or confirm that the Status check mark is green).
-
Disable Service: Click Disable beside the desired service name (or confirm that the Status check mark is red).
3.4 Managing Common Settings
The Common Settings apply to all OAM Server instances and services. This section provides the following topics:
3.4.1 About Common Settings Pages
Common Settings apply to all services within the suite. Figure 3-3 shows the named sections on the Common Settings page, which can be expanded to reveal related elements and values.
Figure 3-3 Common Settings Page (Collapsed View)

Description of "Figure 3-3 Common Settings Page (Collapsed View)"
Oracle Access Management Administrators can control and specify parameters used by the entire suite, not just a single service, as introduced in Table 3-3.
| Tab Name | Description |
|---|---|
|
Session |
Session configuration refers to the process of managing the lifecycle requirements of a session, and notification of events to enable global logout. Global logout is required for OSSO Agents (mod_osso) to ensure that logging out of a session on any entity propagates the logout to all entities. See Also: "Managing Common Settings". |
|
Coherence |
Common Oracle Coherence settings shared by all OAM Servers differ from those for individual OAM Servers. However, in both cases Oracle recommends that you make no adjustments to these settings unless instructed to do so by an Oracle Support Representative. See Also: "Managing Common Settings". |
|
Audit Configuration |
Oracle Access Management supports auditing for a large number of administrative and run-time events, uniform logging and exception handling, and the diagnostics of all audit events. Oracle Access Management auditing configuration is recorded in See Also: "Managing Common Settings" and "About Auditing Configuration Using Oracle Access Management Console". |
|
Default and System Identity Stores |
This section identifies the default identity and system stores, which can be one in the same (or different). See Also: "Managing Common Settings". |
See Also:
Details for other operations common to all OAM components:3.4.2 Managing Common Settings
Users with valid Oracle Access Management Administrator credentials can perform the following task to display the Common Settings page and perform changes. Included in each main step is a reference to more information elsewhere in this book.
The OAM Server must be running.
-
From the System Configuration tab, Common Configuration section, double-click Common Settings in the navigation tree.
-
Session:
-
On the Common Settings page, expand the Session section.
-
Click the arrow keys beside each list to increase or decrease session lifecycle settings as needed:
Session Lifetime (minutes)
Idle Timeout (minutes)
Maximum Number of Sessions per User -
Database Persistence: Check the box to enable Database Persistence for Active Sessions (or clear it to disable Database Persistence).
-
Click Apply to submit your changes.
-
See Also: Chapter 14, "Managing Sessions".
-
-
Coherence: See "Viewing Common Coherence Settings".
-
Audit Configuration:
-
Open the Audit Configuration section.
-
In the Audit Configuration section, enter appropriate details for your environment:
Maximum (Log) Directory Size
Maximum (Log) File Size
Filter Enabled
Filter preset (select from the list to define verbosity of audit data)
Audit Configuration Table: Use Add (+) or Delete (x) buttons to specify users. -
Click Apply to submit the Audit Configuration (or close the page without applying changes).
-
See Also: Chapter 8, "Auditing Administrative and Run-time Events".
-
-
Default Store and System Stores:
-
Expand the Default and System Identity Stores section.
-
Click the name of the System Store (or Default Store) to display the configuration page.
-
See "Setting the Default Store and System Store" for more information.
-
3.4.3 Viewing Common Coherence Settings
Figure 3-4 shows the Common Settings page with the coherence section expanded.
Note:
Oracle strongly recommends that you do not alter these settings without the assistance of Oracle Support.Table 3-4 describes these settings.
Table 3-4 Common Coherence Settings
| Element | Description |
|---|---|
|
Port |
Value between 1 and 65535 is supported. |
|
Cluster Address |
Value between 224.1.255.0 to 239.255.255.255 is allowed. |
|
Time to Live |
Value between 0 and 255 is supported. |
|
Cluster Port |
Value between 1 and 65535 is supported. |
To view Common Coherence settings
-
From the System Configuration tab, expand the Common Configurations section, and double-click Common Settings.
-
On the Common Settings page, expand the Coherence section.
-
Close the page when you finish; do not make any changes.
3.5 Managing Global Certificate Validation and Revocation
This section provides the following topics:
3.5.1 About Certificate Validation and Revocation
Oracle Access Management uses the Online Certificate Status Protocol (OCSP) to maintain the security of an OAM Server and other network resources:
-
OCSP is used for obtaining the revocation status of an X.509 digital certificate
-
OCSP specifies the communication syntax between the server containing the certificate status and the client application that is informed of that status
An OCSP responder can return a signed response signifying that the certificate specified in the request is 'good', 'revoked' or 'unknown'. If OCSP cannot process the request, it returns an error code.
The Certificate Validation module is used by Security Token Service to validate X.509 tokens and to verify (if needed) whether or not the certificates are revoked, by using:
-
Certificate Revocation Lists (CRLs)
-
Online Certificate Status Protocol (OCSP)
-
CRL Distribution Point extensions (CDP extensions)
A Certificate Revocation List (CRL) is a common way to maintain access to servers in a network when using a public key infrastructure. The CLR is a list of subscribers paired with their digital certificate status. Revoked certificates are listed with a reason. The dates of certificate issue, and the entities that issued them, are also included. In addition, each list contains a proposed date for the next release. When a potential user attempts to access a server, the server allows or denies access based on the CRL entry for the particular user.
Figure 3-5 shows OCSP/CDP settings for global certificate validation in the console.
Figure 3-5 OCSP/CDP Settings for Global Certificate Validation

Description of "Figure 3-5 OCSP/CDP Settings for Global Certificate Validation"
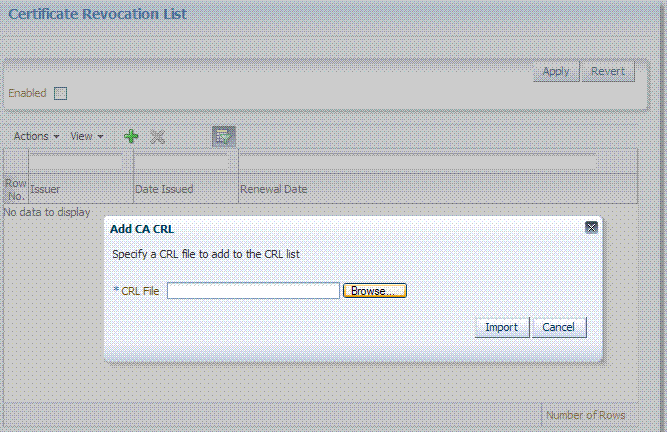
Figure 3-6 shows adding a CA CRL using the console.
Figure 3-6 Certificate Revocation List Dialog Box

Description of "Figure 3-6 Certificate Revocation List Dialog Box"
3.5.2 Managing Certificate Revocation Lists (CLRs)
Users with Oracle Access Management Administrator credentials can use the following procedure to maintain the security of a server and other network resources. This is accomplished by enabling continuous data protection and importing current CA Certificate Revocation Lists.
Have your CA Certificate Revocation List (CA CRL) ready to import.
To manage certificate revocation lists
-
From the Oracle Access Management Console System Configuration tab, Common Configuration section, select Certificate Validation.
-
Open the Certificate Revocation List node and:
-
Confirm that the Enabled box is checked.
-
Add: Click the Add button, browse for the CRL file and select it, click Import.
-
Remove: Click the name of the list in the table, click the Delete (x) button, and confirm when asked.
-
Save the configuration.
-
-
Search for CRLs:
-
Review the table.
-
Enable Query by Example and enter the filter strings in the header fields of the table.
-
-
Proceed to "Enabling Certificate Validation".
3.5.3 Enabling Certificate Validation
Users with Oracle Access Management Administrator credentials can use the following procedure to maintain the security of a server and other network resources. This is accomplished by enabling the Online Certificate Status Protocol.
Have your CA Certificate Revocation List (CA CRL) ready to import.
To manage certificate validation
-
From the Oracle Access Management Console System Configuration tab, Common Configuration section, select Certificate Validation.
-
Open the Certificate Revocation List node:
-
Confirm that the Enabled box is checked.
-
Save the configuration.
-
-
Open the OCSP/CDP node and:
-
Enable OCSP.
-
Enter the URL of the OCSP Service.
-
Enter the Subject DN of the OCSP Service.
-
Save this configuration.
-
Proceed to "Configuring CRL Distribution Point Extensions (CDP)".
-
3.5.4 Configuring CRL Distribution Point Extensions (CDP)
Users with Oracle Access Management Administrator credentials can use the following procedure to maintain the security of a server and other network resources.
-
From the Oracle Access Management Console System Configuration tab, Common Configuration section, select Certificate Validation.
-
Open the Certificate Revocation List node:
-
Confirm that the Enabled box is checked.
-
Save the configuration.
-
-
Open the OCSP/CDP node and:
-
Enable CDP.
-
Save this configuration.
-
