46 Integrating Access Manager 11.1.2 with SAP NetWeaver Enterprise Portal
This chapter describes the integration of Access Manager 11.1.2 with SAP NetWeaver Enterprise Portal 7.0.
This chapter covers the following topics:
-
Configuring SAP NetWeaver Enterprise Portal for Access Manager
-
Configuring Access Manager to Work With SAP NetWeaver Enterprise Portal
46.1 What is New in This Release?
Access Manager 11.1.2 supports SAP NetWeaver Enterprise Portal v7.0 with the following caveats:
-
SAP version 7.0.x is supported.
-
Apache 2.0 (from Apache.org) is supported as a Web server with this release.
-
MySAP is not certified.
46.2 Supported Versions and Platforms
Access Manager 11.1.2 supports the versions and platforms described on the following site:
http://www.oracle.com/technetwork/middleware/ias/downloads/fusion-certification-100350.html
46.3 Integration Architecture
The following diagram illustrates the integration between Access Manager and SAP NetWeaver Enterprise Portal.
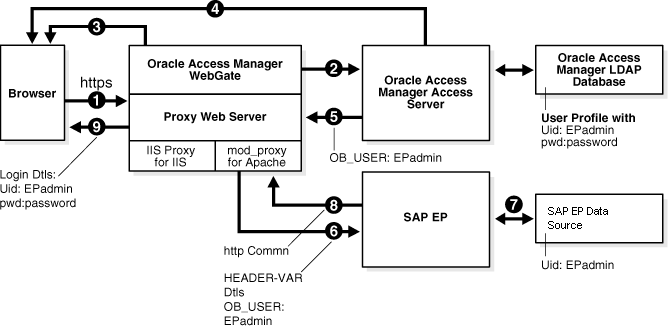
46.3.1 Process Overview: Integration with SAP NetWeaver Enterprise Portal
-
A user attempts to access content via the SAP NetWeaver Enterprise Portal.
For example, the user may enter the following URL to access an HR application through a proxy server:
https://host:port/irj -
The WebGate intercepts the request and queries the Access Server for the security policy that determines if the resource is protected.
The security policy consists of an authentication scheme, authorization rules, and allowed operations. Based on the authentication and authorization success or failure, specified actions are performed.
The Access System security policy for the SAP
/irjlogin URL is applicable to all resources accessed using thehttps://host:port/irjURL.Note that the SAP NetWeaver Enterprise Portal has its own authorization system that can be configured to set user access to iViews.
-
If the resource is protected, the WebGate prompts the user for authentication credentials.
The credentials that the WebGate requests depend on the authentication scheme configured in the Access System, for example, Basic over LDAP or Form-based authentication.
-
If the credentials are validated, the Access System authenticates the user and sets an encrypted ObSSOCookie in the user's browser.
-
After authenticating, the authorization rules defined in the Access System are applied based on the security policy.
Specific actions are performed based on the authorization rules. If the user is authorized, access to the SAP Portal login (the requested content) is allowed. For SAP Enterprise Portal header variable integration, the Access Server sets the authenticated user ID in a header variable.
If the user is not authenticated or authorized, he or she is denied access and redirected to another URL, as determined by the administrator. For example, the user may be redirected to an "invalid credentials" page.
-
For the integration with SAP NetWeaver Enterprise Portal, the proxy Web server redirects the request to the SAP NetWeaver Enterprise Portal internal Web server that contains the header variable details.
-
The SAP NetWeaver Enterprise Portal uses the header variable value to check the mapping of the user ID against the configured data source in the portal.
Both the Access Manager and SAP NetWeaver Enterprise Portal data source must contain the same user ID value.
Upon successful mapping, SAP NetWeaver Enterprise Portal allows the user to access the requested resource.
SAP NetWeaver Enterprise Portal sends a response to the proxy, and the proxy redirects to the client browser.
-
All interaction with the SAP Enterprise Portal takes place through the proxy server.
46.4 Prerequisites
Before you can integrate Access Manager 11.1.2 with SAP NetWeaver Enterprise Portal, you must complete the following tasks.
To prepare for the integration with SAP NetWeaver Enterprise Portal v7
-
Install Access Manager, as described in the Oracle Fusion Middleware Installation Guide for Oracle Identity and Access Management
-
Install Apache HTTP Server 2.0.x by following the installation steps provided by apache.org.
-
For each Web server instance, install and configure a WebGate.
-
Synchronize the time on all servers where SAP NetWeaver Enterprise Portal and Access Manager components are installed.
-
Ensure that the users exist in the Access Manager LDAP directory as well as on the SAP R3 system database.
The user ID in Access Manager and the SAP database must be the same or be mapped to each other. Any attribute in a user's profile can be configured as the SAP ID and passed directly to SAP. Alternatively, SAP can be configured to map the SAP ID to any user attribute that it receives from Access Manager.
-
Configure the Web browser to allow cookies.
46.5 Configuring SAP NetWeaver Enterprise Portal for Access Manager
This section describes how to configure SAP NetWeaver Enterprise Portal to work with Access Manager. To complete the integration you also need to configure Access Manager as described in Section 46.6.
-
You need to have SAP NetWeaver Enterprise Portal version 7.0.x installed before completing the steps in this section.
-
You also need to install a WebGate on the Apache HTTP Server instance that supports the proxy connection to the SAP Enterprise Portal instance. See Installing Webgates for Oracle Access Manager for details.
This section covers the following topics:
-
Configuring SAP NetWeaver Enterprise Portal for External Authentication
-
Adjusting the Login Module Stacks for using Header Variables
46.5.1 Configuring the Apache HTTP Server as a Proxy
The following procedure describes how to configure a proxy (Apache HTTP Server 2.0.x) to access SAP NetWeaver Enterprise Portal v7.0.
To configure Apache HTTP Server 2.0.x
-
Set up the Apache HTTP Server proxy in non-SSL mode or SSL mode, as described in the Apache documentation.
If HTTPS communication is used with the SAP NetWeaver Enterprise Portal, use SSL mode.
-
To enable the proxy to access the SAP NetWeaver Enterprise Portal, enter the following in the
httpd.confconfiguration file:ProxyRequests Off ProxyPass /webdynpro http://sap_host:port/irj ProxyPassReverse /webdynpro http://sap_host:port/irj ProxyPreserveHost On
Where sap_host is the name of the machine hosting the SAP NetWeaver Enterprise Portal instance and port is the listen port for the SAP NetWeaver Enterprise Portal instance. This set of directives specifies that all of the requests to this Web server of the form
http://apache_host:port/irjorhttps://apache_host:port/irjare redirected tohttp://sap_host:port/irj orhttps://sap_host:port/irj. -
Restart the proxy Web server.
-
Access the following URL:
Non-SSL—
http://apachehost:port/irjSSL—
https://apachehost:port/irjThis request should be redirected to the SAP NetWeaver Enterprise Portal login.
-
Log in using the SAP NetWeaver Enterprise Portal administrator login ID.
The administrator should be able to perform the available administrative functions.
-
Log in as a non-administrative user.
This user should be able to perform non-administrative functions.
46.5.2 Configuring SAP NetWeaver Enterprise Portal for External Authentication
The following steps describe enabling external authentication in SAP Enterprise Portal using the OB_USER header variable.
For more information about configuring authentication schemes for SAP Enterprise Portal, see the SAP NetWeaver 7.0 Security Guide.
To configure the header variable
-
Stop the SAP J2EE dispatcher and server.
-
Browse to the following directory:
SAP_J2EE_engine_install_dir
\ume -
Back up the file
authschemes.xml.bakto another directory. -
Rename
authschemes.xml.baktoauthschemes.xml. -
Open
authschemes.xmlin an editor and change the reference of the default authentication scheme to the authentication scheme header as follows:<authscheme-refs> <authscheme-ref name="default"> <authscheme>header</authscheme> <authscheme>uidpwdlogon</authscheme> </authscheme-ref> </authscheme-refs> -
In the authentication scheme header of
authschemes.xml, specify the name of the HTTP header variable where the Access System provides the user ID.As described in Section 46.6.1, "Configuring Access Manager 11.1.2 for SAP Enterprise Portal," this is the
OB_USERheader variable. You configure this header variable as follows:<authscheme name="header"> <loginmodule> <loginModuleName> com.sap.security.core.logon.imp.HeaderVariableLoginModule </loginModuleName> <controlFlag>REQUISITE</controlFlag> <options>Header=OB_USER</options> </loginmodule> <priority>5</priority> <frontEndType>2</frontEndType> <frontEndTarget>com.sap.portal.runtime.logon.header</frontEndTarget> </authscheme>The control flag value
REQUISITEmeans the login module must succeed. If login succeeds, authentication continues through the list of login modules. If it fails, control immediately returns to the application and authentication does not continue through the list of login modules. -
Restart the portal server and J2EE engine.
The modified
authschemes.xmlfile will be loaded into the Portal Content Directory (PCD). SAP Enterprise Portal will rename it asauthschemes.xml.bak.
-
To enable logout from a single sign-on session in both SAP Enterprise Portal and Access Manager, configure a logout URL in SAP Enterprise Portal from the administration interface.
The URL for the administration interface is as follows:
http://SAP_host:port/irj/Where SAP_host is the name of the machine hosting the SAP Enterprise Portal and port is the listen port for the portal.
-
From the administration interface, click System Administration, then System Configuration, then UM Configuration, then Direct Editing.
-
Add the following lines to the end of the configuration file:
ume.logoff.redirect.url=http(s)://proxy_host:port/logout.html
ume.logoff.redirect.silent=false
Where http(s) is either
httporhttps, proxy_host is the name of the proxy Web server, and port is the listen port for the proxy. -
Save the changes and log out.
46.5.3 Adjusting the Login Module Stacks for using Header Variables
Add the HeaderVariableLoginModule to the appropriate login module stack or template and configure the options as described here.
Table 46-1 Login Module Stacks for using Header Variables
| Login Modules | Flag | Options |
|---|---|---|
|
EvaluateTicketLoginModule |
SUFFICIENT |
{ume.configuration.active=true
|
|
HeaderVariableLoginModule |
OPTIONAL |
{ume.configuration.active=true, Header=<header_name>}
|
|
CreateTicketLoginModule |
SUFFICIENT |
{ume.configuration.active=true}
|
|
BasicPasswordLoginModule |
REQUISITE |
{}
|
|
CreateTicketLoginModule |
OPTIONAL |
{ume.configuration.active=true}
|
To adjust the Login Module Stacks for using Header Variables
-
Run the Visual Administrator tool, in the following location:
SAPJ2EEEngine_install_dir
\j2ee\admin\go.bat -
In the Visual Administrator, choose Security Provider.
-
Switch to edit mode by choosing the pencil icon.
-
Choose Policy Configurations, then Authentication.
-
For each template or application that is to support header variable authentication, add the login module HeaderVariableLoginModule to the login module stack (see Table 46-1.
46.6 Configuring Access Manager to Work With SAP NetWeaver Enterprise Portal
This section describes how to configure Access Manager 11.1.2to work with SAP NetWeaver Enterprise Portal. To complete the integration you also need to configure SAP NetWeaver Enterprise Portal as described in Section 46.5.
-
You need to have Access Manager 11.1.2installed before completing the steps in this section.
-
You also need to install an Access Manager WebGate on the Apache HTTP Server instance that supports the proxy connection to the SAP Enterprise Portal instance.
This section covers the following topics:
46.6.1 Configuring Access Manager 11.1.2 for SAP Enterprise Portal
The following procedure describes configuration of the security policy in Access Manager to protect log-ins to SAP NetWeaver Enterprise Portal. For more information about configuring application domains, see Oracle Fusion Middleware Administrator's Guide for Oracle Access Management.
To configure Access Manager for SAP NetWeaver Enterprise Portal
-
Log in to the Oracle Access Management Console.
-
From the System Configuration tab, Access Manager section, register a Webgate for this integration. For example:
Name—SAP_AG
Host Identifier—Apache proxy host
Auto Create Policies—Enabled (checked)
Protected Resource List—
Public Resource List—Add any public Resources to this list.
Apply—Add any public Resources to this list.
-
Click the Authorization Policies tab, then click the Create Authorization Policy button to open a fresh page (Chapter 17).
-
Summary Tab: Add your information to the Summary tab.
-
Add Resources: The Resource must be defined in the Application Domain before you can add the resource to a specific policy.
-
Click the Resources tab on the Authorization Policy page.
-
Click the Add button on the Resources tab.
-
Click the Search button.
-
Click a URL in the Results table, then click Add Selected.
-
Repeat these steps to add more resources.
-
-
Click Apply to save changes and close the Confirmation window.
-
Responses: Add policy Responses, as described in "Adding and Managing Policy Responses for SSO".
-
Conditions: Add authorization conditions, as described in "Defining Authorization Policy Conditions".
-
Rules: Add authorization rules, as described in "Defining Authorization Policy Rules".
-
Close the page when you finish.
46.7 Testing the Integration
Use the following procedures to test the integration.
Front-End Integration Test Procedure
Follow these steps to test the integration using a Web browser.
-
Open a protected URL. For example:
https://host:port/irjAccess Managershould prompt for authentication (either form based, or basic authentication over LDAP, or Cert Mode authentication).
-
Enter the correct user credentials.
If the credentials are correct, you will be logged into the SAP NetWeaver Enterprise Portal system.
Back-End Integration Test Procedure
To use these steps, download and install a plug-in for your Web browser that displays the HTTP requests and responses that happen when your browser requests a resource. Live HTTP Headers for Firefox, or ieHTTPHeaders for Internet Explorer are two such plug-ins.
-
Open the plug-in and type a URL in your browser to request a protected resource, for example:
https://host:port/irjThe plug-in window will be populated with the HTTP requests and responses.
-
Analyze the requests and responses and make sure that each request returns a response without errors.
Once the user is authenticated you should see some sessions and cookies set in the HTTP Header logs. The cookies that are set include the following:
-
ObSSOCookie
-
JSESSIONID
-
OAM_ID
-
OAM_REQ
When the request reaches the SAP NetWeaver Enterprise Portal, you will receive responses from the Enterprise Portal system in the header logs.
-
46.8 Troubleshooting the Integration
The following information is intended to help you troubleshoot issues with this integration.
Problem: The browser has problems displaying the SAP administration interface through the proxy server. You may receive an "object not found" error and related JavaScript errors.
Solution: See the following SAP document for a list of supported browsers, "SAP NetWeaver 7.0x Product Availability Matrix."