13 Registering and Managing OAM 11g Agents
This chapter provides information on registration and management of 11g Webgates (and the programmatic equivalent, Access Clients) using either the console method or the remote registration command-line utility. During registration, you can identify specific applications to be protected by Access Manager policies.
This chapter includes the following topics:
-
Understanding OAM Agent Registration Parameters in the Console
-
Configuring and Managing Registered OAM Agents Using the Console
-
Understanding the Remote Registration Tool, Modes, and Process
13.1 Prerequisites
Before you can perform tasks in this chapter, ensure that the Oracle Access Management Console host (AdminServer) and a managed OAM Server are running.
See Also:
The following, as needed for your environment.13.2 Understanding OAM Agent Registration Parameters in the Console
This section describes OAM Agent registration parameters. Unless explicitly stated, information here applies equally to both 11g and 10g Webgates, including programmatic Access Clients. Topics include:
13.2.1 About Create OAM Webgate Page and Parameters
The Create OAM ... Webgate page requests minimal information to streamline registration. Required details are identified by the asterisk (*). Whether you register an 11g Webgate or 10g Webgate, the initial information requested is the same.
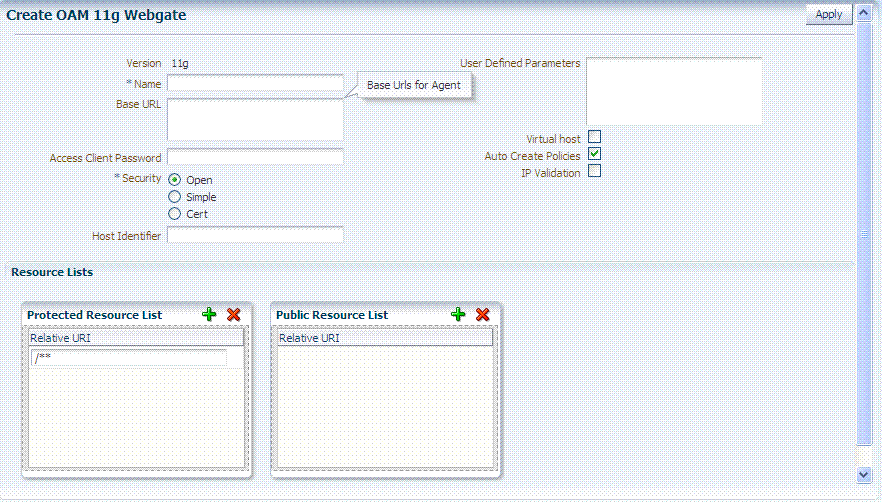
Table 13-1 describes the Create page for 11g Webgates (or Access Clients). Unless explicitly noted, all elements apply to both 11g and 10g Agents.
Table 13-1 Elements on Create Pages for 11g and 10g OAM Agents
| OAM Webgate Element | Description |
|---|---|
|
Name |
The unique identifying name for this Agent registration. This is often the name of the computer that is hosting the Web server used by Webgate. A unique identifying name for each Agent registration is preferred. However:
|
|
Base URL Optional |
The host and port of the computer on which the Web server for the Webgate is installed. For example, http://example_host:port or https://example_host:port. The port number is optional. Note: A particular Base URL can be registered once only. There is a one-to-one mapping from this Base URL to the Web server domain on which the Webgate is installed (as specified with the Host Identifier element). However, one domain can have multiple Base URLs. |
|
Access Client Password Optional |
An optional, unique password for this Webgate, which can be assigned during this registration process. When a registered Webgate connects to an OAM Server, the password is used for authentication to prevent unauthorized Webgates from connecting to OAM Servers and obtaining policy information. |
|
Level of communication transport security between the Agent and the OAM Server (this must match the level specified for the OAM Server):
Note: For more information on Simple and Cert modes, and private key encryption, see Appendix C. |
|
|
Host Identifier |
This identifier represents the Web server host. This is automatically seeded with the value in the agent Name field. Note: You can register multiple OAM Webgates (or Access Clients) under a single host identifier with the same Application Domain and policies, as follows:
See Also: "About Virtual Web Hosting". |
|
User-defined Parameters |
Parameters you can enter to enable specific Webgate behaviors: See Also: "About User-Defined Webgate Parameters". |
|
Virtual Host |
Check the box beside Virtual Host if you installed a Webgate on a Web server that contains multiple Web site and domain names. The Webgate must reside in a location that enables it to protect all of the Web sites on that server. See Also: "About Virtual Web Hosting". |
|
Auto Create Policies |
During agent registration, you can have authentication and authorization policies created automatically. This option is checked (enabled) by default. Default: Enabled Shared Registration and Policies: Multiple Webgates (or Access Clients) installed on different Web servers can share a single registration and policies to protect the same resources. This is useful in a high-availability failover environment. To do this:
After registering the second agent, both Webgates use the same host identifier and policies. |
|
IP Validation |
Check the box beside IP Validation to ensure a client's IP address is the same as the IP address stored in the ObSSOCookie generated for single sign-on. In the IP Validation Exceptions box, enter any IP addresses to exclude from validation using standard notation for the addresses: for example, 10.20.30.123. When enabled, the IP address stored in the ObSSOCookie must match the client's IP address. Otherwise, the cookie is rejected and the user must re-authenticate. Default: Disabled See Also: "About IP Address Validation for Webgates". |
|
Agent Key Password |
Requested for only Cert mode communication, this passphrase is used to encrypt the private key used for SSL communication between Webgate and the OAM Server in Simple and Cert modes. Note: The Agent Key Password has no relationship to the Access Client Password described earlier within this table. Simple Mode: In this mode, the agent key password is a global passphrase that must be the same on both the client and server. Once the OAM Server has this configured, the password can be retrieved during agent registration. However, the Administrator must copy to the client side, the password.xml file generated during agent registration. Cert Mode: In this mode, the agent key can be different on the client and server; it is no longer global. Administrators must enter the Agent Key Password to enable generation of a password.xml file during agent registration, which must be copied to the agent side. For certificate generation, you must encrypt the private key (used for SSL) using this password through
For more information, see Appendix C. |
|
Resource Lists |
|
|
Protected Resource (URI) List |
URIs for the protected application: / Default: /** The default matches any sequence of characters within zero or more intermediate levels spanning multiple directories. Add Resources: Each URI should be specified in a new row of the table for the Protected Resource List. Click the + button to add a resource to the Protected Resource List. For instance, if you add /financial yields Resource URL /financial/** /myfinancial yields Resource URL /myfinancial/** /** |
|
Public Resource (URI) List |
Each public application should be specified in a new row of the table for the Public Resource List. Add Resources: Each URI should be specified in a new row of the table for the Public Resource List. Click the + button to add a resource to the Public Resource List. For instance, if you add /people |
|
See Also: |
Table 13-3, "Elements on Expanded 11g and 10g Webgate/Access Client Registration Pages" |
To help streamline Webgate registration, some elements are concealed during the create operation and default values are applied.
Note:
All changes made using the Oracle Access Management Console are taken up without restarting the application server. Changes are reflected automatically after the reconfiguration timeout period.13.2.2 About User-Defined Webgate Parameters
Certain supported parameters can be defined by Administrators entering these directly on the Webgate registration page or within the OAM Agent remote registration request template. Table 13-2 describes supported user-defined parameters. Each parameter can have only one value.
Table 13-2 User-Defined Webgate Parameters
| User-Defined Webgate Parameter | Description |
|---|---|
|
ChallengeRedirectMethod |
Authentication POST data preservation parameter for both the embedded credential collector (ECC) and the detached credential collector (DCC). Value: GET|POST|DYNAMIC Note: Preference is given first to the Authentication Scheme containing this parameter; second to the Webgate providing this user defined parameter. Otherwise, default behavior is Dynamic. See Also: ... |
|
MaxPostDataBytes |
Authentication post-data preservation parameter for both the embedded credential collector (ECC) and the detached credential collector (DCC). This existing Authentication Scheme challenge parameter requires a positive integer value that restricts the maximum number of bytes of POST data that is submitted as user credentials and sent to the OAM Server. The alternate value is the default, 8192 bytes. Assigning MaxPostDataBytes to a Resource Webgate gives preference to restricting the size of the post data received from the application before forwarding the post data to be preserved. |
|
PostDataRestoration |
Authentication post-data preservation parameter for both the embedded credential collector (ECC) and the detached credential collector (DCC). This parameter requires a value of Default: When set to See Also: ... |
|
serverRequestCacheType |
Authentication post-data preservation parameter for both the embedded credential collector (ECC) and the detached credential collector (DCC). This existing OAM Server parameter in oam-config.xml indicates mechanism to be used to remember the request context. Possible values are FORM, COOKIE, or CACHE. Default: COOKIE FORM is the required value for POST data preservation. See Also: |
|
UrlInUTF8Format=true |
In an environment that uses Oracle HTTP Server 2, this parameter must be set to true to display latin-1 and other character sets. |
|
ProxySSLHeaderVar=IS_SSL |
Uses when the Webgate is located behind a reverse proxy, SSL is configured between the client and the reverse proxy, and non-SSL is configured between the reverse proxy and the Web server. It ensures that URLs are stored as HTTPS rather than HTTP. The proxy ensures that URLs are stored in HTTPS format by setting a custom header variable indicating whether it is servicing an SSL or non-SSL client connection. The value of the ProxySSLHeaderVar parameter defines the name of the header variable the proxy must set. The value of the header variable must be "ssl" or "nonssl". If the header variable is not set, the SSL state is decided by the SSL state of the current Web server. Default: IS_SSL |
|
client_request_retry_attempts=1 |
Webgate-to-OAM Server timeout threshold specifies how long (in seconds) the Webgate waits for the OAM Server before it considers it unreachable and attempts the request on a new connection. If the OAM Server takes longer to service a request than the value of the timeout threshold, the Webgate abandons the request and retries the request on a new connection. Default: 1 Note: The new connection that is returned from the connection pool can be to the same OAM Server, depending on your connection pool settings. Also, other OAM Servers may also require more time to process the request than the time specified on the timeout threshold. In some cases, the Webgate can retry the request until the OAM Servers are shut down. You can configure a limit on the number of retries that the Webgate performs for a non-responsive server using the client_request_retry_attempts parameter. |
|
InactiveReconfigPeriod=10 |
The Webgate update thread reads the shared secret from the OAM Server every 1 minute when Webgate is active. The OAM Server server returns the shared secret in its own cache (the OAM Server cache). Default: 10 (minutes) See Also: Oracle Fusion Middleware Performance and Tuning Guide |
|
fallbackToContainerPolicy=true |
Used for the IAMSuiteAgent. When set to When set to 'true' the request goes through to the container and uses whatever policy (related to J2EE authentication/authorization) is configured on the container to grant or deny the user access. Default: |
|
logoutRedirectUrl= |
Default = http://OAMServer_host:14200/oam/server/logout |
|
protectWebXmlSecuredPagesOnly=true |
Used for the IAMSuiteAgent. After the user is authenticated, this parameter is used for all subsequent requests to determine if the Agent should validate the incoming request. When set to:
|
|
maxAuthorizationResultCacheElems |
Max Authorization Results Cache Elements—Number of elements maintained in the Authorization Result Cache. This cache maintains information about authorization results for associated sessions. For example: maxAuthorizationResultCacheElems=10000 Default = 100000 See Also: Oracle Fusion Middleware Performance and Tuning Guide |
|
authorizationResultCacheTimeout |
Authorization Results Cache Timeout—Number of elements maintained in the Authorization Result Cache. This cache maintains information about authorization results for associated sessions. For example: authorizationResultCacheTimeout=60 Default, if no time is specified = 15 (seconds) Note: Authorization Results Cache Timeout is not set by default. With the cache enabled, the first request result persists for the cache duration. This magnifies the effect causing a brief time delay. For example suppose you set an authentication policy Response and set a custom session attribute exmpl:sample. The corresponding authorization policy Response returns this as HEADER SESSION_ATTR_EXMPL=sample. When a user access the URL protected by these policies, the header comes after a few refreshes. Initially, however, the value might not be found. A value of 0 disables the cache. With no cache, it takes two requests for the header response to be filled. The first sets the session variable used, the second uses the session variable. Oracle recommends that you do not set a Response value in the same authorization request that triggers it. See Also: Oracle Fusion Middleware Performance and Tuning Guide. |
|
UniqueCookieNames |
Controls Webgate cookie name format:
|
|
11g Webgate only |
|
|
ssoCookie |
Controls the OAMAuthnCookie cookie. Default: ssoCookie=httponly ssoCookie=Secure Disable either setting: ssoCookie=disablehttponly ssoCookie=disableSecure Note: These parameters are configured differently depending on your credential collector configuration.
See Also: Table 16-22, "User-Defined Challenge Parameters for Authentication Schemes" |
|
miscCookies |
Controls other miscellaneous Access Manager internal cookies. By default, httponly is enabled for all other (miscellaneous) cookies. Default: miscCookies=httponly miscCookies=Secure Disable either setting: miscCookies=disablehttponly miscCookies=disableSecure Note: These parameters are configured differently depending on your credential collector configuration.
See Also: Table 16-22, "User-Defined Challenge Parameters for Authentication Schemes" |
|
OAMAuthAuthenticationServiceLocation 11g Webgate non-browser client functionality |
Activates non-browser client functionality and defines the location of the authentication service.
For example, to activate this functionality for Identity Connect:
OAMAuthAuthenticationServiceLocation=https://login.example.com/nbc
Non-browser client functionality is deactivated if the parameter is omitted (or is provided with no value). See Also: Section 36.3, "Managing Oracle Access Management Mobile and Social." |
|
OAMAuthUserAgentPrefix 11g Webgate non-browser client functionality |
Activates non-browser client functionality and defines the string that acts as a prefix for the "user-agent" http header value.
For example, to activate this functionality for Identity Connect: OAMAuthUserAgentPrefix=NBC Non-browser client functionality is deactivated if this parameter is omitted (or is provided with no value). See Also: Section 36.3, "Managing Oracle Access Management Mobile and Social." |
13.2.3 About IP Address Validation for Webgates
IP address validation is specific to Webgates. It determines if a client's IP address is the same as the IP address stored in the cookie generated for single sign-on. The IPValidation parameter turns IP address validation on and off. If IPValidation is true, the IP address stored in the cookie must match the client's IP address, otherwise, the SSO cookie (Table 1-3) is rejected and the user must reauthenticate. By default, IPValidation is true.
The IP Validation parameter can cause problems with certain Web applications. For example, Web applications managed by a proxy server typically change the user's IP address, substituting the IP address of the proxy. This prevents single sign-on from using the cookie.
The IP Validation parameter can cause problems with certain Web applications. For example, Web applications managed by a proxy server typically change the user's IP address, substituting the IP address of the proxy. This prevents single sign-on from using the cookie.
Note:
TheIP Validation Exceptions parameter lists IP addresses that are exceptions to this process.If IPValidation is true, the IP address can be compared to the IP Validation Exceptions list. If the address is found on the exceptions list, it does not need to match the IP address stored in the cookie. You can add as many IP addresses as needed. These addresses are the actual IP addresses of the client, not the IP addresses that are stored in the SSO cookie. If a cookie arrives from one of the exception IP addresses, Access Manager ignores the address stored in the SSO cookie for validation. For example, the IP addresses in the IP Validation Exceptions parameter can be used when the IP address in the cookie is for a reverse proxy.
To configure single sign-on between Webgate and an Access Client that does not have the client IP address at authentication, the IP validation option can be explicitly turned off (set IP Validation to false). When the IP Validation parameter is set to false, the browser or client IP address is not used as a part of the SSO cookie. However, Oracle recommends that you keep IP validation on whenever possible.
13.3 Registering an OAM Agent Using the Console
This procedure is for both a Webgate or programmatic Access Client. Registration steps are the same. You can register an OAM-type agent before you deploy it. Users with valid Administrator credentials can perform the following task to register a Webgate using the Oracle Access Management Console.
See Also:
-
Understanding OAM Agent Registration Parameters in the Console
-
Oracle Fusion Middleware Installation Guide for Oracle Identity and Access Management chapter "Installing and Configuring Oracle HTTP Server 11g Webgate for OAM"
After agent registration, you can change the communication mode of the OAM Server if needed. Communication between the agent and server continues to work as long as the Webgate mode is at least at the same level as the OAM Server mode or higher. See Appendix C.
Confirm that at least one OAM Server is running in the same mode as the agent to be registered.
-
From the Oracle Access Management Console Welcome page, SSO Agent panel, click one of the following to open a fresh page:
-
New OAM 11g Agent
-
New OAM 10g Agent (see also Chapter 22)
Alternatively: From the System Configuration tab, Access Manager section, SSO Agents node, OAM Agents node, click the desired Create ... Webgate button in the upper-right corner.
-
-
On the Create OAM ... Webgate page, enter required details (those with an *) to register this Agent ().
-
Protected Resource List: In this table, enter individual resource URLs to be protected by this Agent, as shown in Table 13-1.
-
Public Resource List: In this table, enter individual resource URLs to be public (not protected), as shown in Table 13-1.
-
Auto Create Policies: Check to create a fresh Application Domain and policies (or clear and use the same host identifier as another Webgate and share policies (Table 13-1)).
-
Click Apply to submit the registration (or close the page without applying changes).
-
10g Webgate: See Chapter 22 and:
-
Ignore the ObAccessClient.xml file that is created as a result of provisioning for now.
-
Add resources to the Application Domain.
-
Proceed as needed for your environment (Chapter 22):
Existing Webgate: Go to Chapter 19, "Configuring Centralized Logout for Sessions Involving 11g Webgates".
New Webgate: Go to "Locating and Installing the Latest 10g Webgate for Access Manager 11g".
Replacement: Go to "Replacing the IAMSuiteAgent with an 10g Webgate".
-
-
Copy the artifacts as follows (or install Webgate with the same specifications, then copy artifacts), including any Simple or Cert mode files. For example, Open mode files include:
Agent & Artifacts Artifacts 11g Webgate/Access Client ObAccessClient.xml and cwallet.sso
From the AdminServer (Console) host: $DOMAIN_HOME/output/$Agent_Name/
To the Agent host: $11gWG_install_dir/webgate/config
10g Webgate/Access Client ObAccessClient.xml
Note: Go to Chapter 22 before completing this task.
From the AdminServer (Console) host: $DOMAIN_HOME/output/$Agent_Name/
To the Agent host:
$10gWG_install_dir/oblix/lib/
-
Verify Registration: These are similar to steps in "Validating Agent Registration using the Oracle Access Management Console".
-
In the navigation tree, confirm the Agent name is listed; click the Reset button in the navigation tree toolbar if needed.
-
Confirm the registration page contains the appropriate information.
-
Auto Create Policies: Confirm the Application Domain was generated, the host identifier was created for the application, and that resources were created in the Application Domain and associated with the host identifier.
-
Perform further tests, as described in "Validating Authentication and Access After Remote Registration".
-
-
Proceed as needed for your deployment:
13.4 Configuring and Managing Registered OAM Agents Using the Console
This section provides the following topics to help you manage registered Webgates:
-
Understanding Registered OAM Agent Configuration Parameters in the Console
-
Viewing or Editing an OAM Agent Registration Page in the Console
13.4.1 Understanding Registered OAM Agent Configuration Parameters in the Console
Whether you registered the agent using the Oracle Access Management Console or the remote registration utility, you can view the full agent configuration page in the console, as shown in Figure 13-2.
Figure 13-2 Confirmation Window and Expanded 11g Webgate Page with Defaults
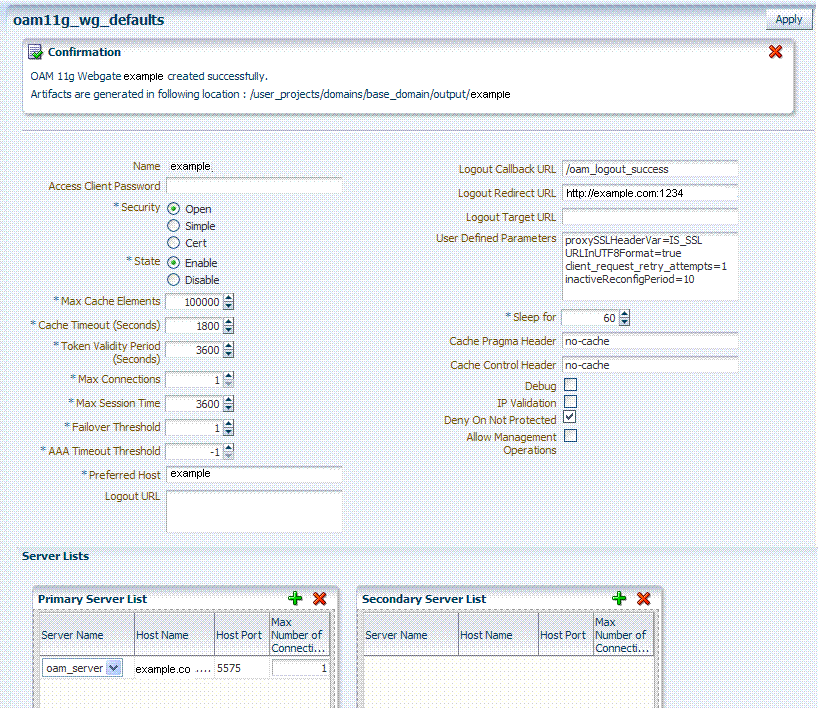
Description of "Figure 13-2 Confirmation Window and Expanded 11g Webgate Page with Defaults "
There are only a few differences between 11g and 10g Webgate registration pages.
Note:
Most elements on the agent's page are the same as those you define when using the remote registration tool with the expanded OAM template. ObAccessClient.xml is populated with values after agent registration or modification, regardless of the method you use.Table 13-3 describes elements on an expanded registration. Additional settings revealed here are used by the OAM Proxy.
Table 13-3 Elements on Expanded 11g and 10g Webgate/Access Client Registration Pages
| Element | Description |
|---|---|
|
Name User-defined Parameters IP Validation |
See: Table 13-1, "Elements on Create Pages for 11g and 10g OAM Agents". See Also: "About User-Defined Webgate Parameters" See Also: "About IP Address Validation for Webgates". |
|
10g Webgate only, Chapter 22 |
This parameter describes the Web server domain on which the Agent is deployed, for instance,.example.com. You must configure the cookie domain to enable single sign-on among Web servers. Specifically, the Web servers for which you configure single sign-on must have the same Primary Cookie Domain value. Webgate uses this parameter to create the ObSSOCookie authentication cookie. This parameter defines which Web servers participate within the cookie domain and have the ability to receive and update the ObSSOCookie. This cookie domain is not used to populate the ObSSOCookie; rather it defines which domain the ObSSOCookie is valid for, and which Web servers have the ability to accept and change the ObSSOCookie contents. Default: If the client side domain can be determined during registration, the Primary Cookie Domain is populated with that value. However, if no domain is found, there is no value and Webgate uses the host-based cookie. Note: The more general the domain name, the more inclusive your single sign-on implementation will be. For example, if you specify b.com as your primary cookie domain, users will be able to perform single sign-on for resources on b.com and on a.b.com. However, if you specify a.b.com as your primary cookie domain, users will have to re-authenticate when they request resources on b.com. |
|
Only in the console. |
Specifies whether this registration is enabled or disabled. Default = Enabled |
|
Number of elements maintained in the cache. Caches are the following:
The value of this setting refers to the maximum consolidated count for elements in these caches. Default = 100000 |
|
|
Amount of time cached information remains in the Webgate caches (Resource to Authentication Scheme, Authentication Schemes, and 11g Webgate only Resource to Authorization Policy) when the information is neither used nor referenced. Default = 1800 (seconds) |
|
|
Token Validity Period (seconds) 11g Webgate only |
Maximum valid time period for an agent token (the content of OAMAuthnCookie for 11g Webgate). Default = 3600 (seconds) Note: For 10g Webgates, use Cookie Session Time to set the Token Validity Period. |
|
The maximum number of connections that this Webgate can establish with the OAM Server. This number must be the same as (or greater than) the number of connections that are actually associated with this agent. Default = 1 |
|
|
Maximum amount of time to keep connections from the WebGate to OAM Server Network alive. After this time has elapsed, all connections from WebGate to OAM Server Network will be shutdown and replaced with new ones.The unit of time is based on the maxSessionTimeUnits user-defined parameter which can be 'minutes' or 'hours'. When maxSessionTimeUnits is not defined, the unit is defaulted to 'hours'. |
|
|
Number representing the point when this Webgate opens connections to a Secondary OAM Server. Default = 1 For example, if you type 30 in this field and the number of connections to primary OAM Server falls to 29, this Agent opens connections to secondary OAM Server. |
|
|
Number (in seconds) to wait for a response from the OAM Server. If this parameter is set, it is used as an application TCP/IP timeout instead of the default TCP/IP timeout. Default = -1 (default network TCP/IP timeout is used) A typical value for this parameter is between 30 and 60 seconds. If set to a very low value, the socket connection can be closed before a reply from OAM Server is received, resulting in an error. For example, suppose an Webgate is configured to talk to one primary OAM Server and one secondary OAM Server. If the network wire is pulled from the primary OAM Server, the Webgate waits for the TCP/IP timeout to learn that there is no connection to the primary OAM Server. The Webgate tries to reestablish the connections to available servers starting with the primary OAM Server. Again, the Agent waits for the TCP/IP timeout to determine if a connection can be established. If it cannot, the next server in the list is tried. If a connection can be established to another OAM Server (either a primary or secondary), the requests are re-routed. However this can take longer than desired. When finding new connections, Webgate checks the list of available servers in the order specified in its configuration. If there is only one primary OAM Server and one secondary OAM Server specified, and the connection to the primary OAM Server times out, the Agent still tries the primary OAM Server first. As a result, the Agent cannot send requests to an OAM Server for a period greater than twice the setting in the OAM Server Timeout Threshold. If the OAM Server takes longer to service a request than the value of the timeout threshold, the Agent abandons the request and retries the request on a new connection. Note that the new connection that is returned from the connection pool can be to the same OAM Server, depending on your connection pool settings. Also, other OAM Server may also take longer to process the request than the time specified on the threshold. In these cases, the Agent can continue to retry the request until the OAM Server is shut down. |
|
|
Idle Session Timeout 10g Webgate only, Chapter 22 |
Default: 3600 Release 7.0.4 Webgates enforced their own idle session timeout only. 10.1.4.0.1 Webgates enforced the most restrictive timeout value among all Webgates the token had visited. With 10g (10.1.4.3), the 7.0.4 behavior was reinstated as the default with this element. To set Idle Session Timeout logic:
|
|
Preferred Host |
Specifies how the hostname appears in all HTTP requests as users attempt to access the protected Web server. The hostname within the HTTP request is translated into the value entered into this field regardless of the way it was defined in a user's HTTP request. The Preferred Host function prevents security holes that can be inadvertently created if a host's identifier is not included in the Host Identifiers list. However, it cannot be used with virtual Web hosting. For virtual hosting, you must use the Host Identifiers feature. Defaults to Name (of Webgate registration) |
|
User Defined Parameters |
See Also: "About User-Defined Webgate Parameters" and Oracle Fusion Middleware Performance and Tuning Guide |
|
Logout URL 10g and 11g Webgates |
The Logout URL triggers the logout handler, which removes the cookie (ObSSOCookie for 10g Webgates; OAMAuthnCookie for 11g Webgates) and requires the user to re-authenticate the next time he accesses a resource protected by Access Manager. Default = [] (not set) Note: This is the standard 10g Webgate configuration parameter used to trigger initial logout through a customized local logout page as described in "Configuring Centralized Logout for 10g Webgate with 11g OAM Servers". |
|
Additional Logout for 11g Webgate Only |
For 11g Webgate single sign-off behavior, specific logout elements and values automate the redirect to a central Logout URL, callback URL, and end_URL. See Also: Table 19-2, "Logout Details After Registration (ObAccessClient.xml)" |
|
Logout Callback URL 11g Webgate only |
The URL to Default = /oam_logout_success This can also be a full URL format with a host:port, where OAM Server calls back directly without reconstructing callback URL. Note: In the remote registration template this parameter is named logoutCallbackUrl (Table 13-10). See Also: Table 19-2, "Logout Details After Registration (ObAccessClient.xml)" |
|
Logout Redirect URL 11g Webgate only |
This parameter is automatically populated after agent registration completes.By default, this is based on the OAM Server host name with a default port of 14200. For example: Default = http://OAMServer_host:14200/oam/server/logout See Also: Table 19-2, "Logout Details After Registration (ObAccessClient.xml)" |
|
Logout Target URL 11g Webgate only |
The value is the name for the query parameter that the OPSS applications passes to Webgate during logout; the query parameter specifies the target URL of the landing page after logout completes. Default: end_url Note: The end_url value is configured using param.logout.targeturl in jps-config.xml. See Also: Table 19-2, "Logout Details After Registration (ObAccessClient.xml)" |
|
Sleep for (seconds) |
The frequency (in seconds) with which the OAM Server checks its connections to the directory server. For example, if you set a value of 60 seconds, the OAM Server checks its connections every 60 seconds from the time it comes up. Default: 60 (seconds) |
|
Cache Pragma Header Cache Control Header Webgate only (not Access Clients) |
These settings apply only to Webgates and control the browser's cache. By default, both parameters are set to no-cache. This prevents Webgate from caching data at the Web server application and the user's browser. However, this may prevent certain operations such as downloading PDF files or saving report files when the site is protected by a Webgate. You can set the Access Manager SDK caches that the Webgate uses to different levels. See http://www.w3.org/Protocols/rfc2616/rfc2616-sec14.html section 14.9 for details. All of the cache-response-directives are allowed. For example, you may need to set both cache values to public to allow PDF files to be downloaded. Defaults: no-cache See Also: Oracle Fusion Middleware Performance and Tuning Guide |
|
Debug |
Debugging can be enabled or not. |
|
Deny on Not Protected Webgates only (not Access Clients) |
Oracle recommends enabling Deny On Not Protected. When enabled, this element denies access to all resources to which access is not explicitly allowed by a rule or policy. Enabling this can limit the number of times the Webgate queries the OAM Server, and can improve performance for large or busy Application Domains.
Important: Deny on Not Protected overrides Host Identifiers and Preferred Host. Oracle recommends enabling Deny on Not Protected. Otherwise security holes can occur in large installations with multiple Host Identifiers, virtual hosts, and other complex configurations. |
|
Allow Management Operations |
This Agent Privilege function enables the provisioning of session operations per agent, as follows:
Default: Disabled Note: Only privileged agents can invoke session management operations. When this parameter is enabled, session management requests (listed above) are processed by the OAM Server. If disabled, such requests are rejected for the agent. |
|
11g Webgate only |
|
|
Allow Credential Collector Operations 11.1.2 and later Webgate only |
Activates Webgate detached credential collector functionality for simple-form or dynamic multi-factor authentication. Default: Disabled See Also: "Configuring 11g Webgate and Authentication Policy for DCC". |
|
Sharepoint Impersonation User 10g Webgate only, Chapter 22 |
The trusted user for impersonation, in Active Directory. This user should not be used for anything other than impersonation. The constraints are the same as any other user in Active Directory. Note: SharePoint impersonation is separate and distinct from the Access Manager user impersonation feature described in the Oracle Fusion Middleware Developer's Guide for Oracle Access Management. |
|
Sharepoint Impersonation Password 10g Webgate only, Chapter 22 |
This is the trusted user password for impersonation. The constraints are the same as any other user password in Active Directory. Oracle recommends that the user choose a very complex password, because the trusted user is granted powerful permissions. Also, check the box |
|
Primary Server List |
Identifies Primary Server details for this Agent. The default is based on the OAM Server:
|
|
Secondary Server List |
Identifies Secondary OAM Server details for this agent, which must be specified manually:
|
13.4.2 Searching for an OAM Agent Registration
Figure 13-3 shows the Webgates Search controls, defaults, and the empty Search Results table. From this page you can create a new 11g Webgate or 10g Webgate registration, or search for a specific Webgate or group of Webgates (all 11g Webgates, for instance).
Figure 13-3 Webgate Search Controls and Create ... Buttons
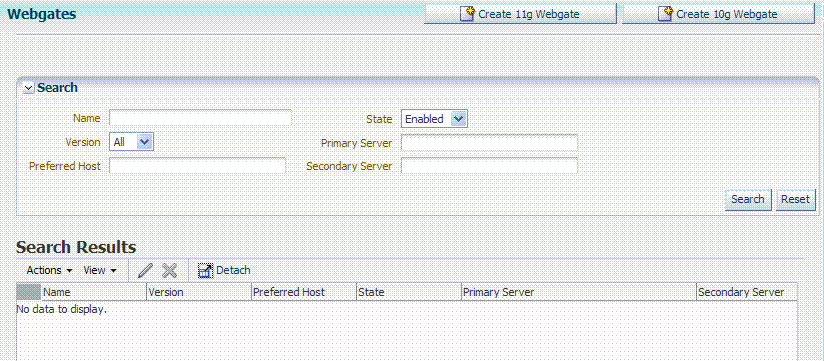
Description of "Figure 13-3 Webgate Search Controls and Create ... Buttons"
If you do not know the exact name, you can use a wild card (*) in the search string. From the search results table, you can choose an name to open and view or edit the registration page.
The controls available on this page are described in Table 13-4.
Table 13-4 OAM Agent Search Controls
| Control | Description |
|---|---|
|
Create 11g Webgate |
Click to open a fresh 11g Webgate registration page. |
|
Create 10g Webgate |
Click to open a fresh 10g Webgate registration page and see Chapter 22, "Registering and Managing 10g Webgates with Access Manager 11g". |
|
Name |
Enter the name (or partial name and wild card (*)) as defined on the registration page. For example: entering a* could return Agent_WebGate_AccessDebugNew in the result table. |
|
Version |
Choose a Webgate version to narrow the search and results:
|
|
Preferred Host |
Enter all (or part of with a wild card (*)) hostname as it appears in HTTP requests. For example: iam* could return IAMSuiteAgent in the result stable. |
|
State |
Choose a Webgate state to narrow the search and results:
|
|
Primary Server |
Enter the entire (or partial with a wild card (*)) Primary Server name. |
|
Secondary Server |
Enter the entire (or partial with a wild card (*)) Secondary Server name. |
The OAM Agent must be a registered agent of Access Manager.
To search for a OAM Agent registration
-
Activate the System Configuration tab, Access Manager section.
-
Expand the SSO Agents node, and double-click the OAM Agents node.
-
Find:
-
All Enabled: Select Version All, State All, and click the Search button.
-
An Agent Version: From the Agent version list, choose 10g or 11g and click the Search button.
-
An Agent Name: In the text field, enter the exact name of the instance you want to find and click the Search button. For example:
my_OAM_Agent
-
-
Click the Search Results tab to display the results table, then:
-
Edit or View: Click the Edit command button in the tool bar to see the configuration page.
-
Delete: Proceed to "Deleting OAM Agent Registration Using the Console".
-
Detach: Click Detach in the tool bar to expand the table to a full page.
-
Reconfigure Table: Select a View menu item to alter the appearance of the results table.
-
-
Apply any changes (or dismiss the page) when you finish.
13.4.3 Viewing or Editing an OAM Agent Registration Page in the Console
This procedure is the same whether you are editing a Webgate or Access Client registration. Users with valid Administrator credentials can change any setting for registered Webgates and programmatic Access Clients using the Oracle Access Management Console, as described in the following procedure. For example, you might want to revise the timeout threshold or other settings used by the OAM Proxy.
After changes, updated details are propagated through a runtime configuration update process. There is usually no need to copy the artifacts over to Webgate configuration area.
Note:
All changes made using the Oracle Access Management Console are taken up without restarting the application server. Changes are reflected automatically after the reconfiguration timeout period.Also:
Artifacts need only be copied to the Webgate directory path if the agent name, access client password, or security mode is changed.
Note:
Artifacts need only be copied to the Webgate directory path if the agent name, access client password, or security mode is changed.The agent must be registered and available in the Oracle Access Management Console.
To view or modify details for a registered OAM Agent
-
From the System Configuration tab, Access Manager section, expand the SSO Agents node.
-
Double-click OAM Agents node to display the Search page.
-
Find the Registration: See "Searching for an OAM Agent Registration".
-
Click the Agent name in the results table to open the page.
-
-
Modify Agent details, and Primary or Secondary Server details, as needed (Table 13-1, Table 13-3).
-
User-Defined Parameters: Add or modify these as desired (Table 13-2).
-
Click Apply to submit changes and dismiss the Confirmation window (or close the page without applying changes).
-
Copy the artifacts as follows (or install Webgate with the same specifications, then copy artifacts), including any Simple or Cert mode files. For example, Open mode files include:
Agent & Artifacts Artifacts 11g Webgate/Access Client ObAccessClient.xml and cwallet.sso
From the AdminServer (Console) host: $DOMAIN_HOME/output/$Agent_Name/
To the Agent host: $11gWG_install_dir/webgate/config.
10g Webgate/Access Client ObAccessClient.xml
Note: Go to Chapter 22 before completing this task.
From the AdminServer (Console) host: $DOMAIN_HOME/output/$Agent_Name/
To the Agent host
$10gWG_install_dir/oblix/lib/ObAccessClient.xml
-
Proceed as needed for your deployment:
Part V, "Managing Access Manager SSO, Policies, and Testing".
13.4.4 Deleting OAM Agent Registration Using the Console
Users with valid Administrator credentials can perform the following procedure to delete a registered Webgate or Access Client from the Oracle Access Management Console.
Note:
Deleting an agent registration removes only the registration (not the associated host identifier, Application Domain, resources, or the agent itself).Evaluate the Application Domain, resources, and policies associated with this agent and ensure that these are configured to use another agent (or be removed).
To delete a Webgate or Access Client registration
-
From the System Configuration tab, Access Manager section, expand the SSO Agents node.
-
Open the OAM Agents node to display the Search page.
-
Find the Registration: See "Searching for an OAM Agent Registration".
-
Select the desired registration from the results table, and open it to confirm it is the right agent to remove, close the page.
-
Select the name in the results table, click the Delete (X) button, check the Confirmation dialog and then close the page.
-
Confirm the Agent name is no longer listed in the navigation tree.
-
-
Remove the Agent Instance: Perform the following steps (see "Removing a 10g Webgate from the Access Manager 11g Deployment", if needed).
-
Shut down the Web server.
-
Remove Webgate software using the utility provided in the following directory path:
$Webgate_install_dir/oui/bin
Windows: setup.exe -d
Unix: runInstaller -d
-
Revert to the httpd.conf version before updates for Webgate. For example:
Copy: httpd.conf.ORIG
To: httpd.conf
-
Restart the Web server.
-
On the agent host, manually remove the Webgate instance directory:
11g Webgate/Access Client: 11gWebgate_instance_dir/webgate/config.
10g Webgate/Access Client: $Webgate_install_dir/oblix/lib/
-
13.5 Understanding the Remote Registration Tool, Modes, and Process
As an alternative to using the console for agent registration, you can use the remote registration utility, oamreg, with Oracle-provided templates. Administrators using the Oracle Access Management Console or remote registration utility must have credentials stored in the System Store (Chapter 4).
This section provides details about remote registration in the following topics:
See Also:
"Introduction to Remote Registration"13.5.1 About Remote Registration Command Arguments and Modes
Before using the remote registration tool, two environment variables within the script must be set as shown in the samples in Table 13-5, which presume the location of the tool to be $OAM_REG_HOME on a Linux system. Your environment might be different.
Table 13-5 Environment Variables to Set within oamreg
| Environment Variable | Description |
|---|---|
|
OAM_REG_HOME |
The directory under which RREG.tar was exploded, followed by /rreg: OAM_HOME/oam/server/rreg/client/rreg |
|
JAVA_HOME |
The location where Java is located on the client computer. For example: WLS_HOME/Middleware/jdk160_11. Note: JAVA_HOME should point to JDK 1.6. |
Additionally, before using the remote registration tool, you must modify several tags in the request file, as described later (Table 13-9).
Remote Registration Command Arguments
The arguments required to run the remote registration script are listed in Table 13-6.
Table 13-6 Remote Registration Command Arguments: mode
| Arguments | Description |
|---|---|
|
mode |
Either:
|
|
input/ |
Either the absolute path to the input file (*request.xml or an agentName_Response.xml), or the path relative to the value of OAM_REG_HOME. The preferred location is $OAM_REG_HOME/input |
Remote Registration Sample Commands
Sample commands are shown in Table 13-7, which presume the location of the tool to be $OAM_REG_HOME on a Linux system.
Table 13-7 Remote Registration Command Samples
| Command Type | Sample (on Linux) |
|---|---|
|
In-band Administrator In-band Request |
./bin/oamreg.sh inband input/*Request.xml |
|
In-band Administrator Submitted Request |
./bin/oamreg.sh outofband input/starting_request.xml |
|
Out-of-band Administrator Returned Response |
./bin/oamreg.sh outofband input/agentName_Response.xml |
|
[prompt_flag] value: [-noprompt] |
Optional. When -noprompt is used, oamreg does not wait for prompts (password, and so on). Instead these values can be piped in, either from an input file or from the command line itself using an echo command. Examples from OAM_REG_HOME location: (echo username; echo password; echo webgate_password;) | ./bin/oamreg.sh inband input/Request.xml -noprompt config.file (echo username; echo password; echo webgate_password; echo httpscert_trust_prompt;) | ./bin/oamreg.sh inband input/Request.xml -noprompt (echo username; echo password; echo webgate_password; echo cert_password;) | ./bin/oamreg.sh inband input/Request.xml -noprompt (echo username; echo password; echo webgate_password; echo httpscert_trust_prompt; echo cert_password;) | ./bin/oamreg.sh inband input/Request.xml -noprompt See Also: "Updating Agents Remotely" |
Note:
After launching the script, Administrators are prompted for a username and password (unless -noprompt is used as shown in Table 13-7.)After running the script, messages inform you of success or failure. Following a successful registration or update, you must copy the artifacts to the Agent host, as outlined in "About Updated Agent Configuration Files".
13.5.2 Common Elements within Remote Registration Request Templates
Table 13-8, shows the global elements that are common within all remote registration request files, regardless of agent type.
Table 13-8 Common Elements in Remote Registration Requests
| Element | Example | |
|---|---|---|
|
<serverAddress> |
<serverAddress>http://{oam_admin_ser
ver_host}:{oam_admin_server_port}
</serverAddress>
|
|
|
<agentName> |
<agentName>RREG_OAM</agentName>
|
|
|
<hostIdentifier> |
<hostIdentifier>RREG_HostId11G
</hostIdentifier>
|
|
|
Extended Templates Only |
||
|
<agentBaseUrl> |
<agentBaseUrl>http://{web_server_
host):(web_server_port}
</agentBaseUrl>
|
|
|
<autoCreatePolicy> |
<autoCreatePolicy>true </autoCreatePolicy> |
|
|
<applicationDomain> |
<applicationDomain>RREG_OAM11G </applicationDomain> |
|
|
<virtualhost> |
<virtualhost>false<virtualhost> |
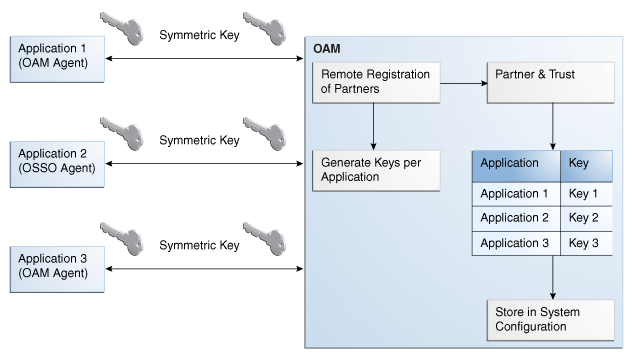
13.5.3 About Key Use, Generation, Provisioning, and Storage
Each registered agent has a symmetric key, regardless of the registration method (Oracle Access Management Console versus remote registration).
Each application will have a symmetric key whether it is protected through mod_osso, or an OAM Agent. This key is generated by the registration tool. Storage of the application mapping, key, and type of Agent persists in the system configuration for retrieval as needed.
Each 11g Webgate agent has its own secret key that is shared between the agent and the OAM Server. If one 11g Webgate is compromised, other 11g Webgates are unaffected. The following presents an overview:
-
Encrypt/Decrypt the host-based Webgate-specific OAMAuthnCookie_<host:port>_<random number>.
-
Encrypt/Decrypt the data that is redirected between Webgate and OAM Server.
Figure 13-4 illustrates the process of key generation, which occurs automatically when the agent is registered, regardless of the method used (Oracle Access Management Console versus remote registration). There is one symmetric key per agent.
Key Accessibility and Provisioning
Each Agent specific key must be accessible to the corresponding Webgate through a secure local storage on the client machine. Cryptographic keys are not stored in the data store. Instead, an alias to an entry in a Java keystore or CSF repository is stored; the Partner and Trust Management API obtain the actual key when it is requested. The agent specific secret key:
-
Is provisioned during remote registration (either in-band mode or out-of-band mode)
-
Is unique so that it can uniquely identify each agent.
-
Is distributed securely back to the agent (either through the wire during in-band mode or through a separate secure channel during out-of-band mode).
-
Is saved in the Oracle Secret Store, in the SSO wallet. SSO wallet creation applies only to 11g Webgates (not to 10g Webgates or other agent types).
Note:
The Oracle Secret Store is a container that consolidates the storage of secret keys and other security-related secret information inside the Oracle Wallet, not in plain-text. The SSO wallet relies on underlying file system security to protect its data. Opening this wallet does not require a password. The SSO wallet depends on the operating system and file permissions for its security. -
Is saved in the Oracle Secret Store, in an auto-login editable SSO wallet, upon completion of registration.
The SSO wallet containing the agent key must be located in cwallet.sso, in the directory with ObAccessClient.xml in Webgate_instance_dir/webgate/config (for example, WebTier_Middleware_Home/Oracle_WT1/instances).
The SSO wallet does not require a user password, and should be protected with the proper file permission (700) or registry on Windows.
13.6 Understanding Remote Registration Templates: OAM Agents
Oracle provides both a short and extended registration request template for use with the remote agent registration tool: oamreg.sh (Linux) or oamreg.bat (Windows). This topic focuses on OAM Agent templates (Webgates and Access Clients).
Regardless of the template you choose (short or extended), only a few differences exist between 11g and 10g OAM Agent templates, listed in Table 13-9 and stored in $OAM_REG_HOME/input/.
Table 13-9 Remote Registration Request Templates for OAM Agents
| Template Type | Template Name in $OAM_REG_HOME/input/ |
|---|---|
|
Abbreviated (Short) Form |
|
|
Extended (Full) Form |
|
|
Other Templates Update Agent Create Policies, Update Policies Out-of-band Response |
For a look at these specialized tasks and templates, see: |
Note:
Despite being nearly identical for both 10g and 11g Webgates, be sure to copy and use the appropriate request for your release.13.6.1 OAM Agent Parameters for Remote Registration
Table 13-10 describes elements specific to OAM Agent remote registration requests. Element names in request templates might differ slightly from counterparts in the Oracle Access Management Console. Unless explicitly stated, all information applies equally to requests for both 10g and 11g Webgates/Access Clients. Protected, public, and excluded resource lists are included in both the short and extended request templates for OAM Agents.
Note:
In Table 13-10, descriptions of each element are omitted because they are shown in Table 13-3.Table 13-10 Elements in Extended OAM Agent Remote Registration Requests
| Element | Example | |
|---|---|---|
|
<serverAddress> <agentName> <hostIdentifier> <agentBaseUrl> <autoCreatePolicy> <applicationDomain> <virtualhost> |
See Table 13-8, "Common Elements in Remote Registration Requests". |
|
|
<hostPortVariationsList> |
<hostPortVariationsList> <host>host1</host> <port>7777</port> </hostPortVariations> <host>host2</host> <port>7778</port> </hostPortVariations> </hostPortVariationsList> |
|
|
<protectedResourcesList> |
<protectedResourcesList> <resource>/</resource> </protectedResourcesList> |
|
|
<publicResourcesList> |
<publicResourcesList> <resource>/public/index.html </resource> </publicResourcesList> |
|
|
<excludedresourcesList> |
<excludedresourcesList> <resource>/excluded/index.html </resource> </excludedresourcesList> |
|
|
<primaryCookieDomain> 10g Request Only In OAMRequest.xml (10g Webgates) <hostIdentifier> is also used as preferred HTTP host |
<primaryCookieDomain>{client_domain}
</primaryCookieDomain>
|
|
|
<maxCacheElems> |
<maxCacheElems>100000 </maxCacheElems> |
|
|
<cacheTimeout> |
<cacheTimeout>1800</cacheTimeout> |
|
|
<tokenValidityPeriod> 11g Request Only |
<tokenValidityPeriod>3600 </tokenValidityPeriod> |
|
|
<cookieSessionTime> 10g Webgate only, Chapter 22 |
<cookieSessionTime>3600 </cookieSessionTime> |
|
|
<maxConnections> |
<maxConnections>1</maxConnections> |
|
|
<maxSessionTime> |
<maxSessionTime>24</maxSessionTime> |
|
|
<idleSessionTimeout> 10g Webgate only, Chapter 22 |
<idleSessionTimeout>3600> </idleSessionTimeout |
|
|
<failoverThreshold> |
<failoverThreshold>1 </failoverThreshold> |
|
|
<aaaTimeoutThreshold>- |
<aaaTimeoutThreshold>-1 </aaaTimeoutThreshold> |
|
|
<sleepFor> |
<sleepFor>60</sleepFor> |
|
|
<debug> |
<debug>false</debug> |
|
|
<security> |
<security>open</security |
|
|
<denyOnNotProtected> |
<denyOnNotProtected>1 </denyOnNotProtected> |
|
|
<allowManagementOperations> |
<allowManagementOperations>false/<allowManagementOperations> |
|
|
<cachePragmaHeader> <cacheControlHeader> |
<cachePragmaHeader>no-cache </cachePragmaHeader> <cacheControlHeader>no-cache </cacheControlHeader |
|
<ipValidation>0</ipValidation> |
||
<ipValidationExceptions> <ipAddress>10,11,11,11</ipAddress> <ipAddress>10,11,11,12</ipAddress> <ipAddress>10,11,11,13</ipAddress> </ipValidationExceptions> |
||
|
<logOutUrls> |
<logOutUrls>
    <url>/logout1.html</url>
    <url>/logout2.html</url>
</logOutUrls>
|
|
|
<logoutCallbackUrl> 11g Request Only |
<logoutCallbackUrl>/oam_logout_success </logoutCallbackUrl> |
|
|
<logoutTargetUrlParamName> 11g Request Only |
<logoutTargetUrlParamName>end_url </logoutTargetUrlParamName> |
|
|
User-Defined Parameter Names |
Examples
<userDefinedParameters>
   <userDefinedParam>
      <name>...</name>
      <value>...</value>
</userDefinedParam>
|
|
|
MaxPostDataLength |
<userDefinedParameters>
   <userDefinedParam>
      <name>MaxPostDataLength</name>
      <value>750000</value>
</userDefinedParam>
|
|
|
maxSessionTimeUnits |
<userDefinedParameters> <name>maxSessionTimeUnits</name> <value>hours</value> </userDefinedParam> |
|
|
RetainDownstreamPostData |
<userDefinedParameters> <name>RetainDownstreamPostData </name> <value>false</value> </userDefinedParam> |
|
|
useIISBuiltinAuthentication |
<userDefinedParameters> <name>useIISBuiltinAuthentication </name> <value>false</value> </userDefinedParam> |
|
|
idleSessionTimeoutLogic 10g Webgates only |
<userDefinedParameters> <name>idleSessionTimeoutLogic </name> <value>leastComponentIdleTimeout </value> </userDefinedParam> |
|
|
URLInUTF8Format |
<userDefinedParameters> <name>URLInUTF8Format</name> <value>true</value> </userDefinedParam> |
|
|
inactiveReconfigPeriod Shared secret applies to only 10g Webgate Configuration applies to only 11g Webgate. |
<userDefinedParameters> <name>inactiveReconfigPeriod</name> <value>10</value> </userDefinedParam> |
|
|
WaitForFailover |
<userDefinedParameters> <name>WaitForFailover</name> <value>-1</value> </userDefinedParam> |
|
|
proxySSLHeaderVar |
<userDefinedParameters> <name>proxySSLHeaderVar</name> <value>IS_SSL</value> </userDefinedParam> |
|
|
client_request_retry_attempts |
<userDefinedParameters> <name>client_request_retry_attempts </name> <value>1</value> </userDefinedParam> |
|
|
ContentLengthFor401Response |
<userDefinedParameters> <name>ContentLengthFor401Response </name> <value>0</value> </userDefinedParam> |
|
|
SUN61HttpProtocolVersion |
<userDefinedParameters> <name>SUN61HttpProtocolVersion </name> <value>1.0</value> </userDefinedParam> |
|
|
impersonationCredentials |
<userDefinedParameters>
   <name>username:password
</name>
   <value>cred</value>
</userDefinedParam>
|
|
|
UseWebgateExtForPassthrough |
<userDefinedParameters> <name>UseWebgateExtForPassthrough </name> <value>false</value> </userDefinedParam> |
|
|
syncOperationMode |
<userDefinedParameters> <name>syncOperationMode</name> <value>false</value> </userDefinedParam> |
|
|
filterOAMAuthnCookie 11g Request only. |
<userDefinedParameters> <name>filterOAMAuthnCookie</name> <value>true</value> </userDefinedParam> |
13.7 Performing Remote Registration for OAM Agents
This section includes the following topics describing how to perform remote registration, which is similar regardless of the agent type:
13.7.1 Acquiring and Setting Up the Remote Registration Tool
The oamreg client tool can be used anywhere, not just on the OAM Server. If the oamreg home is already exploded, you can use the following procedure to acquire and update the oamreg script for your operating system:
Windows: oamreg.bat
Linux: oamreg.sh
Note:
Oracle Recommends using the latest tool and files by applying the latest bundle patch and untarring RREG.tar.gz again as described here.For remote registration, two variables are required: JAVA_HOME and OAM_REG_HOME, as described in Table 13-11.
Table 13-11 Variables Required for Remote Registration
| Location | Variable | Description |
|---|---|---|
|
Client Side |
JAVA_HOME |
The JDK 1.6 location on the computer that relies on $JAVA_HOME already set in the environment. |
|
OAM_REG_HOME |
The absolute file location for RREG HOME (directory under which RREG.tar was exploded, followed by /rreg and one directory above where the scripts reside). For example: OAM_HOME/oam/server/rreg/client/rreg Suppose IM_ORACLE_HOME is MW_HOME/Oracle_IDM: export OAM_REG_HOME=MW_HOME/Oracle_IDM/oam/server/rreg |
|
|
rreg folder location (not RREG.tar.gz location) |
JAVA_HOME |
Relies on $JAVA_HOME already set in the environment. |
|
OAM_REG_HOME |
Is already set in the script during the installation. |
To acquire the tool and update the script with your environment variables
-
Locate RREG.tar.gz file in the following path:
ORACLE_HOME/oam/server/rreg/client/RREG.tar.gz
-
Untar RREG.tar.gz file, which creates directories beneath
/clientcontaining the required tool and templates. -
In the oamreg script (...
/rreg/client/rreg/bin) set environment variables as follows:-
Set JAVA_HOME to JDK 1.6 (Table 13-11).
-
Set OAM_REG_HOME to the exploded_dir_for_RREG.tar/rreg based on your environment (client side or server side Table 13-11).
-
-
Proceed with "Creating Your Remote Registration Request".
13.7.2 Creating Your Remote Registration Request
You can use the following procedure to create an appropriate *Request*.xml file to provide input for the specific agent you want to register.
Understanding Remote Registration Templates: OAM Agents
To create the registration request
-
Locate the required *Request*.xml input file for the agent you want to register:
Regardless of the template you choose (short or extended), only a few differences exist between 11g and 10g agent templates stored in
$OAM_REG_HOME/input/. For example:OAM11GRequest.xml
-
Copy the request file to a new name. For example:
From: OAM11GRequest.xml
To: my11gagent_request.xml -
In the Request file, modify information to reflect details for your agent and the resources to protect using details in:
-
Proceed with task needed for your environment:
13.7.3 Performing In-Band Remote Registration
The OAM Administrator within the network performs all tasks. This section provides the steps to perform in-band remote registration, regardless of agent type. For this example, an OAM Agent is being registered using the short request on a Linux system. Your agent type, request template, and output files will be different.
See Also:
Oracle Fusion Middleware Installation Guide for Oracle Identity and Access Management chapter "Installing and Configuring Oracle HTTP Server 11g Webgate for OAM"To perform in-band remote registration
-
On the computer hosting the Agent, run the registration command and specify your own *Request*.xml as the input file. For example:
./bin/oamreg.sh inband input/myagent_request.xml -
Provide the registration Administrator user name and password when asked.
-
Read the messages on-screen to confirm:
-
Success: On-screen message confirms
In-band registration process completed successfully!Native Configuration File Location: "... created in output folder ..."The output folder is in the same location where RREG.tar.gz was expanded: /rreg/output/AgentName/
-
-
Review the native configuration file created for the agent in the /rreg/output/AgentName/ folder.
-
Finalize Registration: Perform the following steps to replace the earlier agent configuration file if it is not already replaced:
-
Copy artifacts in /rreg/output/AgentName/ to update the agent configuration. For example:
From the AdminServer (Console) host
/rreg/output/Agent_Name/ObAccessClient.xmlandcwallet.ssoTo the Agent host: $11gWG_install_dir/
webgate/config. For example:
$WebTier_Middleware_Home/Oracle_WT1/instances/instance1
/config/OHS/ohs1/webgate/config -
Restart the OAM Server hosting the agent.
-
-
Proceed with "Validating Remote Registration".
13.7.4 Performing Out-of-Band Remote Registration
This section provides steps for Administrators outside (and inside) the network as they work together to register an agent remotely.
During out-of-band remote registration, an administrator outside the network submits a registration request to an Administrator within the network. After processing the request, the in-band Administrator returns the following files to the out-of-band Administrator to configure his environment:
Table 13-12 Files Returned by in-band Administrator to out-of-band Administrator
| File | Description |
|---|---|
|
agentName_Response.xml |
Returned to, and used by, the out-of-band Administrator. Oracle recommends that you do not open or edit agentName_Response.xml. |
|
Native Web server configuration files |
Returned to, and used by, the out-of-band Administrator to update his Web server. |
|
See Also |
The steps performed by each Administrator are identified:
-
In-Band Administrator: Identifies a task performed by the Web server Administrator within the network.
-
Out-of-Band Administrator Identifies a task performed by the Web server Administrator outside the network
See Also:
Oracle Fusion Middleware Installation Guide for Oracle Identity and Access Management chapter "Installing and Configuring Oracle HTTP Server 11g Webgate for OAM"Steps here illustrate registering an OAM Agent on a Linux system. Your templates and output files will be different.
Acquiring and Setting Up the Remote Registration Tool
See Also:
Part VI, "Registering and Using Legacy Agents with Access Manager", if needed.To perform out-of-band remote registration
-
Out-of-Band Administrator: Create and send your starting_request.xml file to the in-band Administrator for processing (see "Creating Your Remote Registration Request"):
WLS_Home/Middleware/Oracle_IDM1/oam/server/rreg/client/rreg/output/AgentName/starting_request.xml
-
In-Band Administrator:
-
Run the registration command and specify the out-of-band Administrator's starting_request.xml as the input file. For example:
./bin/oamreg.sh outofband input/starting_request.xml -
Provide the Registration Administrator user name and password when asked.
-
Read messages on-screen to confirm:
Success: "... registration process completed successfully!
Response.xml location: "... created in input folder ..."
The input folder is in the same location where RREG.tar.gz was expanded: /rreg/input/AgentName/
-
Return the agentName_Response.xml file to the out-of-band Administrator along with any other artifacts. For example:
agentName_Response.xml
-
-
Out-of-Band Administrator: Updates the environment, as follows.
-
On the computer hosting the Agent, run the remote registration command and specify the received agentName_Response.xml as the input file. For example:
./bin/oamreg.sh outofband input/agentName_Response.xml -
Copy artifacts generated in /rreg/output/AgentName/ to update the agent configuration (), then restart the OAM Server hosting the agent. For example, ObAccessClient.xml and cwallet.sso:
From the AdminServer (Console) host
/rreg/output/Agent_Name/ObAccessClient.xmlandcwallet.ssoTo the Agent host: $11gWG_install_dir/
webgate/config. For example:
$WebTier_Middleware_Home/Oracle_WT1/instances/instance1
/config/OHS/ohs1/webgate/config -
Proceed with "Validating Remote Registration and Resource Protection".
-
13.8 Introduction to Updating Agents Remotely
Several remote management modes are provided to help Administrators quickly update, validate, or delete an existing agent registration. This section provides the following topics:
13.8.1 About Remote Agent Update Modes
Table 13-13 presents remote agent management modes. Command parameters include the mode, input *Request.xml file (a relative path with respect to OAM_REG_HOME, the preferred location for the input *Request.xml files):
./oamreg.sh <mode> <input_file> [prompt_flag] [component.oam.config_file] <mode> value
Table 13-13 Remote Agent Update Modes and Input Files
| Mode and Input Files | Description and Syntax |
|---|---|
|
agentUpdate mode OAM11GUpdateAgentRequest.xml OAMUpdateAgentRequest.xml |
Allows Administrators to update existing agent attributes, regardless of agent type: ./bin/oamreg.sh agentUpdate input/*UpdateAgentRequest.xml See Also: OpenSSOUpdateAgentRequest, Chapter 20 OSSOUpdateAgentRequest, Chapter 21 |
|
agentValidate mode No input file needed. |
Validates whether the agent is already provisioned in Oracle Access Manager:
./bin/oamreg.sh agentValidate agentname
|
|
agentDelete mode No input file needed. |
Allows Administrators to delete the agent registration:
./bin/oamreg.sh agentDelete agentname
|
13.8.2 About Remote 11g OAM Agent Updates Template
You use OAM11GUpdateAgentRequest.xml to pass specific Agent-update values to the remote registration tool, oamreg. The primary differences between the update request and the original registration request is that the update request.
13.9 Updating Agents Remotely
This section provides the following topics for agents registered with Access Manager, regardless of agent type:
13.9.1 Updating Agents Remotely
This topic provides the steps to update agents registered with Access Manager, regardless of agent type.
Review About Remote Agent Update Modes
See Also:
To remotely update an Agent registration
-
Set up the registration tool as described in, "Acquiring and Setting Up the Remote Registration Tool".
-
Create your update request using one of the following templates:
-
OAM11GUpdateAgentRequest.xml
-
OAMUpdateAgentRequest.xml (10g) Chapter 22
-
OSSOUpdateAgentRequest.xml Chapter 21
-
OpenSSOUpdateAgentRequest.xml Chapter 20
-
-
On the computer hosting the Agent, run the following command with
agentUpdatemode specify your own *Request*.xml as the input file. For example:./bin/oamreg.sh agentUpdate input/*UpdateAgentRequest.xml
-
Provide the registration Administrator user name and password when asked.
-
Read the messages on-screen to confirm:
-
Success: On-screen message confirms
agentUpdate process completed successfully!Native Configuration File Location: "... created in output folder ..."The output folder is in the same location where RREG.tar.gz was expanded: /rreg/output/AgentName/
-
-
Finalize Agent Registration: Copy the updated ObAccessClient.xml and cwallet.sso.
From the AdminServer (Console) host: /rreg/output/Agent_Name/
To the Agent host: $11gWG_install_dir/webgate/config. For example:
$WebTier_Middleware_Home/Oracle_WT1/instances/instance1/ config/OHS/ohs1/webgate/config -
Restart the OAM Server that is hosting this agent and proceed to "Performing Remote Agent Validation".
13.9.2 Performing Remote Agent Validation
This topic provides the steps to validate agent registration, regardless of agent type.
Review About Remote Agent Update Modes
To remotely validate an Agent registration
-
Set up the registration tool as described in, "Acquiring and Setting Up the Remote Registration Tool".
-
On the Agent host, run the following command in
agentValidatemode. For example:./bin/oamreg.sh agentValidate agentname -
Provide the registration Administrator user name and password when asked.
-
Read the messages on-screen to confirm:
-
Success: On-screen message confirms
AgentValidation process completed successfully!
-
13.9.3 Performing Remote Agent Removal
This topic provides the steps to remove a registered agent, regardless of agent type.
Review About Remote Agent Update Modes
To remotely remove an Agent registration
-
Set up the registration tool as described in, "Acquiring and Setting Up the Remote Registration Tool".
-
On the computer hosting the Agent, run the following
agentDeletecommand. For example:./bin/oamreg.sh agentDelete agentname -
Provide the registration Administrator user name and password when asked.
-
Read the messages on-screen to confirm:
-
Success: On-screen message confirms
AgentDelete process completed successfully!
-
13.10 Validating Remote Registration and Resource Protection
This section provides the following topics:
13.10.1 Validating Remote Registration
You can use the following steps as a guide to validate registration of an agent regardless of the agent type. You must be an in-band Administrator to perform tasks using the Oracle Access Management Console. Out-of-band Administrators must test authentication and access remotely.
This topic provides the following procedures:
-
Validating Agent Registration using the Oracle Access Management Console
-
Validating Authentication and Access After Remote Registration
13.10.1.1 Validating Agent Registration using the Oracle Access Management Console
Only an in-band Administrator can use the following procedure.
To validate agent and application registration
-
Validate Agent Registration in the Oracle Access Management Console:
-
Confirm Agent details under the System Configuration tab in the Oracle Access Management Console.
-
Confirm the updated Agent configuration files are in the appropriate location, as described in "Performing Remote Registration for OAM Agents".
-
-
Validate Shared Components, Host identifier: Confirm that the host identifier is defined in the Oracle Access Management Console.
-
Validate Application Domain: Under the Policy Configuration tab, confirm there is a new Application Domain named after the registered agent. Resources in the Application Domain should be associated with the host identifier.
-
Proceed with "Validating Authentication and Access After Remote Registration".
13.10.1.2 Validating Authentication and Access After Remote Registration
After registration, protected resource should be accessible with proper authentication without restarting the AdminServer or OAM Server. Both in-band and out-of-band Administrators can use the following procedure to validate proper registration and policies.
The procedure here provides several methods for confirming that registration, authentication, and authorization are properly configured and operational. The procedures is nearly identical for all agent types.
To verify authentication and access after registration
-
Enter the URL for an application protected by the registered OAM Agent to confirm that the log in page appears (proving that the authentication redirect URL was specified appropriately). For example:
http://exampleWebserverHost.sample.com:8100/resource1.html -
On the Log In page, enter a valid username and password when asked, and click Login.
-
Check the OAM specific cookies are created in the browser session. For example:
ObSSOCookie:
Set-Cookie:
ObSSOCookie=GGVEuvjmrMe%2FhbItbjT24CBmJo1eCIfDIwQ1atdGdnY4mt6kmdSekSFeAAFvFrZZZ
xDfvpkfS3ZLZFbaZU2rAn0YYUM3JUWVYkYFwB%2BBK7V4x%2FeuYHj%2B8gwOyxhNYFna3iSx1MSZBE
y51KTBfsDYOiw6R%2BCxUhOO8uZDTYHI3s0c7AQSyrEiQTuUV3nv1omaFZlk1GuZa4J7ycaGbIUyqwX
rM0cKuBJNd6sX1LiRj9HofYQsvUV7ToqeAOpDS7z9qs5LhqU5Vq60bBn12DTX6zNX6Lcc0L5tVwvh7%
2BnOAkz2%2BoDkLs%2BBTkeGcB3ppgC9;httponly; path=/; domain=.example.com;
OAM_ID Cookie:
Set-Cookie:
OAM_ID=v1.0~0~E1EBBC9846E09857060A68E79AEEB608~AA79FC43C695162B6CDE3738F40E94DA
6408D58B879AC3B467EBBD4800743C899843672B3511141FFABCF58B2CDCB700C83CC734A913625
7C4ABDA6913C9EF5A4E05C5D03D3514F2FECACD02F1C1B9314D76B4A68CB7A8BE42AEB09AFB98B8
EB; path=/; HttpOnly
-
Proceed as follows:
-
Success: If you authenticated successfully and were granted access to the resource; the configuration is working properly. Proceed with Steps 5 through 12 for further validations.
-
Failure: If you received an error during login or were denied access to the resource, check the following:
-
Login Error: Confirm that you provided a valid user id and password.
-
Unavailable Resource: Confirm that the resource is available.
-
Wrong Redirect URL: Verify the redirect URL in the Oracle Access Management Console.
-
-
-
User Variations: Perform steps 1 through 4 again with user variations to confirm appropriate behavior (either success for authorized users or failure for unauthorized users).
-
Request Cancellation: Perform a partial log in and click Cancel to confirm that the resource is not accessed.
-
Modified Authentication URL: Enter a nearly identical authentication URL as you perform Steps 1 through 5 to confirm appropriate response. For example, add a character to the URL string.
-
Updated Resource: Perform the following steps to ensure the resource is accessible. For example:
Original Resource: /abc/test.html
Updated Resource: /abc/xyz/test.html
Without restarting the Oracle WebLogic Server:
-
Access the updated resource and confirm the user is asked to authenticate and the resource is accessible.
-
Access the original resource and confirm that the resource is accessible and the user is not asked for authentication.
-
-
Various URL Patterns: Verify authentication for various URL patterns as you perform steps 1 through 5.
-
New Authentication Scheme: Perform the following steps to confirm authentication operations without restarting the WebLogic Server.
-
Add a new authentication policy that uses a different Authentication Scheme.
-
Protect the resource using the new policy.
-
Without restarting the Oracle WebLogic Server, perform steps 1 through 4.
-
-
CGI Resource Header Variable and Cookies: Perform the following steps to confirm authentication operations without having to restart the WebLogic Server.
-
Add a new authentication policy to protect a Common Gateway Interface (CGI) resource and set the Response for "Authentication Successful".
-
Protect the resource using the new policy.
-
Access the CGI resource.
-
Check for the header values configured for the response in a CGI data dump.
-
-
Agent Disabled: Perform the following steps to validate accessibility and authentication if Webgate is disabled in ObAccessClient.xml (Webgate should pick up the enabled value from oam-config.xml).
-
Disable the Agent State.Start the Web server and OAM Server.Access an application protected by the Agent and confirm that you are asked to authenticate.
-