11 Managing Policies, Rules, and Conditions
Policies are created and managed by organizations to prevent fraud and misuse across multiple channels of access and for business processes. They contain security rules used to evaluate the level of risk at each decision and enforcement point.
A full snapshot of policies, dependent components and configurations is shipped with Oracle Adaptive Access Manager. The oaam_base_snapshot.zip file is located in the MW_HOME/IDM_ORACLE_HOME/oaam/init directory.
OAAM provides out of the box security policies and rules. For more information on these policies and rules, refer to Chapter 10, "OAAM Policies Concepts and Reference." When working with policies, it is important that you understand how they work, and how to create new policies and rules to suit your business.
This chapter explains how to plan, create, configure, and manage policies.
11.1 Discovery and Policy Development
This section shows the security policy development and modeling process in which high-level requirements are translated into security policies.
11.1.1 Security Policy Development Process
The process for developing policies are outlined in this section.
11.1.1.1 Overview
Table 11-1 summarizes examples of actors who would take part in the security policy development process.
Table 11-1 Example of Policy Development Actors
| Actors | Description |
|---|---|
|
Investigators and Customer Service Representatives |
Investigators and Customer Service Representatives (CSR) use Oracle Adaptive Access Manager's case management tools to handle security and customers cases day-to-day. They have detailed knowledge about user activity and security issues. Analysts work with investigators and CSRs to identify if policies need to be adjusted or new policies need to be created. |
|
Business/Security Analyst |
Analysts gather intelligence from various sources to identify needs and develop requirements to address them. Some sources for intelligence include Investigators, industry reports, antifraud networks, compliance mandates, and company polices. |
|
Security Administrator |
Administrators plan, configure and deploy policies based on the requirements from analysts. |
|
System Administrator |
A System Administrator configures environment-level properties and transactions. |
|
Quality Assurance |
Quality Assurance (QA) tests the policies to confirm that they meet requirements. |
Editing an existing policy involves the following tasks:
-
Research/Troubleshooting
-
Requirements and Planning
-
Configuration
-
Testing
-
Deployment to production
Creating a new policy involves the following tasks:
-
Discovery/Research
-
Requirements and Planning
-
Configuration
-
Testing
-
Deployment to production
11.1.1.2 Edit Policy: Research and Troubleshooting
Business Analysts gather intelligence from various sources to identify issues and develop requirements to address them.
Table 11-2 Edit Policy: Research/Troubleshooting
| Source | Details |
|---|---|
|
OAAM Reports |
In an existing OAAM deployment analysts can run reports using BIP to identify security or customer issues that need to be addressed. |
|
Investigator/CSR feedback |
Interviews with staff can reveal customer and security issues. Are customers complaining they are challenged too often without valid cause? Are there a number of fraud cases where the current policy was not strict enough to prevent access? |
|
Industry Reports |
There may be a new type of threat not covered by the current rules. Do thresholds need to be adjusted? |
|
Anti-Fraud Networks |
Are there new rule thresholds being suggested by peers/experts? Do they make sense for the business? |
11.1.1.3 New Policy: Discovery and Research
Business and Security Analysts gather intelligence from various sources to identify needs and develop requirements to address them.
Table 11-3 New Policy: Discovery/Research
| Source | Details |
|---|---|
|
OAAM Reports |
In an existing OAAM deployment analysts can run reports using BIP to identify security or customer issues that need to be addressed. |
|
Investigator/CSR feedback |
Interviews with staff can reveal customer and security issues. Are customers complaining they are challenged too often without valid cause? Are there a number of fraud cases where current policy was not strict enough to prevent access? |
|
Industry Reports |
There may be a new type of threat not covered by the current rules. Do thresholds need to be adjusted? |
|
Anti-Fraud Networks |
Are there new rule thresholds being suggested by peers/experts? Do they make sense for your business? |
|
Compliance |
Is there a new mandate for security measures not addressed by your current policies? |
|
Company policy |
Are there new requirements for employee access that can be addressed with OAAM? |
11.1.1.4 Edit Existing or Create New Policy: Requirements and Planning
Business/Security Analysts develop requirements to address needs identified during discovery.
-
What new policies are needed and why?
-
What are the use cases?
-
What are the expected outcomes (actions, alerts, score)?
-
What applications are involved?
-
What user groups are involved?
11.1.1.5 Edit Existing or Create New Policy: Configuration
Security Administrators plan, configure and deploy policies based on the requirements from analysts.
-
What data points should be profiled by autolearning?
-
What rules need to be configured to fulfill use cases?
-
What thresholds should be defined for rules?
-
What rule outcomes are needed?
11.1.1.6 Edit Existing or Create New Policy: Testing
QA tests the policies to confirm that they meet requirements.
-
Do the expected outcomes occur?
-
Are the rule thresholds triggering as expected?
-
Is the profiling working as expected?
-
Following common "normal" end user flows, do the new polices cause user experience issues? Too many challenges, users blocked, and so on.
-
Offline can be used to test new/edited policy based on historical control date.
11.1.2 Discovery Process Overview
The high-level steps involved in security policy development are as follows:
-
Determine what you are trying to accomplish (problem statement).
-
Break the problem statement into:
-
Inputs: What data is available to evaluate?
-
Rules: What types of evaluations do I need to perform on the data?
-
Outcomes: What should happen based on the analysis?
-
-
Translate the wording of the problem statement into a security policy by mapping the data, evaluations, and outcomes to an OAAM configuration. For example:
-
Datapoints to profile
-
Rules for use cases
-
Thresholds defined by rules
-
Outcomes needed - scores, actions, and alerts
-
Exclusion groups
-
-
Configure entities, transactions, patterns, groups, policies, rules, actions and alerts based on your preparation.
11.1.3 Example Scenario: Transaction Security
In this scenario, a Security Administrator must configure OAAM to notify the security team if there are more than 4 orders to a shipping address in a 24 hour period.
11.1.3.1 Problem Statement
Notify the security team to perform a manual review if there are more than 4 orders placed to any single shipping address in a 24 hour period regardless of the number of users.
11.1.3.2 Inputs Available
The following data is required to perform the stated evaluation described in the problem statement:
-
Date/time of each order
-
Shipping address for each order
-
Count of orders using each shipping address
11.1.3.3 Evaluation
It is recommended to form a logical statement to describe the risk evaluation required by your problem statement.
The logical statement for this scenario is:
"For a shipping address, if total # of orders > 4 in last 24 hours, then review order."
11.1.3.4 Outcomes
The outcome required by the problem statement in this case is to generate a single Fraud Alert for the security team.
11.1.3.5 Translation
In the translation step, the problem statement that was broken down is mapped to the OAAM security policy components.
Table 11-4 Problem Statement Mapping
| Problem Statement Breakdown | Oracle Adaptive Access Manager Security Policy Components |
|---|---|
|
Notify the security team to perform a manual review |
An alert with specific messaging |
|
Shipping address |
An address entity |
|
Orders |
A custom checkpoint for this transaction is needed |
|
A policy scoped to the "order" checkpoint will contain any rules needed. |
|
|
If there are more than 4 orders placed to any single shipping address in a 24 hour period |
A rule configured using a generic transaction rule condition |
11.1.4 Example Scenario: Login Security
In this scenario, a Security Administrator wants users that login from a state they have used less than 5% of the time in the last month to answer a KBA challenge question before being allowed into the protected application.
11.1.4.1 Problem Statement
Profile users' login behaviors including the geographic locations they login from. Use their unique profile to determine how risky a login attempt is and challenge with a KBA question when required based on risk level. If the login is from a state the user have come from less than 5% of the time in the last month them with a KBA challenge before allowing them into the protected application.
11.1.4.2 Inputs Available
The following data is required to perform the stated evaluation described in the problem statement:
-
User
-
Time period
-
Geographic location
-
Percentage for total logins used for the comparison
-
Registration status
11.1.4.3 Evaluation
It is recommended to form a logical statement to describe the risk evaluation required by your problem statement.
The logical statement for this scenario is:
"For a user (logging in from state(s)), if % of logins < 5% of all his logins from this state in last month, then challenge user."
11.1.4.4 Outcome
The outcome required by the problem statement in this case is to challenge the user with a KBA question if the percentage of logins to a state is less than 5% of his total log ins to states in the last month.
11.1.4.5 Translation
In the translation step, the problem statement that was broken down is mapped to the OAAM security policy components.
Table 11-5 Problem Statement Mapping
| Problem Statement Breakdown | Oracle Adaptive Access Manager Security Policy Components |
|---|---|
|
if logins from a state |
Pattern to track the user's logins from different states. Multi-bucket pattern with user as actor and state as attribute and for each as the compare operator. |
|
challenge user |
An action group to KBA Challenge |
|
with a KBA question |
Is registered is an attributes and equals as the compare operator and yes as the compare value. He has to have questions registered before the system can challenge him with a KBA question |
|
percentage for state vs. percentage of total |
Condition: "Pattern (Authentication): Entity is a Member of the Pattern Less Than Some Percent of Time" |
|
5% |
Percentage basis specified in rule |
|
last 1 month |
Time period specified in rule |
|
before allow to proceed to protected resource |
Post-Authentication checkpoint policy In best practices, KBA challenges occur in the Post-Authentication checkpoint. |
11.1.5 Evaluation and Deployment
After building the policies, you would perform the following tasks:
Evaluate the effectiveness.
Test the rule to ensure that it is functioning as expected by running predictable data through it using your offline system.
When you are satisfied that the policy is functioning as expected, migrate the policy in pre-production where performance testing can be run.
This is an important step since the new rule, or policy, or both can potentially have a performance impact. For example, if you define a new policy to check that a user was not using an email address that had been used before (ever). If the customer has more than 1 billion records in the database, performing that check against all the records for every transaction has great impact on performance. Therefore, testing the policy under load is important.
Develop New Rules for New Fraud Scenarios
Develop the new rule using your offline system (a separate installation of Oracle Adaptive Access Manager set up for testing or staging).
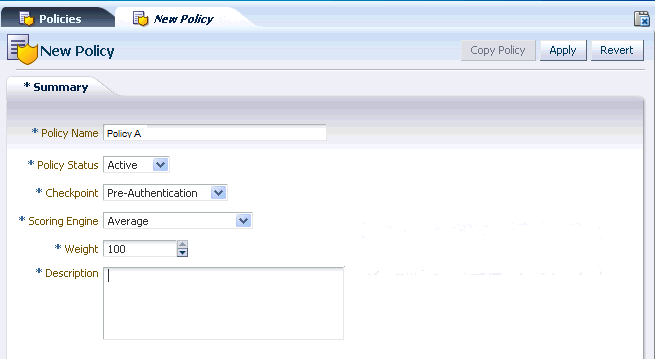
11.2 Creating Policies
OAAM provides out of the box security policies and rules, but you may want to create new policies and rules depending on business requirements. This section provides basic instructions to create a policy. Figure 11-1 illustrates the pages that you will configure for the policy.
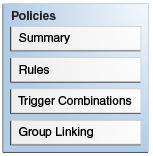
Table 11-6 provides brief descriptions of the configuration pages.
Table 11-6 Policy Configuration
| Policies Pages | Description |
|---|---|
|
Summary |
Specify details of the new policy. |
|
Rules |
Configure the rules for the policy. For information on creating rules, see Section 11.4, "Creating Rules." |
|
Trigger Combination |
Configure trigger combinations. These are additional results and policy evaluations that are generated if a specific set of rules trigger. For information on creating trigger combinations, see Section 11.5, "Setting Up Trigger Combinations." |
|
Group Linking |
Link the policy to a group so that the policy is executed for the set of users within the linked group. For information on group linking, see Section 11.3, "Linking a Policy to All Users or a User ID Group." |
To start creating a policy, proceed as follows:
-
After you have logged into the OAAM Administration Console, double-click Policies in the Navigation pane on the left. The Policy page is displayed.
-
Click the New Policy button. The New Policy page is displayed where you can specify details to create a new policy.
Alternatively, you can open a New Policy page by:
-
Right-clicking the Policies node and selecting New Policy from the context menu.
-
Selecting the Policies node and then choosing New Policy from the Actions menu.
-
Clicking the Create new Policy button in the Navigation toolbar.
-
Selecting the Create New Policy button from the Search Results toolbar.
-
Selecting New Policy from the Actions menu in Search Results.
Details you need to provide are as follows:
-
Policy Name: Enter a name that is meaningful and relevant to the policy.
-
Policy Status: The option to activate the policy. If you want the policy to function as soon as it is created, keep the default, Active, for the Policy Status.
If you want to policy to be disabled, select Disabled. A policy that is disabled is not enforced at the checkpoint. Disabling a policy does not remove it from the system. You can enable the policy at a later date.
-
Checkpoint: Select the point when you want the policy to be executed. For example, set the checkpoint to post-authentication if you want to initiate an action after successful authentication. For information on checkpoints, see Section 10.3.4, "Checkpoints."
-
Scoring Engine: Select the fraud analytic engine that you want to use to calculate the numeric score that determines the risk level. For information on the scoring engine, see Section 10.2.8, "What is a Scoring Engine?."
-
Weight: Enter a value from
0to100as the multiplier if you want to use a weighted scoring engine to influence the total score.If the policy uses a "weighted" scoring engine, both score and weight (multiplier value) are used to influence the total score calculations. If the policy is not using a "weighted" scoring engine, only the score is used to influence the total score. For information on weight, refer to Section 10.2.10, "What is Weight?."
-
Description: Enter a description that is meaningful and relevant.
-
-
Click Apply to create the policy.
A confirmation dialog appears with a message that the policy was created successfully. Click OK to dismiss the confirmation dialog.
The Rules, Trigger Combinations, and Group Linking tabs are enabled after you click OK. You must provide information about the policy in these tabs to fully configure the policy.
Example: Create a Policy where Users are Challenged with KBA
You must configure a login use case that can result in a KBA challenge. It is usually best practice to use KBA challenges only after successful authentication by the primary method. A Post-Authentication KBA challenge policy did not already exist so you must create a new one. The security team wants this policy to be applied to all users in the deployment. Directions: Create a new Post-Authentication KBA challenge policy that applies to all users. Name the policy, KBA Challenge.
To create a policy:
-
Log in to the OAAM Administration Console as an administrator.
-
Double-click the Policies node.
-
In the Policies Search page, click the New Policy button.
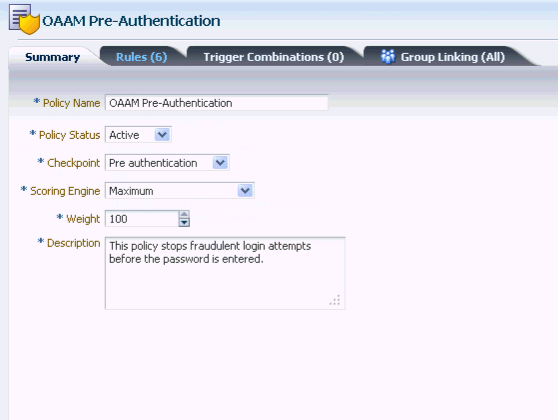
The New Policy page appears. In the Summary tab, the default values for the new policy are displayed as follows:
-
Policy Status: Active
-
Checkpoint: Pre-Authentication
-
Scoring Engine: Average
-
Weight: 100
-
-
Create a new Post-Authentication security policy.
-
For Policy Name, enter KBA Challenge.
-
For Description, enter a description for the KBA Challenge policy.
-
For Checkpoint, select Post-Authentication.
-
Modify the policy status, scoring engine, and weight according to your requirements.
By default, the policy status is Active. A policy that is disabled is not enforced at the checkpoint.
-
Click Apply.
A confirmation dialog displays the status of the operation. If you click Apply and the required fields are not filled in an error message is displayed.
-
Click OK to dismiss the confirmation dialog.
-
-
Configure the policy to run for all users.
-
Click the Group Linking tab.
-
For Run Mode, select All Users.
Since All Users is selected for the run mode, the policy is executed (run) for all users.
Specifying a run mode is a mandatory step in order for the policy to execute. It enables the policy to execute/run for a set of users or all users. For information, see Section 11.3, "Linking a Policy to All Users or a User ID Group."
-
Click Apply.
A confirmation dialog displays the status of the operation.
-
Click OK to dismiss the confirmation dialog.
-
If the KBA Challenge policy was created successfully, it would be listed in the Search Results table of the Policies Search page.
Although not covered in this example, for the policy to function, you must add a rule to the policy either by creating a new rule within a policy (Section 11.4, "Creating Rules") or by copying an existing one (Section 11.7.1, "Copying a Rule to a Policy") to the policy.
Example: Checking for Blacklisted Country
Jeff a Security Administrator has a brand new installation and must import the base security policies into the development environment of the Oracle Adaptive Access Manager Server. To support the base policies he also configures a black-listed country group. As well he links user groups to the proper roll-out phase policies to test phase two for a group of test users.
To import a policy:
-
Log in to the OAAM Administration Console as an administrator.
-
Double-click the Policies node. The Policies Search page is displayed.
-
Click Import Policy in the Policies Search page. The Import Policy screen is displayed.
-
Click Browse and search for the policies ZIP file.
-
Click OK to upload the policies ZIP file.
A confirmation dialog displays the status of the operation. The imported policies are listed in the Imported List section. An error is displayed if you try to import files in an invalid forma or an empty ZIP file.
-
Click OK to dismiss the confirmation dialog.
-
In the Policy Search page, verify that the policy appears in the Search Results table.
-
Double-click the Groups node. The Groups Search page is displayed.
-
From the Groups Search page, click the New Group button or icon.
The New Group screen is displayed.
You could also open the New Group screen by right-clicking the Groups node and selecting Create from the context menu that appears.
-
In the New Group screen, enter Black-listed Country Group as the name and provide a description.
-
From the Group Type list, select Countries.
-
Set the cache policy to Full Cache or None.
-
Click OK to create the Black-listed Country Group.
-
Click OK to dismiss the dialog.
The Group Details page for the Black-listed Country Group is displayed.
-
In the Countries tab of the Group Details page, click Add.
The Add Member dialog is displayed.
-
From the Available Countries table, select one or more countries to add to the group.
-
Click Add.
-
Open the Policies Search page.
-
Search for the Post-Authentication policy.
-
In the Results table, click the Post-Authentication policy.
The Policy Details page appears.
-
Link the Test Users group to the policy.
-
In the Policy Details page, click the Rules tab.
-
In the Rules tab, click Add.
-
In the New Rule page, enter the rule name as
Location: In Country Group. -
Click the Conditions tab.
-
In the Conditions page, click Add.
The Add Conditions page is displayed where you can search for and select the
Location: In Country Groupcondition and add it to the rule. -
Click OK.
The parameters for the condition are displayed in the bottom panel.
-
In the parameters area, for Country in country group, select the Blacklisted Country group and for Is In Group, select True.
-
Click Save.
-
In the Results tab, select RegisterUserOptional as the Action group.
RegisterUserOptional allows the user to opt in or out of selecting a personalized image.
-
Click Apply.
Example: Conditions: IP Login Surge
William is a Security Administrator and he must configure a policy and rule to track the number of logins from the same IP address and if there are more than 10 logins in 1 hour from an IP address, a high alert should be triggered.
-
Log in to the OAAM Administration Console as an administrator.
-
Create a Monitor IP group
-
Double-click the Groups node.
-
In the Groups Search page, click the New Group button.
The Create Group screen appears.
-
Enter the group name, Monitor IP addresses, and select IP as the Group type and click Create.
-
In the Monitor IP addresses group page, click the IP tab.
-
In the IP tab, click the Add button.
-
In the Add IPs screen, select the Search and select from the existing IPs option, enter criteria, then click Search.
-
From the Search Results table, select one of the IP addresses that you want to monitor and click Add.
A confirmation dialog appears.
-
Click OK.
-
Add IP addresses to monitor as needed.
-
-
Create an IP Surge High Alert group
-
In the Groups Search page, click the New Group button.
The Create Group screen appears.
-
Enter the group name, IP Surge, and select Alerts as the Group type and click Create.
A confirmation message appears.
-
Click OK to dismiss the confirmation dialog.
The new IP Surge alert group is created successfully and the Group Details page is displayed.
-
Click the Alerts tab to add alerts to the group.
-
In the Alerts tab, click the Add (Add Member) button.
-
In the Add Member page, select Create new element.
-
For Alert Type, select Investigator.
-
For Alert Level, select High.
-
For Alert Message, enter "More than 10 logins from the same IP address in 1 hour."
-
Click Add to add the alert to the group.
A confirmation dialog appears.
-
Click OK to dismiss the dialog.
-
-
Double-click the Policies node.
-
In the Policies Search page, click the New Policy button.
The New Policy page appears. In the Summary tab, the default values for the new policy are displayed as follows:
-
Policy Status: Active
-
Checkpoint: Pre-Authentication
-
Scoring Engine: Average
-
Weight: 100
-
-
Create a new Pre-Authentication security policy.
-
For Policy Name, enter Logins_SameIP.
-
For Description, enter Track the number of logins from the same IP address and if there are more than 10 logins in the last hour from an IP address.
-
Select Active as the policy status; otherwise the policy is not enforced at the checkpoint.
-
Enter Weighted Maximum Score for the scoring engine and 100 as the weight.
-
Click Apply.
A confirmation dialog displays the status of the operation.
If you click Apply and the required fields are not filled in an error message is displayed.
-
Click OK to dismiss the confirmation dialog.
-
-
Configure the policy to run for all users.
-
Click the Group Linking tab.
-
For Run Mode, select All Users.
Since All Users is selected for the run mode, the policy is executed (run) for all users.
Specifying a run mode is a mandatory step in order for the policy to execute. It enables the policy to execute/run for a set of users or all users. For information, see Section 11.3, "Linking a Policy to All Users or a User ID Group."
-
Click Apply.
A confirmation dialog displays the status of the operation.
-
Click OK to dismiss the confirmation dialog.
-
-
Create IP Excessive Use rule for the policy.
-
Click the Rules tab.
-
In the Rules tab, click Add to add a new rule.
The New Rule page is displayed.
-
In the Summary tab, enter IP Excessive Use as the rule name.
-
Enter a description for the rule.
-
Select Active as the rule status.
-
Add the
Location: IP excessive userule condition to create the new rule.-
To add the
Location: IP excessive usecondition, click the Conditions tab. -
In the Conditions tab, click Add. The Add Condition page appears.
-
Search for the
Location: IP excessive usecondition by entering IP in the Condition Name field and then clicking Search. -
In the Search Results table, select that condition and click OK.
-
In the New Rule/IP page, select
Location: IP excessive usein the top panel.The bottom panel displays the parameters of the condition.
-
In the bottom panel, modify the parameters.
Enter 10 for "Number of Users."
Select 1 for "Within (hours)."
Enter 0 for "and not used in (days)."
-
-
-
Create the Location: IP in Group rule for the policy.
-
Click the Rules tab in the Policy Details page.
-
In the Rules tab, click Add to add a new rule.
The New Rule page is displayed.
-
In the Summary tab, enter IP in Group as the rule name.
-
Enter a description for the rule.
-
Select Active as the rule status.
-
Add the
Location: IP in Grouprule condition to create the new rule.-
To add the
Location: IP in Groupcondition, click the Conditions tab. -
In the Conditions tab, click Add. The Add Condition page appears.
-
Search for the
Location: IP in Groupcondition by entering IP in the Condition Name field and then clicking Search. -
In the Search Results table, select that condition and click OK.
-
In the New Rule/IP page, select
Location: IP in Groupin the top panel.The bottom panel displays the parameters of the condition.
-
In the bottom panel, modify the parameters.
Select true for "Is in List."
Select the Monitor IP addresses group.
-
-
-
Create a trigger combination in which if both conditions are true, trigger the Block action and the IP Surge Alert.
-
In the Policy Details page, click the Trigger Combination tab.
-
Click the Add button.
-
For the IP Excessive Use, select True.
-
For the IP in Group, select True.
-
For Action Group, select Block.
-
For Alert Group, select IP Surge High Alert.
-
Click Apply.
-
11.3 Linking a Policy to All Users or a User ID Group
Group linking enables you to specify the users that a policy links to. You must link the policy to a group for the policy to function. Linking a policy to a group enables the policy to execute or run for the set of users within the linked group. The All Users option links a policy to all users. If group linking shows All Users, all available linking is ignored. If a user selects group linking as All Users, the link option will be disabled.
The total number of groups that are linked in the policy appears in parentheses next to the Group Linking tab title.
After the policy is created, you can link the policy to a User ID group or several User ID groups, which enables the policy and rules to execute/run for that set of users.
-
Open the Policy Details page.
-
Double-click the Policies node. The Policies Search page is displayed.
-
Search for the policy that you want.
-
Click the policy name to open its Policy Details page.
-
-
From the Policy Details page, click the Group Linking tab.
-
For Run Mode, specify Linked Users.
-
In the table header, click the Link icon.

The Link Group screen appears where you can enter details to link a group to the policy.
-
The available target sets appear in the associated box.
From the Group Name list, select the group you want to link to the policy.
Only user groups are listed.
Group Name is a required field.
-
Enter linking notes.
-
Click Link Group.
11.4 Creating Rules
You can only create a rule from within a policy. The new rule cannot be saved until you add a condition to it.
Figure 11-3 illustrates the pages you will use and information you will provide for each page when creating a rule.
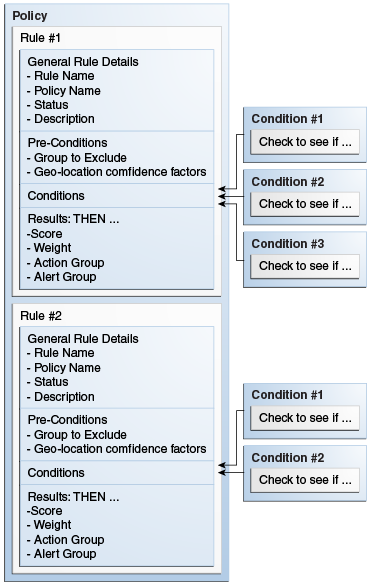
Results are responses, such as the activation of an action and a message, when a rule is triggered—for example, action (event activated) and alert (message activated).
As part of the process, specify the following:
-
Rule score and weight value. For information on score and weight, see Section 10.2.12, "How Does Risk Scoring Work?."
-
Actions. For information on actions, see Section 10.2.6, "What are Action and Alerts?."
-
Alerts. For information on alerts, see Section 10.2.6, "What are Action and Alerts?."
An action is an event that is activated when a rule is triggered—for example, block access, challenge question, ask for PIN or password, and so on.
An alert is a message that is generated when a rule is triggered—for example, login attempt from a new country for this user.
On the Preconditions tab, you can specify the group to exclude and the geolocation confidence factor parameters.
All preconditions filter whether or not a rule evaluates. The conditions do not process the rule if the preconditions are not met. The process stops at the preconditions level.
In the Excluded User Group field, select the User ID group that you do not want the policy to applied to.
Device fingerprinting is a mechanism to recognize the device that a customer typically uses to log in. Identification is based on combinations of the Device ID attributes, secure cookie, flash movie, user agent string, browser characteristics, device hardware configuration, network characteristics, geolocation, and historical context. Device risk gradient is a value calculated by the OAAM engine.
Different use cases and exceptions are taken into account and help to define the device risk gradient. The device risk gradient specifies the certainty of the device being identified. It is standard in almost all rules as a precondition.
The score ranges to specify the amount of device identification risk are:
-
400 and lower: Low risk
-
401-700: Moderate risk
-
701 and higher: High risk
Device Gradient of 0 means an exact match with the secure cookie; 500 means similar device with reasonable matching attributes; 1000 means similar device with much less confidence.
Country Confidence Factor, State Confidence Factor, and City Confidence Factor
Geolocation confidence factors are specific to Quova geolocation data. This factor is not provided by other vendors so the precondition is only operable when Quova data is being utilized. Quova assigns a confidence level to each of the three elements: city, state, and country. This confidence factor is based on the IP geolocation information.
The higher the value, the higher the level of confidence from Quova that the mapping of the location is correct. If you want the rule that you are creating to be dependent on IP location identification accuracy, specify the amount of geolocation accuracy with which you want to run the rule. For example, the rules are triggered when it is below 60% since we are not sure of the location.
11.4.1 Starting the Rule Creation Process
To start the rule creation process:
-
Double-click the Policies node. The Policies Search page is displayed.
-
Search for the policy that you are interested in.
-
In the Search Results table, click the name of the policy. The Policy Details page for that policy is displayed.
-
In the Policy Details page, click the Rules tab.
-
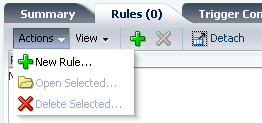
In the Rules tab, click the Add button on the row header or select New Rule from the Action menu.
The New Rule page is displayed.
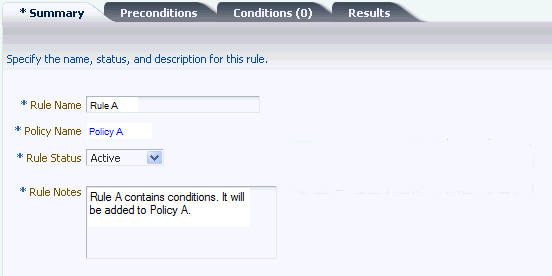
11.4.2 Specifying General Rule Information
Table 11-7 summarizes the general information of a rule.
| Field | Description |
|---|---|
|
Rule Name |
Name of the rule. Enter between 1 and 4000 characters. |
|
Policy Name |
Name of the policy. (Read-only) |
|
Rule Status |
Status of the rule: Active or Disabled. If the rule status is changed from Active to Disabled, the rule is disabled and cannot be added to a policy. A policy that already contains the rule is not affected and continues to function as before. |
|
Description |
Description for the rule. Enter between 1 and 4000 characters. |
To add general information about the rule, the procedure is as follows:
-
In the Summary tab, enter the name of the rule and a description. Duplicate rule names are allowed across policies, but not within the same policy.
If you try to navigate to one of the other tabs before entering a rule name or description, an error message reminds you that a value is required.
The policy name cannot be changed.
-
If you want to disable the rule, select Disabled. Rule Status has the default value of Active. A rule that is disabled is not run when the policy is enforced.
11.4.3 Configuring Preconditions
To configure preconditions for the rule, follow the procedure in Section 11.7.5.2, "Specifying Preconditions."
Through preconditions, you can specify the group to exclude and the geolocation confidence factor parameters.
Example: Adding a Rule Exception Group
Jeff, a Security Administrator, must create an exception user group to be used as a rule precondition. Jeff is creating a blacklisted country rule and realizes he should have an exception group so he creates a new user group named "BLC: exception users." In the description he enters a note that CSR managers can add users that need to be permanently allowed access from a blacklisted country. When created, the user group is added as the precondition. After the rule is in production a CSR manager assists a user who has moved to a blacklisted country. He manually adds his User ID to the group so he has an exception to the rule and adds a note in his case to this effect.
-
Create a new user group named "BLC: exception users."
Group name: BLC: exception users
Group type: User ID
In the description, enter a note to tell investigators, Add users that need to be permanently allowed access from a blacklisted country.
-
Select existing User IDs to add to the BLC: exception users group.
For information on creating user groups and then adding members, refer to Section 12.13, "Searching for and Adding Existing Elements or Creating and Adding a New Element."
-
Create a rule in a Post-Authentication blacklisted country policy.
-
For rule condition, choose
Location: IP in group. -
In Pre-condition, select BLC: exception users as the exception group.
-
-
After the rule is in production an investigator assists a user who has moved to a blacklisted country. He manually adds his User ID to the group so he has an exception to that rule and adds a note in his case to this effect.
11.4.4 Adding Conditions
To add conditions for the rule, follow the procedure in Section 11.8.2, "Adding Conditions to a Rule."
11.4.5 Specifying Results for the Rule
To specify the results for if the rule triggers, follow the procedure in Section 11.7.5.3, "Specifying the Results for a Rule."
You can select from the following types of results:
-
Score and Weight
-
Actions
An action is an event activated when a rule is triggered. For example: block access, challenge question, ask for PIN or password, and so on. For information about action groups, see Chapter 12, "Managing Groups."
-
Alerts
An alert is a message generated when a rule is triggered. For example: login attempt from a new country for this user. For information about alert groups, see Chapter 12, "Managing Groups."
11.4.6 Adding or Copying a Rule to a Policy
The Copy Rule button enables you to copy an existing rule to other policies.
Example: Add New Rule to the Policy
After you have created a security policy (see Example: Create a Policy where Users are Challenged with KBA) you are ready to create a new rule to perform the risk evaluation in your use case. The use case requires an evaluation of the physical distance between the location a user is logging in from now verses the last location he came from. This rule calculates the velocity/speed required to travel between the location given the time. The security team has determined that if the user appears to travel faster then 500 miles per hour between location and the device used is different then the user should be given a KBA challenge. Directions: Create a new rule, User Velocity and use the out-of-the-box condition, User: Velocity from last successful login.
To add a new rule:
-
Log in to the OAAM Administration Console as an administrator.
-
Double-click the Policies node. The Policies Search page is displayed.
-
Search for KBA Challenge.
-
In the Search Results table, click KBA Challenge. The Policy Details page for KBA Challenge is displayed.
-
In the Policy Details page, click the Rules tab.
-
In the Rules tab, click Add to add a new rule.
The New Rule page is displayed.
-
Enter User Velocity as the rule name.
-
Enter a description for the rule.
-
Select the rule status.
When the New Rule page first appears, the default value for the rule status is Active.
-
Add the
User: Velocity from last successful loginrule condition to create the new rule.-
To add the
User: Velocity from last successful logincondition, click the Conditions tab. -
In the Conditions tab, click Add. The Add Condition page appears.
-
Search for the
User: Velocity from last successful logincondition by entering velocity in the Condition Name field and then clicking Search. -
In the Results table, select that condition and click OK.
-
In the New Rule/User Velocity page, select
User: Velocity from last successful loginin the top panel.The bottom panel displays the parameters of the condition.
-
In the bottom panel, modify the parameters.
-
Enter 500 for Miles per Hour is more than.
-
Select true for Ignore if last login device is same.
-
-
Click Save to save your changes. A confirmation dialog appears with a message that the modified rule parameters were saved successfully.
-
Click OK to dismiss the confirmation dialog.
-
-
Add a KBA challenge as a result of the User Velocity rule.
-
Click the Results tab.
The Results tab enables you to specify the results for the rule if the conditions are met.
-
To set up a KBA challenge to occur if the rule is triggered, select ChallengeQuestionPad in the Actions Group list.
-
-
Click Apply. A confirmation dialog appears with a message that the modified rule details were saved successfully.
If the required fields are not filled in and the user clicks Apply, an error is displayed.
If the rule was successfully created, the new rule should be listed in the Rules tab of the Policy Details page.
-
Click OK to dismiss the confirmation dialog.
Example: Canceling Rule Creation
William is a Security Administrator and he creates a new policy. He is not sure which rule condition would apply for his business use case. Hence he decides to close the rule without adding any condition.
-
Log in to the OAAM Administration Console as an administrator.
-
Double-click the Policies node.
-
In the Policies Search page, click the New Policy button.
-
Create a new policy.
-
In the Policy Details page, click the Rules tab.
-
In the Rules tab, click Add to add a new rule.
The New Rule page is displayed.
-
Enter the rule name.
-
Enter a description for the rule.
-
To add the condition, click the Conditions tab.
-
In the Conditions tab, click Add. The Add Condition page appears.
-
Search for the condition by entering a name into the Condition Name field and then clicking Search.
-
In the Results table, select that condition.
-
Click Cancel.
You are not sure which rule condition would apply for your business use case.
-
Click the Delete button in the upper-right corner.
An Unsaved Data Warning dialog appears with the message, "You have unsaved data. Are you sure you want to continue?"
-
Click Yes.
You are returned to the Rules page.
-
Click the Delete button in the upper-right corner again.
You are returned to the Policies Search page.
-
In the Search Results table, click the policy you created.
The rule has not been created.
11.5 Setting Up Trigger Combinations
Trigger combinations are additional results and policy evaluation that are generated if a specific set of rules trigger. You can set up trigger combinations using the Policy Details page. There is no limit to the number of trigger combinations that you can add. The total number of trigger combinations in the policy appears in parenthesis next to the tab title. The first column is frozen to enable you to scroll and see all of the data in the table while having the labels available for reference.
By default, if a policy does not have any trigger combination, a table is created with all the rules in the policy and one column for the trigger combination. You can make edits to the combination and then save it. You can edit multiple trigger combinations and save them all at once.

Table 11-8 describes the fields in a trigger combination. For information about Action and Alert groups, see Chapter 12, "Managing Groups."
Table 11-8 Trigger Combination
| Fields | Description |
|---|---|
|
Description |
Description for the trigger combination. Each trigger combination has a description. If the description is too long to display and part of it is obscured, you can place the mouse over the text to see the entire description. |
|
Name |
Name of the rule. |
|
Score/Policy |
If you select score, the score box appears where you can enter an integer value from 0 to 1000. The minimum and maximum scores for the Score are defined as properties. Scores of 0 or less than 0 are ignored. If you select Policy, a policy list appears with policies of same checkpoint. |
|
Policy |
If you select policy, the nested policy must be configured to run in the same checkpoint. |
|
Action Group |
An action group indicates all the actions that must occur when the rule is triggered. |
|
Alert Group |
An alert group is made up of graded messages that are used as results within rules so that when a rule is triggered all of the alerts within the groups are activated. |
If you navigate away from the tab while editing the trigger combination, the trigger combination is saved in the session and available when you navigate back.
Note:
Note that the Add, Delete, and other operations are irreversible. Ensure that you are ready to perform these operations before proceeding.Table 11-9, "Trigger Combination Toolbar Options" lists the commands that are available through the toolbar.
Table 11-9 Trigger Combination Toolbar Options
| Command | Description |
|---|---|
|
Add |
This button adds a new column (trigger combination). |
|
Delete |
This button is enabled only if a column or row is selected. The Delete button also enables you to delete multiple trigger combinations. When the Delete button is clicked, a warning message appears, asking for confirmation. |
|
Reorder |
This button invokes the Reorder screen. Columns can be reordered using the Reorder button. |
To specify trigger combinations:
-
Double-click the Policies node. The Policies Search page is displayed.
-
Search for the policy which you want.
-
Click the policy name to open its Policy Details page.
-
Click the Trigger Combinations tab.
-
Select the return value permutations you want for each rule in the first column.
-
In the Score/Policy row, select Score or Policy to specify whether the result return a score or point to a nested policy.
-
If you selected Score, in the field directly below, specify the score you want to assign to that combination.
-
If you selected Policy, in the field directly below, specify the policy you want to run to further evaluate the risk.
Only the list of policies of the same checkpoint are available.
-
-
Set an action outcome.
-
Set an alert outcome:
-
If you want to specify other trigger combinations, click Add to add another column.
-
Repeat Steps 5 through 8 for each trigger combination you want.
-
In the Trigger Combinations tab, click Apply after making all your edits.
You cannot add two trigger combinations of the same combination. When you add new combinations, each combination is saved and validated automatically.
If you navigate away from the tab while editing trigger combinations, the unsaved trigger combinations are saved in the session and available when you navigate back.
Trigger Combination Example: Nest Policy Containing Rules That Can Result in a KBA Challenge
To KBA challenge a user Oracle Adaptive Access Manager must check two things:
-
First, check to see whether the user has challenge questions registered.
-
Second, if the user has a questions set active challenge him if a challenge scenario has to be performed.
To configure this behavior you must nest your new security policy, which contains rules that can result in a KBA challenge, under the policy, which contains KBA business rules to check for registration status.
Directions: Nest the KBA Challenge policy under the System - Questions check policy using policy trigger combinations.
The KBA Challenge policy was created in Example: Create a Policy where Users are Challenged with KBA.
To create a trigger combination:
-
Log in to the OAAM Administration Console as an administrator.
-
Double-click the Policies node. The Policies Search page is displayed.
-
Search for the System - Questions check policy.
-
In the Search Results table, click System - Questions check. The Policy Details page for the System - Questions check policy is displayed.
-
In the Policy Details page, click the Trigger Combinations tab.
-
In the Trigger Combinations tab, click Add.
The column added to the table corresponds to a trigger combination.
By default, trigger combinations are created with all the rules in the policy. The rules used in the policy are represented by a row name.
For example, the rules to check for registration status would appear as rows:
-
Registered User with condition
User: Account Status -
Question Registered
-
Unregistered User
-
-
In the trigger combination, enter a description in the Description field.
-
For each rule specify the rule result based on which trigger combination must be executed (performed)
-
True: The rule is triggered
-
False: the rule is not triggered
-
Any: Ignore the rule whether or not it triggers
By default, a trigger combination is executed for a rule result of Any.
-
-
For a trigger combination, specify that if the trigger combination triggers, the result returns a nested policy.
Select Policy, and in the field directly below, specify KBA Challenge as the policy you want to run to further evaluate the risk.
A nested policy is a secondary policy used to further quantify the risk score in instances where the original result output by the system is inconclusive. Nested policies can be assigned to ensure a higher degree of accuracy for the risk score.
-
Select the Action Group.
The action is an event generated when the combination is triggered.
-
Select the Alert Group.
The alert is a message generated when the combination is triggered.
-
Click Apply. A confirmation dialog is displayed, saying that the policy details were updated successfully.
-
Click OK to dismiss the dialog.
Example Trigger Combination and Rule Evaluation
Jeff, a Security Administrator, must configure two levels of authentication to challenge the user using KBA for any single rule trigger and OTP for specific combinations of rules triggering.
The tasks he must perform are the following:
-
Create a pattern to profile user login times into 4 hour time range buckets.
-
Create a second pattern to profile states users log in from.
-
Create the rules to use these patterns in the KBA challenge policy so these evaluations only run if the user has KBA active.
-
Create a rule to challenge using KBA if the user falls into a login time bucket he has fallen into less than 10% of the time in the last month.
-
Next, create a rule to challenge using KBA if the user logs in from a state he has used less than 20% of the time in the last two weeks.
-
Then, create a rule that checks to see if a user has an OTP delivery channel active.
-
Finally, configures a trigger combination to OTP challenge the user if all three of these rules returns true.
The steps to accomplish these tasks are:
-
Log in to the OAAM Administration Console as an administrator.
-
Double-click the Patterns node. The Patterns Search page is displayed.
-
Click the New Pattern button.
Create a pattern, Pattern 1, where:
-
Member Type: User
-
Creation Method: Multi-bucket
-
-
Click the Attribute tab.
-
Click the Add icon.
-
Select Time (Time when the user is logged in) as the attribute.
-
Click Next.
-
Select For Each as the Compare Operator and 4 as the compare value.
-
Press Add.
-
Click the Patterns tab.
-
Create a pattern, Pattern 2, where:
-
Member Type: User
-
Creation Method: Multi-bucket
-
-
Click the Attribute tab.
-
Click the Add icon.
-
Select State as the attribute.
-
Select compare operator as for each state.
-
Click Next.
-
Create Rule1: Add pattern condition,
Entity is member of bucket less than some percentage of times. (Select Pattern 1 and percentage = 10 and select 1 month as time period.) -
Add condition to rule,
User: Question status to check if he has registered questions. -
Add action, KBA Challenge to Rule 1." (This rule triggers if the user has registered questions and he has logged in from time bucket less than 10% of time. The Result, he is challenged with KBA).
-
Create Rule 2: Add pattern condition,
Entity is member of bucket less than some percentage of times. (Select Pattern 2, percentage =20 and select 15 days as time period) -
Create Rule 3: Add pattern condition,
User: Is OTP enabled. (Using conditionChallenge Channel Status) -
Create a policy and add all three rules.
-
Add trigger combination to policy such that if all rules are triggering (true) then action is Challenge OTP.
For more information on patterns, see Chapter 15, "Managing Autolearning."
Example: Disable Trigger Combination
Jim is a Security Administrator. He wants to inactivate his trigger combinations and enable them later, but he does not want to lose his settings.
He can accomplish that by not setting the Score/Policy, Actions, and Alerts for the combinations and they are automatically in disabled state. No action would be taken based on these combinations.
To disable trigger combinations:
-
Double-click the Policies node. The Policies Search page is displayed.
-
Search for the policy which you want.
-
Click the policy name to open its Policy Details page.
-
Click the Trigger Combinations tab.
-
Select 0 as the score or make sure no nested policy is specified.
-
Deselect the actions in the action group lists.
-
Deselect the alert sin the alert group lists.
-
In the Trigger Combinations tab, click Apply after making all your edits.
11.6 Managing Policies
This section explains how to manage policies.
11.6.1 Navigating to the Policies Search Page
To open the Policies Search page, double-click the Policies node. The Policies Search page is displayed.
Alternatively, you can open the Policies Search page by:
-
Right-clicking the Policies node and selecting List Policies from the context menu.
-
Selecting the Policies node and then choosing List Policies from the Actions menu.
-
Clicking the List Policies button in the Navigation toolbar.
The Policies Search page is the starting place for managing your policies. It is also the home page for the Security Administrator.
From the Policies Search page, you can:
-
Search for a policy
-
View a list of policies
-
Create a new policy
-
Import a policy
-
Export policies
-
Export policies and create a delete script
-
Delete policies
-
Open the Policy Details page
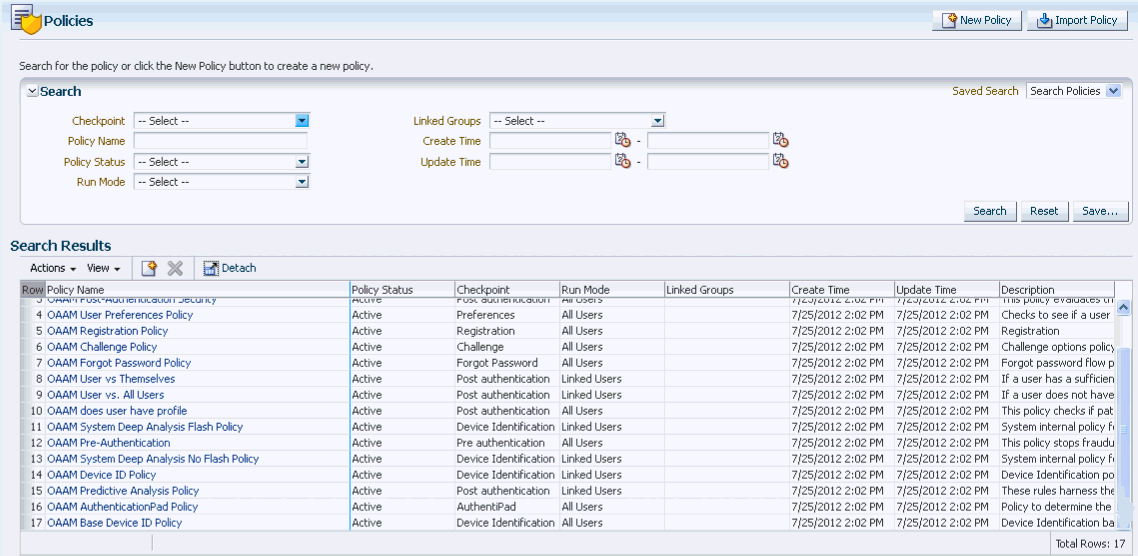
An example of a Policies Search page is shown in Figure 11-6, "Policies Search Page".
11.6.2 Searching for a Policy
In the Policies Search page, you search for a policy by specifying criteria in the Search filter.
When the Policies Search page first appears, the Search Results table is empty. You must press Search to see a list of policies in the Oracle Adaptive Access Manager environment.
To search for policies:
-
Double-click the Policies node. The Policies Search page is displayed.
-
Specify criteria in the Search Filter to locate the policy and click Search.
Clicking Reset instead of Search resets the search criteria.
The search filter criteria are described in Table 11-10.
Table 11-10 Policies Search Filter Criteria
| Filters and Fields | Descriptions |
|---|---|
|
Linked Groups |
Users can filter policies based on the user groups they are linked with. The Linked Groups filter is disabled when the Run Mode is "Not Linked" since there are no associated User ID groups. |
|
Policy Name |
Name of the policy. You can enter the complete name or part of a policy name. For example, if you enter HTTP, any policy with HTTP in any part of its name will appear. |
|
Policy Status |
Status of the policy: Active or Disabled. Defines the state of the policy or its availability for business processes. For information, refer to Policy Status. |
|
Checkpoints |
Point during the session the rules in a policy are evaluated. |
|
Run Mode |
Run mode enables you to select whether to link the policy to all users, a specified User ID group, or not to link the policy. Linking a policy to a group enables the policy to execute/run for the set of users within the linked group.
|
|
Created Date |
Time when policy was created. |
|
Update Time |
Time when policy was last updated. |
11.6.3 Viewing a Policy or a List of Policies
Depending on the search performed, a policy or a list of policies is displayed in the Search Results table. The policies that are displayed from a search are those that match the criteria specified in the Linked Groups, Policy Name, Policy Status, Checkpoint, and Run Mode fields.
You can sort the Search Results table by sorting on a column.
Each policy has a name. If the description is too long to be fully shown, you can place the mouse over the text to see the entire description.
The Search Results table provides quick access to the Policy Details page for a policy. Click the policy name for the policy you are interested in to view more details.
11.6.4 Viewing Policy Details
By clicking the policy name, the Policy Details page for the specific policy is displayed.
The Policy Details page enables you to view and edit the details of a policy. You can also access the Policy Details page through the Policy Tree. For information, refer to Chapter 3, "Getting Started with Common Administration and Navigation."
The Policy Details page provides the following four tabs:
-
Summary - Enables you to view and edit the general details of the policy
-
Rules - Enables you to view a list of all the rules of the policy, and add and delete them.
-
Trigger Combinations - Enables you to view the trigger combinations of the policy and to add, delete, and to edit them.
-
Group Linking - Enables you to link a policy to a User ID group

The number of rules, trigger combinations, and group links present in the policy is shown in parenthesis in the Policy Details page tabs. Disabled rules are also included in the count.
11.6.5 Editing a Policy's General Information
To edit a policy's general information:
-
Search for the policy you are interested in, as described in Section 11.6.2, "Searching for a Policy."
-
In the Search Results table, click the name of the policy you want to edit.
The Summary tab displays general details about the policy, as shown in Table 11-10, "Policy Details Summary Tab".
Table 11-11 Policy Details Summary Tab
Field Description Policy Name
Name of the policy.
Policy Status
Status of the policy: Active or Disabled.
Defines the state of the policy or its availability for business processes.
For information, refer to Policy Status.
Checkpoint
Point during the session the rules in a policy are evaluated.
Scoring Engine
Fraud analytic engine you want to use to calculate the numeric score that determines the risk level.
Weight
Multiplier used to influence the total score at various evaluation levels. Weight is an integer value from 0 to 100
Description
Description for the policy.
-
To edit the policy's general information, make the changes you want in the Summary tab and then click Apply.
The policy details are updated successfully.
Example: Edit Existing Security Policy
Jeff, a Security Administrator wants to change the maximum number of attempts at a challenge question. He must edit a rule parameter to do this.
Best practice is to set the maximum number of failed KBA challenges to one less than the total number of challenge questions each user registers. For example, if all users register for four questions the maximum failures allowed should be three.
To edit an existing Security Policy, follow these steps:
-
Log in to the OAAM Administration Console as an administrator.
-
Double-click the Policies node. The Policies Search page is displayed.
-
In the Search Results table, click Fraud Blocking.
-
In the Rules tab of the Policy Details page, click Maximum Number of Failed Challenges.
-
In the Conditions tab of the Rule Details page, select
User: Challenge Maximum Failureson the top panel.This condition checks to see if the user failed to answer the challenge question for specified number of times.
-
On the bottom panel, change the value of Number of Failures More than or equal to so that it is one less than the total number of challenge questions each user registers.
11.6.6 Activate/Disable Policies
To activate/disable a policy:
-
Search for the policy you are interested in, as described in Section 11.6.2, "Searching for a Policy."
-
In the Search Results table, click the name of the policy you want to activate/disable.
-
Changes the policy status in the Summary tab and then click Apply.
For information, refer to Policy Status.
11.6.7 Deleting Policies
To delete policies:
-
Double-click the Policies node. The Policies Search page is displayed.
-
In the Policies Search page, search for the policy or policies you want to delete.
For information on searching for a policy, see Section 11.6.2, "Searching for a Policy."
-
Select the policies you want to delete and click the Delete button or select Delete Selected from the Action menu.
A Confirm Delete dialog appears, asking for confirmation. If you selected to delete more than one policy, a list of policies is shown in the dialog.
-
Click Delete.
An information screen appears.
-
In the information screen, click OK.
The policy deleted successfully.
You cannot undo the delete. The changes are permanent.
11.6.8 Copying a Policy to Another Checkpoint
You can copy a policy to other checkpoints.
-
Double-click the Policies node. The Policies Search page is displayed.
-
Enter the search criteria you want and click Search.
-
Click the policy name to open its Policy Details page.
-
In the Policy Details page, click Copy Policy.
You can access the Copy Policy button from any tab in the Policy Details page.
The Copy Policy screen appears with all the fields pre-populated.
Table 11-12, "Copy Policy to Checkpoint" lists the fields in the Copy Policy screen.
Table 11-12 Copy Policy to Checkpoint
Field Description Checkpoint
The checkpoint you are copying the policy to. By default the field is pre-populated with the checkpoint from the policy that is being copied.
Policy Name
Default value for Policy Name field is policy_nameCopy. You can edit the policy name, if needed.
Status
The policy status of "disabled" is set as the default value.
Defines the state of the policy or its availability for business processes.
For information, refer to Policy Status.
Description
Current description is set as the default description.
-
In the Copy Policy screen, select the checkpoint and status.
-
Enter a policy name and description.
-
In the Copy Policy screen, click Copy.
If you click Copy, the policy is copied to the checkpoint.
If the rules of the policy are not applicable (cannot be copied) to the new checkpoint, a "The following rules are not applicable for this checkpoint" message appears.
You are given the option either to abort the copy operation or to continue copying the policy without those rules.
When policies are copied, all the details are copied including the nested policies, trigger combinations, preconditions, group linking, and so on.
11.6.9 Changing the Sequence of the Trigger Combination
To change the order of trigger combinations:
-
Double-click the Policies node. The Policies Search page is displayed.
-
Search for the policy which you want.
-
Click the policy name to open its Policy Details page.
-
Click the Trigger Combinations tab.
-
To reorder columns, click the Reorder button.
The Reorder Trigger Combinations screen appears.
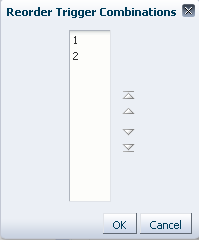
-
Reorder the trigger combinations and click OK.
-
In the Trigger Combinations tab, click Apply.
Reordering of trigger combinations takes effect only after you click Apply. The changes are lost if you close the tab before you click Apply.
11.6.10 Deleting a Trigger Combination
To delete a trigger combination:
-
Double-click the Policies node. The Policies Search page is displayed.
-
Search for the policy which you want.
-
Click the policy name to open its Policy Details page.
-
Click the Trigger Combinations tab.
-
Select the column header corresponding to the trigger combination and click Delete.
11.7 Managing Rules
This section explains how to manage rules.
11.7.1 Copying a Rule to a Policy
You can copy a rule to a different policy under any checkpoint. For example, you want to move the rule to a different checkpoint.
To copy a rule to a policy:
-
Double-click the Rules node. The Rules Search page is displayed.
-
Enter the search criteria you want and click Search.
-
In the Search Results table, click the name of the rule you want to copy to a policy.
The Rule Details page for that rule is displayed.
-
In the Rule Details page, click the Copy Rule button.
The Copy Rule page appears pre-populated with the rule name and description from the original rule.
-
In the Policy field, select the policy you want to copy the rule to.
-
In the Rule Name field, enter a new name for the rule that you are copying.
-
In the Description field, enter a description for the rule.
-
Click Copy to copy the rule to the policy.
11.7.2 Navigating to the Rules Search Page
To open the Rules Search page, right-click the Rules node. The Rules Search page is displayed.
Alternatively, you can open the Rules Search page by:
-
Right-clicking the Rules node and selecting List Rules from the context menu.
-
Selecting the Rules node and then choosing List Rules from the Actions menu.
-
Clicking the List Rules button in the Navigation toolbar.
An example of a Rules Search page is shown in Figure 11-9, "Rules Search Page".
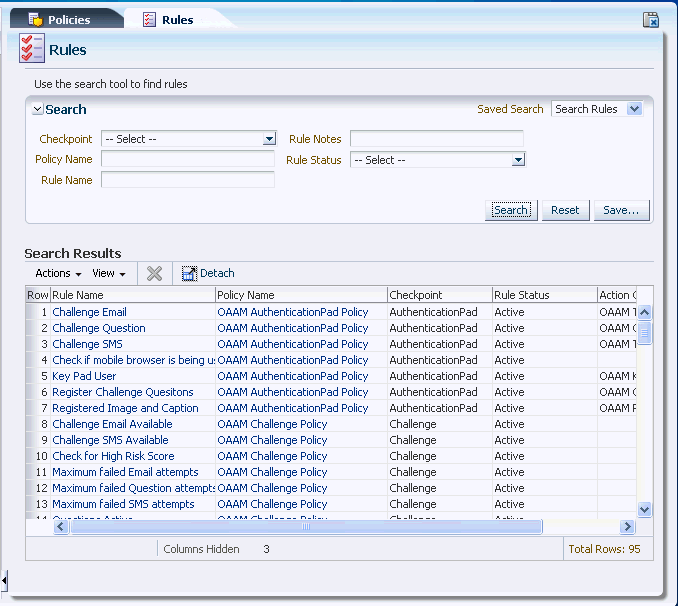
11.7.3 Searching for Rules
The Rules Search page displays a Search filter and a Search Results table that shows a summary of the rules that match your search criteria.
From the Rules Search page, you can view and edit the details of the rule, but you cannot create a rule. Rules can only be created in the context of policies.
-
Double-click the Rules node. The Rules Search page is displayed.
-
In the Rules Search page, enter the search criteria you want.
-
Click Search.
Clicking Reset instead of Search resets the search criteria.
The Search Results table displays a summary of rules that meet the criteria you specified.
| Field | Description |
|---|---|
|
Rule Name |
Name of the rule |
|
Policy Name |
Name of the policy where the rule resides. |
|
Checkpoint |
Point during the session the rules in a policy are evaluated. |
|
Rule Notes |
Description for the rule. |
|
Rule Status |
Status of the rule: Active or Disabled. If the rule status is changed from Active to Disabled, the rule is disabled and cannot be added to a policy. A policy that already contains the rule is not affected and continues to function as before. |
|
Action Group |
Group of actions. An action group indicates all the actions that must occur when the rule is triggered. By default, actions are not specified. You must specify a set of results for the rule. |
|
Score |
Integer value from 0 to 1000. The minimum and maximum scores for the Score are defined as properties. |
|
Weight |
Integer value from 0 to 100 |
The Delete button or Delete Selected from the Action Menu enables you to delete rules. The Delete and Delete Selected are enabled only if a row is selected.
The delete operation either succeeds or fails. There are no partial updates made.
The option to sort is provided on every column in the Search Results table.
Each rule has a name. If the description is too long to be fully shown, you can place the mouse over the text to see the entire description.
To view and edit the rule details, click the rule name in the Search Results to open the rule.
11.7.4 Viewing More Details of a Rule
To view the details of a rule:
-
Double-click the Rules node. The Rules Search page is displayed.
-
Search for the rule in which you want to view the details.
-
Click the rule name in the Search Results table or select the row and select Open Selected from the Action menu to open its Rule Details page in a new tab.
The Rule Details page enables you to access the complete details of a rule through four tabs. These pages allow the management of the rule.
The Rule Details page has four tabs
-
General
-
Preconditions
-
Conditions
-
Results
These tabs allow the management of the rule.
-
11.7.5 Editing Rules
To edit a rule:
-
Double-click the Rules node. The Rules Search page is displayed.
-
Search for the rule which you want to edit.
-
Click the rule name in the Search Results table to open its Rule Details page in a new tab.
The Rule Details page provides tabs to the Summary, Preconditions, Conditions, and Results page.
The total number of conditions in the rule appears in parenthesis next to the Conditions tab title.
-
Edit the rule's general information (Section 11.7.5.1, "Modifying the Rule's General Information").
-
Edit the Preconditions (Section 11.7.5.2, "Specifying Preconditions").
-
Edit/Add Conditions (Section 11.8.2, "Adding Conditions to a Rule").
-
Edit the Results (Section 11.7.5.3, "Specifying the Results for a Rule").
-
Click Apply to save the changes or Revert to discard them.
11.7.5.1 Modifying the Rule's General Information
From the Summary tab, you can modify the rule name, status, and description.
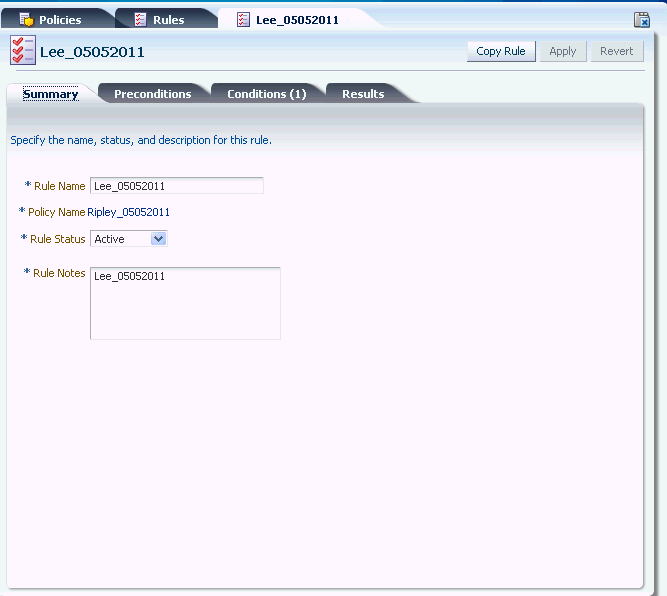
The fields displayed are listed in Table 11-14.
Table 11-14 Rule Details Summary Tab
| Field | Description |
|---|---|
|
Rule Name |
Name of the rule |
|
Policy Name |
Name of the policy. (Read-only) |
|
Status |
Status of the rule: Active or Disabled. If the rule status is changed from Active to Disabled, the rule is disabled and cannot be added to a policy. A policy that already contains the rule is not affected and continues to function as before. |
|
Description |
Description for the policy. |
11.7.5.2 Specifying Preconditions
From the Preconditions tab, you can specify the group to exclude and the geolocation confidence factor parameters.
All preconditions filter whether or not a rule evaluates. The conditions do not process the rule if the preconditions are not met. The process stops at the preconditions level.
To specify preconditions for the rule:
-
Open the Rule Details page.
-
Double-click the Rules node. The Rules Search page is displayed.
-
Search for the rule in which you want to specify preconditions for.
-
In the Search Results table, click the name of the rule. The Rule Details page for that rule is displayed.
-
-
In the Rule Details page, click the Preconditions tab.
-
Excluded User Group: In the Excluded User Group field, select the User ID group you do not want the policy to applied to.
-
Device Risk Gradient: Device fingerprinting is a mechanism to recognize the device a customer typically uses to log in. Identification is based on combinations of the Device ID attributes, secure cookie, flash movie, user agent string, browser characteristics, device hardware configuration, network characteristics, geolocation and historical context.
Different use cases and exceptions are taken into account and help to define the device risk gradient. The device risk gradient specifies the certainty of the device being identified. It is standard in almost all rules as a precondition.
The score ranges to specify the amount of device identification risk are:
-
400 and lower - low risk
-
401-700 - moderate risk
-
701 and higher - high risk
-
-
Country Confidence Factor, State Confidence Factor, and City Confidence Factor: The IP address location vendor can assign a confidence level to each of the three elements: city, state, and country. This confidence factor is based on IP geolocation information.
The higher the value, the higher the level of confidence from Quova that the mapping of the location is correct.
If you want the rule you are creating to be dependent on IP location identification accuracy, specify the amount of geolocation accuracy with which you want to run the rule.
For example, if the range is 60 to 100, you may specify for the rule to run only if the IP location is greater than 60% positive.
11.7.5.3 Specifying the Results for a Rule
Results are the responses, such as the activation of an action and message, when a rule is triggered. For example, action (event activated) and alert (message activated).
As part of the process, specify:
-
Rule score and weight value
-
Actions
-
Alerts
To specify the results for if the rule triggers, follow these steps:
-
Open the Rule Details page if you are not on the Rule Details page of the rule you want.
-
Double-click the Rules node. The Rules Search page is displayed.
-
Search for the rule for which you want to specify the results.
-
In the Search Results table, click the name of the rule. The Rule Details page for that rule is displayed.
-
-
In the Rule Details page, click the Results tab.
-
Enter a rule score and weight value.
You can change the weight value for a rule to instruct OAAM Admin to give more or less value to the total score.
By default the score is 1000 and the weight is 100.
-
In the Actions Group list, select the actions you want triggered by this rule, if actions are required.
By default, an Actions Group is not selected.
-
In the Alerts Group list, select the alerts you want sent if this rule is triggered.
By default, an Alerts Group is not selected.
-
Click Apply to save the modified rule details.
The rules engine takes the information you specify for the rule and information specified in other rules in the policy and returns rule results to the policy. All the policies in the policy set results in multiple actions and multiple scores and multiple alerts. All these are propagated to the checkpoint. The score, the weight, and so on result in one final score, one final action, and a couple of alerts.
An example of a final action is Block. An example action list is Block, Challenge, Background Check and an example score is 800.
| Field | Description |
|---|---|
|
Score |
Integer value from 0 to 1000. The minimum and maximum scores for the Score are defined as properties. |
|
Weight |
Integer value from 0 to 100 |
|
Action Group |
Group of actions. An action group indicates all the actions that must occur when the rule is triggered. |
|
Alert Group |
Group of graded messages that are used as results within rules so that when a rule is triggered all of the alerts within the groups are activated. |
11.7.6 Activate/Disable Rule
To activate/disable a rule:
-
In the Summary tab of Rule Details, select Active or Disable for Status.
If the rule status is changed from Active to Disabled, the rule is disabled and cannot be added to a policy. A policy that already contains the rule is not affected and continues to function as before.
-
Click Apply.
11.7.7 Deleting Rules
To delete rules:
-
Double-click the Rules node. The Rules Search page is displayed.
-
Search for the rule you want to delete.
-
Select the rows corresponding to the rules of interest and press the Delete button or select Delete Selected from the Actions menu.
A Confirm Delete dialog appears withe a list of rules to be deleted.
The delete operation either succeeds or fails. There are no partial updates made.
-
Click the Delete button.
-
When the confirmation appears, click OK.
If you delete the rule, the corresponding row are deleted in the trigger combinations where this rule was used.
11.8 Managing Conditions
This section explains how to manage conditions.
11.8.1 Searching Conditions
The Conditions Search page displays a Search filter and a Search Results table that shows a summary of the conditions that match your search criteria.
For a list of conditions, see Appendix B, "Conditions Reference."
From the Conditions Search page, you can search for a condition or a list of conditions in the system.
-
Double-click the Conditions node.
The Conditions Search page is displayed.
Alternatively, you can open the Conditions Search page by:
-
Right-clicking the Conditions node and selecting List Conditions from the context menu.
-
Selecting Conditions in the Navigation tree and then choosing List Conditions from the Actions menu.
-
Clicking the List Conditions button in the Navigation tree toolbar.
-
-
Enter the search criteria you want and click Search.
Clicking Reset instead of Search resets the search criteria.
Table 11-16, "Conditions Search fields" lists the fields in the Search section.
Table 11-16 Conditions Search fields
| Field | Description |
|---|---|
|
Condition Name |
Name given to the condition. |
|
Description |
Description of the condition |
|
Type |
Type of condition. For example, Device, Location, and User. |
|
Checkpoints |
Point during the session the rules in a policy are evaluated. |
Each condition has a name. If the description is too long to be fully shown, you can place the mouse over the text to see the entire description.
Click the name of the condition you are interested in to view more details.
11.8.2 Adding Conditions to a Rule
The Rule page's Condition tab displays the conditions in the rule and enables you to add other conditions and customize them.

Follow these steps to add a condition:
-
If you are not on the Rule Details page of the rule in which you want to add the condition to, navigate to that page.
-
In the Navigation tree, select Rules. The Rules Search page is displayed.
-
Search for the rule in which you want to add the condition for.
-
In the Search Results table, click the name of the rule. The Rule Details page for that rule is displayed.
-
-
In the Rule Details page, click the Conditions tab.
-
In the Conditions tab, click Add. The Add Condition page appears.
-
Search for the condition you want for the rule.
-
In the Search Results table, select that condition and click Add.
-
In the Conditions edit page, select the condition in the top subtab.
The bottom subtab displays the parameters of the condition.
-
In the bottom subtab, modify the parameters per your requirements.
-
Click Save to save your changes.
A confirmation dialog displays the status of the operation.
-
Click OK to dismiss the confirmation dialog.
-
Click Apply. The modified rule details were saved successfully.
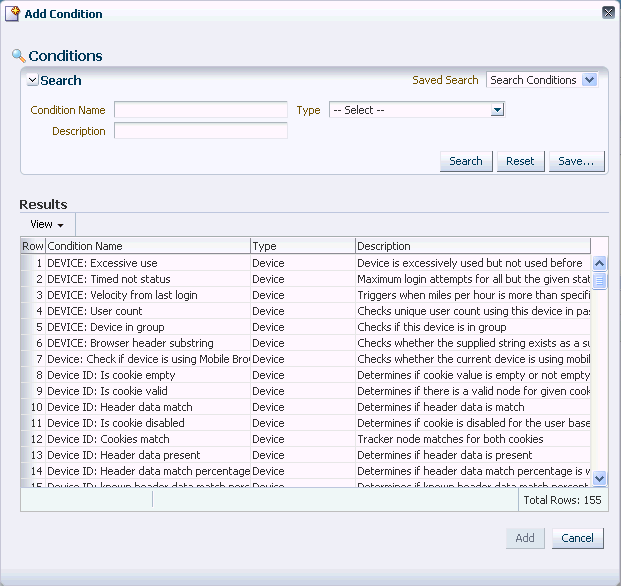
An example of the Conditions tab is shown in Figure 11-13, "Condition Parameters".
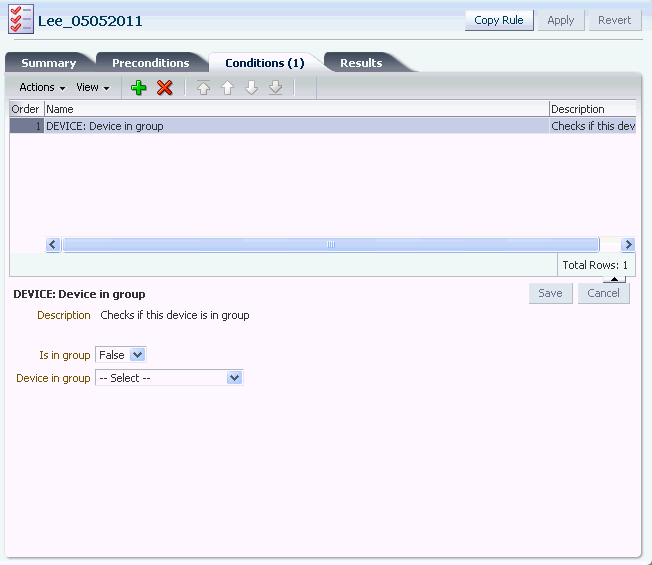
The top tab displays the conditions in the rule.
Table 11-17 lists the fields in the top subtab of the Conditions tab.
Table 11-17 Rule Details Conditions Tab
| Fields | Descriptions |
|---|---|
|
Order |
Order of the condition. Conditions in the rule are evaluated sequentially. Subsequent conditions are evaluated only if the current one was evaluated to be true. In other words, the evaluation stops when a condition is evaluated to be false. For the rule to be triggered all the conditions that constitute the rule must be evaluated to true; if any of the conditions is evaluated to false, the rule is evaluated to false, and the rule does not trigger. |
|
Condition Name |
Name of the condition. |
|
Description |
Description of the condition. |
You can only view/edit one condition's parameters at a time.
Example: Link Group to Rule Condition
In this use case, you must link an existing high risk countries group used for various purposes to a rule in the policy, System - Pre Blocking, you imported in Section 11.9.2, "Example: Importing a Policy."
Directions: Find a high risk countries group and link it to the rule in the KBA Challenge policy, you created.
To link a group to a rule condition:
-
Log in to the OAAM Administration Console as an administrator.
-
Double-click the Rules node. The Rules Search page is displayed.
-
Search for the Blacklisted countries rule.
-
In the Search Results table, click Blacklisted countries. The Rule Details page for the Blacklisted countries rule is displayed.
-
Select the in group rule condition in the Blacklisted countries rule.
-
In the Rule Details page, click the Conditions tab.
-
In the Conditions tab, click Add. The Add Conditions page appears.
-
Search for the condition,
Location: In Country group.The condition checks to see if the IP address is in the given country group.
-
In the Search Results table, select the
Location: In Country groupcondition and click OK.
-
-
Link the existing high risk countries group to the rule condition.
-
In the Conditions edit page, select the
Location: In Country groupcondition in the top panel.The bottom panel displays the parameters of the condition.
-
In the bottom panel, modify the parameters by setting:
Is in list: true
Country in country group: Restricted countries.
-
-
Click Save to save your changes. A confirmation dialog appears with a message that the modified rule parameters were saved successfully.
-
Click OK to dismiss the confirmation dialog.
-
Click Apply. A confirmation dialog appears with a message that the modified rule details were saved successfully.
11.8.3 Editing Rule Parameters
The Conditions tab of the Rule Details page displays the conditions in the rule and enables you to edit parameters of the rule.
To edit rule parameters:
-
In the Navigation tree, select Rules. The Rules Search page is displayed.
-
Search for the rule which you want to edit.
-
Click the rule name in the Search Results table to open its Rule Details page in a new tab.
The Rule Details page provides the Summary, Preconditions, Conditions, and Results tabs.
-
In the Rule Details page, click the Conditions tab.
-
In the Conditions tab, select the condition in the top subtab.
The bottom subtab displays the parameters of the condition.
-
Use the Reorder buttons on the tool menu to change the order of the conditions.
See Section 11.8.5, "Changing the Order of Conditions in a Rule" for details.
-
In the bottom subtab, modify the parameters per your requirements.
-
Click Save to save your changes.
A confirmation dialog displays the status of the operation.
-
Click OK to dismiss the confirmation dialog.
-
Click Apply. The modified rule details were saved successfully.
11.8.4 Viewing the Condition Details of a Rule
To view the details of a condition:
-
Open the Rule Details page of the rule.
-
In the Navigation tree, select Rules. The Rules Search page is displayed.
-
Search for the rule in which you want to add the condition for.
-
In the Search Results table, click the name of the rule. The Rule Details page for that rule is displayed.
-
-
In the Rule Details page, click the Conditions tab.
-
In the Conditions tab, highlight the condition you are interested in.
The bottom subtab displays the parameters for the condition.
11.8.5 Changing the Order of Conditions in a Rule
Conditions in the rule are evaluated sequentially. Subsequent conditions are evaluated only if the current one was evaluated to be true. In other words, the evaluation stops when a condition is evaluated to be false.
To change the order of a condition in a rule:
-
In the Navigation tree, select Rules. The Rules Search page is displayed.
-
Search for the rule which you want to edit.
-
Click the rule name in the Search Results table to open its Rule Details page in a new tab.
The Rule Details page provides the Summary, Preconditions, Conditions, and Results tabs.
-
In the Rule Details page, click the Conditions tab.
-
In the Conditions tab, select the condition in the top subtab.
-
Use the Reorder buttons reorder the condition.
-
Click Save to save your changes.
A confirmation dialog displays the status of the operation.
-
Click OK to dismiss the confirmation dialog.
-
Click Apply. The modified rule details were saved successfully.
11.8.6 Deleting Conditions
-
In the Navigation tree, select Conditions. The Conditions Search page is displayed.
-
Enter the search criteria for the conditions you are interested in and click Search.
-
Select the conditions in the Search Results table and click Delete.
Note:
If rules are using the condition, deleting it affects the rules and policies that use it.
11.8.7 Deleting Conditions from a Rule
To delete a condition from a rule:
-
In the Navigation tree, select Rules. The Rules Search page is displayed.
-
Search for the rule that contains the conditions you want to delete.
-
Click the rule name in the Search Results table to open its Rule Details page.
-
In the Rule Details page, click the Conditions tab.
-
Select the condition of interest and click Delete.
The Delete button is enabled only if a row is selected or the search result has at least two rows.
You cannot delete multiple conditions at a time in a given rule; you must select one condition at a time.
You can delete more than one condition, but not all conditions can be deleted.
When the Delete button is clicked, the deletion is performed. You do not receive a message asking if you are sure you want to delete. The change is permanent.
11.9 Exporting and Importing
Policies can be exported and imported.
For example, you can export the policies defined in a system and import them into another system.
11.9.1 Exporting a Policy
-
In the Navigation tree, select Policies. The Policies Search page is displayed.
-
Enter the search criteria you want and click Search.
-
Select the rows corresponding to the policies you want to export.
-
From the Actions menu, select Export selected or Export Delete Script.
-
When the export screen appears, select Save File, and then OK.
11.9.2 Importing Policies
To import policies:
-
In the Navigation tree, select Policies. The Policies Search page is displayed.
-
In the Policies Search page, click the Import Policy button. The Import Policy screen appears.
-
In the Import Policy dialog box, type the path and name of the file; or use the Browse (...) button to locate the ZIP file that contains the policies, and then select the file.
Note: a validation is performed for the imported file's MIME type. The MIME type of the export file should be "Application/ZIP."
-
Click Open and then click OK.
A confirmation dialog appears with the list of policies and the number of policies that were added, updated, not updated, or not deleted in the system after the import.
The policies are imported into the system unless the ZIP file contains a delete script or files in an invalid format or the ZIP file is empty.
If you are importing a delete script, the policies are deleted from the system.
An error occurs if you try to import policies in an invalid format or an empty ZIP file.
-
Click Done to dismiss the confirmation dialog.
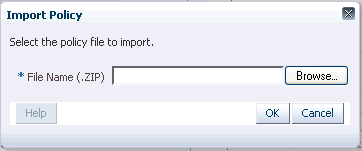
Note for Policies Migrated from 10g to 11g
Business, third-party, workflow policy types have been removed from Oracle Adaptive Access Manager.
In 10g, scoring was not used by business policies. In 11g, when business policies are loaded from the Oracle Adaptive Access Manager database, the policy set scoring engine is applied by default and these policies are treated as security policies from 11g onward.
You are Jennifer, a member of the security team at Acme Corp. You must configure Oracle Adaptive Access Manager to accomplish one of the use cases the team came up with focusing on high risk countries. Chuck, another team member, configured a Pre-Authentication policy in the Oracle Adaptive Access Manager offline environment to block login requests from high risk countries before authentication. You know this policy can work for your purposes. Chuck already exported the policy and now you must import it into production. Directions: Import the ZIP file that contains Chuck's configured policies. He has name the file, PreAuth_Block_policy.zip.
To import a policy:
-
Log in to the OAAM Administration Console as an administrator.
-
In the Navigation tree, select Policies. The Policies Search page is displayed.
-
Click Import Policy in the Policies Search page. The Import Policy screen is displayed.
-
Click Browse and search for
PreAuth_Block_policy.zip. -
Click OK to upload
PreAuth_Block_policy.zip.A confirmation dialog displays the status of the operation.
A list also appears showing numbers for Number of Policies Added, Number of Policies Updated, Number of Policies Not Updated, and Number of Policies Deleted.
The imported policy is listed in the Imported List section.
The policy is added to the system or it overwrites/updates an existing policy depending on whether the same policy name exists. If the name already exists, the policy is updated. If the name does not exist, the imported policy is added to the system.
An error is displayed if you try to import files in an invalid format or an empty ZIP file.
-
Click OK to dismiss the confirmation dialog.
-
In the Policy Search page, verify that the policy appears in the Search Results table.
11.9.3 Importing a Policy With the Same Name as an Existing Policy
When you import policies to overwrite an existing policy with the same name to update changes in the actions with the actual rules remaining the same, if the replacement action is blank it does not overwrite the original value. To import the policy with the same name as an existing policy, you must first delete the policy and then import the new version of that policy.
11.9.4 Importing Conditions
-
From the Navigation tree, click Conditions.
The Conditions Search page is displayed.
-
Click Import Conditions.
-
In the Import Conditions dialog box, type the path and name of the file; or use the Browse (...) button to locate the ZIP file that contains the conditions, and then select the file.
-
Click Open and then click OK.
A confirmation dialog appears with the list of conditions and the number of conditions that were added, updated, not updated, or not deleted in the system after the import.
-
Click Done to dismiss the confirmation dialog.
11.9.5 Exporting a Condition
-
In the Navigation tree, select Conditions. The Conditions page is displayed.
-
Enter the search criteria you want and click Search.
-
Select the rows corresponding to the conditions of interest.
-
From the Actions menu, select Export selected.
-
When the export dialog appears, select Save File, and then OK.
11.10 Evaluating a Policy within a Rule
The System: Evaluate Policy condition can be used to evaluate the policy (execute the policy by name) and then see if the actions returned by the policy contains a particular action. This condition is added to rule and works as follows.
-
Create a rule and add this as only condition.
-
Specify the name of some policy and expected action (for example, Block) for the condition parameters.
-
If at runtime this policy returns a list of actions and one of the actions is Block, then this rule will trigger.
Jeff has two policies. One of the policies Policy B is like a pre-cursor to Policy A so this policy should be executed every time, no matter what the other rule evaluations turn out to be. Hence nesting this policy under Policy A may not work all the time. (trigger combinations)So Jeff decides to add a new rule condition to Policy A such that it executes Policy B every time.
-
Open Policy A.
-
In the Rules tab of the Policy Details page, click the Add Rule button.
-
Create a rule, Rule C.
-
In the Condition tab of the Rule Details page, click Add Condition.
-
Add System: Evaluation Policy condition.
-
In Trigger Combination, select Policy B as action.
11.11 Best Practices
This section outlines some best practices for using policies, rules, and conditions.
Simple Conditions First in the Rules
Order conditions within a rule such that the conditions that are simple are first in the rule. Usually Session type conditions are ones that are more efficient. Usually Autolearning type conditions and conditions that use location data are more expensive--they should be placed after the simple ones.
Organize Policies So Conditions Do Not Evaluate Many Times in the Flow
Organize the policies such that you do not have to evaluate the same condition again and again in the flow. This could help prevent getting the same result at different checkpoints in the same session. Use nested policies to prevent evaluating the same conditions.
Adding and Editing Policies and Rules
These general steps outline the process for adding or updating of policies or rules into a production environment:
-
Develop the new rule using your offline system (a separate installation of Oracle Adaptive Access Manager set up for testing or staging).
-
Test the rule to ensure that it is functioning as expected by running predictable data through it using your offline system.
-
When you are satisfied that the policy is functioning as expected, migrate the policy in pre-production where performance testing can be run.
This is an important step since the new rule, or policy, or both can potentially have a performance impact. For example, if you define a new policy to check that a user was not using an email address that had been used before (ever). If the customer has more than 1 billion records in the database, performing that check against all the records for every transaction has great impact on performance. Therefore, testing the policy under load is important.
-
Only when you are satisfied that your new rule/policy is functioning as expected and does not adversely affect performance should it be migrated into production.
Using a Maximum Scoring Engine
Whether a high score or low score is considered "bad" is dependant on the policy and how the developer models the policy. For example, the higher the score in device policies, the higher the risk for the situation.
For example, if you want "1000" to be considered a "bad" score, use the Maximum scoring engine. Then, model the rules so that whatever generates a maximum score is "bad." For example, you can model the policy such that if a user logs in from a particular location, the score is 200 points, and if a user logs in from a bad device, the score is 500 points. In this case, the one that has the maximum score is considered the worse of the two.
Using an Aggregate Scoring Engine
If you do not know how risky a situation is, you can use an aggregate scoring engine. For example, for a Device ID, you can apply six or seven rules. For each rule, specify a score of 200 or 300 weight. If you the scores are more than this, it is considered "bad." If there are six rules, and two of them trigger, you would get the lower aggregate. If six rules triggers, you get the higher aggregate, which means that this situation is the riskier.
Using an Average Scoring Engine
Use the Average scoring engine when none of the rules are more important than the others or there are a lot of rules that trigger for the evaluation. For example, each rule can view a particular part of a situation, but each part is not enough for you to base a decision on.
Score Does Not Matter for Some Policies in a Checkpoint
If there are multiple policies in a checkpoint and if the score does not matter for some of the policies, set the rule score to 0 for these policies, so that they are ignored when scores are aggregated.