| Oracle® Communications Converged Application Server Developer's Guide Release 5.1 Part Number E27707-01 |
|
|
PDF · Mobi · ePub |
| Oracle® Communications Converged Application Server Developer's Guide Release 5.1 Part Number E27707-01 |
|
|
PDF · Mobi · ePub |
This chapter describes the testing tools included with the SCE. The tools include simulators, SIPp, and Diameter domain extension tools.
The SCE includes simulators and other network service tools that you can use to develop and test applications. The simulators provide the functions of common IMS network components. The simulators allow you to test your applications against network components without having to access a live or production network.
The SCE includes simulators or simulator integration features for the following types of network components:
XDMS server
Diameter Ro server
Diameter Rf server
Diameter HSS server
Media server
In addition to simulator-related features, the SCE provides a graphical user interface for using SIPp directly from the SCE. It also enables you to extend and configure a Converged Application Server domain with Diameter capabilities.
You access the converged application tools from the OCCAS menu in the OEPE. Figure 4-1 shows the general components of the graphical user interface for configuring the SCE simulators:
As shown, the simulator list provides access to the various configuration page for each type of simulator. After setting the configuration, you can deploy the simulator to the selected target servers by clicking the start icon. The stop icon terminates the simulator process, and also removes the simulator as a deployed application from the target server.
Any target server you have added to the SCE project appears in the target server list. You can click the refresh icon to update the list of servers that appear in the list. Refreshing the server list adds newly created servers and removes deleted servers from the list.
The following sections provide more information on how to use each type of simulator, as well as the SIPp and Diameter domain configuration tools.
In an IMS network, the XML Document Management Server (XDMS) makes user-specific service information available to client applications. The type of information hosted by the XDMS presence authorization policies, contact and group lists, and presence status. The SCE provides an XDMS simulator that allows you to test applications that interact with XDMS servers.
The XDMS simulator is suitable for testing purposes only. It supports only those document management capabilities applicable to call functions that are available through the SFT APIs, including call barring, call forwarding, and OIP.
The XDMS simulator does not support data persistence, high availability, or other requirements of a production XDMS system. Since it lacks data persistence, when you shut down the XDMS simulator, its hosted data is lost. Also, the simulator supports basic operations only, such as GET and SET.
In addition, shared XDMS is not supported; the SCE supports single XDMS simulator instances only.
The XDMS runs on the Converged Application Server. To use it, you deploy it from the Converged Application SCE to the Converged Application Server. It can be deployed to any server you have added as a target server environment in the SCE.
Using an XDMS system involves both loading and querying information. The XDMS simulator exposes get and set operations through a REST-based XCAP interface. See "Using the XCAP Interface to Populate and Query the XDMS" for more information about the RESTful interface.
The XDMS simulator software is distributed as a WAR file that you deploy to the Converged Application Server. Although it is possible to deploy the XDMS file to the Converged Application Server manually, the SCE enables you to deploy and control the XDMS simulator directly from the development interface.
The following steps describe how to deploy and start the simulator. Before starting, configure the target server environment to which you want to deploy the simulator in the SCE.
To deploy and start the XDMS in the Converged Application SCE, follow these steps:
From the OCCAS menu, click Simulators.
If is not already selected, select the XDMS Simulator node from the SCE Simulators list.
The XDMS Simulator settings appear in the right pane. Notice that the target servers appear at the bottom of the pane.
To have the XDMS simulator enforce digest authentication requirements, select the Enable digest filter.
Select the check box of the server to which you want to deploy the XDMS software.
You should deploy the simulator to a Converged Application Server administration server only; it does not operate on engine tier servers. XDMS simulators on different servers cannot share information. For most development testing scenarios, deploying the XDMS simulator to a single server is sufficient.
Click the start icon.
The SCE deploys the XDMS bundle to the selected server and starts the XDMS application. You can now populate the XDMS simulator with data and test it from SFT applications.
After starting the XDMS simulator, you can remove the XDMS simulator from the server by clicking the stop icon. Stopping the XDMS simulator removes the XDMS simulator package from the Converged Application Server to which it was deployed.
While the XDMS simulator is running, you can populate it with data using its XCAP interface. See "Using the XCAP Interface to Populate and Query the XDMS" for more information.
After deploying the XDMS to the Converged Application Server, you can use the XCAP interface to add or get documents in the XDMS.
By default, the XDMS simulator exposes its XCAP root address at the following location:
http://hostname:7001/xdms_simulator
An XCAP client application can establish a connection to the simulator as it does to the any XDMS system.
For example, given an XCAP client instantiated on the communication service, the following code fragment creates the connection to the XDMS simulator on the local host:
XCAPClient client = getClient();
   XcapRoot root = client.createXcapRoot("http://127.0.0.1:7001/xdms");
   XcapConnection connection = client.createConnection(root);
See Chapter 24, "Using the XCAP Interfaces,"to learn about XCAP and XDMS from a programming perspective.
You can shut down and undeploy the XDMS simulator from the server by clicking the stop icon in the XDMS Simulator tab. Because the XDMS simulator stores its contents in memory only, stopping the simulator application clears its contents and returns it to its initial state.
Converged applications rely on media servers to enable rich media services, such as conferencing, audio prompting, and speech detection. The SCE provides a JSR 309 adapter that allows you to test interactions between converged applications and an external media server.
The SCE includes a media server simulator that you can use to test applications that rely on a media server.
To configure the media server connectivity in the SCE, follow these steps:
From the OCCAS menu, click Simulators.
In the simulators list, choose Media Server Simulator.
The media server configuration settings appear in the right pane.
Configure the following settings:
Media Server Address: Enter the host name or IP address of the media server in your environment.
Media Server Port: Enter the port number on which the media server listens for client requests. By default, this is 6666.
JNDI Name: The name of the media server resource in Java Naming and Directory Interface (JNDI) format. By default, this is mscontrol/jvb/default.
Select the Converged Application Server on which to deploy the media server driver. The page shows the servers that have been configured as target servers for the project. Choose the server on which to deploy the media server driver.
Click the start icon to deploy and start the simulator.
The media server starts. You can now test the applications that rely on the media server.
When finished, click the stop icon to terminate the media server process and remove the deployment from the Converged Application Server.
You can now test your converged applications that use the media server simulator.
The Diameter charging and HSS simulators enable you to test operations related to charging and authentication in your converged applications.
The Diameter and HSS simulators can operate as standalone servers only. For additional information about deploying and running the simulator, see the information about the Sh and Rf simulator in the Oracle Communications Converged Application Server Administrator's Guide.
To configure connectivity to the Diameter server from the SCE:
From the OCCAS menu, click Simulators.
In the simulators list, choose one of the following nodes:
Diameter Ro Simulator to have the simulator perform online charging functions.
Diameter Rf Simulator if the simulator performs offline charging server functions.
Diameter HSS Simulator if the simulator performs Home Subscriber Server (HSS) functions, such as serving subscriber information.
The configurations settings for the simulator integration appear in the right pane.
Configure the following settings:
realm name: Enter the realm name for which the Diameter node simulator has responsibility.
host name: Enter the identity of the Diameter simulator.
listen address: Enter the listen address on which the Diameter simulator listens for Diameter traffic.
listen port: Enter the listen port on which this node listens for Diameter traffic with the simulator.
Enable debug output: Select to have debug output printed to the SCE log screen.
Enable message tracing: Select to have log output printed to the SCE log screen.
Click the start icon to start the simulator.
You can now test run the applications that rely on charging functions of the simulator.
When finished, click the stop icon to terminate the simulator process.
You can now test the Diameter interactions of your converged applications with the Diameter simulator.
Diameter-enabled converged applications can run only on domains that have been extended with the Diameter domain template. The template provides the container framework for enabling Diameter capabilities. You can use the Diameter configuration tool in the SCE to extend an existing Converged Application Server domain for Diameter.
The SCE Diameter configuration interface provides an alternative to extending the domain with the Converged Application Server Configuration Wizard, as described in the Converged Application Server Installation Guide. The interface also enables you to specify the initial configuration for the domain from the SCE.
Note:
The SCE can extend domains on a local server only; it cannot extend domains on remote servers.The Diameter domain extension configuration page has settings that populate the diameter.xml configuration file for the Converged Application Server. See the Converged Application Server Administrator's Guide for more information on the diameter.xml file.
The configuration page has several types of settings, including:
Application settings apply to Diameter applications that run on the node.
Peer configuration settings define the other Diameter nodes with which this node operates. You can define peer connection information for each Diameter node.
Alternatively, you can use the allow-dynamic-peers functionality in combination with TLS transport to allow peers to be recognized automatically. See the Oracle Communications Converged Application Server Administrator's Guide for more information.
Routes configuration settings define realm-based routes that the node can use when resolving messages.
The target servers for the domains to be extended. Any target server configured in the SCE appears in the list.
To extend a domain with Diameter capabilities from the SCE, follow these steps:
From the OCCAS menu, click Extending Diameter.
The Diameter domain extension configuration page appears.
Click the Add button next to the Diameter application settings list.
In the Diameter Application dialog, specify the following settings:
Application Name: Enter a name for the application configuration.
Class Name: Enter the class name of the application to deploy to this node, from the following options:
com.bea.wcp.diameter.sh.WlssShApplication for the HSS application
com.bea.wcp.diameter.charging.RoApplication for the Diameter Ro (online charging) application
com.bea.wcp.diameter.charging.RfApplication for the Diameter Rf (offline charging) application.
Application ID: The Diameter application ID for this application. If one of the predefined Diameter classes is selected, this field is populated automatically.
16777217 for Diameter HSS
3 for Diameter Rf
4 for Diameter Ro
Parameters: Enter optional parameters to pass to the application upon startup.
For example, the Rf application accepts the parameters cdf.host and cdf.realm, which are used to identify the host name and realm of the Charging Data Function (CDF), respectively. See information about configuring Diameter applications in the Oracle Communications Converged Application Server Administrator's Guide for more information on parameters accepted by the applications.
Click Add to save the settings.
Configure peer nodes by clicking the Add button next to the peer node configuration list.
In the Diameter Peer dialog, specify the peer Diameter node using the following settings:
Import configuration from: Select this option to import Charging or HSS simulator parameters from the simulator view.
Host: Enter the peer node's host identity.
Realm: Enter the peer node's Diameter realm.
Address: Enter the peer node's address (DNS name or IP address).
Port: Enter the listen port number of the peer node.
Protocol: Select the protocol used to communicate with the peer (TCP or SCTP).
Enable WatchDog: Select this check box to specify that the peer supports the Diameter Tw watchdog timer interval.
Click Add to save the settings.
Optionally, configure settings the Converged Application Server container will use to resolve routes to the peer nodes by clicking the Add button next to the realm-based routes configuration list.
In the Diameter Route dialog, specify the following settings:
Name: A unique, identifying name for this route configuration.
Servers: The peer for which this route applies. The peer nodes you have configured appear as menu options for this item.
realm: The target Diameter realm associated with this route.
Application ID: The Diameter application ID for this application. If one of the predefined Diameter classes is selected, this field is populated automatically.
16777217 for Diameter HSS
3 for Diameter Rf
4 for Diameter Ro
Action: Select an action that this node performs when using the configured route. The action type may be one of: local, relay, proxy, or redirect.
For a given route, choose the route in the route list and choose Default Route to make this route the default route used when resolving messages.
The Converged Application Server uses the selected route as the default message exchange route. In the view, a blue icon indicates the currently selected default route.
Click Add to save the settings.
Select the target server from the list of configured servers, and click the extend icon to extend the domain and deploy the configuration to the selected server.
You can now deploy Diameter-capable applications to the target server.
With the SCE, you can run SIPp directly from Eclipse. SIPp is a freely available SIP traffic generator and testing tool. To use SIPp with the SCE, you must have the SIPp program installed on your computer.
The SIPp software is available for download from:
The SCE SIPp interface exposes existing SIPp features. Therefore, for detailed information on any of the SIPp interface settings, including SIPp embedded scenarios, XML scenario files, CSV files, and other features, see the SIPp documentation page at:
http://sipp.sourceforge.net/doc/reference.html
Note:
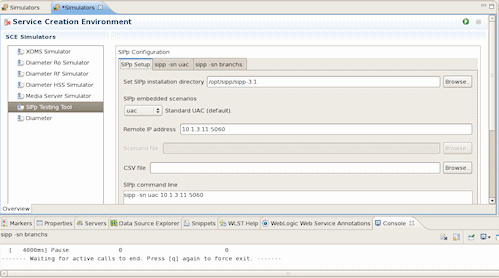
The SCE SIPp interface does not support SIPp short cut keys.The SIPp integration page appears as a simulator resource in the SCE user interface, as shown in Figure 4-2:
As shown in the figure, you compose the SIPp command in the SIPp Setup tab. When you click the run icon at the top right corner of the page, a new tab is created for the command. You can create additional commands by returning to the SIPp Setup tab and repeating the command configuration. The output of the execution appears in the Console log viewer at the bottom of the screen.
There are several ways to compose SIPp commands in the tab. They include:
Choosing a SIPp embedded scenario from the list.
Specifying a standard SIPp scenario file.
Entering the command manually in the SIPp command line field.
In the SCE SIPp interface, the command you create in the interface appears in the SIPp command line field. When you use the SIPp interface controls to configure the command, changes to the command are automatically reflected in the command that appears in the field.
For example, if you choose the uac embedded scenario and added an address to the Remote IP address field, the SIPp command line field is populated with this command:
sipp -sn uac 10.1.3.11:5060
You can further modify the command by editing the command in the field directly.
Embedded scenarios are simple, predefined scenarios for SIPp. You can create complex or custom scenarios using scenario XML files. Further, SIPp provides a mechanism for injecting values from a CSV file into scenarios. In the command line invocation, the CSV file name is specified as a value for the -inf option. In the SCE SIPp interface, you can specify the equivalent file name in the CSV file field.
Note:
The SCE SIPp interface exposes only existing SIPp features. Therefore, for detailed information on any of the SIPp interface settings, including SIPp embedded scenarios, XML scenario files, CSV files, and other features, see the SIPp documentation page at:After installing SIPp and creating the scenarios and CSV files, you can run SIPp from the SCE as follows:
From the OCCAS menu, click Simulators.
From the SCE Simulators list in the Service Creation Environment pane, click the SIPp Testing Tool node.
In the SIPp Setup tab, specify the full path to the SIPp program file in the Set SIPp installation directory, such as /opt/sipp/sipp-3.1.
Use the configuration fields in the setup tab to compose the SIPp command. The fields are:
SIPp embedded scenarios: choose from one of the common, predefined SIPp scenarios.
Remote IP address: The IP address and port on which a client agent runs.
CSV file: A comma-separated values file that contains injection values for this scenario. The values in the file are matched to placeholders in the scenario XML file.
Manually modify or extend, if desired, the SIPp command as it appears in the SIPp command line field.
When the command is ready, click the Start button at the top right corner of the interface.
A new tab appears that contains that command instance. The console tab appears with a printout of the execution log for the command. You can simultaneously issue additional command executions.
Optionally, click the SIPp Setup tab to return to the command configuration page and create a new command. You can run any number of commands simultaneously.
While the command is running, you can click the Stop icon at any time to terminate the command.
|
Copyright © 2005, 2012, Oracle and/or its affiliates. All rights reserved. Legal Notices |
|