1 Introduction and Preinstallation Checklist
This guide uses a step-by-step approach to assist you with the installation of Oracle Fail Safe. Oracle Fail Safe installation provides the option for installing Oracle Fail Safe Manager, Oracle Fail Safe Server, and Oracle Fail Safe documentation. Typically, you would install all three components but you may want to customize the installation depending on your needs. For example, if you have a single desktop system that you want to use to manage all your clusters, then you may want to install Oracle Fail Safe Manager and Oracle Fail Safe documentation on that system.
Oracle Fail Safe Manager is a graphical user interface for configuring and managing Oracle single-instance databases, Oracle Management Agent, generic services, and so on for high availability in Microsoft Windows Failover Cluster. Oracle Fail Safe is the main server component.
You perform the installation using Oracle Universal Installer graphical user interface. If you perform the same installation on multiple systems, you may run Oracle Universal Installer in silent mode to automate the installation process in batch files or scripts. Silent installations are described in Appendix B.
The following topics are discussed in this chapter:
1.1 Cluster Setup Prerequisites
You must perform the following configuration tasks before the installation of Oracle Fail Safe:
-
Select Validate This Cluster action found in the Actions menu of Microsoft Windows Failover Cluster Manager and then review the results by running View Validation Report action. Resolve any issues found during Microsoft Windows Failover Cluster validation process before proceeding.
-
Check that each system has the proper Oracle Net
tnsnames.oraconfiguration to allow the system to connect to its local database. -
If you install Oracle Fail Safe on a subset of the nodes in the cluster, check that the Cluster Group is running on one of the nodes where you installed Oracle Fail Safe. You can view or change the location of the Cluster Group using Microsoft Windows Failover Cluster Manager. Oracle Fail Safe will not function properly if the Cluster Group is moved to a node that does not have Oracle Fail Safe installed.
-
Ensure that Microsoft Windows Event Viewer is not running while installing Oracle Fail Safe. This is an issue only if installing on top of an existing installation (in-place upgrade).
Note:
If you attempt to install Oracle Fail Safe while the Microsoft Windows Event Viewer is running, the installation procedure may return an error indicating that it cannot copy thefsus.dllfile (fsja.dllon Japanese systems) and asks you to retry, ignore, or cancel. You can continue the installation if you stop the Microsoft Windows Event Viewer and then click Retry in the Oracle Fail Safe installation Error window.
1.2 Software Compatibility
Refer to Oracle Fail Safe Release Notes for Microsoft Windows for information on current software compatibility for different operating systems.
1.3 Disk Space Requirements
The following table describes the disk space requirements for each installation type:
| Installation Type | Disk Space (MB) |
|---|---|
| Typical Install | 188 |
| Client Only Install | 177 |
1.4 Installation and Configuration
Oracle Fail Safe Manager requires Microsoft .NET 3.5 Service Pack 1. If .NET 3.5 Service Pack 1 is not installed on Windows Server 2008 R2 and later, then ensure that you add it either using Server Manager Interface or PowerShell as described here:
Using Server Manager Interface
-
In the Server Manager interface, select Add Features to display a list of possible features.
-
In the Select Features interface, expand .NET Framework 3.5.1 Features.
-
Once you expand .NET Framework 3.5.1 Features, you will see two check boxes. One for .NET Framework 3.5.1 and the other for WCF Activation. Select the box next to .NET Framework 3.5.1 and click Next.
Note:
If you do not expand .NET Framework 3.5.1 Features and select it, then you will get a pop-up titled Add Features Wizard.Click Cancel and expand .NET Framework 3.5.1 Features and then check .NET Framework 3.5.1 check box below it.
You cannot install .NET Framework 3.5.1 Features unless the required role services and features are also installed.
-
In the Confirm Installation Selections interface, review the selections and then click Install.
-
Allow the installation process to complete and then click Close.
-
From the Start menu, select All Programs, then select Accessories.
-
Expand and right-click Windows PowerShell, then select Run as administrator. Click Yes on the User Account Control box.
-
At the PowerShell command prompt, type the following commands, and then press Enter after each command:
-
Import-Module ServerManager -
Add-WindowsFeature as-net-framework
-
1.5 Recommended Order for Software Installation
Although this guide describes the Oracle Fail Safe installation in detail, other products must also be installed to implement the Oracle Fail Safe environment. Figure 1-1 shows the recommended order for installing software on a two-node cluster
Note:
The numbers in Figure 1-1 do not correspond to the numbered steps in the subsequent list because the list contains more detailed information than the figure.Figure 1-1 Recommended Order for Installing Software on a Two-Node Cluster
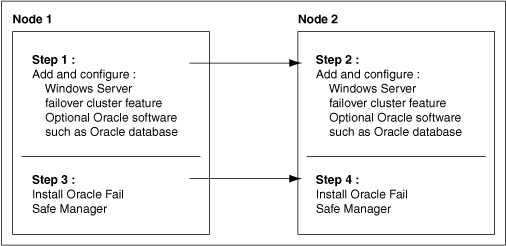
Description of "Figure 1-1 Recommended Order for Installing Software on a Two-Node Cluster"
The following list provides more detail about the installation order and other tasks to help you get started with Oracle Fail Safe:
-
On each cluster node, add and configure the Microsoft Windows Failover Cluster feature.
See Oracle Fail Safe Release Notes for Microsoft Windows for information about the versions of Microsoft Windows that can be used with Oracle Fail Safe.
-
On each cluster node, install the optional Oracle software (Oracle Database and other applications) that you plan to use with Oracle Fail Safe. Place all application and database data, control, and log files on shared cluster disks so that they can fail over. If you add an Oracle product after Oracle Fail Safe has started, then you must restart Oracle Fail Safe so it can identify the new installation. This can be done by restarting the Cluster Service action on each node in the cluster. Note that restarting the Cluster Service will force all cluster groups on a node to failover to another node.
If you are installing Oracle Database software, you can create the database before or after you install Oracle Fail Safe. Create the database as you would in a noncluster environment, including the database listener. However, the database must be created on a cluster disk or disks.
-
On each cluster node, install the server component of Oracle Fail Safe.
See Chapter 2 for complete information about installing Oracle Fail Safe.
-
On one or more client systems, optionally, install Oracle Fail Safe Manager (for example, to set up additional management consoles).
Figure 1-2 lists the software and the files that should be installed on private disks and shared-nothing cluster disks.
Figure 1-2 Software Installed on Private, Shared-Nothing Cluster Disks
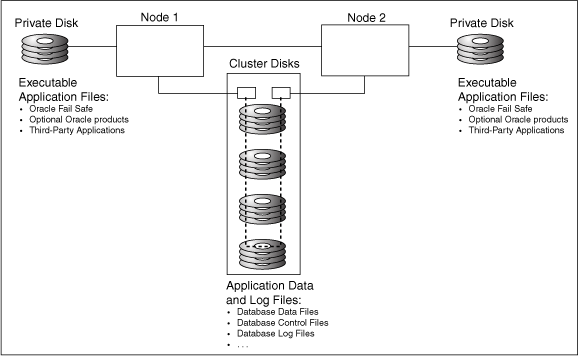
Description of "Figure 1-2 Software Installed on Private, Shared-Nothing Cluster Disks"
1.6 Adding a Node to an Existing Cluster
If you want to add a node to an existing cluster, perform the following operations:
-
Follow Microsoft's instructions to add a node to a cluster.
-
On the new node, install any desired optional Oracle software (Oracle Database and other applications) that you plan to use with Oracle Fail Safe. Install executable application files located on private disks (for example, on the system disk for each node).
-
On the new node, install the server component of Oracle Fail Safe. You can install Oracle Fail Safe Manager at the same time.
1.7 Adding a Sample Database
Oracle Fail Safe includes a Create Sample Database command that installs a preconfigured sample database on a cluster disk specified by the user. The sample database has limited functions and is intended only for testing purposes and for use with the online Oracle Fail Safe Tutorial for Microsoft Windows. The sample database should not be used for production. To create a database for production, use Database Configuration Assistant or create the database manually.
1.8 Postinstallation Procedures
After you have successfully installed Oracle Fail Safe, perform the following tasks:
-
If you have installed optional Oracle software:
-
Configure application data and log files on the shared cluster disks.
-
Configure alert and trace files on either the shared cluster disks or on the private disk.
Configuring alert and trace files on private disks allows the administrator to determine the node on which problems occur, but requires that you maintain multiple sets of files. Placing parameter files on private disks is recommended only when you want the parameters to be different on each cluster node. For example, this can be useful if you want a database to use fewer resources on its failover node than on its primary node (such as when you know that another application or database on the failover node needs resources).
For information about re-creating databases on cluster disks, refer to the Import and Export documentation that is specific to your database.
-
-
Start Oracle Fail Safe Manager, connect to the cluster alias with a domain account that has Administrator privileges on each cluster node. You must confirm that the installation is completed when prompted. If you perform a silent installation, then you can complete the installation by running an
fscmd verifyclustercommand or the PowerShell commandTest-OracleCluster.See Oracle Fail Safe Concepts and Administration Guide for Microsoft Windows for more information about the command line utilities.
See Chapter 3 for information to help you get started with Oracle Fail Safe.
-
Refer to the Oracle Fail Safe Tutorial for Microsoft Windows for step-by-step information about creating a group and adding resources to it.