11g Release 1 (11.1.4)
Part Number E22380-05
Contents
Previous
Next
|
Oracle® Fusion
Applications Post-Installation Guide 11g Release 1 (11.1.4) Part Number E22380-05 |
Contents |
Previous |
Next |
This chapter contains the following:
Configuring Oracle Metadata Services
Installing Additional Languages
Configuring Oracle Business Intelligence
Setting Up Segregation of Duties
Configuring Oracle Data Integrator Studio
Setting Up a Secondary Oracle HTTP Server
Setting Up Spreadsheet Integration
Health Checking and Troubleshooting
After provisioning is complete, run the Oracle WebLogic Scripting Tool (WLST) diagnostic scripts to verify configurations.
This table lists what diagnostic scripts are available and what they do. You can find these diagnostic scripts at <ATGPF_ORACLE_HOME>/atgpf/bin/.
|
Diagnostic Scripts |
Description |
|---|---|
|
Application User Session ( |
This script checks the setup and configuration definitions of Application User Session. Specifically, it checks the Session Filters and Filter-Mappings definitions and sequential order of the Filter-Mappings definitions in the application Web configuration. These are defined within the web.xml file of respective application .war file archived inside the application .ear file. This script also validates application user session runtime data for a user in any Oracle Fusion application. For example, if a user is having problems with the application user session even after confirming that all the application user session configurations are correct, then it might be the case that runtime data for that session for the user is not created properly in the database. This script can detect such type of issues. This script prompts for a session cookie and if a cookie is entered, it performs runtime data validations for the user session. If no cookie is entered, the script ignores this particular validation. To obtain the session cookie value:
If you cannot find the cookie |
|
Attachments ( |
The script checks web.xml and verifies the configuration in the Content Server. |
|
Data Security ( |
This script checks the setup and configuration definitions of data security. Specifically, it performs the following checks:
For the |
|
Flexfields ( |
This script checks the setup and configuration definitions of flexfields. Specifically, it performs the following:
|
|
Topology and taxonomy ( |
This script checks the setup and configuration definitions of topology and taxonomy. Specifically, it checks that the topology and taxonomy Java management extensions Managed Beans (MBeans) are correctly configured in Oracle WebLogic Server, and checks whether setup definitions of runtime MBeans attributes are defined in the topology-mbean.xml file. |
|
UI shell integration and preferences ( |
These scripts are used for diagnosing the configuration issues pertaining to UI Shell integration and preference settings. The
The |
To run the diagnostic scripts, perform the following on the Administration Server:
Open the setDomainEnv.sh file and set -Dweblogic.jdbc.remoteEnabled property to true.
The setDomainEnv.sh file is located in the following directories:
(UNIX) DOMAIN_HOME/bin
(Windows) DOMAIN_HOME\bin
Start the Administration Server by using the following script from the fusionapps Middleware directory:
(UNIX) DOMAIN_HOME/bin/startWebLogic.sh
(Windows) DOMAIN_HOME\bin\startWebLogic.cmd
Note
For specific instructions about starting the WebLogic Administration Server, refer to the guide Oracle Fusion Middleware Managing Server Startup and Shutdown for Oracle WebLogic Server.
Start Oracle WebLogic Scripting Tool (WLST) console by using the following command:
Note
Before running the command, change to the directory where the scripts are stored.
(UNIX) ATG ORACLE_HOME/common/bin/wlst.sh
(Windows) ATG
ORACLE_HOME\common\bin\wlst.cmd
At the wls offline prompt, enter the following command: >wls:/offline> execfile ('script_name.py').
When prompted, enter the Oracle WebLogic
Server user name and password, which is the same as the Oracle Fusion
Middleware administrative user name and password entered during installation.
Also, enter the host name and port to Administration Server for the Oracle
WebLogic Server.
The following table lists these values as an example:
|
Details |
Sample Value |
|---|---|
|
Enter directory path to store the output file |
|
|
Enter WebLogic server user name |
|
|
Enter WebLogic server password |
|
|
Enter WebLogic server URL |
t3://localhost:7001 |
For each application, enter the application
name for which you want to run the diagnostics. Enter the application
name along with its version, for example, HomePageApp#V2.0.
WLST generates a report of the diagnostic validation failures in the directory path you specified. View the output report file in the path displayed in the WLST output, such as the following.
Applsession Diagnostics Overall Status: Failure. See the output file at /home/user/ApplsessionDiagResults.out for more information.
After Oracle Fusion Applications is deployed and provisioned, you should generate optimized query plans for Oracle Metadata Services (MDS) queries so that performance does not decline until the next automatic statistics collection window. For each MDS schema, execute the following statements in SQL*Plus as a privileged database user, for example SYS.
Regather the statistics by executing the following:
execute dbms_stats.gather_schema_stats(
ownname =>'<schemaOwner>',
estimate_percent =>dbms_stats.auto_sample_size,
method_opt =>'for all columns size auto',
cascade => true);
When using Oracle database version 11.2 or higher, execute the following additional commands:
DBMS_STATS.DELETE_COLUMN_STATS(
    ownname       => '<schemaOwner',
    tabname       =>'MDS_PATHS',
    colname       =>'PATH_FULLNAME',
    col_stat_type => 'HISTOGRAM'
   );
DBMS_STATS.SET_TABLE_PREFS(
     '<schemaOwner',
     'MDS_PATHS',
     'METHOD_OPT',
     'FOR ALL COLUMNS SIZE AUTO, FOR COLUMNS SIZE 1 PATH_FULLNAME'
    );
Note
Replace <schemaOwner> with the name of the schema, for example FUSION_MDS.
If performance does not improve after collecting statistics, then flush the shared pool to clear the execution plan for the database and generate a new query plan.
alter system flush shared_pool;
alter system flush buffer_cache;
Oracle Fusion Applications are released with American English as the default language. However, there is built-in support available for installing additional languages based on locale preferences. To install additional languages, you must apply the appropriate language pack using the Oracle Fusion Applications Language Pack Installer.
For administering the Oracle Fusion Applications environment, refer to the Oracle Fusion Applications Administrator's Guide.
For information on using the patching framework tools to update and maintain your Oracle Fusion Applications software between major releases, see the Oracle Fusion Applications Patching Guide.
Oracle Fusion Applications Search provides the search framework to manage enterprise-wide searches. Each product family within Oracle Fusion Applications such as Oracle Fusion Customer Relationship Management, Oracle Fusion Human Capital Management, and Oracle Fusion Supply Chain Management has its own set of seeded searchable objects that are packaged into its corresponding search application. For example, the seeded searchable objects for Oracle Fusion Customer Relationship Management such as leads, opportunities, and contacts are packaged in the Oracle Fusion Customer Relationship Management search application. To support the lifecycle management of searchable objects for a particular product family, you must provision your Oracle Fusion Applications environment.
You can include Help in the list of search categories for the search in the global area of Oracle Fusion Applications. This search is of type Oracle Fusion Applications Search, and administering this search involves tasks in Oracle Enterprise Crawl and Search Framework.
The search in Oracle Fusion Applications Help and the navigators, for example Search by Business Process, are based on other search functionality and do not require configuration.
Oracle Enterprise Crawl and Search Framework administration is described fully in the Oracle Fusion Applications Administrator's Guide. As you read content from that guide, keep in mind that Oracle Fusion Applications Search is not used only for Oracle Fusion Applications Help; therefore, the content is not specific to help.
To perform global search within Oracle Business Intelligence (BI) and Oracle WebCenter, you must create the appropriate external search categories in Oracle Fusion Applications. For general instructions on making external search categories available for search, see the Oracle Fusion Applications Administrator's Guide.
However, before you proceed with the configuration of external search categories for Oracle Business Intelligence and Oracle WebCenter, you must manually create the Business Intelligence data source. Refer to the section Configuring for Full-Text Catalog Search in the Oracle Fusion Middleware System Administrator's Guide for Oracle Business Intelligence Enterprise Edition.
You can perform the search-related configuration tasks using Oracle Enterprise Crawl and Search Framework. To configure external search categories for Oracle Business Intelligence and Oracle WebCenter, follow these instructions.
Sign in to Oracle Enterprise Manager Fusion Applications Control.
From the navigation pane, open Farm - Enterprise Crawl and Search Framework folder.
Select the application engine instance SES 11.2.1. It contains the searchable objects that you want to manage to open the Enterprise Crawl and Search Framework Configuration Settings page.
From the Search Engine Types table, click Oracle Fusion Application Search engine SES 11.2.1 to open the Search Engine Instance administration page.
On the External Search Categories tab, click Import.
In the Available Categories column, select the check box of the external search categories you want to import, and click Move to shuttle your selection to the Selected Categories column.
To import BI, select bi_search
To import Oracle WebCenter, select Collaboration
Click OK to import the selected external search categories.
Associate the Application ID with the imported external categories:
To associate with BI, in the Application ID column corresponding to the external search category you imported (bi_search), enter BI.
To associate with Oracle WebCenter, in the Application ID column corresponding to the external search category you imported (Collaboration), enter WC.
Click Save External Search Category to save the selected record.
Associate the Application ID with the Search Service component:
From the navigation pane on the left side, select Enterprise Crawl and Search Framework folder. The Enterprise Crawl and Search Framework Settings page appears.
From the context menu of Enterprise Crawl and Search Framework, select Home.
Select the first active service component and note down the search engine instance that is associated with the active service component.
In the ECSF_QUERY_SERVICE_APP_IDS field, enter the Application ID in comma separated string format:
To configure external search category for Business Intelligence, enter BI
To configure external search category for Oracle WebCenter, enter WC
Save the changes.
Restart the Search application from the WebLogic Server Console.
Each installation of Oracle Fusion Applications can provision one or more offerings such as Customer Relationship Management (CRM), Human Capital Management (HCM), and so on. Each offering has its own search application such as CRM Search Application, HCM Search Application and so on. However, the application architecture restricts running only one search application at a time and only that search application is registered as the identity plug-in end point of Oracle Secure Enterprise Search (SES). The identity plug-in end point of Oracle SES is a critical part of Oracle Fusion Search and is used in authenticating all users using the search functionality. Therefore, to mitigate the risk of any down time, it is necessary to identify and make the registered search application highly available by adding more managed WebLogic servers to the cluster.
Depending on the provisioned offerings, the actual search application registered as the identity plug-in endpoint varies. The following instructions help you identify the search application and add more managed WebLogic servers to the existing cluster.
Sign in to the Oracle SES Administration page.
On the Global Settings tab, click Identity Management Setup. Review the protocol identified by the HTTP end point for authentication and the current search application indicated by one of the following values for User ID:
User ID = FUSION_APPS_CRM_ECSF_SEARCH_APPID: indicates CRM Search Application is used
User ID = FUSION_APPS_FSCM_ECSF_SEARCH_APPID: indicates FSCM Search Application is used
User ID = FUSION_APPS_HCM_ECSF_SEARCH_APPID: indicates HCM Search Application is used
Identify the search application and add more managed servers to the cluster. For detailed instructions, see the Oracle Fusion Applications High Availability Guide.
You can grant specific users or groups the administrator role to post announcements on the help site. The announcements feature is an Oracle WebCenter service.
Granting the administrator role is described in the Oracle Fusion Middleware Administrator's Guide for Oracle WebCenter.
Oracle User Messaging Service is a component of Oracle SOA Suite, which enables you to receive notifications sent from SOA applications.
Applications in the following product families receive approval notifications and complete approvals and rejections of requests through e-mail:
Oracle Fusion Customer Relationship Management
Oracle Fusion Financials
Oracle Fusion Human Capital Management
Oracle Fusion Supply Chain Management
Oracle Fusion Procurement
Note
Before you proceed, ensure that an e-mail server exists. If you intend to use the bulk e-mail feature of Customer Relationship Management, you need to set up the e-mail to handle bulk e-mail. To configure an e-mail server, see detailed instructions in the Oracle Fusion Middleware Administrator's and Developer's Guide for Oracle Business Intelligence Publisher.
You must configure Oracle SOA Suite as follows to enable e-mail notification:
For existing users, associate the users with their e-mail addresses in the domain.
For new users:
Add user profile in the domain.
Create e-mail account in the e-mail server for the added user.
Associate the user profile with the respective e-mail address.
For more information on using the administration console to manage the users, groups, and roles, see the Oracle Fusion Middleware Securing Resources Using Roles and Policies for Oracle WebLogic Server.
Configure e-mail driver properties.
To enable the workflow participants to receive and forward notifications, configure Oracle User Messaging Service by setting the appropriate driver instances with Oracle Enterprise Manager Fusion Applications Control.
In the navigation pane, expand farm - User Messaging Service - usermessagingdriver-email.
Go to User Messaging Email Driver - Email Driver Properties. The Email Driver Properties page displays.
In the Driver-Specific Configuration, modify the Outgoing and Incoming properties as provided below.
Modify OutgoingMailServer, OutgoingMailServerPort, OutgoingDefaultFromAddr, OutgoingUsername, and OutgoingPassword.
Modify IncomingMailServer, IncomingMailServerPort, IncomingMailIDs, IncomingUserIDs, IncomingUserPasswords, and receivefolder.
Select the ImapAuthPlainDisable checkbox.
Click Apply to save the changes.
Note
To configure e-mail driver properties for other usermessagingdriver-email services under farm - User Messaging Service, repeat all the above steps (2a to 2d).
For more information on e-mail custom properties, see the Oracle Fusion Middleware Administrator's Guide for Oracle SOA Suite and Oracle Business Process Management Suite.
Configure workflow notification properties.
Set the notification properties properly to enable workflow e-mail notifications. To select the notification mode with Oracle Enterprise Manager Fusion Applications Control:
In the navigation pane, expand farm - SOA.
Go to SOA Infrastructure - SOA Administration - Workflow Notification Properties. The Workflow Notification Properties page displays.
From the Notification Mode list, choose All.
In the Notification Service section, specify the notification channel values. These properties are used to notify the users of any changes to the state of a task. Workflow notifications can use three types of addresses:
From Address: For sending notifications.
Actionable Address: For receiving actionable responses. The Actionable Address is the account in which task action-related e-mails are received and processed by human workflow.
Reply To Address: For receiving reply notifications.
Click Apply to save the changes.
Note
To configure workflow notification properties for other SOA servers, repeat all the above steps (3a to 3e).
For more information on user messaging server and configuring human workflow notification properties, refer to section Configuring Oracle User Messaging Service in the Oracle Fusion Middleware Administrator's Guide for Oracle SOA Suite.
Assign the actionable e-mail account name.
To specify the actionable e-mail account name with Oracle Enterprise Manager Fusion Applications Control:
In the navigation pane, expand farm - SOA.
Go to SOA Infrastructure - SOA Administration - Workflow Task Service Properties. The Workflow Task Service Properties page displays.
In the Actionable
Email Account field, enter the incoming actionable e-mail
account to use. The default account name is Default, which is the account configured in step 3, Configure workflow notification
properties. If a different account name is specified in the Actionable Email Account field, then create
and configure that account.
For more information on configuring human workflow notification properties, see the Oracle Fusion Middleware Administrator's Guide for Oracle SOA Suite and Oracle Business Process Management Suite.
Restart Oracle WebLogic Server
To restart the Oracle WebLogic Server Managed Servers for the domains in the product families:
Stop the Managed Servers by using
one of the following scripts from the fusionapps Middleware home directory. In these scripts, managed_server_name specifies the name of the Managed Server
and admin_url specifies the listen address
and port number of the domain's administration server. The listen
address is the host name, IP address, or domain name server (DNS)
name. When prompted, enter your user name and password.
|
Platform |
Script |
|---|---|
|
Windows |
|
|
UNIX |
|
Start the Oracle WebLogic Server
Managed Servers for the product families using one of the following
scripts from the fusionapps Middleware directory.
In these scripts, managed_server_name specifies the name of the Managed Server and admin_url specifies the listen address (host name, IP address,
or DNS name) and port number of the domain's administration server.
When prompted, enter your user name and password.
|
Platform |
Script |
|---|---|
|
Windows |
|
|
UNIX |
|
For more information about performing administrative activities, refer to the Oracle Fusion Applications Administrator's Guide.
Add the host name and address of the e-mail server to the /etc/hosts file on the server hosting the SOA managed servers where the drivers are running.
The Oracle Business Intelligence applications suite consists of two products: the Oracle Transactional Business Intelligence application and Oracle Business Intelligence Applications. To use these components effectively, you must configure them after their installation.
Users must be able to select a preferred language when using the single sign on page to log on to Oracle Business Intelligence (BI) Enterprise Edition.
To enable language selection via Oracle Access Manager, configure the following:
Oracle BI Enterprise Edition
Oracle Enterprise Manager
Configure Oracle BI Enterprise Edition to support the libraries provided by Oracle Fusion Middleware Extensions for Applications.
Install Oracle BI Enterprise Edition using the BIEE shiphome from the BISHIPHOME label.
Note
BISHIPHOME should be the label picked up in the FMWTOOLS label that is used to setup the ATGPF environment.
Install the ATGPF shiphome.
Install Oracle WebCenter using the WebCenter shiphome:
Download the /fmwtools/soa/shiphome/wc.zip and /fmwtools/shiphome/atgpf.zip files from the FMWTOOLS label.
Extract the contents of wc.zip and atgpf.zip to a local folder, for example sh_folder.
Run the WebCenter installer using
the command sh_folder/wc/Disk1/runInstaller -jreLoc
$JAVA_HOME.
Follow the wizard to install WebCenter to $MW_HOME, where Oracle Business Intelligence Enterprise Edition is installed and deselect the ECM Server configure check box.
Run the ATGPF installer using the
command sh_folder/atgpf/Disk1/runInstaller -jreLoc
$JAVA_HOME, and install ATGPF to $MW_HOME, where Oracle Business
Intelligence Enterprise Edition is installed.
Extend the Business Intelligence domain:
Shut down the Business Intelligence domain (both administration and managed servers).
Run the configurator using the command $MW_HOME/oracle_common/common/bin/config.sh.
Select the existing domain (BI domain) that you need to extend and from the list of templates, select Oracle Application Core (Webapp).
In the configuration information field, enter the JDBC data sources.
Note
Ensure that you enter the same application database details, which exist in the ATGPF environment.
In the Custom Services Deployment field , select Target JDBC/ApplicationDBDS to bi_cluster, and complete the process of extending the domain.
To start the Business Intelligence domain, start the administration server followed by the managed server.
Configure the Oracle Business Intelligence Publisher authentication schema:
Log on to Oracle Enterprise Manager and from the menu, select Business Intelligence - CoreApplication - Security.
Enable Single Sign On and select Oracle Access Manager plus Fusion Applications.
Save the changes.
Restart the Oracle Business Intelligence Publisher service.
Configure Single Sign On.
Restart the Oracle Business Intelligence domain in Oracle Fusion Applications mode.
Shut down the Business Intelligence domain and start it.
Start WebLogic servers using the command line interface:
To start the administration server, use:
cd $Domain_Home/bin

./startWeblogic.sh
To start the managed server, use:
cd $Domain_Home/bin
./startManagedWeblogic.sh bi_server1
To configure Oracle Enterprise Manager:
Log on to Oracle Enterprise Manager.
From the menu, select Business Intelligence - CoreApplication - Security.
Enable Single Sign On and select Oracle Access Manager plus Fusion Applications.
Save the changes.
Restart the Business Intelligence components.
When a role assignment is requested through Oracle Identity Management, it needs to check with the Oracle Governance, Risk and Compliance Controls suite to see if there are any segregation of duties (SOD) violations. If Governance, Risk and Compliance Controls reports any SOD violations, depending on the violation or access issues, Oracle Identity Manager needs to send the request for an approval to specific roles, automatically approve the request, or reject the request.
For more information about role provisioning and segregation of duties and the integration between Oracle Identity Management and Governance, Risk and Compliance Controls, see the Oracle Fusion Applications Security Guide.
To set up SOD, complete the following procedures.
Ensure that the following configuration requirements are met:
Set up a Governance, Risk and Compliance Controls server
Set up the Oracle Fusion connector
Define a data source
Update Governance, Risk and Compliance Controls server details in Identity Manager
For more information on setting up these as part of the Oracle Application Access Controls Governor, see the Oracle Governance, Risk and Compliance Installation and Upgrade Guide.
Important
Perform all the setup tasks only from the Identity Manager domain.
To manually switch from Oracle Identity Management to Lightweight Directory Access Protocol (LDAP) as the source of user roles for Service-Oriented Architecture (SOA) server deployed with Identity Manager, perform the following configuration steps.
This step is applicable only to the environments set up with Oracle Identity Management and Oracle Access Management integration, and LDAP synchronization of users and roles enabled in Oracle Identity Manager.
Sign in to the Enterprise Manager Console as a Weblogic_Administrator user.
Access the Weblogic Domain in which Identity Manager is configured.
Open Security - Realms.
On the Providers tab of the security realm settings page, open OIDAuthenticator.
In the provider specific parameters
for OIDAuthenticator, update the Oracle
Virtual Directory port with the Oracle Internet Directory port by
changing the value of the port from Oracle Virtual Directory port
to Oracle Internet Directory port.
On the Providers tab of the security realm settings page, create a new authentication provider with the name OIMSignatureAuthenticationProvider and the type OIMSignatureAuthenticationProvider.
Configure OIMSignatureAuthenticationProvider with the following parameters:
DBDriver: oracle.jdbc.OracleDrive
DBUrl: jdbc:oracle:thin:@<db_hostname>:<db_port>:<db_sid>.
For example, jdbc:oracle:thin:@localhost:5521:iam4.
PKIKeystore Provider: sun.security.rsa.SunRsaSign
Symmetric Key Keystore Provider: com.sun.crypto.provider.SunJCE
DBUser: the Identity Manager database schema user name
DBPassword: the Identity Manager database schema user password
Note
These parameters as same as in OIMAuthenticationProvider.
Delete the existing OIMSignatureAuthenticator.
Reorder authentication providers into the following sequence:
OAMIDAsserter
OIMSignatureAuthenticationProvider
OIMAuthenticationProvider
OIDAuthenticator
DefaultAuthenticator
DefaultIdentityAsserter
IDMDomainAgent
Disable the Weblogic user profile in Identity Manager.
Note
You need to disable this user profile to avoid the authentication errors at Identity Manager Authenticator level, as Identity Manager Authenticator is now placed ahead of the Default Authenticator in authentication provider ordering. However, you cannot disable the user profile from Identity Manager Administration page. Instead, run the following SQL scripts on the OIM database.
update usr set
usr_status='Disabled' where usr_login='WEBLOGIC';
update usr set
usr_disabled=1 where usr_login='WEBLOGIC';
Create the Weblogic user profile in LDAP and add it to the Administrators role. If the Administrators role does not exist in LDAP, create it first and then add the Weblogic user profile to it.
You can create a user in LDAP by creating an LDAP Data Interchange Format (LDIF) file and using the ldapadd command.
In the jps-config.xml file, locate the element group <jpsContext
name="default">.
Under <jpsContext
name="default">, locate the identity store element <serviceInstanceRef ref="idstore.oim"/>,
replace its value with idstore.ldap and
save the file.
Restart all servers in the domain, including the admin server.
Administer role memberships using the Delegated Administration tasks in Oracle Identity Manager. To apply SOD checks on these administrative actions, configure the following Identity Manager system properties.
Set XL.RM_REQUEST_ENABLED to TRUE
Set XL.RM_ROLE_ASSIGN_TEMPLATE to ASSIGN ROLES WITH CALLBACK POLICY
For more information about managing system properties of Identity Manager and its request-based role grants, see the Oracle Fusion Middleware User's Guide for Oracle Identity Manager.
To turn off the SOD checks, perform the following.
Sign in as an Administrator into the Enterprise Manager application that administers the Oracle Identity Manager server.
Navigate to the system MBean browser for the Identity Manager server.
Locate OAACGConfig
MBean option.
Set the property SODEnabled to False and save.
Sign in to the Identity Manager's
advanced console and set the system property XL.RM_REQUEST_ENABLED to False.
Restart the Identity Manager server.
Note
To turn on the SOD checks, set the properties SODEnabled and XL.RM_REQUEST_ENABLED to True.
When a segregation of duties (SOD) policy
necessitates an approval, the predefined routing rules determine the
approver for a role provisioning request. These rules are defined
in the OAACGRoleAssignSODCheck composite
because of Approval Management Extensions (AMX) functionality
such as Supervisory List.
The following rules are used to route the request to the suitable role.
If the requested role assignment is of Chief Financial Officer, SOD remediation task is assigned to the IT Security Manager role.
If SOD violation occurs because of a policy where the SOD control tag is Business Process - Information Technology Management and the control priority is 1, SOD remediation task is assigned to the Application Administrator role.
If SOD violation occurs for any other reason (Catch All rule), SOD remediation task is assigned to the Controller role.
If you need to modify these routing rules, you can do it in two ways:
Using Oracle SOA Composer
Using JDeveloper
Use the Oracle SOA Composer associated with the SOA
server used by Oracle Identity Management, and change the RemediationRules ruleset associated with OAACGRoleAssignSODCheck composite. For instance,
you may want to shift the task assignment in the Catch All rule from
the Controller role to a different role.
Sign in to the Oracle SOA Composer.
Click Open - Open Task.
Select OAACGRoleAssignSODCheck and click Open.
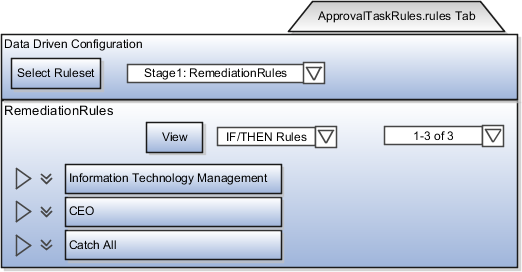
On the ApprovalTaskRules.rules tab, click Edit.
Expand Catch All and in the THEN statement, replace GL_CONTROLLER_JOB with the new role.
Save the changes.
The figure shows the ApprovalTaskRules.rules tab in Oracle SOA Composer.
For more information about using Oracle SOA Composer to add rules, see the Oracle Fusion Middleware User's Guide for Oracle Business Rules.
You can directly make the modifications to the configuration file available within OAACGRoleAssignSODCheck.zip.
Go to OIM_HOME/server/workflows/composites/ and extract the contents of OAACGRoleAssignSODCheck.zip to a directory.
Open the application in JDeveloper.
You can see the routing rules in the ruleset RemeditationRules of the ApprovalTaskRules.rules file, where the following SOD related information is available for
configuring the rules as part of the task payload element oaacgResponse.
hasIssues: Acceptable values are:
TRUE: Authorization issues exist but can be remedied
FALSE: No authorization issues
REJECT: Authorization issues exist but cannot be remedied; request has to be rejected
dimensions: List of dimensions and tags that are defined on the controls related to the authorization issues
requestedRoles: List of roles that are requested as part of this request
existingRoles: List of existing role memberships for the user
authIssues: List of Oracle Governance, Risk and Compliance Controls Incident IDs and the following additional details. This information is subsequently required to notify the approval decision.
ctrlPriority: Priority of the Oracle Applications Access Control Governor control that resulted in the authorization issue
ctrlName: Name of the SOD policy
userName: User profile to which the authorization issue belongs
roleName: Role associated with the authorization issue
sodStatus: Approval status of the request indicating whether the request is approved by Governance, Risk and Compliance Controls, or approved with conditions, or rejected
issuePath: Information about the entity on which the SOD policy is defined
After the rule modifications, update the following values in the OAACGRoleAssignSODCheck_cfgplan.xml configuration plan file.
|
Value |
Description |
|---|---|
|
|
The OIM server t3 URL |
|
|
The OIM server host name |
|
|
The OIM server port number |
Thereafter, deploy the modified composite with this updated configuration plan file.
The following scenarios may require troubleshooting measures to ensure successful completion of segregation of duties (SOD) checks and approval of role provisioning requests.
The role assignment request fails and the request gets the Request Failed status. To troubleshoot this, do the following:
Sign in to the Identity Management domain in Enterprise Manager.
On the home page, under (Service Oriented Architecture), click OAACGRoleAssignSODCheck composite.
Under Recent Instances, click the latest instance and look for any error message or description of failure of request.
Check if the Governance, Risk and Compliance Controls server information provided in Oracle Identity Manager is correct.
On the left pane, click IDM domain and from the context menu select System Mbean Browser.
Under Application Defined Mbeans,
navigate to oracle.iam and select the
OIM server and Application OIM.
Expand XML Config - Config - XMLConfig.OAACGConfig and select OAACGCOnfig.
Ensure that the attribute values
used in Host, Port, DataSourceName, Service URL, and UserName are
correct. To modify any incorrect information, on the Operations tab,
click updateOAACGConfigInformation method,
and provide the following parameters.
|
Parameter |
Description |
|---|---|
|
host |
Oracle Application Access Control Governor host name or IP |
|
port |
Application Access Control Governor port |
|
username |
Admin username |
|
password |
Admin password |
|
serviceURL |
Application Access Control Governor service URL Note Ensure that there is a forward slash at the end of the URL. The URL must be in the format /grcc/services/GrccService/. |
|
DatasourceName |
Data source name of the Oracle Fusion connector that is configured in Application Access Control Governor |
After saving the modifications, restart the Identity Management server.
If you do not find the task details of the assigned task, perform the following checks to troubleshoot.
Ensure that the taskflow is deployed on the SOA server.
Sign in to the Weblogic console.
On the left side, under the menu, click Deployments.
Ensure that TaskDetails application is deployed to SOA server and its state is Active.
Ensure that the predefined Admin user in Oracle Identity Management (OIM) is available in the Oracle Credential Store Framework (CSF), do the following:
Sign in to Identity Management domain in Enterprise Manager.
On the left pane, click Identity Management domain and from the context menu, select Security - Credentials.
Expand OIM and check for the key
entry sysadmin.
Select the entry and click Edit to view the details.
Ensure that the user name is set
to xelsysadm.
Note
If these steps do not help, refer to the generic troubleshooting tips associated with Oracle Identity Manager.
For generic information about troubleshooting OIM, see the Oracle Fusion Applications Administrator's Guide.
Configuring Oracle Data Integrator Studio for external authentication is necessary to prevent any unauthorized access. The access credentials are stored in a configuration file. To make the external configuration work, the jps configuration file (jps-config.xml) must be configured and placed in the prescribed directory where the application is installed.
To be able to configure Oracle Data Integrator Studio, ensure that the following selections were made in the Oracle Data Integrator installation wizard:
Developer Installation options on the Select Installation Type page:
ODI Studio (with local agent)
ODI SDK
Skip Repository Configuration on the Repository Configuration page
For more information on the installing Oracle Data Integrator, see the Oracle Fusion Middleware Installation Guide for Oracle Data Integrator.
In the <ODI_HOME>/oracledi/client/odi/bin directory, access the file odi.conf and update
the parameter AddVMOption -Doracle.odi.studio.ess=true. This enables ESS configuration properties to be visible in Topology.
To configure external authentication for Oracle Data
Integrator Studio, you need to configure the jps-config.xml file for Oracle Fusion Applications and place it in the appropriate
directory on the computer where Oracle Fusion Applications is installed.
The jps-config-jse.xml file is already provisioned
for Oracle Fusion Applications, and is available in the <domain name>/config/fmwconfig directory. The recommendation
is to directly point to this file by providing complete path of the jps-config-jse.xml as the value for the parameter AddVMOption -Doracle.security.jps.config=, within
the Oracle Data Integrator configuration file for Studio (odi.conf) in <ODI_HOME>/oracledi/client/odi/bin directory. Alternatively, copy the provisioned jps-config-jse.xml file to the client bin directory and rename it to jps-config.xml file. You may also need to copy any file that is referenced in the jps-config-jse.xml file.
The Oracle Fusion Applications super user is the default supervisor for Oracle Data Integrator. However, it is recommended not to use that role for performing the administrative tasks within Oracle Data Integrator. Therefore, create additional users with supervisory access rights to Oracle Data Integrator.
Perform the following tasks while signed in as Oracle Fusion Applications super user.
In Lightweight Directory Access Protocol (LDAP), create a user without provisioning it with any role.
Sign in to Oracle Data Integrator Studio using Oracle Fusion Application super user, and create the same user that you created in LDAP.
Assign the role of Supervisor to that user.
In the Retrieve GUID field, reconcile the Globally Unique Identifier (GUID) for the user.
The new user has a supervisory role in Oracle Data Integrator. The user can perform all functions of an Oracle Fusion Applications super user.
You must install print servers for external applications as part the implementation activity in Oracle Fusion Applications.
Several external applications require specialized print servers. See the related product documentation for installing print servers for these applications.
If you have an on-premise installation of Oracle Fusion Applications, you can optionally use Microsoft Office Communication Server (OCS) 2007 or Microsoft Live Communication Server (LCS) as the presence server. The setup involves creating external application connections, and instant messaging and presence connections, to OCS or LCS for each Oracle Fusion application.
Note
You also need to set up prerequisites for OCS or LCS. For more information on instant messaging and presence server prerequisites, see the Oracle Fusion Middleware Administrator's Guide for Oracle WebCenter.
This table lists the Java EE applications that you can configure with OCS or LCS.
|
Product Family or Product |
Java EE Application Name |
|---|---|
|
Oracle Fusion Application Customer Relationship Management |
|
|
Oracle Fusion Applications Human Capital Management |
|
|
Oracle Fusion Applications Projects |
ProjectFinancialsApp |
|
Oracle Fusion Application Toolkit |
HomePageApp |
For each application, you execute the following commands against the appropriate domain:
createExtAppConnection
addExtAppField
createIMPConnection
Important
Replace placeholder values enclosed within brackets (< >) with real values, for the appName, url, poolName, userDomain, and server fields.
For the appName field, enter the Java EE application name, for example HcmBenefitsApp.
The userDomain field is required only for the OCS connection and refers to the user domain associated with the OCS installation.
For the server field, enter the managed server name on which the Java EE application is deployed. This field is optional if there is only one managed server for the application.
Execute this command:
createExtAppConnection(appName='<JavaEEApp>',
name='IMP_EXT_APP', displayName='Presence Server Login Credentials')
The appName field is environment specific and requires you to enter a value.
Execute this command:
addExtAppField(appName='<JavaEEApp>',
name='IMP_EXT_APP', fieldName='Account', fieldValue='', displayToUser=1)
The appName field is environment specific and requires you to enter a value.
If Oracle Fusion Applications is deployed in a high availability configuration, there may be multiple managed servers targeted for each Java EE application. You must run the createIMPConnection command for each application on each server, and specify the server in the server field.
If you are using the LCS adapter, then execute this command:
createIMPConnection(appName='<JavaEEApp>',
name='presence', adapter='LCS', url='<http://host:port/contextPath>',
appId='IMP_EXT_APP', poolName='<poolNameHere>', timeout=60, default=1,
server='<managedServerName>')
If you are using the OCS adapter, then execute this command:
createIMPConnection(appName='<JavaEEApp>',
name='presence', adapter='OCS2007', url='<http://host:port/contextPath>',
appId='IMP_EXT_APP', userDomain='<example.com>', poolName='<poolNameHere>',
timeout=60, default=1, server='<managedServerName>')
These fields are environment specific and require you to enter a value:
appName
adapter (OCS2007 or LCS)
url
poolName
default (1 or 0)
Note
The connection will not be used unless this field is set to 1. If you use 0, then you essentially disable the connection.
server
A secondary Oracle HTTP server needs to be added to the Oracle Fusion Application environment to effectively handle the load and improve the application performance.
Before you proceed with the installation of the secondary HTTP server, you need to ensure that the following prerequisites are met.
Availability of a free slot to install the secondary HTTP server.
Note
Usually, the secondary HTTP server is installed on the same slot as the primary HTTP server. In such cases, the webgate used by the primary HTTP server can be used by the secondary HTTP server. However, if the secondary HTTP server is not installed on the same slot as the primary HTTP server, the webgate used by the primary HTTP server is not accessible by the secondary HTTP server. In that case, a separate webgate needs to be installed for the secondary HTTP server.
Set up a directory structure similar to the directory structure of the primary HTTP server. The directory structure of the primary HTTP server is as follows.
First OHS mw home: /slot/ems5905/appmgr/APPTOP/webtier_mwhome
First OHS OH: webtier
First OHS instance dir: /slot/ems5905/appmgr/APPTOP/instance/CommonDomain_webtier/
First OHS component name: ohs1
First OHS bin dir: /slot/ems5905/appmgr/APPTOP/instance/CommonDomain_webtier/bin
First OHS config dir: /slot/ems5905/appmgr/APPTOP/instance/CommonDomain_webtier/config/OHS/ohs1/moduleconf
On the same lines, you can define a directory structure for the secondary HTTP server as shown here:
Second OHS mw home: /slot/ems5905/appmgr/APPTOP/webtier_mwhome2
Second OHS OH: webtier2
Second OHS instance dir: /slot/ems5905/appmgr/APPTOP/instance/CommonDomain_webtier2
Second OHS component name: ohs2
Follow these steps to install the secondary Oracle HTTP server.
Log on to the computer where the secondary Oracle HTTP server needs to be installed.
In the command line interface, change directory to the installer location: /net/adcnas421/export/fainteg_repos/FAINTEG_11.1.1.5.1_PLATFORMS_110812.0749/installers/webtier/Disk1
Enter the command ./runInstaller. The Installation wizard appears, displaying
the Specify Inventory Directory screen.
Click OK. The Inventory Location Confirmation dialog box appears.
Select the Continue Installation with Local Inventory check box and click OK.
On the Welcome screen, click Next.
Select Install and Configure and proceed to the next screen.
On the Prerequisites screen, verify if all the prerequisites are met and click Next.
On the Specify Installation Locations screen, provide details to create the Oracle Home and Oracle Middleware Home directories, and click Next. The Configure Components screen appears.
Select the Oracle HTTP Server check box and click Next. The Specify Component Details screen appears.
Provide the Instance Home Location, Instance Name , and OHS Component Name and click Next.
On the Configure Ports screen, select the Auto Port Configuration check box and click Next.
On the Specify Security Updates page, clear the check box I wish to receive security update and click Next. A confirmation dialog box with the message Do you wish to remain uninformed of critical security updates? appears.
Click Yes.
On the Installation Summary page, review the information and click Install.
Click Finish after the installation is complete.
Before you proceed with the installation, ensure that you shut down the secondary Oracle HTTP server using the following commands in the given order:
cd to /slot/ems5905/appmgr/APPTOP/instance/CommonDomain_webtier2/bin
./opmnctl stopall
Follow these steps to install the Webtier patch.
In the command line interface, changed
directory to the installer location: /net/adcnas421/export/fainteg_repos/FAINTEG_11.1.1.5.1_PLATFORMS_110812.0749/installers/webtier_patchset/Disk1
Enter the command ./runInstaller. The Installation wizard appears.
On the Inventory page, specify Local Inventory. This location should be the same as the one used during the secondary Oracle HTTP server installation.
On the Welcome page, click Next.
Provide the same Oracle Home and Oracle Middleware Home directory names used for installing Oracle HTTP server, and click Next.
On the Security Updates page, click Next.
On the Installation Summary page, review the information and click Install.
Follow these steps to configure the secondary Oracle HTTP server.
In the command line interface, use
the diff command to check differences
between the httpd.conf file of the primary HTTP
server and the httpd.conf file of the secondary
HTTP server. Except the server name, everything else must be the same
between the two servers.
Copy the webgate related configuration from the httpd.conf of the primary HTTP server to the httpd.conf of the secondary HTTP server.
Copy all the .conf files from the config - moduleconf directory of the primary HTTP server to the config - moduleconf of the secondary HTTP server.
Within the .conf files inside the moduleconf, replace the references to the hostname of the primary HTTP server with the hostname of the secondary HTTP server. The references should be changed as per the following directives:
Listen adcdai02.us.oracle.com:xxxxx
<VirtualHost adcdai02.us.oracle.com:xxxxx >
Caution
While making changes to the hostname, please do not make a global change because WebLogic servers in the same host as the primary HTTP server might be referred in context roots and that might get changed.
Preferably, shut down the primary HTTP server and then start the secondary HTTP server. Ensure that there are no problems with the startup. You can then try to access the BIG/IP URLs.
Sign into the custom provisioning tool and ensure that all the HTTP server custom provisioning is completed in both the HTTP servers.
Add the secondary HTTP server information to the Admin server and update the start/stop script at $HOME/scripts/efops/start(stop)_webtier_2nd.sh.
For more information about configuring the Oracle HTTP server, refer to the Oracle Fusion Middleware Administrator's Guide for Oracle HTTP Server. You can also refer to the section Scaling Out Oracle HTTP Server in the Oracle Fusion Applications Enterprise Deployment Guide.
Oracle Application Development Framework (ADF) Desktop Integration is part of Oracle ADF and enables desktop integration with Microsoft Excel spreadsheets. Users can manage large volumes of data from web applications using Excel, for example to create journals, load currency rates, or create expense entries.
ADF Desktop Integration is an Excel add-in that must be loaded onto each client. Because ADF Desktop Integration is an add-in to Microsoft Office products, users can use this feature only if they have Microsoft Excel 2007 or above, Internet Explorer 7 or above, and Microsoft Windows 7, XP Professional SP2, or Vista. Users must download the installation files from Navigator - Tools - Download Desktop Integrator Installer.
Note
Ensure that the version installed on the client is same as that installed on the server. For information on verifying whether your Oracle Fusion web application supports desktop integration or not, see the Oracle Fusion Middleware Desktop Integration Developer's Guide for Oracle Application Development Framework.
The infrastructure for health checking and troubleshooting Oracle Fusion applications is provided along with provisioning. However, before beginning any production activity on Oracle Fusion applications, perform the following configuration tasks.
The configuration tasks are described in the Oracle Fusion Applications Administrator's Guide unless otherwise specified.
|
Copyright © 2011-2012, Oracle and/or its affiliates. All rights reserved. Legal Notices |
|