| Oracle® Fusion Applications Cloning and Content Movement Administrator's Guide 11g Release 4 Refresh 9 (11.1.4) Part Number E38322-11 |
|
|
PDF · Mobi · ePub |
| Oracle® Fusion Applications Cloning and Content Movement Administrator's Guide 11g Release 4 Refresh 9 (11.1.4) Part Number E38322-11 |
|
|
PDF · Mobi · ePub |
Although Data Masking is described in other guides, this section gives targeted tips on performing the process after cloning. It is an optional step.
This document covers the procedures for configuring and running Data Masking for Oracle Fusion Applications. For reference and more detail, see:
The Data Masking section of the "Securing Oracle Fusion Applications" chapter in the Oracle Fusion Applications Administrator's Guide.
For Data Masking Tutorial: http://www.oracle.com/webfolder/technetwork/tutorials/obe/em/emgc10205/data_masking/datamask.htm
Oracle Data Masking Overview Demo: http://www.youtube.com/watch?v=dcldnaukpcI
Post-clone data masking requires the following:
Oracle Fusion Applications 11g
Oracle Database Release 2 for Oracle Fusion Applications
Oracle Enterprise Manager Grid Control 11g or Oracle Enterprise Manager Cloud Control 12c or Oracle Enterprise Manager Database Control for Oracle Database
The Oracle Data Masking Pack
The Data Masking Format Library contains the data format and functions for masking. This library must be installed in the target database where data masking will be run. Oracle provides 2 SQL scripts for installing the Data Masking Format Library. These SQL scripts can be found in the database ORACLE_HOME:
$ORACLE_HOME/sysman/admin/emdrep/sql/db/latest/masking/dm_fmtlib_pkgdef.sql
        $ORACLE_HOME/sysman/admin/emdrep/sql/db/latest/masking/dm_fmtlib_pkgbody.sql
Oracle Fusion Applications provides out-of-the-box masking definitions for each product family. These definitions specify the list of sensitive database tables and columns, along with the data formats to be used to mask these columns. The masking templates can be found on Oracle Fusion Applications nodes in the Oracle Fusion Applications Middleware Home (APPLICATIONS_BASE/fusionapps)
For Oracle Enterprise Manager 11g:
APPLICATIONS_BASE/fusionapps/atgpf/sysman/dataMasking/Mask_Oracle_Fusion_Applications_1.0_EM_11.1.0.1.0_Combined_Template.xml
For Oracle Enterprise Manager 12c:
APPLICATIONS_BASE/fusionapps/atgpf/sysman/dataMasking/ADM_Oracle_Fusion_Applications_1.0_EM_12.1.0.1.0_Combined_Template.xml

APPLICATIONS_BASE/fusionapps/atgpf/sysman/dataMasking/Mask_Oracle_Fusion_Applications_1.0_EM_12.1.0.1.0_Combined_Template.xml
Before using Data Masking, perform the following on the target database:
Install the Data Masking Format Library in the target database by executing the following 2 SQL scripts using SQL*Plus. Connect as SYS or a user that can create packages in the DBSNMP schema.
$ORACLE_HOME/sysman/admin/emdrep/sql/db/latest/masking/dm_fmtlib_pkgdef.sql
$ORACLE_HOME/sysman/admin/emdrep/sql/db/latest/masking/dm_fmtlib_pkgbody.sql
Change all the temp spaces used for data masking to Auto Extend and Increment by 150MB and Maximum File Size to 32767MB. The amount of additional space you require depends on the amount of data being masked. Data masking takes up approximately two times the size of the largest table being masked.
Ensure that sufficient free space is available for the database before executing the masking job.
The user executing the data masking script must have the dba role.
Before using Data Masking, import the out-of-the-box Data Masking Definitions provided by Oracle Fusion Applications.
Login to Oracle Enterprise Manager Grid Control as SYSMAN.
Click the Targets tab, then click the Database subtab.
Select the target database where data masking will be run.

Click the Schema tab, then click Definitions in the Data Masking section.
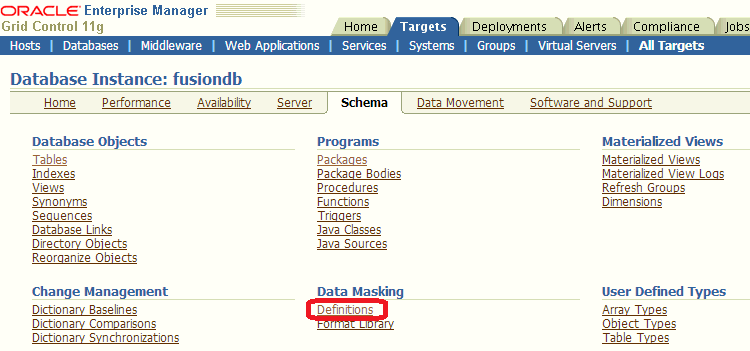
Click Import.

Make sure the masking template XML file is accessible from the browser by copying the XML file to the machine from which you are browsing.
This XML file is available on Oracle Fusion Applications nodes at: APPLICATIONS_BASE/fusionapps/atgpf/sysman/dataMasking/Mask_Oracle_Fusion_Applications_1.0_EM_11.1.0.1.0_Combined_Template.xml.
Edit the XML file and change the database name in line 3 to the target database name. For example, change
<TARGET_NAME>database</TARGET_NAME>
to
<TARGET_NAME>fusiondb</TARGET_NAME>
In the browser, click Choose File and select the Data Masking Template XML file that you edited in Step 7.
Click Continue.

When the Masking Definition is imported successfully it is shown in the Masking Definition table.
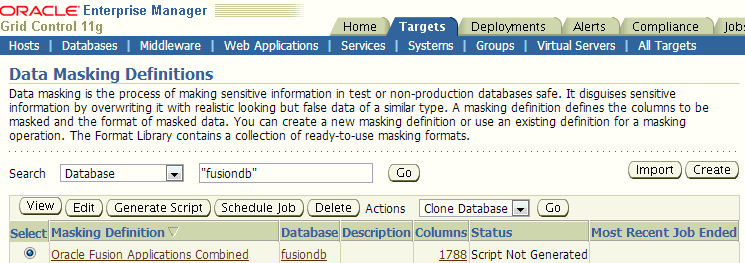
Click the View button to view the tables, columns and format in the Masking Definition.
Click the Edit button to customize the Masking Definition.
Click Generate Script to generate the SQL script for running the data masking job. This might take some time. When the script is generated, the data masking job can be scheduled to run on the target database by clicking Schedule Job.
Login to Oracle Enterprise Manager Database Control as SYS in SYSDBA role.
Modify the SYSMAN.MGMT_DM_RULEENTRY table and increase FIXED_STRING column size to 40:
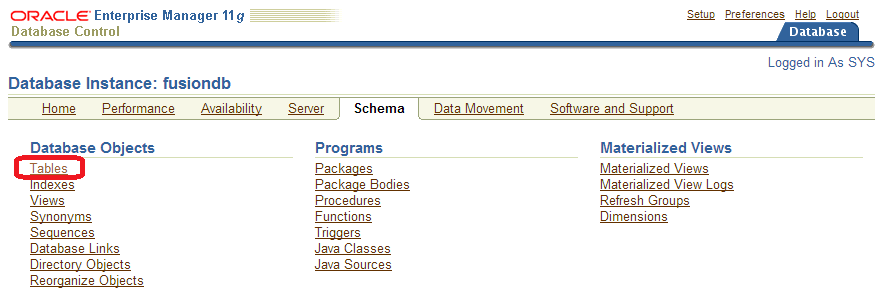
Click the Schema tab, then click Tables under the Database Objects heading.
Enter SYSMAN in the Schema field and MGMT_DM_RULEENTRY in the Object Name field and click Go.
In the search result table, click the MGMT_DM_RULEENTRY link.
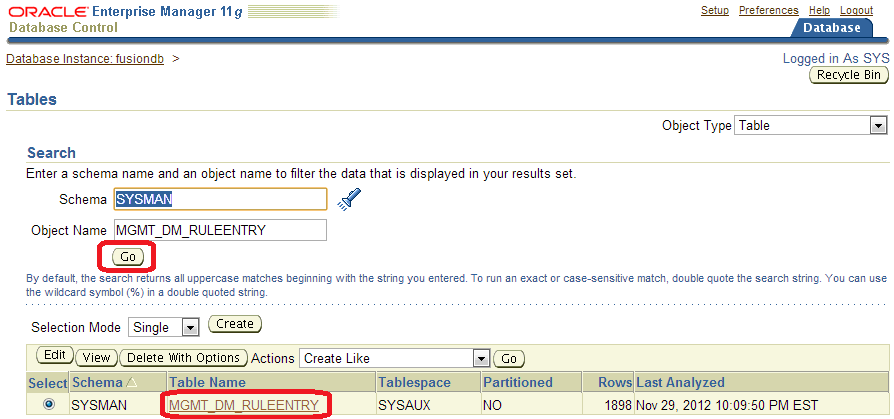
Click Edit.
Change FIXED_STRING column size to 40 and click Apply.
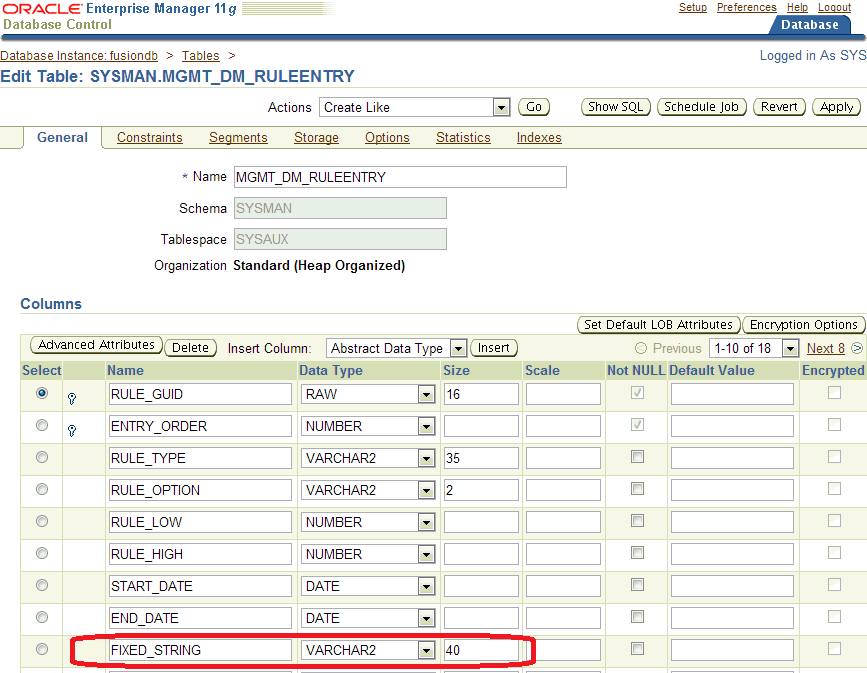
Increase the heap size of the database console:
Stop the database console by running this command:
$ORACLE_HOME/bin/emctl stop dbconsole
Increase the heap size by running this command:
$ORACLE_HOME/bin/emctl config dbconsole -heap_size 1024m -max_perm_size 512m
Restart the database console by running this command:
$ORACLE_HOME/bin/emctl start dbconsole
Login to Oracle Enterprise Manager Database Control as SYS in SYSDBA role.
Click the Schema tab, then click Definitions under the Data Masking heading.
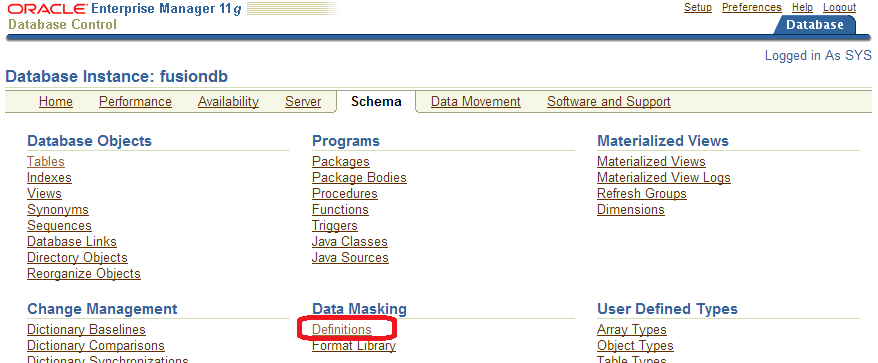
Click Import.

Make sure the masking template XML file is accessible from the browser by copying the XML file to the machine from which you are browsing.
This XML file is available on Oracle Fusion Applications nodes at: APPLICATIONS_BASE/fusionapps/atgpf/sysman/dataMasking/Mask_Oracle_Fusion_Applications_1.0_EM_11.1.0.1.0_Combined_Template.xml.
Edit the XML file and change the database name in line 3 to the target database name. For example, change
<TARGET_NAME>database</TARGET_NAME>
to
<TARGET_NAME>fusiondb</TARGET_NAME>
In the browser, click Choose File and select the Data Masking Template XML file that you edited in Step 8.
Click Continue.

When the Masking Definition is imported successfully it is shown in the Masking Definition table.

Click the View button to view the tables, columns and format in the Masking Definition.
Click the Edit button to customize the Masking Definition.
Click Generate Script to generate the SQL script for running the data masking job. This might take some time. When the script is generated, the data masking job can be scheduled to run on the target database by clicking Schedule Job.
Using SQL*Plus on the target database, connect as SYS in SYSDBA role.
Grant select_catalog_role and DBA to the FUSION user.
Login to Oracle Enterprise Manager Cloud Control as sysman.
Deploy the TDM package:
Navigate to Enterprise, then Jobs, then Job Activity.
From the OS Command list, select Deploy Test Data management packages and click Go.
Enter the job name, click Add, then add the database where masking is to be run.
Click Parameters. From the list, select Fusion Driver.
Click Credential and enter the FUSION credentials. This user must have all the privileges specified in Step 2.
Click Submit.
When the job completes, verify that it succeeded. Review the job details and make sure there are no errors.
Import the Application Data Model (ADM):
Navigate to Enterprise, then Quality Management, then Data Discovery and Modelling.
Click Action, then Import. Provide the ADM XML file, ADM_Oracle_Fusion_Applications_1.0_EM_12.1.0.1.0_Combined_Template.xml, the ADM name, and the FUSION database. Make sure the ADM XML file is accessible from the browser by copying the XML file to the machine from which you are browsing.
This XML file is located on Oracle Fusion Applications nodes at: APPLICATIONS_BASE/fusionapps/atgpf/sysman/dataMasking/ADM_Oracle_Fusion_Applications_1.0_EM_12.1.0.1.0_Combined_Template.xml.
If prompted for database credentials, provide the FUSION user credentials.
Note:
You might see one or more warnings indicating that duplicate sensitive types were not imported; these warnings can be safely ignored.
Create a verification job:
Navigate to Enterprise, then Quality Management, then Data Discovery and Modelling.
Click on the ADM you just imported and click Verify.
Click Create Verification Job.
Provide a job name and job description.
Click New Credential and provide the FUSION credentials.
Schedule the job to start immediately and click Submit.
Check the job status:
When the verification job completes, navigate to Enterprise, then Job Activity, then select All Job Status.
Click Go and check that your job completed successfully.
Import the masking template file:
Navigate to Enterprise, then Quality Management, then Data Masking Definition. The drop-down list contains data masking definitions and formats.
Import the masking template file, Mask_Oracle_Fusion_Applications_1.0_EM_12.1.0.1.0_Combined_Template.xml. Make sure this XML file is accessible from the browser by copying the XML file to the machine from which you are browsing.
This XML file is located on Oracle Fusion Applications nodes at: APPLICATIONS_BASE/fusionapps/atgpf/sysman/dataMasking/Mask_Oracle_Fusion_Applications_1.0_EM_12.1.0.1.0_Combined_Template.xml.
Provide the masking definition name.
For the ADM name, specify the name of the FUSION ADM you created in Step 5.
For the database name, specify the FUSION database.
Select the mask definition and click the Generate Script button.
Note:
Script generation can take a few hours, so consider running it on a terminal that will be available for a while to allow the job to complete. If you run it on a laptop and have to disconnect it during execution, you will lose the browser session that was generating the script.
When the job completes, you can view the impact report and save or view the script.
Submit the masking script for execution by clicking Submit Job.
This section describes additional data masking options.
You can modify the Data Masking Definition by adding and deleting column(s) to the Masking Definition and/or changing the masking format of existing definition. You can modify the Data Masking Definition in the following ways:
Select the definition and click Edit. Columns in the masking definition and its masking format are shown.
Click Add to add a table column and format to the definition.
To remove column(s), select the column(s) and click Remove.
To modify a column format, click the Format icon
When a data masking definition is newly created or imported or modified, the SQL masking script must be generated before data masking can be run on the target database. To generate the script:
Select the definition and click Generate Script. This may take some time to complete.
After the script is generated successfully, you can schedule a data masking job to run on a target database by clicking the Schedule Job button. You can save the script for viewing or to run the script on the target database manually. You can also view the Impact Report.
To customize Masking Formats, click the Format Library link under the Masking Definition table. 
You can view, edit, and delete existing formats. You can also create or import new formats or create a new format based on an existing format using the Create Like feature.
Does Masking remove nulls?
Masking will try to preserve null values. When masking a column only the non-null values get masked; null values are left alone.
How are dependent objects such as Intermedia Index and Materialized views masked after the base tables are masked?
Dependent objects are masked automatically by the masking tool.
How does the shuffle format work?
Shuffle format will shuffle the distinct values so the distribution will change. For example, if you had 35 Married, 30 Single, 20 Divorced and 15 Widowed people and you masked them by shuffling, after masking you might have 35 Single, 30 Divorced, 20 Widowed and 15 Married. All the records that had the same value as each other before masking will have the same value after masking. In general almost all masking formats will mask the same values in a table consistently.
Does Masking maintain Data Distribution? Is it prone to inference based attacks?
Masking does not maintain data distribution but it does mask values in a single column consistently. If there were 5 people with the same salary then they will have their salaries masked to the same values. This behavior is true for all mask formats. In this particular case one of the 5 people with the same salary can infer the salaries of the others based on their salary. This is called an inference based attack. Preventing inference based attacks in a generic way is a hard problem. For example there are other such cases like the CEO of a company can usually be identified because he won't have a manager, etc. The only way to avoid inference based attacks is to generalize the rows by taking people in certain salary ranges (or with special circumstances) and mask them to a fixed value (like an average salary range). There is currently no support in masking for generalization. One extreme approach to generalization is to mask all salaries to a fixed value to prevent any chance of inference. Note that inference based attacks can involve using multiple pieces of information in multiple columns and tables to infer a person's identity. For instance, people who had a given medical condition and who are under the age of 30, in a particular department, and who are male may be just one person and it may be possible to identify their row in a table.
For security reasons it is extremely desirable to have a mask function that does not maintain any distribution. In such a case it would not be possible to handle any denormalization rules on the column as the same salary in different rows can be changed to different mask values.
How will related product families can be masked?
For instance, Oracle Fusion Customer Relationship Management masking requires Oracle Fusion Applications Customer Data Management masking. Similarly, Oracle Fusion Human Capital Management and Oracle Fusion Financials require Oracle Fusion Applications Customer Data Management to be masked. An Oracle Fusion Applications database contains all schemas for all product families, even if the customer is not using some of the schemas. Masking unused schemas containing empty tables is not a problem.
How will sensitive information in BLOB, CLOB, columns be masked?
LOB columns can be masked using one of the following formats: Fixed String, Null, or Fixed Number.
What is the difference between a User Defined Function, Post Processing Function, and Pre/Post Masking Script?
A user defined function (UDF) takes the original value, row ID, and column name and generates the mask value. A single-column format can be a combination of one of more formats, including UDFs.
A post-processing function (PPF) is a special case of user-defined function.
A PPF is called after the mask value is generated using one of the other formats. The PPF will take the generated mask value and further modify it to produce the actual mask value. For example, if the masking format used Random Number (1000,10000) and a post-processing fuction (checksum), a number between 1000 and 10000 is generated and this value is fed into the PPF. The PPF can compute the checksum and append it to the original number and return the new mask value. There can be only one PPF to a column. Additionally, PPF cannot be the only format for a column; a PPF has to have some other format preceding it.
A post-masking script is not a masking format but a SQL script that executes after all masking completes. It can be use to recompute aggregated columns after the detailed data is masked. This ensures aggregated and masked columns are consistent and the totals match.
A pre-masking script is also a SQL script but it runs before the start of masking. Both the pre- and post- masking scripts execute in the same connection.