3 Authoring Oracle Portal Pages with Discoverer Portlets
This chapter explains how to author Oracle Portal pages with Discoverer Portlets, and contains the following topics:
-
"Pre-requisites for publishing Discoverer worksheets in Oracle Portal"
-
"How to connect to Oracle Portal and display the Add Portlets page"
-
"How to add a Discoverer List of Worksheets portlet to an Oracle Portal page"
-
"How to add a Discoverer Worksheet portlet to an Oracle Portal page"
-
"How to add a Discoverer Gauges portlet to an Oracle Portal page"
-
"How to customize a Discoverer portlet using Discoverer Portlet Provider"
-
"How to customize the Discoverer worksheet shown in a portlet in Viewer, using the Analyze link"
-
"Notes about resizing graphs in Discoverer Worksheet portlets"
-
"Notes about using worksheet parameters in Discoverer portlets"
-
"How to map worksheet parameters to Page Parameters in Oracle Portal"
-
"How to add Simple Parameter Form portlets to an Oracle Portal page"
-
"About choosing database connections for Discoverer portlets"
3.1 Pre-requisites for publishing Discoverer worksheets in Oracle Portal
Before you can publish Discoverer content in Oracle Portal you need:
-
Discoverer Portlet Provider to be registered in Oracle Portal (for more information, see Chapter 2, "Setting up Discoverer Portlet Provider in Oracle Portal").
-
Oracle Portal log in details (that is, Single Sign-On user details)
-
Privileges to create, edit, and customize pages in Oracle Portal
Note:
For Discoverer WSRP Portlets, the Edit Defaults link is not available. To edit these kind of portlets, you can use the Customize option.
-
Access to a public Discoverer connection created by the Discoverer manager or a private Discoverer connection created while you were logged in as a Single Sign-On user
-
One or more worksheets created in Discoverer Plus Relational, Discoverer Plus OLAP, or Discoverer Desktop
Note: If you want to create a Discoverer Gauges portlet, you must use a crosstab worksheet.
-
Contact the Oracle Portal administrator if you do not have the privileges to create, edit, or customize pages.
-
Private Discoverer connections created in a non-Single Sign-On environment are not available in Discoverer Portlet Provider. To use a private connection to publish Discoverer data in a Discoverer portlet, Single Sign-On must be enabled in Oracle Fusion Middleware (for more information, contact the Oracle Fusion Middleware administrator).
To add a Discoverer portlet to an Oracle Portal page, you:
-
use the Add Portlets page to add an undefined portlet with default settings to the Oracle Portal page
-
use the Edit Defaults page to edit the default settings of the portlet to suit your needs, and make the portlet ready for use
Having created a Discoverer Portlet, you can subsequently modify it in two ways:
-
by editing defaults
When you use the Edit Defaults option, the changes that you make are visible to all users of an Oracle Portal page (for more information, see "How to edit a Discoverer portlet").
-
by customizing
When you use the Customize option, the changes that you make are only visible to you (for more information, see "How to customize a Discoverer portlet using Discoverer Portlet Provider").
-
Refer to the Oracle Portal Online Help for more information about using the Oracle Portal toolbars and wizards.
3.2 How to connect to Oracle Portal and display the Add Portlets page
You connect to Oracle Portal and display the Add Portlets page when you want to add a portlet (for example, a Discoverer Worksheet portlet) to an Oracle Portal page.
To connect to Oracle Portal and display the Add Portlets page:
-
Start an Internet browser.
-
Display the Oracle Portal page to which you want to add a Discoverer portlet.
-
If you are not logged in, click Login and enter your Oracle Portal login details (that is, your Single Sign-On details).
-
Click Edit to display the Edit Views page.
-
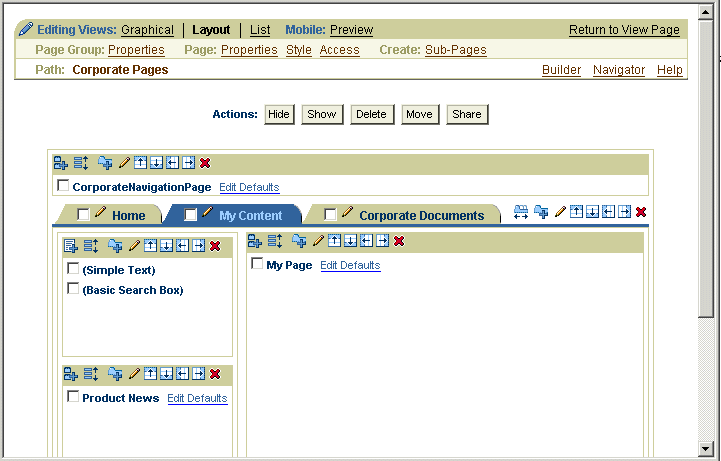
Select the Editing Views: Layout link at the top of the page.
-
Click the Add Portlets icon in a region to display the Add Portlets page.
To add portlets, you move portlets from the Available Portlets list to the Selected Portlets list.
-
In the Available Portlets area, select Discoverer Portlet Provider or navigate to where the Discoverer Portlet Provider is located and select it.
Hint: If you have recently installed Oracle Fusion Middleware or Oracle Business Intelligence, the Discoverer portlets might be in the Portlet Staging Area folder. If you cannot find the Discoverer Portlet Provider, contact the Discoverer manager or Oracle Portal administrator.
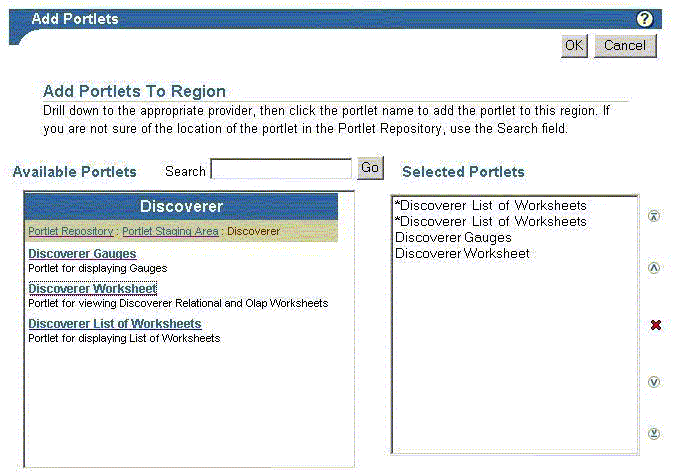
The three Discoverer portlet types (Discoverer Worksheet, Discoverer List of Worksheets, and Discoverer Gauges) are displayed in the Available Portlets area.
-
Click the Discoverer portlets you want to add to the Selected Portlets list.
-
(Optional) Use the up and down arrows to change the order of the portlets in the Selected Portlets list.
-
Click OK.
3.3 How to add a Discoverer List of Worksheets portlet to an Oracle Portal page
You add a List of Worksheets portlet to an Oracle Portal page when you want to provide Discoverer worksheet links in Oracle Portal. For example, you might want to publish a link for sales worksheets to colleagues in a sales department.
For more information, see "About the Discoverer List of Worksheets portlet".
To add a Discoverer List of Worksheets portlet:
-
Connect to Oracle Portal and display the Add Portlets page (for more information, see "How to connect to Oracle Portal and display the Add Portlets page").
-
Select the Discoverer List of Worksheets link to add the portlet to the Selected Portlets list.
-
Click OK to close the Add Portlets page.
-
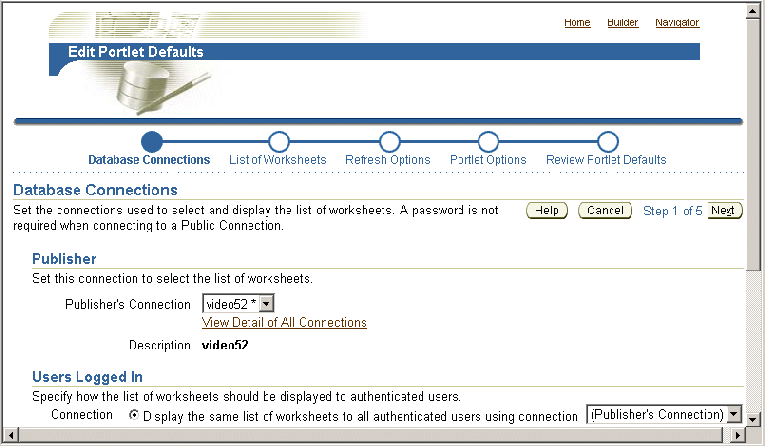
Select the Edit Defaults link next to the portlet that you have just added to start the portlet wizard.
Note:
For Discoverer WSRP Portlets, the Edit Defaults link is not available. To edit these portlets, use the Customize option. For more information, see "How to customize a Discoverer portlet using Discoverer Portlet Provider".
-
Use the Database Connections page to specify how Oracle Portal users can access the portlet (for more information, see "About choosing database connections for Discoverer portlets").
-
Use the List of Worksheets page to select the worksheets to display in the portlet.
-
Use the Refresh Options page to specify when the workbook list is refreshed.
-
Use the Portlet Options page to specify the portlet name, the order of worksheets, and the maximum number of worksheets to display.
For example, you might want to display a maximum of ten worksheets in alphabetical order.
-
Use the Review Portlet Defaults page to check that you have selected the correct portlet options.
-
Click Finish to save the defaults.
You can now view the Discoverer list of worksheets portlet. It might take a few minutes for the portlet to retrieve its content for the first time.
3.4 How to add a Discoverer Worksheet portlet to an Oracle Portal page
You add a Worksheet portlet when you want to add Discoverer worksheet data to a page in Oracle Portal. For example, you might want to publish a sales report to colleagues in a sales department.
For more information, see "About the Discoverer Worksheet portlet".
To add a Discoverer Worksheet portlet:
-
Connect to Oracle Portal and display the Add Portlets page (for more information, see "How to connect to Oracle Portal and display the Add Portlets page").
-
Select the Discoverer Worksheet Portlet link to add a portlet to the Selected Portlets list.
-
Click OK to close the Add Portlets page.
-
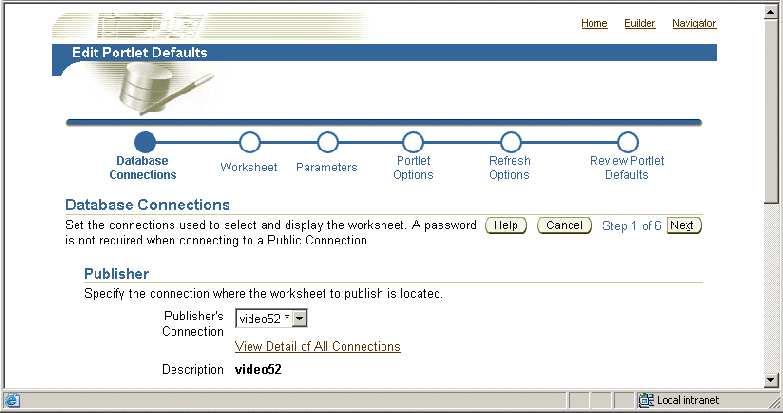
Select the Edit Defaults link next to the portlet that you have just added to start the portlet wizard.
Note:
For Discoverer WSRP Portlets, the Edit Defaults link is not available. To edit these portlets, use the Customize option. For more information, see "How to customize a Discoverer portlet using Discoverer Portlet Provider".
-
Use the Database Connections page to specify how Oracle Portal users can access the portlet (for more information, see "About choosing database connections for Discoverer portlets").
-
Use the Worksheet page to select the worksheet to display in the portlet.
-
(optional) If parameters are defined for the worksheet, use the Edit Parameters page to specify parameter values.
Parameter values provide dynamic input to worksheets. For example, to focus on specific information, or to provide input to calculations (for more information about parameters, see the Oracle Fusion Middleware User's Guide for Oracle Business Intelligence Discoverer Plus).
Note: The Edit Parameters page is not displayed if you are publishing a worksheet containing OLAP data.
-
Use the Portlet Options page to specify the parts of the worksheet to publish.
For example, you might want to publish the worksheet data only, the worksheets graph only, or both the worksheet data and the worksheet's graph.
-
Use the Refresh Options page to specify when the worksheet data is refreshed.
-
Use the Review Portlet Defaults page to check that you have selected the correct portlet options.
-
Click Finish to save the defaults.
You can now view the Discoverer worksheet in the portlet. It might take a few minutes for the portlet to retrieve its content for the first time.
3.5 How to add a Discoverer Gauges portlet to an Oracle Portal page
You add a Discoverer Gauges portlet when you want to display Discoverer worksheet data as gauges in a page in Oracle Portal. For example, you might want to create a management dashboard that monitors key performance indicators.
Note: To create a Discoverer Gauges portlet, you must use a crosstab worksheet.
For more information, see "About the Discoverer Gauges portlet".
To add a Discoverer Gauges portlet:
-
Connect to Oracle Portal and display the Add Portlets page (for more information, see "How to connect to Oracle Portal and display the Add Portlets page").
-
Select the Discoverer Gauges Portlet link to add a portlet to the Selected Portlets list.
-
Click OK to close the Add Portlets page.
-
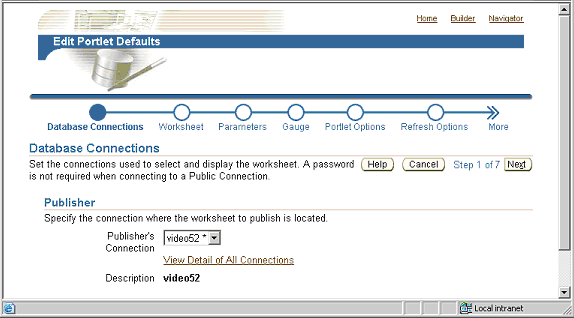
Select the Edit Defaults link next to the portlet that you have just added to start the portlet wizard.
Note:
For Discoverer WSRP Portlets, the Edit Defaults link is not available. To edit these portlets, use the Customize option. For more information, see "How to customize a Discoverer portlet using Discoverer Portlet Provider".
Description of the illustration portal_10.gif
-
Use the Database Connections page to specify how Oracle Portal users can access the portlet (for more information, see "About choosing database connections for Discoverer portlets").
-
Use the Worksheet page to select the worksheet to display in the portlet.
Note: If you are creating a Discoverer Gauges portlet, the Worksheet page only displays crosstab worksheets. You cannot create a Discoverer Gauges portlet based on a table worksheet.
-
(optional) If parameters are defined for the worksheet, use the Edit Parameters page to specify parameter values.
Parameter values provide dynamic input to worksheets. For example, to focus on specific information, or to provide input to calculations (for more information about parameters, see the Oracle Fusion Middleware User's Guide for Oracle Business Intelligence Discoverer Plus).
Note: The Edit Parameters page is not displayed if you are publishing a worksheet containing OLAP data.
-
Use the Gauge page to specify the rows and columns to publish, and specify threshold values for the gauges.
-
Use the Portlet Options page to specify the parts of the worksheet to publish.
For example, you might want to publish the worksheet data only, the worksheet's graph only, or worksheet data and a worksheet's graph.
-
Use the Refresh Options page to specify when the worksheet data is refreshed.
-
Use the Review Portlet Defaults page to check that you have selected the correct portlet options.
-
Click Finish to save the defaults.
You can now view the Discoverer Gauges portlet. It might take a few minutes for the portlet to retrieve its content for the first time.
3.6 How to edit a Discoverer portlet
You edit a Discoverer portlet when you want to change how a portlet is displayed to Oracle Portal users. For example, you might want to display a different worksheet in a Discoverer Gauges portlet.
To edit a Discoverer portlet:
-
Start an Internet browser.
-
Display the Oracle Portal page containing the Discoverer portlet that you want to edit.
-
If you are not logged in, click Login and enter your Oracle Portal login details (that is, your Single Sign-On details).
-
Click Edit to display the page in edit mode.
-
Select the Layout link from the Editing Views area at the top of the page.
-
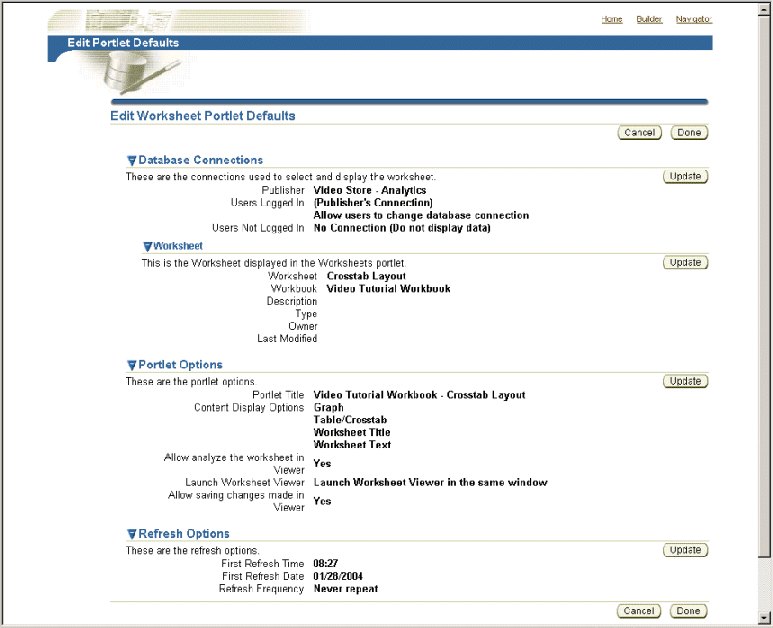
Select the Edit link to display the Edit page.
For example, for a Discoverer Worksheet portlet, the Edit Worksheet Portlet Defaults page is displayed.
-
Use the Update buttons on the Edit Portlet Defaults page to change the portlet settings as required.
For example, to update the portlet options, click Update in the Portlet Options area to display the Portlet Options page and make changes.
-
Click Done to save your changes.
You can now view the updated Discoverer portlet.
3.7 How to customize a Discoverer portlet using Discoverer Portlet Provider
You customize a Discoverer portlet when you want to make changes that are only visible to you, not to other Oracle Portal users. For example, you might want to apply a stoplight format to a Discoverer Worksheet portlet.
For more information about the different customizations you can make in Discoverer Portlet Provider and Discoverer Viewer, see "About using Oracle Portal as a personalization framework for Discoverer".
To customize a Discoverer portlet using Discoverer Portlet Provider:
-
Start an Internet browser.
-
Display the Oracle Portal page containing the Discoverer portlet that you want to edit.
-
If you are not logged in, click Login and enter your Oracle Portal login details (that is, your Single Sign-On details).
-
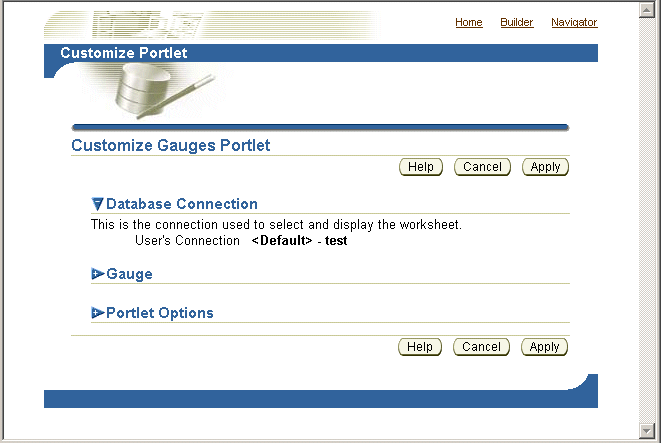
Click Customize to display the appropriate Customize Portlet page for the Discoverer portlet you selected.
For example, for a Discoverer Gauges portlet, the Customize Gauges portlet page is displayed.
Description of the illustration portal_11.gif
-
Use the Customize Portlet page to make the required changes to the portlet.
-
Click Apply to save customizations to the portlet.
You can now view the updated Discoverer portlet. Customization changes that you make are only visible to you, not to other Oracle Portal users.
3.8 How to customize the Discoverer worksheet shown in a portlet in Viewer, using the Analyze link
You typically customize the Discoverer worksheet shown in a portlet to change its layout or create a personalized view of it.
For more information about the different customizations you can do in Discoverer Portlet Provider and Discoverer Viewer, see "About using Oracle Portal as a personalization framework for Discoverer".
Note: You can choose not to allow users to analyze in Discoverer Viewer, or not to allow users to save their changes back from Discoverer Viewer, by using settings in the Portlet Options page (displayed using the Edit Defaults link).
To customize the Discoverer worksheet shown in a portlet in Viewer, using the Analyze link:
-
Start an Internet browser.
-
Display the Oracle Portal page containing the Discoverer portlet that you want to edit.
-
If you are not logged in, click Login and enter your Oracle Portal login details (that is, your Single Sign-On details).
-
Select the Analyze link to display the worksheet in Discoverer Viewer.
-
Make changes to the worksheet in Discoverer Viewer.
-
Select the Save and return to Portal link.
Hint: The Save and return to Portal link is only displayed if you have the necessary privileges to save changes. If you do not have the necessary privileges, only the Cancel and return to Portal link is displayed. If you require privileges, contact the portlet publisher.
You can now view the updated Discoverer worksheet in the portlet.
3.9 Notes about resizing graphs in Discoverer Worksheet portlets
When you publish a worksheet containing a graph in a Discoverer Worksheet portlet, you might find that the graph is too large and uses too much of the Oracle Portal display area. If a graph is too large, you can resize it in any of the following ways:
-
In Oracle BI Discoverer Plus, edit the source worksheet and resize the graph, then save the worksheet.
The graph size that you specify in Oracle BI Discoverer Plus is also applied for all users in Oracle BI Discoverer Viewer and Oracle Portal.
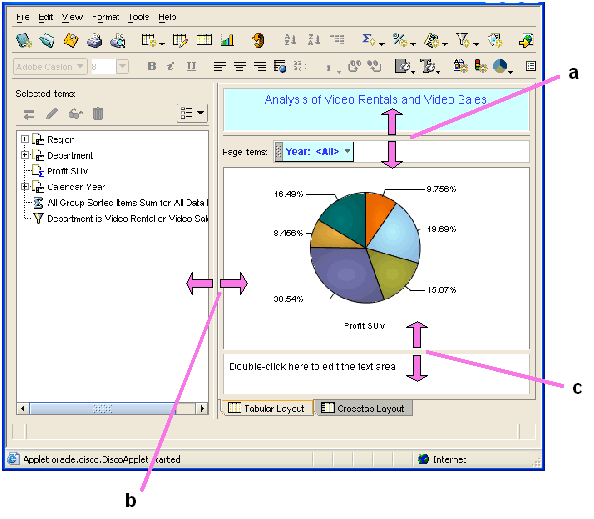
To resize a graph in Oracle BI Discoverer Plus, drag the dividers surrounding the graph pane to change the size of the graph pane. Discoverer automatically resizes the graph to fit the graph pane. For example, in the example below you might drag the left-hand divider to the right to make the graph smaller.
Description of the illustration graph.gif
Key to figure
-
The top divider used to increase or decrease the height of the graph pane from the top.
-
The left-hand divider used to increase or decrease the width of the graph pane.
-
The bottom divider used to increase or decrease the height of the graph pane from the bottom.
-
-
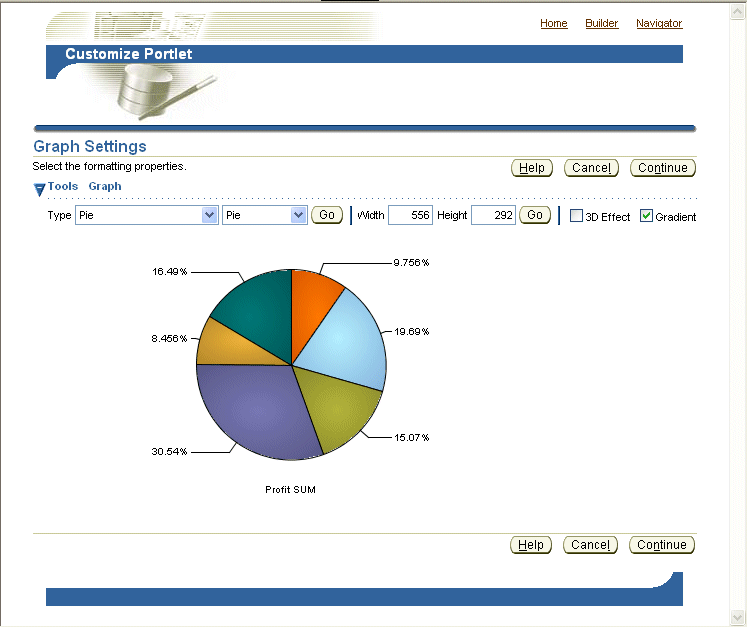
In Oracle Portal, customize the portlet and resize the graph, then save the changes.
The graph size that you specify in Oracle Portal is applied in Oracle Portal, but not for other Oracle Portal users. The source worksheet is not changed.
To resize a graph in Oracle Portal, select the Customize link in a portlet, display the Graph Settings page and use the Height and Width fields to resize the graph.
Description of the illustration graph3.gif
For more information about customizing worksheet portlets, see "How to customize a Discoverer portlet using Discoverer Portlet Provider".
-
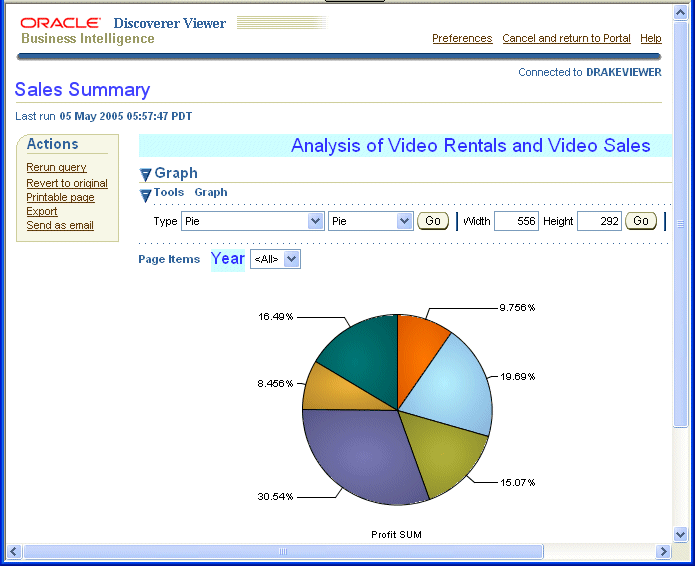
In Oracle BI Discoverer Viewer invoked from within Oracle Portal (that is, you select the Analyze link below a Discoverer portlet), customize the worksheet and resize the graph, then save the changes.
The graph size that you specify in Oracle BI Discoverer Viewer is applied in Oracle BI Discoverer Viewer for end users using the current connection, but not for other connections. The source worksheet is not changed.
To resize a graph in Oracle BI Discoverer Viewer, you select the Analyze link below a Discoverer portlet, select the Graph link, and use the Height and Width fields to resize the graph.
Description of the illustration graph2.gif
For more information about customizing a worksheet in Oracle BI Discoverer Viewer, see "How to customize the Discoverer worksheet shown in a portlet in Viewer, using the Analyze link".
-
Customizations made in Oracle Portal override worksheet settings saved in Oracle BI Discoverer Plus.
-
If you resize a graph in Oracle BI Discoverer Plus, to display the resized graph in Oracle Portal you must refresh the Discoverer portlets that display that worksheet.
3.10 Notes about using worksheet parameters in Discoverer portlets
If you create Discoverer portlets that contain worksheet parameters, you can map the worksheet parameters to Oracle Portal Page Parameters and create a Simple Parameter Form portlet. This capability enables a portlet user to easily specify a parameter value for a page level parameter to update many different Discoverer portlets at the same time. To accomplish this you:
-
map the Discoverer worksheet parameter to a Generic (for example, Discoverer portlet) Page Parameter (for more information, see "How to map worksheet parameters to Generic Page Parameters")
-
create an Oracle Portal Page Parameter (for more information, see "How to create a Page Parameter")
-
map the Oracle Portal Page Parameter to the Generic Page Parameter (for more information, see "How to map a Generic Page Parameter to a Page Parameter")
-
add a Simple Parameter Form portlet to the Oracle Portal page containing the Discoverer portlets (for more information, see "How to add Simple Parameter Form portlets to an Oracle Portal page")
For example, you could create three Discoverer portlets, each one containing a worksheet with a parameter called City_WS_param. While editing the defaults of each portlet, you map City_WS_param to a generic Discoverer portlet parameter, say DiscoParameter1. Make a note of each generic Discoverer portlet parameter and which worksheet parameters they map to so that you can correctly set up the Oracle Portal page parameters.
When you get all three portlets on an Oracle Portal page, click the Edit button and select the Page: Properties link. Display the Parameters tab of the Edit Page screen. If there is no suitable page parameter available, add a new page parameter called City_Page_Param. In the Page Parameter Properties section, you might want to make the parameter Customizable and may optionally set the Display Name, Default Value and Description. In the Portlet Parameter Values section, for each appropriate portlet, map DiscoParameter1 to use Page Parameter City_Page_Param.
Note: You can map parameters in both Worksheet portlets and Gauges portlets. In other words, you can update both Gauges portlets and Worksheet portlets at the same time with a single parameter value.
You can also enable users to easily set page level parameter values by adding one or more Simple Parameter Form portlets to the portal page. Portlet users can then specify a parameter value in a Simple Parameter Form portlet to update many Discoverer portlets at the same time (for more information, see "How to add Simple Parameter Form portlets to an Oracle Portal page").
For more information about mapping worksheet parameters to portal page level parameters, see "How to map worksheet parameters to Page Parameters in Oracle Portal".
-
If the worksheet parameter must be entered as an index value rather than an actual value (for example, the end user must enter the value 3 instead of the value March), the end user must specify the index value in single quotation marks (for example, '3').
-
You can map Page Parameters in Oracle Portal only to worksheets that contain relational data. Worksheets that are created in Discoverer Plus OLAP do not support parameters.
3.11 How to map worksheet parameters to Page Parameters in Oracle Portal
You map worksheet parameters to Page Parameters in Oracle Portal to enable portlet users to specify a Page Parameter value that updates many Discoverer portlets at the same time. For example, when a portlet user chooses January as a Page Parameter value, you might want three Discoverer worksheets to be refreshed with data for January.
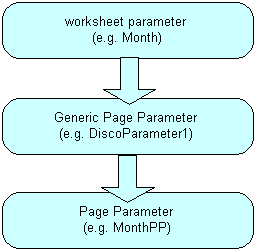
To map a worksheet parameter to a Page Parameter you:
-
Map a worksheet parameter to a Generic Page Parameter.
-
Map the Generic Page Parameter to a portal Page Parameter.
Discoverer provides ten default Generic Page Parameters called DiscoParameter1, DiscoParameter2, DiscoParameter3, and so on through to DiscoParameter10.
The figure below shows the process of mapping worksheet parameters to Page Parameters.
To map Discoverer worksheet parameters to portal Page Parameters:
-
For each Discoverer portlet, map a worksheet parameter to a Generic Page Parameter (for more information, see "How to map worksheet parameters to Generic Page Parameters").
For example, you might map a worksheet parameter called Month to a Generic Page Parameter called DiscoParameter1.
-
(optional) If you have not created a Page Parameter in the Oracle Portal page you want to edit, create a Page Parameter (for more information, see "How to create a Page Parameter").
For example, you might create a Page Parameter in Oracle Portal called MonthPP.
-
Map a Generic Page Parameter to a Page Parameter for each Discoverer portlet on an Oracle Portal page (for more information, see "How to map a Generic Page Parameter to a Page Parameter").
For example, you might map DiscoParameter1 to MonthPP.
3.11.1 How to map worksheet parameters to Generic Page Parameters
You map a worksheet parameter to Generic Page Parameters to enable you to later map the Generic Page Parameter to a Page Parameter in Oracle Portal.
To map a worksheet parameter to a Generic Page Parameter:
-
Start an Internet browser.
-
Display the page containing the Discoverer portlet that you want to edit.
-
If you are not logged in, click Login and enter your portal login details (that is, your Single Sign-On details).
-
Create a new Discoverer Worksheet portlet or Gauges portlet (or edit an existing portlet) and navigate to the Parameters page, as follows:
-
If you are creating a new portlet, add a new Discoverer Worksheet portlet or Gauges portlet and navigate to the Parameters page.
For more information, see "How to add a Discoverer Worksheet portlet to an Oracle Portal page" or "How to add a Discoverer Gauges portlet to an Oracle Portal page".
-
If you are editing an existing portlet, select the Edit Defaults link next to the portlet to edit, and navigate to the Parameters page.
For more information, see "How to edit a Discoverer portlet".
Oracle Portal displays the Parameters page.
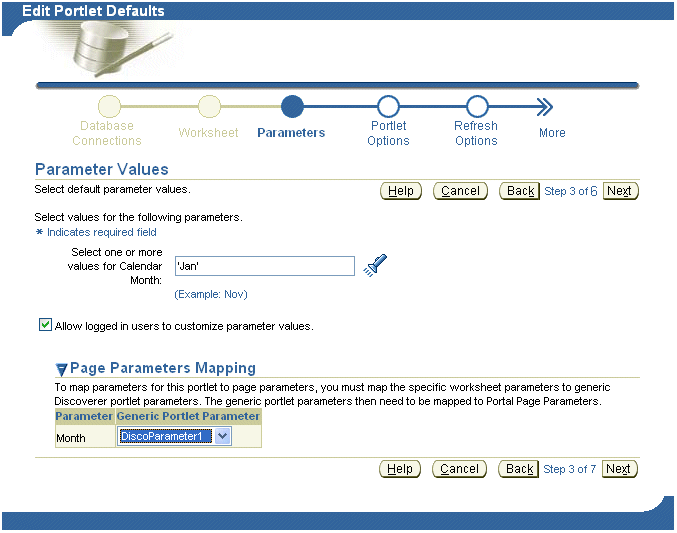
Description of the illustration portal_13.gif
-
-
Use the Generic Page Parameter drop down list next to a worksheet parameter in the Parameter column to map that worksheet parameter to a Generic Page Parameter provided by Discoverer (for example, DiscoParameter1).
For example, to map a worksheet parameter called Month to DiscoParameter1, select DiscoParameter1 from the Generic Page Parameter drop down list.
-
Save changes to the portlet.
Having mapped a worksheet parameter to a Generic Page Parameter, you must map the Generic Page Parameter to a Page Parameter in Oracle Portal (for more information, see How to map a Generic Page Parameter to a Page Parameter).
3.11.2 How to create a Page Parameter
You create a Page Parameter to enable portlet users to specify a Page Parameter value that updates many Discoverer portlets at the same time.
To create a Page Parameter:
-
Start an Internet browser.
-
Display the Oracle Portal page containing the Discoverer portlet that you want to edit.
-
If you are not logged in, click Login and enter your Oracle Portal login details (that is, your Single Sign-On details).
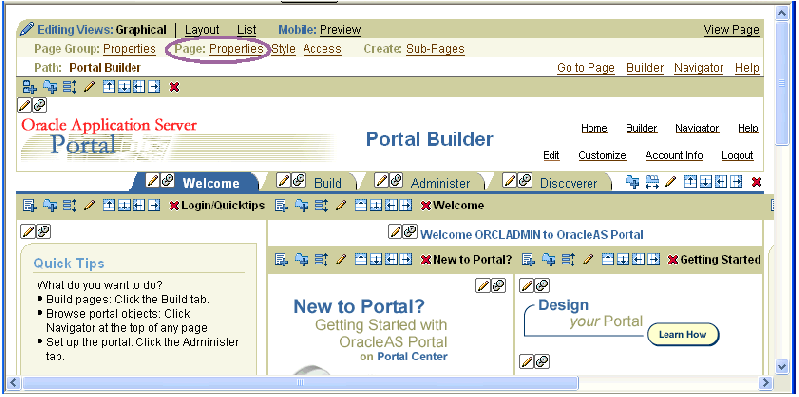
-
Select the Properties link in the Page area to display the Edit Page dialog.
-
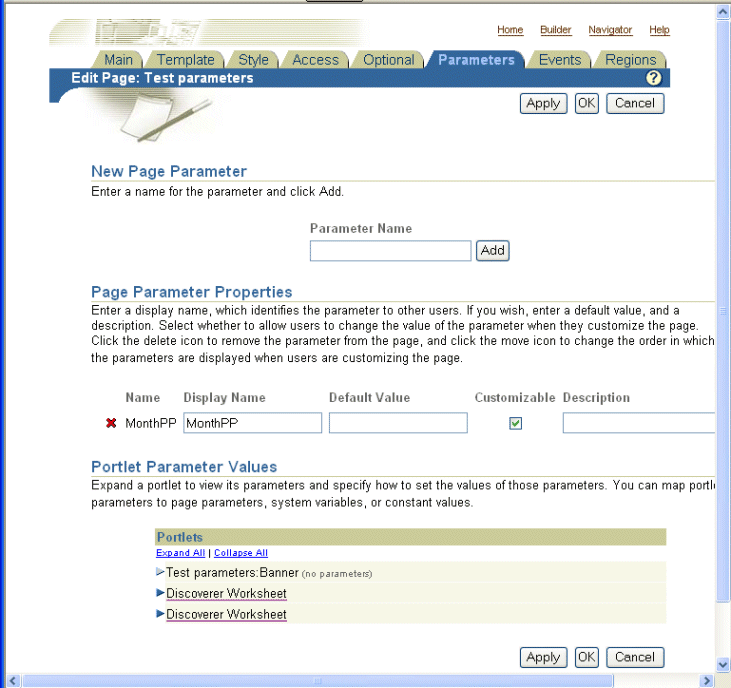
Display the Parameters tab.
-
Enter a name for the Page Parameter in the New Parameter field and click Add.
Hint: The name should be a short unique string with no spaces or separating characters (for example, MonthPP).
The page parameter that you created is added to the list in the Page Parameter Properties area.
-
Click OK to save the page properties.
You can now map Generic Page Parameters to the new Page parameter (for more information, see "How to map a Generic Page Parameter to a Page Parameter").
3.11.3 How to map a Generic Page Parameter to a Page Parameter
You map a Generic Page Parameter to a Page Parameter to enable portlet users to specify a Page Parameter value that updates many Discoverer portlets at the same time.
Hint: Before you can map a Page Parameter to a Generic Page Parameter, you must first map a worksheet parameter to a Generic Page Parameter (for more information, see "How to map worksheet parameters to Page Parameters in Oracle Portal") and create a Page Parameter if one is not available (for more information, see "How to create a Page Parameter").
To map a Generic Page Parameter to a Page Parameter:
-
Start an Internet browser.
-
Display the Oracle Portal page containing the Discoverer portlet that you want to edit.
-
If you are not logged in, click Login and enter your Oracle Portal login details (that is, your Single Sign-On details).

-
Select the Properties link in the Page area to display the Edit Page dialog.
-
Display the Parameters tab.
-
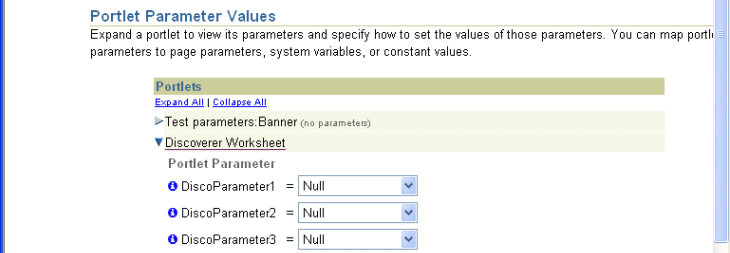
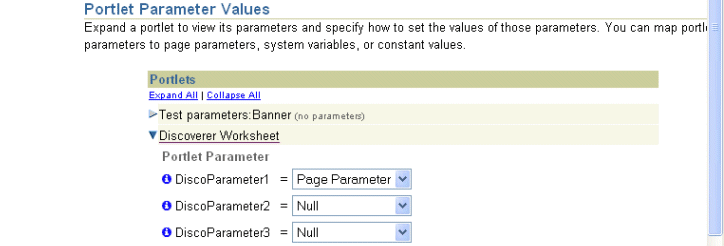
In the Portlets table in the Portlet Parameter Values area, click on a portlet name (for example, Discoverer Worksheet) to display the list of Generic Page Parameters (for example, DiscoParameter1, DiscoParameter2).
-
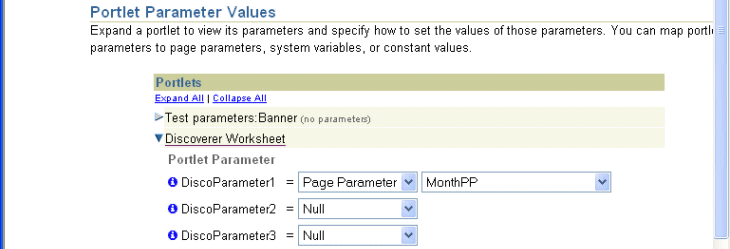
Select Page Parameter from the drop down list next to the Generic Page Parameter to which you want to map the Page Parameter.
-
Select the Page Parameter (for example, MonthPP) from the second drop down list that is displayed when you select Page Parameter in the previous step.
-
Click OK to save the page properties.
Oracle Portal refreshes the portal page.
You can now create a Simple Parameter Form portlet to enable portlet users to specify a Page Parameter value that updates many different Discoverer portlets at the same time (for more information, see "How to add Simple Parameter Form portlets to an Oracle Portal page").
Note: An alternative (but more time consuming) method for portlet users to specify a Page Parameter value that updates many Discoverer portlets is as follows:
-
Select the Customize link to display the Customize Page page.
-
Display the Parameters tab.
-
In the Page Parameter Values area, use the Value field next to a Page Parameters to specify a parameter value.
For example, you might enter January if you want Discoverer worksheet portlets to be refreshed with data for January.
-
Click OK to save the changes.
The Page Parameter value that you specified is applied to Discoverer portlets in that page.
-
3.12 How to add Simple Parameter Form portlets to an Oracle Portal page
You add a Simple Parameter Form portlet to an Oracle Portal page to enable users to easily apply a parameter value to update the data displayed in one or more Discoverer portlets.
Before you can create a Simple Parameter Form portlet you must first:
-
map a worksheet parameter to a Generic Page Parameter (for more information, see "How to map worksheet parameters to Page Parameters in Oracle Portal")
-
create a Page Parameter if one is not available (for more information, "How to create a Page Parameter")
-
map a Generic Page Parameter to a Page Parameter (for more information, see "How to map a Generic Page Parameter to a Page Parameter")
When you add a Simple Parameter Form portlet, do not base the form on the row or column from the worksheet for the gauge portlet. Instead, base the form only on the page items or measures from the worksheet for the gauge portlet.
To add a Simple Parameter Form portlet to an Oracle Portal page:
-
Start an Internet browser.
-
Display the Oracle Portal page that contains the Discoverer portlets, where you want to add a Simple Parameter Form portlet.
-
If you are not logged in, click Login and enter your Oracle Portal login details (that is, your Single Sign-On details).

-
Select the Add Portlet link to display the Add Portlets page.
-
Select the Portlet Builders link and the Simple Parameter Form link to add a Simple Parameter Form to the list of Selected Portlets.
-
Click OK.
Oracle Portal displays an undefined Simple Parameter Form portlet.

Description of the illustration spf2.gif
-
Select the Define link in the undefined Simple Parameter Form.
Oracle Portal displays the Define your Simple Parameter Form pages where you enter the details that are required to create a Simple Parameter Form portlet.
For example, you might enter the following information in the Entry Fields area for a Month page parameter.

Description of the illustration spf4.gif
-
Click Finish when you have entered all the appropriate details.
-
Oracle Portal displays a new Simple Parameter Form.

Description of the illustration spf5.gif
-
Select the Properties link in the Page area to display the Edit Page dialog.
-
Create a Page Parameter (for example, MonthPP) if one is not available (for more information, see "How to create a Page Parameter").
-
Map a Generic Page Parameter to a Page Parameter.
You complete this step once for the Simple Parameter Form portlet and once for each Discoverer portlet that you want the Simple Parameter Form to update (for more information, see "How to map a Generic Page Parameter to a Page Parameter").
-
Display the Events tab.
-
Select the Submit link under the Simple Parameter Form link.
Oracle Portal displays an additional area. This are enables you to specify what happens.
-
Click the Browse icon and select the page to which the parameter value is sent when this event is raised (that is, when a user clicks the Submit button in the Simple Parameter Form).
For example, to specify that a Simple Parameter Form portlet submit its parameter value to the Discoverer BI Demo page, you would select the Go to page option (see screenshot below).

Description of the illustration spf7.gif
Oracle Portal displays a Page Input area.
-
Enter appropriate information into the fields that appear in the Page Input area.
For example, to specify that the input from raising the event (that is, when a user clicks the Submit button in the Simple Parameter Form) is Parameter 1 you would select the following values:

Description of the illustration spf8.gif
-
Click OK to apply your changes.
You have now added a Simple Parameter Form portlet to an Oracle Portal page, enabling users to easily apply a parameter value to update the data displayed in one or more Discoverer portlets.
Hint: You can create more Simple Parameter Forms to update other parameter values in Discoverer portlets.
For more information, see:
-
Oracle Fusion Middleware Administrator's Guide for Oracle Portal
-
Oracle Portal Help system
3.13 Notes about publishing Discoverer content in portlets
When creating a Discoverer portlet, you have a large degree of control over what data is displayed. You also have control over when and how frequently the portlet is refreshed. When creating a portlet, you should carefully consider these settings to ensure that they meet your requirements and ensure a good balance between timeliness of data and performance of your system.
The following sections contain information about publishing Discoverer portlets:
3.14 About choosing database connections for Discoverer portlets
When you create a Discoverer portlet (or edit an existing Discoverer portlet), the first step is to select the database connections that determine the following:
-
The Discoverer content and options displayed in the portlet
-
The data that is displayed to the portlet user
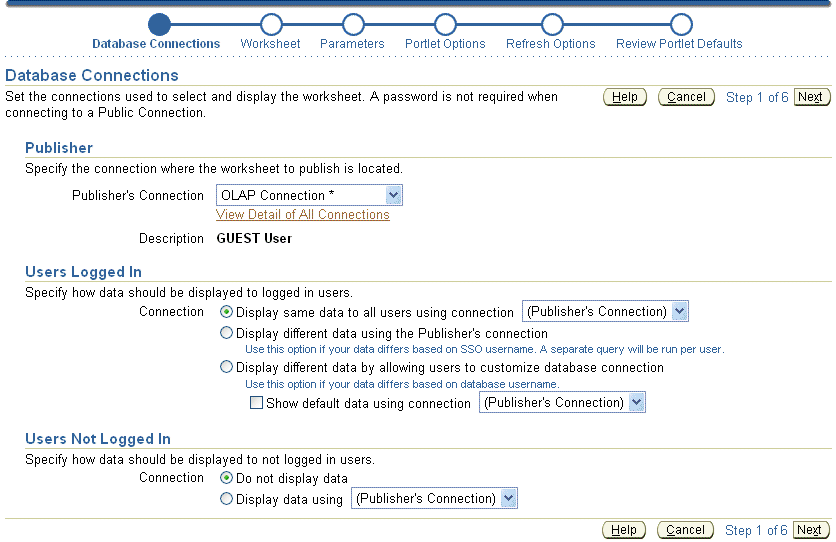
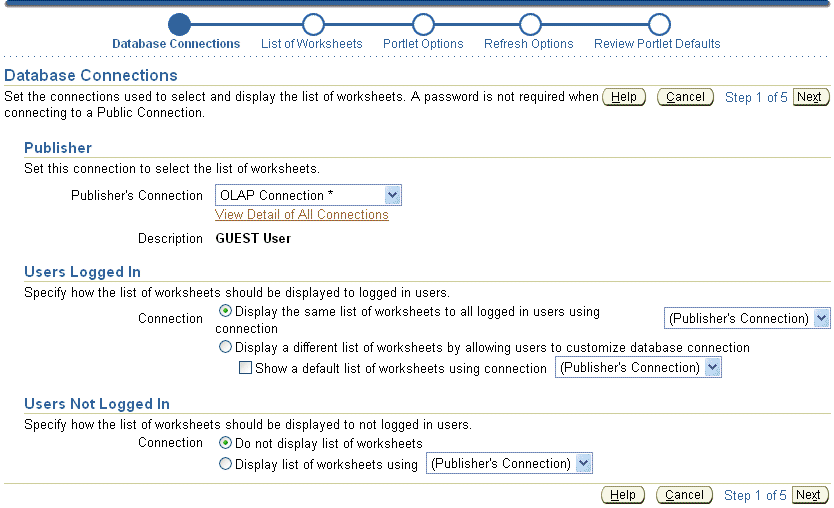
You select database connections using the Database Connections page (see example screenshots below).
Figure 3-2 Database Connections page for the Discoverer List of Worksheets portlet
Description of "Figure 3-2 Database Connections page for the Discoverer List of Worksheets portlet"
The Publisher's Connection list displays the names of all Discoverer connections that are available to you as an Oracle Portal user. Public connections are indicated by a trailing asterisk '*'. Private connections that you created while connected to Discoverer as a Single Sign-On user are also displayed.
The Discoverer connection you select in the Publisher's Connection field determines the worksheets or lists of worksheets that are available to you in later steps of the wizard. It also determines the connections that are available to set for data display for other users (Users Logged In to Portal and Users Not Logged In). The list of connections available on the rest of this page is limited to those that have the same database and EUL of the connection you choose for the Publisher's Connection. This behavior ensures that users can see the content you choose if you select a connection other than the Publisher's Connection for other users.
You specify how data is displayed to users when they are logged in to Oracle Portal in the Users Logged In area of this page. You have three choices on how to display the data to these logged-in users.
-
You can display the same data to all users using the connection selected in the Publisher's Connection field, or select another Discoverer connection from the list.
Note: For List of Worksheets portlets this runs only one query for all users, and shows the same data returned by running the single query.
-
If the worksheet you are including in the portlet is based on tables in your database that are striped by Single Sign-On user, you can select the Display different data using the Publisher's Connection option. Choosing this option enables the portlet to use the Publisher's Connection to get access to the worksheet and passes the Oracle Portal/Single Sign-On username to the database to return only data that the logged in, Oracle Portal/Single Sign-On user has access to.
Note: For List of Worksheets portlets this runs one query per Single Sign-On user.
-
If the worksheet you are displaying in the portlet is based on tables in your database that are striped by database user, you can select the Allow Users to Customize Database Connection option. Choosing this option enables the user to determine which connection they want to use to get access to the worksheet and the data. In this case the user sees only the worksheet/list of worksheets/gauge if they have access to the published worksheet. You can also optionally select a connection to determine the data that is displayed by default before the user customizes a portlet.
Note: For List of Worksheets portlets this runs one query for every Single Sign-On user that customizes this portlet.
You specify how data is displayed to users who do not log in to Oracle Portal but still have access to the page that contains your portlet. These users are sometimes referred to as Public users. You have two choices for these users, as follows:
-
You can choose to not display data.
-
You can choose to display data using the Publisher's Connection or an available connection in the list.
Note: If you choose connections other than the Publisher's Connection to display data or allow users to choose their own connection, only those connections that have access to the worksheet defined in the portlet can see it.
For example, you create a worksheet portlet using worksheet MyWorkbook.sheet1 and choose the Publisher's Connection to be user SCOTT and you allow users to customize their database connection. The user SCOTT has shared the MyWorkbook workbook to user MARY but not to user FRED. When user MARY customizes the portlet to use her connection, she sees the contents of MyWorkbook.sheet1. If user FRED customizes the portlet to use his connection he gets an error stating that he does not have access to the worksheet. For more information about sharing, see Oracle Fusion Middleware User's Guide for Oracle Business Intelligence Discoverer Plus.
For a Discoverer List of Worksheets portlet, you have two choices on how to display the data to users that are logged in (that is, in the Users Logged In area on the Database Connections page), as follows:
-
You can choose to display the same list of worksheets to all logged in users using a Discoverer connection that you select. If you select this option, all users see the same list and cannot customize this list.
-
You can choose to display a different list of worksheets to each logged in user by allowing them to customize their own Discoverer connection. In choosing this option, users might or might not see the list of worksheets that you select, depending on the Discoverer connection that they select.
Note: If you want users to be able to customize a Discoverer List of Worksheets portlet to include their own list of worksheets, be sure to select the Allow users to change selected worksheets option in the List of Worksheets page.
In the Users Not Logged In area of the Database Connections page, you specify how data is displayed to users who have not logged into Oracle Portal, but who still have access to a page that contains your portlet (that is, public users). You can choose to either display no data, or display data or worksheets using a Discoverer connection that you specify.
3.15 About choosing refresh options for Discoverer portlets
When you create a Discoverer portlet, you specify how often to refresh the data in the portlet.
While deciding the refresh frequency, consider the following factors:
-
Each time a portlet is refreshed, it requires at least one Discoverer session on the middle-tier machine. If different users are using different connections for viewing the same portlet, a different Discoverer session is required for each user.
Note:
The refresh cycle for each portlet instance is performed not just for currently logged-in users, but for all users who logged in to view that portlet instance at any time earlier. So, in a scenario involving 100 portlets accessible by 50 Single Sign-On users, potentially, the system would need to execute 5000 refresh requests in each refresh cycle.
If, for any reason, a particular user no longer requires access to a portlet, you must remove the corresponding cache entry manually from the
ptm5_cachetable. -
The number of portlet instances that Oracle Portal refreshes is restricted. The maximum number is determined by the Discoverer manager or Oracle administrator (for more information about the number of sessions in the Discoverer Portlet Provider's pool, see the Oracle Fusion Middleware Configuration Guide for Oracle Business Intelligence Discoverer). If the number of refresh jobs exceeds the number of sessions at any given time, the refresh jobs are queued until a session becomes available.
-
The last refresh time and next refresh time are displayed in each portlet so that users would know how recent the displayed data is.
-
If you allow users to analyze the data by selecting an Analyze link, a new query is run and they see the current data in Discoverer Viewer.
It is recommended that you select the lowest frequency possible that would still provide your users with data that meets their timeliness requirements.
You can choose to not refresh the portlet, which is the default setting. In this case, the portlet requires a Discoverer session when it is published, when a new user accesses it for the first time, or when a user changes the set of parameter values (only applies to Worksheet or Gauges portlets based on worksheets with parameters). You cannot set the refresh schedule of a Discoverer List of Worksheets portlet that contains a static list of worksheets.
As the publisher of a portlet, you can go to the Edit Defaults page of a portlet at any time and select the Refresh Portlet Now option to manually refresh the portlet.
3.16 About Discoverer connections and Single Sign-On
Discoverer connections work as follows with Single Sign-On:
-
If Single Sign-On is enabled, then private connections (created in Discoverer Viewer) are available for publishing in Oracle Portal
-
If Single Sign-On is not enabled, then only public connections (created in Oracle Fusion Middleware Control) are available for publishing in Oracle Portal
