2 Creating Analyses
This chapter describes how to create analyses in Oracle Business Intelligence Enterprise Edition, including how to specify the criteria for analyses, display the results, and examine the SQL statements. It also explains subject areas and columns, the double column feature, and variables.
This chapter includes the following sections:
What Are Analyses?
An analysis is a query against an organization's data that provides answers to business questions. A query contains the underlying SQL statements that are issued to the Oracle BI Server.
Analyses let you explore and interact with information by visually presenting data in tables, graphs, pivot tables, and so on. You can save, organize, and share the results of analyses.
Analyses that you create can be saved in the Oracle BI Presentation Catalog and integrated into any Oracle BI EE dashboard. Analyses can be enhanced through features such as graphs, result layout, calculated items, and drilling.
How Do I Work with Analyses?
To work with analyses, you use one of the following editors:
-
The "Analysis editor" — A more complex editor that allows you to explore and interact with information by visually presenting data in tables, graphs, pivot tables, and so on. For more information, see "What Is the Analysis Editor?"
You have access to this editor only if you have been granted the Access to Analysis privilege by the administrator.
-
The "BI Composer wizard" — A simple-to-use wizard that allows you to quickly and easily create, edit, or view analyses without the complexities of the Analysis editor. For more information, see Chapter 14, "Using BI Composer to Work with Analyses."
You have access to this editor only if you have been granted the Access to BI Composer privilege by the administrator.
You specify which editor you want to use on the "My Account dialog: Preferences tab." However, if you have turned on accessibility mode either in the "Sign In page" or the "My Account dialog: Preferences tab," then the BI Composer wizard in accessibility mode is used as the analysis editor, regardless of your choice.
How Are Analyses Processed?
When an analysis is processed, the request is sent in the form of logical SQL statements to the Oracle BI Server. The BI Server generates queries against the appropriate data sources. When the BI Server receives the query results, they are in a format that is not yet suitable for returning to the user. The BI Server merges the results and applies any additional calculations or filters that pertain to the results. The BI Server then sends the data to Oracle BI Presentation Services to format the results for display.
Embedding an Analysis in a Dashboard
Embedding an analysis in a dashboard causes it to execute automatically and display the most current results every time the dashboard is accessed. This provides access to the most current results. For example, if you are a sales executive whose company captures sales data on a daily basis, then you might want to have the dollar volume of product that was sold today be displayed on the front page of your dashboard.
You can embed saved analyses by using the Dashboard editor. For information about the Dashboard editor, see "Adding Content to Dashboards."
What Are Subject Areas and Columns?
A subject area contains folders, measure columns, attribute columns, hierarchical columns, and hierarchy levels that represent information about the areas of an organization's business or about groups of users with an organization. Subject areas usually have names that correspond to the types of information that they contain, such as Marketing Contracts, Service Requests, and Orders.
A subject area corresponds to the presentation layer in an Oracle BI metadata repository. In a repository, the subject area is the highest-level object in the presentation layer and represents the view of the data that end users see when they create or edit an analyses.
Individuals who design and build metadata repositories (such as a Business Intelligence strategist, metadata provider, or ETL developer) create subject areas using the Oracle BI Administration Tool. Generally, rather than creating one large subject area for their company's data, they create multiple smaller subject areas. This enables them to provide a particular group of users or a particular area of a company with the most important data that they need in one small subject area and the less important data in one or more related subject areas created from the same business model layer. Having these smaller subject areas makes it easier for users to find the data they need. It also makes it easier to maintain the data. For more information, see "Creating Subject Areas" in Oracle Fusion Middleware Metadata Repository Builder's Guide for Oracle Business Intelligence Enterprise Edition.
Note:
The individuals who design and build metadata repositories can specify that a subject area, folder (and its children), or column (both attribute and hierarchical) is to be hidden. A hidden subject area, folder, or column is not visible in the "Subject Areas pane" but is visible elsewhere, such as in an analysis or saved filter contents. (Because the object is still visible elsewhere, hiding a subject area, folder, or column in this way is not a solution for security or access control.)
If the criteria of an existing analysis includes a subject area, folder, or column that is subsequently hidden, the analysis is still accessible but the subject area, folder, or column is no longer visible in the Subject Areas pane of the "Analysis editor: Criteria tab."
Columns contain the individual pieces of data that an analysis returns. Columns usually have names that indicate the types of information that they contain, such as Account or Contact. Together with filters and selection steps, columns determine what data an analysis contains.
When you create an analysis, filter, or dashboard prompt, you first select the subject area with which you want to work. This is known as the primary subject area and is displayed in the "Subject Areas pane." If, as you work, you find that you need more data, you can add additional subjects areas that are related to the primary subject area that you have chosen. (You can add related subject areas only if they are available for the primary subject area and only if you have permission to access them.)
Typically, when you query a single subject area, all the measure columns that are exposed in that subject area are compatible with all the attribute columns and hierarchical columns that are exposed in the same subject area. However, when you combine columns from multiple subject areas, you must ensure that you do not include combinations of measure columns with attribute columns and hierarchical columns that are incompatible with one another.
For example, a measure column in one subject area might not be associated with the Project attribute column. If measure columns associated with the Project attribute column from another subject area are added to the analysis along with columns that are not associated with Project, then the query might fail to return results, or cause the BI Server error "No fact table exists at the requested level of detail: XXXX."
For an analysis to return data, you must select at least one column to include in the analysis.
What Are the Types of Columns?
Subject areas contain the following types of columns:
-
Attribute Column — Holds a flat list of values that are also known as members. No hierarchical relationship exists between these members, as is the case for members of a hierarchical column. An attribute column was referred to as a presentation column in previous releases (prior to 11g).
Examples include ProductID or City.
-
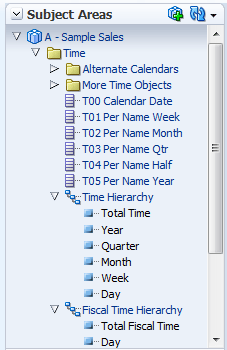
Hierarchical Column — Holds data values that are organized using both named levels and parent-child relationships. This column is displayed using a tree-like structure. Individual members are shown in an outline manner. Hierarchies allow you to drill deeper into the data, to view more detailed information. Examples include Time or Geography. Figure 2-1 shows the Time folder and the Time and Fiscal Time hierarchies expanded in the Subject Areas pane.
A hierarchical column can be one of the following kinds:
-
Level-based hierarchy — Consists of an ordered set of two or more levels. For example, a Time hierarchy might have three levels for Year, Quarter, and Month. Level-based hierarchies can also contain parent-child relationships.
-
Parent-child hierarchy — Consists of values that define the hierarchy in a parent-child relationship and does not contain named levels. For example, an Employee hierarchy might have no levels, but instead have names of employees who are managed by other employees. Employees can have titles, such as Vice President. Vice Presidents might report to other Vice Presidents and different Vice Presidents can be at different depths in the hierarchy.
In addition to being level-based or parent-child, hierarchical columns can be one of the following:
-
Ragged — A hierarchy in which all the lowest-level members do not have the same depth. For example, a Time hierarchy might have data for the current month at the day level, the previous month's data at the month level, and the previous 5 years' data at the quarter level. This type of hierarchy is also known as an unbalanced hierarchy.
-
Skip-level — A hierarchy in which certain members do not have values for certain higher levels. For example, in the United States, the city of Washington in the District of Columbia does not belong to a state. The expectation is that users can still navigate from the country level (United States) to Washington and below without the need for a state.
-
-
Measure Column — Holds a simple list of data values. It is a column in an Oracle BI EE repository, usually in a fact table, that can change for each record and can be added up or aggregated in some way. Examples include Revenue or Units Sold.
Throughout this guide, the term "column" on its own generally refers to all three types. Names for specific types of columns are included where necessary.
How Are Columns Indicated Visually?
Each type of column is indicated by its own icon in places such as the Subject Areas pane and Layout pane. You can expand level-based hierarchies and see their levels. Parent-child hierarchies are shown as hierarchical columns that have no levels. Figure 2-2 shows the icons and names of various columns.
How Will Measure Columns Created in Previous Releases Be Upgraded?
In previous releases (prior to 11g) of Oracle BI EE, measure columns could easily be treated as attribute columns, which allowed you to move them freely among the edges of views. This release introduces functionality that specifies to not show all the detail when a measure column is moved to an edge but rather to aggregate the measure column to the grain of the edge. During upgrade, all measure columns have the Treat as an Attribute Column box selected in the "Edit Column Formula dialog: Column Formula tab." For more information, see "Upgrading Measure Columns" in Oracle Fusion Middleware Upgrade Guide for Oracle Business Intelligence.
Understanding the Double Column Feature
Oracle BI EE provides a feature called double columns. When a repository is configured for the double column feature, column data includes a display column that has a code column mapped to it (that is, it has double columns). A display column contains the display values for the column data, for example, Excellent, Good, and Poor. A code column contains code values that uniquely identify display values and are consistent across users or locales, for example, the code values 1 (uniquely identifying Excellent), 2 (uniquely identifying Good), and 3 (uniquely identifying Poor).
When Oracle BI EE processes a double column, for example, as part of the criteria of an analysis or as the basis for a filter, it generates and issues SQL statements to the Oracle BI Server that use code values rather than display values, thereby making the filter language independent.
The double column feature lets you:
-
Build internationalized analyses that are automatically filtered by language independent codes. (In previous releases (prior to 11g), filters were not language independent.) For example, you can build one filtered analysis that can be used by both French-language users and English-language users.
-
Build common analyses that can be shared among groups even if the groups require different display values. For example, you can build a common analysis that displays for a Status field the values Excellent, Good, and Poor to one group, and Superb, Okay, and Bad to another group.
-
Change display values without breaking existing analyses. For example, suppose that you have an analysis that is filtered on the display value Excellent. If it is a double column, then the filtering is performed on its code column with the code value for "Excellent" rather than the display value of "Excellent." This means that you can change the display value Excellent to Superb without breaking the existing analysis.
In addition, if your organization allows the display of code values within Oracle BI EE, you can use code values rather than the display values in some dialogs, such as the "New Filter dialog." This means, for example, when specifying the values to use when applying a filter, you can specify code values rather than display values.
Before you can take advantage of the double column feature, your administrator must configure your repository by mapping code columns to display columns. Check with the administrator to see if your repository is configured for double columns.
What Is the Analysis Editor?
The "Analysis editor" lets you explore and interact with information by visually presenting data in tables, graphs, pivot tables, and so on. You can include the views that you create in an analysis for display in dashboards.
The Analysis editor contains the following tabs:
-
Criteria tab — Lets you specify the criteria for an analysis, including columns, and filters. You can specify the order in which the results should be returned, formatting (such as headings, number of decimal places, styles such as fonts and colors, and conditional formatting), and column formulas (such as adding a Rank or Percentile function). Additionally, you can change the sort order of the subject area and subject area folders (see "Changing the Sort Order of Subject Areas and Subject Area Folders" for additional information).
-
Results tab — Lets you create different views of the analysis results such as graphs, tickers, and pivot tables. You can also add or modify selection steps.
-
Prompts tab — Lets you create prompts that allow users to select values to filter an analysis or analyses on a dashboard. Prompts allow users to select values that dynamically filter all views within the analysis or analyses. You can also create prompts for use with selection steps, both for member selection steps and qualifying condition steps.
-
Advanced tab — Lets you edit XML code and examine the logical SQL statement that was generated for an analysis. You can use the existing SQL statement as the basis for creating a new analysis.
The tabs of the Analysis editor are organized into various panes and areas. As you work, you can manage these panes to suit your needs. See "Managing Panes in the Analysis Editor Tabs."
You access the Analysis editor when you create (or edit) an analysis. See "Creating New Analyses."
Note:
If you are using Oracle BI EE in accessibility mode, then, when you create (or edit) an analysis, the Analysis editor is replaced by the "BI Composer wizard." For more information on BI Composer, see Chapter 14, "Using BI Composer to Work with Analyses." For more information on accessibility mode, see Appendix C, "Accessibility Features."
Managing Panes in the Analysis Editor Tabs
Each of the tabs in the Analysis editor consists of several panes. For example, the Results tab consists of the "Subject Areas pane," the "Catalog pane," the "Views pane," the "Compound Layout," and the "Selection Steps pane."
As you work, you can manage these panes to give yourself the most efficient work area for the task that you are performing. For example, if you add multiple views to the compound layout on the Results tab, then you might want to hide the other panes in the Results tab to maximize the area in which to see the views that you are adding. You can:
-
Show or hide the panes that are displayed on the left side of the Analysis editor by clicking the sideways triangle button that is displayed between the left and right sides.
-
Expand or collapse an individual pane by clicking the plus or minus button in the title bar of the pane.
-
Resize an expanded pane by dragging its splitter. For example, you can drag the splitter on top of the Catalog pane up to increase the height of the pane.
-
Show or hide a pane by clicking its show/hide toolbar button, if one is available for the pane on the toolbar. For example, you can show or hide the Filters pane in the Criteria tab by clicking the Show/Hide Filters pane button on the toolbar.
What Is the Process for Constructing Analyses?
Note:
If you are using Oracle BI EE in accessibility mode or you have selected Wizard (limited functionality) as the analysis editor, then you use the "BI Composer wizard" rather than the "Analysis editor" to construct analyses. For more information on BI Composer, see Chapter 14, "Using BI Composer to Work with Analyses." For more information on accessibility mode, see Appendix C, "Accessibility Features."
The process for constructing an analysis includes the following steps:
Creating New Analyses
This procedure is a step in the process for constructing an analysis. For more information, see "What Is the Process for Constructing Analyses?"
To create an analysis:
-
In the global header, click New, then Analysis, then one of the following options:
-
Select a subject area.
The Analysis editor is displayed. You can now specify the criteria for the analysis. See "Specifying the Criteria for Analyses."
-
Create Direct Database Query.
Note:
In versions prior to Oracle BI EE 11.1.1.7.10, the Create Direct Database Query option was named Create Direct Database Request.
For information, see "Working with Direct Database Requests."
-
Create Analysis from Simple Logical SQL.
The "Analysis Simple SQL Statement dialog" is displayed in which you enter SQL statements for creating an analysis. The results of the analysis can be displayed and manipulated within the Analysis editor, and subsequently incorporated into dashboards and agents.
-
Specifying the Criteria for Analyses
This procedure is a step in the process for constructing an analysis. For more information, see "What Is the Process for Constructing Analyses?"
You use the "Analysis editor: Criteria tab" to specify the criteria for an analysis, including columns, filters, and selection steps. You also can specify:
-
The default order in which columns are to be displayed in the analysis results
-
The default sorting for the values that are displayed in views
-
The default formatting (such as headings, number of decimal places, conditional formats, and systemwide defaults)
-
Column formulas (such as adding a Rank or Percentile function)
-
The aggregation rules for column totals
-
The sort order for subject area folders and folder objects within the Subject Areas pane
To specify the criteria for an analysis:
-
In the Criteria tab, select the columns to be included in the analysis by doing one of the following:
-
Double-clicking the columns in the "Subject Areas pane."
-
Dragging and dropping the columns from the Subject Areas pane to the "Selected Columns pane."
To select multiple non-contiguous columns, press and hold the Ctrl key, then click each column to include.
The selected columns are displayed in a box in the Selected Columns pane. Each column box has two sections. The upper section shows the name of the folder that contains the column, for example, Customers. The lower section shows the name of the column, for example, Customer Name.
If you want to:
-
Change the sort order of the subject area folders and objects within each folder, click the Sort Subject Area button. Clicking the button executes the sort and closes all subject area folders except the primary subject area. See "Changing the Sort Order of Subject Areas and Subject Area Folders" for additional information.
-
Add or remove related subject areas from which to select columns, click the Add/Remove Subject Areas toolbar button in the Subject Areas pane to display the "Add/Remove Subject Areas dialog."
If you add a related subject area but do not add any columns from that subject area to the analysis, then the subject area is not related to the analysis after you close and re-open the analysis.
-
Refresh the content in the Subject Areas pane, click the Refresh toolbar button on the Subject Areas pane or click the arrow beside the button.
Clicking the button executes the default behavior of Refresh Display. Clicking the arrow enables you to select Refresh Display or Reload Server Metadata to refresh the subject area's metadata.
For more information about these options, see the "Subject Areas pane."
-
-
Modify the columns or levels of hierarchical columns as needed using the Selected Columns pane:
-
Click the Options button to the right of a column name in the Selected Columns pane to display options to:
-
Specify the sort order for columns. (You cannot specify the sort order for hierarchy levels.)
For more information, see "Sorting Data in Views."
-
Edit formulas for attribute columns and measure columns, including customizing headings, and specifying the aggregation rule. (You cannot customize headings, specify the aggregation rule, or edit the formulas for hierarchical columns or for hierarchy levels.)
For more information, see "Editing the Formula for a Column."
-
Edit column properties to control the formatting and interaction of columns and hierarchy levels.
For more information on applying formatting, see "Applying Formatting to a Column."
-
Add filters for attribute columns and measure columns. (You cannot add filters for hierarchical columns or hierarchy levels.) For more information, see "Creating Column Filters."
-
Delete the columns from the analysis. (You cannot delete hierarchy levels.)
-
-
Click the Remove all columns from criteria toolbar button in the Selected Columns pane to remove all columns from the analysis.
-
Click the Combine results based on union, intersection, and difference operations toolbar button in the Selected Columns pane to combine the results of two or more analyses into a single result. For more information, see "Combining Columns Using Set Operations."
-
Use the Drag Column buttons in the Selected Columns pane to place the columns in the default order for display in the analysis results.
-
-
Add and edit inline filters as needed using the "Filters pane."
For more information, see "Creating Column Filters."
-
Create or edit selection steps as needed using the "Selection Steps pane."
For more information, see "Working with Selections of Data."
-
Add named filters, calculated items, and groups from the Oracle BI Presentation Catalog as needed using the "Catalog pane."
-
Use the buttons on the toolbar for the Criteria tab, as needed, to show or hide the Filters pane, to show or hide the Selections Steps pane, and to edit the properties of the analysis, such as the type of message (default or custom) to be displayed if no results are available.
You can now add views to the analysis. See "Displaying the Results of Analyses."
-
In general, an analysis should contain at least one measure column. Measure columns are the key additive measurements of business performance, such as dollar sales per store, or the number of service requests opened and closed each day. An analysis without any measure columns generally is not meaningful, and can cause poor query performance or unexpected results. If you want to build an analysis without any measure columns, then first consult the administrator.
-
Generally, you should avoid including both a hierarchical column and an attribute column that is also a lower level in the hierarchical column in the same analysis, unless you have selection steps that limit the data in the analysis to only the same level as the attribute column. If you do so, the data for all levels above the level that is the same as the attribute column will not be correct.
For example, suppose you have a hierarchical column named Merchandise Hierarchy that has these levels:
Total Product
   Brand
      LOB
         Product Type
            Product
And you have another attribute column named Product Name, which is the same level as the Product level. If you include both Merchandise Hierarchy and the Product Name attribute column in the same analysis, the data above the Product level will not be correct.
-
If you add a column from the Subject Areas pane to the Selected Columns pane after displaying the analysis results, then the column is either included (that is, displayed in the view) or excluded from existing views, depending on the setting of the Display of Columns Added in Criteria tab option in the "Analysis Properties dialog: Data tab":
-
The column is included in existing views as well as in any new views that you add, if the Display in existing and new views option is selected for the Display of Columns Added in the Criteria tab option.
-
The column is excluded from existing views (that is, it is placed in the Excluded drop target of the Layout pane) but included in any new views that you add, if the Exclude from existing views, but display in new views option is selected for the Display of Columns Added in the Criteria tab option.
For more information on the Excluded drop target, see "Understanding Drop Targets."
-
Understanding Null Suppression
By default, null measure values are suppressed for all analyses. As a content designer sometimes you may want to include null values in an analysis to contribute to the overall understanding of the data. You can set null values to display for the data at both analysis and view levels by selecting the Include Null Values option.
The following applies to an analysis or a view when the Include Null Values option is selected:
-
Column members display.
-
When drilling a column on the edge (one with null suppression turned off), null suppression is turned off for all columns on the edge.
-
Member selection and conditions are applied to the edge and are filtered first. Note that nulls may not display due to the applied condition.
-
Calculated items, groups, totals, grand totals, showing data as a percentage, and server running aggregates, such as a running sum, are not affected by the Include Null Values setting.
Note:
Oracle BI Presentation Services sorts null values based on the NULL_VALUES_SORT_FIRST setting located in the NQSConfig.INI file.
Note:
Null values will be suppressed in a table view if you have a criteria filter set on a measure.
You cannot turn off null suppression for the following:
-
Direct Database Requests. See "Working with Direct Database Requests" for additional information.
-
Analyses that have been combined. See "Combining Columns Using Set Operations" for additional information.
-
Hand-coded logical SQL analyses or any analysis that has been converted by using the Advanced Logical SQL settings. See "Examining the Logical SQL Statements for Analyses" for additional information.
To turn off null suppression at the analysis level:
-
In the Criteria or Results tab, click the Analysis Properties button (see "Analysis Properties dialog" for additional information.)
-
Select the Include Null Values option to turn off null suppression for all views. Note that null suppression can be overridden at the view level for funnels, gauges, graphs, tables, pivot tables, and trellises.
To turn off null suppression at the view level for funnels, gauges, graphs, tables, pivot tables, and trellises:
-
Display the Results tab for the specific view. See "Editing Views" for additional information.
-
Click the Properties button.
-
Select the appropriate Include Null Values options for the view. For example, if you want to turn off null suppression for both rows and columns in a pivot table (see "Null Values" for additional information), select the Include rows with only Null values and Include columns with only Null values check boxes. This setting displays corresponding dimensions that have data, as well as null values. Note that if the view contains prompts or section edges, they also inherit the null suppression value from either the row or column edge.
Note:
Turning null suppression off may increase the volume of the data returned and impact performance. Contact your administrator for additional information.
If results for analyses that include null values are not as you expect, ensure that data in your sources is consistent. See "Ensuring That Data in Multiple Sources Is Consistent" in Oracle Fusion Middleware Metadata Repository Builder's Guide for Oracle Business Intelligence Enterprise Editionfor more information.
Example 1: Adding a Filter to a Row Edge on a Measure When Null Values Are Included
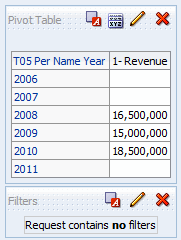
Suppose that you have a pivot table with Year on the row edge and Include Null Values selected in the Pivot Table Properties dialog (that is, nulls are not suppressed). See "Null Values" for additional information.
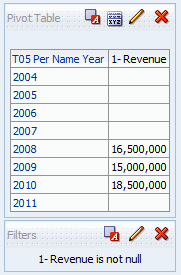
Figure 2-3 shows an example of T05 Per Name Year on the row edge with null values not suppressed.
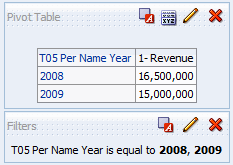
Figure 2-4 shows an example of T05 Per Name Year on the row edge with null values not suppressed and a Criteria filter set to 2008 and 2009. When the Criteria filter is set for the attribute column, the filter is applied and the corresponding rows are removed from the analysis.
Example 2: Adding a Filter to a Row Edge on a Measure When Null Values Are Included
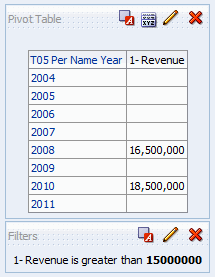
Suppose that you have the same pivot table with Year on the row edge and null values selected in the Pivot Table Properties dialog (the same criteria as indicated in Figure 2-3). This time however, you set the filter on the measure, 1 - Revenue, where the value is "greater than 15,000,000." (See "Null Values" for additional information.)
Figure 2-5 shows an example of the results. Oracle BI Server returns all years (regardless of the measure filter) for unsuppressed edge queries. Because the measure value for T05 Per Name Year is equal to 15,000,000, the value for the row is filtered out, but the row still displays.
Example 3: Adding a "Not Null" Filter to a Row Edge on a Measure When Null Values Are Included
Suppose that you have the same pivot table with Year on the row edge and Include Null Values selected in the Pivot Table Properties dialog (the same criteria as indicated in Figure 2-3). This time however, you set the filter on the measure, 1 - Revenue, to not null. See "New Filter dialog" for additional information.
Figure 2-6 shows an example of the results. Oracle BI Server returns all values and honors the Include Null Values option for the member. Therefore, all rows with null values are displayed.
Editing the Formula for a Column
You can edit the formulas for attribute columns and measure columns when you specify the criteria for an analysis. This editing affects the column only in the context of the analysis and does not modify the formula of the original column in the subject area. You can also customize table and column headings and specify the aggregation rule for column totals. (This functionality is not available for hierarchical columns.)
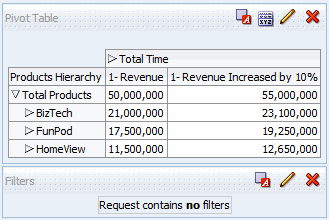
A column formula specifies what the column values represent. In its most basic form, such as "Base Facts"."1 - Revenue", a column takes the data from the data source as is. You can edit the formula to add functions, conditional expressions, and so on. This editing enables you to present analysis results in a variety of ways. For example, suppose that you want to perform what-if analysis and show what the revenue might be by product if you increased revenue by 10%. You can see this increase by changing the formula for the 1 - Revenue column to show the revenue increased by 10%. Figure 2-7 shows an analysis in a pivot table that includes the 1 - Revenue column (which shows the revenue in the data source) and the 1 - Revenue Increased by 10% column, where the formula for the 1 - Revenue column was edited to calculate revenue increased by 10%.
To edit the formula of a column:
-
In the "Selected Columns pane," click the Options button beside the column whose formula you want to edit and select Edit Formula. The "Edit Column Formula dialog" is displayed.
-
Use the "Edit Column Formula dialog: Column Formula tab" to perform various tasks such as creating customized headers and creating or editing the formula for the column. You can build a simple mathematical formula using operator and character buttons, such as "Base Facts"."1 - Revenue"*1.10.
-
Optionally, use the "Edit Column Formula dialog: Bins tab" to combine values for the column into sets.
-
Click OK.
The column formula is saved with the analysis with which it is used.
"What Are Analyses?"
"Specifying the Criteria for Analyses"
Combining Columns Using Set Operations
After you have selected a subject area for an analysis, you can combine columns from one or more subject areas using Set operations such as Union or Intersect. By combining columns, you create a column for displaying the data in a different way.
Guidelines for Selecting Columns to Combine
When selecting columns to combine, keep the following guidelines in mind:
-
The number and data types of the columns to combine must be the same. The number of rows that are returned for each column can differ.
-
You can select columns from the same subject area or from a different subject area, but the columns must have some commonality.
-
You can specify one Set operation for one collection of criteria. For example, if you create criteria from the A-Sample Sales subject area, you can apply only one Set operation to those columns. You cannot apply different Set operations to different columns in the collection of criteria.
-
You cannot use hierarchical columns, selection steps, or groups when you combine criteria.
Difference Between Combining Columns Using Set Operations and Adding Columns from Related Subject Areas
Combining columns using Set operations produces different results than adding columns from related subject areas:
-
When you combine columns using Set operations, the analysis results show a single newly combined column governed by a Set operation. For example, see "Example: Combining Columns from One Subject Area."
-
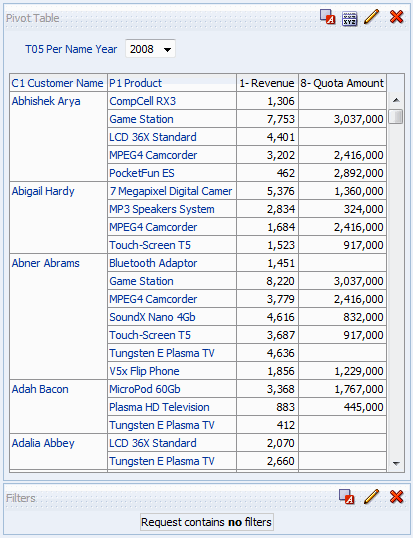
When you add columns from related subject areas to an analysis, the results show each added column individually. For example, if you have the appropriate permissions, then you can create an analysis by selecting one column from a primary subject area and selecting another column from a related subject area.
Figure 2-8 shows a table with columns from related subject areas. The 1 - Revenue measure is stored in the A-Sample Sales subject area and the 8 - Quota Amount measure is stored in the B-Sample Quotas Subject Area.
For information, see "What Are Subject Areas and Columns?"
Example: Combining Columns from One Subject Area
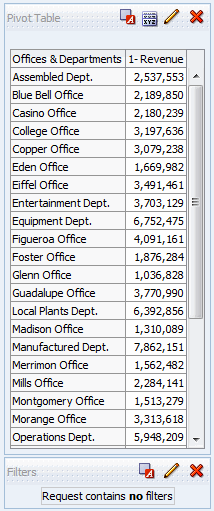
The A-Sample Sales subject area contains the Offices folder, which contains the D1 Office and D2 Department columns. You can combine these two columns and create a column called Offices & Departments. You can include the Union All Set operation to specify that this new column shows all the values from both columns in a single column in a table.
Combining Columns from One or More Subject Areas
The following procedure describes how to combine columns from one or more subject areas. Some steps include references to the example of creating the Offices & Departments column with the A-Sample Sales subject area.
Note:
Data formatting that has been saved as the systemwide default for a column is not reflected in a combined column. If you want the data formatting in the combined column, then you must reapply it to the combined column. For more information on data formatting, see "Column Properties dialog: Data Format tab."
To combine columns from one or more subject areas:
-
In the Analysis editor, create an empty analysis that uses a subject area such as A-Sample Sales.
-
In the Criteria tab, select the columns to include in the analysis. For example, select D1 Office from the Offices folder and 1 - Revenue from the Base Facts folder.
-
In the "Selected Columns pane," click the Combine results based on union, intersection, and difference operations toolbar button to display the Select Subject Area menu.
-
Select a subject area that contains the columns to combine with the columns that you have previously included. For example, click A-Sample Sales.
The Set Operations area is displayed in the Selected Columns pane. Note the boxes with dotted line borders that are displayed below the criteria. These boxes indicate the kind of column that you must combine with those that you have previously included. For example, the boxes might include "Add Column (D1 Office)" and "Add Column (1 - Revenue)". This text indicates that the columns that you include in each of those boxes is combined with the previously selected D1 Office and 1 - Revenue columns using a Set operation to form a new column. When you combine measure columns, no arithmetic operations are performed.
-
In the Subject Areas pane, select the columns to combine with the originally selected columns. For example, from the Offices folder, select D2 Department and from the Base Facts folder, select 1 - Revenue.
Note that the boxes that previously had dotted line borders now hold the columns that you have just selected. You have now specified the columns to combine.
-
Click the Union button under the Result Columns link. Select the operation type to use for combining the columns. For example, select the Union All type.
The result columns are those that are displayed in views after applying the set operation of the derived columns.
-
Click the Result Columns link. Note that the Selected Columns pane is updated to show the newly combined columns that you have just created. You can work with these columns as you do other columns in this pane. For example, you can rename the first column (that is the single newly combined column) by following these steps:
-
Click the Options button for the D1 Office column.
-
Select Column Properties.
-
Select Column Format.
-
Ensure that Custom Headings is selected.
-
In the Column Heading box, enter
Offices & Departments. -
Click OK.
-
-
Click the Results tab to view the columns in a table in the "Compound Layout."
Figure 2-9 shows how the combined Offices & Departments column is displayed in a table.
Viewing Metadata Information from the Subject Areas Pane
You can view metadata information for subject areas, folders, columns, and hierarchy levels. This is helpful, for example, if you need a full description of one of these objects when creating an analysis.
Metadata information is contained in a metadata dictionary. A metadata dictionary is a static set of XML documents. Each XML document describes a metadata object, such as a column, including its properties and relationships with other metadata objects.
Note:
In order for you to view metadata information, the administrator must have performed various configuration tasks, as described in "Providing Access to Metadata Dictionary Information" in Oracle Fusion Middleware System Administrator's Guide for Oracle Business Intelligence Enterprise Edition.
To view metadata information:
-
In the Subject Areas pane in the Criteria tab or the Results tab, select the subject area, folder, column, or hierarchy level for which you want to view metadata information.
-
Click View Metadata Dictionary on the toolbar.
The metadata dictionary information for the object is displayed either in a new browser window or in a tab, depending on the browser setting.
Note:
If the metadata dictionary information does not display in the browser, then ensure that the browser setting to access data sources across domains is enabled.
Changing the Sort Order of Subject Areas and Subject Area Folders
Note:
Changing the sort order of subject areas and subject area folders applies to Oracle BI EE 11.1.1.7.10 and later versions, and might not be available in earlier versions. For more information about Oracle BI EE 11.1.1.7.10, see "New Features for 11.1.1.7.10."
Subject area folders are displayed in the Subject Areas pane in the sort order specified in the "My Account dialog: Preferences tab" by default. This sort order, established in the Oracle BI metadata repository and initially set by the administrator, can be changed by modifying the Subject Area Sort Order option in the "My Account dialog: Preferences tab." See "Changing the Sort Order of Subject Areas and Subject Area Folders" for additional information.
To change the sort order for subject areas, subject area folders, and the columns within the subject area folders for all analyses, perform the following steps:
-
In the global header, click Signed In As username and select My Account.
The "My Account dialog: Preferences tab" is displayed.
-
Click the Subject Area Sort Order list, and then make the appropriate selection. Your options follow:
-
Sort A to Z (ascending)
-
Sort Z to A (descending)
-
Sort in Saved Order (The subject areas sort order specified in an analysis is saved as the default and subsequently used as the default sort order.)
-
Default - Sort in Saved Order (The subject areas sort order is originally defined in the repository.)
Note:
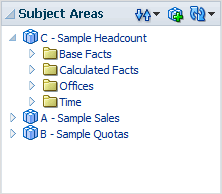
The primary subject area specified when creating the analysis is always fixed at the top; that is, it will always display as the first subject area in the "Subject Areas pane." For example (see Figure 2-10), if you have three subject areas (A - Sample Sales, B - Sample Quotas, and C - Sample Headcount) participating in the analysis with C - Sample Headcount as the primary subject area, and the sort order is ascending, then the subject areas display as follows:
-
C - Sample Headcount
-
A - Sample Sales
-
B - Sample Quotas
-
-
-
Click OK to save your changes.
To change the sort order for subject area folders and objects within each folder for the current analysis that you are creating or modifying, perform the following steps:
-
In the "Subject Areas pane," add the appropriate subject areas.
-
Click the Sort Subject Area button, and then select one of the following sort orders from the drop-down list
-
Sort A to Z
-
Sort Z to A
-
Sort in Saved Order
There is a fixed sort order for column types. This fixed sort order is:
-
Nested folders
-
Measures
-
Attributes
-
Hierarchies
-
-
Complete your analysis.
Note:
Subject area sorts are not case-sensitive.
Where Else is the Subject Areas Sort Order Reflected?
In addition to seeing the subject areas sort order in the Subject Areas pane in the Criteria tab, you can also see the subject areas sort order that you configured in the Subject Areas pane reflected in the following places:
-
Select the More columns option in the "Filters pane" to display the "Select Column dialog." See "Creating Column Filters."
-
Select the More options in the "Filters pane" and select Add EVALUATE_PREDICATE function to display the "New EVALUATE_PREDICATE Function dialog." See "Working with the EVALUATE_PREDICATE Function."
-
Select the More options button for a column in the Criteria tab, the Available pane displays in the "Edit Column Formula dialog: Column Formula tab." See "Editing the Formula for a Column."
-
Select the More options button for a column in the Criteria tab, the "Edit Column Formula dialog: Column Formula tab" displays. Click the Filter button to display the "Insert Filter dialog." See "Editing the Formula for a Column."
-
Select the "Analysis editor: Prompts tab," and then click the New button and select Column Prompt - More Columns to display the "Select Column dialog." See "Adding Prompts to Analyses."
-
Click the Show/Hide Selection Steps Pane button to display the "Selection Steps pane." Click Then New Step and select Apply a Condition. From the "New Condition Step dialog," select a Condition Type to display the Measure drop-down list. See "Creating Selection Steps."
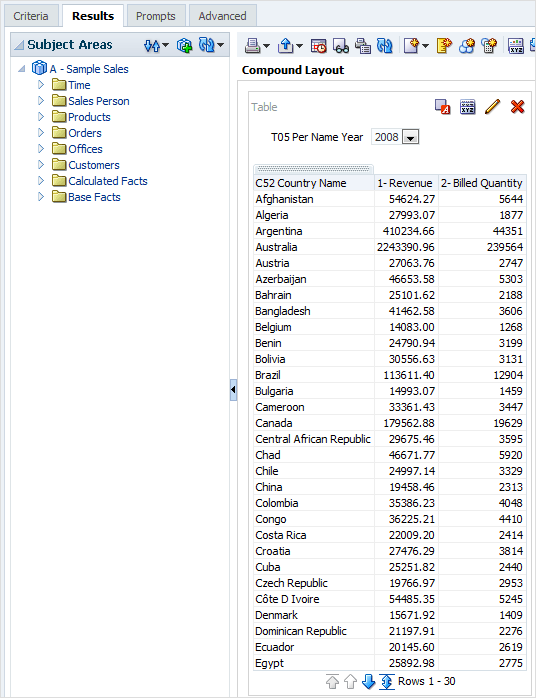
You can also see the subject areas sort order in the subject areas pane within the Results tab. The Results tab reflects the subject areas sort order, but the values for columns are not sorted. Figure 2-11 shows an example of A - Sample Sales sorted in descending order. The values for C52 Country Name (for example, Afghanistan, Algeria, Argentina, and so on) are not sorted in descending order.
Displaying the Results of Analyses
This procedure is a step in the process for constructing an analysis. For more information, see "What Is the Process for Constructing Analyses?"
You use the "Analysis editor: Results tab" to add different views of the results such as graphs, tickers, and pivot tables. For a list of the views that you can add, see "What Types of Views Are Available?"
When you create an analysis and display the Results tab, you see in the "Compound Layout" a title view and either a table or pivot table view by default, based on the following:
-
If the analysis contains only attribute columns and measure columns, then a table is displayed by default.
-
If the analysis contains at least one hierarchical column, then a pivot table is displayed by default.
The administrator might have configured different views to display by default in the Results tab.
You can combine views and position them anywhere in the Compound Layout. For example, you can create side-by-side pivot tables that reflect different views of the data, graphs that allow you to explore interrelationships in depth, and filters that limit the results.
Together all of these views are called a compound layout. You can create additional compound layouts, as described in "Creating Additional Compound Layouts."
To display the results of an analysis:
-
Click the Results tab.
The results of the analysis are displayed in a table or pivot table.
-
(Optional) Edit the table or pivot table or add additional views. For more information, see "Adding Views for Display in Dashboards."
Creating Additional Compound Layouts
As you work with an analysis, you can create multiple compound layouts that use different combinations of views. For example, one layout might include a graph and a title, and another layout might include a graph and a narrative view. When you add the analysis to a dashboard page, you can select which layout you want to include on that page.
To create additional compound layouts:
-
Click the "Analysis editor: Results tab."
-
Create another compound layout in the "Compound Layout" by clicking one of the following buttons on the toolbar of the Results tab:
-
Create Compound Layout — Creates a new instance of the compound layout.
-
Duplicate Compound Layout — Creates a copy of the current compound layout, with the same views.
-
Alerting Users to No Data in the Results of Analyses
When the results of an analysis return no data, the following default message is displayed to users:
No Results
The specified criteria didn't result in any data.
This is often caused by applying filters and/or selections that are too restrictive or that contain incorrect values.
Please check your Analysis Filters and try again.
The filters currently being applied are shown below.
Rather than display the default message, you can create a customized message to alert users. This message enables you to provide your own explanation for why the analysis returned no data.
To create a custom message to alert users to no data in the results of an analysis:
-
Edit the analysis to which you want to add a custom message.
-
Click the "Analysis editor: Results tab."
-
Click the Analysis Properties toolbar button. The "Analysis Properties dialog" is displayed.
-
In the No Results Settings box, select Display Custom Message.
-
In the Header field, enter the text of the header for the custom message.
-
In the Message field, enter the explanatory text.
-
Click OK.
Adding Prompts to Analyses
This procedure is a step in the process for constructing an analysis. For more information, see "What Is the Process for Constructing Analyses?"
You use the "Analysis editor: Prompts tab" to create prompts that allow users to select values to filter an analysis. Prompts allow users to select values that dynamically filter all views within the analysis.
To add a prompt to an analysis:
-
Click the Prompts tab.
-
Add the prompt, as described in Chapter 6, "Prompting in Dashboards and Analyses."
Examining the Logical SQL Statements for Analyses
This procedure is an advanced step in the process for constructing an analysis. For information, see "What Is the Process for Constructing Analyses?"
You use the "Analysis editor: Advanced tab" to examine the XML code and logical SQL statement that is generated for an analysis and optionally create an analysis based on that SQL statement. Generally you need not use the features of this tab, because the vast majority of functionality for working with analyses is provided through the user interface. The following list provides examples of situations in which you might want to examine SQL statements:
-
You can use the Prefix section to override any user variable or session variable that has been marked as available for updating. You can specify multiple variables to update with one line of code.
To override variables, use the following syntax:
SET VARIABLEvar-name=valueFor example, you can set the variables that are shown in the following code line:
SET VARIABLE "My Variable"=4, DISABLE_CACTHE_HIT = 1, LOGLEVEL = 2;For information on variables, see "Where Can I Reference Variables?"
-
You can temporarily change the logging level for an analysis for troubleshooting, even when logging is turned off for analyses. In the Prefix section of the Advanced tab, you can specify the following:
SET VARIABLE LOGLEVEL=4;This specification runs the analysis at level 4, which facilitates advanced troubleshooting. The default level is 0, which indicates no logging. You can view the logs using the View Log link on the "Administration: Manage Sessions page."
See Oracle Fusion Middleware Metadata Repository Builder's Guide for Oracle Business Intelligence Enterprise Edition for information on logging levels.
-
You can enter your own logical SQL statements. Entering your own statements eliminates many features of Oracle BI EE (such as hierarchical columns, selection steps, groups, and formatting), but enables you to use functions such as SET operations.
-
You can create an analysis using the SQL statements from an existing analysis as your starting point.
Before working with the Advanced tab, keep the following important points in mind:
-
This procedure is only for advanced users and developers that have the appropriate responsibilities to access the Advanced tab. It is assumed that you understand advanced SQL statements, have expertise working with the Oracle BI Server metadata, are familiar with the SQL information in Appendix D, "Logical SQL Reference," and understand the content and structure of the underlying data sources.
-
This tab provides the Advanced SQL Clauses area, which enables you to add clauses to the SQL statements and other similarly advanced features. These features, except for the ability to specify a prefix, are disabled for analyses that contain hierarchical columns, member selections, or groups.
-
The links at the top of the tab allow you to download analysis results into Microsoft Excel. You might be unable to download analysis results based on the security features that have been configured at your organization. For information, contact your administrator.
Note:
You can see the logical SQL statement that an analysis is using by inserting a logical SQL view. You can also enter SQL statements using the "Administration: Issue SQL page."
To edit the XML code or examine the SQL statement that is generated for an analysis:
-
Click the "Analysis editor: Advanced tab."
-
Use the links that correspond to the analysis name in the Referencing the Results area at the top of the tab to:
-
Display pages that contain links for working with the results of the analysis.
-
Download a file for working with the results of the analysis in Excel. For information, see "Integrating an Analysis with Microsoft Excel's Internet Query Feature."
-
-
Use the fields in the Analysis XML area to view and modify the XML code, and click Apply XML.
If you modify the XML code, then you affect the analysis as it is saved in the Oracle BI Presentation Catalog.
To apply the settings for the Partial Update and the Bypass Oracle BI Presentation Services Cache boxes, you must also click the Apply SQL button at the bottom of the tab.
-
Use the read-only box in the SQL Issued area to examine the SQL statement that is sent to the Oracle BI Server when the analysis is executed.
If you want to create an analysis using the SQL statement from the current analysis as the starting point, then click the New Analysis button. Any hierarchical columns, selection steps, groups, or formatting that are specified in the current analysis are removed.
-
Depending on the content of the analysis, use the available fields in the Advanced SQL Clauses area to change the subject area, add GROUP BY or HAVING clauses, and specify DISTINCT processing and a prefix.
-
Click Apply SQL to apply your changes.
Note:
Use care when clicking the Apply SQL button. When you do, Oracle BI EE creates a new analysis based on the SQL statement that you have added or modified. Therefore, you lose all views, formatting, and so on that you had previously created for the analysis. The XML code is also modified for the new analysis.
Integrating an Analysis with Microsoft Excel's Internet Query Feature
Integrating an analysis with Excel's Internet Query (IQY) feature enables you to run the analysis from within Excel. This feature can be useful for printing and distributing analyses. You can integrate analyses into Excel's IQY feature only with results that are displayed in one or more table or pivot table views. Other view types are not supported.
When the IQY file is opened in Excel, you are prompted to enter your Oracle Business Intelligence user ID and password. (You must have a nonblank password.) Then, the results of the saved analysis are retrieved and placed in an Excel spreadsheet. You can save the Excel spreadsheet so that the data can be refreshed directly from within Excel.
Note:
You might not be able to download results into an Excel spreadsheet if your company is using certain security features. For more information, contact the administrator.
By default, Excel prompts you to enter your user ID and password each time that the query is refreshed. Alternatively, you can save your user ID and password within the spreadsheet. Consult your Excel documentation for details.
To integrate an analysis with Excel's IQY feature:
-
Save an analysis with one or more table or pivot table views.
-
In the "Analysis editor: Advanced tab," click the link to generate and download a Web Query file.
-
Save the file to the desired location.
After opening the file in Excel, you can specify additional formatting, enhance it with graphs, and so on, but you cannot edit the query. For information, see your Excel documentation.
Saving Analyses
This procedure is a step in the process for constructing an analysis. For more information, see "What Is the Process for Constructing Analyses?"
You can save an analysis to a:
-
Personal folder, from which only you can access it.
Your top-level personal folder is called My Folders. Every user with a unique user name has a folder called My Folders. This is designed to hold the analyses that you run most often, and other content that you access frequently.
When you click the Refresh Display link at the bottom of the pane, the analysis is listed under the folder in which you saved it.
-
Shared folder, from which users with permission to access that folder can access it.
-
Lotus Notes database by either:
-
Saving the analysis to a Web Archive file (file extension .mht), and then uploading the file to the Lotus Notes database.
-
Saving the analysis and scheduling it to be sent by email automatically to a specific address on a Lotus Notes server using an agent. The Lotus Notes server can then process the email and write it to the database.
-
To save an analysis:
-
In the Analysis editor, click the Save Analysis toolbar button to display the dialog to save the analysis.
-
If you want to save the analysis to a personal or shared folder:
-
In the Save In box, select the personal or shared folder in which to save the analysis.
-
In the Name field, enter a name for the analysis, such as forecasted_sales.
-
Click OK.
-
-
If you want to save the analysis to a Lotus Notes database using a Web Archive file:
-
In the Save In box, select the folder in which to save the analysis.
-
In the Name field, enter a name for the analysis, including an .mht file extension, such as forecasted_sales.mht.
-
Click OK.
-
Upload the .mht file to the Lotus Notes database.
-
-
If you want to save the analysis to a Lotus Notes database using an agent:
-
In the Save In box, select the folder in which to save the analysis.
-
In the Name field, enter a name for the analysis, such as forecasted_sales.
-
Click OK.
-
Create the agent, scheduling it to be sent by email to a specific address on a Lotus Notes server.
For more information on creating an agent, see "Creating Agents."
-
Creating Agents from Analyses
You can create an agent directly from an analysis. When you create an agent using this method, Oracle BI EE does the following:
-
Creates a condition based on the analysis and adds the condition to the "Agent editor: Condition tab"
-
Adds the analysis as the content delivery on the "Agent editor: Delivery Content tab"
For more information on agents, see Chapter 8, "Delivering Content."
To create an agent from an analysis:
-
Locate the analysis from which you want to create an agent using one of the following methods:
-
Open the analysis, click the "Analysis editor: Results tab" and then the Schedule toolbar button.
The analysis is saved and then the "Agent editor" is displayed.
-
Navigate to the analysis on the "Catalog page," click the More list, and then click the Schedule option.
The "Agent editor" is displayed.
-
-
Complete the following tabs of the Agent editor:
-
Save the agent.
Editing Analyses
Note:
If you are using Oracle BI Enterprise Edition in accessibility mode, then you use the "BI Composer wizard" rather than the "Analysis editor" to edit analyses. For more information on BI Composer, see Chapter 14, "Using BI Composer to Work with Analyses." For more information on accessibility mode, see Appendix C, "Accessibility Features."
To edit an analysis:
-
In the global header, click Catalog to display the "Catalog page."
-
Navigate to the analysis to edit and click the Edit link. The analysis is displayed in the "Analysis editor."
-
Make the desired changes.
-
Save the analysis.
Editing Upgraded Analyses that Contain "Advanced SQL"
In previous releases (prior to 11g), advanced users could edit the SQL statements for analyses using the Advanced tab. In this release, you can continue to use the "Analysis editor: Advanced tab" for this purpose, if the analysis does not contain features such as hierarchical columns, selections, or groups.
For more information, see "Examining the Logical SQL Statements for Analyses." For information on upgrade, see "Upgrading Analyses that Use Advanced SQL" in Oracle Fusion Middleware Upgrade Guide for Oracle Business Intelligence.
About Embedding an Analysis in a Dashboard
Embedding an analysis in a dashboard causes it to execute automatically and display the results within the dashboard. This provides access to current results. For example, if you are a sales executive whose company captures sales data on a daily basis, then you might want to have the dollar volume of product that was sold today be displayed on the front page of your dashboard.
You can embed previously created analyses from the Oracle BI Presentation Catalog by using the Dashboard editor. For information about the Dashboard editor, see "Adding Content to Dashboards."
Working with Direct Database Requests
Users with the appropriate privileges can create and issue a direct database request directly to a physical back-end database. The results of the request can be displayed and manipulated within the Analysis editor, and subsequently incorporated into dashboards and agents. This section includes the following topics:
Setting Privileges for Direct Requests
The following privilege settings in Oracle BI Presentation Services Administration control whether you can modify and execute direct requests:
-
Edit Direct Database Analysis
If this privilege is set for you, then you can create and edit direct database requests.
-
Execute Direct Database Analysis
If this permission is set for you, then you can issue direct requests and see the results.
For information, see "Managing Presentation Services Privileges" in Oracle Fusion Middleware Security Guide for Oracle Business Intelligence Enterprise Edition.
Executing a Direct Database Request
You can send a direct request to the database from Oracle BI EE.
Note:
Oracle BI Server security rules for data are bypassed and cannot be applied when direct database requests are issued from Oracle BI EE.
To execute a direct database request:
-
In the global header, select New, then Analysis, then Create Direct Database Query.
Note:
In versions prior to Oracle BI EE 11.1.1.7.10, the Create Direct Database Query option was named Create Direct Database Request.
The "Analysis editor: Criteria tab" is displayed with options for creating a database request.
-
Specify the appropriate options on the Criteria tab.
-
To issue the request and see the results, if any, click the Results tab.
Seeing the Results of Direct Database Requests
After you retrieve columns to create an analysis from a direct database request, you can work with that analysis similarly to how you work with other analyses. The following list outlines differences with analyses whose columns originated from direct database requests:
-
The "Subject Areas pane" does not contain any columns, because you are not working with columns from a repository.
-
You cannot create groups or selection steps for this analysis.
-
You cannot specify conditional formatting for the columns.
Using Variables
You can reference variables in several areas of Oracle BI Enterprise Edition, including in analyses, dashboards, KPIs, actions, agents, and conditions. For example, suppose that you wanted to create an analysis whose title displays the current user's name. You can do this by referencing a variable.
There are five types of variables that you can use:
-
Session
-
Repository
-
Presentation
-
Request
-
Global
What Are Session Variables?
A session variable is a variable that is initialized at login time for each user. When a user begins a session, the Oracle BI Server creates a new instance of a session variable and initializes it.
There are as many instances of a session variable as there are active sessions on the Oracle BI Server. Each instance of a session variable could be initialized to a different value.
There are two types of session variables:
-
System — A session variable that the Oracle BI Server and Oracle BI Presentation Services use for specific purposes.
System session variables have reserved names that cannot be used for other kinds of variables (such as static or dynamic repository variables and non-system session variables).
-
Non-system — A system variable that the administrator creates and names. For example, the administrator might create a SalesRegion non-system variable that initializes the name of a user's sales region.
The administrator creates non-system session variables using the Oracle BI Administration Tool.
For more information, see "About Session Variables" in Oracle Fusion Middleware Metadata Repository Builder's Guide for Oracle Business Intelligence Enterprise Edition.
What Are Repository Variables?
A repository variable is a variable that has a single value at any point in time.
There are two types of repository variables:
-
Static — Repository variables whose value persist and do not change until the administrator decides to change them.
-
Dynamic — Repository variables whose values are refreshed by data returned from queries.
The administrator creates repository variables using the Oracle BI Administration Tool.
For more information, see "About Repository Variables" in Oracle Fusion Middleware Metadata Repository Builder's Guide for Oracle Business Intelligence Enterprise Edition.
What Are Presentation Variables?
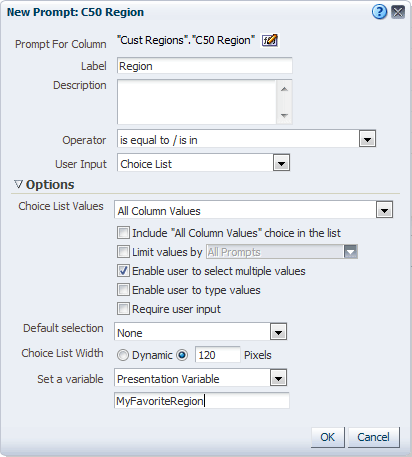
A presentation variable is a variable that you can create as part of the process of creating one of the following types of dashboard prompts:
-
Column prompt — A presentation variable created as part of a column prompt is associated with a column, and the values that it can take come from the column values.
To create a presentation variable as part of a column prompt, in the "New Prompt dialog" (or Edit Prompt dialog), you have to select Presentation Variable in the Set a variable field and then enter a name for the variable in the Variable Name field.
For information on working with column prompts, see "Creating a Column Prompt."
-
Variable prompt — A presentation variable created as part of a variable prompt is not associated with any column, and you define the values that it can take.
To create a presentation variable as part of a variable prompt, in the "New Prompt dialog" (or Edit Prompt dialog), you have to select Presentation Variable in the Prompt for field and then enter a name for the variable in the Variable Name field.
For information on working with variable prompts, see "Creating a Variable Prompt."
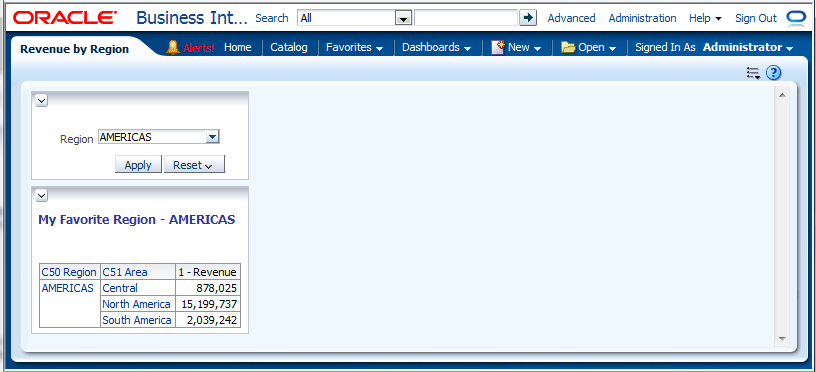
The value of a presentation variable is populated by the column or variable prompt with which it was created. That is, each time a user selects one or more values in the column or variable prompt, the value of the presentation variable is set to the value or values that the user selects.
What Are Request Variables?
A request variable lets you override the value of a session variable but only for the duration of a database request initiated from a column prompt. You can create a request variable as part of the process of creating a column prompt.
A request variable that is created as part of a column prompt is associated with a column, and the values that it can take come from the column values.
To create a request variable as part of a column prompt, in the "New Prompt dialog" (or Edit Prompt dialog), you have to select Request Variable in the Set a variable field and then enter the name of the session variable to override in the Variable Name field.
The value of a request variable is populated by the column prompt with which it was created. That is, each time a user selects a value in the column prompt, the value of the request variable is set to the value that the user selects. The value, however, is in effect only from the time the user presses the Go button for the prompt until the analysis results are returned to the dashboard.
Note:
Only string and numeric request variables support multiple values. All other data types only pass the first value.
For information on working with column prompts, see "Creating a Column Prompt."
What Are Global Variables?
Note:
Global variables apply to Oracle BI EE 11.1.1.7.10 and later versions, and might not be available in earlier versions. For more information about Oracle BI EE 11.1.1.7.10, see "New Features for 11.1.1.7.10."
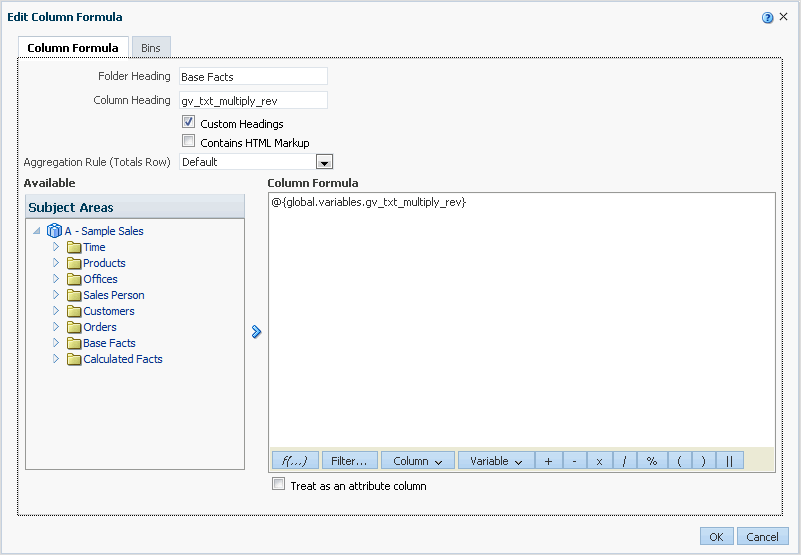
A global variable is a column created by combining a specific data type with a value. The value can be a string, number, date, time, expression, formula, and so on. You create a global value during the process of creating an analysis by using the "Edit Column Formula dialog." The global variable is then saved in the catalog and made available to all other analyses within a specific tenant system. (See "What is Multitenancy?" in Oracle Fusion Middleware System Administrator's Guide for Oracle Business Intelligence Enterprise Edition.)
You create a global variable as part of the process of creating an analysis.
Global variables can be of the following types:
-
Date
-
Date and Time
-
Number
-
Text
-
Time
To create a global variable:
-
In the "Selected Columns pane" on the Criteria tab, click the Options button beside the column whose formula you want to edit and select Edit Formula. The "Edit Column Formula dialog: Column Formula tab" is displayed. You can a create a custom header for the global variable by using this tab.
-
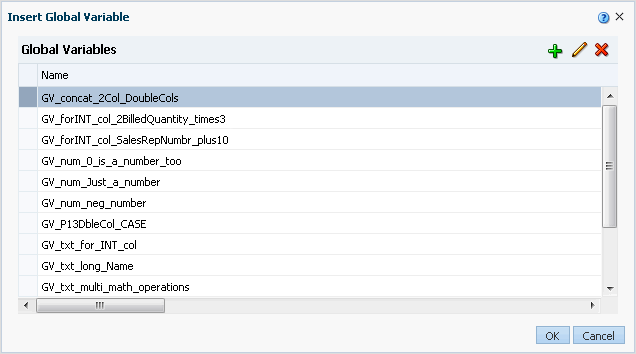
Click the Variable button, and then select Global. The "Insert Global Variable dialog" is displayed.
-
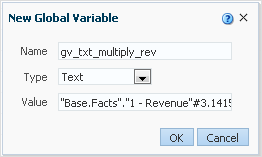
Click the Add New Global Variable button. The "New Global Variable dialog" displays.
-
Enter a unique name.
-
Select a data type.
-
Enter a value.
Note:
If you are selecting "Date and Time" as the data type, enter the value, as in the following example:
03/25/2004 12:00:00 AMIf you are entering an expression or a calculation as a value, you must use the Text data type, as in the following example:
"Base Facts"."1- Revenue"*3.1415 -
Click OK. The new global variable is added to the Insert Global Variable dialog.
-
Select the new global variable that you just created, and then click OK. The Edit Column Formula dialog is displayed with the global variable inserted in the Column Formula pane.
The Custom Headings check box is automatically selected. Enter a new name for the column to which you have assigned a global variable to more accurately reflect the variable.
-
Click OK.
The global variable is evaluated at the time the analysis is executed, and the value of the global variable is substituted appropriately. Only users with appropriate privileges can manage (add, edit, and delete) global variables.
Where Can I Reference Variables?
You can reference variables in the following areas (but not all types of variables can be referenced in each area):
-
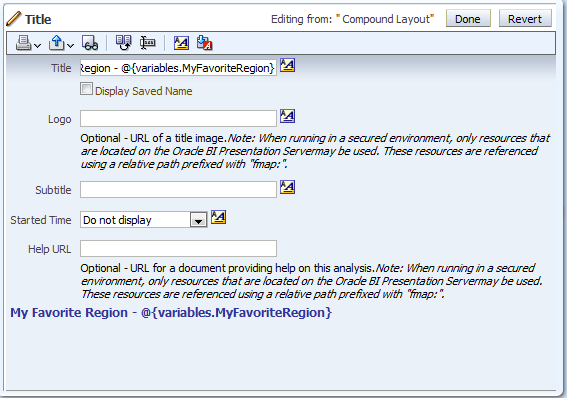
Title views. See "Results tab: Title editor."
-
Narrative views. See "Results tab: Narrative editor."
-
Static text views. See "Results tab: Static Text editor."
-
Filters. See "New Filter dialog" and "New EVALUATE_PREDICATE Function dialog."
-
Column formulas. See "Edit Column Formula dialog: Column Formula tab."
-
Conditional formatting conditions. See "Column Properties dialog: Conditional Format tab" and "New Condition dialog."
-
Table and column headings in analyses. See "Column Properties dialog: Column Format tab."
-
Direct database requests. See "Working with Direct Database Requests."
-
Dashboard prompts and inline prompts. See "New Prompt dialog."
-
Headers and footers for PDF output. See "Edit Footer or Header dialog."
-
Link or image objects in a dashboard. See "Link or Image Properties dialog."
-
Text objects in a dashboard. See "Text Properties dialog."
-
Graphs to specify conditional formatting of graph data. See "Graph Properties dialog: Style tab" and "Style and Conditional Formatting dialog: Conditional Formatting tab."
-
Gauge thresholds. See "Enter Expression dialog."
-
Gauge limits. See "Customize Gauge Limit dialog."
-
Agents. See the "Agent editor: Delivery Content tab."
-
Actions to specify parameters. See "Create New Action dialog" and "Edit Parameter Mapping dialog."
-
Conditions to specify parameters. See "New Condition dialog."
-
Selection steps. See "New Condition Step dialog."
-
KPIs to define thresholds. See "KPI editor: States page."
-
KPIs included in a KPI watchlist. See "Add KPI dialog."
-
URL fields in dialogs. See "Image Map Prompt Properties dialog."
For the syntax that you use to reference variables, see "What Is the Syntax for Referencing Variables?"
What Is the Syntax for Referencing Variables?
You can reference variables in analyses, dashboards, KPIs, and agents. How you reference a variable depends on the task that you are performing.
For tasks where you are presented with fields in a dialog, you must specify only the type and name of the variable (not the full syntax), for example, referencing a variable in a filter definition.
For other tasks, such as referencing a variable in a title view, you specify the variable syntax. The syntax you use depends on the type of variable as described in Table 2-1.
Note:
In the syntax, if the "at" sign (@) is not followed by a brace ({), then it is treated as an "at" sign.
Table 2-1 Syntax for Referencing Variables
| Type of Variable | Syntax | Example |
|---|---|---|
|
Session |
@{biServer.variables['NQ_SESSION.variablename']} where variablename is the name of the session variable, for example DISPLAYNAME. For a list of system session variables that you can use, see "About System Session Variables" in Oracle Fusion Middleware Metadata Repository Builder's Guide for Oracle Business Intelligence Enterprise Edition. |
@{biServer.variables['NQ_SESSION.USER']} |
|
Repository |
@{biServer.variables.variablename} or @{biServer.variables['variablename']} where variablename is the name of the repository variable, for example, prime_begin. |
@{biServer.variables.prime_begin} or @{biServer.variables['prime_begin']} |
|
Presentation or request |
@{variables.variablename}[format]{defaultvalue} or @{scope.variables['variablename']} where:
Note: When using a dashboard prompt with a presentation variable that can have multiple values, the syntax differs depending on the column type. Multiple values are formatted into comma-separated values and therefore, any format clause is applied to each value before being joined by commas. |
@{variables.MyFavoriteRegion}{EASTERN REGION} or @{MyFavoriteRegion} or @{dashboard.variables['MyFavoriteRegion']} or (@{myNumVar}[#,##0]{1000}) or (@{variables.MyOwnTimestamp}[YY-MM-DD hh:mm:ss]{) or (@{myTextVar}{A, B, C}) |
|
Global |
@{global.variables.variablename} where variablename is the name of the global variable, for example, gv_region. When referencing a global variable, you must use the fully qualified name as indicated in the example. Note: The naming convention for global variables must conform to EMCA Scripting language specifications for JavaScript. The name must not exceed 200 characters, nor contain embedded spaces, reserved words, and special characters. If you are unfamiliar with JavaScripting language requirements, consult a third party reference. |
@{global.variables.gv_date_n_time} |
You also can reference variables in expressions. The guidelines for referencing variables in expressions are described in Table 2-2.
Table 2-2 Guidelines for Referencing Variables in Expressions
| Type of Variable | Guidelines | Example |
|---|---|---|
|
Session |
|
"Market"."Region"=VALUEOF(NQ_SESSION."SalesRegion") |
|
Repository |
|
CASE WHEN "Hour" >= VALUEOF("prime_begin") AND "Hour" < VALUEOF("prime_end") THEN 'Prime Time' WHEN ... ELSE...END
|
|
Presentation |
Note: If the @ sign is not followed by a {, then it is treated as an @ sign. When using a presentation variable that can have multiple values, the syntax differs depending on the column type. Use the following syntax in SQL for the specified column type in order to generate valid SQL statements:
|
"Market"."Region"=@{MyFavoriteRegion}{EASTERN REGION}
or
"Products"."P4 Brand"=(@{myTextVar}['@']{BizTech})
or
"Products"."PO Product Number"=(@{myNumVar}{1000})
or
"Sales Person"."E7 Hire Date"=(@{myDateTimeVar}{timestamp '2013-05-16 00:00:01'})
or
"Time"."Total Fiscal Time"=(@{myDateVar}{date '2013-05-16'})
or
"Time"."Time Right Now"=(@{myTimeVar}{time '00:00:01'})
For multiple values (in specified data types) when using SQL: If the column type is Text and variablename is passing val1, val2, and val3, the resultant is ('val1', 'val2', 'val3'). or If the column type is Date and variablename is passing 2013-08-09 and 2013-08-10, the resultant is (date '2013-08-09', date '2013-08-10'). or If the column type is Date-time and variablename is passing 2013-08-09 00:00:00 and 2013-08-10 00:00:00, the resultant is (timestamp '2013-08-09 00:00:00', timestamp '2013-08-10 00:00:00'). |
For the specific areas where you can reference variables, see "Where Can I Reference Variables?"
What Predefined Presentation Variables Are Available?
Table 2-3 contains a list of the predefined presentation variables that you can reference in analyses, dashboards, KPIs, and agents. (Note that the syntax for these predefined presentation variables omits the variables. qualifier, for example, @{session.locale} rather than @{session.variables.locale}.)
Note:
For time zone variables, the time zone for a user must be set to a value other than Default in order for this variable to work. (Users set their preferred time zone in the "My Account dialog: Preferences tab.")
Table 2-3 Predefined Presentation Variables
| Scope | Presentation Variable | Example |
|---|---|---|
|
system |
productVersion |
system.productVersion = 11.1.1.3 (Build 090619.0110.000) |
|
system |
currentTime |
system.currentTime = 6/29/2009 7:35:59 PM |
|
session |
locale |
session.locale = en-us |
|
session |
language |
session.language = en |
|
session |
rtl This indicates whether the language selection in the Login page is a right to left language. For example, if the language selection is Hebrew, then this variable returns true. |
session.rtl = false |
|
session |
timeZone |
session.timeZone = (GMT-06:00) Central America |
|
session |
timeZone.id This returns a value that is not localized. |
session.timeZone.id = (GMT-06:00) Central America |
|
session |
timeZone.name This returns a localized value. |
session.timeZone.name = (GMT-06:00) Central America |
|
session |
timeZone.value This returns a localized value. |
session.timeZone.value = (GMT-06:00) Central America |
|
session |
loginTime |
session.loginTime = 6/29/2009 7:12:01 PM |
|
session |
logoutTime |
session.logoutTime = 6/29/2009 8:02:01 PM |
|
session |
lastAccessTime |
session.lastAccessTime = 6/29/2009 7:35:59 PM |
|
session |
currentUser |
session.currentUser = Administrator |
|
session |
currency.name |
session.currency.name = $ English - United States |
|
session |
currency.symbol |
session.currency.symbol = $ |
|
session |
currency.userPreference |
session.currency.userPreference = Global Currency 2 |
|
session |
accessibility This indicates whether accessibility mode is enabled for the current user session. |
session.accessibility = true |
|
user |
id |
user.id = Administrator |
|
user |
displayName |
user.displayName = Administrator |
|
user |
homeDirectory |
user.homeDirectory = /users/administrator |
|
dashboard |
currentPage |
dashboard.currentPage = page 1 |
|
dashboard |
xml |
dashboard.xml = the dashboard XML |
|
dashboard |
dashboard.currency.name |
dashboard.currency.name = Euro |
|
dashboard |
dashboard.currency.symbol |
dashboard.currency.symbol = $ |
|
dashboard |
dashboard.currency.userPreference |
dashboard.currency.userPreference = Global Currency 1 |
|
dashboard |
dashboard.path This returns the path in the catalog. |
dashboard.path = /users/administrator/_portal/Sales |
|
dashboard |
dashboard.name |
dashboard.name = MyDashboard |
|
dashboard |
dashboard.caption This returns the localized name of the dashboard. |
dashboard.caption = Sales |
|
dashboard |
dashboard.location This returns the URL for the location. |
dashboard.location = Dashboard&PortalPath=/users/administrator/_portal |
|
dashboard |
dashboard.description |
dashboard.description = Sales by region and district |
|
dashboard |
dashboard.author |
dashboard.author = Administrator |
|
dashboard.currentPage |
dashboard.currentPage.name |
dashboard.currentPage.name = Sales page 1 |
|
dashboard.currentPage |
dashboard.currentPage.path |
dashboard.currentPage.path = /users/administrator/_portal/Sales/page 1 |
|
dashboard. current Page |
dashboard.currentPage.currency.name |
dashboard.currentpage.currency. |
|
dashboard.current Page |
dashboard.currentPage.currency.symbol |
dashboard.currentPage.currency. |
|
dashboard. current Page |
dashboard.currentPage.currency.userPreference |
dashboard.currentPage.currency.userPreference = Global Currency 2 |
|
analysis |
report.currency.name |
report.currency.name = $ English - United States |
|
analysis |
report.currency.symbol |
report.currency.symbol = $ |
|
analysis |
report.currency.userPreference |
report.currency.userPreference = |
Example of Referencing a Variable in a Title View
Suppose that you have created a dashboard prompt called Region, which is based on the C50 Region column and which creates a presentation variable called MyFavoriteRegion as shown in Figure 2-15.
Suppose also that you have created an analysis that shows Revenue by Region and Area. You have also added a filter on the C50 Region column that is set to Is Prompted so that you can prompt the user for a region using this Region prompt.
You can reference the MyFavoriteRegion variable in the Title view so that the user's selection in the Region prompt is displayed in the title of the analysis. To do so, you enter the variable syntax @{variables.MyFavoriteRegion} in the Title field in the Title editor, as shown in Figure 2-16.
Figure 2-17 shows the results on a dashboard page when a user selects AMERICAS REGION in the Region prompt. Notice that the variable in the analysis title has been updated to the user's selection, AMERICAS REGION.
