4 Adding Parameters and Lists of Values
This chapter describes how to add parameters and lists of values to a BI Publisher data model.
This chapter includes the following sections:
4.1 About Parameters
Adding parameters to a data model enables users to interact with data when they view reports.
BI Publisher supports the following parameter types:
-
Text — the user enters a text string to pass as the parameter.
-
Menu — the user makes selections from a list of values. A list of values can contain fixed data that you specify or the list can be created using a SQL query that is executed against any of the defined data sources. This option supports multiple selections, a "Select All" option, and partial page refresh for cascading parameters.
To create a menu type parameter, define the list of values first; then define the parameter and associate it to the list of values. See Section 4.4, "Adding Lists of Values."
-
Date — the user selects a date as a parameter. Note that the data type must also be "Date" and the format must be Java date format.
Once you have defined the parameters in the data model, you can further configure how the parameters are displayed in the report as a report-level setting. For more information about the report-level settings, see the section "Configuring Parameter Settings for the Report" in Oracle Fusion Middleware Report Designer's Guide for Oracle Business Intelligence Publisher.
Support for parameters varies based on the data set type. SQL Query data sets support the full set of available parameter features. Other types of data sets may support all, none, or a subset of these features. Table 4-1 summarizes what is supported for each data set type.
Table 4-1 Parameter Support by Data Set Type
| Data Set Type | Parameter Support | Multiple Selection | Can Select All | Refresh Other Parameters on Change |
|---|---|---|---|---|
|
SQL Query |
Yes |
Yes |
Yes |
Yes |
|
MDX Query |
No |
No |
No |
No |
|
Oracle BI Analysis |
Inherited from Oracle BI Analysis |
Yes (via Oracle BI Dashboards) |
Yes (via Oracle BI Dashboards) |
Yes (via Oracle BI Dashboards) |
|
View Object |
Yes, provided that the view object supports and is designed for it |
No |
No |
Yes (view object parameters only) |
|
Web Service |
Yes |
No |
No |
No |
|
LDAP Query |
Yes |
No |
No |
No |
|
XML File |
No |
No |
No |
No |
|
Microsoft Excel File |
Yes |
No |
No |
No |
|
CSV File |
No |
No |
No |
No |
|
HTTP (XML Feed) |
Yes |
No |
No |
No |
|
Oracle Endeca Query |
No |
No |
No |
No |
4.2 Adding a New Parameter
To add a new parameter:
-
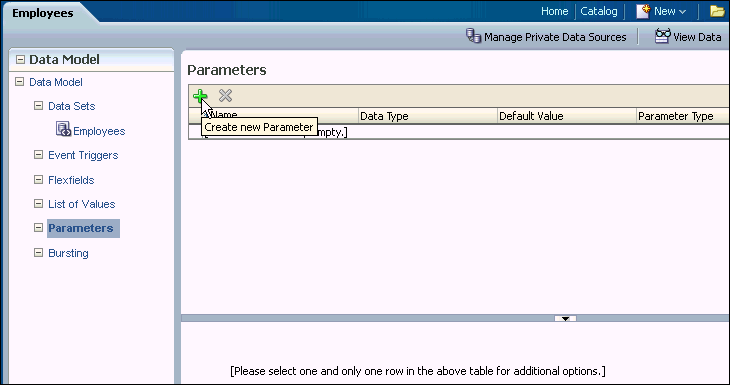
On the Data Model components pane, click Parameters and then click Create new Parameter, as shown in Figure 4-1.
-
Enter a Name for the parameter. The name must match any references to this parameter in the data set.
Note:
The parameter name you choose must not exceed the maximum length allowed for an identifier by your database. Refer to your database documentation for identifier length limitations.
-
Select the Data Type from the list. A Date data type only support a Date Parameter Type. The other data types support a Parameter Type of either Text or Menu:
-
String
-
Integer
Note:
The Integer data type for parameters is a 64-bit sign integer. It has a value range of -9,223,372,036,854,775,808 to a maximum value of 9,223,372,036,854,775,807 (inclusive).
-
Boolean
-
Date
-
Float
-
-
Enter a Default Value for the parameter. This is recommended to prevent long running queries. Default parameter values are also used to preview the report output when you design report layouts using BI Publisher Layout Editor.
-
Select the Parameter Type. Supported types are:
-
Text — Allows the user to enter a text entry to pass as the parameter. See Section 4.2.1, "Defining a Text Parameter."
-
Menu — Presents a list of values to the user. See Section 4.2.2, "Defining a Menu Parameter."
-
Date — Passes a date parameter. The Data Type must also be Date. See Section 4.2.3, "Defining a Date Parameter."
Note:
BI Publisher supports parameters that are of type text entry or menu (list of values) but not both. That is, you cannot define a "combination" parameter that enables a user to either enter a text value or choose from a menu list of values.
-
-
Row Placement - this setting configures the number of rows for displaying the parameters and in which row to place each parameter. For example, if your report has six parameters, you can assign each parameter to a separate row, 1 - 6, with one being the top row; or, you can assign two parameters each to rows 1, 2, 3. By default, all parameters are assigned to row 1.
Row placement can also be configured at the report level. The report definition supports additional display options for parameters. For more information, see "Configuring Parameter Settings for the Report" in Oracle Fusion Middleware Report Designer's Guide for Oracle Business Intelligence Publisher.
4.2.1 Defining a Text Parameter
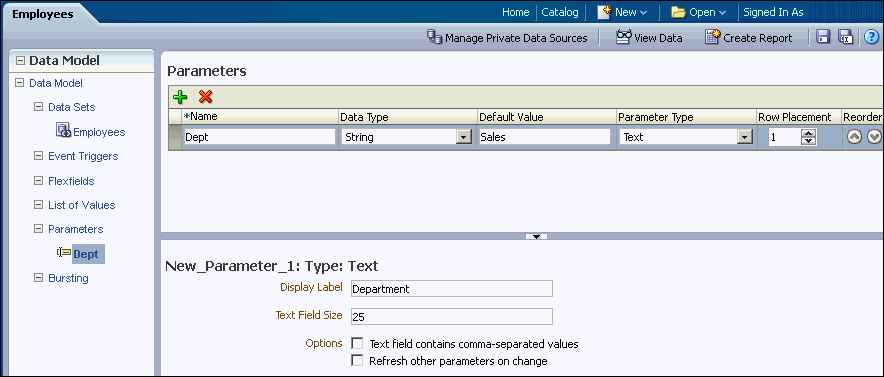
The Text type parameter provides a text box to prompt the user to enter a text entry to pass as the parameter to the data source. Figure 4-2 shows a text parameter definition.
To define a Text type parameter:
-
Select Text from the Parameter Type list. The lower pane displays the appropriate fields for the selection.
-
Enter the Display Label. The display label is the label that displays to users when they view the report. For example: Department.
-
Enter the Text Field Size as an integer. This field determines the number of characters that the user can enter into the text box. For example: 25.
-
Enable the following Options if required:
-
Text field contains comma-separated values — Select this option to enable the user to enter multiple comma-delimited values for this parameter. The parameter in your data source must be defined to support multiple values.
-
Refresh other parameters on change — Performs a partial page refresh to refresh any other parameters whose values are dependent on the value of this one.
-
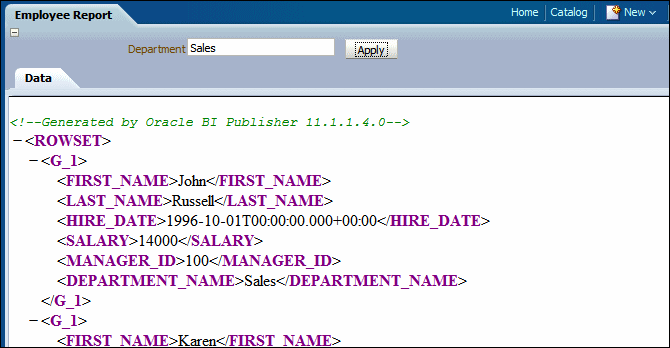
Figure 4-3 shows how the Department parameter displays to the report consumer.
4.2.2 Defining a Menu Parameter
A Menu type parameter presents a list of values to the user. You must define the list of values first. See Section 4.4, "Adding Lists of Values." The Menu type parameter supports the data types of String and Integer only.
The Menu parameter definition includes the options:
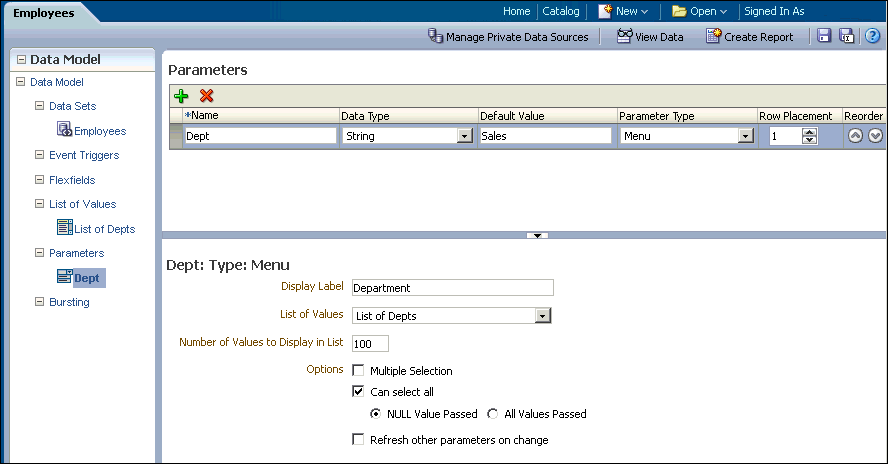
Figure 4-4 shows the menu parameter definition.
To define a Menu type parameter:
-
Select Menu from the Parameter Type list. The lower pane displays the appropriate fields. Choose the Data Type (must be String or Integer).
-
Enter the Display Label. The display label is the label that displays to users when they view the report. For example: Department.
-
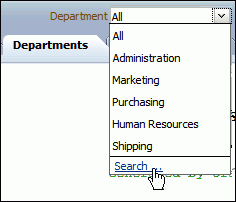
Enter the Number of Values to Display in List. If the number of values in the list exceeds the entry in this field, the user must click Search to find a value not displayed, as shown in Figure 4-5. This field defaults to 100.
-
Select the List of Values that you defined for this parameter.
-
Enable the following Options if required:
-
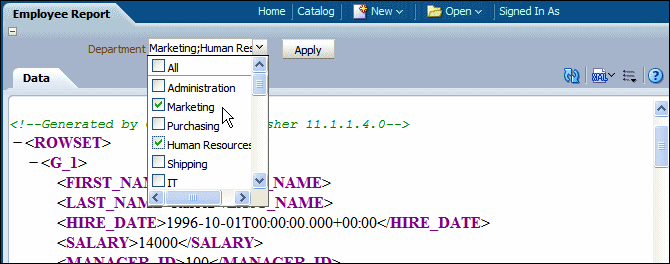
Multiple Selection — Allows the user to select multiple entries from the list. Your data source must be able to support multiple values for the parameter. The display of a menu parameter that supports multiple selection differs. See Figure 4-6 and Figure 4-7.
-
Can select all — Inserts an "All" option in the list. When the user selects "All" from the list of values, you have the option of passing a null value for the parameter or all list values. Choose NULL Value Passed or All Values Passed.
Note:
Using * passes a null, so you must handle the null in your data source. A method to handle the null would be the standard Oracle NVL command, for example:
where customer_id = nvl(:cstid, customer_id)
where cstid is a value passed from the LOV and when the user selects All it passes a null value.
-
Refresh other parameters on change — Performs a partial page refresh to refresh any other parameters whose values are dependent on the value of this one.
-
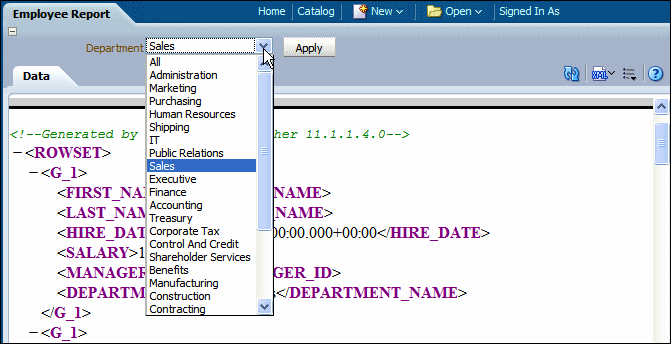
Figure 4-6 shows how the Department menu type parameter displays to the report consumer when multiple selection is not enabled.
Figure 4-7 shows how the Department menu type parameter displays to the report consumer when multiple selection is enabled.
4.2.2.1 Customizing the Display of Menu Parameters
The display of menu parameters in the report can be further customized in the report definition. Menu type parameters support the additional display option as a static list of checkboxes or radio buttons. For more information, see "Configuring Parameter Settings for the Report" in the Oracle Fusion Middleware Report Designer's Guide for Oracle Business Intelligence Publisher.
4.2.3 Defining a Date Parameter
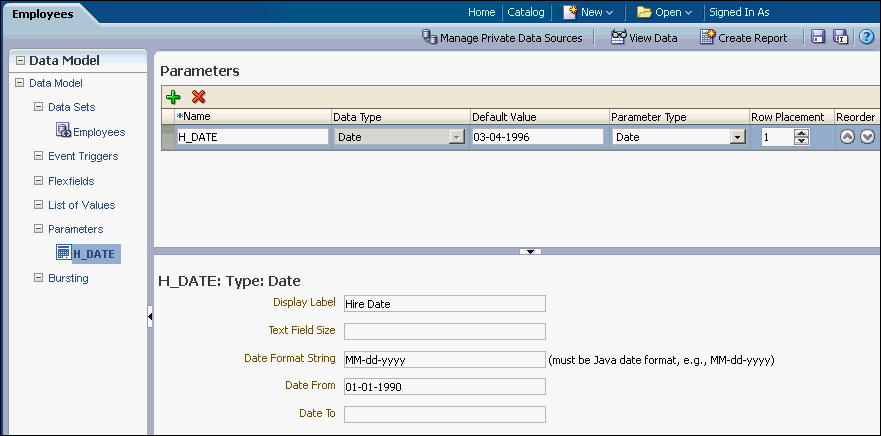
The Date type parameter provides a date picker to prompt the user to enter a date to pass as the parameter to the data source. Figure 4-8 shows the date parameter definition.
To define a Date type parameter:
-
Select Date from the Parameter Type list. The lower pane displays the appropriate fields for your selection.
-
Enter the Display Label. The display label is the label that displays to users when they view the report. For example: Hire Date.
-
Enter the Text Field Size as an integer. This field determines the number of characters that the user can enter into the text box for the date entry. For example: 10.
-
Enter the Date Format String. The format must be a Java date format (for example, MM-dd-yyyy).
-
Optionally, enter a Date From and Date To. The dates entered here define the date range that are presented to the user by the date picker. For example if you enter the Date From as 01-01-1990, the date picker does not allow the user to select a date before 01-01-1990. Leave the Date To blank to enable all future dates.
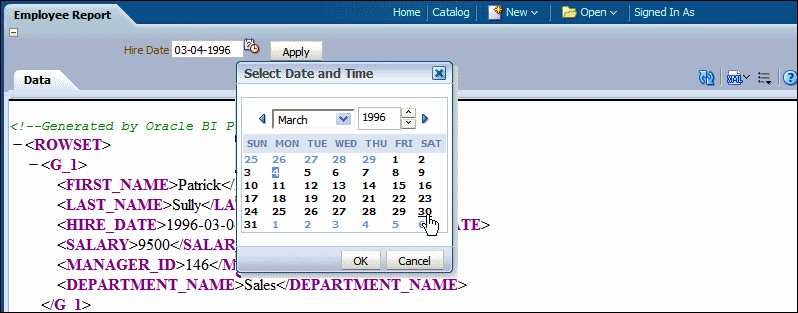
Figure 4-9 shows how the Hire Date parameter displays to the report consumer.
4.3 About Lists of Values
A list of values is a defined set of values that a report consumer can select from to pass a parameter value to your data source. If you define a menu type parameter, the list of values that you define here provides the menu of choices. You must define the list of values before you define the menu parameter.
Populate the list using one of the following methods:
-
Fixed Data — Manually enter the list of values.
-
SQL Query — Retrieve the values from a database using a SQL query.
-
Flexfield— Retrieve the values from a key flexfield defined in Oracle E-Business Suite. This option is only available when BI Publisher is using the Oracle E-Business Suite security model. For more information, see Section 4.5, "Adding Flexfield Parameters."
4.4 Adding Lists of Values
To add a List of Values:
-
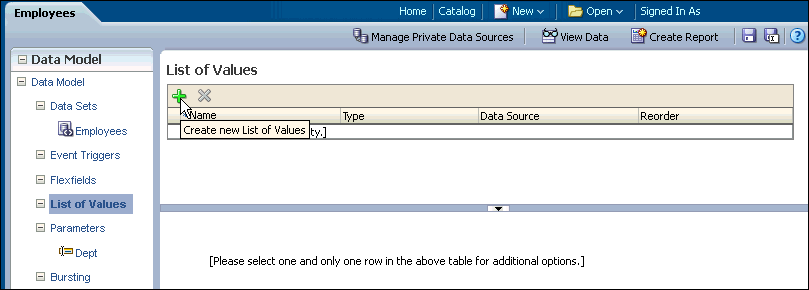
On the Data Model components pane, click List of Values and then click Create new List of Values, as shown in Figure 4-10.
-
Enter a Name for the list and select a Type: SQL Query or Fixed Data.
4.4.1 Creating a List from a SQL Query
The data engine expects a (display) name-value pair from the list of values query. In the list of values select statement, the column listed first is used as the display name (what is shown to the user) and the second is used for the value that is passed to the parameter in the data set query by the data engine.
If the query returns only one column, then the same column value is used both as the list of values display name shown to the user and as the value that is passed to the parameter.
To create a list from a SQL query:
-
Select a Data Source from the list.
-
In the lower pane, select Cache Result (recommended) if you want the results of the query cached for the report session.
-
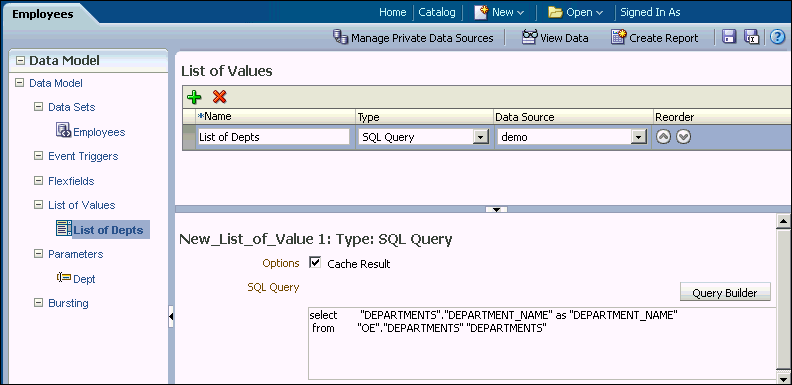
Enter the SQL query or use the Query Builder. See Section 2.3.3, "Using the SQL Query Builder" for information on the Query Builder utility. Figure 4-11 shows a SQL query type list of values.
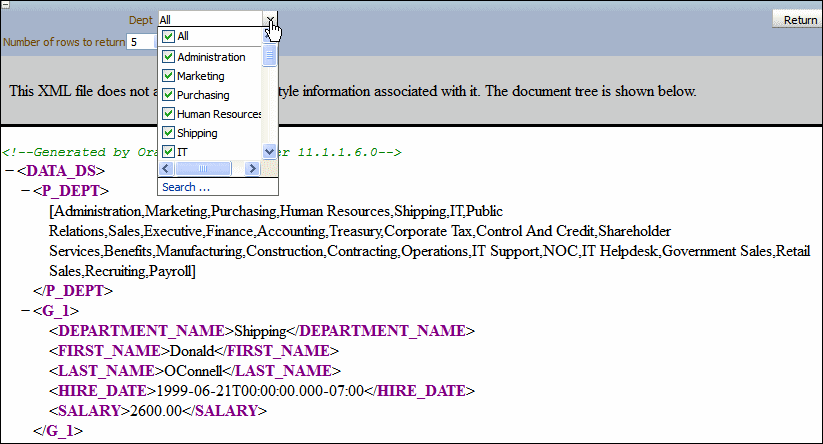
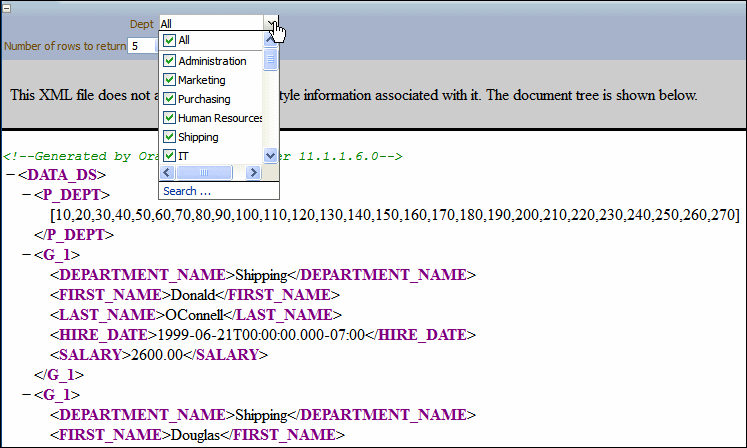
The SQL query shown in Figure 4-11 selects only the DEPARTMENT_NAME column from the DEPARTMENTS table. In this case the list of values both displays the results of the query in the list and passes the same value to the parameter in the data set. Figure 4-12 shows the list of values display entries and the values passed to the data set. Note that the menu items and the values shown for P_DEPT are the DEPARTMENT_NAME values.
If instead you wanted to pass the DEPARTMENT_ID to the parameter in the data set yet still display the DEPARTMENT_NAME in the list, construct your SQL query as follows:
Select     "DEPARTMENTS"."DEPARTMENT_NAME" as "DEPARTMENT_NAME",
         "DEPARTMENTS"."DEPARTMENT_ID" as "DEPARTMENT_ID"
 from    "DEMO"."DEPARTMENTS" "DEPARTMENTS
Figure 4-13 shows the list of values display entries and the values passed to the data set. Note that the menu lists the DEPARTMENT_NAME while the values shown for P_DEPT are the DEPARTMENT_ID values.
4.4.2 Creating a List from a Fixed Data Set
To create a list from a fixed data set:
-
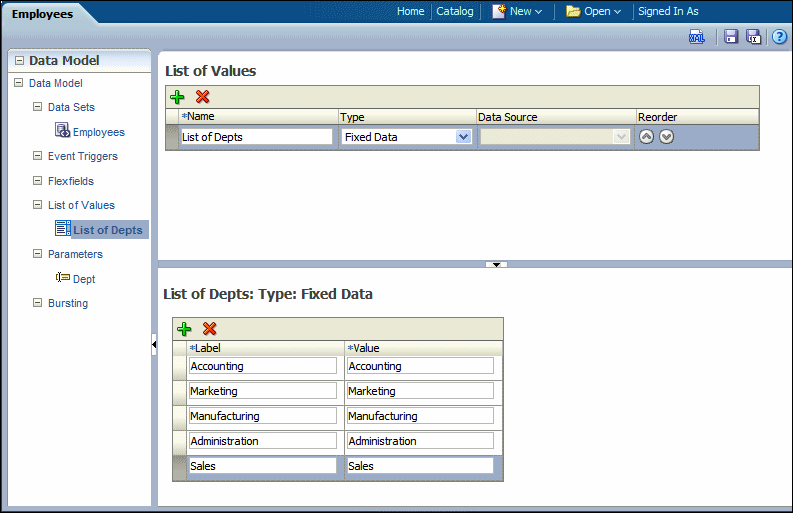
In the lower pane, click the Create new List of Values icon to add a Label and Value pair. The label is displayed to the user in the list. The value is passed to the data engine.
-
Repeat for each label-value pair required.
Figure 4-14 shows fixed data type list of values.
4.5 Adding Flexfield Parameters
Oracle E-Business Suite customers who have configured BI Publisher to use E-Business Suite security can create reports that leverage key flexfields as parameters. When you define a data model to pass a key flexfield as a parameter, BI Publisher presents a dialog to the report consumer to make selections for the flexfield segments to pass as parameters to the report, similar to the way flexfields are presented when running reports through the concurrent manager in the E-Business Suite.
The flexfield list of values displays in the report viewer as shown in Figure 4-15.
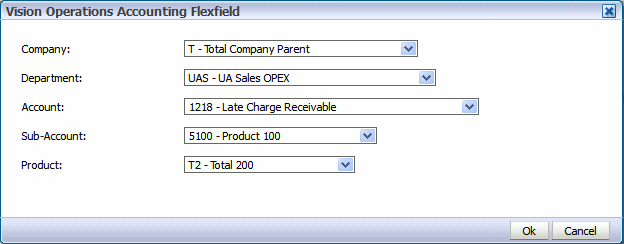
The flexfield list of values displays as a dialog from which you select the segment values as shown in Figure 4-16.
4.5.1 Prerequisites for Using Flexfields
When defining a list of values, E-Business Suite customers see a list Type called "Flexfield". To enable the flexfield type list of values, BI Publisher must be configured to use E-Business Suite Security. The flexfield must already be defined in the E-Business Suite.
For information about flexfields in the E-Business Suite, see Oracle E-Business Suite Flexfields Guide. For information about setting up E-Business Suite security for BI Publisher, see "Integrating with Oracle E-Business Suite" in Oracle Fusion Middleware Administrator's Guide for Oracle Business Intelligence Publisher.
4.5.2 Adding a Flexfield Parameter and List of Values
To add a flexfield parameter complete the following tasks. Each task is described in detail in the subsequent sections:
-
Add the flexfield list of values (LOV). The flexfield type list of values retrieves the flexfield metadata definition to present the appropriate values for each segment in the flexfield list of values selection dialog.
-
Add a parameter and associate it with the flexfield LOV by selecting your flexfield list of values as the source menu for the parameter.
-
Add the Flexfield component to the data model. Use the flexfield parameter to pass values to the Flexfield defined in the Data Model.
-
Reference the Flexfield in your SQL query using the
&flexfield_namesyntax. At runtime the&flexfield_namereference is replaced with the lexical code constructed based on the values in the Flexfield component definition.
4.5.2.1 Adding the Flexfield List of Values
To add a list of values retrieved from a flexfield definition:
-
On the Data Model components pane, click List of Values and then click Create new List of Values.
-
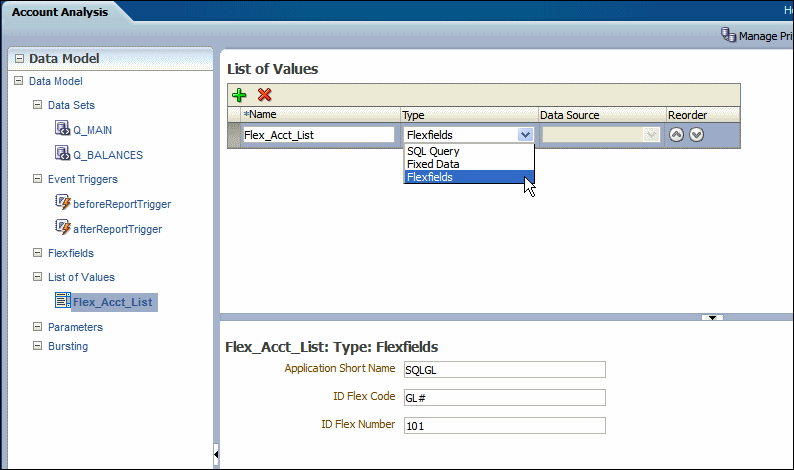
Enter a Name for the list and choose Flexfields as the Type. When you choose Flexfields as the Type, the Data Source option is no longer editable. All flexfields type lists of values use the Oracle E-Business Suite as the data source.
-
In the lower pane, enter the following:
-
Application Short Name - the E-Business Suite application short name, for example: SQLGL.
-
ID Flex Code - the flexfield code defined for this flexfield in the Register Key Flexfield form, for example: GL#.
-
ID Flex Number - the name of the source column or parameter that contains the flexfield structure information, for example: 101 or :STRUCT_NUM. If you use a parameter, ensure that you define the parameter in the data model.
Figure 4-17 shows a sample flexfield type LOV.
-
4.5.2.2 Adding the Menu Parameter for the Flexfield List of Values
Define the parameter to display the flexfield list of values and capture the values selected by the user. The Flexfield type parameter definition includes an additional field called Range to support range flexfields. A range flexfield supports low and high values for each key segment rather than just single values.
To define the parameter for the flexfield list of value:
-
On the Data Model components pane, click Parameters and then click Create new Parameter.
-
Select Menu from the Parameter Type list. Choose the Data Type (must be String or Integer).
-
Enter a Default Value for the flexfield parameter. The default value can also be customized in the report definition.
-
Enter the Row Placement. The row placement determines where this parameter appears in the report viewer. Row placement can also be customized in the report definition
-
Enter the Display Label. The display label is the label that displays to users when they view the report. For example: Account From. The display label can also be customized in the report definition.
-
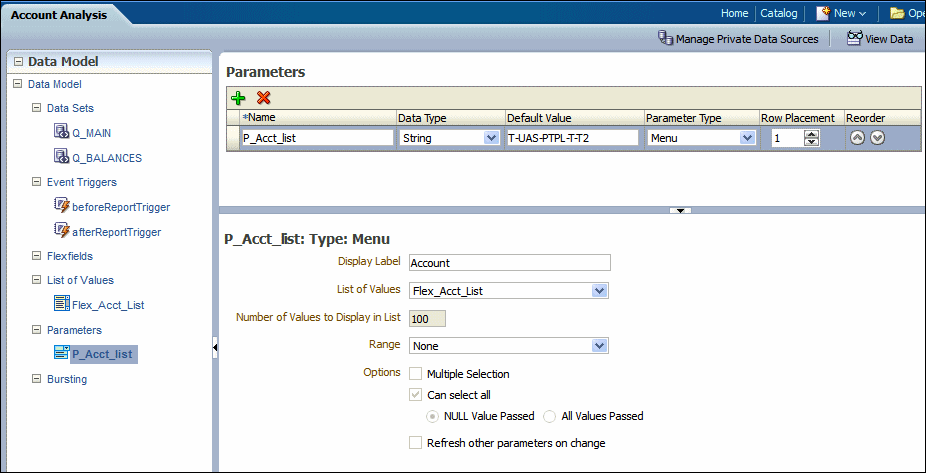
Select the List of Values that you defined for this parameter. When you select a list of values that is the Flexfield type, an additional field labeled Range displays. To pass a range of flexfield segment values see Section 4.5.2.5, "Passing a Range of Values."
-
The following options are disabled for flexfield parameters: Number of Values to Display in List, Multiple Selection, Can select all, and Refresh other parameters on change.
Figure 4-18 shows a parameter definition for the flexfield list of values.
4.5.2.3 Using the Flexfield Parameter to Pass Values to a Flexfield Defined in the Data Model
Now you can pass the parameter values to a flexfield component in the data model. Chapter 6, "Adding Flexfields" covers adding a flexfield component in detail. The simplified procedure is provided here to complete the example.
To define the Flexfield in the data model:
-
On the Data Model components pane, click Flexfields and then click Create new Flexfield.
-
Enter the following:
-
Name — Enter a name for the flexfield component.
-
Type — Select the flexfield type from the list. The type you select here determines the additional fields required. See Section 6.2.1, "Entering Flexfield Details."
-
Application Short Name — Enter the short name of the Oracle Application that owns this flexfield (for example, GL).
-
ID Flex Code — Enter the flexfield code defined for this flexfield in the Register Key Flexfield form (for example, GL#).
-
ID Flex Number — Enter the name of the source column or parameter that contains the flexfield structure information. For example: 101. To use a parameter, prefix the parameter name with a colon, for example, :PARAM_STRUCT_NUM.
-
-
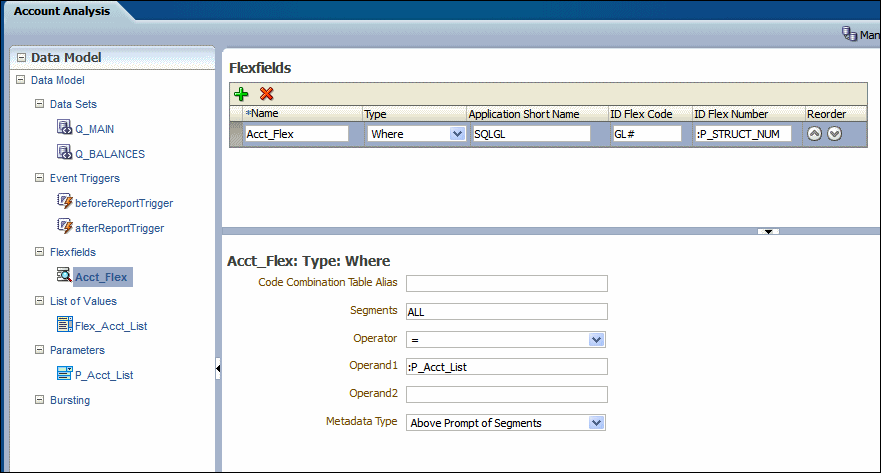
In the lower region of the page, enter the details for the type of flexfield you selected. For the field that is to take the parameter value, enter the parameter name prefixed with a colon, for example, :P_Acct_List.
In Figure 4-19 the Flexfield component is defined as a "Where" Type. The parameter :P_Acct_List is entered in the Operand1 field. At runtime, values selected by the user for the parameter P_Acct_List will be used to create the where clause.
4.5.2.4 Referencing the Flexfield in the SQL Query
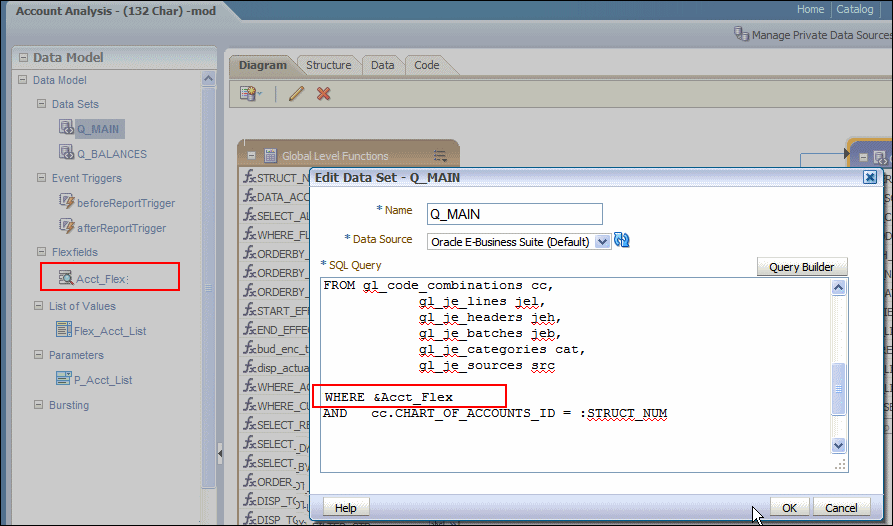
Finally, create the SQL query against the E-Business Suite database. Use the lexical syntax in the query as described in Section 6.2, "Adding Key Flexfields." In Figure 4-20 &Acct_Flex is the Flexfield lexical called in the where condition of the SQL query.
4.5.2.5 Passing a Range of Values
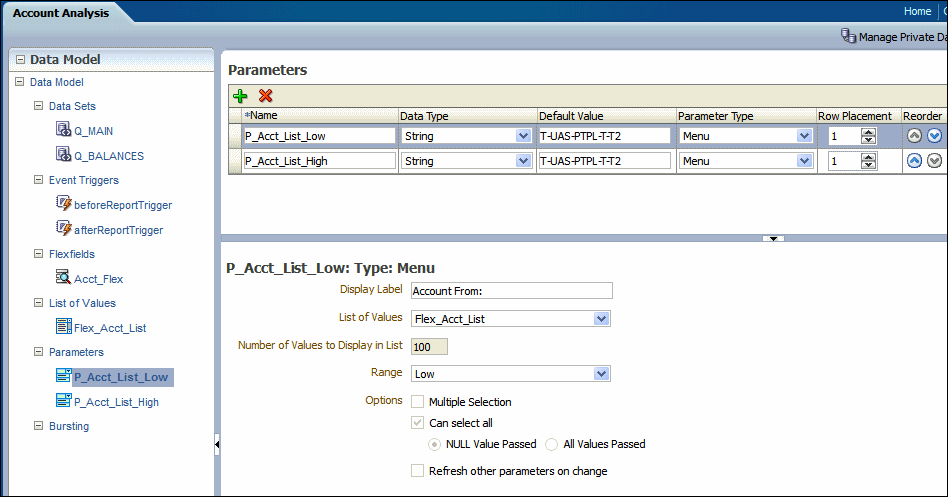
To define the parameters for the flexfield lists of values when you want to pass a range of values you create two menu parameters that both reference the same flexfield LOV. At runtime users choose a high value from the list of values and a low value from the same list of values. These two values are then passed as operands to the flexfield component of the data model.
-
Create one flexfield LOV as described in Section 4.5.2.1, "Adding the Flexfield List of Values."
-
Create the high range parameter following the steps in Section 4.5.2.2, "Adding the Menu Parameter for the Flexfield List of Values." For the Range field, select High to designate this parameter as the high value.
-
Create the low range parameter following the steps in Section 4.5.2.2, "Adding the Menu Parameter for the Flexfield List of Values." For the Range field, select Low to designate this parameter as the low value. Both parameters reference the flexfield list of values that you created in Step 1. Figure 4-21 shows creating the parameters to define the range.
-
Create the Flexfield in the data model, as described in Section 4.5.2.3, "Using the Flexfield Parameter to Pass Values to a Flexfield Defined in the Data Model."
In the lower region of the page, enter the details for the type of flexfield you selected. Enter the parameter prefixed with a colon for example, :P_Acct_List.
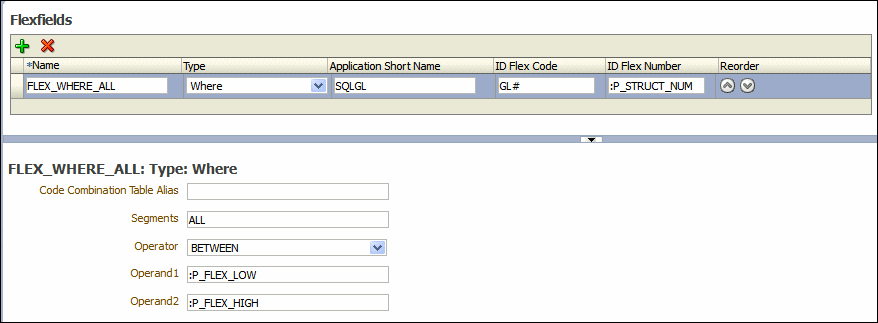
In Figure 4-19 the Flexfield component is defined as a "Where" Type. The parameters :P_FLEX_LOW and :P_FLEX_HIGH are entered in the Operand1 and Operand2 fields. At runtime, values selected by the user for the parameters P_FLEX_LOW and P_FLEX_HIGH will be used to create the where clause.
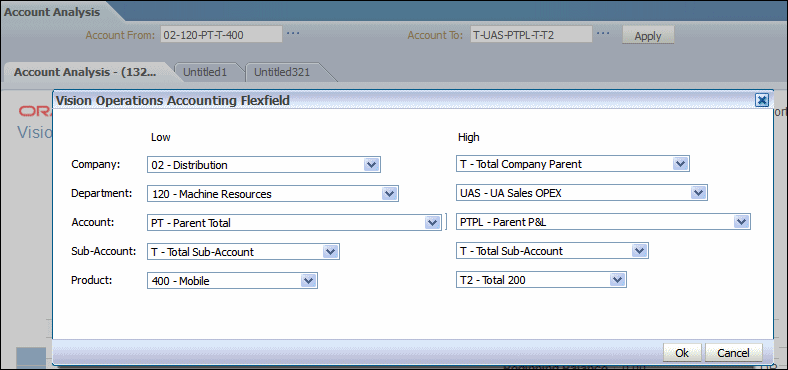
When the report associated with this data model is displayed in the report viewer, the report consumer sees the two flexfield parameters as shown in Figure 4-23.
When the report consumer clicks either the high or low flexfield indicator (...), a dialog launches enabling input of both the high and low values as shown in Figure 4-24.
The display characteristics in the report viewer of the range flexfield parameter resemble closely the presentation of range flexfields in the E-Business Suite.
