This chapter describes how to acquire Oracle BI Mobile, set up user credentials, and configure the application (for example, adding a server connection and setting console logging).
The chapter contains the following topics:
Getting Oracle BI Mobile for Your Apple iPad
To download Oracle BI Mobile, tap the App Store icon (shown in Figure 1-2) on your iPad's Home screen. Alternatively, you can download the application from your computer through iTunes and then synchronize your iPad.
To download and install Oracle BI Mobile:
-
On your iPad, search the App Store for "Oracle".
-
Select the "Oracle BI HD" application, and tap the Install button.
Note:
In Apple's App Store, Oracle BI Mobile for iPad is referred to as "Oracle BI HD". This guide refers to the application as "Oracle Business Intelligence Mobile", and "Oracle BI Mobile".
Starting Oracle BI Mobile
You start the Oracle BI Mobile application from the Home screen on your device.
Note:
If the BI Presentation Services server that you are connecting to is behind a firewall, you need to connect through a Virtual Private Network (VPN). See your administrator for more information.
This section is organized as follows:
Launching Oracle BI Mobile for the First Time
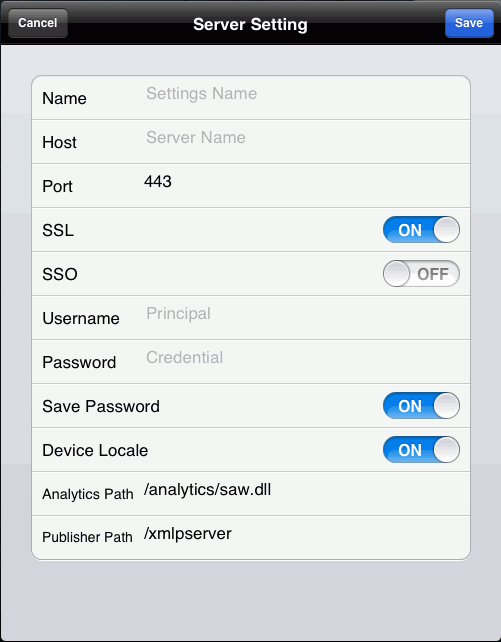
You open the Oracle BI Mobile application as you open any other iPad application, by tapping its icon in the Home screen. The first time you use the Oracle BI Mobile application, however, you are presented with the licensing screen, then a login page that provides an initial server setting screen in which you add your server configuration. Figure 1-3 shows the Server Setting screen.
To launch Oracle BI Mobile for the first time:
-
On your device's Home screen, tap the Oracle BI Mobile application icon, shown in Figure 1-4.
The end-user licensing agreement screen is displayed.
-
Scroll to read the licensing agreement, and if you agree to the terms, tap Accept.
The Login screen is displayed.
-
Tap the Add Server row (with the blue Add icon) to enter your initial server configuration settings.
The Server Settings screen is displayed.
-
In the Server Settings screen, specify the following:
-
Name. Give the server connection a name. Once set, this name cannot be changed.
-
Host. Enter the name of the server to connect to. Enter either the IP address (for example:
192.168.1.1) or the fully qualified host name of the computer on which Oracle BI Presentation Services is running (for example,host1.example.com). Do not enter a stand-in URL, such astinyurl.com/1234that redirects to a server. -
Port. Enter the port number (for example,
7001). -
SSL. Tap the toggle to select ON or OFF. The Secure Sockets Layer (SSL) protocol is configured on the entry point for your Oracle Business Intelligence Presentation Services server by your system administrator. If SSL is configured on the server you are connecting to, toggle this setting to ON. System administrators are advised to configure SSL on the Oracle Business Intelligence Presentation Services server.
-
SSO. Tap the toggle to select ON or OFF. Single Sign-On (SSO) is configured on the entry point for your Oracle Business Intelligence Presentation Services server by your system administrator. If SSO is configured on the server you are connecting to, toggle this setting to ON.
-
Username. Use your standard username for connecting to Oracle BI EE.
-
Password. Use your standard password for connecting to Oracle BI EE.
-
Save Password. Tap the toggle to select ON or OFF. If set to ON, the password you enter in the Password field is saved as part of the configuration for the server. If set to OFF, you are prompted to enter your password each time you launch the application. The default setting is ON.
-
Device Locale. Tap the toggle to select ON or OFF. If set to ON, the application uses the device's settings for user interface language and region format. If set to OFF, language and region formats are based on the user preferences for Oracle BI Presentation Services. This toggle affects BI content only; setting it to OFF has no bearing on the application shell user interface.
-
Analytics Path. For example,
/analytics/saw.dll. -
Publisher Path. For example,
/xmlpserver. This setting is mandatory; it is only used, however, if you access any BI Publisher content.
-
-
Tap Save.
-
Tap Login.
Once you are signed in, you can modify your server configuration or add a new server connection by tapping the Options icon (in the branding bar) and then Settings. For more information, see "Configuring Oracle BI Mobile."
Returning to Oracle BI Mobile
When you have left Oracle BI Mobile and are returning, for example, after leaving it and working with other iPad applications, Oracle BI Mobile returns you to whichever view you were on when you left.
If your user state is no longer preserved, for example, if you have rebooted the device, or the iOS purged the session after a long delay, or the authentication has timed out, then Oracle BI Mobile automatically attempts to authenticate to the connection you last used.
Note:
When no server connections are available, you can work with locally-saved content in offline mode by tapping the Offline button in the authentication screen. (You can even work in offline mode when server connections are available and have been defined.)
Launching Oracle BI Mobile from a Mobile URL
Another way to launch the Oracle BI Mobile application is through "mobile URLs"—either from emails or from other applications (such as Oracle WebCenter).
Emails can be sent by the Oracle BI Mobile application that contain specially configured URLs that allow for the linked BI content to be opened in Oracle BI Mobile when viewed from a supported device such as the Apple iPad.
When you click a link to BI content that is in an email sent using Oracle BI Mobile, and the BI content opens in Oracle BI Mobile rather than in a browser, you are using an embedded URL to launch the mobile application.
For more information, see "Sending BI Content in Email."
About Oracle BI Mobile User Credentials
Oracle BI Mobile uses the same security definitions as configured on the server on which Oracle BI Presentation Services is running. The Oracle BI Mobile application signs in for you automatically as it launches. When your Presentation Services server is configured with single sign-on (SSO), the Oracle BI Mobile application prompts you for your login credentials. You use the same user name and password to connect from a mobile device as you use when logging into Oracle BI EE from a web browser.
Accessing the Oracle BI Mobile Demonstration Server
If you would like to test the Oracle BI Mobile application without having to set up a connection to one of your organization's Oracle BI Presentation Services servers, you can use Oracle BI Mobile to connect to a publicly available demo server. The Oracle BI Mobile demo server provides a full set of sample content with which you can work. As you navigate the application while connected to the demo server, you can gain an understanding of best practices for mobile dashboard design.
When you tap the Demo button in the initial server connections screen, you are taken directly to the demo server, with Oracle BI Mobile automatically managing the login credentials.
To access the demo server:
-
From the Home screen on your device, tap the Oracle BI HD application icon.
-
In the login screen tap Demo, as shown in Figure 1-5.
The Recent view is displayed, along with the Navigation bar.
-
In the branding bar, tap the Options button and then tap Show First Time Help to view an overlay with tips for how to navigate the Oracle BI Mobile application.
-
(Optional) If you want to log out of the demo server, tap the Options button, then tap Logout.
What Does Oracle BI Mobile Look Like?
Oracle BI Mobile is launched from the Home screen of your device, where all your other installed applications display as icons.
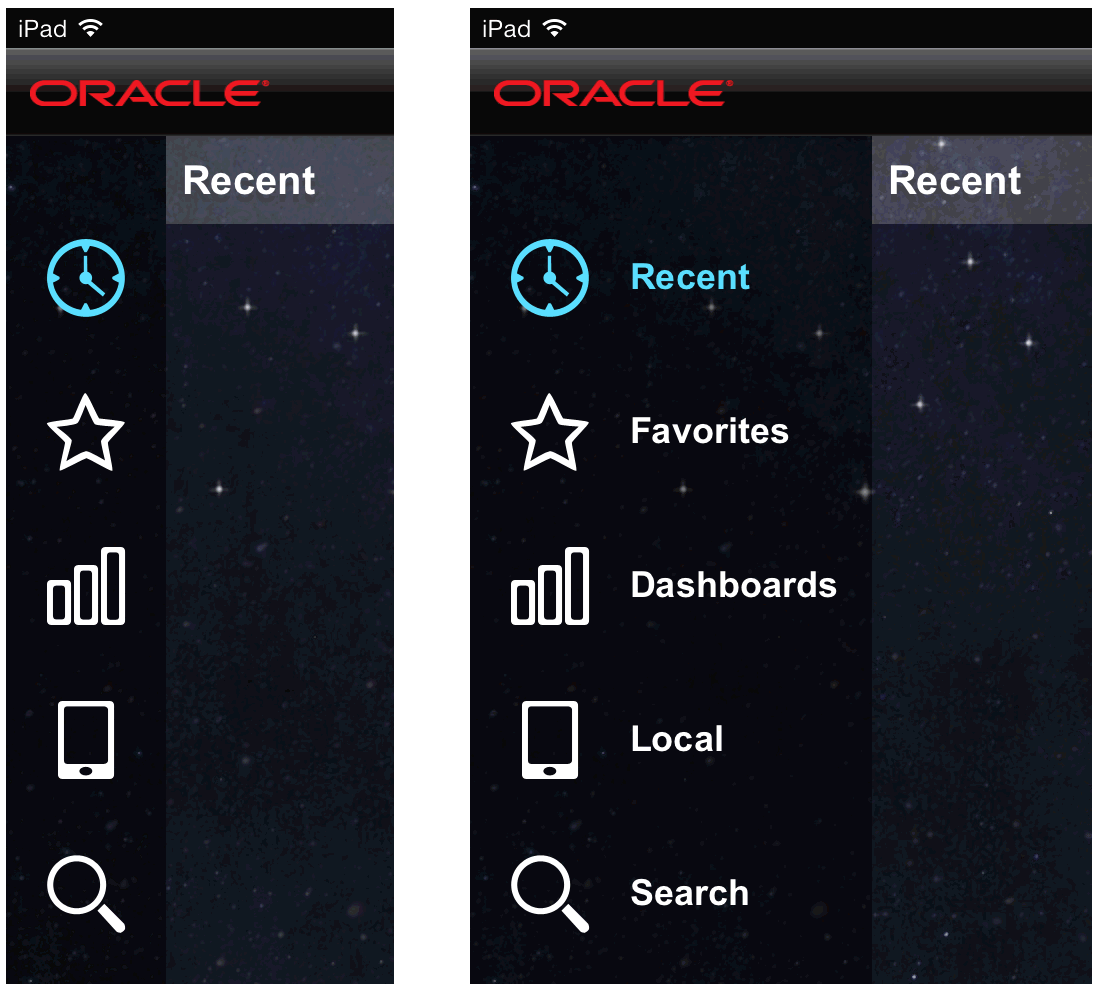
You navigate the Oracle BI Mobile application using the navigation bar, shown in Figure 1-6. (If you swipe once to the right on the navigation bar, you can view the titles of each view, as shown in the second image of Figure 1-6.) Tap the icon that represents the view you want to go to. In the Settings view, you can choose which view that you want your instance of Oracle BI Mobile to start on.
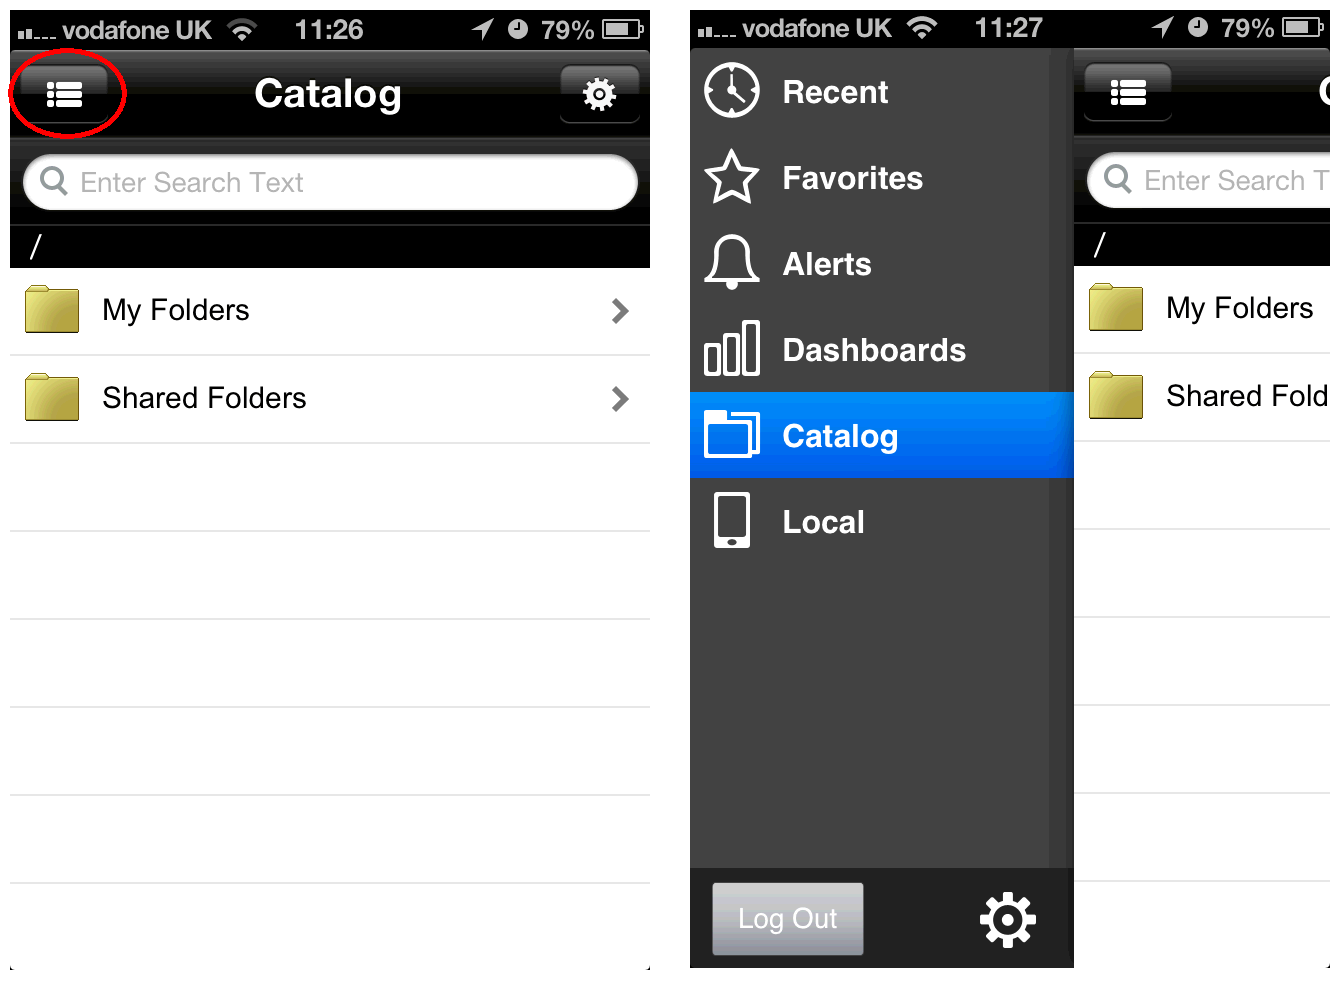
On the iPhone, tap the Navigation icon (circled in red in Figure 1-7) to access the navigation bar. The second image in Figure 1-7 shows the navigation bar on the iPhone after the user has tapped the Navigation icon.
The navigation bar can take you to the various views within the Oracle BI Mobile application: Recent, Favorites, Dashboards, Local (for locally-saved content), and Search. If you have previously launched Oracle BI Mobile and have opened BI content, your recently viewed items are displayed for you in the Recent view.
Note:
To access Search on the iPhone, navigate to the Catalog view, as shown in Figure 1-7.
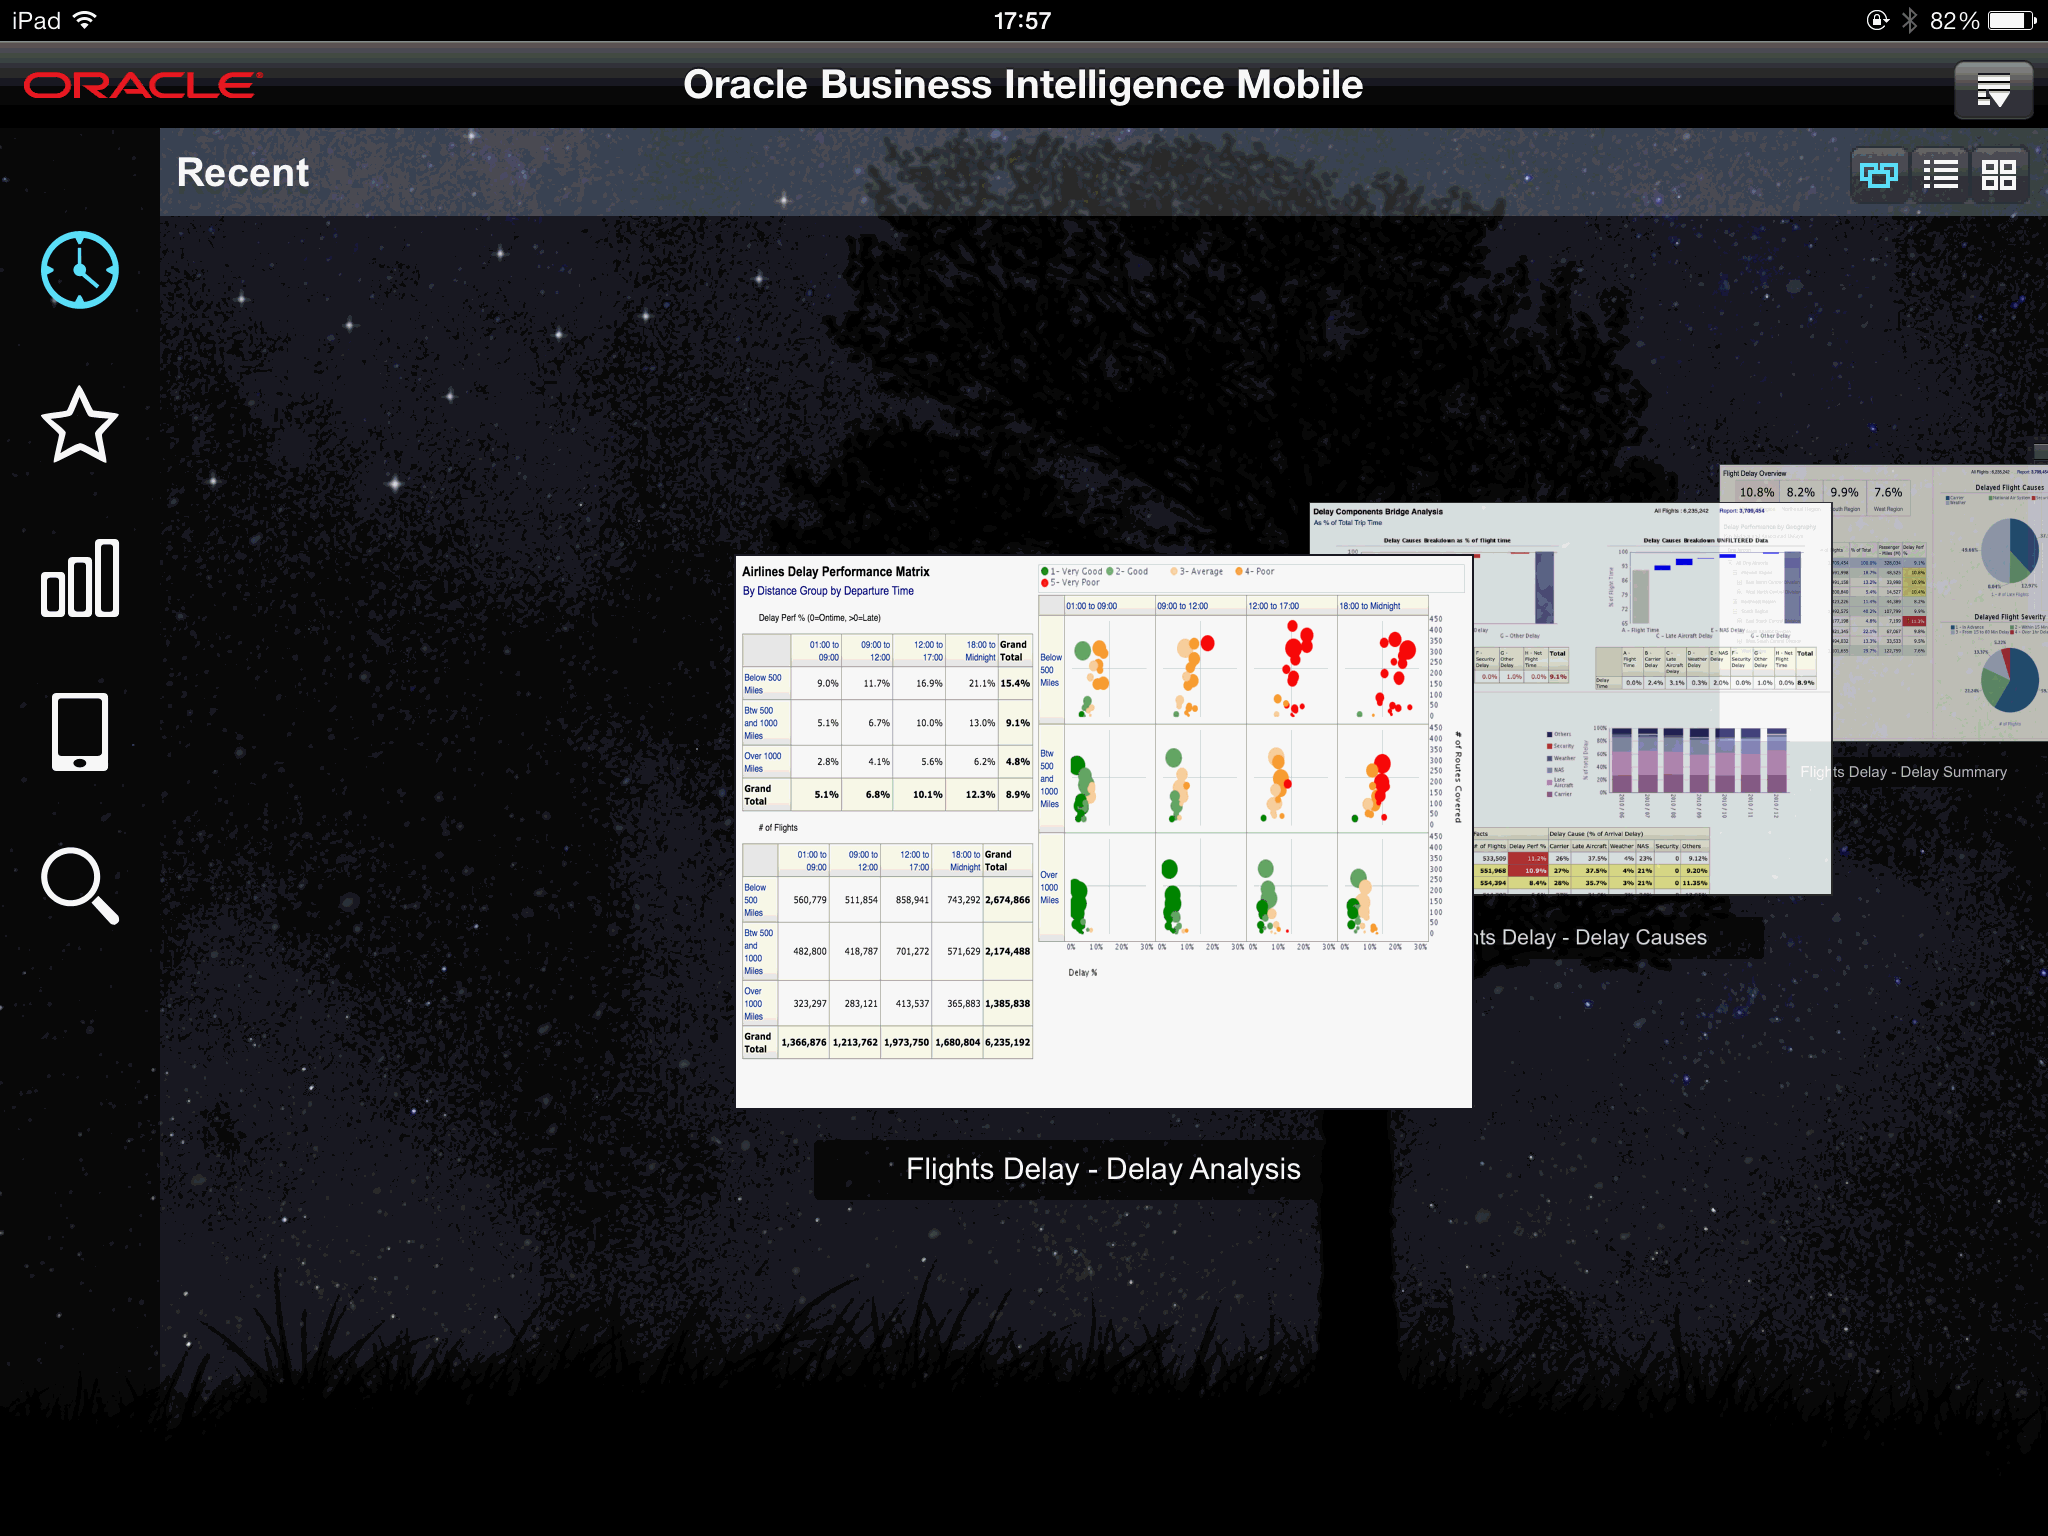
Figure 1-8 shows an instance of the Oracle BI Mobile application that launches into the Recent view.
The top bar, called the Status bar, shows you information about your device, including cell signal strength, the current network connection, and battery charge.
Below the Status bar is the branding bar, which includes the Options icon. Tap the Options icon to see information and options that include Settings, Logout, Help (this guide), and so on.
Just below the Status bar, is the Display bar. The Display bar shows the title of the current view and contains buttons (the Carousel-style Display icon, the List-style Display icon, and the Grid Display icon) that change your view of BI content from a carousel-style display to a list-style display or a grid-style display (when you are in the Recent and Favorites views).
The main screen shows the contents of the current view, such as the list of your dashboards when you are in the Dashboards view, or a carousel-style display of your recently accessed items when you are in the Recent view.
At the left side of the application screen, the Navigation bar shows the views you can select when you want to work with Oracle BI Mobile. To hide the Navigation bar, swipe left. If the Navigation bar is hidden, swipe right to reveal it, and swipe right a second time to reveal the titles of the views. (If you swipe right a third time, you access the Settings view.)
Note:
On the iPhone, you may find it easier to show and hide the Navigation bar by tapping the Navigation button rather than by swiping. The Navigation button is circled in red in Figure 1-7.
Your device's Home button takes you out of Oracle BI Mobile, back to the Home screen where you can find the Oracle BI Mobile icon along with the other application icons on your device.
For a list of unlabeled icons and their names, see Appendix A, "User Interface Reference for Oracle BI Mobile."
For a list of iPad gestures that are useful in the Oracle BI Mobile application, see Appendix B, "Touch Gestures Used in Oracle BI Mobile."
Switching Between Oracle BI Mobile and Other iPad Applications
If you are using an Apple device that supports multitasking (that is, a device running iOS 4.2 or later), you can switch from Oracle BI Mobile to a different iPad application, and the Oracle BI Mobile application retains its state. You return to the exact user interface state that you were in when you placed the application in the background (by switching to a different application).
The standard iPad multitasking gesture is a four-finger or five-finger swipe. Swipe in this fashion from the bottom of your screen to reveal the multitasking bar so that you can move between iPad applications. For more information on useful gestures within Oracle BI Mobile, see Appendix B, "Touch Gestures Used in Oracle BI Mobile."
Configuring Oracle BI Mobile
You use the Settings view in Oracle BI Mobile to manage your server configurations, choose the view you want the application to start on, or set your email-sending preference. You access the Settings view by tapping the Options icon in the branding bar. Another way to access the Settings view is by swiping right twice from the left side of the screen.
There are other configuration tasks your organization can perform:
Adding, Modifying, and Removing Server Connections
If you need to connect to more than one Oracle BI Presentation Services instance, you must configure multiple server connections. You can use the Settings view to add, modify, and remove server connections.
To add a server connection:
-
If you are viewing BI content, tap the Previous icon to go back to the Recent, Favorites, Dashboards, Local, or Search views.
-
In the branding bar, tap the Options icon, then tap Settings.
The Settings view is displayed.
-
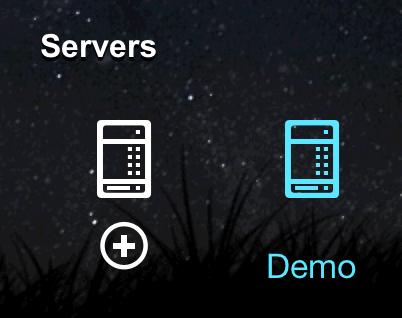
In the Servers section of the Settings view (shown in Figure 1-9), tap the Add Server icon (the one with the plus sign).
-
In the Server Settings screen, complete the fields. For further information, see the Server Settings screen fields described in "Launching Oracle BI Mobile for the First Time."
-
Tap Save.
To modify or remove a server connection:
-
If you are viewing BI content, tap the Previous icon to go back to the Recent, Favorites, Dashboards, Local, or Search views.
-
In the branding bar, tap the Options icon, then tap Settings.
The Settings view is displayed.
-
In the Servers section of the Settings view (shown in Figure 1-9), double-tap the icon for the server connection you want to modify.
-
In the Server Settings screen, do one of the following:
-
To modify the server connection, make your changes. When finished, tap Save.
-
To remove a server connection, scroll down to see the Delete Server button, then tap it.
-
Switching Between Servers
You can change the server you connect to by default, which re-launches the application.
To change your default server:
-
In the branding bar, tap the Options icon, then tap Settings.
The Settings view is displayed.
-
In the Servers section, shown in Figure 1-9, tap the icon for the server connection to which you want to switch.
-
In the confirmation dialog, tap OK.
The Oracle BI Mobile application relaunches, with a connection to the new server.
Configuring Start-up Content
By configuring a setting, you can select a default view—or even a specific dashboard—to display when you log in to the Oracle BI Mobile application. In this way, you or your organization's end users navigate automatically and directly to preferred BI content.
To set your start-up content:
-
In the branding bar, tap the Options icon.
-
Tap Settings.
-
In the Start On section of the Settings view, do one of the following:
-
To set the start-up view as your Recent items, Favorites, Dashboards, Local content, or the Search view, tap its associated icon, as shown in Figure 1-10.
(Optional) If your start-up choice is Recent or Favorites, you then select your preferred view type: Carousel, List, or Grid.
-
To set a specific catalog object as your start-up content, tap the Start-up Content icon as shown in Figure 1-11.
-
In the list of your dashboards, scroll to find the dashboard of your choice, then tap it.
-
Tap OK.
-
-
Log out (tap the Options icon, and then tap Logout).
When you log back in, the view or dashboard you have chosen is displayed immediately after authentication.
Considering Security When Using Oracle BI Mobile
This section discusses measures you can take to address security of your BI content. This information is organized as follows:
For other sections that discuss security information, see "Implementing Server Provisioning Through URL" and "Setting Up Access to the Oracle BI Presentation Services Server Through a Reverse Proxy Server."
Understanding Mobile Device Management
When using the Oracle BI Mobile application, you connect to an Oracle BI server and benefit from the same security platform provided by the infrastructure of Oracle Fusion Middleware.
Oracle BI Mobile allows mobile users to connect to the Oracle BI server using Single Sign-On (SSO) and Secure Sockets Layer (SSL) technologies for secure and automated passing of credentials. For servers behind a firewall, you can connect with Oracle BI Mobile through a VPN. To better protect your BI content saved locally, you can use the passcode lock on your iPad.
If your organization requires greater levels of mobile device security, you may work with a mobile device management (MDM) vendor. MDM software can be used for monitoring and securing mobile devices beyond what is currently available with native operating systems. Your MDM vendor might provide additional capabilities such as enhanced data encryption, restricted sharing, wiping of data in case of loss or theft, geo-fencing, and management of local data. The Oracle BI Mobile Security Toolkit is designed to allow MDM vendors to work with the Oracle BI Mobile application to provide a solution that can be readily consumed by end users.
For more information, see "Using the Security Toolkit for Mobile Device Management."
Using the Security Toolkit for Mobile Device Management
If your organization works with a security vendor or a mobile device management (MDM) vendor, you can consider using an additional security layer available for Oracle BI Mobile: the Oracle BI Mobile Security Toolkit. This toolkit can be integrated with other options that an MDM vendor builds into your security package.
The Oracle BI Mobile Security Toolkit provides a repackaged, unsigned and uncertified version of the Oracle BI Mobile application, delivered at the library level, that allows organizations to combine the Oracle BI mobile application with their chosen third-party mobile security solution. When the application is combined by the MDM vendor into one mobile security solution, it gets signed with your organization's corporate signature. You then have a fully functioning version of Oracle BI Mobile—which is certified for distribution outside of the Apple App Store—and which can be delivered internally as part of the chosen mobile application delivery mechanism.
The security toolkit for Oracle BI Mobile is delivered through Oracle Technology Network. It includes a license agreement for software vendors, and a FAQ with instructions for use. To find the FAQ and the toolkit, search on "security toolkit" in the Downloads section of Oracle Technology Network here:
http://www.oracle.com/technetwork/middleware/bi-enterprise-edition/downloads/index.html
Details for building an IOS application can be found at:
Using Passcode Lock to Protect Content Saved Locally
As a user of Oracle BI Mobile, it is important to remember that any network security that your iPad connects through to access the Oracle BI server has no bearing on BI content saved locally onto your device. For that reason, using Passcode Lock (in the General section of your iPad's Settings screen) is vital for protecting local BI content in case of device loss or theft. For more information, see "Saving Content Locally."
Also see "Disabling Local Content."
Disabling Access to Oracle BI Mobile
Administrators can disable access to the Oracle BI Mobile application. In the desktop version of Oracle BI EE, in the Manage Privileges page, an administrator disables access by restricting the privilege called "Access to Mobile." For more information, see "Default Presentation Services Privilege Assignments" in Oracle Fusion Middleware Security Guide for Oracle Business Intelligence Enterprise Edition.
Implementing Server Provisioning Through URL
Server provisioning through URL is the facility to "seed" the Oracle BI Mobile application with one or more servers and their settings by accessing a URL that the administrator provides.
This allows the Oracle BI Mobile application to configure itself for a user, by making use of the URL launch mechanism supported in iOS. Using Oracle BI Mobile, this launch mechanism can work for you when either you tap on a URL link within an email, when you type the URL into the Safari browser on the iPad, or when you tap a URL link on a web page. The mechanism then launches Oracle BI Mobile on your iPad and configures the required settings with the settings in an XML file that your administrator has edited and referenced as a URL in the syntax for the launch URL.
Where the Oracle BI Mobile schema on the device is "oraclebi", the syntax for the launch URL is the following:
oraclebi://oraclebusinessintelligencemobile/configure?xml=<URL to XML file>
Note:
In this example syntax, the URL to the XML file might appear within an email, or it might be the address for a web page hosted on a web server, or it might be the URL for a wiki, or any number of other options.
As the schema for the configuration XML file, use Apple's standard plist format. Access the XML file here: http://www.apple.com/DTDs/PropertyList-1.0.dtd
For example, you can provide a snippet of HTML that reads "Click to configure Oracle Business Intelligence Mobile for iPad" as in the following example:
<a href="oraclebi://oraclebusinessintelligencemobile/configure?xml=http://server.my.company.com:7001/obim_configuration.xml">Click to configure Oracle Business Intelligence Mobile for iPad</a>
Note:
You can have multiple server configurations inside the "servers" dictionary. You cannot provide user credentials in the XML configuration file.
Example 1-1 shows a sample XML file for a seeded instance of Oracle BI Mobile.
<?xml version="1.0" encoding="UTF-8"?>
<!DOCTYPE plist PUBLIC "-//Apple//DTD PLIST 1.0//EN"
"http://www.apple.com/DTDs/PropertyList-1.0.dtd">
<plist version="1.0">
<dict>
  <key>obim</key>
  <dict>
    <key>servers</key>    <array>      <dict>        <!-- Analytics Web App Context Path -->        <key>analyticsPath</key>        <string>/analytics/saw.dll</string>        <!-- Machine Name including Domain or IP address -->        <key>host</key>        <string>host1.example.com</string>
        <!-- Use Device Locale -->
        <key>locale</key>
        <true/>
        <!-- Configuration name, any name-->
        <key>name</key>
        <string>host1</string>
        <!-- Analytics Web App Port -->
        <key>port</key>
        <integer>443</integer>
        <!-- use this server as default -->
        <key>selected</key>
        <false/>
        <!-- enable SSL -->
        <key>ssl</key>
        <true/>
        <!-- enable SSO -->
        <key>sso</key>
        <true/>
        <!-- Publisher Web App Context Path -->
        <key>xmlpPath</key>
        <string>/xmlpserver</string>
      </dict>
    </array>
    <key>version</key>
    <string>11.1.1.6.0</string>
  </dict>
</dict>
</plist>
Table 1-1 provides the schema information for URL application launching.
Setting Up Access to the Oracle BI Presentation Services Server Through a Reverse Proxy Server
Use of a reverse proxy server can make content served by different servers appear as if coming from one single server. Use of a reverse proxy can also be an effective way of protecting your enterprise web infrastructure.
Your organization may consider configuring access to the Oracle BI Presentation Services server through a reverse proxy to protect it without the requirement of a VPN. To do this, you must first make your Oracle HTTP Server port open and available for public access—for example, by using port 80.
This topic explains how to set up controlled access to your web tier so that content from your Oracle BI Presentation Services folder is delivered instead by reverse proxy. You do this by modifying an Oracle HTTP Server web server configuration file.
Before you begin this procedure, ensure that you are familiar with the information in "Using a Text Editor to Update Oracle Business Intelligence Configuration Settings" in Oracle Fusion Middleware System Administrator's Guide for Oracle Business Intelligence Enterprise Edition.
To set up the reverse proxy access:
-
Log in to the middle tier computer as application user "oracle".
-
In the
ORACLE_INSTANCEfolder, find themod_wl_ohs.confconfiguration file, then open it in a text editor. -
Add configuration settings as follows:
-
for a stand-alone instance of a proxy module, use Example 1-2 to add settings.
-
for a clustered instance of a proxy module, use Example 1-3 to add settings.
-
-
Save your changes to the
mod_wl_ohs.conffile and exit the text editor.Restart Oracle HTTP Server.
Example 1-2 Example Settings for a Stand-alone Instance of a Proxy Module
<Location /analytics>
    SetHandler weblogic-handler
    WebLogicHost <Host for Weblogic_Managed_Server>
    WebLogicPort <Port for Weblogic_Managed_Server>
    WLProxySSL ON
    WLProxySSLPassThrough ON
  </Location>
Example 1-3 Example Settings for a Clustered Instance of a Proxy Module
<Location /analytics>
    SetHandler weblogic-handler
    WebLogicCluster <Host for Weblogic_Managed_Server1:PORT>,<Host for Weblogic_Managed_Server2:PORT>,<Host for Weblogic_Managed_ServerN:PORT>
    WLProxySSL ON
    WLProxySSLPassThrough ON
  </Location>
Setting Console Logging
If you want to capture console logs, for example to troubleshoot authentication issues, you can enable console logging for your iPad or iPhone in the device's Settings application.
Console logging can be useful when it is necessary to debug issues on mobile devices. Console logging can slow down the performance of the Oracle BI Mobile application, however, since it requires that numerous messages are written to console logs on the device. You can access these device logs using the iPhone Configuration Utility available from Apple. Search Apple's developer website for the utility, or visit: http://developer.apple.com/library/ios/#featuredarticles/FA_iPhone_Configuration_Utility/Introduction/Introduction.html
Because console logging impacts application performance, the default setting is OFF.
To enable or disable console logging:
-
In the device's Home screen, tap the Settings icon to access device settings.
Note:
The setting for console logging for Oracle BI Mobile is adjusted outside of the Oracle BI Mobile application, in the device's general Settings application.
-
In the left pane of Settings, swipe to scroll down in the list of applications till you locate the Oracle BI HD application, then tap it.
-
In the right pane, in the Console Logging row, tap the toggle to change the setting from OFF to ON.
