8 Walkthrough: Assembling a Simple Application
This chapter introduces how to build Oracle Event Processing applications through a walkthrough in which you build a simple application. Along the way, it provides an overview of key concepts
This chapter includes the following sections:
-
Section 8.1, "Introduction to the Simple Application Walkthrough"
-
Section 8.6, "Create a Listener to Receive and Report Events"
8.1 Introduction to the Simple Application Walkthrough
This walkthrough introduces the basics of building Oracle Event Processing applications using the Eclipse IDE. It is intended as a survey of key Oracle Event Processing concepts, a starting place from which you can investigate more about each.
The application you build in this walkthrough models a simple stock trade alert system. The application receives example data about stock trades, examines the data for certain characteristics, then prints some of the data to the console. The following illustration shows the application's finished EPN diagram:

Description of the illustration tradereport_finishedepn.png
This introduction includes the following sections:
This walkthrough starts with Section 8.2, "Create the Workspace and Project".
8.1.1 Key Concepts in this Walkthrough
This walkthrough introduces the following concepts that are typically part of Oracle Event Processing applications you build:
-
IDE features designed to make building Oracle Event Processing applications easier, including a project type, a graphical editor for designing event processing networks, and validation support for project-specific configuration files
-
Building an application as an event processing network (EPN), the core design construct for modeling the behavior of an application that receives streaming data and operates on that data as it flows through the application.
-
Designing event types that model events, normalizing event data for use with code inside the application.
-
Using adapters to manage interactions with external components, including sources of streaming data.
-
Implementing a Java class that can receive or send events within an event processing network.
-
Using Oracle Continuous Query Language (Oracle CQL) to filter events based on specific properties within them.
8.1.2 Before You Get Started
You should have installed Oracle Event Processing and the Eclipse IDE. In addition, you should have updated the Eclipse IDE with the plugin included with Oracle Event Processing.
Although it introduces features specific to Oracle Event Processing, this walkthrough assumes that you are somewhat familiar with basic Java programming.
For more information, see the following topics:
8.2 Create the Workspace and Project
In this first step, you'll use the IDE to create the workspace and project in which to develop your application. To make it easier to develop Oracle Event Processing applications, the IDE provides the Oracle Event Processing application project type. This project type includes the artifacts and dependencies that typical Oracle Event Processing applications need, making it easier to get into writing application-specific code.
You should already have configured your IDE preferences to know the location of the JRockit JRE, which is the best practice choice on which to run the Oracle Event Processing server.
Create the Walkthrough Workspace and TradeReport Project
-
Start the Eclipse IDE.
-
When prompted to select a workspace, create a workspace called
walkthroughs. -
From the File menu, choose New > Project to begin creating a new project.
-
In the New Project dialog, expand Oracle Event Processing, click Oracle Event Processing Application Project, then click Next.
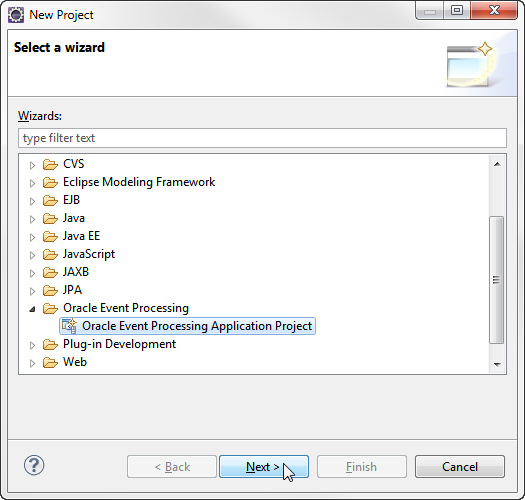
Description of the illustration newproject_oep.png
-
In the New Oracle Event Processing Application Project dialog, in the Project name box, enter
TradeReport.Leave the Use default location check box selected to have the new project created in the location of the workspace you created.
-
Under Target Runtime, if no runtime is displayed in the dropdown, do the following:
-
Click the New button.
-
In the New Server Runtime Environment dialog, expand Oracle, then select Oracle Event Processing v11.1 and click Next.
-
Click Next.
-
Under New Oracle Event Processing v11.1 Runtime, next to the Oracle Middleware Home Directory box, click Browse.
-
In the Browse for Folder dialog, locate the Middleware home directory, then click OK.
By default, the Middleware home directory will be located at ORACLE_HOME/Middleware.
-
In the JRE dropdown, select a JRockit JRE.
The Oracle Event Processing server is optimized for use with the JRockit JRE. If a JRockit JRE isn't available among those listed, use the following steps to locate the JRE that is included with Oracle Event Processing.
-
Click the Installed JRE preferences link.
-
In the Preferences dialog, next to the Installed JREs list, click the Add button.
-
In the Add JRE dialog, under Installed JRE Types, select Standard VM, then click Next.
-
Next to the JRE home box, click the Directory button to browse for the location of the JRockit JRE.
-
In the Browse For Folder dialog, expand the Middleware home directory, then the jrockit_160_29 directory, then click the JRE directory and click OK.
-
After the Add JRE dialog displays the JRE home directory, name, and system libraries, click the dialog's Finish button.
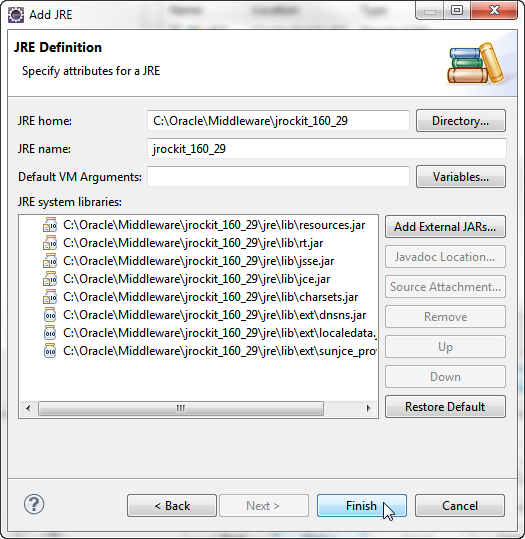
Description of the illustration tradereport_jredef.png
-
In the Preference dialog, select the check box for the JRE you just added, then click OK.
-
In the New Server Runtime Environment dialog, from the JRE dropdown, select the JRE you just added.
-
-
Click Finish.
-
-
In the New Oracle Event Processing Application Project dialog, with the Oracle Event Processing v11.1 target runtime selected, click Next.
-
Under Oracle Event Processing Application Content, confirm the properties for the project you're created.
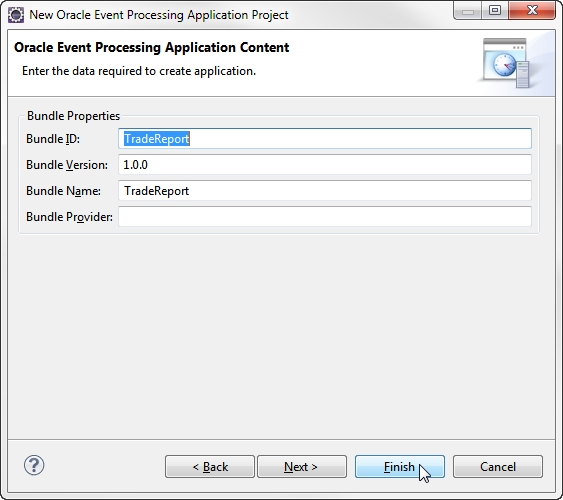
Description of the illustration tradereport_bundleprop.png
-
Click Finish.
After you've created your project, the IDE will display the Project Explorer, with a hierarchical list of the artifacts in your project, along with an empty editor for the event processing network you're about to build.
An event processing network (EPN) is a central design concept in an Oracle Event Processing application. An EPN represents the components, known as stages, that make up the application, as well as the path taken by events from stage to stage. As you develop your application, the EPN editor will display the stages you add and the connections between them. Conceptually, event data enters your application from the left, moving toward the right from stage to stage.
The design that the EPN editor shows is actually a graphical representation of the EPN's underlying configuration. When you add a stage or connection through the EPN editor, the IDE writes configuration XML to an underlying assembly file (just as editing the XML file directly will result in an updated graphical design in the EPN editor). An EPN assembly file includes the default configuration for each of an EPN's stages. This is a default configuration that cannot be changed on the server at runtime without redeploying the application. For configuration that can be edited at runtime, you can use another kind of configuration file, as described later.
Note:
The EPN assembly file's XML schema is an extension of the Spring framework configuration file. For more on Spring, see the Spring web site.
Take a look at the Project Explorer. You should have a project hierarchy that's something like what's shown in the following illustration.
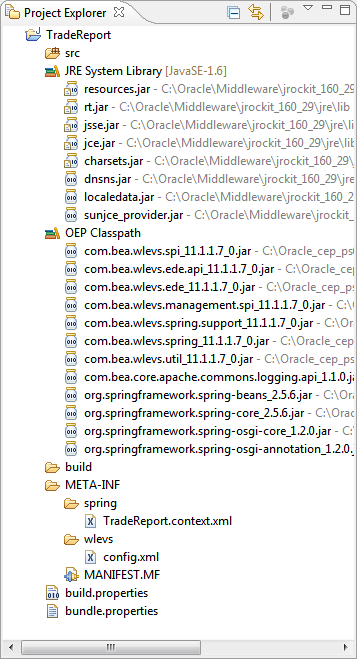
Description of the illustration tradereport_projexp.png
If you're experienced with IDEs, much of this should be familiar. In addition to the usual places for Java source code, the JRE system library, and build output, you'll also find the following:
-
JAR files that make up the Oracle Event Processing classpath. These provide the functionality needed for the Oracle Event Processing server, including for stages of an event processing network, Spring-configured components, and logging.
-
A spring directory for configuration files that conform to the Spring framework (for more on Spring, see the Spring web site). The file you start off with is the EPN assembly XML file that describes the contents and structure of the event processing network you're building. As you build your EPN, adding and connecting stages, the IDE captures your work in this file. You can also edit the file manually. At this point, the file merely declares namespaces for the XML that will be added to it.
-
A wlevs directory for files that describe components whose configuration should be editable at runtime. Most components have a default configuration that you can override within a component configuration file in the wlevs directory. The only component whose configuration you must put in one of these files is a processor. A processor's Oracle CQL code is editable at runtime by using the Oracle Event Processing Visualizer.
If you're configuring multiple components, you can use one or multiple component configuration files. For example, in the case of a team of developers, where each is responsible for a different component, you might want to have a configuration file per component to avoid source control conflicts.
Now that you've got a project created, in Section 8.3, "Create an Event Type to Carry Event Data", you'll start assembling an event processing network. You'll begin by creating an event type that will represent incoming event data to the application's logic.
8.3 Create an Event Type to Carry Event Data
Oracle Event Processing applications are about receiving, processing, and sending events. Events start as event data that can be in almost any structured form. The event data arrives at the application in its raw form, then is bound to an event type that you define. Using your own event type makes handling the data predictable for the rest of your code in the application, including Oracle CQL queries, Java code, and so on. (The conversion is done by an adapter. More about those later.)
So an early task in defining any event processing network is clarifying the structure of the data coming from the source, then defining the form to which you'll convert that data for use inside the EPN. In this section, you'll work from the structure of example stock trade data to define an event type to which the data will be bound.
In the case of the application you're building here, the sample incoming event data is arriving as rows of comma-separated values. Each row contains data about a particular thing that happened -- here, a stock trade. The structure of the values is consistent from row to row. Here are a few example rows:
IBM,15.5,3.333333333,3000,15
SUN,10.8,-1.818181818,5000,11
ORCL,14.1,0.714285714,6000,14
GOOG,30,-6.25,4000,32
YHOO,7.8,-2.5,1000,8
Though they aren't labeled in the CSV file, the values could be labeled as follows:
stock symbol, price, percentage change, volume of shares purchased, last price
That's the structure of the incoming trade event data. In order to handle that data in your application -- query it, filter it, perform calculations, and so on -- you will need to assign that data to a new structure that supports doing those things. In particular, the new structure should have the ability to specify properties of particular types. Having types matched to the anticipated values makes it easier to handle the values in code.
Looking at the example data and labels, you can imagine each of the values for each row bound to properties of the following Java types:
String, Double, Double, Integer, Double
Oracle Event Processing supports several forms on which you can base your new event type. These include JavaBean classes, tuples, and java.util.Map instances. A JavaBean class is the best practice type for new event types, so that's what you will use here for trade events.
If you haven't worked with them before, you should know that JavaBeans are Java classes that follow specific standard rules designed to make them predictable. In general, the idea is for the class to provide variables to hold data inside it (such as the trade event stock symbol) and methods through which the data can be retrieved or set by code outside the class. Naming the methods with predictable names, such as "setSymbol" and "getSymbol", gives code outside the class a predictable way to use the data inside the class. For example, when Oracle Event Processing needs to bind incoming event data to your event type, it will create a new instance of the event type JavaBean and use the bean's "set" methods to set the data in the proper places inside the class. Code later in the application, such as Java code or Oracle CQL code you will write, will be able to call the bean's "get" methods to get the data out again.
In the following sections, you will create the JavaBean as code behind your event type, then configure the event type to use the JavaBean.
Create the TradeEvent JavaBean
In this section, you will create a TradeEvent JavaBean class that will be used as an event type for incoming trade event data.
-
In the IDE, right-click the src directory, then click New > Class.
-
In the New Java Class dialog, in the package box, enter
com.oracle.oep.example.tradereport -
In the Name box, enter
TradeEvent.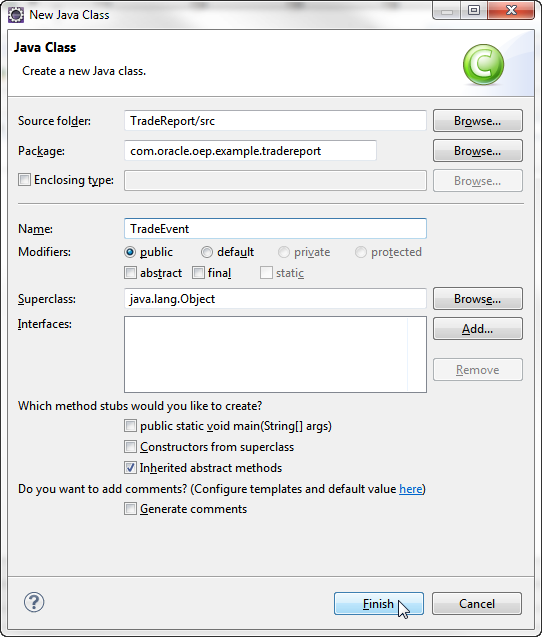
Description of the illustration tradereport_tradeevt.png
-
Click Finish.
The TradeEvent.java source code window will display with the declaration for the TradeEvent class.
-
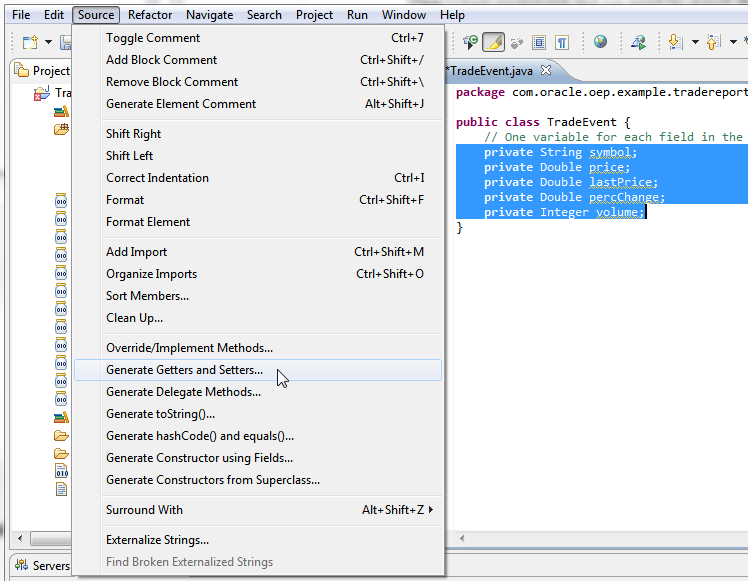
In the TradeEvent class, just beneath the TradeEvent class declaration, add private variables for each of the properties you'll need as shown in the following example.
public class TradeEvent { // One variable for each field in the event data. private String symbol; private Double price; private Double lastPrice; private Double percChange; private Integer volume; } -
Select the code for all of the variables, click the Source menu, then click Generate Getters and Setters.
Description of the illustration tradereport_genaccess.png
-
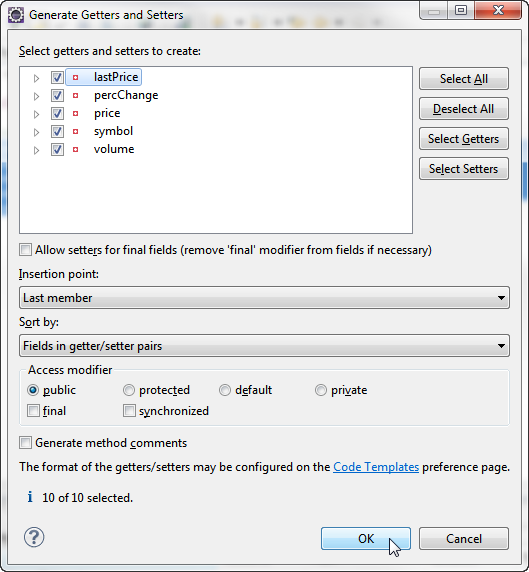
In the Generate Getters and Setters dialog, select the check box for each variable you selected (in other words, all of them).
-
In the Insertion Point dropdown, select Last member.
Description of the illustration tradereport_gendialog.png
-
Click OK.
In the TradeEvent source code window, notice that you have created pairs of methods that simply get or set the values of the variables you added.
-
Save the TradeEvent.java file and close the code window.
And that's all there is to creating a JavaBean (at least, in this case). The next step is to tell your application that the JavaBean should be used as an event type.
Configure the TradeEvent Event Type
In this section, you'll tell the TradeReport application that the TradeEvent JavaBean should be used as an event type.
-
In the IDE, confirm that the empty TradeReport EPN editor is open. Its tab at the top of the window should read EPN: TradeReport.
-
At the bottom of the designer window, click the Event Types tab.
-
Under Event Type Definitions, select TradeReport.context.xml. This is the EPN assembly file underlying your EPN design.
This is also the file you noticed in the META-INF/spring directory of the project explorer. You are selecting it here to ensure that the event type you are about to configure gets defined in that file.
-
Under Event Type Definitions, click the plus sign to add a new event definition.
-
Click the newEvent entry that was created.
-
Under Event Type Details, in the Type name box, change the event type's name to
TradeEvent. (It doesn't have to be the same as the JavaBean class, but it makes things simpler to use the same name.) -
Select the Properties defined in Java bean option. The other option is for defining events as tuples.
-
In the Class box, enter the name of the JavaBean class you created:
com.oracle.oep.example.tradereport.TradeEvent.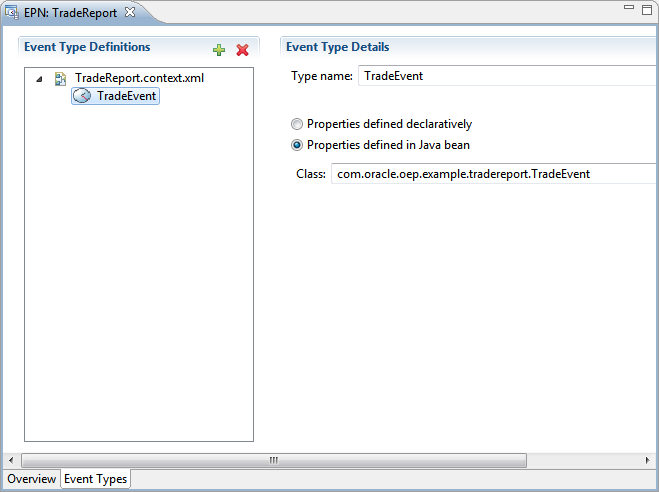
Description of the illustration tradereport_eventdef.png
-
Save the file to have the event type name updated in the event type definitions.
If you're curious about what was added to your EPN assembly file, open the file. It's in the Project Explorer under TradeReport > META-INF > spring > TradeReport.context.xml. The part you added looks something like the following (you might need to click the Source tab at the bottom of the editor window):
<wlevs:event-type-repository>
    <wlevs:event-type type-name="TradeEvent">
        <wlevs:class>com.oracle.oep.example.tradereport.TradeEvent</wlevs:class>
    </wlevs:event-type>
</wlevs:event-type-repository>
As the code suggests, Oracle Event Processing manages event types in an event type repository. The TradeEvent event type you defined is mapped to the TradeEvent JavaBean class you created.
Now that you have an event type defined and configured, you need to tell the application how to watch for incoming event data. You also need to specify that the data should be assigned to the TradeEvent type you created. You do those things with an adapter, which you will add in Section 8.4, "Add an Input Adapter to Receive Event Data".
8.4 Add an Input Adapter to Receive Event Data
Before you can try out the event processing network you're building, you will need to create a way for event data to flow into it. In Oracle Event Processing applications, adapters manage traffic between external components and the internals of the event processing network. Event data arriving from external sources enter the application through an adapter, while event data leaving the application on its way to external components or applications exits through an adapter. By default, Oracle Event Processing includes adapters for three different kinds of external components: Java Message Service (JMS) destinations, HTTP publish-subscribe servers, and CSV files.
The adapter for CSV files, called csvgen, is great for trying things out with code in development. It's a lightweight alternative to the task of defining an adapter for a more substantial, "real" event data source. In your own apps, you might find it easier to use the csvgen adapter until you have your EPN started and some of its logic defined.
The csvgen adapter's logic knows how to translate event data read from a CSV file into the event type you defined. You use the csvgen adapter in conjunction with the load generator utility included with Oracle Event Processing (more about the load generator later in this walkthrough). The csvgen adapter's implementation code is included by default in Oracle Event Processing, so all you need to do is add configuration code to declare the adapter as a stage in your EPN, as well as set a few of its properties.
Add Code to Configure a CSV Adapter
In this section, you will add configuration code that creates a place for your CSV adapter in the event processing network. The code will also set a few adapter properties needed to configure the adapter's runtime behavior. You add the code to the EPN assembly file so that the adapter will be included in the EPN and appear in the EPN designer as a stage.
-
In the IDE, locate and open the EPN assembly file. In the Project Explorer, it should be located at TradeReport > META-INF > spring > TradeReport.context.xml.
-
Below the event-type-repository XML stanza, add the following XML to declare the adapter:
<wlevs:adapter id="StockTradeCSVAdapter" provider="csvgen">
    <wlevs:instance-property name="port" value="9200" />
    <wlevs:instance-property name="eventTypeName"
        value="TradeEvent" />
    <wlevs:instance-property name="eventPropertyNames"
        value="symbol,price,percChange,volume,lastPrice" />
</wlevs:adapter>
This XML stanza declares an instance of the csvgen adapter and assigns to it three properties that configure it for use in your EPN. The adapter uses the properties to map from incoming raw event data to the properties of the event type you defined in Section 8.3, "Create an Event Type to Carry Event Data". The following describes the values you're adding:
-
Adapter declaration. The
idattribute value is a unique identifier for the adapter. The provider attribute value must be "csvgen" in order to refer to the csvgen implementation included with Oracle Event Processing. -
The
portinstance property tells the adapter instance what port to listen on for incoming event data. The value here, 9200, corresponds to the port number to which the load generator will send event data (more on that later). -
The
eventTypeNameinstance property tells the instance the name of the event type to which incoming event data should be assigned. Here, you give the name of the TradeEvent type you defined earlier. -
The
eventPropertyNamesinstance property tells the instance the names of the event type properties to which data should be assigned. Notice in this case that theeventPropertyNamesattribute value is a comma-separated list of the same properties you defined in the JavaBean for the event type. In order for the csvgen adapter to map from incoming values to event type properties, the names here must be the same as your event type and must be in the same order as corresponding values for each row of the CSV file.
-
-
Save and close the EPN assembly file with the adapter XML in it.
-
If it isn't open already, open the EPN editor to its Overview tab.
-
In the EPN editor, notice that it now displays an icon representing the csvgen adapter instance you just added. The icon will be labeled with the adapter id value you specified in configuration code.
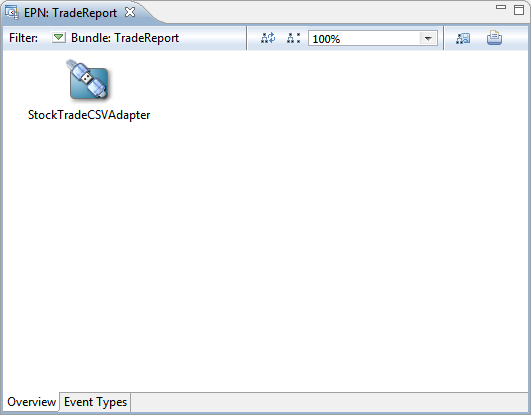
Description of the illustration tradereport_csvadapter.png
In the next step, Section 8.5, "Add a Channel to Convey Events", you will add a way to carry events from the adapter to logic you will add in a moment.
8.5 Add a Channel to Convey Events
In this step, you will add a way to connect the adapter you added in Section 8.4, "Add an Input Adapter to Receive Event Data" to a bit of logic you will add in the next step. Afterward, you will test the application.
In Oracle Event Processing applications, you connect EPN stages together by using a channel. A channel is a conduit that transfers events from one part of the EPN to another. Though conveying events is a channel's primary purpose, channel configuration options give you opportunities to specify other properties through which you can tune the application. These include:
-
Whether the channel can process events asynchronously, and how big the buffer for this can get.
-
How many threads may be used to process events in the channel (a larger number can increase performance).
-
Whether to partition events, based on their properties, in order to have the events dispatched to separate downstream parts of the EPN.
Those kinds of channel configuration properties have default values, so you needn't set them for the application you're building. In this application, you'll keep channel configuration simple.
The purpose of the channel you are about to add is to carry newly generated events from the adapter that's receiving event data to code you will add in the next step.
-
In the IDE, ensure that the EPN editor is open and that the EPN you're building is visible.
-
Right-click the EPN editor, then click New > Channel.
A channel icon should appear in the EPN editor.
-
Double-click the channel icon that appears in the editor to display the channel's configuration XML in the EPN assembly file.
-
In the assembly XML file, locate the channel XML stanza for the channel you added. It should look something like the following:
<wlevs:channel id="channel">
</wlevs:channel>
You might notice a warning that "channels should declare an 'event-type' value". You are about to fix that.
-
Edit the default XML to match the following (or simply paste the following code over the code you have).
<wlevs:channel id="AdapterOutputChannel" event-type="TradeEvent">
</wlevs:channel>
The following describes the values you're adding to configure the channel:
-
The
channelelement represents configuration for the channel, placing the channel in the EPN. -
The
idattribute's value is a unique identifier for the channel in this EPN. (You will be adding another channel.) -
The
event-typeattribute's value is the name of the event type that the channel is configured to convey. In this case, you're setting it toTradeEvent, the name of the event type you added earlier, whose implementation is theTradeEventJavaBean you created. Note that the value you are adding here is the same as thetype-nameattribute value of theevent-typeelement elsewhere in the assembly file.
After you have finished editing the channel configuration XML, save the assembly file.
-
-
Return to the EPN editor. You might need to click the EPN: TradeReport tab to display the EPN editor.
-
In the EPN editor, create a connection from the input adapter to the channel you added. To do this, click the StockTradeCSVAdapter icon and drag to the AdapterOutputChannel icon. This will create a connecting line between the two icons.
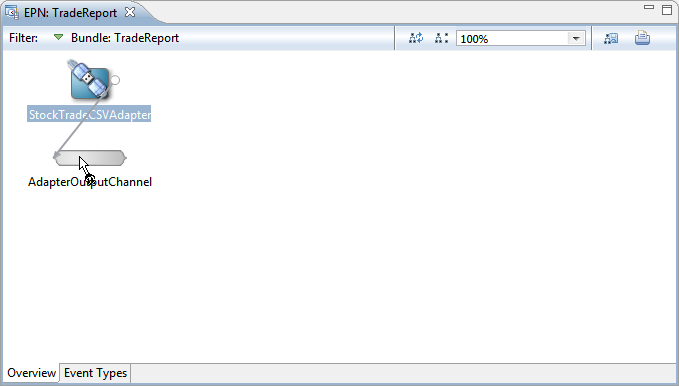
Description of the illustration tradereport_csv_chan.png
-
To make the EPN diagram tidy by having icons display sequentially from left to right, click the Layout EPN icon at the top right corner of the EPN editor.
-
Double-click the StockTradeCSVAdapter icon to display the adapter's configuration XML in the assembly file.
-
In the assembly file, notice that creating a connection between the adapter and the channel has added a
listenerelement to the adapter XML stanza. That element'srefattribute value is set to theidattribute of channel element. This XML defines the connection that is graphically displayed in the EPN editor.The resulting EPN assembly XML should look something like the following (aspects that connect components are shown in bold text):
<?xml version="1.0" encoding="UTF-8"?> <beans xmlns="http://www.springframework.org/schema/beans" xmlns:xsi="http://www.w3.org/2001/XMLSchema-instance" xmlns:osgi="http://www.springframework.org/schema/osgi" xmlns:wlevs="http://www.bea.com/ns/wlevs/spring" xmlns:jdbc="http://www.oracle.com/ns/ocep/jdbc/" xmlns:spatial="http://www.oracle.com/ns/ocep/spatial/" xsi:schemaLocation="..."> <!-- Schema locations omitted for brevity. --> <wlevs:event-type-repository> <wlevs:event-type type-name="TradeEvent"> <wlevs:class>com.oracle.cep.example.tradereport.TradeEvent</wlevs:class> </wlevs:event-type> </wlevs:event-type-repository> <wlevs:adapter id="StockTradeCSVAdapter" provider="csvgen"> <wlevs:listener ref="AdapterOutputChannel" /> <wlevs:instance-property name="port" value="9200" /> <wlevs:instance-property name="eventTypeName" value="TradeEvent" /> <wlevs:instance-property name="eventPropertyNames" value="symbol,price,percChange,volume,lastPrice" /> </wlevs:adapter> <wlevs:channel id="AdapterOutputChannel" event-type="TradeEvent"> </wlevs:channel> </beans> -
Save TradeReport.context.xml and close the file.
In this step, you added a channel to convey events out of the input adapter. In the next step, Section 8.6, "Create a Listener to Receive and Report Events", you will add a stage for the events to go.
8.6 Create a Listener to Receive and Report Events
In this step, you will add a stage that will complete a simple event processing network so that you can test the application with event data. The stage will be a "listener" Java class that's designed to receive trade events passing through the EPN and report information about the trades.
The listener you're adding is a particular kind of Java class known in Oracle Event Processing as an event sink. An event sink is code that is able to receive events as they pass through an EPN. By intercepting events with an event sink, you can use the class's logic to find out what's inside the events and use that data while executing other logic in the class. In addition to writing event sinks, you can also write event sources, which are able to send events to stages downstream in the EPN.
So you can imagine, for example, a single Java class that intercepts events, executes code that changes the events' contents (or creates new events from them), then sends the resulting events along to the next stage. Such code could also initiate other processes (potentially in other applications) based on what the events look like.
Both event sinks and event sources implement particular Oracle Event Processing Java interfaces. For example, an event sink implements one of two interfaces, depending on whether the events it's receiving are part of a stream or a relation: com.bea.wlevs.ede.api.StreamSink or com.bea.wlevs.ede.api.RelationSink.
The difference between streams and relations isn't especially important in the application you are building here (your code won't rely on the difference). Still, it's worth a brief explanation because it's an important part of understanding how event processing with Oracle Event Processing works.
A stream is a sequence of events that's sequential with respect to time, with events with an earlier timestamp arriving before those with a later timestamp. In contrast, a relation is a set of events in which events in the set were chosen because they met certain criteria. Code executing on a relation can result in delete, insert, and update events.
As an illustration, consider a metaphor for a stock trade application that's more involved than the one you're building here. Imagine that the trade events your application receives are flowing through a pipe that you can't see into. The events emerge from the pipe in the order they were received -- an order that you care about because it matters which events occurred before which other events. To catch them, you put a bucket under the end of the pipe that's designed to catch fifteen seconds' worth of the trades at a time so that your code can see if a trade of one specific stock occurred within 15 seconds before a trade of another specific stock.
The pipe is a stream, where the sequence and adjacent quality are key characteristics. The bucket is a relation, where certain shared characteristics define what's in the bucket.
In the following sections, you'll create a Java class that implements the interface through which it listens for events, then configure that class as an event bean, making it part of the EPN.
Create the Listener Event Sink Class
In this section, you'll create a Java class capable of receiving events from a stream.
-
In the IDE, in the Project Explorer, right-click the src directory, then click New > Class.
-
In the New Java Class dialog, in the Package box, enter
com.oracle.oep.example.tradereport. -
In the Name box, enter
TradeListener. -
Next to the Interfaces box, click the Add button to select the interface your listener will need to implement to be an event sink.
-
In the Implemented Interfaces Selection dialog, in the Choose interfaces box, enter
com.bea.wlevs.ede.api.StreamSink. -
With StreamSink selected in the Matching items box, click OK.
-
In the New Java Class dialog, under Which method stubs would you like to create, ensure that the Inherited abstract methods check box is selected (the others should be cleared).
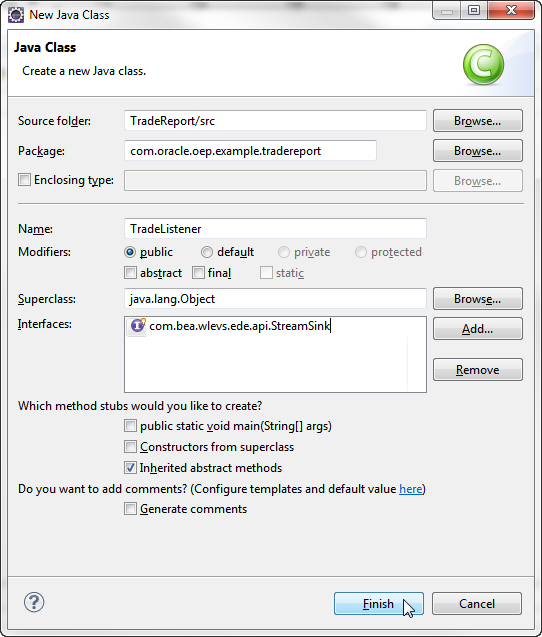
Description of the illustration tradereport_newlistener.png
-
Click Finish.
The TradeListener.java source code window will open to display the declaration for the
TradeListenerclass. A declaration for theonInsertEventmethod should also be present in the .java file. This method is required when implementing theStreamSinkinterface. -
In the TradeListener class, edit the
onInsertEventmethod to match the following code:@Override public void onInsertEvent(Object event) throws EventRejectedException { if (event instanceof TradeEvent){ String symbolProp = ((TradeEvent) event).getSymbol(); Integer volumeProp = ((TradeEvent) event).getVolume(); System.out.println(symbolProp + ":" + volumeProp); } }This is the method that Oracle Event Processing will use to pass an event into your listener, where your code can do something with it. The changes you're making implement the method to do the following:
-
Ensure that the incoming event is an instance of your
TradeEventJavaBean. (Any others would be ignored.) -
If the event is a
TradeEvent, the code will simply print out the stock symbol and trade volume it contains.
-
-
Save and close the TradeListener.java file.
Configure the Listener Class as an Event Bean
In the preceding section, you implemented an event sink to create a class to listen for events of a particular type. In this section, you will add that listener to your EPN as an event bean that you can connect to other parts of the EPN.
An event bean is a way to add Java code to an EPN. Another way is a Spring bean. Though they offer differing management features, both bean models provide a means to configure an EPN stage whose implementation is Java code that you write. An event bean, which you're creating here, integrates more fully with Oracle Event Processing server features. A Spring bean is a good choice when you need to integrate with an existing Spring framework.
-
In the EPN editor, right-click an empty area, then click New > Event Bean.
-
Double-click the new eventBean icon to display its configuration code in the assemble XML file.
-
In the TradeReport.context.xml source code, locate the
event-beanelement and edit it so that it appears as follows:<wlevs:event-bean id="ListenerBean" class="com.oracle.oep.example.tradereport.TradeListener" />With this code, you're configuring the event bean with the unique identifier, "ListenerBean", and an implementation class that's the class you created earlier.
-
Save the assembly XML file.
-
Return to the EPN editor to see that the design reflects your changes to the underlying XML, such as the new event bean name.
-
In the EPN editor, click the AdapterOutputChannel to select it.
-
Again click the AdapterOutputChannel and drag to the ListenerBean event bean icon. This creates a connection so that events can pass from the channel to the event bean.
-
Tidy the diagram by clicking the Layout EPN icon.
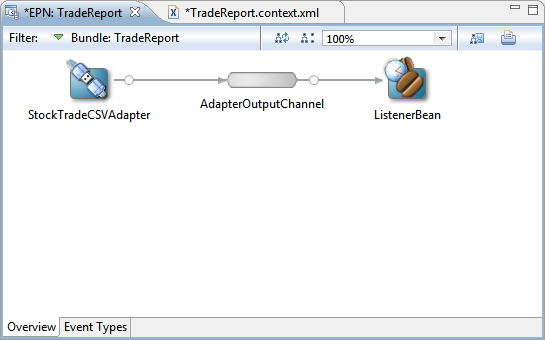
Description of the illustration tradereport_eventbeanadded.png
-
Double-click the AdapterOutputChannel to display its underlying XML.
Note that the channel XML stanza now includes a listener element whose ref attribute value is the same as the ID value for the event bean you added. (The word "listener" in both places here is for convenience only.)
<wlevs:channel id="AdapterOutputChannel" event-type="TradeEvent"> <wlevs:listener ref="ListenerBean" /> </wlevs:channel> <wlevs:event-bean id="ListenerBean" class="com.oracle.oep.example.tradereport.TradeListener" /> -
Save TradeReport.context.xml.
In this step, you added an event bean to listen for events traveling through the event processing network. In the next step, Section 8.7, "Set Up the Load Generator and Test", you will test the application you are building.
8.7 Set Up the Load Generator and Test
In this step, you will deploy your project on an instance of the Oracle Event Processing server, then use the load generator utility included with Oracle Event Processing to feed sample data to the application you are building.
The load generator utility installed with Oracle Event Processing provides a way for you to easily begin testing your project. It's specifically designed to read a CSV file and send rows in the file as event data to a port you specify in its configuration. In your project, a CSV adapter listening on that port receives the rows and converts their data into instances of the event type you defined for it. Through a properties file, you can configure certain aspects of the load generator, including the CSV file and target port to use, how long the load generator should run, how fast it sends event data, and so on.
In the following sections, you'll create an instance of the Oracle Event Processing server, configure it for deploying your project, then set up the load generator and test the project.
Create a Server on Which to Run the Project
In this section, you'll add an Oracle Event Processing server instance to the TradeReport project. Adding the server instance gives you a convenient way to use the IDE to start and stop the server, as well as redeploy the project whenever you make changes and want to test again.
The IDE is aware of the Oracle Event Processing server through the server runtime environment included when you created the project. (You might have needed to add the server runtime envirronment as a separate step.)
-
In the IDE, ensure that the Servers view is displayed. If it isn't visible, click Window > Show View > Servers to display it.
-
In the Servers view, right-click to display the context menu, click New, then click Server.
-
In the New Server dialog, under Select the server type, expand Oracle, then click Oracle Event Processing v11.1.
-
Leave the host name, server name, and runtime environment as is, then click Next.
-
Under New Oracle Event Processing v11.1 Server, ensure that the Local Server option is selected, then click Next.
-
In the next window, under New Oracle Event Processing v11.1 Server, leave the Domain Directory as is, then click Next.
-
Under Add and Remove, in the Available box, select TradeReport, then click the Add button between the Available and Configured boxes.
Moving the TradeReport project name into the Configured list specifies that the TradeReport project you're building should be configured to run on the server you're adding. This simple step makes it easy to deploy (and redeploy) the project to the server as you're debugging.
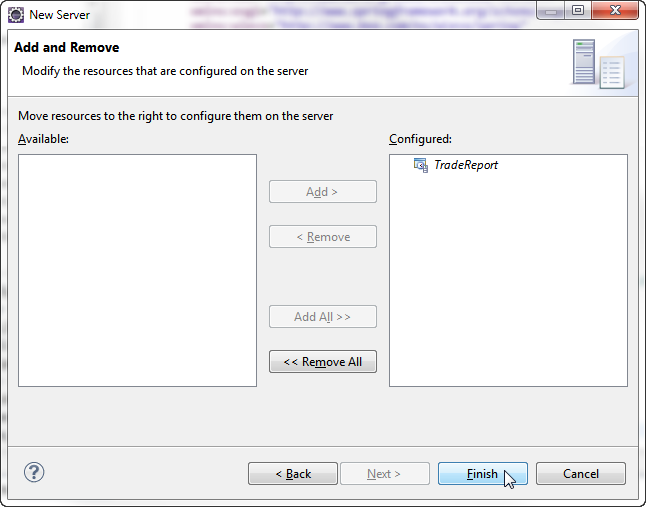
Description of the illustration tradereport_newserv_conf.png
-
Click Finish.
After you've added the server, it should be listed in the Servers view as Oracle Event Processing v11.1 at locahost (Stopped). Expand its entry to confirm that the TradeReport project is one of its configured projects.
Set Up the Test Data and Load Generator
You don't actually need to set up the test data and load generator -- they're set up when you install Oracle Event Processing. But since you'll be using them to debug your project, use the following steps to take a look at them.
-
In the text editor of your choice, open the StockData.csv file included with Oracle Event Processing. By default, you'll find this file at the following path:
ORACLE_HOME/Middleware/ocep_11.1/utils/load-generator/StockData.csv
Notice that the contents of the file are essentially more of what you saw in the example when you defined an event type for the data. Notice that, as with any CSV file, the rows are uniform in terms of the order of values they contain.
-
In the text editor, open the StockData.prop file.
This is the properties file that configures the work of the load generator. Two of its properties -- test.csvDataFile and test.port -- are required in order for the load generator to work. The other properties are technically optional, but you'll need to set one more in order to ensure that the load generator knows that your input is in CSV form. To debug the TradeReport project, you should have the following properties set:
-
test.csvDataFile-- The name of the CSV file that the load generator will read. The value here should beStockData.csv. -
test.port-- The port number to which the load generator will send event data. This should be the port value you specified when you configured the CSV adapter instance, or9200. -
test.packetType-- The form that the load generator will be handling. This value should beCSV.
-
Of course, you probably won't need to actually debug this project (you've been doing everything exactly as described here, right?). But setting a breakpoint and running the Oracle Event Processing server in debug mode will give you a chance to see how things are working.
-
In the IDE, open the TradeListener.java file you created in an earlier step. In the Project Explorer, the file should be visible by expanding TradeReport > src > com.oracle.cep.example.tradereport.
-
In TradeListener.java, set a breakpoint at the line with the following code:
System.out.println(symbolProp + ":" + volumeProp);
-
In the Servers view, select the server you added: Oracle Event Processing v11.1 at localhost
-
With the server selected, click the Start the server in debug mode button in the upper right corner of the Servers view.
You will likely need to wait for a few moments while the server starts, the IDE compiles your project, and then deploys the TradeReport project as an application to the running server. During this time, the Console view will display status messages related to the server's startup progress. The server is running in debug mode when the Console view's output ends with <Server STARTED> or <The application context for "TradeReport" was started successfully>.
-
In the Servers view, confirm that the project does not need to be republished to the server. If the TradeReport entry shows (Republish), then right-click the TradeReport entry and click Force Publish. After it has been successfully deployed, the entry will show (Synchronized).
If you see errors when you attempt to republish, you might need to clean and rebuild the project before continuing.
-
Open a command prompt and change directory to the load-generator directory installed with Oracle Event Processing. By default, this is at the following path:
ORACLE_HOME/Middleware/ocep_11.1/utils/load-generator -
In the command prompt, type the following, then press Enter to start sending event data to your deployed project:
-
On Windows:
runloadgen.cmd StockData.prop -
On Linux:
runloadgen.sh StockData.prop
-
-
Once the load generator begins sending event data, the IDE should switch to its debugging perspective (if you have the IDE set that way) and pause execution at the breakpoint you set in the Listener class.
-
When execution has paused at the breakpoint, look at the Variables view to examine the contents of the event that was received by the listener. By clicking each of the event's properties, you can view the values assigned to each from the CSV file.
-
Click the Resume button repeatedly to advance execution from event to event, noticing the values in each.
-
In the Console window, notice that the listener code is printing stock symbols and volumes from the events it receives.
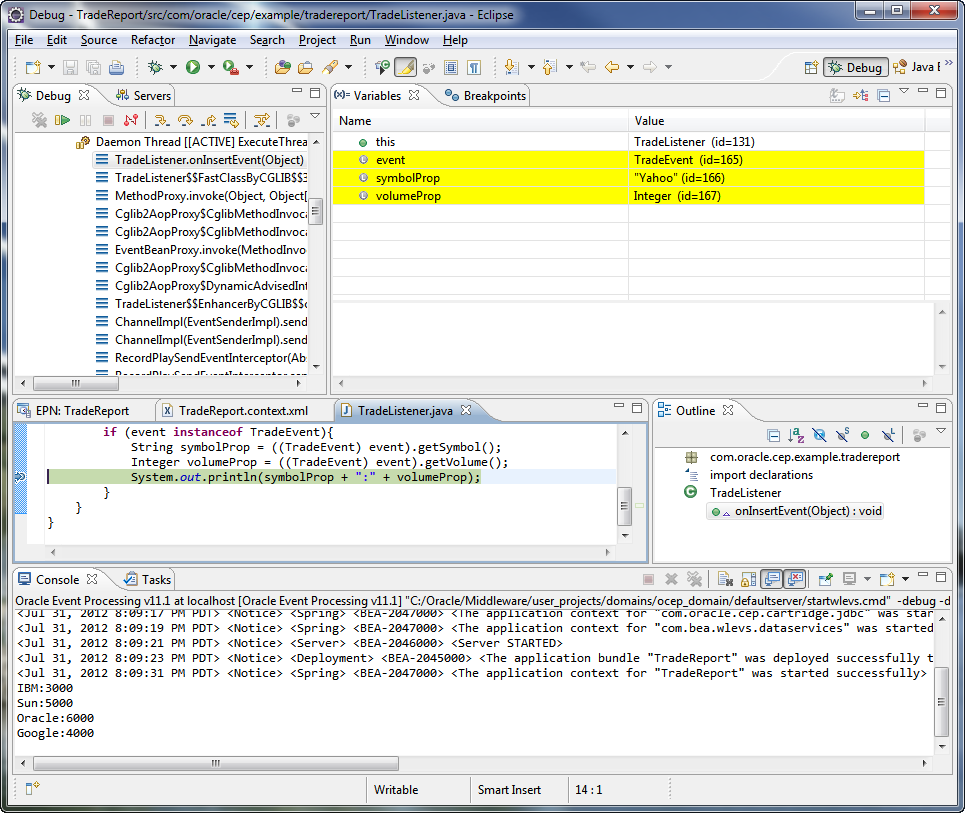
Description of the illustration tradereport_breakpoint.png
-
In the Servers view, select the Oracle Event Processing server, then click the Stop the server button.
-
In the load generator command prompt window, press CTRL+C to stop the load generator.
That's it! You've created and tested a simple Oracle Event Processing application. In the last step, Section 8.8, "Add an Oracle CQL Processor to Filter Events", you'll make the application a little more interesting by adding some Oracle CQL code.
8.8 Add an Oracle CQL Processor to Filter Events
In this step, you'll add a processor to filter events based on certain criteria. A processor is a stage to which you add Oracle Continuous Query Language (Oracle CQL) code for querying incoming events. Processors and Oracle CQL queries represent much of the real power of event-oriented applications you build with Oracle Event Processing. With Oracle CQL, you can focus the application's logic on just those events you care about, executing sometimes complex logic as events arrive.
If you have used Structured Query Language (SQL), Oracle CQL will appear very familiar. In fact, Oracle CQL is essentially like SQL -- with the same keywords and syntax rules -- but with features added to support the unique aspects of streaming data. (If you aren't familiar with SQL, getting acquainted with it will go a long way toward helping you get the most out of Oracle CQL.)
Remember that event data (and the Oracle Event Processing events that result from it) is a stream of data that the EPN receives sequentially. To continue the comparison of SQL and Oracle CQL, an event may be said in one sense to correspond to a row in a database. However, an important difference is that with events, one event is always before or after another, time-wise, and the stream is potentially infinite and ever-changing. In a relational database, rows may be said to be a finite set where data is relatively static. With a relational database, data is waiting for your query to go and get it; with a stream of event data, data is always flowing into the EPN, where your query examines it as it arrives.
To make the most of the sequential, time-oriented quality of streaming data, CQL includes the ability to:
-
Specify a window of a particular time period, or range, from which events should be queried. This could be each five seconds worth of events, for example.
-
Specify a window of a particular number of events, called "rows," against which to query. This might be each sequence of 10 events.
-
Specify how often the query should execute against the stream by using the
slidekeyword. The query could "slide" every five seconds to a later five-second window of events. -
Separate, or partition, an incoming stream into multiple streams based on particular characteristics of the events. You could have the query create new streams for each of specified stock symbols found in incoming trade events.
In addition, CQL supports common aspects of SQL you might be familiar with, including views and joins. For example, you can write CQL code that performs a join involving streaming event data and data in a relational database table or cache. CQL is extensible through cartridges, with included cartridges providing support for queries that incorporate functionality within Java classes, for calculations specific to spatial data, and to query JDBC data sources.
To get acquainted with processors and CQL, you'll keep the code you're adding here simple. You'll add a query that retrieves certain events fed from the AdapterOutputChannel. The query will be designed to retrieve only those trades whose volume is greater than 4000. Events in the query's results will be passed along to the listener.
The following is what the CQL code will look like:
Example 8-1 GetHighVolume Query Element with CQL Code
<query id="GetHighVolume"><![CDATA[
    select trade.symbol, trade.volume
    from AdapterOutputChannel [now] as trade
    where trade.volume > 4000
    ]]>
</query>
This query can be paraphrased as "for every event coming from the AdapterOutputChannel whose trade volume is more than 4000 shares, get the symbol and volume values." The select, from, and where statements should look familiar if you've used SQL. The now operator represents a window of time, where the window is essentially instantaneous -- it includes every event. Another window might have been [range 5], meaning "select from all the events that arrive within each five second period." (That might be useful if you care that certain trades have occurred within five seconds of one another.)
The output of this query will be a relation -- or set, rather than sequence -- that includes all of the events whose trade volume is greater than 4000. Because the window is [now], the set will always have no more than one member. A relation from a larger range might have multiple members in its set.
Add a GetHighVolume Processor and Query
-
In the IDE, in the EPN editor, right-click an empty area of the diagram, then click New > Processor.
-
In the New Processor dialog, in the Processor ID box, enter
GetHighVolumeProcessor. -
Select the Use an existing configuration file option.
Remember that you can create a different configuration file for each processor. That might be useful if you have a different person working on each one.
-
In the dropdown, leave config.xml selected, then click OK.
-
In the EPN editor, notice that a GetHighVolumeProcessor icon has been created.
-
Right-click the connector from the AdapterOutputChannel icon to the ListenerBean icon, then click Delete.
-
Click then AdapterOutputChannel icon, then drag from it to the GetHighVolumeProcessor icon.
Creating this connection makes the processor aware of the channel, After connecting the channel to the processor, you can refer to the channel by its ID value in CQL code.
-
Double-click the GetHighVolumeProcessor icon to open its configuration code in the config.xml file.
-
In the config.xml file, replace the query element with the following query XML:
<query id="GetHighVolume"><![CDATA[
    select trade.symbol, trade.volume
    from AdapterOutputChannel [now] as trade
    where trade.volume > 4000
    ]]>
</query>
The code window should look something like the following:
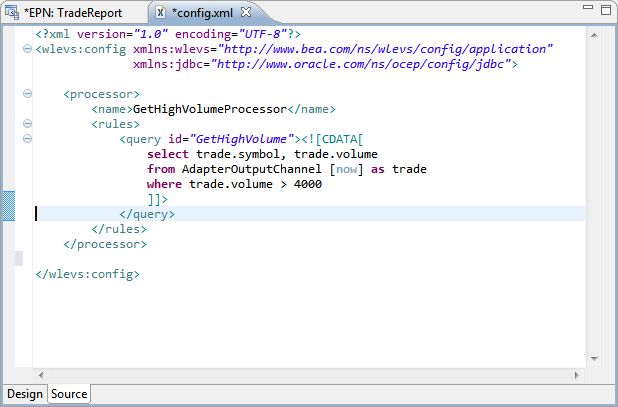
Description of the illustration tradereport_cqlcode.png
-
In the EPN editor, right-click an empty area of the diagram, then click New > Channel.
-
Right-click the icon for the new channel, then click Rename.
-
Type
ProcessorOutputChanneland press Enter to rename the channel. -
Click the GetHighVolumeProcessor icon, then drag to the new channel icon to connect the processor and channel.
-
Click the ProcessorOutputChannel icon, then drag to the ListenerBean icon to connect the channel to the listener.
-
Click the Layout EPN button to tidy the diagram so that the icons are in a row from left to right in order of sequence.
-
Double-click the ProcessorOutputChannel icon to open the channel's configuration in the assembly XML file.
-
In TradeReport.context.xml, replace the default channel configuration with the following XML. In particular, note that you're specifying that TradeEvent is the event type that passes through this channel.
<wlevs:channel id="ProcessorOutputChannel" event-type="TradeEvent"> <wlevs:listener ref="ListenerBean" /></wlevs:channel> -
Save all of the files in the project.
At this point, you should be ready to debug the application again.
In this section, you'll debug once more to confirm that your CQL code is producing the results you intend.
-
In the IDE, open the TradeListener.java file you created in an earlier step. In the Project Explorer, the file should be visible by expanding TradeReport > src > com.oracle.cep.example.tradereport.
-
In TradeListener.java, confirm that you have a breakpoint at the line with the following code:
System.out.println(symbolProp + ":" + volumeProp);You might need to rebuild the project before you can successfully debug.
-
In the Servers view, select the server you added: Oracle Event Processing v11.1 at localhost
-
With the server selected, click the Start the server in debug mode button in the upper right corner of the Servers view.
You will likely need to wait for a few moments while the server starts, the IDE compiles your project, and then deploys the TradeReport project as an application to the running server. During this time, the Console view will display status messages related to the server's startup progress. When the Console view's output ends with <Server STARTED>, the server is running in debug mode.
-
In the Servers view, confirm that the project does not need to be republished to the server. If the TradeReport entry shows (Republish), then right-click the TradeReport entry and click Force Publish. After it has been successfully deployed, the entry will show (Synchronized).
-
If you don't have one already, open a command prompt and change directory to the load-generator directory installed with Oracle Event Processing. By default, this is at the following path:
ORACLE_HOME/Middleware/ocep_v11.1/utils/load-generator
-
In the command prompt, type the following, then press Enter to start sending event data to your deployed project:
-
On Windows:
runloadgen.cmd StockData.prop -
On Linux:
runloadgen.sh StockData.prop
Once the load generator begins sending event data, the IDE should switch to its debugging perspective (if you have the IDE set that way) and pause execution at the breakpoint you set in the listener class.
-
-
When execution has paused at the breakpoint, look at the Variables view to examine the contents of the event that was received by the listener.
By clicking each of the event's properties, you can view the values assigned to each from the CSV file. Notice that the event contains only two values -- symbol and volume. That's because your query selects only those two values from events that pass through the processor.
-
Click the Resume button repeatedly to advance execution from event to event, noticing the values in each.
-
In the Console window, notice that the listener code is printing stock symbols and volumes from the events it receives.
If you have coded your query correctly, all of the volume values should be higher than 4000.
-
In the Servers view, select the Oracle Event Processing server, then click the Stop the server button.
-
In the load generator command prompt window, press CTRL+C to stop the load generator.
That's it -- you've finish this application. For a list of the things covered in this walkthrough, along with links to more information, see Section 8.9, "Summary: Simple Application Walkthrough".
8.9 Summary: Simple Application Walkthrough
This section summarizes the simple application walkthrough, which begins with Section 8.1, "Introduction to the Simple Application Walkthrough". In this walkthrough, you built a simple Oracle Event Processing application. You assembled an event processing network to receive events and report on those that met certain criteria.
For other introductory content, see Chapter 1, "Overview of Creating Oracle Event Processing Applications".
This walkthrough introduced the most basic aspects of developing Oracle Event Processing applications. Those concepts include:
-
IDE features designed to make building Oracle Event Processing applications easier.
To start learning more about the IDE, see Section 4.1, "Overview of Oracle Event Processing IDE for Eclipse".
-
Building an application as an event processing network (EPN).
For another introduction to EPNs, see Section 1.2, "How an Oracle Event Processing Application Works".
-
Designing event types that model events.
For more information, see Section 9.1, "Overview of Oracle Event Processing Event Types".
-
Using adapters to manage interactions with external components.
Oracle Event Processing includes adapters. You can also build your own. See the following sections for more:
-
Implementing a Java class that can receive or send events.
For more on writing event sinks and event sources, see Chapter 16, "Handling Events with Sources and Sinks"
-
Event streams and relations as models for handling events as they pass through an event processing network.
For an introduction to streams and relations, see Section 1.3, "Overview of Events, Streams and Relations".
-
Using Oracle Continuous Query Language (Oracle CQL) to find and filter events.
For more on Oracle CQL, see Chapter 17, "Querying an Event Stream with Oracle CQL"