7 Uninstalling the Software
This chapter describes how to uninstall or reinstall WebLogic Server 10.3.6, and how to revert to a previous WebLogic Server installation.
This chapter includes the following sections:
Uninstalling the Software
The following sections describe how to uninstall your software or individual components on Windows and UNIX systems. You can uninstall the software using graphical, console, or silent mode.
Note:
If you used an Upgrade installer to upgrade an existing installation, you can either remove the software completely, or revert back to the previous installation as described in Reverting to a Previous Installation.You can uninstall individual components of your product distribution, or the entire installation. Dependency checking in the uninstall program ensures that the appropriate components are uninstalled.
The uninstall program does not remove the home directory associated with the installation, the JDK, or any user-created WebLogic domains. Only the components that were installed by the installation program can be removed. If you choose to uninstall the entire product, the uninstallation program also removes the product directory associated with the installation unless any of the following is true:
-
The product directory contains user-created configuration or application files. The uninstallation program does not delete user-created configuration files, application files, or domains.
-
The complete installation was not uninstalled. If an individual component is uninstalled, only the installation directory for that component is removed; the installation directories for other components are unaffected.
-
The uninstall program was invoked from within the product directory structure—specifically, from the
uninstallerdirectory.
Uninstalling Your Software in Graphical Mode
To run the uninstall program in graphical-mode, your console must support Java-based GUIs. If the uninstallation program determines that your system cannot support Java-based GUIs, it automatically starts running in console mode.
Use the following procedure to uninstall the complete product installation, or individual components, in graphical mode:
-
Shut down any servers that are running. If any of these servers is configured as a Windows service, you should stop the service(s) before uninstalling the software.
-
Start the uninstall program as described in Table 7-1.
Table 7-1 Starting the Uninstall Program in Graphical Mode
Platform Procedure Windows
Choose Start > Programs > Oracle WebLogic > Uninstall Oracle WebLogic.
The Oracle Uninstaller Welcome screen is displayed.
UNIX
-
Go to the following directory:
MW_HOME\utils\uninstallwhere
MW_HOMErepresents the Middleware home directory in which you installed the product you are uninstalling. -
Enter
uninstall.shat the prompt.The Oracle Uninstaller Welcome screen is displayed.
Note: If your system supports a graphical user interface, the uninstall program starts in graphical mode. If your system does not support a graphical user interface, the uninstall program starts in console mode. If console mode is started, see Uninstalling Your Software in Console Mode, for instructions.
-
-
Click Next to start the uninstall program.
The Choose Components screen is displayed.
-
Select the components to uninstall by selecting or clearing the appropriate check boxes, By default, all installed components are selected, indicating that they will be removed.
Note:
To uninstall Workshop for WebLogic prior to using an Upgrade installer to upgrade a WebLogic Server 10.3.0, 10.3.1, 10.3.2 or 10.3.3 installation to WebLogic 10.3.6, select only the components shown here.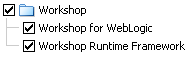
Description of the illustration workshop_components.gif -
After selecting the components to uninstall, click Next.
Caution:
Once you click Next, you cannot abort the uninstallation process. -
Optionally, click Details to view the log file that lists the uninstalled components.
-
Click Done in the Uninstalling Oracle Products screen to exit the uninstallation program.
Uninstalling Your Software in Console Mode
Use the following procedure to uninstall the complete product installation, or individual components, using the command-line interface:
-
Shut down any servers that are running. If any of these servers are configured as a Windows service, you should stop the service(s) before uninstalling the software.
-
Start the uninstall program as described in Table 7-2.
Table 7-2 Starting the Uninstall Program in Console Mode
Platform Procedure Windows
-
Open a command prompt window and go to the following directory:
MW_HOME\utils\uninstallwhere
MW_HOMErepresents the Middleware home directory in which you installed WebLogic Server. -
Enter the following command at the prompt:
uninstall -mode=console
The
Welcometext is displayed.UNIX
-
Go to the following directory:
MW_HOME/utils/uninstallwhere
MW_HOMErepresents the Middleware home directory in which you installed WebLogic Server. -
At the prompt, enter the following command:
sh uninstall.sh -mode=console
The
Welcometext is displayed. -
-
Enter
nextor press Enter to proceed to the next panel of the uninstallation program.Note:
Instead of typing complete words when you want to enterexit,previous, andnext, you can use the one-letter shortcuts,x,p, andn, respectively.The
Choose Products and Components to uninstallprompt is displayed. -
Select the components you want to uninstall. By default, all installed components are selected, indicating that they will be removed.
To leave a component installed on your system, enter the numeric code for that component on the command line, exactly as it appears within the brackets. Dependency checking is performed to ensure that you do not uninstall a component that is required by another component.
To uninstall Workshop for WebLogic prior to using an Upgrade installer to upgrade a version 10.3.1 or 10.3.2 installation to a later 10.3.x installation:
-
Enter 1 to deselect all WebLogic Server components.
-
If you also installed Coherence, enter the value for that component to deselect it.
-
Verify that only the Workshop for WebLogic components are selected (indicated by a check mark next to the component number).
-
-
Enter
nextor press Enter to proceed with the uninstallation process.Caution:
Once you enternext, you cannot abort the uninstallation process. -
When the uninstallation process is complete, enter
exitor press Enter to complete the uninstallation and exit the uninstallation program.
Uninstalling Your Software in Silent Mode
When you uninstall the software in silent mode, the complete software installation is uninstalled. You cannot uninstall individual components.
Note:
If you need to uninstall Workshop for WebLogic prior to running an Upgrade installer, you must run the uninstaller in graphical mode or console mode to remove only the Workshop components.When you run the uninstallation program in silent mode, it leaves behind the same files and directories as when you run the uninstall program in graphical and console modes, including:
-
The home directory, including the
logsandutilssubdirectories -
The JDK, if it was installed with your product
-
Domain directories, including those in
user_projects -
Any other file that was created or modified after your software was installed.
You can manually delete these files.
Although you can use silent-mode to manually uninstall your software, silent-mode uninstall is intended for use in scripts. You can use the commands in Table 7-3 in scripts.
Use the following procedure to uninstall your Products software in silent mode:
-
Shut down any servers that are running. If you configured any of the servers as a Windows service, you must stop the service(s) before uninstalling the software.
-
Start the uninstallation program as described in Table 7-3.
Table 7-3 Starting the Uninstallation Program in Silent Mode
| Platform | Procedure |
|---|---|
|
Windows |
|
|
UNIX |
|
Note:
When you run the uninstallation program in silent mode, no messages are displayed indicating that the uninstallation is in progress or has completed successfully, even if errors are encountered.You can include the -log=full_path_to_log_file option in the command line to create a verbose installation log. For example:
uninstall -mode=silent -log=C:\logs\weblogic_uninstall.log
Reverting to a Previous Installation
If you used an Upgrade installer to upgrade an existing installation to the most current version, you can use the uninstaller program to revert to the previous version of the software. For example, if you upgraded from WebLogic Server version 10.3.0 to version 10.3.3, you can use the uninstaller to revert back to the 10.3.0 installation.
Notes:
When reverting to a previous installation, you can run the uninstall program either in graphical mode or console mode. You cannot run it in silent mode in this situation.You can also use the Smart Update tool to remove patches and updates. For more information, see Oracle Smart Update Installing Patches and Maintenance Packs.
Reverting to a Previous Version Using Graphical Mode
To revert to a previous installation using graphical mode:
-
Shut down any servers that are running. If any of these servers is configured as a Windows service, you should stop the service(s) before uninstalling the software.
-
If you are rolling back to WebLogic Server 10.3.0, refer to Upgrading the Embedded LDAP Schema, for important information regarding the Embedded LDAP schema.
-
Start the uninstall program as described in Table 7-1.
-
Click Next. The Select Uninstall Type screen appears. The options on this screen differ depending on the initial installation you upgraded, and the release to which you upgraded. The following example is for an environment in which WebLogic Server 10.3.0 was installed (without Workshop for WebLogic), and the version 10.3.0 installation was upgraded to version 10.3.4.
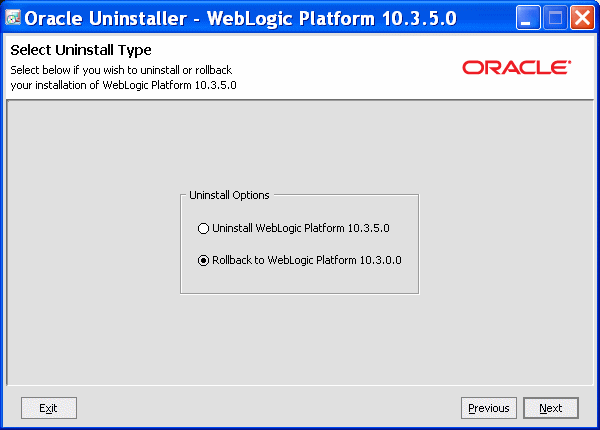
Description of the illustration uninstall_select.gif
-
Select the appropriate Rollback or Uninstall option. In this example:
-
To revert back to the WebLogic Server 10.3.0 release, select Rollback to WebLogic Platform. Click Next. The Uninstalling WebLogic Platform screen is displayed. Go to step 5.
-
To completely uninstall the WebLogic Server 10.3.6 release, select Uninstall WebLogic Platform version. In this case, the Component Selection screen appears next, and you can continue the uninstallation from step 4 in Uninstalling Your Software in Graphical Mode.
-
-
Wait while the uninstall program restores the previous version of your software. When the message "Uninstall Complete" appears, click Done.
Reverting to a Previous Version Using Console Mode
To revert to a previous installation using console mode:
-
Shut down any servers that are running. If any of these servers is configured as a Windows service, you should stop the service(s) before uninstalling the software.
-
If you are rolling back to WebLogic Server 10.3.0, refer to Upgrading the Embedded LDAP Schema, for important information regarding the Embedded LDAP schema.
-
Start the uninstall program as described in Table 7-2.
-
Enter
nextor press Enter to proceed to the next panel of the uninstallation program. -
Enter the appropriate number for the Uninstall or Rollback option you want to select. The options you see depend on your initial installation and the version to which you upgraded.
-
If you select the Rollback to WebLogic Server 10.3.0.0 option, after a few minutes, the message
Restoring Filesis displayed while the uninstall program restores your previous version. Go to Step 5. -
If you select an Uninstall option, you can completely remove all of the existing installation, or you can remove individual components of the currently installed version. In this case, the
Choose Components to Uninstallpanel is displayed. To continue, go to step 4 in Uninstalling Your Software in Console Mode.
-
-
The process is complete when the uninstall program shell closes.
Upgrading the Embedded LDAP Schema
A new operational attribute, orclguid, was added to the Embedded LDAP server as of WebLogic Server 10.3.1. Therefore, if you upgraded from WebLogic Server 10.3.0 to a later 10.3.x version, and then need to perform a rollback to the 10.3.0 installation, Oracle recommends that, after rollback, you upgrade the Embedded LDAP schema in your 10.3.0 installation to the schema version in the later installation. Otherwise, you may see the following LDAP error after rollback:
LDAPException: error result (65); Missing Attributes: [], NotAllowed Attributes: [orclguid]
To upgrade the Embedded LDAP schema:]
-
Prior to rolling back to the 10.3.0 installation, save a copy of the following schema file to a temporary directory:
WL_HOME\server\lib\schema.core.xml -
After rolling back to the WebLogic Server 10.3.0 installation, replace the schema file in the WebLogic Server 10.3.0 installation with the schema file you saved to the temporary directory.
Reinstalling Your Software
You cannot reinstall the same version of a product on top of a previously installed version of the same product, in the same home directory or in the same file location. However, you can add products and product components to an existing installation. For example, you can install Core Application Server, Administration Console, and Configuration Wizard Upgrade Framework during one installation, and add WebLogic JDBC Drivers and Server Examples during a separate installation.
To reinstall the same version of a product component or an entire product distribution in the same location, you must first uninstall the previous installation.
If you try to install a complete copy of a product in a home directory that contains a complete installation, an error message is displayed. Click OK (or enter OK, if in console mode) to return to the Choose Middleware Home Directory screen (or panel).
At the prompt, choose one of the following options:
-
To continue installing the software using a different home directory, select an existing home directory that does not contain a previous installation, or create a home directory.
-
Exit the installation program. To reinstall your software in the same home, you must uninstall the previous installation.
You can start the uninstall program appropriate for your platform, as described in the following sections:
Then, install the software as described in one of the following chapters: