5 Configuring the BPM Imaging Solution
This chapter describes how to configure BPM imaging solution components and options, based on your administrator role. For more information about roles and the types of solution changes administrators can make with each role, see Section 1.2.2.
This chapter covers the following topics:
-
Section 5.1, "Understanding Solution Application Administration"
-
Section 5.2, "Getting Started Configuring the Solution Application"
-
Section 5.6, "Using Oracle Fusion Middleware Control to Manage AXF for BPM"
5.1 Understanding Solution Application Administration
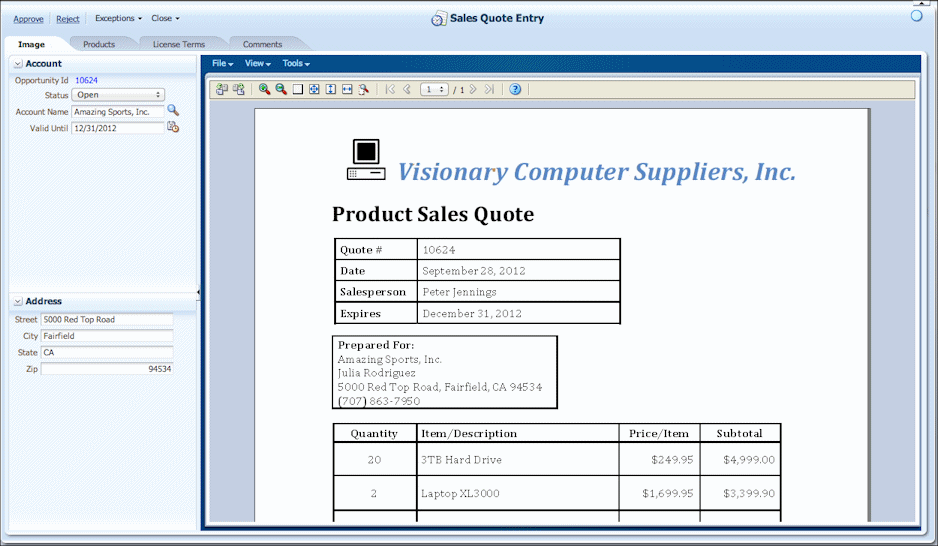
Section 1.2.4 describes how the solution application portion of the solution workspace (shown in Figure 5-1) provides a highly configurable human task area where users complete selected tasks. This section describes the concepts behind editing the solution application's underlying business rules. In addition, the HelloBPM solution installed with AXF for BPM provides an example configuration you can use to examine and practice solution application configuration.
Note:
This section assumes a general knowledge of business rule editing, including rulesets, decision tables, and dictionaries. Business rule information is covered extensively in the Oracle Fusion Middleware Business Process Composer User's Guide for Oracle Business Process Management.
Figure 5-1 Solution Application Driven by Business Rules
Description of "Figure 5-1 Solution Application Driven by Business Rules"
This section covers the following topics:
-
Section 5.1.1, "About the Dynamic Page Template and Page Components"
-
Section 5.1.9, "About Disabling or Discarding Business Rule Changes"
5.1.1 About the Dynamic Page Template and Page Components
In AXF for BPM, every solution application page a user sees is built on a single dynamic page template. This template includes menu (action control) and tab (dynamic tabs) components, as shown in Figure 5-1. Although every page the user navigates to is the same page, business rules define how the page is rendered. For example, depending on context, different tabs may display to some users and not others and the contents of the tabs may differ.
5.1.1.1 About the Action Control
The action control is a business rule-driven component that defines actions that call AXF functionality. The functionality that actions call is specified by functional blocks, which are described in Section 5.1.3. For example, the HelloBPM solution action control contains Approve and Reject actions displayed as links. This configuration can be used for more commonly used actions. You can also configure the action control to display actions grouped in dropdown menus. For example, the Account Manager action and Save and Close action are organized under the Exceptions and Close dropdown menus.
Use the Action rule dictionary to configure the layout and behavior of the actions displayed in the action control, and the FunctionalBlock dictionary to configure the functionality the actions invoke. For example, use business rules to:
-
Define actions and sections (for example, several close action links might display within a Close dropdown menu).
Note that actions not assigned to a section display left-justified in the Action menu as links, allowing users to easily access commonly used actions. Sections display as dropdown menus with their actions listed as menu items.
-
Add new actions to the control. After adding an action, define the functional block or functional block sequence to invoke for the action. For example, clicking on an Approve action might navigate to an Identity Browser control page.
-
Exclude or disable actions or sections based on rule outcome. For example, an Approve action might be disabled or hidden when a required data field is blank or set to 0.
5.1.1.2 About the Update Status Icon
To the right of the action control is the Update Status icon shown below.
This icon changes (appears selected) to indicate to the user that an update to the internal, underlying data has occurred. For example, it changes when a value is updated in the business application, but not when users change data values on dynamic tabs. Once changed, the user clicks the icon to acknowledge the data update, which resets the icon to its deselected state.
5.1.1.3 About Dynamic Tabs
The dynamic tabs control is a business rule-driven component that defines the tabs that display within the solution application and their page component contents. The default dynamic tabs in the HelloBPM solution shown in Figure 5-1 include Image Data, Master Detail for Products, Master Detail for License Terms, and Comments.
Use the DynamicTab dictionary to configure a tab's contents and behavior. See Section 5.1.2.
5.1.1.4 About Page Components
Page components display contents such as images, data fields, and/or tables on a dynamic tab. The dynamic tab control hosts a page component, as described in more detail in Section A.1.1. Page components implement the main functionality displayed in the task details area.
-
A page component can be comprised of other page components, resulting in a composite page component. For example, if a dynamic tab hosts the Data page component, the user role sees data only. But if the tab also hosts the Image or TableData page components, it displays an image or a data table, respectively.
-
The Image Data and Master Detail page components are examples of page components made from other page components. The Image Data page component contains a Data and Image page component while the Master Detail page component contains a Data and Table Data page component.
5.1.2 About Business Rules and Dictionaries
Business rules provide the means of configuring the solution application to meet the custom needs of business application users. In AXF for BPM solution administration, business rules are standard SOA business rules that you modify to change the AXF solution's behavior. Using the solution administration area, you can load, edit, and save business rules, test the results of your modifications, and if needed, restore the business rules to their product state.
Rules are stored in a separate AXF MDS repository that uses the same schema but is separate from the SOA repository. The initial product rules are deployed as part of the solution application.
A dictionary is a container for business rules grouped for a solution application feature. For example, the Action dictionary defines actions and sections (dropdown menus) in the action control portion of the solution application. The dictionaries provided with the AXF for BPM infrastructure are listed in Table 5-1. A solution's dictionaries are grouped into a package, as described in Section 5.1.6. For example, all dictionaries in the HelloBPM solution are contained in the oracle.axf.solution.hellobpm package.
For the most part, rule dictionaries are separate from one another, although some have entity relationships, as highlighted in Section A.1.9. All rules tie to the solution application, not to the BPM processes.
Table 5-1 Dictionaries Provided with the AXF for BPM Infrastructure
| Dictionary | Description |
|---|---|
|
Action |
This dictionary defines the layout and behavior of the action control area, in which task actions display. You can optionally define actions as conditionally displayed or disabled. For example, you could edit business rules so that an Approve button displays as disabled to certain user roles when a specific data value (such as Amount) exceeds a specified amount. For reference information, see Section A.1.3. |
|
Data |
This dictionary defines the data (metadata) and items displayed within the Data page component. Data values can be defined in a variety of ways, including editable or read-only. For reference information, see Section A.1.4. |
|
DynamicTab |
This dictionary defines the layout and behavior of the tabs displayed in the solution application. For example, you might use this dictionary to display a Comments tab and require that users enter a comment before routing a task. For reference information, see Section A.1.5. |
|
FunctionalBlock |
This dictionary defines solution application functions and function sequences for actions, such as the actions that occur when a user selects an action link. For example, you can use functional blocks to set an outcome to a human task or to navigate to a predefined control page such as the identity browser control page. For reference information, see Section A.1.6. |
|
LookupAndValidator |
This dictionary defines lookups (user selection of data values from a selection list) for the Data and TableData controls. Lookups can be either static (fixed list) or dynamic (SQL query from a database), and dynamic lookup fields can be dependent (linked). In addition to lookups, this dictionary also defines validators for validation configuration. For reference information, see Section A.1.7. |
|
TableData |
This dictionary defines how data is displayed in table format. A single table can be defined that contains multiple column definitions. Tables are dynamically rendered at runtime based on rule configuration. For reference information, see Section A.1.8. |
5.1.2.1 About Editing Dictionaries
When you edit a dictionary's business rules, you edit its custom rules, but you can return the dictionary's rules back to product rules if needed. For more information about editing dictionaries, see Section 5.2.5.
A context is a specialized version of one or more dictionaries. Typically, contexts are used to provide additional functionality to certain tasks. For example, the HelloBPM solution includes a SalesQuoteEntry context that displays data fields and tables when a sales quote entry task is selected. For more information, see Section 5.2.6.
5.1.2.2 About Rulesets and Bucketsets
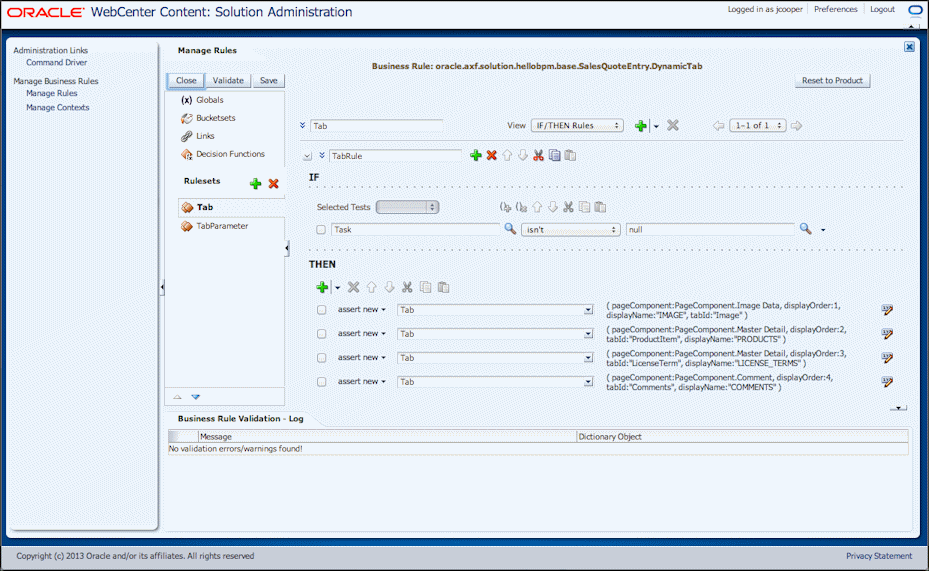
In a business rule dictionary, related rules are grouped into rulesets that define specific aspects of the dictionary. For example, with the DynamicTab dictionary open as shown in Figure 5-2, the right portion of the pane lists individual rules defined for the ruleset selected in the adjacent pane (under Rulesets).
Note that each ruleset is prepopulated as much as possible, enabling you to add new functionality by adapting previous settings or changing the placeholder value.
Bucketsets define constraints, such as a list of values or a range of values for a specified fact type. For example, the DynamicTab dictionary's bucketset, PageComponent, defines the page components that you can configure (Image, Image Data, Data, Table Data, Master Detail, Comment, and Identity Browser).
Figure 5-2 Editing Business Rules in the DynamicTab Dictionary
Description of "Figure 5-2 Editing Business Rules in the DynamicTab Dictionary"
5.1.2.3 About Inputs
Each user interface control's rulesets have access to the input variables listed in Table 5-2, which are sent to the decision point. See the specific control's section in Section A.1 for information about outputs generated by rulesets.
5.1.3 About Functional Blocks
In AXF for BPM, functional blocks represent the raw functional building blocks for things you can do in a solution application. For example, you use functional blocks to set an outcome to a human task, such as approving a task, or to navigate to another page such as a control page.
-
A named functional block is a defined instance of a functional block, including parameters. For example, a functional block might navigate to a control page, but the named functional block specifies the control page to which to navigate and which parameters to use.
-
A named functional block sequence represents a sequence of named functional blocks. For example, a sequence might navigate to an identity browser control page, and then set the human task's outcome to Approve.
You define named functional blocks and their sequences in the FunctionalBlock rule dictionary. Typically, all functional blocks are defined in the base context, and then referenced by other rules in other contexts.
You can use functional blocks for the types of actions listed in Table 5-3. See Section 5.3.6.1 for examples of their use.
Table 5-3 Actions Performed by Functional Blocks
| Action | Description |
|---|---|
|
Set Outcome |
Sets a specified Human Task outcome, such as Approve or Reject. |
|
Navigate Dynamic Page |
Navigate to a specified dynamic page. |
|
Navigate Control Page |
Navigate to a specified control page, such as the Identity Browser, Comments or Data control page. |
|
Save |
Performs an explicit save. |
|
Revert |
Loads the original payload, providing a cancel function for changes made to the task since it was last opened. Note: Comments added to the task are not rolled back, even with the Revert Functional Block. |
|
Close Task |
Tasks close automatically when a user selects another from the task list, but this functional block provides an explicit close. |
|
SystemActionSuspend |
BPM action that suspends a specified action. See the Oracle BPM documentation for more information. |
|
SystemActionWithdraw |
BPM action that withdraws a specified action. See the Oracle BPM documentation for more information. |
|
SystemActionSkipCurrentAssignment |
BPM action that skips an assignment. See the Oracle BPM documentation for more information. |
|
SystemActionEscalate |
BPM action that escalates a specified action. See the Oracle BPM documentation for more information. |
5.1.4 About Control Pages
Control pages are predefined dynamic tab pages that contain one or more tabs and their associated page components for use in a solution. They enable you to quickly incorporate commonly used functions. For example, the Identity Browser Control Page displays an interface from which users can select a user or group, such as for approval purposes.
The AXF for BPM infrastructure provides the following control pages:
-
Data (see Section 5.1.4.1)
-
Identity Browser (see Section 5.1.4.2)
-
Comment (see Section 5.1.4.3)
Each control page has a fixed structure with configurable content based on business rule configurations.
5.1.4.1 About the Data Control Page
The Data control page enables you to specify data fields to users for display or edit, as shown in Figure 5-3. Each data field displayed on the control page is bound to a data field defined in the Data dictionary. Data control page parameters are listed in Table A-7.
In addition to specifying data fields, you can use this control page to configure tables of data fields and configure fixed and SQL-based lookups, as described in Section 5.1.8. You can also group data items in sections.
5.1.4.2 About the Identity Browser Control Page
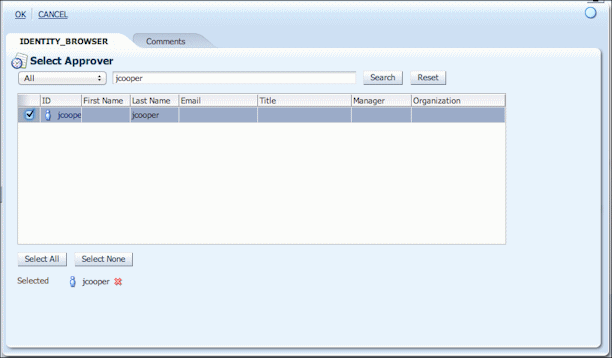
The Identity Browser control page shown in Figure 5-4 enables users to search for users, groups, or application roles and to update the task payload, typically for use in task assignments later in the process. Identity Browser control page parameters are listed in Table A-8. In the HelloBPM example, a sales quote entry user selects the Approve action link, which displays an Identity Browser tab prompting users to select an approver role.
The identity browser control page:
-
Is typically used as part of a sequence of Named Functional Blocks that collects assignment information then completes the task.
-
Allows the task assignment to be updated for future tasks within the process flow.
5.1.4.3 About the Comments Control Page
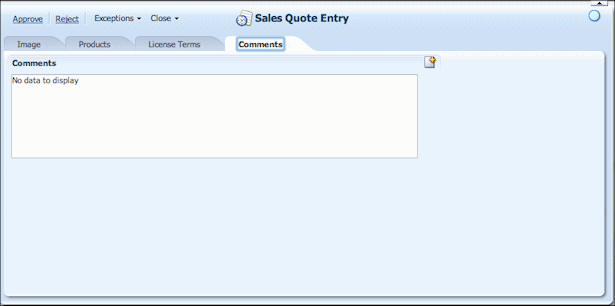
The Comments control page enables users to view and add comments to a task, as shown in Figure 5-5. Comments control page parameters are listed in Table A-9.
You can require users to enter comments. For example, an Approve action link might require users to enter a comment before the approval task can be completed.
5.1.5 About Prompts and Validations
As part of solution application configuration, you can include prompts and validations in human task flows.
A prompt displays a specified message to users as part of a functional block. Prompts can occur before or after validation and allow users to cancel/continue an action or revert changes and continue an action.
You configure prompts in the NamedFunctionalBlockPrompt Properties of the FunctionalBlock Dictionary, specifying settings such as the following:
-
The functional block at which the prompt occurs
-
The point at which the prompt displays (before or after validation)
-
The prompt message to display to users
-
The prompt type (for example, OK or Cancel)
For example, you might define a prompt that occurs at the Reject functional block (when the user clicks the Reject link) that prompts users after validation occurs and displays OK/Cancel buttons along with the following prompt message: "Are you sure you would like to reject this request?" For example prompt configurations, see Table 5-24.
You can configure validations in a variety of ways:
-
A validation can occur immediately or via a functional block.
An immediate validation might occur when the user completes a data field and clicks away from the field.
Functional block validation occurs when a user clicks an action, such as an OK or Cancel button on the page.
-
Validations are performed by validators defined in the LookupAndValidator Dictionary.
A basic validation might check for a null data value when the user clicks Approve, and if found, display a message reminding a user to do something first.
A more complex validation might run a specified validator on a data field, such as the DateTimeRangeValidator, which validates that a date field's entry falls within a specified range. See Table A-33 for a list of validators.
-
A functional block validation can have a specific result (continue, abort, or prompt) if an error occurs.
The result occurs when the functional block executes, enabling you to tailor results by functional block.
Depending on validation type, you configure validations using the following dictionaries:
-
LookupAndValidator Dictionary: In Validator Properties and ValidatorParameter Properties, configure settings such as the validator class and its parameters.
-
Data Dictionary: If specifying validation on a data item, identify the field on which to run the validation (in DataValidator Properties) and whether the validation occurs immediately or via a functional block.
-
TableData Dictionary: If specifying validation on a table column, identify the column on which to run the validation (in ColumnValidator Properties) and whether the validation occurs immediately or via a functional block.
5.1.6 About Packages
A business rule package provides a container for a solution application's set of dictionaries. It includes all business rules in the solution application, including its product rules, edited rules, and all dictionaries defined in all contexts for the solution. (Contexts are described in Section 5.1.7.) For example, the HelloBPM solution is contained in a package called oracle.axf.solution.hellobpm, and contains all dictionaries defined in all contexts.
5.1.7 About Contexts
A context provides a specialized version of one or more dictionaries in the package, separate from the base context. In other words, a context specifies which business rules to execute. Contexts allow you to modify solution application behavior based on human task definition or payload content.
In the HelloBPM example solution, context is based on human task, where the user interface shown depends on the selected task. When users select Sales Quote Entry tasks from the task list, they see additional tabs and actions not shown after selecting Sales Quote Approval tasks.
The HelloBPM solution uses multiple contexts to provide different functionality to three user tasks (sales quote entry users, account managers, and approvers). The base context defines the base set of functionality (functional blocks, lookups, and validators), and the contexts layer on additional functionality to the base (actions and tabs containing data fields and tables), as described in Section 5.3.4.
Contexts form a period-delimited, hierarchical string in decreasing order of specialization, as shown in Example 5-1. Based on runtime context, the AXF for BPM infrastructure traverses down the string until it either finds a rule in one of the contexts or reaches the base context.
As a HelloBPM example, you might define the contexts listed in Example 5-2. When the runtime context is SalesQuoteEntry.Specialist, the rules in the SalesQuoteEntry.Specialist context execute. When the runtime context is SalesQuoteEntry, the rules within the SalesQuoteEntry context execute.
You can create, update, and delete contexts, as described in Section 5.2.6.
-
Creating and implementing a context involves identifying one or more of the package's dictionaries to include in the context, then modifying the context's dictionaries.
-
When creating contexts, use period delimiters in their names to specify their hierarchy, as shown in this section's examples.
-
Deleting a context permanently removes its modified rules, even if the context is in use.
5.1.8 About Data Fields, Tables, and Lookups
Most BPM imaging solutions include business data items that users can view or edit. Using business rules, you can customize how data items display and behave in the solution application. In each case, the data source is the human task payload.
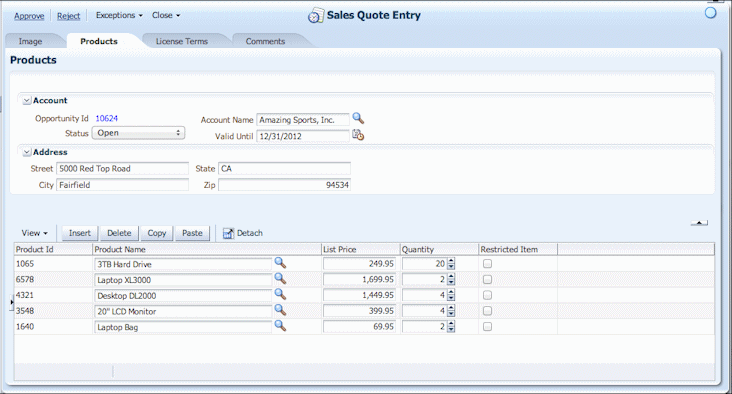
The Master Detail page component displays data items in the solution application's dynamic tabs. You can include and configure the following data controls, which are shown in Figure 5-6 and used in the HelloBPM solution (Section 5.3):
-
Data fields, which are individual data items for display or editing. See Section 5.1.8.1.
-
Tables, which are data items displayed as columns. See Section 5.1.8.2.
-
Lookups, which provide a static or dynamic list of choices; dynamic lookups can also return database values. See Section 5.1.8.3.
Figure 5-6 Data Controls Configured in HelloBPM Solution
Description of "Figure 5-6 Data Controls Configured in HelloBPM Solution"
5.1.8.1 About Data Fields
Table 5-4 lists the type of data fields you can display to users, with examples shown in Figure 5-6.
Table 5-4 Data and Table Field Types
| Type | Appearance | Description |
|---|---|---|
|
Input text |
These fields can accept text and numbers. The Street, City, State, and Zip fields are input text fields. |
|
|
Output text |
These fields, such as Opportunity Id, are read-only. |
|
|
Input date |
These fields, such as Valid Until, display a Select Date icon users click to select a date from a calendar that displays. |
|
|
Input number |
These fields, such as Quantity, display a number spinbox on which users click the upper triangle to increment the number by one, or the lower triangle to decrement the number by one. |
|
|
Static dropdown |
Users click the triangle in these dropdown fields, such as the Status field, to choose a selection from the choice list that displays. Static dropdowns are used for static lookups. |
|
|
Dynamic search |
Users click the Search icon for these fields, such as the Account Name field, and choose a selection from search results that display. If needed, users can specify additional search criteria to narrow the search results. Dynamic search is used for SQL-based lookups. |
You can group data fields in sections. Figure 5-6 shows data fields grouped in Account and Address sections.
Specifying a data field involves adding a new data item to the Data Dictionary for the context in which the field will display, then specifying its properties, including:
-
display order and section (if any)
-
binding name, which identifies where the value is read and written
-
special attributes, such as color
-
other special options, such as lookups
See Data Dictionary for configuration options for the Data component.
5.1.8.2 About Tables
Tables are data fields displayed in a column format instead of as single items. For example, the Product table shown in Figure 5-6 includes multiple data items arranged in columns and rows, with standard options for inserting, deleting, copying, and pasting table rows, which are useful when users need to duplicate and slightly modify multiple line items.
Tables can contain the data item types described in Table 5-4. You can include the table controls described in Table 5-5.
Table 5-5 Available Table Controls
| Control | Description |
|---|---|
|
View |
Users select table view options from this menu.
|
|
Insert |
Enables users to add a new row to the bottom of the table. |
|
Delete |
Enables users to remove the selected rows from the table. |
|
Copy |
Enables users to copy one or more columns from the selected row for pasting. Select each column to copy or All. |
|
Paste |
Enables users to replace selected rows with columns from previously copied rows. |
|
Enables users to magnify the table so that it fills the Task Detail pane. Users can select the Detach icon again to return the table display to its original view. |
Specifying a table involves adding a new table in the TableData Dictionary for the context in which the table will display, then specifying its properties, including:
-
binding, which defines where the table rows and columns load
-
enabling or disabling Copy, Paste, Delete, and Insert buttons for users to work with rows
-
setting options such as column stretching
-
setting the columns, including their binding names (which identifies where the values are read and written), display order, column width, and optional lookup
Note:
You can specify one table definition in the TableData dictionary.
5.1.8.3 About Lookups
Lookups are data items (individual fields or table columns) linked to a lookup list. For example, Figure 5-6 shows Status and Account Name as data field lookups and Product Name as a table lookup. Lookups work the same way in data fields and tables.
Lookups include the following types:
-
Static, which link to a fixed list, and display as a dropdown choice list. For example, the Status field is a fixed lookup from which users select a value of Open, Pending Approval, or Closed. These lookup values are defined in the StaticLookup ruleset of the LookupAndValidator Dictionary.
-
Dynamic, which link to a SQL database, and display with a search icon that users click to query. For example, the Account Name and Product Name fields are dynamic lookups. You can also configure dynamic lookups to autopopulate other data fields when users select an item from a dynamic lookup, as the HelloBPM solution's AccountName lookup populates address fields from the AccountName lookup.
Specifying a lookup involves adding a new lookup in the LookupAndValidator Dictionary for use in one or more contexts. Main steps include:
-
For a static lookup, specifying the values and their order.
-
For a dynamic lookup, creating the lookup's database configuration in Enterprise Manager, then specifying a SQL query to execute against the specified database connection. In addition, you must specify a binding location where the selected value is stored when users make a selection in the lookup.
-
In the Data or TableData dictionary, referencing the new lookup for the data or table field.
5.1.9 About Disabling or Discarding Business Rule Changes
As you edit custom business rules, you may decide to temporarily disable or permanently discard your changes. You might discard changes, for example, if you cannot get the business rule to validate on the Manage Rules tab.
-
To view product rules for reference at any point, select Product Rules from the Rule Type field on the Manage Rules tab. When selected, the Edit link changes to View, as product rules are read-only.
-
To permanently reset a dictionary's custom rules to its default product settings using the Reset to Product button, see Section 5.2.7.
-
To run a specified solution in product mode, which temporarily suppresses all business rule modifications, see Section 5.6.2.
5.2 Getting Started Configuring the Solution Application
This section covers the following topics:
-
Section 5.2.3, "Testing the Solution as a User Through the Command Driver Page"
-
Section 5.2.4, "Injecting Tasks for Use in the HelloBPM Solution"
-
Section 5.2.7, "Resetting a Dictionary's Custom Rules to Product Settings"
5.2.1 Running or Applying a BPM Imaging Solution
After completing installation of the BPM imaging solution, complete one of the following steps for implementation:
-
Use the HelloBPM imaging solution, which is automatically configured during installation and described in Section 5.3. Use this solution to verify BPM imaging functionality and to customize for use in exploring and practicing making configuration changes.
OR
-
Apply a solution accelerator. To obtain an accelerator, contact your systems integrator or Oracle Consulting.
5.2.2 Starting Up Solution Administration
In order to access and edit business rules using the Manage Rules link in Solution Administration, you must be assigned to the axfadmin group in Oracle WebLogic Server.
To access administration functions for the solution application:
-
Open the Solution Administration page, which uses the following format:
http://hostname:port/axf/faces/pages/axfadmin.jspx -
Enter your user ID (Oracle WebLogic Server) and password, and click Sign In.
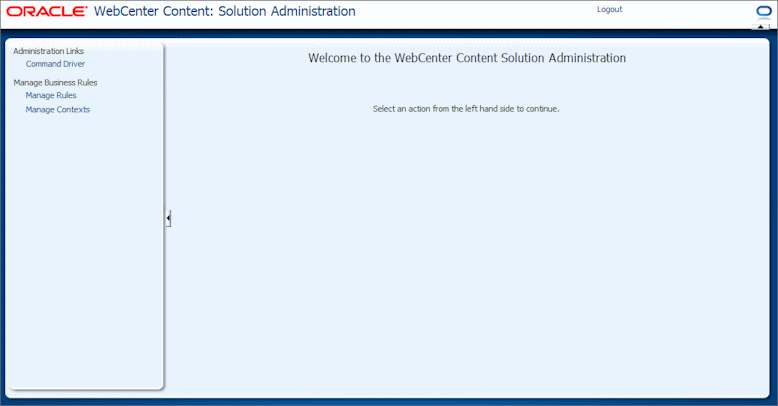
The Solution Administration window displays, as shown in Figure 5-7.
-
Click an administration link in the left pane.
-
Click Command Driver to run the solution as a user, as described in Section 5.2.3.
-
Click Manage Rules to view or update solution dictionaries and their business rules, as described in Section 5.2.5.
-
Click Manage Contexts to create, update, or delete variations of business rules for runtime contexts such as specific human tasks, as described in Section 5.2.6.
-
5.2.3 Testing the Solution as a User Through the Command Driver Page
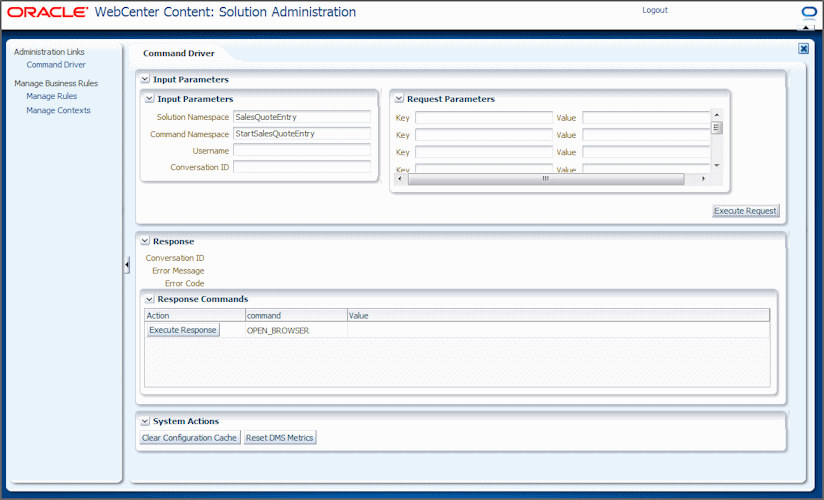
The Command Driver page allows you to run the AXF application as an end user would, in order to explore functionality or test updates made to business rules and contexts, without needing to launch AXF from a business application or an email link.
Follow these steps to use the command driver:
-
On the Solution Administration page (see Section 5.2.2), click the Command Driver link under Administration Links.
Command Driver options display.
-
Under Input Parameters, enter
SalesQuoteEntryin the solutionNamespace field andStartSalesQuoteEntryin the commandNamespace field.For the HelloBPM solution, the default context is based on the human task. The human task you select determines the user interface (tables and tabs) that display.
-
Click the Execute Request button.
A conversation starts, as indicated by entries in the conversationId and other response fields.
Description of the illustration command_driver.gif
-
Under Response Commands, click the Execute Response button.
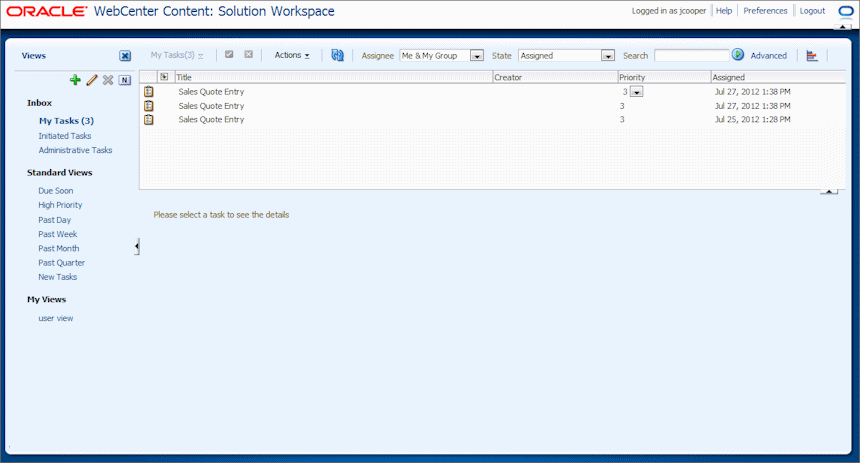
A new browser window opens and displays the Solution Workspace page.
In the HelloBPM solution, BPM views are configured for a single administrator user, where all tasks are assigned to a single default view. To inject tasks, see Section 5.2.4.
Description of the illustration command_driver2.gif
-
Select a task from the list to view its details in the solution application in the lower right pane.
Note that you can enlarge the solution application view by hiding the Views and Task List panes, or by pinning/unpinning the Views pane, as described in the Oracle WebCenter User's Guide for Application Adapters.

Description of the illustration data1.gif
-
You can easily switch between the solution application user view and Solution Administration (Section 5.2.2) to make business rule changes and then view their results, after re-selecting a task.
5.2.3.1 Using the Command Executor
The command executor enables you to define a URL link that represents the same information entered in the command driver page. For example, the command executor URL is used for email links to users.
As an example command executor, use the following URL to display the solution workspace with the HelloBPM solution:
http://hostname:port/axf/faces/command/CommandExecutor.jspx?sol=SalesQuoteEntry&cmd=StartSalesQuoteEntry
After you sign in, the solution workspace you identified displays.
5.2.4 Injecting Tasks for Use in the HelloBPM Solution
Along with the HelloBPM solution automatically installed with the AXF for BPM infrastructure are content input files you can use to inject tasks into the solution. Injecting tasks using Imaging's input agent allows you to test solution application changes. If needed, you can modify the input files to match the HelloBPM workflows described in Section 5.3. For initial configuration details, see "Verifying the AXF for BPM Installation and Configuration with HelloBPM" in Oracle WebCenter Content Installation Guide.
The content files are located in the following directory along with HelloBPM.xml, the Imaging application definition.
$ECM_ORACLE_HOME/axf_bpm/ipm
The sample input files include:
-
TestSalesQuote.pdf, which contains the sample image
-
TestSalesQuote.txt, which contains the input file
-
TestSalesQuote.xml, which contains the document's supporting content
This section describes how tasks are injected, assuming that the default directories configured during adapter installation are being used and that the input agent has been configured to look for files in the input directory listed above. For more information, see "Enabling Input Agent" in Oracle Fusion Middleware Administrator's Guide for Oracle Imaging and Process Management.
Within the time interval specified for the input agent (by default, 15 minutes), the input agent picks up the input files and creates a document with the data values contained in the text input file, the image contained in the PDF, and the supporting content contained in the XML file.
Based on the workflow configuration in place with the HelloBPM solution, a task is created for the document that displays in the BPM task list.
-
In the task list, click the newly injected task to view its details in the solution application.
-
As needed, modify the input file's data values before injecting the input files again. For example, you might inject a task with missing account information to work with its human task flow.
5.2.5 Managing Business Rules
This section describes the basis of solution application administration, which is customizing the solution application's user interface for each context, by editing the solution's business rules. For the most part, this process involves opening a context's dictionaries, and selecting or adding rules to rulesets and specifying their properties. For background information about managing business rules, see Section 5.1.2.
-
On the Solution Administration page (see Section 5.2.2), click the Manage Rules link under Manage Business Rules.
Manage Rules options display.
-
In the Package field, select a solution package. If needed, click Refresh to reload the list of packages.
For example, choose oracle.axf.solution.hellobpm to display business rules for the HelloBPM solution.
-
In the Context field, select base to edit rules in the base dictionary or a previously created context to edit rules for this context.
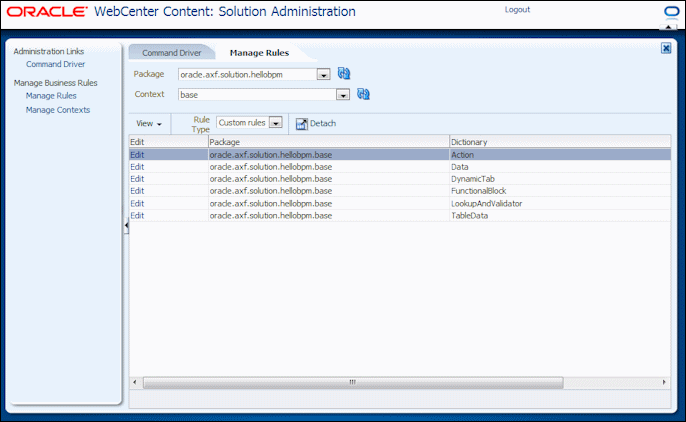
Dictionaries defined for the selected package display in the table, as shown in Figure 5-8.
Figure 5-8 Manage Rules Window, Dictionaries for Base Context
Description of "Figure 5-8 Manage Rules Window, Dictionaries for Base Context"
-
Notice that Custom Rules is selected in the Rule Type field.
Unlike read-only product rules, you can edit custom rules. You can also revert modified custom rules back to their product defaults, as described in Section 5.2.7.
-
Click the Edit link corresponding to the dictionary to edit.
-
Figure 5-9 shows the Manage Rules window that displays when you click the Edit link for the DynamicTab dictionary.
-
Table 5-6 describes tools for adding, editing, or deleting rules in the Manage Rules window.
Figure 5-9 Manage Rules Window, Editing DynamicTab Dictionary

Description of "Figure 5-9 Manage Rules Window, Editing DynamicTab Dictionary"
Table 5-6 Manage Rules Window Tools
Elements Description Business Rule
This center heading lists the package, context and dictionary you are currently editing. For example, the business rule shown in Figure 5-9 indicates:
-
package (oracle.axf.solution.hellobpm)
-
context (base)
-
dictionary (DynamicTab)
Rulesets
Lists rulesets you can edit for the dictionary. A selected ruleset's rules display at right for editing. Note that rulesets not used contain ruleset placeholders to guide you in adding new items.

Click this button to close the rule without saving business rule changes.

Click to validate the rule. Results display in the Business Rule Validation log section.

Click to validate and save changes made to the business rule. If a validation error is found, a warning displays.

Click to discard all changes made to this dictionary's business rules and return the dictionary to its product rule settings.
Note: You cannot undo this action.

Click the Add Action icon to add a new rule to the selected ruleset.

Click the Edit Properties icon to edit the selected rule's properties.

Click the Delete icon to remove the selected rule from the ruleset.
Business Rule Validation Log
Displays validation results for the dictionary after clicking the Validate button.
-
-
To edit a rule, select its ruleset under Rulesets. From the THEN items listed, click the rule's Edit Properties icon.

Edit the rule's properties, as shown in Figure 5-10. When applicable, clicking the Value (magnifying glass) icon displays possible values for the property. For example, clicking the pageComponent property's Value icon in a Tab rule displays available page component values. To guide you in specifying properties, see the dictionary properties reference in Section A.1 and the example settings selected for the HelloBPM solution in Section 5.3.6 and Section 5.3.5.
Notes:
Quotation marks must be included when indicated for the property type. Check the Constant field to automatically add quotation marks.
When entering properties, case matters. For example, "salesRepName" and "SalesRepName" are treated as separate entries.
Figure 5-10 Editing a Rule's Properties (DynamicTab Dictionary's Tab Properties)

Description of "Figure 5-10 Editing a Rule's Properties (DynamicTab Dictionary's Tab Properties)"
-
To add a rule, select a ruleset under Rulesets. In the section showing THEN items, click the inverted triangle in the Add Action icon (shown below) and choose assert new, which adds a new item at the bottom of the list of rules.

From the field adjacent to assert new, select the item to add. Typically, you select the same type assigned to previous items (for example, add a new tab to the Tab ruleset).

Description of the illustration add_rule2.gif
Click the Edit Properties icon shown below and edit the rule's properties, as shown in Figure 5-10, and described in step 6. Checking the Constant box for each property adds quotation marks only if they are needed.

-
Validate changes or additions you made to the rule, then save and close the dictionary.
-
Click the Save button, which validates first, warning you of any errors encountered before saving. In the lower portion of the window, a validation log displays errors or warnings found.
-
Click the Close button. If you close the dictionary without saving, changes are not saved.
-
-
Use the command driver page (Section 5.2.3) to view the results.
By keeping the solution application user view open in another browser window, you can quickly switch between editing and viewing results. Note that to see the results of dictionary changes, you must close and reopen a task.
5.2.6 Managing Contexts
See the following sections to manage contexts. For background information on contexts, see Section 5.1.7.
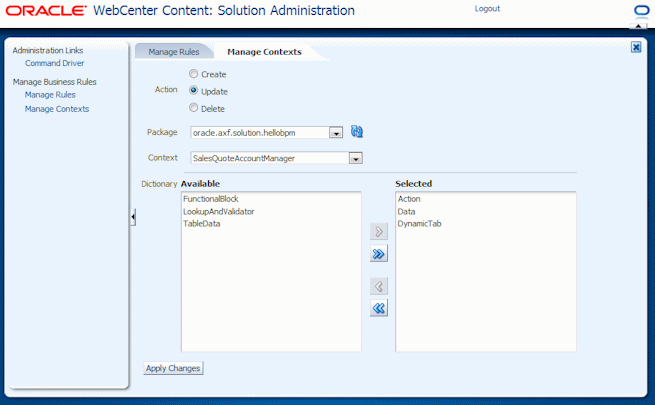
Description of the illustration context.gif
5.2.6.1 Creating a Context
Create a context to provide specialization of the base rules.
-
On the Solution Administration page (see Section 5.2.2), click the Manage Contexts link under Manage Business Rules.
-
From the Action choices, select Create.
-
In the Package field, select the package to which to add a context.
-
In the Context field, enter a name for the new context.
If needed, use a period delimiter in the context name to create a context hierarchy, as described in Section 5.1.7.
-
Move dictionaries to include in the context to the Selected field.
-
Click the Apply Changes button.
-
Edit the new context's dictionaries according to the business user's role, as described in Section 5.2.5.
5.2.6.2 Updating a Context
Update a context to include or exclude selected dictionaries from its user role.
-
On the Solution Administration page (see Section 5.2.2), click the Manage Contexts link under Manage Business Rules.
-
From the Action choices, select Update.
-
In the Package field, select the package containing the context to edit.
-
In the Context field, select the context to update.
-
Move dictionaries to include to the Selected field and move dictionaries to exclude to the Available field.
-
Click the Apply Changes button.
-
Edit its dictionaries according to the business user's role, as described in Section 5.2.5.
5.2.6.3 Deleting a Context
Deleting a context deletes its selected dictionaries and their business rules, even if in use by a solution.
-
On the Solution Administration page (see Section 5.2.2), click the Manage Contexts link under Manage Business Rules.
-
From the Action choices, select Delete.
-
In the Package field, select the package containing the context to delete.
-
In the Context field, select the context to delete.
-
Click the Apply Changes button. If deleting, confirm the deletion.
5.2.7 Resetting a Dictionary's Custom Rules to Product Settings
Resetting a dictionary's custom business rules to product settings permanently removes all business rule modifications you have made and restores the custom rules to product rules. This can be useful if you are receiving errors when running the solution or a customization will not validate. Note that resetting to product rules removes all changes made to the selected dictionary. Note that you must reset each dictionary in a solution separately.
As an alternative, you can temporarily remove all business rule modifications using the RunAsProduct MBean settings, as described in Section 5.6.2.
You can reset dictionary rules for any context, including the base context. Resetting for a context affects the dictionary only in that context.
To reset a dictionary's custom rules to product rules:
-
On the Manage Rules tab, select a package and context.
-
Click the Edit link for the rule dictionary. The dictionary opens.
-
Click the Reset to Product button. You are prompted to confirm permanently deleting the business rule changes.
-
Click OK. A message displays that the product dictionary rules successfully replaced the custom rules.
When you click a task in the solution application, previous business rule changes no longer display.
5.3 Understanding the HelloBPM Solution
This section covers the following topics:
-
Section 5.3.2, "Overview of the HelloBPM Sales Quote System"
-
Section 5.3.5, "Business Rules for the Sales Quote Entry Context"
5.3.1 What is the HelloBPM Solution?
The HelloBPM solution is an example AXF for BPM solution that is automatically installed and configured with the AXF for BPM infrastructure. It provides components to:
-
Verify and learn AXF for BPM functionality as a user.
Start up the HelloBPM solution as described in Section 5.2.2 and run it as a user as described in Section 5.2.3.
-
Learn to modify business rules, by examining the HelloBPM example and using the use cases.
Begin solution application configuration as an administrator through Manage Business Rules functions (shown in Figure 5-7) and test solution functionality as a user (shown in Figure 5-11).
The use cases provide examples of modifying dictionaries and contexts for the HelloBPM solution, while testing and viewing changes as a user.
Note:
At any point in modifying the HelloBPM solution's rules, you can reset dictionary rules to their original product settings. See Section 5.2.7.
5.3.2 Overview of the HelloBPM Sales Quote System
The HelloBPM solution demonstrates a fictitious sales quote system. The solution includes the following BPM human tasks, which correspond to the three user contexts and roles:
-
Sales Quote Entry
-
Sales Quote Account Manager
-
Sales Quote Approval
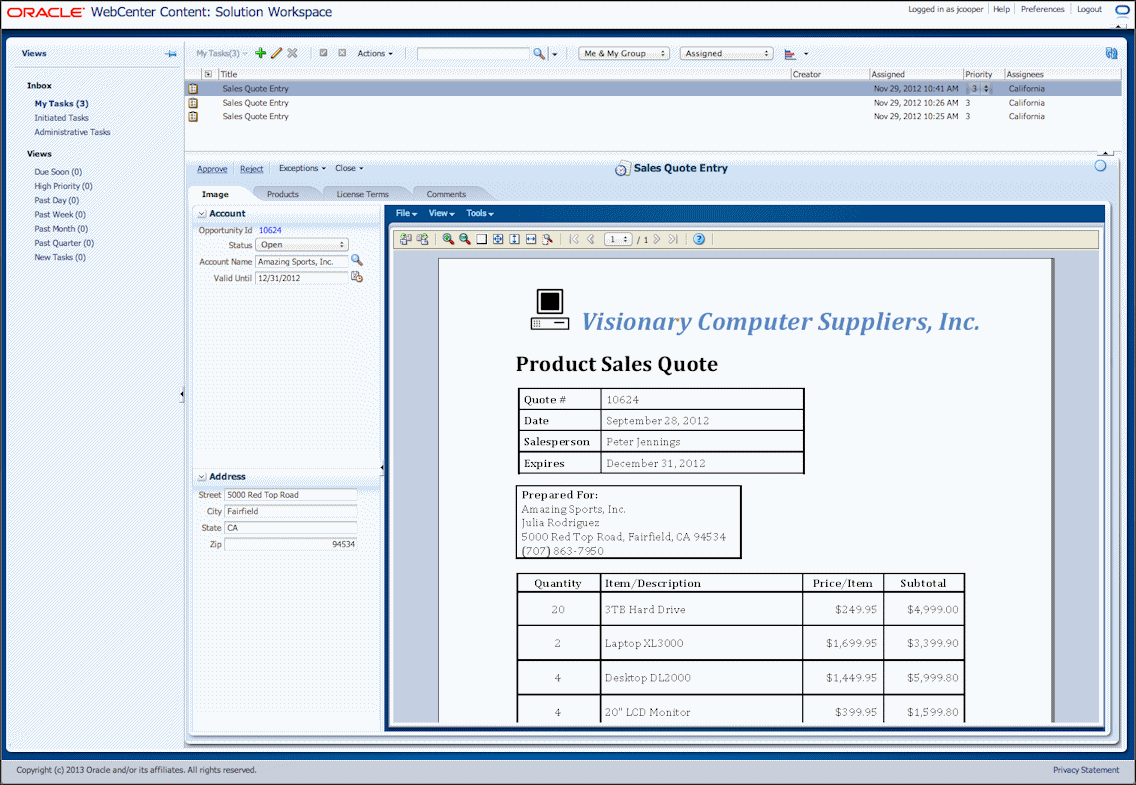
Figure 5-11 illustrates the solution application (task detail) that the main user, the Sales Quote Entry user, sees.
Figure 5-11 Viewing HelloBPM Solution as a Sales Quote Entry User
Description of "Figure 5-11 Viewing HelloBPM Solution as a Sales Quote Entry User"
5.3.3 HelloBPM User Roles and Workflow
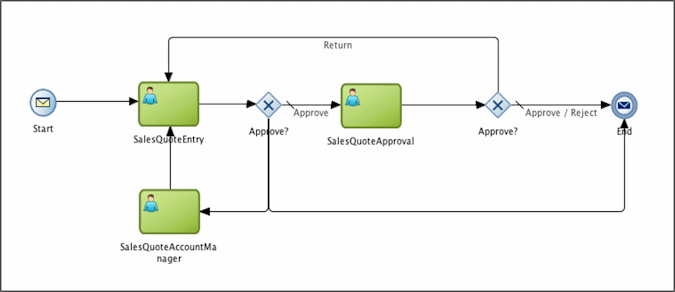
The HelloBPM solution's basic workflow functions as follows.
-
A sales quote entry task flows into the system. It displays in the task list view as a Sales Entry Quote task.
A sales quote entry user (entry user) selects the task and reviews and enters fields, such as the product and license tables shown in Figure 5-11. This entry user has access to the following action links:
-
Approve: When a sales quote entry user clicks this link, the Identity Browser control page displays and the entry user selects an approver. Upon clicking the Identity Browser control page OK action, the task is completed and routed to the SalesQuoteApprover human task.
-
Reject: When an entry user clicks this link, a prompt displays, asking if the user is sure about the rejection.
-
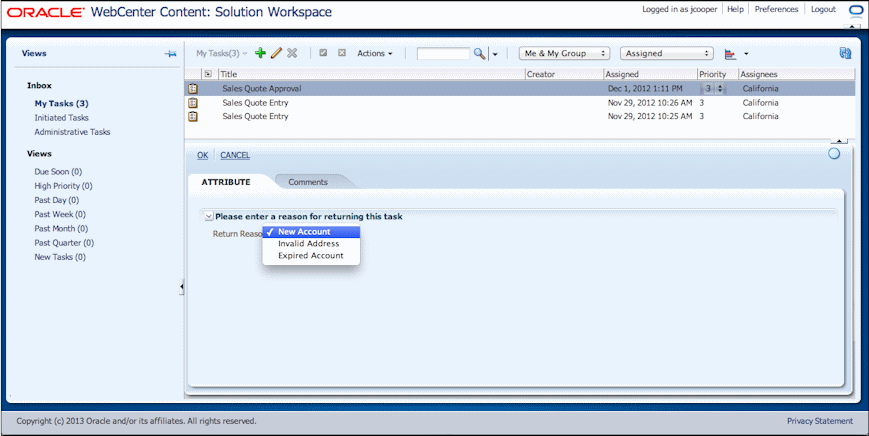
Account Manager (in Exceptions section): This link is active to entry users only when there is no entry in the Account Name field. When an entry user clicks it, a Select Account Manager Reason screen where the user selects a reason (for example, new account, invalid address, or expired account).
-
-
A sales quote account manager (account manager) enters the solution workspace and selects a Sales Quote Account Manager task. He or she completes account management updates, saves and closes the task.
-
A sales quote approver (approver) enters the solution workspace and selects a Sales Quote Approval task. He or she either approves or rejects the task. If approved, the task is automatically marked as completed and removed from the task list.
The workflow is illustrated in Figure 5-12.
Figure 5-12 Basic Workflow of HelloBPM Solution
Description of "Figure 5-12 Basic Workflow of HelloBPM Solution"
5.3.4 How the HelloBPM Solution Uses Contexts
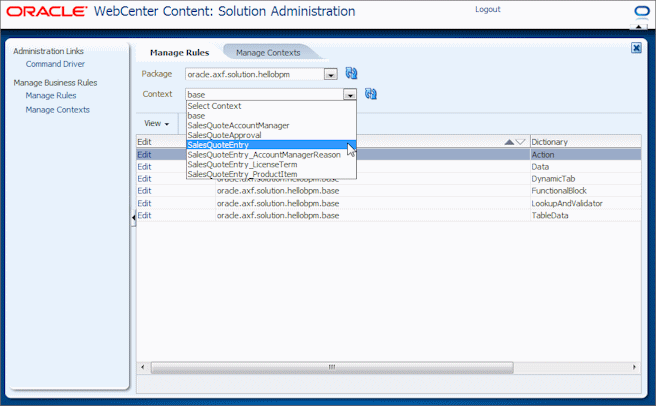
Because each of the three human tasks included in the HelloBPM solution needs access to different data and actions, multiple contexts are configured to display a different and customized user interface depending on the type of task selected. For example, when a user selects a SalesQuoteEntry task, the user sees additional tabs and actions for completing the task.
Figure 5-13 Contexts in HelloBPM Solution
Description of "Figure 5-13 Contexts in HelloBPM Solution"
The solution's contexts include the following:
-
When users select a Sales Quote Approval task, they do not see the Products or License Terms tabs, but have access to Approve and Reject commands and a Comments tab for documenting approval/rejection decisions. The approver context includes the Action, DynamicTab, and Data dictionaries only for defining the actions, tabs, and data fields for this type of task.
-
When users select a Sales Quote Account Manager task, they see limited functions for setting up or modifying sales accounts. This task can change an organization's contact information and route the task for further data entry or approval. Like approval tasks, account manager context includes only the Action, DynamicTab, and Data dictionaries for defining the actions, tabs, and data fields seen with this type of task.
-
When users select a Sales Quote Entry task, they see the most specialized task, with additional Products and License Terms tabs and an Exceptions section with an Account Manager action link. This context contains Action, DynamicTab, and Data dictionaries to display the additional tabs, actions, and data fields.
-
The SalesQuoteEntry_ProductItem and SalesQuoteEntry_LicenseTerm contexts contain the TableData dictionary only, in order to display the Products and License Terms tables, respectively.
-
The SalesQuoteEntry_AccountManagerReason context contains a Data dictionary in order to display a reason lookup data field when a user selects the Account Manager action link.
5.3.5 Business Rules for the Sales Quote Entry Context
5.3.5.1 Action Rulesets for the SalesQuoteEntry Context
Because the Action dictionary is included in the SalesQuoteEntry context, its definitions are used instead of those in the base context. It defines the following actions:
-
The Approve link, which uses a functional block named SendSalesQuoteEntryToSalesQuoteApproval to perform the action.
-
The Account Manager command, contained in an action dropdown menu called Exceptions. The Account Manager command is disabled unless the Account Name field is empty.
-
An action dropdown menu called Close, with Save and Close and Revert and Close commands.
Table 5-7 Action Properties
| actionId | displayName | displayOrder | enableMode | namedFunctionalBlockId | sectionId |
|---|---|---|---|---|---|
|
"Approve" |
"Approve" |
1 |
ENABLE |
"SendSalesQuoteEntryToSalesQuoteApproval" |
|
|
"Reject" |
"Reject" |
2 |
ENABLE |
"Reject" |
|
|
"AccountManager" |
"Account Manager" |
1 |
ENABLE |
"SendSalesQuoteEntryToSalesQuoteAccountManager" |
"Exceptions" |
|
"CloseTask" |
"Save and Close" |
1 |
ENABLE |
"CloseTask" |
"Close" |
|
"RevertCloseTask" |
"Revert Changes and Close" |
2 |
ENABLE |
"RevertCloseTask" |
"Close" |
Table 5-8 Section Properties
| disclosed | displayName | displayOrder | enableMode | sectionId |
|---|---|---|---|---|
|
true |
"Exceptions" |
1 |
ENABLE |
"Exceptions" |
|
true |
"Close" |
2 |
ENABLE |
"Close" |
5.3.5.2 Data Rulesets for the SalesQuoteEntry Context
The Data dictionary is included in the SalesQuoteEntry context, allowing it to provide the following data fields and sections. (In Table 5-9, the componentClass field contains no values and is not shown.)
Table 5-9 Data Properties
| displayName | bindingName | displayOrder | lookupId | dataId | enableMode | sectionId | validator |
|---|---|---|---|---|---|---|---|
|
"OPPORTUNITY_ID" |
"OpportunityID" |
1 |
"OpportunityID" |
DISABLE |
"Account" |
||
|
"STATUS" |
"QuoteRequestStatus" |
2 |
"QuoteRequestStatus" |
"QuoteRequestStatus" |
ENABLE |
"Account" |
|
|
"ACCOUNT_NAME" |
"Account Name" |
3 |
"AccountName" |
"AccountName" |
ENABLE |
"Account" |
"AccountName" |
|
"VALID_UNTIL" |
"Valid Until" |
4 |
"ValidUntil" |
ENABLE |
"Account" |
||
|
"STREET" |
"Street" |
1 |
"Street" |
ENABLE |
"Address" |
||
|
"CITY" |
"City" |
2 |
"City" |
ENABLE |
"Address" |
||
|
"STATE" |
"State" |
3 |
"State" |
ENABLE |
"Address" |
Table 5-10 Section Properties
| disclosed | displayName | displayOrder | enableMode | sectionId |
|---|---|---|---|---|
|
true |
"ACCOUNT" |
1 |
ENABLE |
"Account" |
|
true |
"ADDRESS" |
2 |
ENABLE |
"Address" |
Table 5-11 DataComponentAttribute Properties
| attributeName | attributeValue | dataId |
|---|---|---|
|
"contentStyle" |
""color:blue" |
"OpportunityID" |
|
ComponentAttribute.Converter.Pattern |
"MMM dd, yyyy" |
"ValidUntil" |
5.3.5.3 DynamicTab Rulesets for the SalesQuoteEntry Context
The DynamicTab dictionary is included in the SalesQuoteEntry context, allowing it to provide additional tabs. It defines the following tabs and parameters:
-
It adds the Products and License Terms tabs.
-
In addition to setting the title and positioning, the parameters ruleset sets data and table context for the new tabs. For example, it sets the Product Items tab to use the SalesQuoteEntry_ProductItem context for table settings but the SalesQuoteEntry context for the actual data fields.
Table 5-12 Tab Properties
| pageComponent | displayOrder | tabId | displayName |
|---|---|---|---|
|
PageComponent.Image Data |
1 |
"Image" |
"Image" |
|
PageComponent.Master Detail |
2 |
"ProductItem" |
"Products" |
|
PageComponent.Master Detail |
3 |
"LicenseTerm" |
"License Terms" |
|
PageComponent.Comment |
4 |
"Comments" |
"Comments" |
Table 5-13 TabParameter Properties
| tabId | parameterKey | parameterValue |
|---|---|---|
|
"Image" |
"HideData" |
"false" |
|
"Image" |
"SplitterPosition" |
"250" |
|
"ProductItem" |
"TableDataContext" |
"SalesQuoteEntry_ProductItem" |
|
"ProductItem" |
"DataContext" |
"SalesQuoteEntry" |
|
"ProductItem" |
"PageComponentTitle" |
"Products" |
|
"LicenseTerm" |
"TableDataContext" |
"SalesQuoteEntry_LicenseTerm" |
|
"LicenseTerm" |
"DataContext" |
"SalesQuoteEntry" |
|
"LicenseTerm" |
"PageComponentTitle" |
"License Terms" |
5.3.5.4 Data Rulesets for the SalesQuoteEntry_AccountManagerReason Context
The Data dictionary is included in the SalesQuoteEntry_AccountManagerReason context to provide a data lookup field from which the entry user selects an account manager reason. (In Table 5-14, the componentClass and Validator fields contain no values and are not shown.)
Table 5-14 Data Properties
| displayName | bindingName | displayOrder | lookupId | dataId | sectionId | enableMode |
|---|---|---|---|---|---|---|
|
"Account Manager Reason" |
"NewCustomer" |
1 |
"AccountManagerReason" |
"AccountManagerReason" |
"AccountManagerReason" |
ENABLE |
Table 5-15 Section Properties
| disclosed | displayName | displayOrder | enableMode | sectionId |
|---|---|---|---|---|
|
true |
"Select Account Manager Reason" |
1 |
ENABLE |
"AccountManagerReason" |
5.3.5.5 Table Rulesets for the SalesQuoteEntry_ProductItem Context
The TableData dictionary is included in the SalesQuoteEntry_ProductItem context to display the Product table to sales quote entry users but not other contexts.
Table 5-16 Table Properties
| bindingName | enableCopyPaste | enableDelete | enableInsert | tableId | tableStretchMode |
|---|---|---|---|---|---|
|
"ProductItem" |
ENABLE |
HIDE |
ENABLE |
"ProductItem" |
TableStretchMode.Blank |
(In Table 5-17, the Validator field contains no values and is not shown.)
Table 5-17 Column Properties
| bindingName | columnId | componentClass | displayName | displayOrder | enableMode | columnWidth | lookupId |
|---|---|---|---|---|---|---|---|
|
"ProductID" |
"ProductID" |
"Product ID" |
1 |
DISABLE |
|||
|
"ProductName" |
"ProductName" |
"Product Name" |
2 |
ENABLE |
300 |
"ProductName" |
|
|
"ListPrice" |
"ListPrice" |
"PRICE" |
3 |
ENABLE |
|||
|
"Quantity" |
"Quantity" |
ComponentClass.RichInputNumberSpinbox |
"Quantity" |
4 |
ENABLE |
||
|
"RestrictedItem" |
"RestrictedItem" |
ComponentClass.RichSelectBooleanCheckbox |
"Restricted Item" |
5 |
ENABLE |
Table 5-18 ColumnComponentAttribute Properties
| attributeName | columnId | attributeValue |
|---|---|---|
|
ColumnComponentAttribute.pattern |
"ListPrice" |
"#{bindings.ListPrice.format}" |
5.3.5.6 Table Rulesets for the SalesQuoteEntry_LicenseTerm Context
The TableData dictionary is included in the SalesQuoteEntry_LicenseTerm context to display the License Terms table to sales quote entry users but not other contexts.
Table 5-19 Table Properties
| bindingName | enableCopyPaste | enableDelete | enableInsert | tableId | tableStretch |
|---|---|---|---|---|---|
|
"LicenseTerm" |
ENABLE |
ENABLE |
ENABLE |
"LicenseTerm" |
TableStretchMode.Last |
Table 5-20 Column Properties
| bindingName | columnId | componentClass | displayName | displayOrder | enableMode | columnWidth | lookupId |
|---|---|---|---|---|---|---|---|
|
"Category" |
"Category" |
"Category" |
1 |
ENABLE |
300 |
"LicenseTermCategory" |
|
|
"Type" |
"Type" |
"Type" |
2 |
ENABLE |
300 |
"LicenseTermType" |
|
|
"Description" |
"Description" |
"Description" |
3 |
ENABLE |
5.3.6 Business Rules for the Base Context
The base context of the HelloBPM solution provides a base layer of functionality upon which the other contexts layer additional functionality and reference its functional blocks and lookups.
5.3.6.1 FunctionalBlock Rulesets for the Base Context
The following rulesets define the functional blocks, sequences, and parameters for use in the solution.
NamedFunctionalBlockRuleset sets outcome, task detail dynamic page, and ability to navigate to the identity browser, data, and comment control pages.
Table 5-21 NamedFunctionalBlock Properties
| functionalBlock | namedFunctionalBlockId |
|---|---|
|
FunctionalBlock.Set Outcome |
"Approve" |
|
FunctionalBlock.Set Outcome |
"Reject" |
|
FunctionalBlock.Set Outcome |
"AccountManager" |
|
FunctionalBlock.Close Task |
"RevertCloseTask" |
|
FunctionalBlock.Navigate Control Page |
"SelectSalesQuoteApprover" |
|
FunctionalBlock.Navigate Control Page |
"SelectAccountManagerReason" |
|
FunctionalBlock.Navigate Dynamic Page |
TaskDetail" |
|
FunctionalBlock.Navigate Control Page |
"IdentityBrowserControlPage" |
|
FunctionalBlock.Navigate Control Page |
"DataControlPage" |
|
FunctionalBlock.Navigate Control Page |
"CommentControlPage" |
|
FunctionalBlock.Save |
"Save" |
|
FunctionalBlock.Close Task |
"CloseTask" |
|
FunctionalBlock.Revert |
"Revert" |
Table 5-22 NamedFunctionalBlockSequence Properties
| namedFunctionalBlockId | functionalBlockSequenceId | order |
|---|---|---|
|
"SelectSalesQuoteApprover" |
"SendSalesOrderEntryToSalesOrderApproval" |
1 |
|
"Approve" |
"SendSalesOrderEntryToSalesOrderApproval" |
2 |
|
"SelectAccountManagerReason" |
"SendSalesQuoteEntryToSalesQuoteAccountManager" |
1 |
|
"AccountManager" |
"SendSalesQuoteEntryToSalesQuoteAccountManager" |
2 |
Table 5-23 NamedFunctionalBlockParameter Properties
| namedFunctionalBlockId | parameterKey | parameterValue |
|---|---|---|
|
"Approve" |
"Outcome" |
"APPROVE" |
|
"Reject" |
"Outcome" |
"REJECT" |
|
"AccountManager" |
"Outcome" |
"ACCOUNT_MANAGER" |
|
"SelectSalesQuoteApprover" |
"ControlPageName" |
"IdentityBrowserControlPage" |
|
"SelectSalesQuoteApprover" |
"ControlPageTitle" |
"Select Approver" |
|
"SelectSalesQuoteApprover" |
"UserBindingName" |
"UserBindingName" |
|
"SelectSalesQuoteApprover" |
"GroupBindingName" |
"GroupBindingName" |
|
"SelectSalesQuoteApprover" |
"CommentRequired" |
"true" |
|
"SelectAccountManagerReason" |
"ControlPageName" |
"DataControlPage" |
|
"SelectAccountManagerReason" |
"DataContext" |
"SalesQuoteEntry_AccountManagerReason" |
|
"TaskDetail" |
"pageTitle" |
SolutionApplicationProperty.TaskTitle |
|
"DataControlPage" |
"ControlPageName" |
"DataControlPage" |
|
"DataControlPage" |
"ControlPageTitle" |
|
|
"IdentityBrowserControlPage" |
"ControlPageName" |
"IdentityBrowserControlPage" |
|
"IdentityBrowserControlPage" |
"ControlPageTitle" |
|
|
"IdentityBrowserControlPage" |
"UserBindingName" |
"UserBindingName" |
|
"IdentityBrowserControlPage" |
"GroupBindingName" |
"GroupBindingName" |
|
"CommentControlPage" |
"ControlPageName" |
"CommentControlPage" |
|
"CommentControlPage" |
"ControlPageTitle" |
Table 5-24 NamedFunctionalBlockPrompt Properties
| namedFunctionalBlockId | order | promptMessage | promptMode | promptType |
|---|---|---|---|---|
|
"Reject" |
1 |
"Are you sure you would like to reject this request?" |
PromptModeType.AFTER_VALIDATION |
PromptType.OK_CANCEL_FUNCTIONAL_BLOCK |
|
"RevertCloseTask" |
1 |
"Are you sure you would like to revert any changes before closing?" |
PromptModeType.BEFORE_VALIDATION |
PromptType.ROLLBACK_SAVED_CHANGES |
Table 5-25 NamedFunctionalBlockValidator Properties
| namedFunctionalBlockId | validatorMode | validatorCategoryId |
|---|---|---|
|
"Reject" |
ValidatorMode.CONTINUE |
"Account" |
|
"RevertCloseTask" |
ValidatorMode.CONTINUE |
"Account" |
|
"CloseTask" |
ValidatorMode.CONTINUE |
"Account" |
5.3.6.2 LookupAndValidator Rulesets for the Base Context
The following rulesets define lookups, prompts, and validations used elsewhere in the solution.
Table 5-26 StaticLookup Properties
| displayName | lookupId | value | displayOrder |
|---|---|---|---|
|
"Open" |
"QuoteRequestStatus" |
"OPEN" |
1 |
|
"Pending Approval" |
"QuoteRequestStatus" |
"PENDING_APPROVAL" |
2 |
|
"Closed |
"QuoteRequestStatus" |
"CLOSED" |
3 |
|
"Price Hold Options" |
"LicenseTermCategory" |
"PriceHoldOptions" |
1 |
|
"Non-Standard Pricing And Currency Options" |
"LicenseTermCategory" |
"NonStandardPricingAndCurrencyOptions" |
2 |
|
"License Management Services Options" |
"LicenseTermCategory" |
"LicenseManagementServicesOptions" |
3 |
|
"Non-Standard Licensing Options" |
"LicenseTermCategory" |
"NonStandardLicensingOptions" |
4 |
|
"Future Program Price Holds" |
"LicenseTermType" |
"FutureProgramPriceHolds" |
1 |
|
"Future Discount Provisions" |
"LicenseTermType" |
"FutureDiscountProvisions" |
2 |
|
"Price Hold On Entire Price List" |
"LicenseTermType" |
"PriceHoldOnEntirePriceList" |
3 |
|
"Modifications To Contractual Pricing" |
"LicenseTermType" |
"Modifications ToContractualPricing" |
4 |
|
"Currency" |
"LicenseTermType" |
"Currency" |
5 |
|
"Preferred Customer Provisions" |
"LicenseTermType" |
"PreferredCustomerProvisions" |
6 |
|
"Waiving Or Lowering Purchase Minimums" |
"LicenseTermType" |
"WaivingOrLoweringPurchaseMinimums" |
7 |
|
"Audit Waivers" |
"LicenseTermType" |
"AuditWaivers" |
8 |
|
"Cancel And Replace" |
"LicenseTermType" |
"CancelAndReplace" |
9 |
|
""Direct Order From Competitors" |
"LicenseTermType" |
"DirectOrderFromCompetitors" |
10 |
|
"Reciprocal Transaction" |
"LicenseTermType" |
"ReciprocalTransaction" |
11 |
|
"Hosting" |
"LicenseTermType" |
"Hosting" |
12 |
|
"Hosting Rights" |
"LicenseTermType" |
"HostingRights" |
13 |
|
"NDA" |
"LicenseTermType" |
"NDA" |
14 |
|
"New Account" |
"AccountManagerReason" |
"NEW_ACCOUNT" |
1 |
|
"Invalid Address" |
"AccountManagerReason" |
"INVALID_ADDRESS" |
2 |
|
"Expired Account" |
"AccountManagerReason" |
"EXPIRED_ACCOUNT" |
3 |
Table 5-27 DynamicLookup Properties
| sqlColumn | dataSource | lookupId | lookupType | sqlQuery |
|---|---|---|---|---|
|
"NAME" |
"/jdbc/IPMDS" |
"AccountName" |
LookupType.DYNAMIC_SEARCH |
"select ACCOUNT_NAME as Name, ADDRESS_STREET as Street, ADDRESS_CITY as City, ADDRESS_STATE as State, ADDRESS_ZIP as Zip, ADDRESS_COUNTRY as Country from AXF_HELLOBPM_ACCOUNTS" |
|
"PRODUCT" |
"jdbc/IPMDS" |
"ProductName" |
LookupType.DYNAMIC_SEARCH |
"select PRODUCT_ID as ID, PRODUCT_NAME as Product, LIST_PRICE as Price from AXF_HELLOBPM_PRODUCTS" |
Table 5-28 DynamicLookupRelatedBinding Properties
| bindingName | lookupId | sqlColumn |
|---|---|---|
|
"Street" |
"AccountName" |
"STREET" |
|
"City" |
"AccountName" |
"CITY" |
|
"State" |
"AccountName" |
"STATE" |
|
"Zip" |
"AccountName" |
"ZIP" |
|
"Country" |
"AccountName" |
"COUNTRY" |
|
"ListPrice" |
"ProductName" |
"PRICE" |
|
"ProductID" |
"ProductName" |
"ID" |
Table 5-29 Validator Properties
| validatorClass | validatorId |
|---|---|
|
ValidatorClass."RegExpValidator" |
"AccountName" |
|
ValidatorClass."RegExpValidator" |
"State" |
Table 5-30 ValidatorParameter Properties
| parameterKey | parameterValue | validatorId |
|---|---|---|
|
"Pattern" |
"\\S" |
"AccountName" |
|
"MessageDetailNoMatch" |
"You must enter an Account Name before requesting approval" |
"AccountName" |
|
"Pattern" |
"AL|AK|AS|AZ|AR|CA|CO|CT|DE|DC|FM|FL|GA|GU|HI|ID|IL|IN|IA|KS|KY|LA|ME|MH|MD|MA|MI|MN|MS|MO|MT|NE|NV|NH|NJ|NM|NY|NC|ND|MP|OH|OK|OR|PW|PA|PR|RI|SC|SD|TN|TX|UT|VT|VI|VA|WA|WV|WI|WY" |
"State" |
|
"MessageDetailNoMatch" |
"You must enter a valid state abbreviation" |
"State" |
5.4 HelloBPM Solution Use Cases
The use case examples provided in this section are intended to help you learn how to implement common scenarios by example.
Note:
The HelloBPM solution is installed during AXF installation. For more information, see "Verifying the AXF for BPM Installation and Configuration with HelloBPM" in Oracle WebCenter Content Installation Guide.
Action and Functional Block Use Cases
-
Section 5.4.4, "Use Case: Add a Data Field in a New Section"
-
Section 5.4.5, "Use Case: Set a Data Field's Background Color"
-
Section 5.4.6, "Use Case: Change the Display Order of Data Items or Sections"
-
Section 5.4.7, "Use Case: Set a Section to Initially Display Closed"
Lookup and Validator Use Cases
-
Section 5.4.9, "Use Case: View a Static Lookup's Configuration"
-
Section 5.4.10, "Use Case: View a Dynamic Lookup's Configuration"
5.4.1 Use Case: Add and Configure an Action Link
This exercise leads you through adding a link called Return to the action menu to complete the sales quote approval task and return it to the sales quote entry task queue. You will add the action, then configure functional block settings for it.
-
Under Manage Rules, select the HelloBPM package (oracle.axf.solution.hellobpm) in the Package field.
-
Select the SalesQuoteApproval context and edit its Action dictionary.
-
In the Action ruleset, add an action by adding an assert new Action and assigning it the following properties:
Property Value actionId
"Return"
displayName
"Return"
displayOrder
4
enableMode
EnableMode.ENABLE
namedFunctionalBlockId
"Return"
sectionId
-
Validate, save, and close the dictionary.
The next step is to configure the functional blocks behind the new action, specifically to create a call to BPM to complete the task.
-
Under Manage Rules, select the base context and edit its FunctionalBlock dictionary.
-
Under Rulesets, choose NamedFunctionalBlock. Add an assert new NamedFunctionalBlock and assign it the following properties:
Property Value functionalBlock
FunctionalBlock.Set Outcome
namedFunctionalBlockId
"Return"
-
Under Rulesets, choose NamedFunctionalBlockParameter. Add an assert new NamedFunctionalBlockParameter and assign it the following properties:
Property Value namedFunctionalBlockId
"Return"
parameterKey
"Outcome"
parameterValue
"RETURN"
-
Validate, save, and close the dictionary.
-
Test the configuration so far.
-
From the command driver page, execute the solution as SalesQuoteEntry/StartSalesQuoteEntry.
-
In the task list, select a Sales Quote Approval task. (In order for a task to appear as a Sales Quote Approval task, you must approve a Sales Quote Entry task.)
-
From the action menu, click the new Return link you added. The task is removed from the task list, indicating that it was returned to Sales Quote Entry.
-
5.4.2 Use Case: Navigate to a Data Control Page
This exercise leads you through configuring a means for users to select a reason for returning the sales quote request. Clicking the Return link will navigate to a data control page (predefined page that displays data) that will display reason codes from which the user selects.
-
From the HelloBPM package, select the base context and edit its FunctionalBlock dictionary.
First specify navigation to a control page.
-
In the NamedFunctionalBlock ruleset, add an assert new NamedFunctionalBlock and assign it the following properties:
Property Value functionalBlock
FunctionalBlock.Navigate Control Page
namedFunctionalBlockId
"ReturnReason"
Then specify the control page to navigate to.
-
Under Rulesets, choose NamedFunctionalBlockParameter. Add an assert new NamedFunctionalBlockParameter and assign it the following properties:
Property Value namedFunctionalBlockId
"ReturnReason"
parameterKey
"ControlPageName"
parameterValue
"DataControlPage"
Next define a sequence of calls, with the first to navigate to the Return Reason page.
-
Under Rulesets, choose NamedFunctionalBlockSequence. Add an assert new NamedFunctionalBlockSequence and assign it the following properties:
Property Value namedFunctionalBlockId
"ReturnReason"
namedFunctionalBlockSequenceID
"ReturnToSalesQuoteEntry"
order
1
In the next call, define the return to complete the task.
-
Add another assert new NamedFunctionalBlockSequence and assign it the following properties:
Property Value namedFunctionalBlockId
"Return"
namedFunctionalBlockSequenceID
"ReturnToSalesQuoteEntry"
order
2
-
Validate, save, and close the dictionary.
The last step is to update the action to call the new sequence you defined.
-
Select the SalesQuoteApproval context and edit its Action dictionary.
-
Update the action you created in step 3 of Section 5.4.1, by changing the namedFunctionalBlock from "Return" to "ReturnToSalesQuoteEntry".
Property Value actionId
"Return"
displayName
"Return"
displayOrder
4
enableMode
EnableMode.ENABLE
namedFunctionalBlockId
"ReturnToSalesQuoteEntry"
sectionId
-
Validate, save, and close the dictionary.
-
Test the configuration.
-
Return to the solution application and select a Sales Quote Approval task from the task list.
-
From the action menu, click the Return link. The new return reason data page displays according to the navigation you configured.
The return reason data page displays the same data as displayed on other pages. Follow the steps in Section 5.4.3 to change its data display.
-
Click the Cancel link.
-
5.4.3 Use Case: Add a New Context
This exercise leads you through adding a context for the return reason data page in order to display the appropriate data (return reason codes). First you create the context, then configure the data field to display along with its choices, and finally configure the data page to use the new context.
-
From the left-most menu, choose Manage Contexts.
-
In the Package field, select the HelloBPM solution (oracle.axf.solution.hellobpm).
-
In the Context field, enter a name of
SalesQuoteApproval_ReturnReason. -
Move the Data dictionary to the Selected field, and click Apply Changes.
Now you define the attributes of the data to display for the return reason data page. You will add a data field called Return Reason and a section that instructs the user to select a reason code from the field.
-
Choose Manage Rules. Click the Refresh icon adjacent to the Context field, then select the new context, SalesQuoteApproval_ReturnReason, you created. Edit its Data dictionary.
-
Under the Data ruleset, edit the placeholder rule and assign it the following properties:
Property Value displayName
"Return Reason"
bindingName
"NewCustomer"
displayOrder
1
lookupId
"ReturnReason"
dataId
"ReturnReason"
sectionId
"ReturnReason"
enableMode
EnableMode.ENABLE
componentClass
-
Select the Section ruleset, edit the placeholder rule and assign it the following properties:
Property Value disclosed
true
displayName
"Select the return reason:"
displayOrder
1
enableMode
EnableMode.ENABLE
sectionId
"ReturnReason"
-
Validate, save, and close the dictionary.
The next step is to configure the reason codes for the Return Reason field, which you will define as static lookups.
-
Select the base context and edit its LookupAndValidator dictionary.
-
Under the StaticLookup ruleset, add an assert new StaticLookup rule and assign it the following properties:
Property Value displayName
"Invalid License Terms"
displayOrder
1
lookupId
"ReturnReason"
value
"INVALID_LICENSE_TERMS"
-
Add another StaticLookup rule and assign it the following properties:
Property Value displayName
"Invalid Product Discount"
displayOrder
2
lookupId
"ReturnReason"
value
"INVALID_PRODUCT_DISCOUNT"
-
Validate, save, and close the dictionary.
-
Open the base context's FunctionalBlock dictionary.
The last step is to identify the new context, SalesQuoteApproval_ReturnReason, as the context to use for the return reason data page.
-
Under Rulesets, select NamedFunctionalBlockParameter. Add an assert new NamedFunctionalBlockParameter and assign it the following properties:
Property Value namedFunctionalBlockId
"ReturnReason"
parameterKey
"DataContext"
parameterValue
"SalesQuoteApproval_ReturnReason"
-
Validate, save, and close the dictionary.
-
Test the final configuration.
-
Return to the solution application and select a Sales Quote Approval task from the task list.
-
From the action menu, click the Return link.
-
From the data control page that displays, choose a reason from the Return Reason field, and click OK. The task is returned and removed.
-
5.4.4 Use Case: Add a Data Field in a New Section
This exercise leads you through adding a data item (read-only input text field) called Sales Rep Name to the Data dictionary to display within a section called Sales Info. The steps to create other data field types, such as an output (editable) text field, date input field, or number input field are nearly the same, as shown in the variations at the end of this section.
-
First add the text field. Under Manage Rules, select the SalesQuoteApproval context in the oracle.axf.solution.hellobpm package.
-
Edit the Data dictionary.
-
Under Rulesets, select Data.
-
Add an assert new Data with the following values:
Property Value bindingName
"SalesRepName"
componentClass
ComponentClass.RichInputText
displayName
"Sales Rep Name"
displayOrder
lookupId
dataId
"salesRepName"
enableMode
EnableMode.ENABLE
sectionId
"sales"
-
Now add a section for the text field. Under Rulesets, select Section.
-
Add an assert new Section with the following values:
Property Value disclosed
true
displayName
"Sales Info"
displayOrder
3
enableMode
EnableMode.ENABLE
sectionId
"sales"
-
Validate and save the dictionary.
-
Now view the text field. From the Command Driver page, execute SalesQuoteEntry/StartSalesQuoteEntry, and select a Sales Quote Approval task.
Result: On the Image tab, a new data section called Sales Info displays that contains the new input text Sales Rep Name field.
The data item's componentClass property defines its type. In step 4 above, specifying ComponentClass.RichInputText defines an input text field.
-
To define a date input field, specify ComponentClass.RichInputDate for the componentClass property.
-
To define a number input field, specify ComponentClass.RichInputNumberSpinBox for the componentClass property.
A data item or section's enableMode property defines its enable mode. In steps 4 and 6 above, specifying EnableMode.ENABLE enables the field and section, respectively.
-
To display a field or section as disabled, specify EnableMode.DISABLE for the enableMode property.
-
To hide a field or section, specify EnableMode.HIDE for the enableMode property.
5.4.5 Use Case: Set a Data Field's Background Color
This use case sets a background color to the Sales Rep Name data field you added in Section 5.4.4.
-
Open the SalesQuoteApproval context in the oracle.axf.solution.hellobpm package.
-
Edit the Data dictionary.
-
Under Rulesets, select DataComponentAttribute.
-
Add an assert new DataComponentAttribute with the following values:
Property Value attributeName
"contentStyle"
attributeValue
"background-color:lightblue"
dataId
"salesRepName"
-
Validate, save, and close the dictionary.
-
From the Command Driver page, execute SalesQuoteEntry/StartSalesQuoteEntry.
-
Select a Sales Quote Approval task.
Result: On the Image tab, the Sales Rep Name field displays with a light blue background.
In the use case attribute value above, you specified "background-color:lightblue" for a light blue field background. To specify a field entry's color, specify an attribute value such as one of the following:
"color:red"
"color:blue"
5.4.6 Use Case: Change the Display Order of Data Items or Sections
This use case shows you how to reverse the order of data sections and data items within a section.
-
Under Manage Rules, open the SalesQuoteApproval context in the oracle.axf.solution.hellobpm package.
-
Edit the Data dictionary.
-
Under Rulesets, select Data.
-
Change the displayOrder property for each data item with a sectionId of Account so the data items are displayed in reverse order.
-
Under Rulesets, select Section.
-
Change the displayOrder property of each section so the sections are displayed in reverse order.
-
Validate, save, and close the dictionary.
-
From the Command Driver page, execute SalesQuoteEntry/StartSalesQuoteEntry.
-
Select a Sales Quote Approval task.
Result: On the Image tab, the sections display in reverse order and the Account section's data fields display in reverse order.
5.4.7 Use Case: Set a Section to Initially Display Closed
This exercise sets a section to initially display collapsed to users.
-
Under Manage Rules, open the SalesQuoteApproval context in the oracle.axf.solution.hellobpm package.
-
Open the Data dictionary.
-
Under Rulesets, select Section, and edit the Sales Info section by changing the disclosed property to false.
-
Validate and save the dictionary.
-
From the Command Driver page, execute SalesQuoteEntry/StartSalesQuoteEntry.
-
Select a Sales Quote Approval task.
Result: The Sales Info section displays in a collapsed state.
Note:
If a user manually uncollapses a section, it stays uncollapsed in subsequent page loads due to personalization.
5.4.8 Use Case: Hide all Table Row Buttons
This exercise suppresses display of the Insert, Delete, Copy, and Paste buttons that when enabled allow users to edit table rows.
-
Under Manage Rules, open the SalesQuoteEntry_LicenseTerm context in the oracle.axf.solution.hellobpm package.
This use case uses the license term table, but you can edit any table as described.
-
Edit the TableData dictionary.
-
Under Rulesets, select Table.
-
Edit the existing Table item so its properties are as follows:
Property Value bindingName
"LicenseTerm"
enableCopyPaste
EnableMode.HIDE
enableDelete
EnableMode.DISABLE
enableInsert
EnableMode.HIDE
tableId
"LicenseTerm"
tableStretch
TableStretchMode.Last
-
Validate and save the dictionary.
-
In the solution application, select a Sales Quote Entry task and select the License Term tab.
Result: The table on the License Terms tab displays a disabled Delete button with the Copy, Paste, and Insert buttons hidden.
5.4.9 Use Case: View a Static Lookup's Configuration
This use case familiarizes you with configuring a static lookup and using one as a user.
-
Under Manage Rules, open the base context in the oracle.axf.solution.hellobpm package.
-
Edit the LookupAndValidator dictionary.
-
Under Rulesets, select StaticLookup.
Notice that three entries contain a lookupId of QuoteRequestStatus.
-
From the Command Driver page, execute SalesQuoteEntry/StartSalesQuoteEntry.
-
Select a Sales Quote Entry task.
Result: The Status field displays as a dropdown with three values.
-
Select Pending Approval.
-
Select the Save and Close action from the Close menu.
-
Select the same task again.
Result: The Status field displays as a dropdown with three values and Pending Approval is selected.
5.4.10 Use Case: View a Dynamic Lookup's Configuration
Configuring a dynamic lookup requires specifying a datasource configured in Oracle WebLogic Server (for example, /jdbc/IPMDS, where IPMDS was automatically configured upon installation and creation of the IPM_server domain needed to host AXF). Follow the steps below to view how a dynamic lookup is configured in the LookupAndValidator dictionary, and referenced in the Data or TableData dictionary for the context.
-
Under Manage Rules, open the base context in the oracle.axf.solution.hellobpm package.
-
Edit the LookupAndValidator dictionary.
-
Under Rulesets, select DynamicLookup.
Notice that each of the DynamicLookup entries uses /jdbc/IPMDS as its datasource. Examine the entry with lookupId set to AccountName, and notice that it queries a sample accounts table. This will return a list of account names.
-
Close the LookupAndValidator dictionary, select the SalesQuoteEntry context and open its Data dictionary. In the Data ruleset, find the Account Name data item and view its properties. Notice that "AccountName" is specified for its LookupId property.
-
From the Command Driver page, execute SalesQuoteEntry/StartSalesQuoteEntry.
-
Select a Sales Quote Entry task.
Result: Notice that the Account Name field displays with a Search icon (magnifying glass) next to it.
-
Select the Search icon next to the Account Name field. Select an account from the list and select OK.
Result: The Account Name field is now populated with the account name you chose.
-
Select the Save and Close task action.
-
Select the same task again.
Result: Notice that the Account Name field remains populated with the account name you chose.
5.5 Configuring BPM Views
The solution workspace makes use of standard BPM views and task list functionality for displaying human workflow tasks controlled by an AXF solution. Use the BPM Worklist application to create BPM views and share them with other users or groups, as described in Oracle Fusion Middleware Developer's Guide for Oracle SOA Suite.
Users can perform actions in the task list, such as sorting tasks by clicking a column heading and searching for specific tasks using the Search field. For details, see the Oracle WebCenter User's Guide for Application Adapters.
5.6 Using Oracle Fusion Middleware Control to Manage AXF for BPM
System administrators use Oracle Fusion Middleware Control (also referred to as Enterprise Manager) to manage certain aspects of AXF for BPM functionality. To perform these tasks, you must be a system administrator with Enterprise Manager access.
This section covers the following topics:
-
Section 5.6.1, "Redeploying AXF for BPM Libraries and Applications"
-
Section 5.6.2, "Temporarily Turning Off Business Rule Modifications"
-
Section 5.6.3, "Moving from a Test to a Production AXF for BPM Environment"
You can also set AXF for BPM logging functions in Enterprise Manager. See Section 4.1.
5.6.1 Redeploying AXF for BPM Libraries and Applications
AXF for BPM is deployed as applications and libraries to Weblogic Server. The solution workspace and solution application are deployed to the IPM Managed Server.
Table 5-31 describes the libraries and applications deployed with AXF for BPM. For more information about deploying, see Oracle WebCenter Content Installation Guide.
Table 5-31 Applications and Libraries Deployed With AXF for BPM
| Item Name | Type | WLS Managed Server | Description |
|---|---|---|---|
|
axf-solutionWorkspace.ear |
Application |
IPM |
Contains the solution workspace application, which displays a list of tasks users can select to bring up a solution application. |
|
axf-infrastructure.ear |
Application |
IPM |
Contains the infrastructure code which includes the Solution Mediator, Command Mediator, Commands, Business Rule Framework, Solution Workspace ADF Shared Library, Solution Application ADF Shared Library, Web Services, and other common infrastructure code. |
|
axf-common-lib.war |
Library |
IPM |
Contains common code used across all other Application and Libraries. In addition to general common code, this WAR contains code for the System MBean configuration, Solution Mediator Interface, Command Mediator Interface, Command Interface, Logging, and Conversation Management. |
5.6.2 Temporarily Turning Off Business Rule Modifications
Suppressing business rule modifications is useful when troubleshooting solution application configurations. The MBeans described below allow you to run a specified solution application with product business rules, rather than modified custom rules applied, and then reapply the modified rules when needed.
| MBean Setting | Description |
|---|---|
|
RunAsProduct |
When set to true, this MBean disables all workspace customizations for the application specified in the RunAsProductSolutionApplicationValue MBean, running the specified AXF application in its initial deployed state. Change this setting to either disable customizations (true) or reinstate modified business rules and customizations (false). |
|
RunAsProductSolutionApplicationValue |
Specifies the AXF solution application to disable or enable, according to the RunAsProduct MBean setting. This value is the solution deployment name found in Console Deployments. For the HelloBPM solution, this is axf-solutionApplication-HelloBPM. Change this setting to disable customizations in a different solution application. |
To change the RunAsProduct MBeans:
-
Open the AXF for BPM MBean in the Enterprise Manager System MBean browser.
-
In Enterprise Manager, expand Weblogic Domain.
-
Right-click Base Domain, and select System MBean Browser.
-
Under Application Defined MBeans, expand oracle.ecm.axf, expand the IPM Server entry, and display the config MBean.
-
-
Change RunAsProduct and RunAsProductSolutionApplicationValue, as needed.
5.6.3 Moving from a Test to a Production AXF for BPM Environment
After moving the BPM Imaging solution from a test to a production environment, as described in "Moving from a Test to a Production Environment" in Oracle Fusion Middleware Administrator's Guide, perform the following steps. These steps update the foreign JNDI of the production environment, to ensure that communication with the production environment is not linked to the test environment.
-
At left in the Weblogic Server Administration Console, select Domain Structure, then Services, then Foreign JNDI Providers.
-
Click the Foreign JNDI provider named ForeignJNDIProvider-SOA that was copied as part of the test to production process.
-
Update the Provider URL field to identify the production Oracle SOA Suite.
-
Update the User and Password fields as they apply to the production environment.
-
Click Save.
